I have always been on the lookout for a better way to make a more secure rail post connection at the bottom of a set of deck stairs. Over the years, I have tried the old ways of mounting the post on the outside of the stringer and adding a couple of bolts—a technique that never worked, and especially won’t work today because of the way that building codes have changed: Deck posts must now withstand 200 lbs. of lateral force. This new code requires a lot more thought, and the installation requires a lot more hardware.
(Note: Click any image to enlarge)
Two years ago, I worked on a large deck project with a good-sized set of stairs. Because of the overall length and height of the stairs, and the span limitations for the composite railing, I had to move the bottom posts back a few inches to make sure I could span between the mid-post and the bottom post. That’s when I came up with the first technique in this article.
Since then, I’ve started using a second approach that is a bit more acceptable given recent changes in code requirements for continuous handrail. I’ll review my second approach as well.
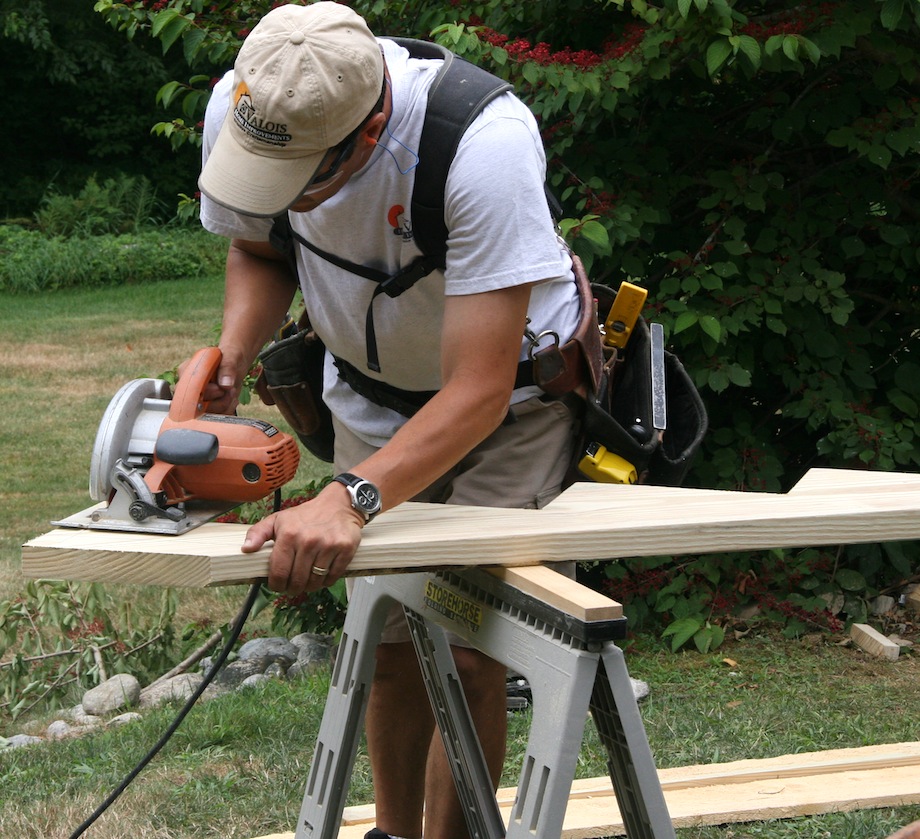
Start with the Stringers
First, you’ll probably notice in some of these photos that there are a few more stringers than normal. That is due to the decking manufacturer’s span limitations for stair stringers—in this case, about 11 in. on center. With some PVC decking, it can be as close as 9 in. on center (just for the stairs; not the deck itself).
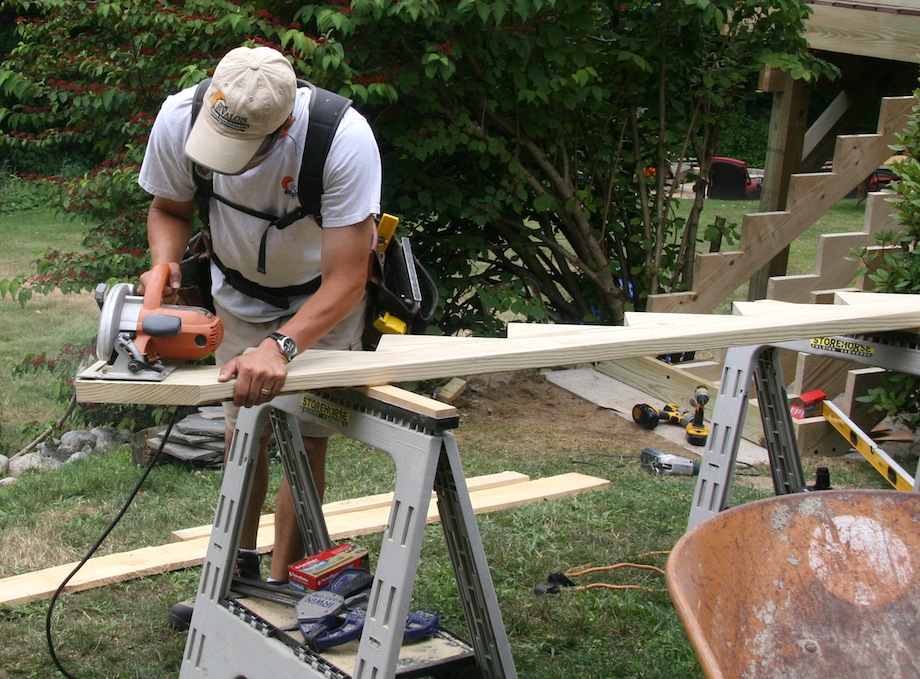
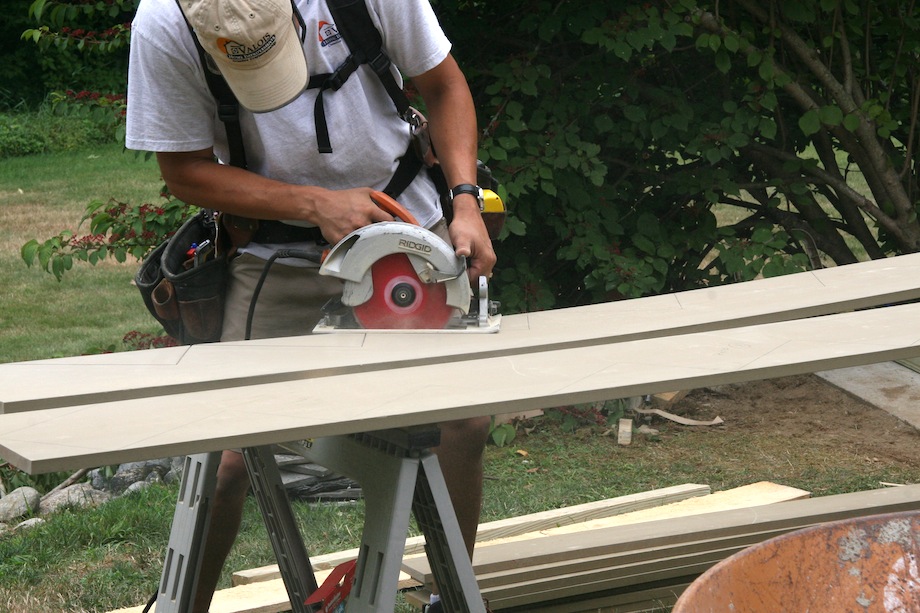
After the stringers are carefully cut, I clamp all the stringers together to check them for uniformity. I use my grinder with a sanding disc to remove any irregularities.
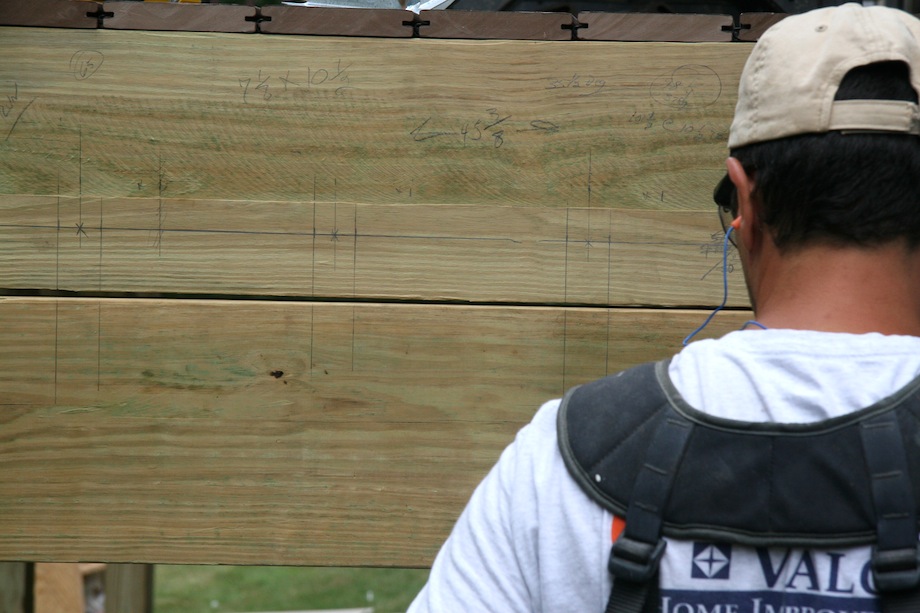
Once all the stringers are finished, I mark the layout, starting with the level line at the height of the first riser—measuring down on the rim joist from the top of the finished decking. Next I mark on-center spacing for each stringer.
I use 2x stock for hanger boards, and whenever possible I attach the hanger boards to the tails of the deck posts to add strength to the railing and help support the hanger board.
…making sure the top steps of the stringers are level.
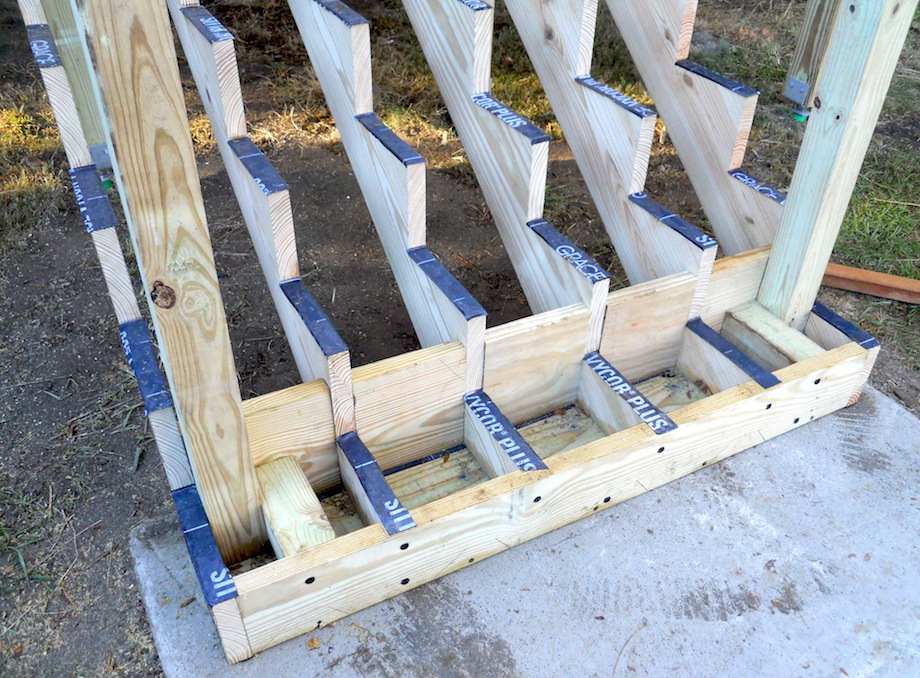
Install the Post Blocking
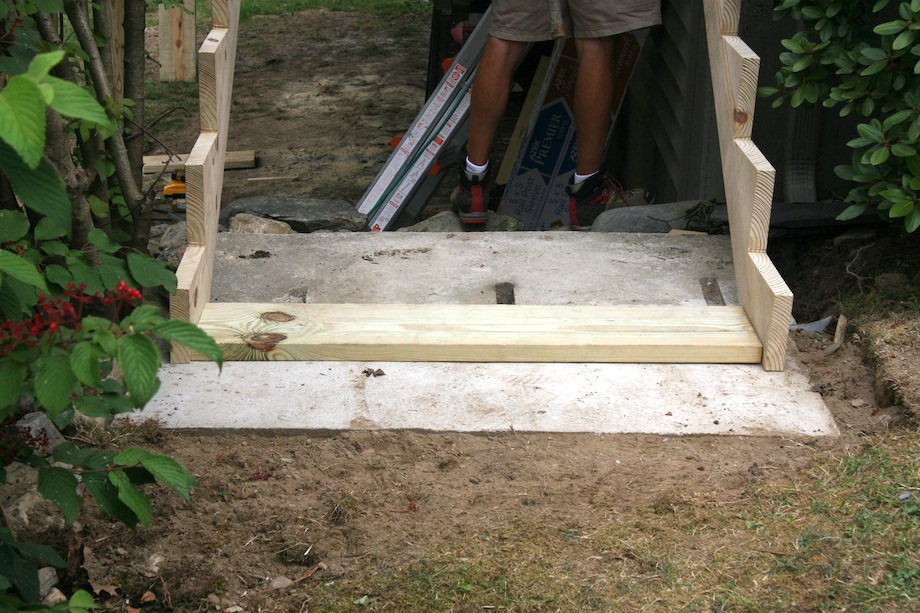
Next I take a 2×12 or 2×10 and cut it to fit in between the bottoms of the outer stringers.
I wrap the bottom of that plate with Ice & Water Shield to protect it from the concrete.
This plate serves two purposes: it keeps the two outer stringers parallel, and it provides a solid nailer for attaching the bolts that hold the bottom stair assembly together.
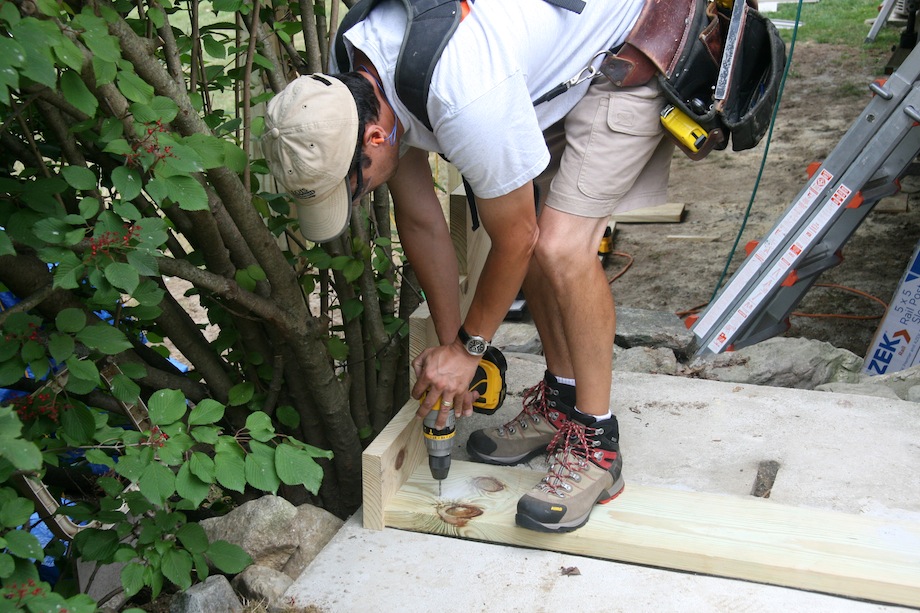
…and then I drill pilot holes with a hammer drill into the concrete for Tapcon screws, which secure the bottom board to the concrete.
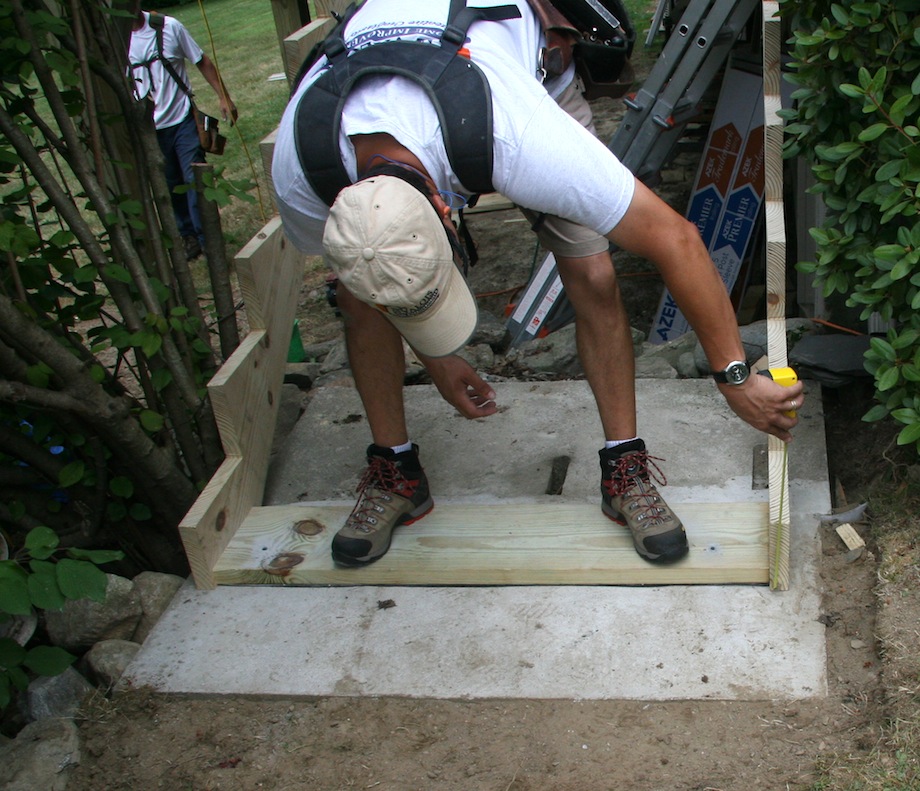
It’s always a good idea to make sure that the bottom riser is at the proper elevation—that’s where most mistakes are made in stringer layout (see Solving Porch Problems).
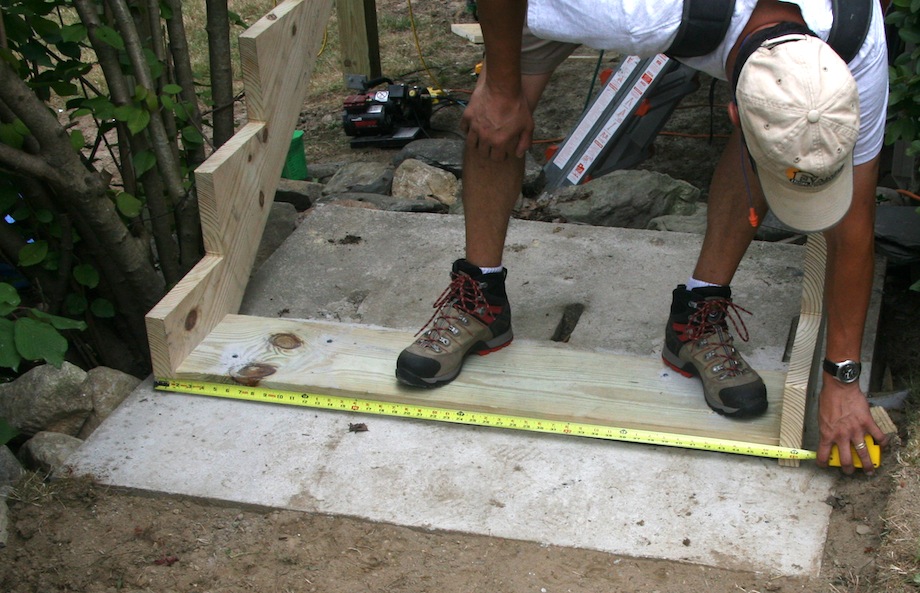
I also check the O.D. width of the stairs for parallel before moving on.
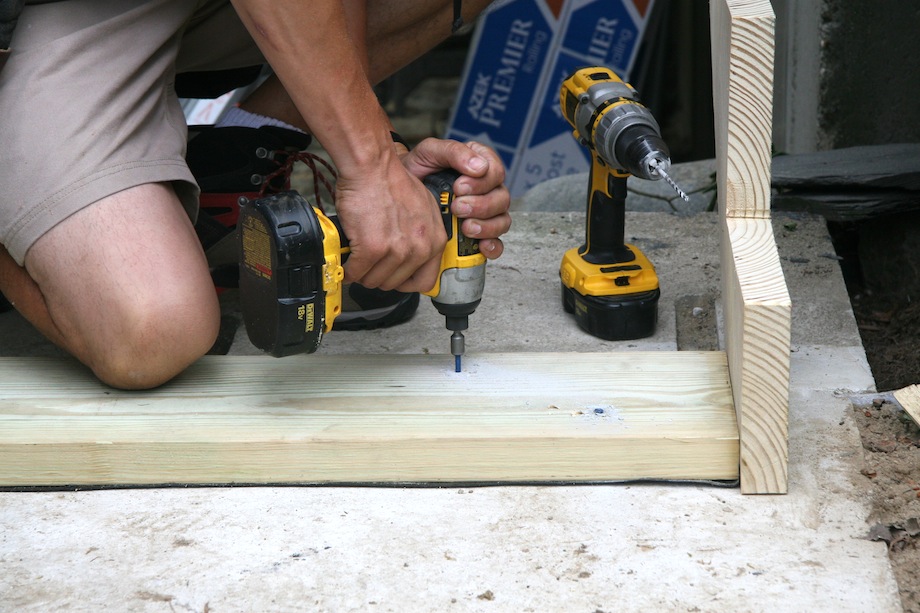
Once I’m certain that the outer stringers are set correctly, I install a solid 2x sub-riser—ripped to the first riser height—and I attach it with more HeadLOK screws.
Note that if you install the sub-riser on the front of the stringer, as I have, you have to adjust the face of your outer stringers for the additional 1 1/2 in. of run. After this project, and for future stairs, I decided to put the solid riser in between the outer stringers to avoid having to adjust or cut the stringers. Whatever you do, be sure to pre-drill for all fasteners at the bottom of the stringers! These holes are close to the ends of the boards and they’ll split easily.
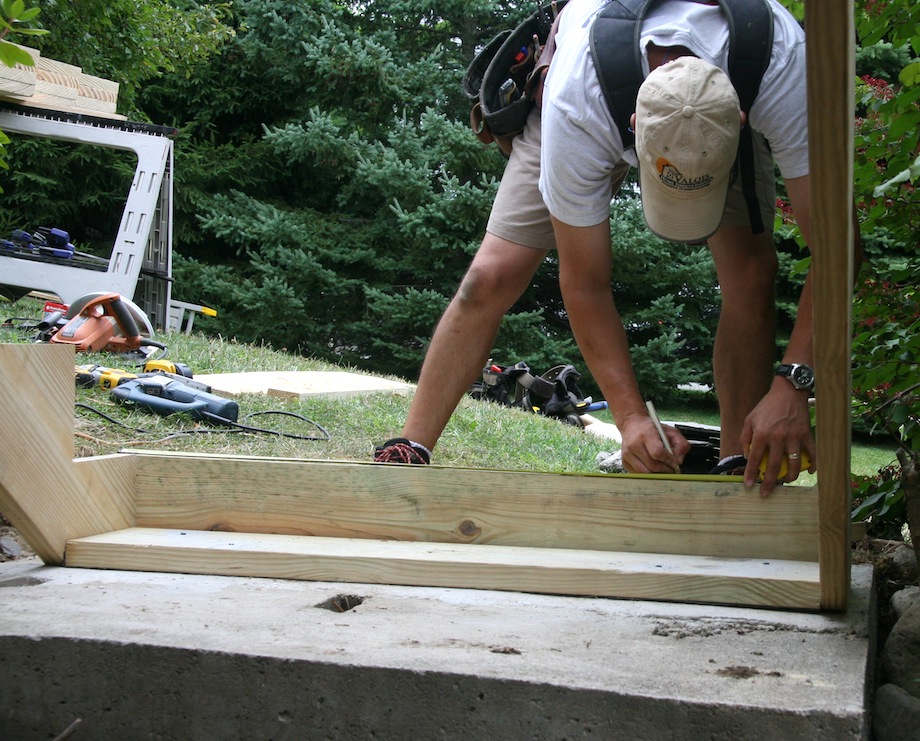
Once the bottom riser is installed, I transfer my on-center measurements to the top of the riser.
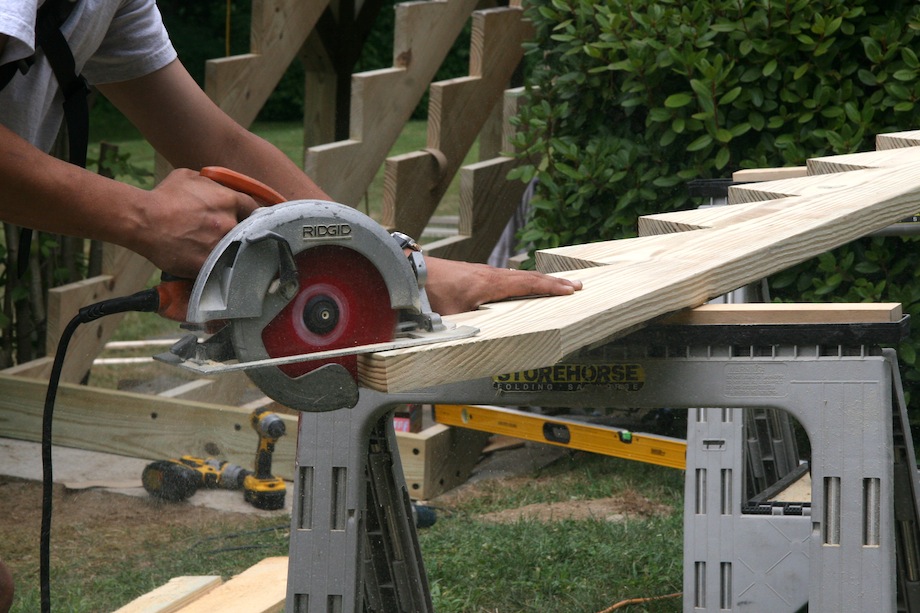
Each of the remaining stringers must be trimmed off the bottom…
…and the front to accommodate the bottom plate and the sub-riser board.
I always end up doing a little fine-tuning to make sure all the stringers are flat and level across the bottom riser.
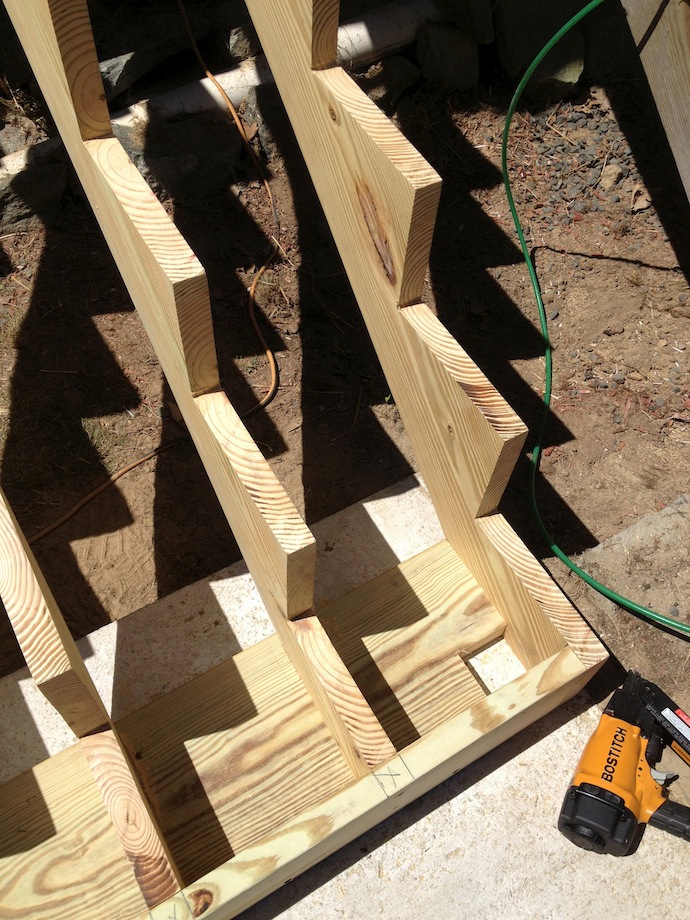
I use any leftover cutoffs from the 2×12 stringers to make blocking that goes in between each of the stair stringers.
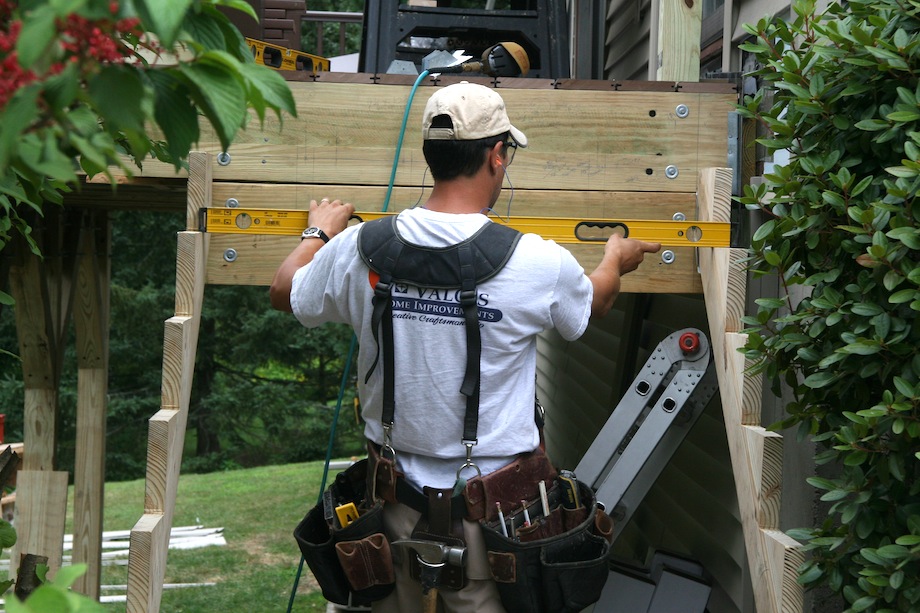
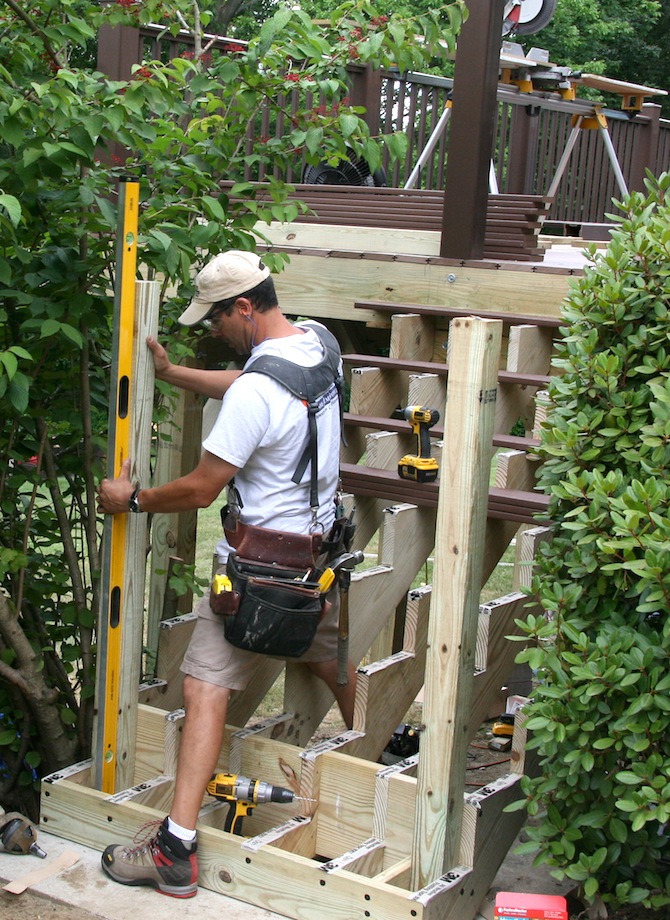
I try my best to make the two outer blocks as plumb as possible because that’s where I attach the railing posts.
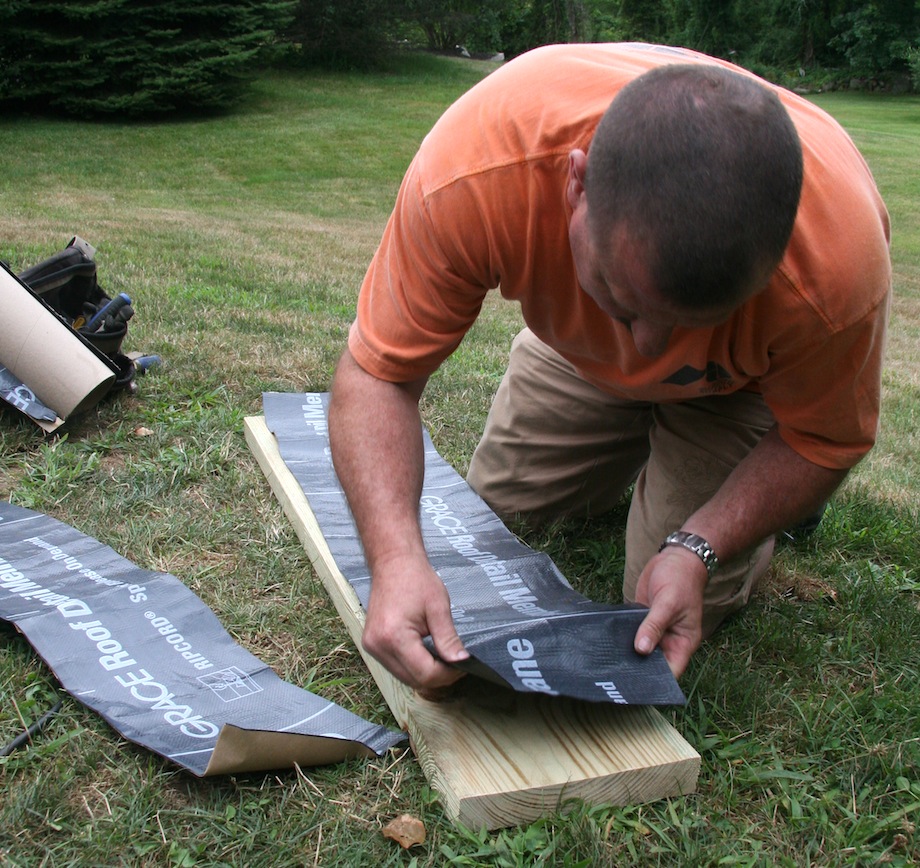
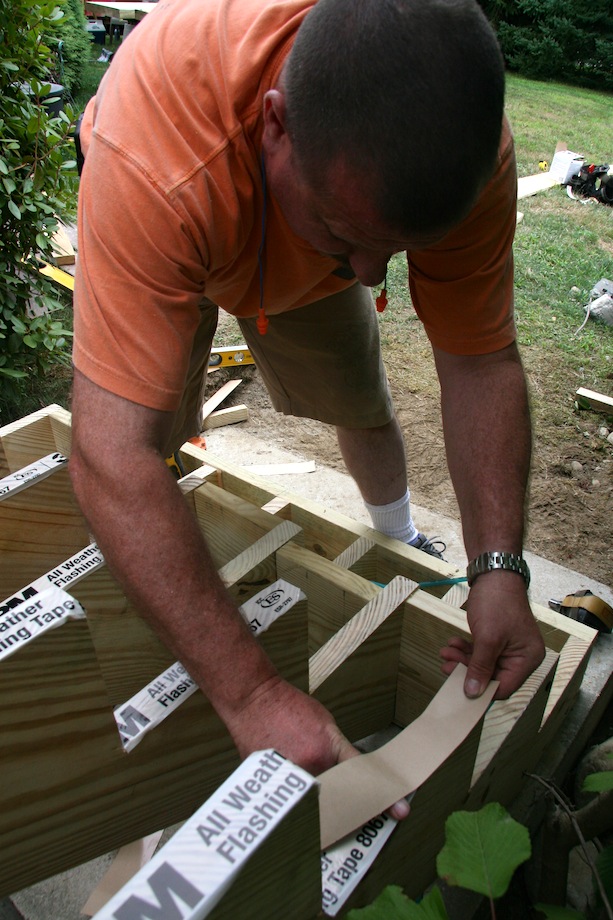
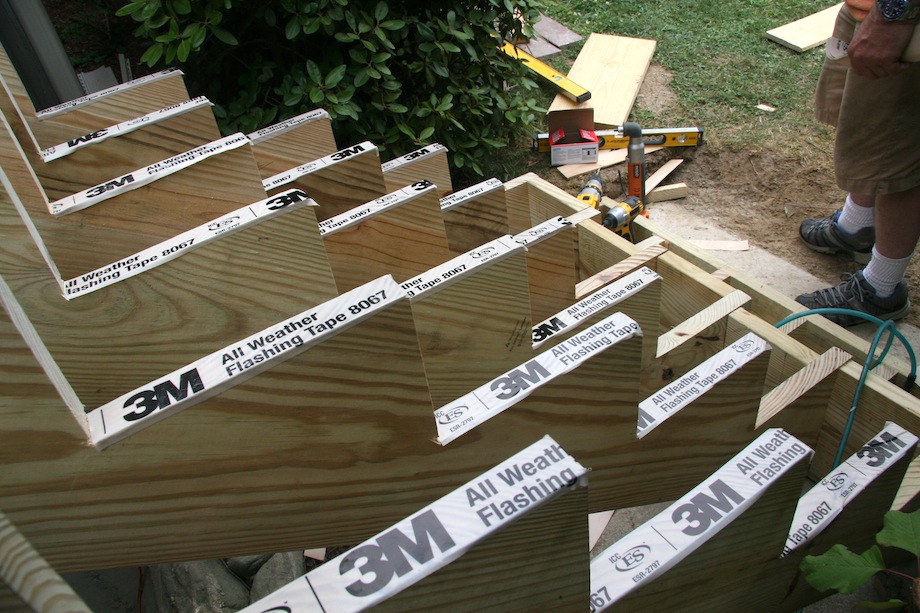
Once all the blocking and backing is installed, I flash the tops of the risers and blocking with a waterproof membrane.
This will prevent water infiltration from rotting out the stringers at the flat riser cuts.
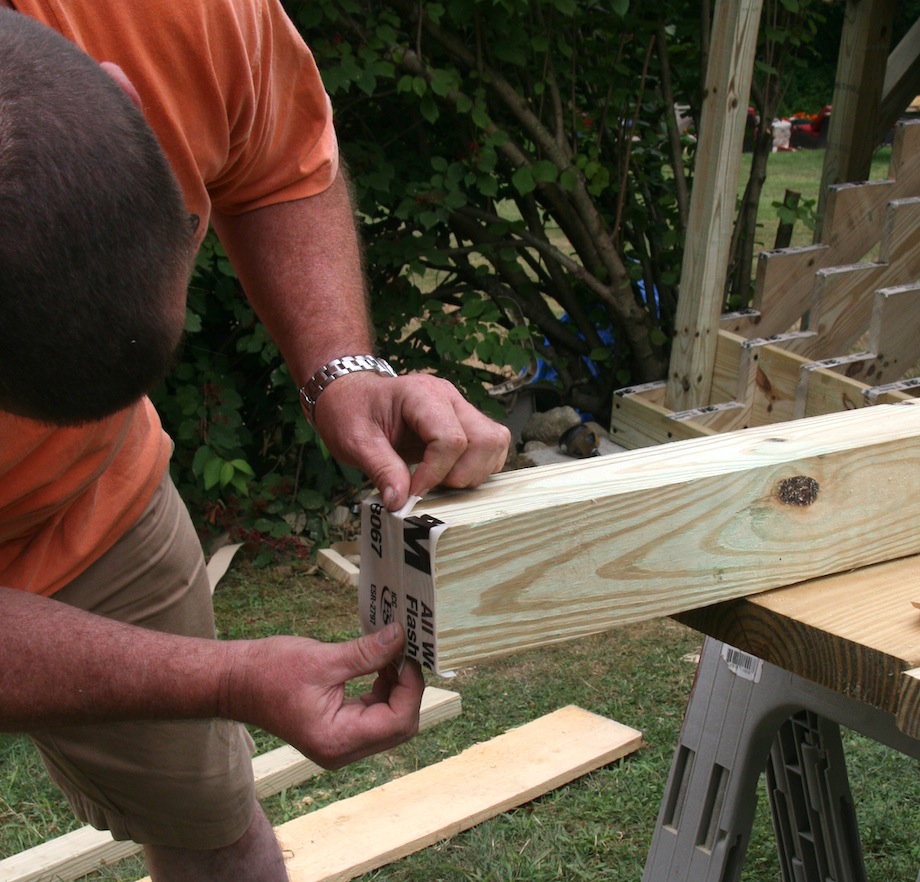
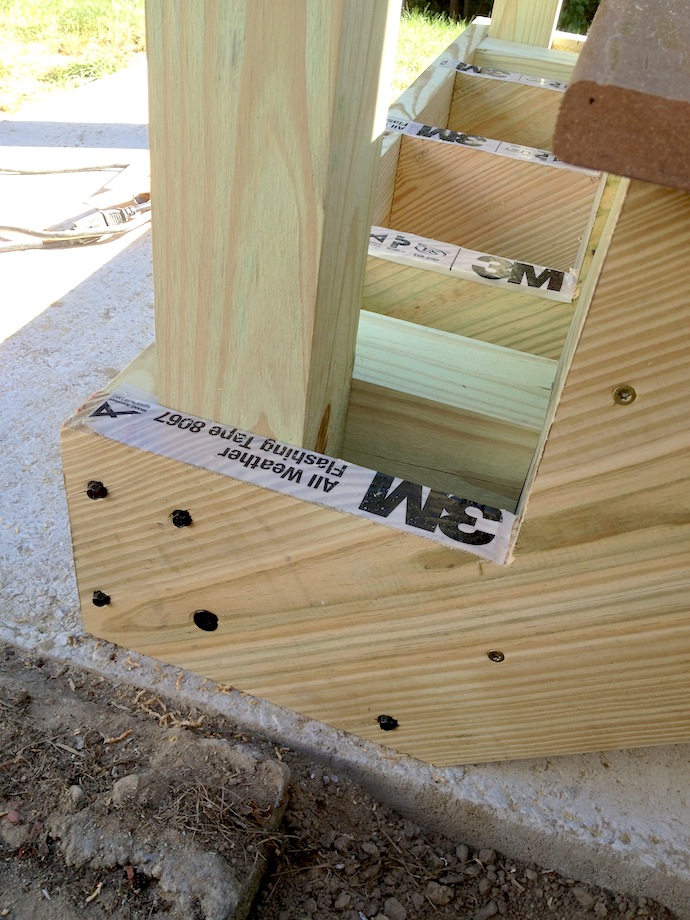
To protect the bottoms of the posts, I wrap them with flashing tape, too.
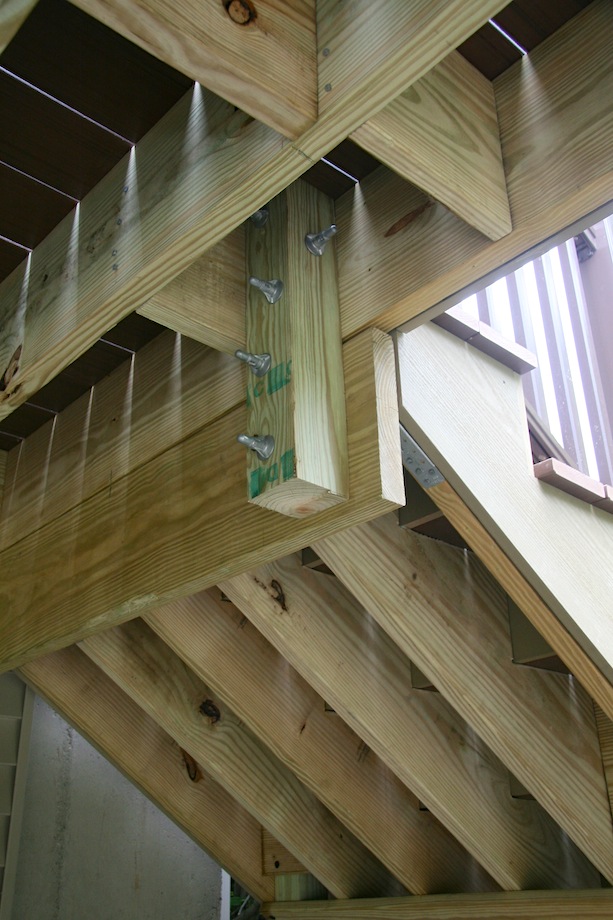
I leave the posts long and then cut them to finished height afterward—it’s much easier than doing the math horizontally!
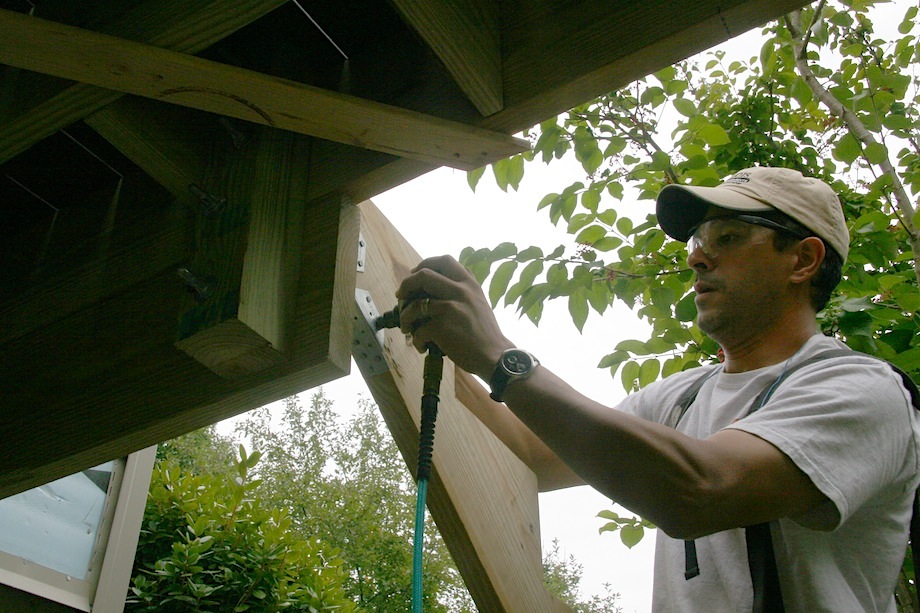
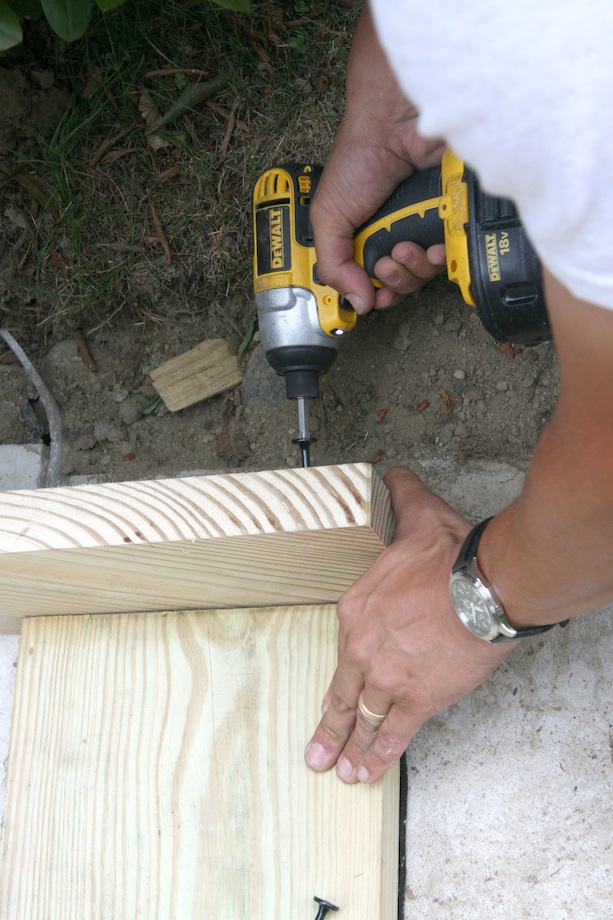
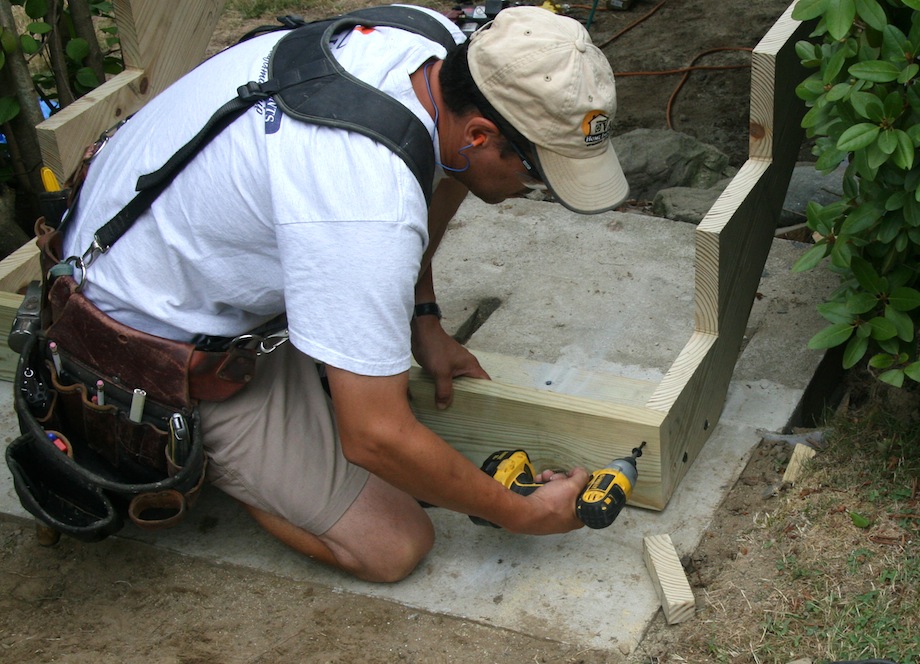
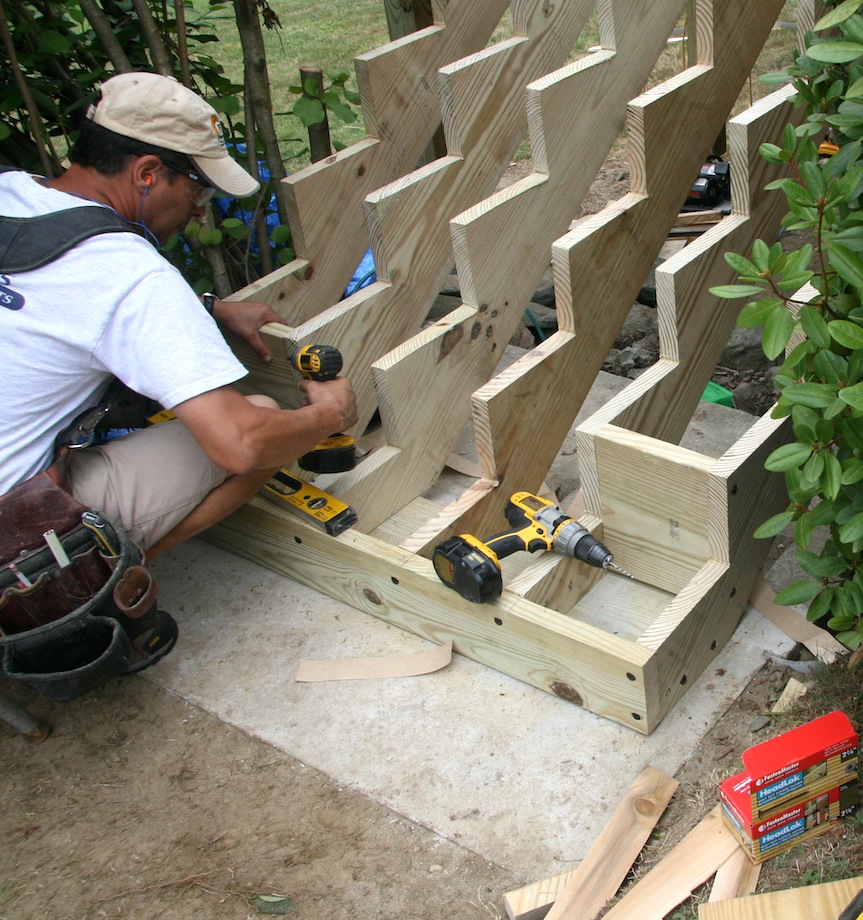
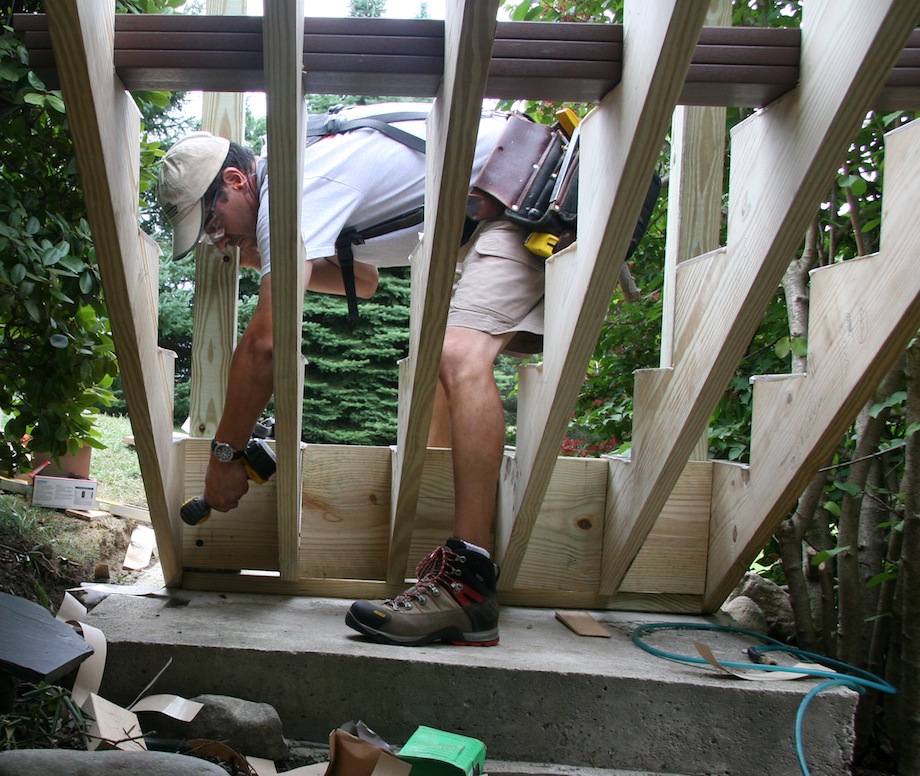
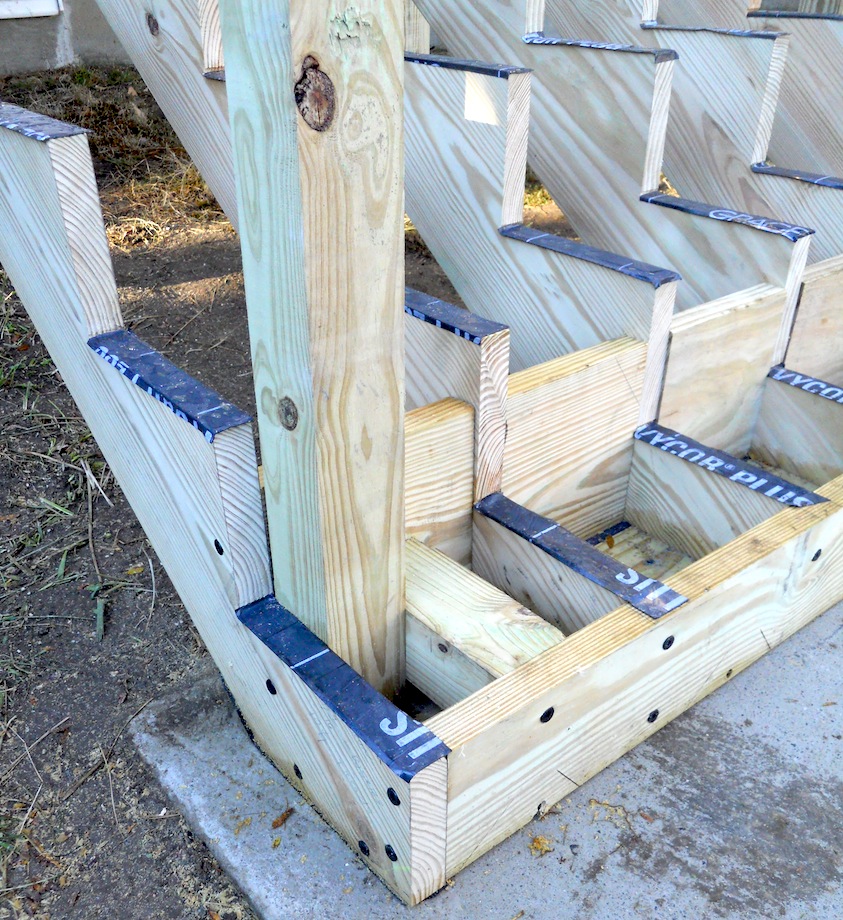
I start by driving in a HeadLOK bolt through the back of the blocking and into each post.
I carefully plumb the posts before tightening the first bolts and installing more.
The final blocking is the most critical—that’s what really secures the bottom rail post. I install a 4×4 block on the inside of the post and cut that piece snug. I have to tap it into place with a hammer, and then bolt that block in with more HeadLOK screws.
In the past I used a 2x block in that location, but I wasn’t nearly as pleased because I didn’t have enough ‘meat’ to really secure the post. The 4×4 block really resists twisting much better—the post doesn’t even flex.
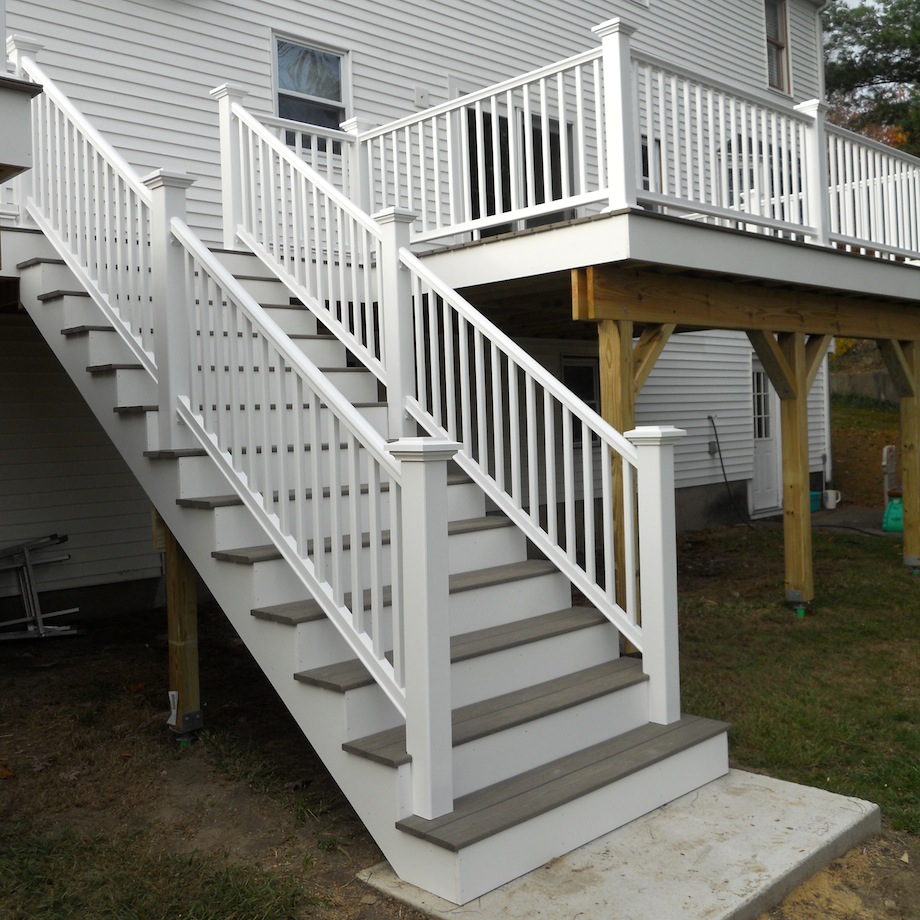
Most of my stairs get skirt boards. I trace the outer stringers onto the trim boards before installing the stringers, and then I cut them out later after the rough framing is done.
I always feel kind of bad covering up all the effort that goes into framing a solid set of stairs, but that’s life.
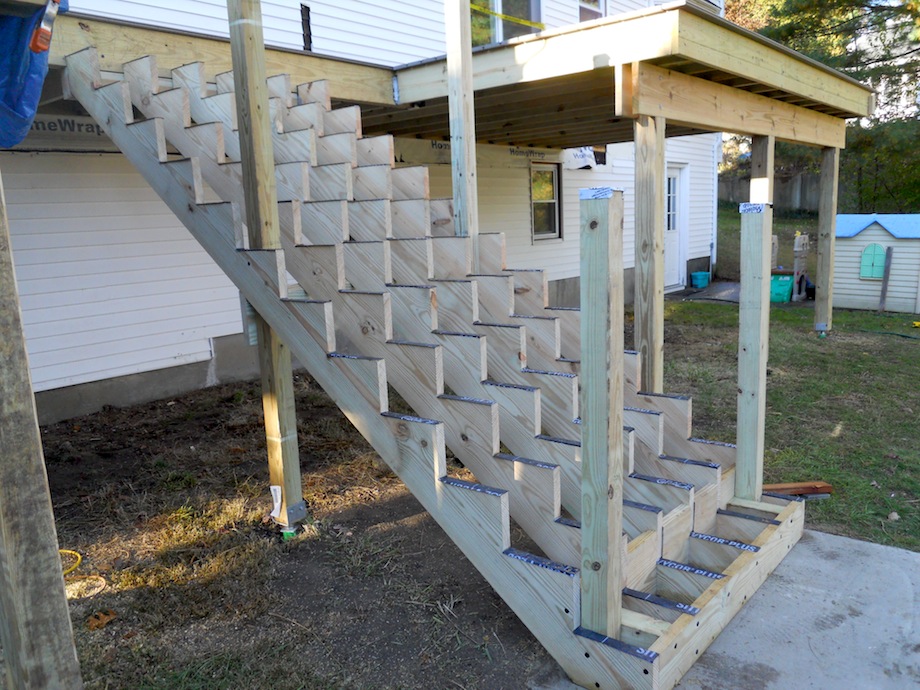
I’ve used this same blocking technique several times.
It works well, even with long runs…
Of course, inspectors are now requiring continuous handrail on many jobs, which makes it even tougher to secure the bottom post. Now I install the post against the back of the bottom riser, but I still use some of the same blocking techniques:
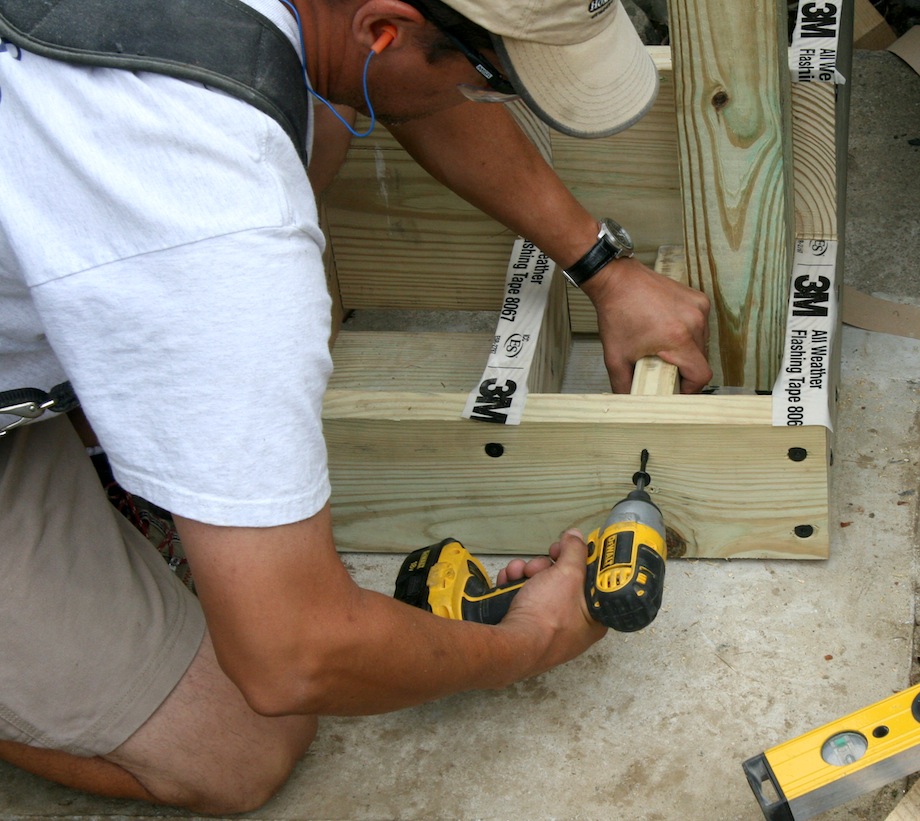
I start by cutting a notch in the bottom plate, so it’ll accept the base of the post.
Next I install that same 4×4 block on the inside of the post between the stringers.
Now I use an 8-10-in. TimberLOK screw to go from the outside of the stringer right through the post and into the 4×4 block.
Though I try to use the same methods on every job—repetitive approaches are the best way to improve efficiency and productivity—I still try new techniques, especially for securing that bottom rail post. That’s one of the trickiest jobs I know of!
Thanks for the kind words Pete.
It’s always great to hear your customer say what a great you did on their project. So the extra work that it takes usually pays off in the end.
I’ve heard too many carpenters and contractors complain about being so anal retentive with regard to this type of detail to rot prevention; structural integrity; being true-plumb-level-square and looking good and why so much blocking, etc, etc.
If you’ve ever seen a collapsed deck in person (and heard the ambulances heading to the site), and discovered that 6 people went to the hospital due to poor workmanship, and a complete lack of detail as seen in your work… just hopefully this very informative and helpful article will save some someone else from a catastrophic failure.
Thanks for the comments Ed.
I believe that it only takes a minimal amount of time to do a job well vs not so well. plus it helps cut out the call backs and keeps the customers coming back which as we all know in this business is very important.
Nice job Raymond, I do it all similar to you, but in addition, I fill any voids around the post with concrete, including the void along side the blocking.
Raymond, Great article and nice work!
Mark, Thanks for sharing the photos and specifications. If you would allow, I have a couple recommendations. The concrete will be a potential sponge for water and will shrink unless it is hydraulic cement. The 2x behind the risers also concerns me in that it can trap water and feed wood decay fungus. On exterior work that is exposed to water, I feel it is important to minimize the framing while maintaining the required strength. It is not always so easy a task to achieve that balance, but when done it will maximize the air spaces around the wood and facilitate drying. Deck stairs are probably the most vulnerable part of a building along with bulkhead doors.
Paul, sorry I didn’t see this, but I’ll respond anyways. All the lumber seen is pressure treated for ground use. Yes, the concrete will shrink, which is probably good for the sponge affect. The blocking in the rear does not go all the way to the ground, thus water is not trapped.
Though not shown, I also use a peel and stick membrane over all the stringer notches.
Nice work Raymond. I really enjoyed reading your article. It’s still nice to see other contractors take pride in what they do. You did a great job on showing and explaining how to attach a deck post. Keep up the good work.
Thanks for the article. Nice work! I am always on the lookout for the best way to deal with that post as well. I often imbed that bottom 2x half way into the concrete using the upper half for a kicker (2×4 instead of wider). I also have been using a 2x on the backside of the post, as an additional way to keep the bottom part of the stringer from splitting, etc. All in all, it’s a great attention to detail.
its incredible how much stronger a hand rail post will be when blocking is used to stop any lateral movement. i was taught to block my posts from day one when i started in the trade.. one method ive been using for 5 years is to drop the 4×4 all the way down through down to just above grade to provide nailing for the skirting. with additional 2×4 nailers at the base and the skirting the entire assembly becomes immovable.
yet some guys rely solely on notching the post to allow for the rim and then nothing more than 1 or 2 lag bolts.. when their said and done you can move the post by upwards of 1/2″ with a single hand
Jeff,
looks like a nice sturdy landing;)
I just got finished doing a deck that was about 30″ off the ground and I did the same thing withe posts by letting them hang down low enough to help with the lattice in the end.
Yes Jeff is right they are Occidental Leather.
They are comfortable but can be a bit warm during the heat of the summer. I sometimes use a non-suspended tool belt set up in real hot weather with a bare minimum of pouches for just the essentials.
You are very right about the occis being warm. i have the suspendavest and it gets ungodly warm in the summer . some days its saturated with sweat . luckily i only wear it when installing trim
Posts against the second riser will not pass code here, unless the railing passes thru or around. Never would fly here. Railing hasta be at ADA code height at the furthest bullnose, and “grab-able”.
Parks,
Good point. Raymond spoke about that in his article, too. That is DEFINITELY one of the real ‘weak spots’ in the current code: meeting Continuous Handrail requirements, while also meeting 200 lb. lateral lode requirements, is extremely difficult.
Parks, if you have a method that meets both requirements, please email me, send photos, write me something.
We’re working on a follow-up story with one of the specialists from Simpson Strong-tie, and that’s the ONLY focus of the story.
Gary Katz
If you have the extra day, with careful measurement and a ready to go stringer, you can mark out exactly where your post will go and dig a 2′ deep hole at each post location, pour the post bases and pad in one pour. Come back the next day and finish your construction with a little extra blocking and away you go! Just pull diagonals on the two post locations, from the stringer attachment point on the rim joist of the deck and you can get it spot on.
So if you are putting 2 4x4s aligning with outdide hanfraIL line, how do you figure exact place to dig potholes half way down…install outside stringer first but it would be in way to use pothole digger???
Hi Mark,
I have given that method a thought a while back and I’m sure it will work quite well. My concern for the long haul is how well that post will survive in the ground. Most likely quite a long time.
I almost gave that method a try recently because the riser was less than 7″ and I was getting concerned as to how well the post would hold even with the blocking. But when all was done it worked out fine.
Great pictures and well done! Love the ease in telling the story. I have a question you may or may not be able to answer. If the new lateral resistance standard on the posts is 200 lbs, how does the inspector assess that? I install several decks/staircases this summer, using many, (but not all ) of the techniques you describe. I never had anyone test lateral strength. Is it done through installation set up and execution? What are your thoughts and what experience(s) do you have with this. Thanks again for posting!!!
Hi Bob,
I have never had an inspector come and test my posts with any equipment but have had one grab the posts on the deck and give them a shake. My general feeling most inspectors will be fine with your methods once they see you have put in the extra details that they probably don’t see on a day to day basis. The method that I use has been a work in progress for quite a few years now after fixing and replacing many decks and noticing how weak the bottom stair post was. My method may not be perfect but it sure is solid when I’m done and no inspector can fault that;)
From the outset of this article I was intrigued by the bottom of the stairs going straight to level concrete. Admittedly I have not done a lot of stairs and risers etc since college. My work consists mostly of smaller renovations. I did do a job around the base of some outside stairs replacing rotted timber that was connected to concrete after my trade training and this told me that it is not something I’m happy with.
The outside stairs that I did of recent were done with galvanized metal risers (5 steps) that were bolted to the landing at the top and just sat on concrete slab at the bottom; this was for reasonably sized cabins at a mobile village. The posts off of these verandas were supported, at base, with metal galvanized anchor posts (see attached picture). At no time with all of this did the timber touch the ground. In Australia you will see these metal anchors used a lot. Can’t recall if there is any legal height requirement in Australian for concrete to timber, although I have seen them fairly close to ground, of which I am not happy with, but still works.
I only mention all of this in that Raymond;s stairs go right to concrete slab and yet I did notice Jeff Kirk place the bottom of his stairs on what appears to be a concrete step (nice). I also noticed that Jeff makes his post go all the way through to just above grade; also nice. Still, the use of metal galvanized anchors that are set in concrete give additional support and strength and sees the posts above ground, away from timber rot; this is more for the 2 posts that are NOT connected to the building.
Sorry if I’m looking at the obvious, as I’m not sure all procedures in the US and I did not see this in this article. Anyway, this article has helped me and thanks to all.
I have never seen flashing placed on top of the stringers where they meet the steps or where the wood meets the cement before. With treated lumber, is that necessary? Do others do that? I connect newel posts on old houses in a similar manner but I cut a notch in them and bolt them to the front of the bottom riser with lots of blocking behind the riser for strength. If old houses had newels and balustardes on the stairs they went to the bottom of the steps.
Hi Dan,
I install the flashing tape along the top of the tread cut of the stringer because the water will still find it’s way between the tread boards and it will eventually compromise the wood even though it’s treated. Even the treated wood dries out and can be compromised by good old mother nature.
As far as placing the 4×4 post on the front edge of the the first riser I think it would be just like doing it the old way of placing the post on the outside edge of the stringer and relying on the just the wood fibers and the strength of the bolts or screws that you use.
It’s not to say that what you have going with your boxed newel post is not sturdy or not going to work. You appear to have a bit more surface area to work with and then can add trim to the post as well to hide any blocking and bolts.
Question for you: are the newel posts hollow like some of the interior boxed newels. Also I would like to see how you are attaching the newel if you have any pictures. I think it would be great to show what can be done with situations that are more restoration than new deck construction.
Nice newel posts, did you make the balusters too? if so very cool;)
Dan, I know this is an old thread, but I am about to attempt to rebuild the original wooden stairs coming off the front porch of my 1892 victorian home. Do you by any chance have photos of the attachment method for the above style of new post at the bottom of the last step? Great thread from all concerned.
Another nice newel post Dan;)
It’s been a while since I have had the chance to do a restoration type job. I do have a couple customers with really old houses that require me to reach into my bag of tricks to pull something off.
Nice job.
Yes treated timber (pine) is something I’ve been watching more so of recent i.e. watching how it splits and distorts. I’ve also noticed the differences of opinions, misunderstandings and perpetuated errors that come from people that sell lumber
.
Ps love the block work inclusive of pouring cement in adjoining space.
I made the balustrades also. The newels are 2 X treated lumber glued up with Gorilla type glue. I run it thru the planer afterwords to get a nice finish. I put lots of blocking behind the first riser. I bolt the newel thru the front into the blocking. I also put in toe nailed bolts on either side of the newel well into the blocking. Covering the bottom of the newel covers everything. The treateed stringers on our front porch have set on a cement pad without flashign below them for 25 years. The treads are glued up 5/4 decking to simulate the old timers 5/4 X 12 fir stair treads that were used for a ccnetury on old houses. Water cannot reach the top of the stringers. The picture is of a newel and balustrade I made for our porch. A mark was left in the sidewalk telling me we had an octagonal newel.
LOVE this article; especially since I can link it to a draftsman/architect/designer so they can draw deck sections appropriately. I like that you went the extra step and added ice and water shield but I’m still kind of iffy about it. I had a couple issues that may create a discussion (and hopefully an answer).
First: taping the bottom of the 4×4 post would create a pool for the water coming down the post to sit (unless the entire post is wrapped, yours is but not all may be) and therefore speed up the rot. Maybe a better solution would be a no-rot connector from Simpson (ABA44, i think). It would allow for a gap in between the post and concrete allowing the water to escape.
Second: shouldn’t the ice/water shield be continuous up the stringer? Ideally the stringers have a little slope to them so there isn’t a big chance of water absorption on the risers but it seems any water that gets trapped on top of the stringer may actually migrate into it via the exposed riser. This might be overkill but this is the first time I saw ice/water shield on top of stringers so I thought: “Why not wrap all the cut edges?”
Hi Luka,
I can’t say that I would disagree with adding flashing tape to the risers as well. I apply the tape on the horizontal cuts for obvious reasons but figured that there would be very minimal water exposure to the riser cut. But what’s a little more flashing tape;)
I have been wrapping the bottom of the post for a while now but it may be a better idea to apply some Jesco terminate wood preserve on the bottom instead. Probably a bit faster, a bit more messy but will most likely help prevent rot from the end grain.
Very nice work, I can tell you are a true craftsman! I have been learning carpentry for the past five years and your article really inspired me. I have a couple questions… Why do you use the waterproof membrane (flashing tape) under the treads and not exposed end grain behind the risers as well? Is there a reason why the tape is better than a preservative such as copper green?
Hi Ben,
Thanks for the comments.
I use the flashing tape because it doesn’t take that long to pre-cut the tape to length and it’s not as messy as the the green Terminate preservative or other similar products.
I don’t put it on the risers because the tread will overlap it and the riser cut does get covered by PVC. There is not really that much exposure to the weather if any once it’s all covered. But the top cut has a space between the treads so water will go in between the boards. Hope that answers your questions.
Thank you for the article Raymond! Great read. It breaks my heart that the code no longer allows the bottom posts to be set back against the second rise like that. Having a foot of backing to fasten into increases the overall strength a hell if alot. Love the waterproofing on the stringers as well.
Thanks for the comments Andy!
Yeah I hear you. I was able to do it maybe twice before I needed an alternative, which is where I came up with the idea to see how well I could block the post in just behind the 2x front riser instead which does still work well just not as good as the post up against the 2nd riser where you have a bout 12-14″ to attach the post.
Was wondering if you had any pictures of your alternative to attaching 4×4 at bottom of stairs (if attaching post to second riser is no longer code. Also can you tell me what kind of bolt you use to attach (size / length) Thanks
Excellent article & comments too! Recent first time home buyer looking to put some new steps on an existing deck and searching for information. I believe this article covered everything I need to know and more! Thank you for the clear and concise information!
Joshua,
thanks for the comments and glad the article will be helpful to you.
If you have any other questions feel free to reach out to me through my website email or just post another comment here and I will do my best to answer it for you. Good luck with your new home.
Hi Raymond, This is one of the best articles I’ve seen on installing posts, very clear and well illustrated too! I’m building my first set of steps that will use composite treads. I have what is probably a dumb question but… when you are installing the blocking in between each of the stringers, how are you able to attach all the blocks from both sides? I would think that after the 2 outer blocks are in place, you would only be able to attach the inner blocks from the open spaces?
Hi Bill,
Thanks for the comments. To answer your question you can stagger the blocks back and forth to give easier access to each side of the block with screws or if you are in a pinch you can add the screws at an angle. Sometimes I will pre-drill the holes to help prevent cracks, but since most times the pressure treated wood is still wet it is not much of an issue. Hope that helps and good luck with your stairs.
The material that we used on the skirt boards and risers was Boral trim. It was the first time that we had it in the field.
Overall my initial impression was good. It is made from recycled fly ash which comes from coal burning. It dos not absorb moisture but does not have the expansions and contraction issues that PVC does.
Best.
Raymond Valois.
Ray thanks nice article .I coat the bottom of my post with polyurethane adhesive using a putty knife pushing it in the end grain double coating. .I cut the top portion of the risers to let in a continuous 2×6 strut helps also with longer runs of stairs keeping the width and put near newel locations.really once all the risers and treads are on it really ties it all together laterally .but i block always at the key locations too. I always with c.c.a. stringers buy them in advance bring them to job site or my place sticker them and let them loose the water air dry .nothing worse then cutting a square rise and run and having it shrink out of square
Ray,
I wish I would have seen what you did before I did my deck stairs.
I calculated my stringers based on my sidewalk. But I had to add 1/2″ of concrete to the sidewalk which was not level where the stringers would land.
After I added the 1/2″ to the sidewalk I did not go back and recalculate my runs and rises. Big mistake! Now my bottom rise to the sidewalk is 1/2″ higher than the rise for the rest of the stairs. The 1/2″ makes a big difference when walking down the stairs, I am worried that someone could lose their balance when hitting the sidewalk, I did.
What would you suggest on how to correct the 1/2″ problem at the bottom of the stairs?
Thanks,
Larry
I noticed that you said to predrill the holes in the bottom 2x’s, attaching the stringers, etc. I agree! I was wondering if you knew of any manufacture that makes a screw similar to some of the “HeadLoc” screws that don’t require drilling and don’t split the wood. They would have to be exterior screws, but would cut out quit a bit of time. Drilling wet pressure treated lumber is a bit of a pain. Also a very nice idea to tape the top of the riser. I will do that today on the stairs I’m building now.
Thanks Ted
I have only used the Headlock screws so far. You can check out Simpson Strong-Tie SDWS Timber Screws they are fairly new and are quite similar.
Usually you do not have to predrill but since they are going into the end of the stringer that has already been notched out to create the stairs I do it mainly as a precaution to stop the wood from splitting. I will agree that drilling pressure treated wood is a bit of a pain but it is better than removing and re-cutting a stringer because it split. The little bit of extra time it takes to drill a pilot hole for that small piece of mind in my opinion is worth it.
Thank you for taking the time to post an article and pictures as well written and shot as your stairs. I really appreciated your thoughtful, creative solutions.
Thanks, also, for spending time responding to the various questions — all of which seem to advance this aspect of craftsmanship.
I’m building my first deck, and your article with the accompanying comments and responses has been incredibly helpful.
You are quite welcome John.
That’s why we are all here to share our craft and get new ideas for the projects we are working on now and the ones that we have not done yet.
Good luck with your deck and be sure to let us know how it comes out.
What do you do about concealing the hardware on the outside of the stringers? You don’t do fascia there, do you? I’m using LedgerLoks and you can drill with a spade head to make it flush, but wondering if a paintable caulk would be the thing to use to make disappear.
Hi Anna,
I typically use Headlok bolts and Timber lok bolts for my stair assembly. If the heads are sticking out just a bit when I go to add 3/4″ trim to the outside of the stringer I place the trim in place and gently tap the trimboard where the bolt heads are which leaves a dipple. From there I will use a forstner bit to make a slight cavity in the backside of the trim board so it will sit flat on the outside of the stringer. If I was not using trim I probably would use a spade bit and make a slight recess for the bolt head but not too deep.
Hope that helps.
Raymond – Terrific and detailed article. Very helpful in my journey of learning how to build my first deck and making sure it’s built to last and meets codes. Looking forward to poking through your blog for other interesting reads.
-steve
I appreciate your article and it’s meticulousness. I have been building a craftsman front porch on our lake house which is turning into a concrete bunker as I tend to make things very sturdy.
I am now hanging the stringers and they will rest on a 2×12 at ground level. The stairs are flared from 4 feet at the top to 6 feet at the bottom.( 8 risers) Of course no one has anything on the Net about cutting the outer flared stringers but I have figured out the angles. The outer stringers are longer and so the treads are about an inch longer on the outer stringers due to the hypotenuse.
So bearing this in mind have you ever installed posts on a flared stair and why do you install the bottom kicker board between the outer stringers? You still have to cut all of the other inside stringers to accommodate the 1.5 inch of the kicker board?
I think that it looks a lot better having the kicker board go across all of the stringers.
Also do your bottom posts follow the angled stringer in other words are they parallel to the this outer stringer or do you make the posts parallel to the treads?
Excellent post, thanks for the clarity and level of detail! I am certainly not at your skill level but am a reasonably handy homeowner and am trying to replace a short set of stairs (3 steps) to a front porch. I’m wondering how to attach the newel post and your method looks great. However, I will need to line up the post to an existing 4×4 at the top of the stairs; to align the inside of the new newel post at the base must be at the inside end of the outer stringer. It was previously installed by the not recommended method you describe at the very beginning (notching the newel post and bolting to the outside of the stringer). :) My best thought is to bury the post in addition to bolting to the outside of the stringer. Do you have any suggestions and how would you recommend I go about this? Thanks very much!
Hi Ryan,
You could use a post base as well inside the blocking. Depending on which one you use you may find it difficult to nail the base to the post inside of the stringers and you would need to be aware of which direction you place it so it does not interfere with the long bolts/ screws you use to connect the post to the blocking.
Hope that helps.
Stringers will split behind the first step when an extreme load is applied like moving a fridge or stove. I was called to repair such an accident after a pregnant woman and husband were injured coming down some deck stairs together. All three stringers snapped. [PT (2×12) 6″ rise/10.5″ run w/ Redwood 2×6 treads]
In my efforts to protect my customers from such an accident I found using a marine grade 1/2″ plywood shear nailed to the inside of the first two tread cut-outs helps strengthen the weakest spot on cut stringers. 400lbs is all it took to convince me to add plywood onto all my stringers.
Sigh. I wish I had found your page before I built the stairs for my deck last year. I followed the instructions on the Family Handyman site and they turned out really nice (although I didn’t use the membrane on the stringer cuts), but now the skirt boards are warping outwards (pulling away from the stringers they are attached to) and I thought I would be able to attach the bottom posts to the outside of the skirt boards, through the skirt (top) and skirt+stringer (bottom), using two OZCO OWT Timber Bolts but you, and all the others that posted, indicate that this is a big no-no and I should affix as you indicated in this posting. Oh well, this was the first set of stairs I ever built so now I have experience and a much better set of instructions I can follow. Thanks for posting your work and I’m looking forward to doing this all over again!
Attached is a photo of the stringers with the skirts.
How do i cut and replace my bottom stringers where it’s touching the concrete it’s rotting away. the stairs have a long run maybe 25 stairs do i have to replace the whole stringers ?
Hello Raymond,
I can tell that you are craftsman and not a wood butcher. We had our home rebuilt after it was totally destroyed by a forest fire by two hacks that came highly recommended. Within 4 years, the side stair posts were falling off the stairs. Blockers were installed but not secured to the stringers. In a 4 foot high post, it was out of plumb by 6 inches. The posts were fastened to the outside of the stringers. In addition, the posts were notched. They used timber locks to secure the posts to the stringers, not 1/2″ carriage bolts. I removed the side porch, railings and stairs to do it right. Thank you for the insight on how to build stairs correctly to support the required loads. During the reconstruction of our home, these professional builders of 30 years were the cause of over $315,000.00 in damages. Consequently, I am having to redo most of their work.
Hello Raymond,
How do you secure, screw, nail, the stringer toe blockers when they are even across the stringers? Can’t figure out you did that.
Thank you,
Jack
I am impressed with the workmanship, but all the blocking, timber screws, concrete fill shown for post at the first step will not pass a 200 lb/10 mph stairway post test. You can not just build on top of a concrete slab landing. In our plans we spec using a Simpson CBSQ-SDS2 type column Base or equivalent. Bottom of base is buried 7″ in concrete, top of base is about 8 1/2 inches secured with (14 ) 1/4″ x 2″ screws, 1″ bottom plate separates post from concrete. Also our stringers and toe plates are connected to the posts and set one inch above the concrete. Concrete retains moisture and rots wood. Placing the post further up the stairs might be strong enough, but in our area the handrail must be grabbed before climbing the first step. Also, if using a mud sill, I would place stringers on top of mud sill so stringer end grain dose not touch concrete.
I am wondering about the possibility of having the stringer throat reduced to less than 5″ when trimming the bottom off of the interior stringers. I cant tell from the pictures if this is a problem.
Many thanks for the article, Raymond. It was very helpful.
I’m a retired homeowner in Ottawa, Canada and have been rebuilding my front porch. I’m not a carpenter so articles like yours have been a great help as I try to meet the need of the building code. I used your original method of securing the bottom post and passed the framing inspection yesterday without any issues.
The continuity of the railing is required but a simple continuous railing extended past the post over the bottom tread will do. Its a common design in our neighborhood.
I haven’t even finished reading your post yet, but I had to comment that this is an incredibly detailed and top quality post on building deck stairs. I will be taking lots of tips and how-to’s from this post. Amazing. Thanks a bunch.
Great article. I have installed stairs and posts in a very similar manner for years. But in recent years here in my area in downstate IL, the local inspectors have designated that positioning of the posts as shown in your pics and then terminating the hand rails into them does not meet code. The claim is that the hand rail must extend continuously to the nose of the first tread. The inspectors make this demand even though there are thousands of pre-existing installations identical to what you show in your article and what I have always done.
When posts are installed in this position, an acceptable hand rail must extend inside the post and all the way to a position plumbed up from the first stair’s nose, and then most often include a cumbersome double return (so a flowing sleeve won’t catch on the end of the rail and cause a fall there.)
Michael,
Absolutely! Continuous handrail is a code requirement. And if you follow the Simpson Strong-tie recommendations for securing your newel “inside” the stringers and inside the bottom riser, then you won’t meet the continuous handrail requirement. We stress this issue at all Katz Roadshow events, and how important it is to ask your building inspector if these Simpson Strong-tie recommendations will be acceptable. Every location is different. Personally, I believe the 200 lb lateral load requirement, along with the long-term stability of the newel post connection, trumps the continuous handrail requirement. But that’s just my ‘experienced’ opinion.
I’ve had similar problems with bottom post for handicap ramps. Any thoughts on how to make strong attachments when there is a tapered joist to connect with?
Hi, I have to replace some rotted deck stairs and found your article which is very informative. The only issue I have it to make things meet the new codes which require the stringers be attached to posts attached to cement which runs below the frost line; 40″ here; I will be using 4 stringers and thinking I can use the two inside stringers to attach to the cement and the two outside stringers for posts for the railing only. I am not sure if this is causing more work though and was wondering if anyone has an update plan to meet the newer requirements? Thanks
I need to build a stair rail on concrete steps. Any advise on mounting the 4X4 posts on the surface? I’m concerned about lateral forces and how to strengthen the posts.
Al
Great article. Not being a carpenter and never having built a deck it was really helpful in sorting out how to attach the stairs to my 2nd story deck. The only quandary I have in completing my deck is how to connect the intermediate posts to the strings. This detail is generally not addressed in any of the many articles and videos I have found on the web. I would like to build a straight stairway without any intermediate landings so will be some 14 feet long. To reduce the point load on the deck I want to use two sets of intermediate posts (probably overkill) spaced about 4-1/2 ft apart. The DAC says to notch the posts to hold the stringers but I would like to extend the posts so they also function as guard rails. Notching the 4 x 4 guard posts is no longer in favor. Although the connection is probably trivial I would love to see how others have managed to connect the stringers to the intermediate posts. I see some detail in one of your photos but it is not enough to know how it is actually put together.
Thank you! I am an armature DIYer. I have studied this and hope I am ready to finish my stairs. Really appreciate your spelling this out so clearly for us.
Peace,
Tom
What were the 3 notches uncut in the original concrete pad? I have the same in my pad and I have no idea what they are for. I thought the original stringers may have gone into them?
Hey, great blog! Answers a ton of questions for me, as I’m currently rebuilding my old Victorians steps. The set you show above with the grey treads and white risers/sides, with the intermediate post is exactly what I need to build and finding this is soooo helpful! One quick question, what are the guardrails that you are using on the steps – looks like the Fiberon or Veranda kits? If so, do these hold up ok to the 200lb load test?
I am having an issue with installing rails that go above the posts when balusters installed. Either my 1 inch tred overhand is the issue or the position of the posts is the issue. Posts are set back almost against the riser…first on bottom step and one midway up.
Great article! I’m working on my deck stairs now and really appreciated the detail and helpful photos in this article. Looks like it is from 10 years ago but still relevant. Much appreciated


Nice work, Raymond. You are fortunate to have customers that value your work.
Thanks for the kind words Pete.
It’s always great to hear your customer say what a great you did on their project. So the extra work that it takes usually pays off in the end.
Raymond-
Very nice work!
I’ve heard too many carpenters and contractors complain about being so anal retentive with regard to this type of detail to rot prevention; structural integrity; being true-plumb-level-square and looking good and why so much blocking, etc, etc.
If you’ve ever seen a collapsed deck in person (and heard the ambulances heading to the site), and discovered that 6 people went to the hospital due to poor workmanship, and a complete lack of detail as seen in your work… just hopefully this very informative and helpful article will save some someone else from a catastrophic failure.
Excellent Raymond-
Thank you—Ed Latson Danby VT
Thanks for the comments Ed.
I believe that it only takes a minimal amount of time to do a job well vs not so well. plus it helps cut out the call backs and keeps the customers coming back which as we all know in this business is very important.
Raymond- One of my old mentors always told me that quality pays……he was absolutely right.
Best to you,
Ed
Nice job Raymond, I do it all similar to you, but in addition, I fill any voids around the post with concrete, including the void along side the blocking.
Hey Mark,
Love the extra blocking and the concrete! I also noticed that you bolted the bottom board down as well. Cool Idea;)
Raymond, Great article and nice work!
Mark, Thanks for sharing the photos and specifications. If you would allow, I have a couple recommendations. The concrete will be a potential sponge for water and will shrink unless it is hydraulic cement. The 2x behind the risers also concerns me in that it can trap water and feed wood decay fungus. On exterior work that is exposed to water, I feel it is important to minimize the framing while maintaining the required strength. It is not always so easy a task to achieve that balance, but when done it will maximize the air spaces around the wood and facilitate drying. Deck stairs are probably the most vulnerable part of a building along with bulkhead doors.
Paul, sorry I didn’t see this, but I’ll respond anyways. All the lumber seen is pressure treated for ground use. Yes, the concrete will shrink, which is probably good for the sponge affect. The blocking in the rear does not go all the way to the ground, thus water is not trapped.
Though not shown, I also use a peel and stick membrane over all the stringer notches.
Won’t the concrete trap moisture against the blocking and promote rot? I think time will reveal that it does.
Nice work Raymond. I really enjoyed reading your article. It’s still nice to see other contractors take pride in what they do. You did a great job on showing and explaining how to attach a deck post. Keep up the good work.
Emanuel
Thanks Emanuel;)
Thanks for the article. Nice work! I am always on the lookout for the best way to deal with that post as well. I often imbed that bottom 2x half way into the concrete using the upper half for a kicker (2×4 instead of wider). I also have been using a 2x on the backside of the post, as an additional way to keep the bottom part of the stringer from splitting, etc. All in all, it’s a great attention to detail.
its incredible how much stronger a hand rail post will be when blocking is used to stop any lateral movement. i was taught to block my posts from day one when i started in the trade.. one method ive been using for 5 years is to drop the 4×4 all the way down through down to just above grade to provide nailing for the skirting. with additional 2×4 nailers at the base and the skirting the entire assembly becomes immovable.
yet some guys rely solely on notching the post to allow for the rim and then nothing more than 1 or 2 lag bolts.. when their said and done you can move the post by upwards of 1/2″ with a single hand
Jeff,
looks like a nice sturdy landing;)
I just got finished doing a deck that was about 30″ off the ground and I did the same thing withe posts by letting them hang down low enough to help with the lattice in the end.
Raymond V.
Nice article. Very informative. I noticed the interesting suspenders on your tool belt. What brand are they?
those are occidental leathers. stronghold suspenders by the looks of it
Yes Jeff is right they are Occidental Leather.
They are comfortable but can be a bit warm during the heat of the summer. I sometimes use a non-suspended tool belt set up in real hot weather with a bare minimum of pouches for just the essentials.
Raymond V.
You are very right about the occis being warm. i have the suspendavest and it gets ungodly warm in the summer . some days its saturated with sweat . luckily i only wear it when installing trim
Posts against the second riser will not pass code here, unless the railing passes thru or around. Never would fly here. Railing hasta be at ADA code height at the furthest bullnose, and “grab-able”.
Parks,
Good point. Raymond spoke about that in his article, too. That is DEFINITELY one of the real ‘weak spots’ in the current code: meeting Continuous Handrail requirements, while also meeting 200 lb. lateral lode requirements, is extremely difficult.
Parks, if you have a method that meets both requirements, please email me, send photos, write me something.
We’re working on a follow-up story with one of the specialists from Simpson Strong-tie, and that’s the ONLY focus of the story.
Gary Katz
And by the way…
GREAT ARTICLE RAYMOND!!!
Thanks Gary!
You also beat me to the response to Parks reply.
Raymond V.
Dig hole 42″deep, drop post in,fill with concrete all at the front of the first rise.
Dig a hole 42″ deep, drop in post fill with concrete. Use ground contact post.
If you have the extra day, with careful measurement and a ready to go stringer, you can mark out exactly where your post will go and dig a 2′ deep hole at each post location, pour the post bases and pad in one pour. Come back the next day and finish your construction with a little extra blocking and away you go! Just pull diagonals on the two post locations, from the stringer attachment point on the rim joist of the deck and you can get it spot on.
So if you are putting 2 4x4s aligning with outdide hanfraIL line, how do you figure exact place to dig potholes half way down…install outside stringer first but it would be in way to use pothole digger???
Hi Mark,
I have given that method a thought a while back and I’m sure it will work quite well. My concern for the long haul is how well that post will survive in the ground. Most likely quite a long time.
I almost gave that method a try recently because the riser was less than 7″ and I was getting concerned as to how well the post would hold even with the blocking. But when all was done it worked out fine.
Great pictures and well done! Love the ease in telling the story. I have a question you may or may not be able to answer. If the new lateral resistance standard on the posts is 200 lbs, how does the inspector assess that? I install several decks/staircases this summer, using many, (but not all ) of the techniques you describe. I never had anyone test lateral strength. Is it done through installation set up and execution? What are your thoughts and what experience(s) do you have with this. Thanks again for posting!!!
Hi Bob,
I have never had an inspector come and test my posts with any equipment but have had one grab the posts on the deck and give them a shake. My general feeling most inspectors will be fine with your methods once they see you have put in the extra details that they probably don’t see on a day to day basis. The method that I use has been a work in progress for quite a few years now after fixing and replacing many decks and noticing how weak the bottom stair post was. My method may not be perfect but it sure is solid when I’m done and no inspector can fault that;)
Raymond V.
Thanks for an insightful article. Love the 4 x 4 blocking and concrete.
From the outset of this article I was intrigued by the bottom of the stairs going straight to level concrete. Admittedly I have not done a lot of stairs and risers etc since college. My work consists mostly of smaller renovations. I did do a job around the base of some outside stairs replacing rotted timber that was connected to concrete after my trade training and this told me that it is not something I’m happy with.
The outside stairs that I did of recent were done with galvanized metal risers (5 steps) that were bolted to the landing at the top and just sat on concrete slab at the bottom; this was for reasonably sized cabins at a mobile village. The posts off of these verandas were supported, at base, with metal galvanized anchor posts (see attached picture). At no time with all of this did the timber touch the ground. In Australia you will see these metal anchors used a lot. Can’t recall if there is any legal height requirement in Australian for concrete to timber, although I have seen them fairly close to ground, of which I am not happy with, but still works.
I only mention all of this in that Raymond;s stairs go right to concrete slab and yet I did notice Jeff Kirk place the bottom of his stairs on what appears to be a concrete step (nice). I also noticed that Jeff makes his post go all the way through to just above grade; also nice. Still, the use of metal galvanized anchors that are set in concrete give additional support and strength and sees the posts above ground, away from timber rot; this is more for the 2 posts that are NOT connected to the building.
Sorry if I’m looking at the obvious, as I’m not sure all procedures in the US and I did not see this in this article. Anyway, this article has helped me and thanks to all.
Another Metal Galvanized Anchor
I have never seen flashing placed on top of the stringers where they meet the steps or where the wood meets the cement before. With treated lumber, is that necessary? Do others do that? I connect newel posts on old houses in a similar manner but I cut a notch in them and bolt them to the front of the bottom riser with lots of blocking behind the riser for strength. If old houses had newels and balustardes on the stairs they went to the bottom of the steps.
Hi Dan,
I install the flashing tape along the top of the tread cut of the stringer because the water will still find it’s way between the tread boards and it will eventually compromise the wood even though it’s treated. Even the treated wood dries out and can be compromised by good old mother nature.
As far as placing the 4×4 post on the front edge of the the first riser I think it would be just like doing it the old way of placing the post on the outside edge of the stringer and relying on the just the wood fibers and the strength of the bolts or screws that you use.
It’s not to say that what you have going with your boxed newel post is not sturdy or not going to work. You appear to have a bit more surface area to work with and then can add trim to the post as well to hide any blocking and bolts.
Question for you: are the newel posts hollow like some of the interior boxed newels. Also I would like to see how you are attaching the newel if you have any pictures. I think it would be great to show what can be done with situations that are more restoration than new deck construction.
Nice newel posts, did you make the balusters too? if so very cool;)
Raymond V.
Dan, I know this is an old thread, but I am about to attempt to rebuild the original wooden stairs coming off the front porch of my 1892 victorian home. Do you by any chance have photos of the attachment method for the above style of new post at the bottom of the last step? Great thread from all concerned.
Here is another picutre of a newel I made in front of the bottom riser.
Another nice newel post Dan;)
It’s been a while since I have had the chance to do a restoration type job. I do have a couple customers with really old houses that require me to reach into my bag of tricks to pull something off.
Nice job.
Raymond V.
Yes treated timber (pine) is something I’ve been watching more so of recent i.e. watching how it splits and distorts. I’ve also noticed the differences of opinions, misunderstandings and perpetuated errors that come from people that sell lumber
.
Ps love the block work inclusive of pouring cement in adjoining space.
I made the balustrades also. The newels are 2 X treated lumber glued up with Gorilla type glue. I run it thru the planer afterwords to get a nice finish. I put lots of blocking behind the first riser. I bolt the newel thru the front into the blocking. I also put in toe nailed bolts on either side of the newel well into the blocking. Covering the bottom of the newel covers everything. The treateed stringers on our front porch have set on a cement pad without flashign below them for 25 years. The treads are glued up 5/4 decking to simulate the old timers 5/4 X 12 fir stair treads that were used for a ccnetury on old houses. Water cannot reach the top of the stringers. The picture is of a newel and balustrade I made for our porch. A mark was left in the sidewalk telling me we had an octagonal newel.
What are you using for paint on your laminated 2x treated posts, thinking I might be able to make up some turning blanks this way.
Nice job on the newels Dan;)
LOVE this article; especially since I can link it to a draftsman/architect/designer so they can draw deck sections appropriately. I like that you went the extra step and added ice and water shield but I’m still kind of iffy about it. I had a couple issues that may create a discussion (and hopefully an answer).
First: taping the bottom of the 4×4 post would create a pool for the water coming down the post to sit (unless the entire post is wrapped, yours is but not all may be) and therefore speed up the rot. Maybe a better solution would be a no-rot connector from Simpson (ABA44, i think). It would allow for a gap in between the post and concrete allowing the water to escape.
Second: shouldn’t the ice/water shield be continuous up the stringer? Ideally the stringers have a little slope to them so there isn’t a big chance of water absorption on the risers but it seems any water that gets trapped on top of the stringer may actually migrate into it via the exposed riser. This might be overkill but this is the first time I saw ice/water shield on top of stringers so I thought: “Why not wrap all the cut edges?”
Once again thanks for an awesome article!!
Hi Luka,
I can’t say that I would disagree with adding flashing tape to the risers as well. I apply the tape on the horizontal cuts for obvious reasons but figured that there would be very minimal water exposure to the riser cut. But what’s a little more flashing tape;)
I have been wrapping the bottom of the post for a while now but it may be a better idea to apply some Jesco terminate wood preserve on the bottom instead. Probably a bit faster, a bit more messy but will most likely help prevent rot from the end grain.
Very nice work, I can tell you are a true craftsman! I have been learning carpentry for the past five years and your article really inspired me. I have a couple questions… Why do you use the waterproof membrane (flashing tape) under the treads and not exposed end grain behind the risers as well? Is there a reason why the tape is better than a preservative such as copper green?
Hi Ben,
Thanks for the comments.
I use the flashing tape because it doesn’t take that long to pre-cut the tape to length and it’s not as messy as the the green Terminate preservative or other similar products.
I don’t put it on the risers because the tread will overlap it and the riser cut does get covered by PVC. There is not really that much exposure to the weather if any once it’s all covered. But the top cut has a space between the treads so water will go in between the boards. Hope that answers your questions.
Thank you for the article Raymond! Great read. It breaks my heart that the code no longer allows the bottom posts to be set back against the second rise like that. Having a foot of backing to fasten into increases the overall strength a hell if alot. Love the waterproofing on the stringers as well.
Thanks for the comments Andy!
Yeah I hear you. I was able to do it maybe twice before I needed an alternative, which is where I came up with the idea to see how well I could block the post in just behind the 2x front riser instead which does still work well just not as good as the post up against the 2nd riser where you have a bout 12-14″ to attach the post.
Was wondering if you had any pictures of your alternative to attaching 4×4 at bottom of stairs (if attaching post to second riser is no longer code. Also can you tell me what kind of bolt you use to attach (size / length) Thanks
Excellent article & comments too! Recent first time home buyer looking to put some new steps on an existing deck and searching for information. I believe this article covered everything I need to know and more! Thank you for the clear and concise information!
Joshua,
thanks for the comments and glad the article will be helpful to you.
If you have any other questions feel free to reach out to me through my website email or just post another comment here and I will do my best to answer it for you. Good luck with your new home.
Hi Raymond, This is one of the best articles I’ve seen on installing posts, very clear and well illustrated too! I’m building my first set of steps that will use composite treads. I have what is probably a dumb question but… when you are installing the blocking in between each of the stringers, how are you able to attach all the blocks from both sides? I would think that after the 2 outer blocks are in place, you would only be able to attach the inner blocks from the open spaces?
Thanks in advance for your help.
Hi Bill,
Thanks for the comments. To answer your question you can stagger the blocks back and forth to give easier access to each side of the block with screws or if you are in a pinch you can add the screws at an angle. Sometimes I will pre-drill the holes to help prevent cracks, but since most times the pressure treated wood is still wet it is not much of an issue. Hope that helps and good luck with your stairs.
What are u using for skirt and riser material
Hi Mark,
The material that we used on the skirt boards and risers was Boral trim. It was the first time that we had it in the field.
Overall my initial impression was good. It is made from recycled fly ash which comes from coal burning. It dos not absorb moisture but does not have the expansions and contraction issues that PVC does.
Best.
Raymond Valois.
Ray thanks nice article .I coat the bottom of my post with polyurethane adhesive using a putty knife pushing it in the end grain double coating. .I cut the top portion of the risers to let in a continuous 2×6 strut helps also with longer runs of stairs keeping the width and put near newel locations.really once all the risers and treads are on it really ties it all together laterally .but i block always at the key locations too. I always with c.c.a. stringers buy them in advance bring them to job site or my place sticker them and let them loose the water air dry .nothing worse then cutting a square rise and run and having it shrink out of square
Ray,
I wish I would have seen what you did before I did my deck stairs.
I calculated my stringers based on my sidewalk. But I had to add 1/2″ of concrete to the sidewalk which was not level where the stringers would land.
After I added the 1/2″ to the sidewalk I did not go back and recalculate my runs and rises. Big mistake! Now my bottom rise to the sidewalk is 1/2″ higher than the rise for the rest of the stairs. The 1/2″ makes a big difference when walking down the stairs, I am worried that someone could lose their balance when hitting the sidewalk, I did.
What would you suggest on how to correct the 1/2″ problem at the bottom of the stairs?
Thanks,
Larry
I noticed that you said to predrill the holes in the bottom 2x’s, attaching the stringers, etc. I agree! I was wondering if you knew of any manufacture that makes a screw similar to some of the “HeadLoc” screws that don’t require drilling and don’t split the wood. They would have to be exterior screws, but would cut out quit a bit of time. Drilling wet pressure treated lumber is a bit of a pain. Also a very nice idea to tape the top of the riser. I will do that today on the stairs I’m building now.
Thanks Ted
Hi Ted,
I have only used the Headlock screws so far. You can check out Simpson Strong-Tie SDWS Timber Screws they are fairly new and are quite similar.
Usually you do not have to predrill but since they are going into the end of the stringer that has already been notched out to create the stairs I do it mainly as a precaution to stop the wood from splitting. I will agree that drilling pressure treated wood is a bit of a pain but it is better than removing and re-cutting a stringer because it split. The little bit of extra time it takes to drill a pilot hole for that small piece of mind in my opinion is worth it.
Raymond,
Thank you for taking the time to post an article and pictures as well written and shot as your stairs. I really appreciated your thoughtful, creative solutions.
Thanks, also, for spending time responding to the various questions — all of which seem to advance this aspect of craftsmanship.
I’m building my first deck, and your article with the accompanying comments and responses has been incredibly helpful.
Thanks … John
You are quite welcome John.
That’s why we are all here to share our craft and get new ideas for the projects we are working on now and the ones that we have not done yet.
Good luck with your deck and be sure to let us know how it comes out.
Raymond Valois
Great article! Any ideas on how to best brace the bottom rail post if its attached to the outside of the stringer at the bottom?
What do you do about concealing the hardware on the outside of the stringers? You don’t do fascia there, do you? I’m using LedgerLoks and you can drill with a spade head to make it flush, but wondering if a paintable caulk would be the thing to use to make disappear.
Hi Anna,
I typically use Headlok bolts and Timber lok bolts for my stair assembly. If the heads are sticking out just a bit when I go to add 3/4″ trim to the outside of the stringer I place the trim in place and gently tap the trimboard where the bolt heads are which leaves a dipple. From there I will use a forstner bit to make a slight cavity in the backside of the trim board so it will sit flat on the outside of the stringer. If I was not using trim I probably would use a spade bit and make a slight recess for the bolt head but not too deep.
Hope that helps.
Raymond Valois
Raymond – Terrific and detailed article. Very helpful in my journey of learning how to build my first deck and making sure it’s built to last and meets codes. Looking forward to poking through your blog for other interesting reads.
-steve
Thanks for the comments Steve,
Good luck with your project, Let us know how it comes out.
I appreciate your article and it’s meticulousness. I have been building a craftsman front porch on our lake house which is turning into a concrete bunker as I tend to make things very sturdy.
I am now hanging the stringers and they will rest on a 2×12 at ground level. The stairs are flared from 4 feet at the top to 6 feet at the bottom.( 8 risers) Of course no one has anything on the Net about cutting the outer flared stringers but I have figured out the angles. The outer stringers are longer and so the treads are about an inch longer on the outer stringers due to the hypotenuse.
So bearing this in mind have you ever installed posts on a flared stair and why do you install the bottom kicker board between the outer stringers? You still have to cut all of the other inside stringers to accommodate the 1.5 inch of the kicker board?
I think that it looks a lot better having the kicker board go across all of the stringers.
Also do your bottom posts follow the angled stringer in other words are they parallel to the this outer stringer or do you make the posts parallel to the treads?
Thanks for your help.
Hi Raymond,
Excellent post, thanks for the clarity and level of detail! I am certainly not at your skill level but am a reasonably handy homeowner and am trying to replace a short set of stairs (3 steps) to a front porch. I’m wondering how to attach the newel post and your method looks great. However, I will need to line up the post to an existing 4×4 at the top of the stairs; to align the inside of the new newel post at the base must be at the inside end of the outer stringer. It was previously installed by the not recommended method you describe at the very beginning (notching the newel post and bolting to the outside of the stringer). :) My best thought is to bury the post in addition to bolting to the outside of the stringer. Do you have any suggestions and how would you recommend I go about this? Thanks very much!
Any thoughts on using a concrete post base in the cutout and doing some additional blocking at the post?
Hi Ryan,
You could use a post base as well inside the blocking. Depending on which one you use you may find it difficult to nail the base to the post inside of the stringers and you would need to be aware of which direction you place it so it does not interfere with the long bolts/ screws you use to connect the post to the blocking.
Hope that helps.
Raymond Valois
Stringers will split behind the first step when an extreme load is applied like moving a fridge or stove. I was called to repair such an accident after a pregnant woman and husband were injured coming down some deck stairs together. All three stringers snapped. [PT (2×12) 6″ rise/10.5″ run w/ Redwood 2×6 treads]
In my efforts to protect my customers from such an accident I found using a marine grade 1/2″ plywood shear nailed to the inside of the first two tread cut-outs helps strengthen the weakest spot on cut stringers. 400lbs is all it took to convince me to add plywood onto all my stringers.
Sigh. I wish I had found your page before I built the stairs for my deck last year. I followed the instructions on the Family Handyman site and they turned out really nice (although I didn’t use the membrane on the stringer cuts), but now the skirt boards are warping outwards (pulling away from the stringers they are attached to) and I thought I would be able to attach the bottom posts to the outside of the skirt boards, through the skirt (top) and skirt+stringer (bottom), using two OZCO OWT Timber Bolts but you, and all the others that posted, indicate that this is a big no-no and I should affix as you indicated in this posting. Oh well, this was the first set of stairs I ever built so now I have experience and a much better set of instructions I can follow. Thanks for posting your work and I’m looking forward to doing this all over again!
Attached is a photo of the stringers with the skirts.
How do i cut and replace my bottom stringers where it’s touching the concrete it’s rotting away. the stairs have a long run maybe 25 stairs do i have to replace the whole stringers ?
Hello Raymond,
I can tell that you are craftsman and not a wood butcher. We had our home rebuilt after it was totally destroyed by a forest fire by two hacks that came highly recommended. Within 4 years, the side stair posts were falling off the stairs. Blockers were installed but not secured to the stringers. In a 4 foot high post, it was out of plumb by 6 inches. The posts were fastened to the outside of the stringers. In addition, the posts were notched. They used timber locks to secure the posts to the stringers, not 1/2″ carriage bolts. I removed the side porch, railings and stairs to do it right. Thank you for the insight on how to build stairs correctly to support the required loads. During the reconstruction of our home, these professional builders of 30 years were the cause of over $315,000.00 in damages. Consequently, I am having to redo most of their work.
Hello Raymond,
How do you secure, screw, nail, the stringer toe blockers when they are even across the stringers? Can’t figure out you did that.
Thank you,
Jack
How many 8″ Timberlock screws?
I am impressed with the workmanship, but all the blocking, timber screws, concrete fill shown for post at the first step will not pass a 200 lb/10 mph stairway post test. You can not just build on top of a concrete slab landing. In our plans we spec using a Simpson CBSQ-SDS2 type column Base or equivalent. Bottom of base is buried 7″ in concrete, top of base is about 8 1/2 inches secured with (14 ) 1/4″ x 2″ screws, 1″ bottom plate separates post from concrete. Also our stringers and toe plates are connected to the posts and set one inch above the concrete. Concrete retains moisture and rots wood. Placing the post further up the stairs might be strong enough, but in our area the handrail must be grabbed before climbing the first step. Also, if using a mud sill, I would place stringers on top of mud sill so stringer end grain dose not touch concrete.
I see that 4 ThruLoks were used for the post/rimjoist connection.
What about the 1,800 lb tensile load req in which a hold down anchor needs to be used? How did you get the ok from inspector w/o those?
Thinking Simpson DTT2Z would accomplish that requirement.
I am wondering about the possibility of having the stringer throat reduced to less than 5″ when trimming the bottom off of the interior stringers. I cant tell from the pictures if this is a problem.
Many thanks for the article, Raymond. It was very helpful.
I’m a retired homeowner in Ottawa, Canada and have been rebuilding my front porch. I’m not a carpenter so articles like yours have been a great help as I try to meet the need of the building code. I used your original method of securing the bottom post and passed the framing inspection yesterday without any issues.
The continuity of the railing is required but a simple continuous railing extended past the post over the bottom tread will do. Its a common design in our neighborhood.
Thanks again.
Mike
I haven’t even finished reading your post yet, but I had to comment that this is an incredibly detailed and top quality post on building deck stairs. I will be taking lots of tips and how-to’s from this post. Amazing. Thanks a bunch.
Steve
Great article. I have installed stairs and posts in a very similar manner for years. But in recent years here in my area in downstate IL, the local inspectors have designated that positioning of the posts as shown in your pics and then terminating the hand rails into them does not meet code. The claim is that the hand rail must extend continuously to the nose of the first tread. The inspectors make this demand even though there are thousands of pre-existing installations identical to what you show in your article and what I have always done.
When posts are installed in this position, an acceptable hand rail must extend inside the post and all the way to a position plumbed up from the first stair’s nose, and then most often include a cumbersome double return (so a flowing sleeve won’t catch on the end of the rail and cause a fall there.)
Have you encountered such code demands?
Michael,
Absolutely! Continuous handrail is a code requirement. And if you follow the Simpson Strong-tie recommendations for securing your newel “inside” the stringers and inside the bottom riser, then you won’t meet the continuous handrail requirement. We stress this issue at all Katz Roadshow events, and how important it is to ask your building inspector if these Simpson Strong-tie recommendations will be acceptable. Every location is different. Personally, I believe the 200 lb lateral load requirement, along with the long-term stability of the newel post connection, trumps the continuous handrail requirement. But that’s just my ‘experienced’ opinion.
I’ve had similar problems with bottom post for handicap ramps. Any thoughts on how to make strong attachments when there is a tapered joist to connect with?
Hi, I have to replace some rotted deck stairs and found your article which is very informative. The only issue I have it to make things meet the new codes which require the stringers be attached to posts attached to cement which runs below the frost line; 40″ here; I will be using 4 stringers and thinking I can use the two inside stringers to attach to the cement and the two outside stringers for posts for the railing only. I am not sure if this is causing more work though and was wondering if anyone has an update plan to meet the newer requirements? Thanks
I need to build a stair rail on concrete steps. Any advise on mounting the 4X4 posts on the surface? I’m concerned about lateral forces and how to strengthen the posts.
Al
How might you adapt this design to install posts and handrail for a handicapped ramp?
Great article. Not being a carpenter and never having built a deck it was really helpful in sorting out how to attach the stairs to my 2nd story deck. The only quandary I have in completing my deck is how to connect the intermediate posts to the strings. This detail is generally not addressed in any of the many articles and videos I have found on the web. I would like to build a straight stairway without any intermediate landings so will be some 14 feet long. To reduce the point load on the deck I want to use two sets of intermediate posts (probably overkill) spaced about 4-1/2 ft apart. The DAC says to notch the posts to hold the stringers but I would like to extend the posts so they also function as guard rails. Notching the 4 x 4 guard posts is no longer in favor. Although the connection is probably trivial I would love to see how others have managed to connect the stringers to the intermediate posts. I see some detail in one of your photos but it is not enough to know how it is actually put together.
I am in the same boat with the intermediate posts, I realize this is an old thread but a very good one! Did you come up with a solution?
Thank you! I am an armature DIYer. I have studied this and hope I am ready to finish my stairs. Really appreciate your spelling this out so clearly for us.
Peace,
Tom
What were the 3 notches uncut in the original concrete pad? I have the same in my pad and I have no idea what they are for. I thought the original stringers may have gone into them?
Hey, great blog! Answers a ton of questions for me, as I’m currently rebuilding my old Victorians steps. The set you show above with the grey treads and white risers/sides, with the intermediate post is exactly what I need to build and finding this is soooo helpful! One quick question, what are the guardrails that you are using on the steps – looks like the Fiberon or Veranda kits? If so, do these hold up ok to the 200lb load test?
I am having an issue with installing rails that go above the posts when balusters installed. Either my 1 inch tred overhand is the issue or the position of the posts is the issue. Posts are set back almost against the riser…first on bottom step and one midway up.
Great article! I’m working on my deck stairs now and really appreciated the detail and helpful photos in this article. Looks like it is from 10 years ago but still relevant. Much appreciated