


I’ve been hanging doors for over thirty-five years, and writing about it for nearly twenty-five. For many years, I approached door installs differently every time (like most carpenters). After all, there are so many steps, and there is a lot you need to watch for! It’s tough to do it the same way every time. But a door is a door is a door. Which means unless you’re doing exactly the same thing every time you install one, you’re wasting valuable energy and time.
In this article, I’ll break down door installation into the most important steps—the first five fasteners. But always prepare the opening before you attempt to set the jamb.
Prepare the Opening
Rough openings are exactly that—rough openings—especially today when framers often frame them more than 2 in. over the size of the door. And floors are almost always out of level, too. And walls are frequently cross-legged. Before you attempt to set a jamb, be sure to correct all those problems or they’ll become bigger problems later.
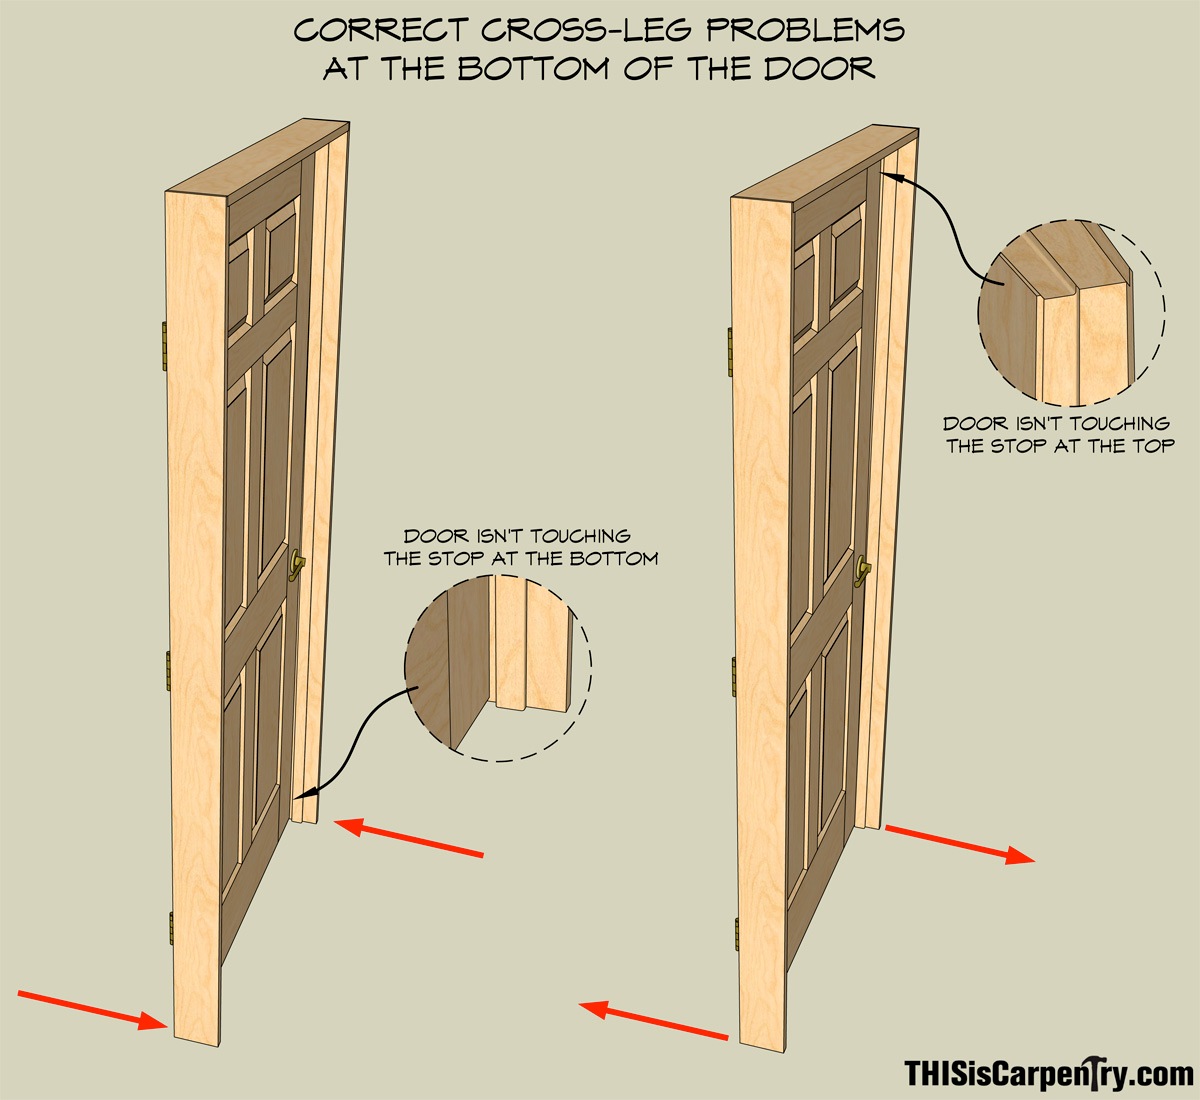
Correct Cross Leg
If you set a jamb into an opening with cross-legged walls, the door won’t lay flat against the jamb and the door stop. You might even think the door is warped, when it isn’t. There are two ways to check for cross-legged walls.
Drive a nail or screw into each corner of the rough opening, then run a string around the four screws, creating an X at the middle of the doorway.
| The two strings should touch each other at the X. If they don’t, try to move the walls at the bottom of the opening—just a little. |
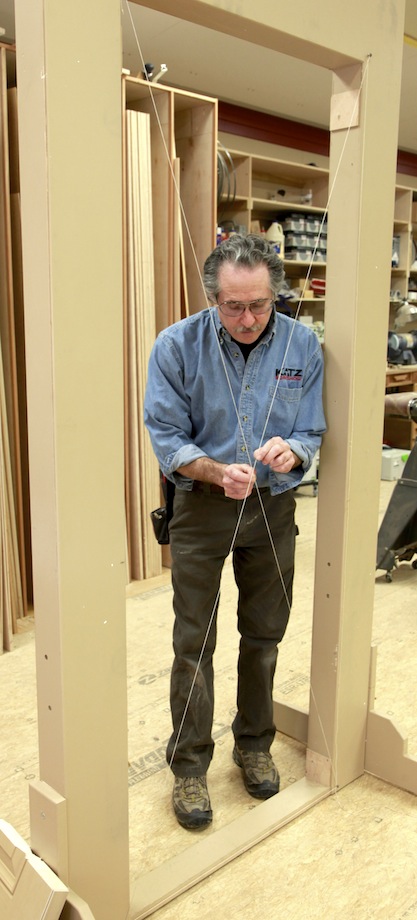 (Note: Click any image to enlarge) |
Use a small sledge hammer and a block of wood, and tap the bottom of each wall lightly. Before banging on a wall, check to be sure there’s no plumbing fixtures or electrical outlets. And look around the back side of the wall for tile, too!
 |
You want to move each wall a little at a time until the strings touch or are close to touching. |
Don’t worry about getting it all. You can correct for cross-legged walls when you set the jamb, too.
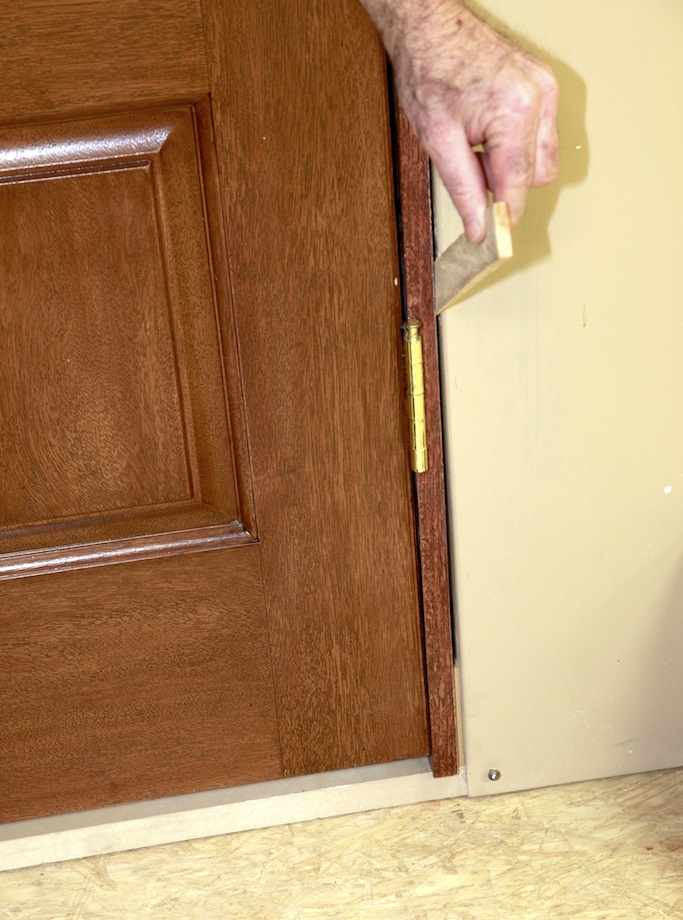
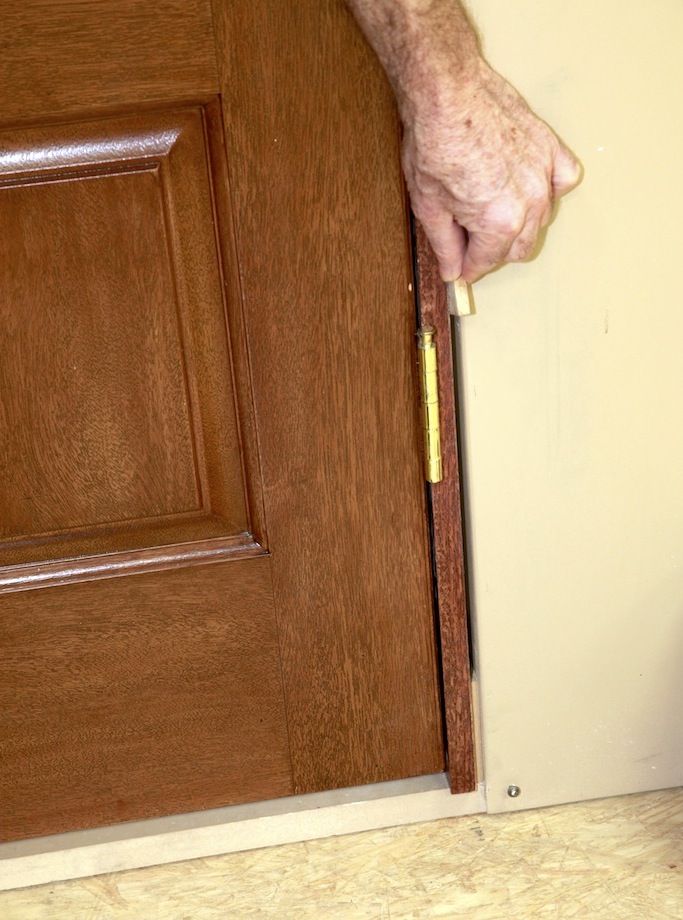
You can also check for cross-legged walls by cross sighting a jamb. If the jamb isn’t at the end of a narrow hallway, stand to one side of the rough opening and sight across the edge of the jamb nearest you to the opposite edge of the jamb farthest from you.
| You’ll need to move your head in order to sight along both edges. Once your head is positioned, look up and down the edge of the nearest jamb. The edge of the farthest jamb should remain parallel. If it doesn’t, the walls are cross-legged; you can see how much the walls must be moved in order to correct the condition. | 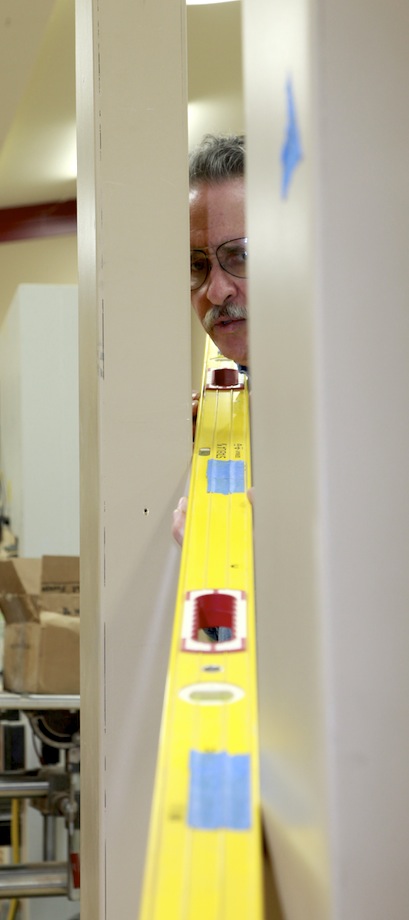 |
Level the Floor
Don’t wait until the jamb is in the opening to level the floor. It’s too difficult and awkward to hold a level over your head while you’re trying to nail the jamb flush with both sides of the wall. Instead, place a level on the floor and shim it until the bubble is centered in the vial.
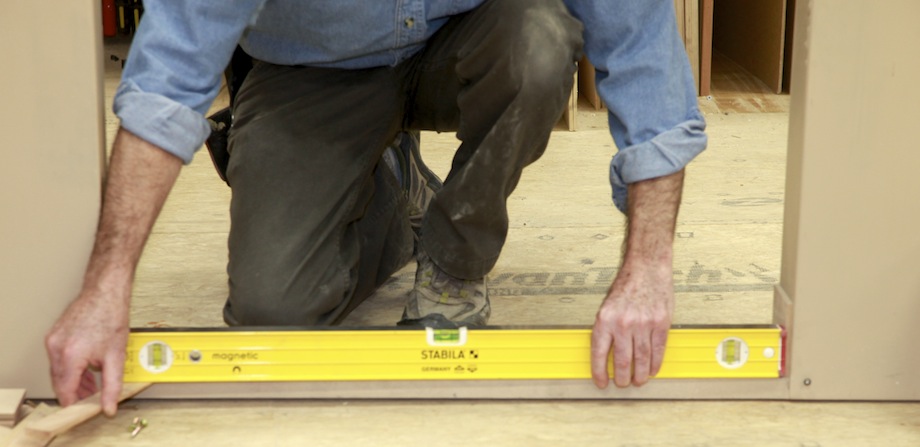
If you’re installing the door on a finished floor—like stone, tile, or hardwood—you can measure the thickness of the shim and cut that amount off the opposite leg. If the flooring isn’t installed, leave the shim in place and set the jamb on top of it.
Shim the Rough Opening
Most rough openings are framed too big and must be shimmed in before setting the jamb, otherwise piles of shims must be inserted between the jamb and the framing. Use plywood squares to shim in the rough opening so that the ‘corrected’ rough opening is 1/8 in. wider than the o.d. (outside dimension) of the door and jamb.
| If the door is in a hallway or other critical location, be sure to center the corrected rough opening, so that casing and drywall reveals will be equal on both sides of the finished door. | 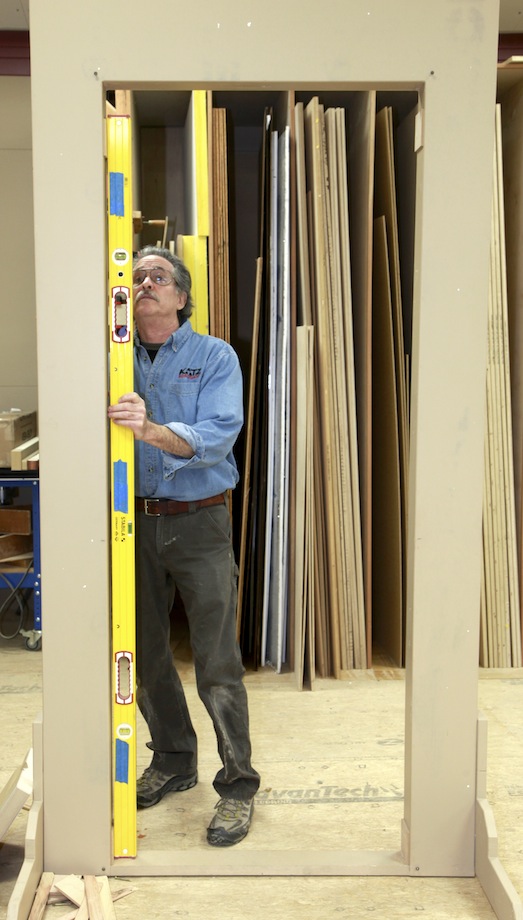 |
But do not shim behind the hinges. Shimming behind the hinges before setting the jamb will prohibit you from making critical adjustments to hinge gaps and will prevent you from making necessary adjustments to strike gaps.
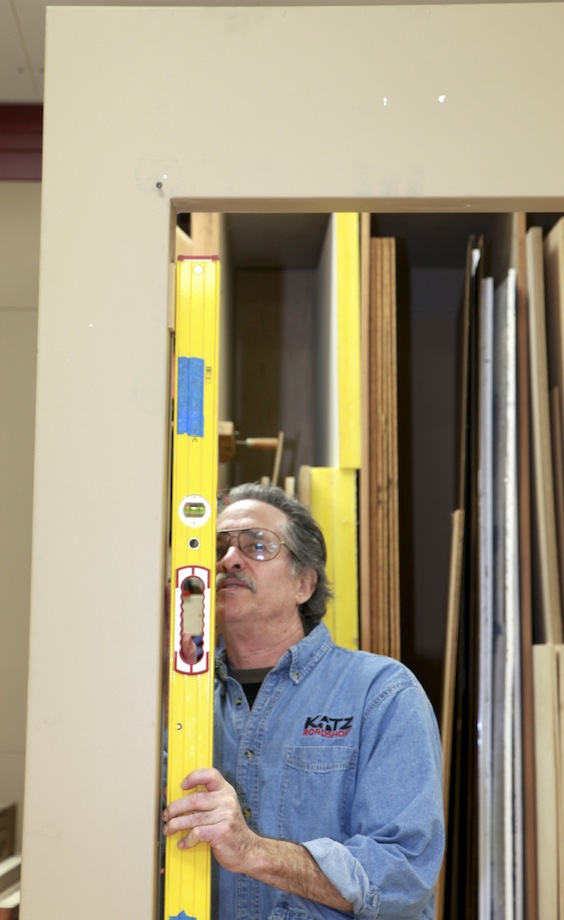 |
Notice my level has blue tape at each hinge location so that I won’t shim behind the hinges. |
Pin the Door in the Opening
Place the jamb in the opening, then remove the fastening screws or temporary latch. Insert two shims at the top of the jamb on opposite sides of the head jamb.
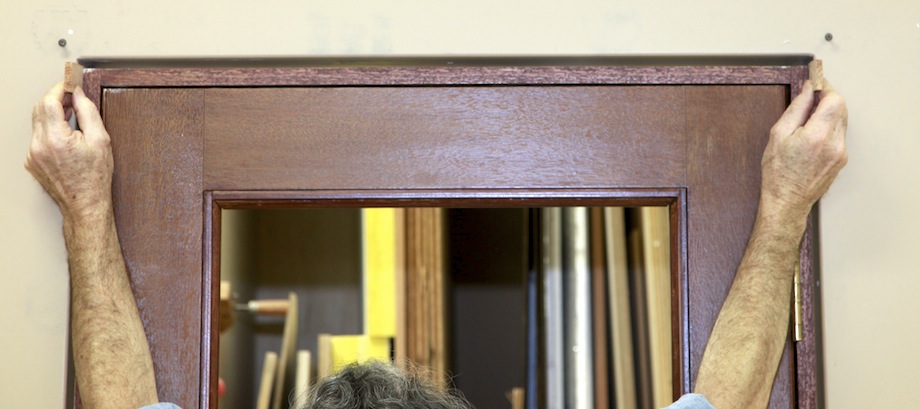
These two shims will safely secure the jamb and the door in the opening.
| Adjust the top of the jamb so that it is flush with both sides of the wall—or as close to flush as possible—so that installing the mitered casing will be easier. | 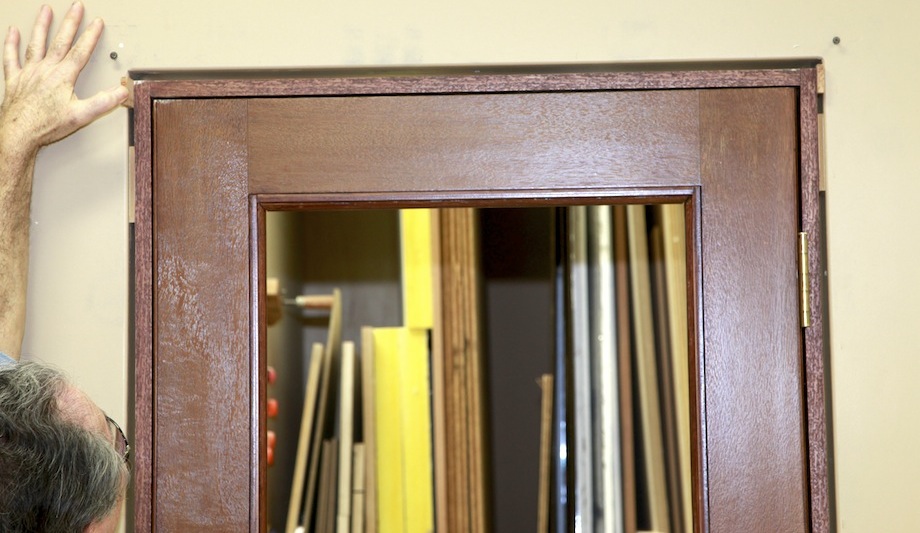 |
The First Five Fasteners
Install the first five fasteners in precisely the correct locations and in exactly the right order. Otherwise, you may not be able to adjust the door properly.
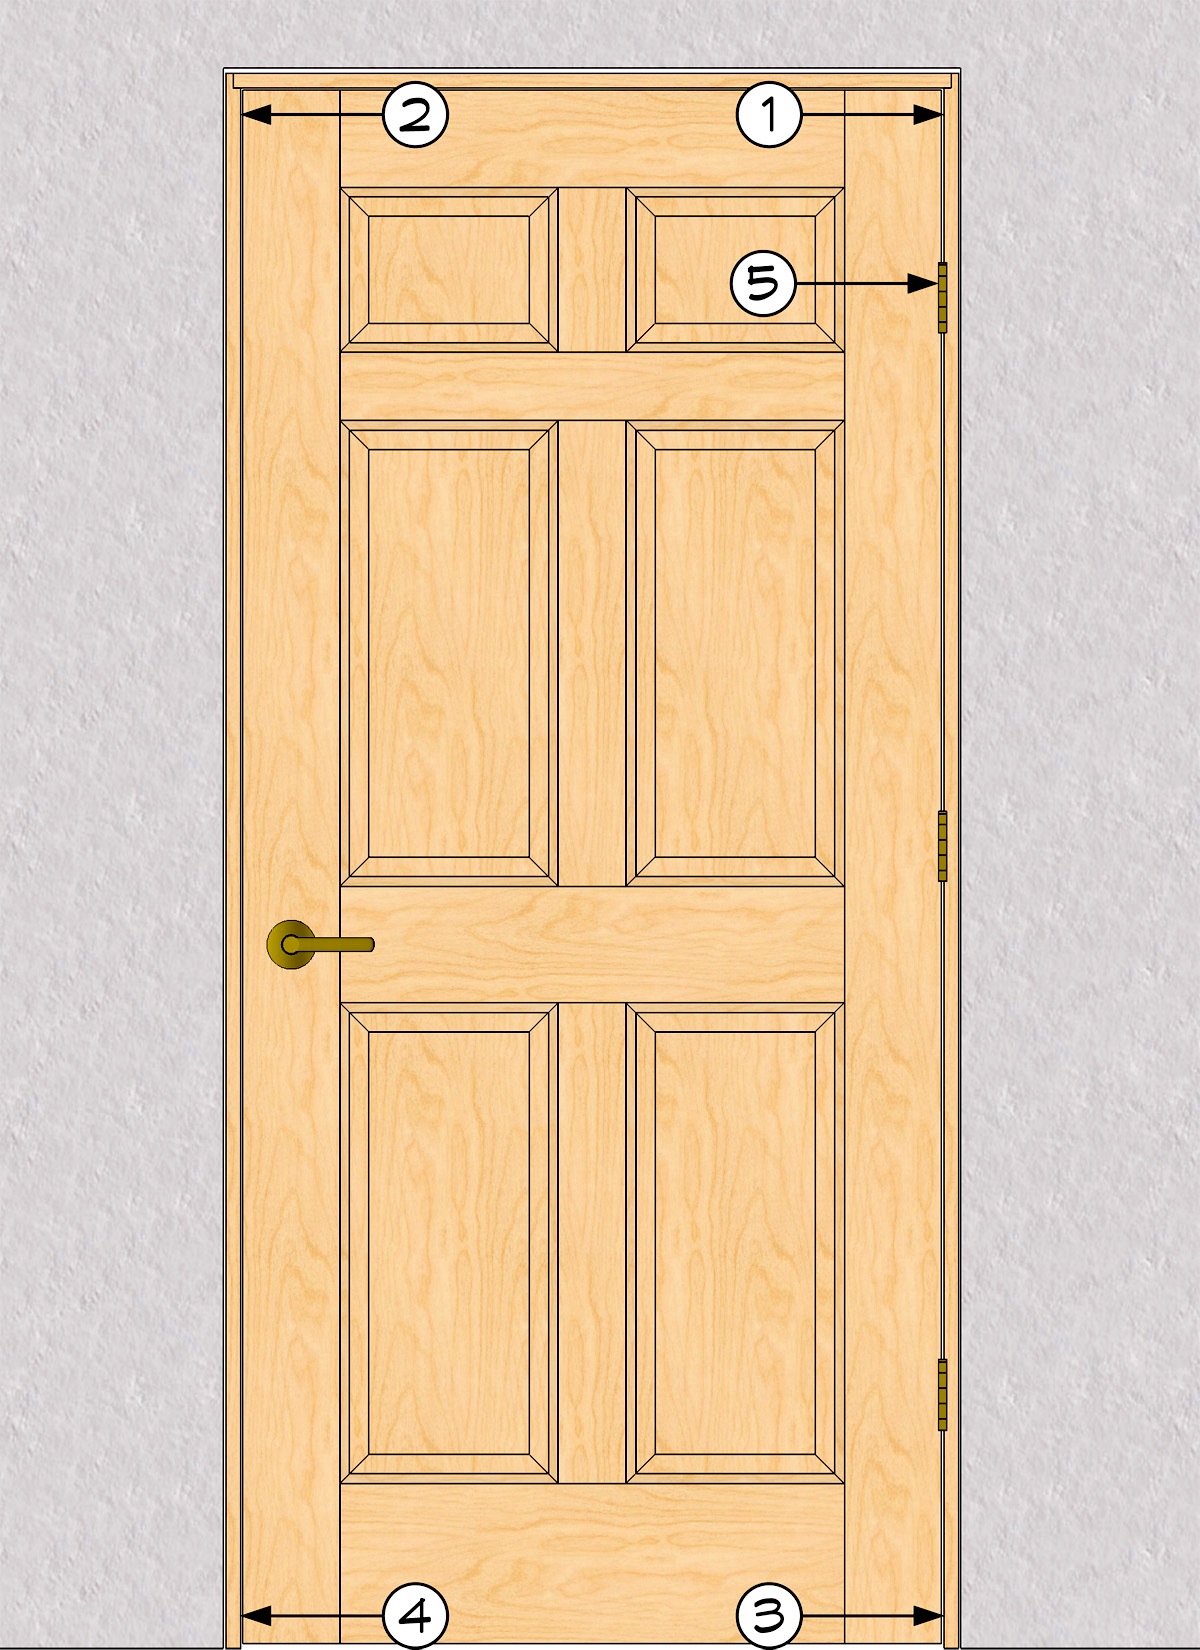
In this instructional example, I’m driving screws through pre-drilled counter-sunk holes in the face of the jamb. Instead, drive 15ga finish nails at each location, or drive screws close to the shoulder of the lower rabbet, where the kerf-in weatherstripping will hide the screws.
| Fastener #1: Drive fastener one up near the top of the hinge jamb—as high on the jamb as possible. Do not shim behind Fastener #1. Shims are already installed at the top of the jamb. | 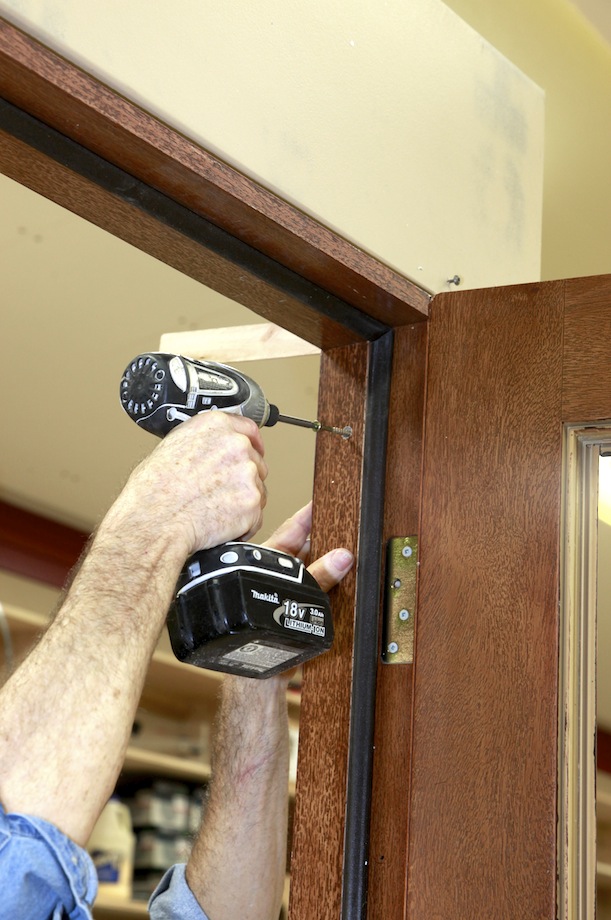 |
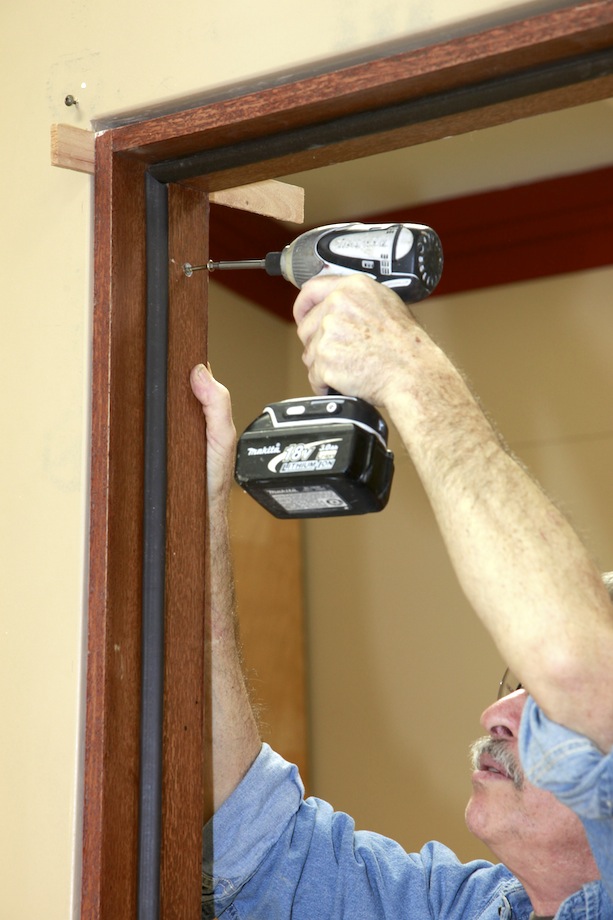 |
Fastener #2: Drive fastener two up near the top of the strike jamb—as high on the jamb as possible. |
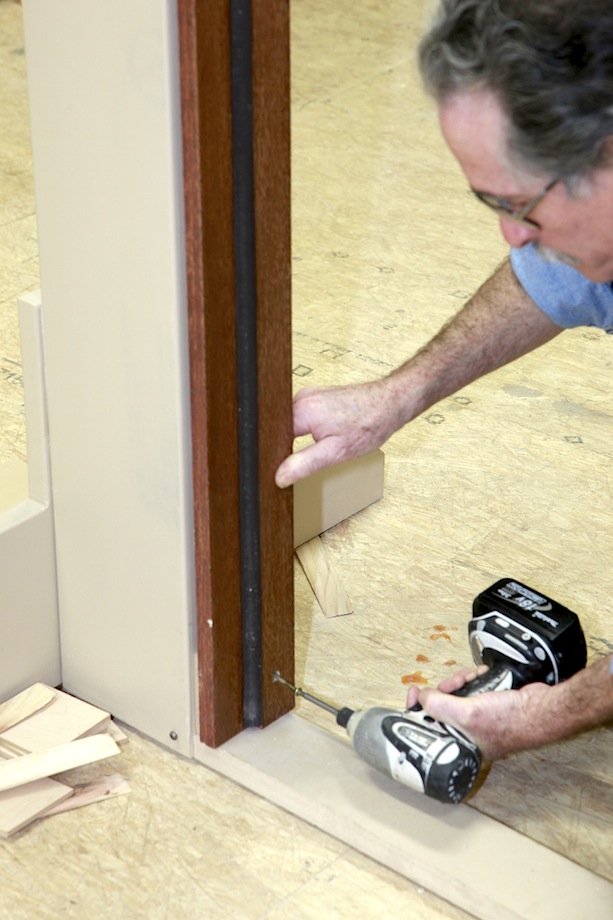
Fastener #3: Fastener #3 must be driven at the very bottom of the hinge jamb, as close to the floor as possible. But before driving fastener #3, correct any remaining cross-leg.
| Move the bottom of the hinge jamb in or out of the wall until the door is lying flat against the strike jamb. If the jamb is severely cross-legged, don’t try to correct it entirely on the hinge jamb—you can still correct cross-leg before driving fastener #4 (this is especially important with pairs of doors). You may need to insert an additional shim to back up the jamb before driving fastener #3. | 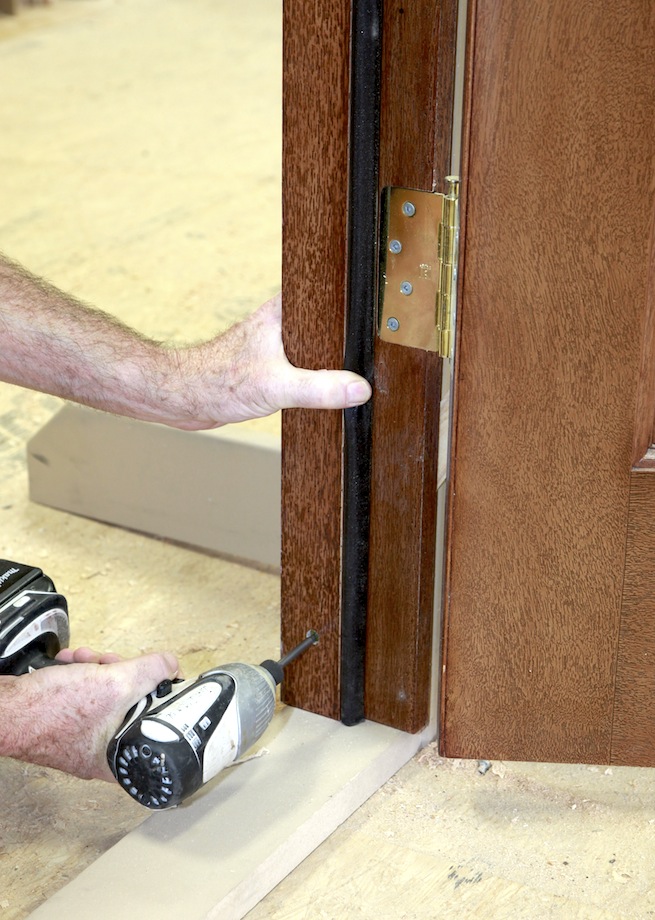 |
Fastener #4: Fastener #4 must be driven at the very bottom of the strike jamb, as close to the floor as possible. But before driving fastener #4, correct any remaining cross-leg.
 |
Move the bottom of the strike jamb in or out of the wall until the door is lying perfectly flat against the strike jamb. If you’re installing a pair of doors, be sure that both doors are flush from the top to the bottom before driving fastener #4. |
In order to maintain a consistent and acceptable strike gap approximately 1/8 in., you may need to insert an additional shim to back up the jamb before driving fastener #4.
Fastener #5: This last fastener corrects a serious issue with prefit doors—especially heavy prefit doors. The weight of a door will pull down on the top hinge, placing the top hinge under tension.
| That tension will increase the hinge gap above the top hinge. If the hinge gap above the top hinge is not corrected, it maybe not be possible to correct the strike gap and the door may rub against the strike jamb. | 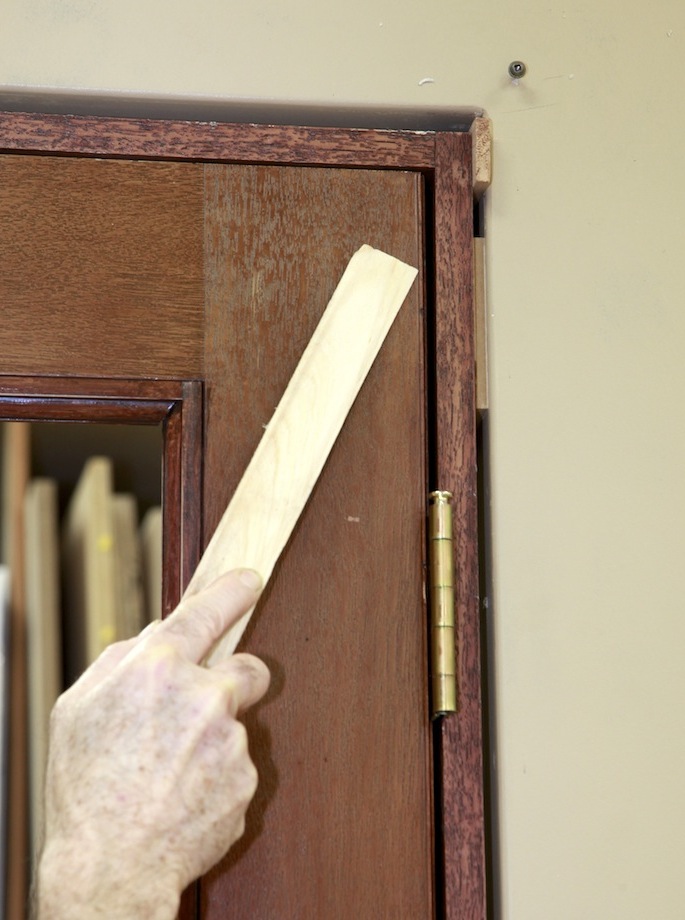 |
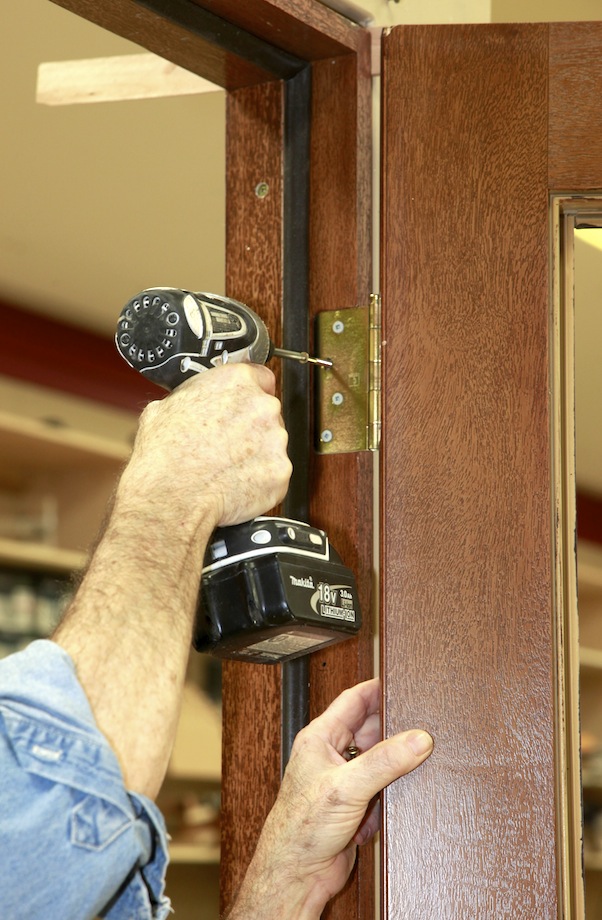
To relieve the tension on the top hinge and jamb, replace one of the top hinge screws with a screw long enough to penetrate the jamb and the wall framing. Do not torque this screw too much or the door will be jamb bound. A slight amount of pressure on that screw will correct the top hinge gap.
 |
 |
And in the future, that screw can be loosened or tightened to correct the fit of the door in the event the home settles.
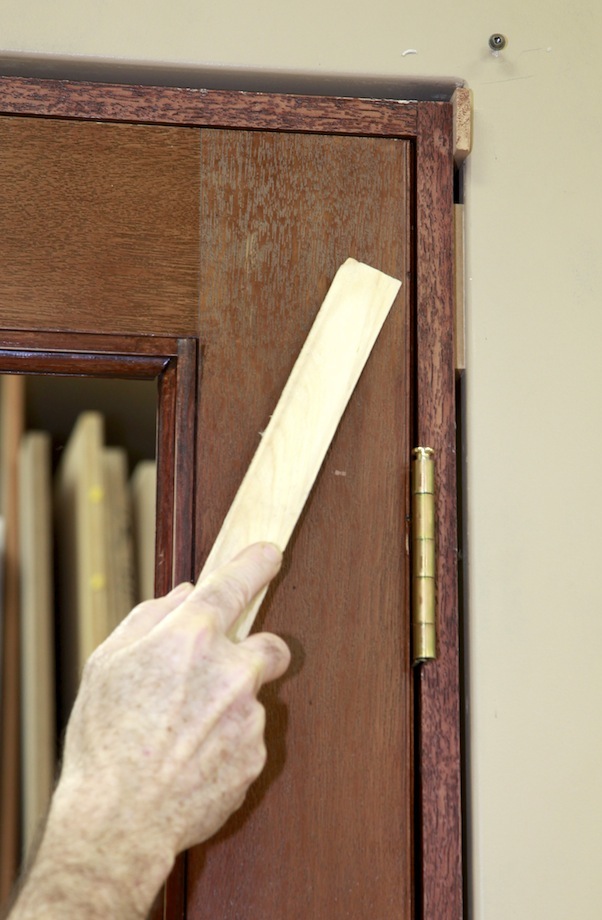
Correct the Bottom Hinge Gap
Most heavy doors will apply pressure and compress the bottom hinge, which will close the hinge gap beneath the bottom hinge. Frequently, prefit doors are not installed correctly and the bottom of the door touches the jamb, leading to the door being jamb bound.
 |
 |
To support the bottom hinge and adjust the bottom hinge gap, install a shim just above the bottom hinge. Insert the shim until the hinge gap is equal at the top and the bottom of the door.
Support the Hinge Jamb
Insert pairs of shims—one from each direction—above and below each hinge, and every 12 in. on center (o.c.).
| Drive fasteners below the shims, not through the shims. The shims may have to be adjusted in order to improve the fit of the door. | 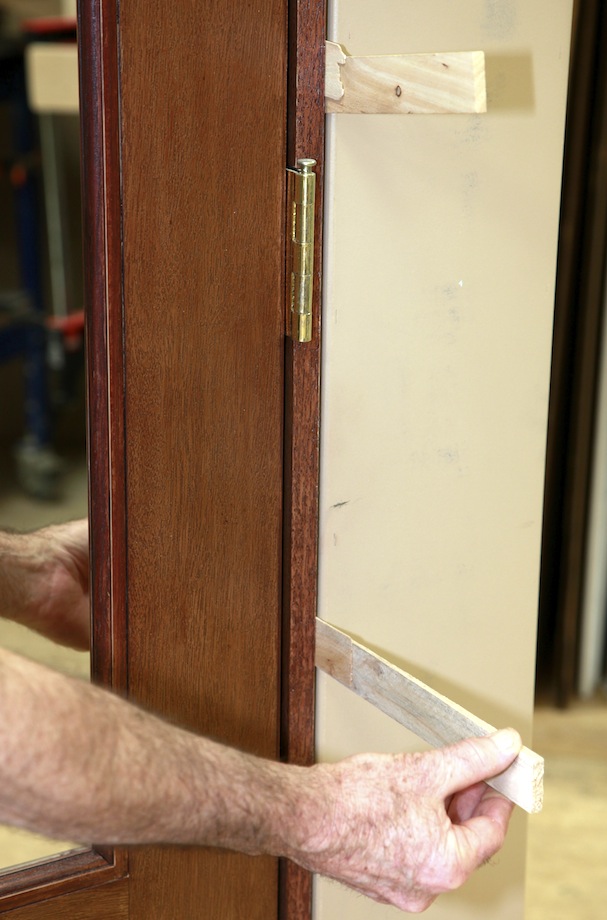 |
Shim the Strike Side and Head
| Insert shims every 12 in. o.c. behind the strike jamb, and shim behind the lockset and dead bolt locations, too. Drive fasteners below the shims, not through the shims. | 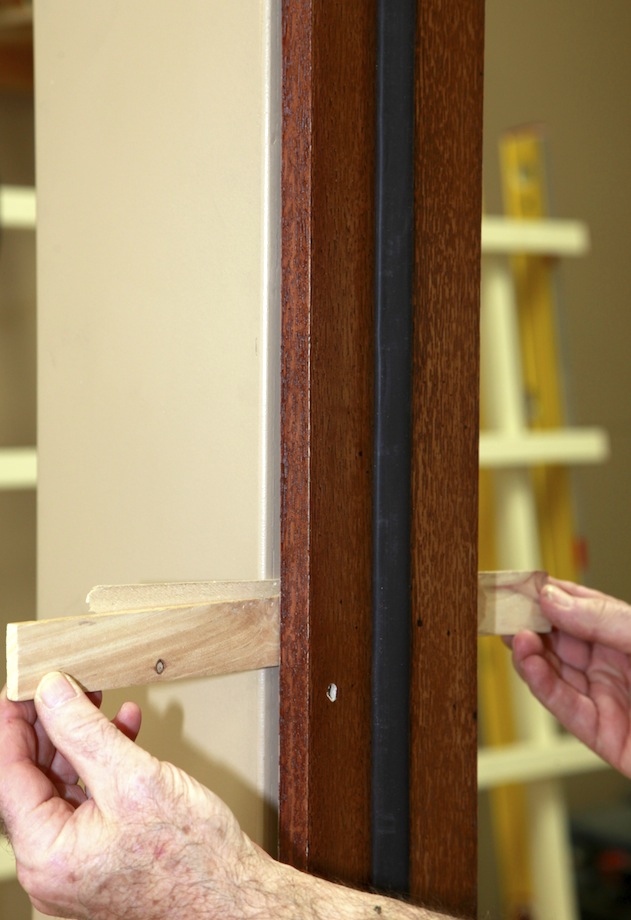 |
Do not drive fasteners near the lockset or deadbolt locations.
Shim the head jamb so that the head gap is even across the top of the door.
Click here to read a related article, “Installing Sidelight/Door/Sidelight Units.”
Great article. Instead of crossing strings, have you ever used the PLS180 laser by Pacific Laser Systems? I love this tool for both installing doors and checking previous installs to troubleshoot problems. I don’t work for or have anything to do with PLS, other than using this product. I love it. Easy to transport and more accurate than a level.
Great article Gary. I too have set numerous pre hung doors(solo). I’m pretty much in line with everything you mentioned except pinning the door in place. I have tried that way in the past but find the door can easily come loose and once nearly lost a door to the other side of the wall. I have found pinning between the header and the top of the hinge side jamb will also hold the bottom tight to floor. It takes a little practice not to exert to much pressure and bow the jamb but once pinned I can swing the door open(depending on the weight of the door) and check both sides. This also let’s me shim from both sides right from the get go.
Tim,
I’ve never had a door slip once I’ve tapped in those hinges, and I’ve hung some pretty big ones. I find that using opposing shims also enables you to center a jamb very nicely. But whatever works for you is the right technique!
Gary
Denny,
I don’t think a laser would be the right tool for the job. It’s not often that walls are perfectly plumb, so you’d have to make some very picky adjustments with how the laser is sitting on the floor in order for the laser line to plane out with the wall…and even then, that’s not what you’d really be trying to achieve. Remember, hanging doors is a lot easier than you might think. Walls can be pretty twisted, but all you have to do is move the bottom legs on the jamb until the door sits flat against the stop, so in a way, it really doesn’t have anything to do with the wall. Pretty easy. And low tech.
Gary
Gary,
I’ve read most of your books and articles and had the pleasure of attending JLC to see and experience how you share your knowledge of the door hangers craft so freely.
This article is great. I’ve loaded it on my TiC iPad app for future reference.
The explanation of what, when, and why for resolving cross-leg issues was clear and have me rethinking how I do my door installs to ensure consistency and quality.
Your new shop looks like you have more than enough room for future growth and productions.
Thanks for passing along your knowledge. Keep sharing your craft.
Sounds good for solid jam doors. How do you change the procedure for split jam doors?
Paul,
There really isn’t much difference for split jamb doors. I’ll do go through all of the first 5 fasteners before installing the jamb on the opposite side of the wall. But I’d be very careful about shimming from that side. The butt-ends of any shims would interfere with installing the opposite jambs.
Gary
Also, if you find loose hinges, correct this before you continue, you can’t hang a door properly if if keeps moving around.
So that’s how you do it!
Excellent article, Gary
Craig
Oh my…I’m sure glad I got it right! If I had known Craig Savage was watching, I might not have published the story at all!
I love you Gary. I have learned so many awesome tips from you over the past few years. Thank you so much.
Terrific tutorial Gary.
Gary,
What you are writing about will work for 95% of what is installed typically. (2/8 or 3/0 x 6/8). I deal with more non-typical installs. With all due respect, if a door is not hung on a correct plane, it isn’t installed correctly. I heard a Super on a job instructing a worker to install an interior door to the wall and then tap the stops to meet the door. When the door was closed it stuck into the room at the top and below the plane of the jamb on the bottom. The super was happy with it because when it closed it “sounded” good because the door hit the stops all at once.
If a wall is leaning one way, or the wall is twisted, you can move the jambs so the door will hit the stop when it closes, but a door should not fall closed or open. If hung correctly, you should be able to swing a door 8″ from the lock side stop and the door should stay. The company I work for manufactures 8/0x10/0 double doors on a weekly basis. I have found if you pin the top with the wall and try to install by simply moving the bottom jamb legs on a unit of this size, it often doesn’t work well. The size of the opening compounds the distance you need to move, especially on double door units. I have found by using the laser (the PLS180 is self leveling) and finding the center point of the plane of the wall, I can move the plane of the frame front to back when I start. (You also can’t install a 8/0x10/0 correctly with the door panels in place simply because of the weight of the unit.) Another reason you need to have a correct plane on a door of this size is the lock. Often this will be a 7 point lock. If the plane on the door unit is not correct, the catches on the lock will not line up with the receiving plates as intended and can cause additional strength to operate the lock and possibly enough stress on the lock mechanism to cause premature failure. I always install to the plane of the door, not the plane of the wall. If I need to correct the wall, I correct the wall. I also point the laser at the hinges/edge of jamb 90 degrees from the wall, and I can see that the jamb and hinges are lined up correctly. To me, installing a 10′ door with a 6 or 8′ level is not as accurate as the laser beam plane. Errors with the installation compound on a door unit of this size. You wrote on another comment that “what works for you is important”. I fully agree! I have found that the laser works for me and I appreciate your thoughts and feedback. Thank you. I enjoy your writing and look forward to your articles. Please keep it up.
Denny,
I think you misunderstand what Gary is suggesting in this article in regard to correcting cross-leggedness. By pinning the door on each end of the head jamb in the RO you are securing it to what in theory should be a rectilinear plane but in any case, you wouldn’t want to set the head jamb in or out of this plane because your trim will not lay flat if you do. If the RO trimmers fall out of the rectangular plane of the head jamb then Gary suggests you correct the problem by moving the legs to coincide with a rectangular plane made by the points of the ends of the head jamb and the bottom of the two jamb legs. He’s not suggesting you install the jamb flush with the plane of the wall at all, that’s where the string comes into the play by stringing both the RO and the door jamb and moving the legs out away from the plane of the wall if necessary so the string touch at the center indicating they are in the same plane.
Gary; Thanks for the article; I have often had a difficult time getting the reveal below the bottom hinge to not look pinched. This will make a difference, both in looks and in my time! Looking forward to seeing you in PDX
This is a great article and has spurred my interest for your videos. I will be picking those up in PDX as well.
Hi Gary,
After plying my trade for over thirty-five years I’m always amazed at new solutions to age old challenges…very clear and concise demonstration…as they say ” grist for the mill”!
Best, Mike
Great article Gary. Have you ever tried countersinking your screws behind the weatherstrip? No holes to fill especially nice on pre-finished units.
Ed,
Yes, I often place fasteners behind the weatherstripping–nails or screws, depending on what I’m using. But the screws and their locations for that article were STRICTLY used for the demonstration. We use that same set over and over and over and over, so we have to use screws, and we have to be careful how we drive them, too so that we don’t strip the backing. You probably noticed I didn’t tighten them up much. When I hang most doors, I use a 15ga finish gun and shot 2 1/2 in. nails. But I always place them the same way as I did in the article: 1, 2, 3, & 4, and then fastener #5 is a long screw through the top hinge.
Gary
HI Gary,
Excellent article and video! As a framer, I am not the best door hanger (obviously!) and always fight the gap being tight below the bottom hinge. I have asked that question so many times and not found an answer.
Now I do. Thanks again, can’t wait to hang the next door.
The reason you haven’t been able to get an answer is because very few people understand the ‘whole picture’ and that often doesn’t happen until you’ve hung a LOT of doors at the same time, which is rare for most finish carpenters–and NEVER happens if you’re a FRAMER!!!! :) Most carpenters shim behind the hinges immediately–that’s what all the articles tell you to do, too. But it’s not until you’ve installed hundreds of doors, one after another, over and over again (or a pro door hanger bangs you on the head!)–that the light comes on and you realize how installing shims prematurely can prevent you from adjusting the door to fit the jamb correctly. I thank the Shaefer brothers for teaching me–definitely the school of hard knocks. :)
Gary
Thank you Gary for a very informative article. I am a beginner home remodeler and while I do not install many doors I sometimes have to adjust doors in the homes that we work on. At the end of the video Gary shows how to adjust the hinge side gap at the bottom by placing the shim above the bottom hinge. How would one go about adjusting that gap if the door is already installed, trimmed, and painted? Thank you again for the articles.
Nathan
I don’t know of any way to make that adjustment if the door is already installed, not without removing the trim, fastening the bottom of the jamb to the trimmer/jack stud securely, and then shimming above the bottom hinge. If you spread the bottom hinge (use a nail set to bend the hinge), you’ll increase the hinge gap below AND above the hinge, which isn’t the fix you need. That’s why this step is so critical and so many installers walk away from prefit doors that are almost pinching the jamb below the bottom hinge. Remember, the top hinge is under tension from the weight of the door; the bottom hinge is under compression. You have to adjust the jamb for BOTH forces.
Gary
Great article, I just need some clarification. So after the door is shimmed and all the gaps are perfect then what? Obviously the shims need to be cut and casing installed. So what keeps the shims in place if we don’t put nails into them?? Thanks so much
I always nail beneath the shims, just to hold them in place. Every time I nail through a shim, I need to move it or adjust it. If I nail beneath the shims, they won’t move or fall down between the jamb and the trimmer or jack stud. But I still don’t shim behind the hinges–above them and below them. I know this goes against ‘accepted’ practice, but try it a few hundred times and you’ll find out how nice it works–while you’re installing the door and later, if you ever have to adjust the door.
Gary
I love hanging doors! I worked at Interior Door Replacement Co in Mtn. View, CA for ten years. You toured our shop once during that time and it felt like Barry Bonds coming to watch my Little League game.
I’m surprised to hear you shim above the head jamb, I was taught not to but also never understood why we didn’t do it.
I would get a huge kick out of being a grunt on your crew, you’re a future hall of famer, no question.
Hey Sam,
I love hanging doors, too, and making them, and trimming them, and…I also remember visiting Interior Door Replacement years ago, when you were working with a laser measuring device that worked along with a CNC program to cut and fit doors to old irregular openings. Remarkable technology. I was always curious if that product ever gained popular use.
There’s nothing special about me or the way I hang doors–I didn’t invent the techniques I use, I learned a lot of them from the Shiefer brothers. Royal and Al were production door hangers in S. CA. and were hanging doors before prefits were used, right after WWII and into the 1980s. I was lucky enough to learn from them at the end of their careers. I’ve also learned a lot the hard way–hang enough doors and that tends to happen.
Gary
I’m a newbee preparing to hang my first door ever (a heavy 36″ solid core) and this looks to be useful info. I’m rather surprised that you secure the jamb with finishing nails — wouldn’t have thought them stiff enough to stabilize the door over time. Is there any down side to using bigger nails or screws other than ease of hiding them?
Thanks for taking the trouble.
Ed
Ed,
I use whatever is necessary. Most often, like most carpenters, I use 15ga finish nails to secure door jambs, and then long screws in the hinges to secure the door. Notice I’m talking about TWO different things. The jamb and the door.
Gary
Great article!
My wife had a handy man install a side door on our garage. Well the door is binding and it leaks a little below the jamb when it rains hard.
It is a fiberglass door with vinyl cladding on the jamb. I have inspected the door and jamb and they seem to be fine.
I’m planning on re-installing this door. How can you move an exterior wall a little for fix cross-leg or just focus on the jamb?
Are they any other suggestions or things to look?
Thanks,
Anthony
Anthony,
Without seeing the door, it’s impossible to guess what the problems might be. But yes, you often can’t move a wall but it’s easy to move the jamb legs at the sill in order to correct cross leg, but if your door is binding, there’s probably more than just a cross leg issue going one. And without seeing it, I can’t tell you why or where it’s binding or how to fix it.
Gary
The doors these days are so cheap the hinge crews into the doors are already striped, people sell 1x finger jointed pine jambs with cheap hinges on a 30 lbs mdf or press board door with pine screwing strip at the hinge, and the screws are 3/4 sheet metal screws. I have hung enough doors to claim I know what I am doing, but there comes a point where cheap is just to labor intensive. Give me 5/4 jambs, and a solid wood door please.
Hi Gary
We are considering the need to straighten up a bowed solid brickwork wall, in order to properly fit hinged double doors Into an opening of 1.4m
The bow is c50mm top to bottom, and Battening out the wall to straighten it up would mean we lose valuable hallway width , and so I am looking for possible ways to avoid doing so, and i came across your helpful article and wondered if your technique would work in our case , to allow a proper fit of 2 hinged doors across this width of span?
The double doors are internal only , and will access a utility room off of a hallway, so will not need locks etc.
I would be very grateful for your advice.
Deborah
I have no idea. I can’t really imagine what you’re doing. You should see if a local builder or carpenter can help you.
GAry
Hi Gary, thanks for all your tips. I was wondering if you can put fastener #5 in earlier due to the weight of the door. I have found that heavy doors drop up to 3/8 of an inch as soon as you remove the screw holding the door in place at the strike side. When this happens I immediately install the 2 1/2 inch long screw in the top hinge. This brings up the door drop as well as adjust the top hinge gap. Then I proceed to the bottom fasteners. Do you think this might interfere with your process. Thanks Bob
Bob,
Sorry it took me so long to respond!! I’ve been much too busy working on the road, and then trying to catch up when I get home.
But I feel your pain. It would be nice to put that #5 fastener in sooner, but once the first two fasteners have secured the top of the jamb, you can’t install any fasteners except #3 & #4, otherwise, you can’t correct for crossleg. If the door is sagging too much in the rough opening, the “correct” the rough opening: shim it in until the rough opening is 1/8 in. wider than the o.d. of the jamb. Then the unit won’t sag much at all!
Gary
Gary, thanks for all your awesome instructional videos and DIY posts. I’m getting ready to install an exterior door with a separate matching single sidelight on the strike plate side. My new set up is identical to the configuration currently in the opening (the door frame is attached to the sidelight frame with corrugated fasteners to make them one unit. Should I attach the new door and sidelight before I install or install them separately? I can send you pictures if it would help make sense. Thanks in advance! Kent
You should follow the manufacturer’s instructions.
Thank you so much for this video and instructions! I just installed my first pre-hung door on the exterior of our new ‘guest room’ I’m building. Followed the method to a T and it works perfectly. Even my wife is impressed, and I am a (gasp) retired electrician.
Good for you, Lance!
Gary
Hi Gary, I just was curious if you ever considered shim screws. That is what I use on all of my door installations. Much quicker to install on any type of door.
Tim,
Yes, I’ve used them, but I find wooden shims are twice as fast and cheaper. Once I ‘correct’ the rough opening, I use hardly any shims at all.
Gary
Hey, Gary,
Missed this first time around. Good, methodical approach! Pretty much what I do, with a couple of opportunities for me to tighten-up my procedure:
1) I level the head jamb. But if the legs are of matching length, your method would be easier. Next time I’ll check the legs, and use your method if they match. If they don’t, I’m not sure, but going over it in my head, I’m thinking that trimming the long leg and doing it your way will still be easier.
2) While I don’t nail through any shims until the very end of the job, I do nail through them eventually. One reason is that I like to hide my fasteners behind the stops, the way I always did back before pre-hungs:
If I have the chance/authority, I always order my doors with the stops just tacked, so that I can pull them off easily, and install the door with screws (even if they are fully-nailed, I usually pull them off — I’ll install them better than the guy at the factory anyway –SEE BELOW). Shims can droop, even with two nails underneath, if those nails are kept in the stop zone, not so if those closely-spaced nails go through the shims. But my method has room for tweaking:
From now on, I think I’ll let go of the fastener-free look, and drive pins, not nails, just below the shims, out wide of the stop zone. I won’t end up with big nail holes, and I also won’t sacrifice strength, since I install with screws.
I do have a problem with replacing hinge screws with long screws, though, just as I have a problem with inserting loose cardboard shims, or bending hinges to tweak the fit:
One visit from a painter, and you are faced with expensive call-backs. Do we really expect the painter to mark this hinge “TOP,” or pick up and save the cardboard shims that fall to the floor? Even if the shim is saved, what if I placed a narrow shim next to the stop edge of the hinge, to TIGHTEN the fit, and the painter sticks it back in on the outside edge, LOOSENING the fit? How about tightening that top hinge screw just so, so that the gaps are as good as when I walked away from the job? Will the painter re-tighten it just so?
So I glue in shims, if any (I carry an assortment of coffee-stirrers, tongue depressors, popsicle sticks, etc, to supplement my cardboard stock), and I install my long top screw UNDERNEATH the top hinge, inside the mortice. More of a PITA to adjust, since you have to unscrew the hinge, drive the screw, then re-install the hinge to check the fit. But it beats a 45-minute drive two weeks later, after the painter has switched everything around. Especially with no shim behind that top hinge! Entirely possible that the painter would simply buzz that long screw in tight, pulling the door over 1/8″ or more from where I left it, and leaving the door and jamb grinding against each other, and leaving someone liable for a re-finishing back-charge.
Two other advantages of installing with the stops off:
1) When I nail the stops on, they touch the door only at the top and bottom of the latch side, nowhere else: KA-CHUNK! No rattle, but they still latch easily, without slamming, even after a few coats of paint.
2) That also gives me two more places to deal with crosslegging — the “flush” fit at both the top and bottom of the jamb. With the easing of both the door and the jamb edges, 3/32″ or more proud at one place, and deep at the other is not noticeable, so you’ve just gained at least 3/16″ without the door appearing to be out of flush with the jamb. When working on twisted, 100-year-old houses with plaster walls that can’t be sledge-hammered back in line, you need all the help you can get!
Anyway, always a chance improve, even for us old farts, and I’ll definitely adopt some of your techniques next time.
Thanks!
Thank you for this information. Can you please advise if it is acceptable to have an exterior door jamb out of square – the top is measured at 37.5+ 1/16″ and the bottom (attached to a threshold) is 37.5″. Obviously, this makes the reveals noticeably uneven. I can’t adjust without causing a gap between the jamb and the threshold. I’m not sure if I should talk to the door company or if I am being too picky?
Johnson,
You’re being too picky. A 1/16″ different isn’t much. It’s not difficult to adjust the hinge gaps so that they appear even.
Gary
Gary,
I have a similar approach to you when I install doors. I start by placing the door in the opening. I shim the door for height to allow for the type of flooring. I shim only the hinge side, and it’s temporary. I then shoot a 15ga nail in each of the corners on the door side of the stop. At this point, the door is centered side to side and flush with the drywall. I adjust the door in the opening by gently prying/tapping the legs at the bottom nail points to get the reveal correct and to eliminate any crossleg issue. This gets me to about 90% of the adjustment. I then nail off the door in what i consider a standard pattern. Next, I make any final adjustments by prying or tapping the jamb to achieve 100%. I haven’t used a single shim to set the door, just the friction or resistance of the nails holding the jamb in place.
Now… the unconventional part. I squirt an expanding foam between the framing and the jamb at the places normally occupied by shims. It’s not the typical can foam with the straw, it’s a low expansion for doors and windows that is used with a gun.
I use this method for all swinging doors. This also allows for minor reveal or operating adjustments later, without conventional shims fixing the door solid in the opening. Don’t get me wrong, the door is not going anywhere. The few times I’ve had to remove one it involved a Sawsall, and I still had to persuade it to come loose from the opening. The foam basically glues it in place.
On new construction, I try to get onsite before sheetrock starts to check the framing and make any adjustments I need, or add blocking, etc.. This makes my job easier when I get there, and eliminates most suprises. It takes less time at this stage to fix things than later when I show up to actually work. It’s piece of mind knowing blocking is where I need it, walls are straight, and openings are the correct size.
I appreciate all the work you do for our trade and the construction industry.
Devin
Hi Gary, excellent article! So glad I found this! One question though with regard to the location of the “corrected” RO shims and fasteners 1, 2, 3, and 4. Do you drive fasteners 1, 2, 3, and 4 directly into the “corrected” RO shims? Or, do those fasteners go IN BETWEEN the shims toward the head which pin the door and the “corrected” RO shims? I know you passionately indicate to drive fasteners BELOW shims – not through them, but what I wasn’t sure is if the “corrected” RO shims fall into that same category of NOT driving directly into them, or if they are treated as just the “new” rough opening.
Todd,
The plywood shims aren’t like regular tapered shims. They’re not there for making FINE adjustments. They’re used to bring in the rough opening so that it’s ready for the jamb or frame. So yes, you can drive fasteners right into those shims. But I never drive fasteners through tapered shims–the purpose of a tapered shim is to make minor adjustments. Once you nail through them, you can’t make minor adjustments without a sawzall.
Gary
Gary,
I suppose this same method would work well for 8′ solid pre-hung interior french doors. Would you do anything in addition or differently?
Jason,
Yes, definitely. I’m guessing when you say “French” you mean a pair. Here’s a video I haven’t finished working on: https://www.youtube.com/watch?v=Gr46nuFA1Bw
Yes, I did mean a pair of doors. I do not even know why I call them french doors, I guess it’s just a popular term of describing them in my neck of the woods. I’m assuming that maybe it was the French that made these doors popular.
That video, like all your video’s are so helpful in making something that can seem complex into something very simple and straight forward. Love it! You have helped me and my business tremendously! There should be some kind of Finish Carpentry apprenticeship program that new apprentices could enroll to learn all these principals that you teach in all of your video’s. Have you ever thought about making some kind of curriculum that people all over could buy from you and use for like a two week apprenticeship program?
Thanks,
Jason,
As Jebediah Nightlinger said: “Well, I have the inclination, the maturity, and the wherewithal… but unfortunately, I don’t have the time.”
Hi Jason,
I’m not sure if the videos you found helpful were on TiC, or if you’re referring to Gary’s DVDs. I wanted to chime in and mention that Gary does have a comprehensive DVD series titled Mastering Finish Carpentry, and it’s available for purchase on his website:
http://garymkatz.com/shop.html#DVDs
Thanks,
Tristan
—
Tristan M. Katz
Managing Editor, THISisCarpentry.com
General Manager, Katz Roadshow
Tristian,
I actually already have his DVD series, and absolutely love them! I try my best to get all the guys that work for me to watch them, but some of the “old timers”, LOL! that work for me will not watch a video, they just want me to demonstrate what I have learned to them, but that ends up taking away my time during productive work hours. So I think it would be so cool, to have like a 2 week program maybe 4hrs a day where apprentices could watch Gary’s videos, have time for discussion and debriefing what was taught, and then some hands on experience creating mock-up’s using the methods that were taught from the video’s. Do you guys no of anyone who has used his material in that type of manner?
I don’t think anyone has, Jason. But we’ll definitely keep that in mind for the future!
Thanks,
Tristan
—
Tristan M. Katz
Managing Editor, THISisCarpentry.com
General Manager, Katz Roadshow
No worries, most likely just a pipe dream…
The ones that are hungry to learn this craft will seek out this type of material for themselves and apply it. You can lead a horse to the water but its up to them to drink. Again thank you so much for your website and all the resources that you make available. Keep it coming
Cheers!
I’m not sure I understand the utility of the initial shims the way you’ve done it. Leaving only 1/8″ gap there between that shim and the jamb doesn’t allow you to get tapered shims in there for later adjustment. Your photos even show you putting the second set of tapered shims above the initial shims, so what is their use? If the opening is really big you’ll have a problem getting tapered shims either in the small 1/8″ gap or in the bigger gap above it.
I use these initial sets of shims but leave about 1/4″ so that I can get the second pair of tapered shims to fit.
On three hinge doors I also usually put one above the middle hinge so I can get the jamb flat by using tapered shims there as well. I might even put one below the middle hinge as well.
Walter,
As I said in the video, I install shims about every 12″, just not behind the hinges. The initial shims I install, leaving the RO 1/8″ wider than the door frame, usually don’t require much more in the way of shimming, but if they do, I just slide a tapered shim in. I nice sharp one will always work, and that thin of a shim won’t cock the jamb out of square. But I also install a lot more plywood shims before installing the frame than I demonstrated in that video! I use tons of them, but I prefer it if they don’t touch the back of my level, held plum on the top and bottom shims. It’s really easy to throw plywood shims on the trimmers or jack studs and keep them at the right elevation–just hold your level on the first two plywood shims, then fill in the remaining space, but like you said, leave a little more room so you can install opposing shims. But really, I was reluctant to respond to your comment because the difference between leaving an 1/8 in. or a 1/4 in. isn’t that big of a deal. I will say that I’ve never had a problem installing plywood shims the way I described in the video. And I’ve used that technique a few times.
Gary
Update on my post # 25:
Today I set a few pre-hungs, and was having problems with the jamb legs skidding around on the slick pre-laid floor while I dealt with crossleg issues. So I screwed scraps to the wall, top and bottom, both sides, overhanging onto the jambs, sandwiching the jambs in place all around.
On the hinge side, these blocks cannot hang in past the jamb, or they will bind on the door. On the other side, though, they can even be 1x2s extending right across the opening and beyond — and fixing the width of both gaps.
That allowed me to tap in shims between these blocks and the jambs, or simply loosen a screw on one side, until the door fit perfectly. I rarely pound the wall over to remove crossleg –most walls were framed with a continuous bottom plate, so it’s rarely that bad. And who is to say that the slab will be flat?
So get the jamb in the opening, and see what has to happen for the door itself to sit flush with the latch-side jamb. Don’t necessarily trust the stops — they could have been nailed on skewed.
On a job where the floor finish isn’t crucial, you can skip my sandwiching blocks, especially with a HC door, and just pound shims in over the jamb legs, clamping the legs down tight enough that they don’t slip around while you tap them into place. Even so, a heavy door can yank you out of alignment if you don’t screw at least one block at the top hinge side of the door. That one I will almost always install.
harlan
I’m just curious, how heavy is a good american door? The reason I’m asking is I am working in norway as a carpenter and last year i had to fix 100lb doors at a hotel, 100 of them to be exact. The brand is Swedoor and they were installed without shims, so the frames got tweaked on them and they wouldn’t shut. I spent 6 months fixing them and it wasn’t easy in the beginning, after i had a door installer from the swedoor factory come out and look at it. He figured out the easiest way to fix it was to drill through the hinges into the concrete(lots of fun by the way with all the rebar) then set a concrete screw to tweak the frame back. I also had hinge shims if the door was too low you popped it off the hinge and placed what looked like little washers on the hinges too lift it up. Some of them were so bad i had to take them completely out and put them in again i found it easiest to put a digital level on the jamb and read the angle,then did the same to the other side,that way i knew they were planing in with each other(these were double doors by the way)on the ones i took out that was the easiest way to do it, putting the frame in first because it was a little hard to shim it in place,then put the doors on because they were so heavy. I wished i would have read this first it would’ve saved me a lot of headaches as i see you install a screw through the hinge to begin with, here the doors have 4 holes predrilled spaced evenly on the jamb where you place the screw and then a plastic cap that goes in the hole when you are done. I’m guessing that there are no predrilled holes on an american style door? Do you actually have to screw through the hinges on all of them? And what if it is a concrete wall?
Your tutorial video is excellent. I used it to help me install a new prehung 30”x80” fire door and a new prehung 36”x80” exterior door. When complete, do you shim behind the top hinge? I would think you can’t if you want to retain the ability to adjust the door for sag later on.
Howard,
You’re right. Once you’ve finished making all necessary major adjustments–the first five fasteners and the shim above the bottom hinge–you can shim behind the top hinge and the any other hinges if you’re convinced that shimming behind the hinges is a necessity. But it’s not and I don’t. I shim above and below the hinges, and never behind the top hinge, for sure. Otherwise, as you said, you can’t use the top hinge to adjust the door later, and it’s not just for sag, but for ‘settling’, too, which might be shrinking or who knows what.
Glad it all worked well for you. It’s a pretty simple full-proof system.
Gary
What a super article! A loving but sometimes slapdash friend installed a door for me and I was just not happy with the reveals and the way the door closed. I removed the door and started from scratch, following the steps in this article. Now the door functions and looks as it should. Hooray!
When you move the bottom jambs to correct cross leg, doesn’t that affect how the casing goes on afterwards?
Yes it does. Some times you have to beat the drywall, sometimes you have to really beat the drywall. Don’t tell me you’ve never done that! If you haven’t done it, then you haven’t installed very many doors/casing!! :):)
Gary
Gary, what about the jamb leg that is proud.
Its easy to beat the drywall, but having the opposite side casing not flush against the wall is unsightly.
Is there a tool like a flush trim router bit that can go to the bottom of the jamb leg
thanks
I’ve never had a problem squeezing the casing to the wall. Adjusting the casing at the bottom of the jamb is pretty easy. It’s the top of the jamb that’s tough, but fortunately, that’s NOT where you want to move the jamb.
Of course, if the jamb is sticking out proud of the drywall by 3/4 in. or something, then, you might want to trim it with a hand plane…or rip a tapered filler for the back of the casing would be a lot easier.
Gary
Upon attempting the first door, we had to start over and take out of RO. Now the door sags like crazy. Even putting the plug back into the bored hole didn’t help very much. What do you recommend when the door is sagging right from the get go?
Lisa,
Without being there and watching what you’re doing; without seeing photos; without even a drawing showing the steps you’d be using, it’s hard for me to guess! But I will—perhaps you didn’t do proper shimming BEFORE you set the jamb in the rough opening? Remember, if you watch the video closely, you’ll see how important it is to shim the exiting rough opening to the “corrected” rough opening width which is about 1/8″ over the width of the rough jamb
Best of luck! Don’t give up. Keep trying. Keep posting notes here.
Gary
This is many years on, but if anyone comes across this issue:
In the same situation, I removed the door from the jamb (just pop the pins out). Then I set the jamb in the opening, shimmed the head to hold it in place, and inserted fasteners 1 & 2. At that point I put the door back on and finished following the rest of this guide.
Hello Gary,
Great work. However I have a question regarding the middle and bottom hinges, do we need to use a long screw for them as the top one?
Thanks
Hello gary,I just wanted to say thank you, I’m a fan of yours, and appreciate you sharing your technique with others.
I have six panel interior oak doors that I want to hang very light items on with over the door hooks. Do you have a recommendation on how much weight I can hang on the door? Would it be better to put longer screws into the door frame to help support the weight better? Any information you may have would be helpful.
Thanks
Hi Gary, I really enjoy your video’s. I was hoping you had one that shows how to install an 8′ double door with 2 functioning side lights. Also, will your roadshow becoming to southern California? Thanks
Victor,
A door is a door is a door.
I think if you read the articles and watch the videos I’ve already published on doors (there’s one more coming on installing a pair of doors), you’ll quickly realize that I use the same fundamental techniques no matter what type of door it is. You HAVE to begin by preparing the opening properly: Make the sill perfectly level. Correct for crossleg if at all possible. And adjust the rough opening size so that it’s only 1/8 in. or so over the O.D. of the jamb. The use the same fastener sequence, no matter what type of door you are installing: Fasteners one and two always go near the head jamb. Fasteners 3 & 4 always go down low on the jamb legs, as close to the floor as possible.
As far as installing a unit with active sidelights, my best advice is: do not buy a pre-hung unit. Set the jamb perfectly then HANG the doors on site, scribing, planing, hinging, and mortising for locks/latches yourself!!!!!! :)
Thanks Gary
Thanks for the article on hanging prehung doors – I have not seen the string trick before for resolving cross leg issues – that is really good. I have renovated several homes – sometimes installing the doors and windows, sometimes hiring it out. I am doing a house now that sits on a slab foundation. We are putting 3/4 ” plywood subfloor and then 3/4 ” white oak floor on top of it. It seems to me that the ideal here is that the doors – exterior and interior – should rest on TOP of the FINISHED floor not the subfloor- isn’t that correct?
The reason I ask is that I am thinking I might go ahead and let the flooring contractor install the white oak floor, sand it and finish it and then cover it up with Ram Board or something like that while I am waiting for the doors and windows to get finished and then install them. Would you have an opinion?
Yeah, of course I have an opinion!
I’ve always felt that the whole idea of installing the flooring first was a convenient strategy supported by the flooring installers. Tile, hardwood, etc. installers love to install the flooring first–at least some of them do, because they don’t have to cut around or up to anything! Imagine that!! But I also know tile installers who will not come on a jobsite until all the other trades are out of there–the cabinets and doors must be installed, otherwise they always suffer the consequences of damaged flooring.
I prefer to work on the rough floor, whether it’s a slab or a wood subfloor. That way I can shim the door jambs off the floor to level the heads and never have to worry about the jambs settling. But that means the flooring people have to undercut the jamb legs and make sure they’re flooring is snug to the jambs so they won’t settle.
I also think the baseboard looks MUCH better if it goes in FIRST. I’ve seen it installed after the flooring and then it must be scribed perfectly to tile and hardwood, and it’s never scribed quite tight enough. Of course, some folks hate baseshoe, and that means installing the flooring first and then scribing the base to the floor.
Gary
Thanks!
Hi Gary! I purchased The Doorhanger’s DVD and wanted to thank you for a great set of videos.
I have a very unusual problem with an exterior door. The wall is terribly out of plumb and there’s no way I’ll be able to move the sill plate.
This might be hard to believe, but it is 1-3/4″ out of plumb on the hinge side and 7/8″ out of plumb on the strike side. It’s leaning out and twisted. I’ve never seen anything like it!
Do you have any suggestions?
Paul,
I’d probably install the jamb plumb and straight and cut tapered jamb extensions for the casing. You’ll probably have to backout the casing at the bottom of the jamb, because the jamb will also end up proud of the wall on one side–A LOT.
Great tutorial. You really have this laid out well. I plan on using this for a reminder to myself and our guys when it’s time to hang a door. We want to get it right the first time, and it’s great to be able to fix issues of poor installation and shifting walls.
I may not be understanding this correctly but if you are using your laser to create a reference line and marking your full length jam/casing height at the high point of the floor would your doors at the low point of the floor not possibly have their casing too high off the ground? If the floor were to be a whole inch low or so in comparison to the high point?
Jordan,
Good eye! And THAT is what this is all about!
Yes, you are absolutely correct. The jamb legs will have to be shimmed off the floor.
This is a new-construction method for controlling casing and jamb height so that all casing–and even more importantly, all muntin bars in windows and doors!–will have straight sight lines, and will ‘look’ level and straight with each other.
This is the same method used for installing kitchen cabinets. This method only works when the finish flooring has NOT been installed. If the finish flooring has been installed, the laser method still works, but there’s a lot more work involved: you have to find the Low Point of the floor and work from THAT elevation, cutting every single jamb (and door), so that the casing and muntins have straight and level sight lines.
Gary
I have a double swing french door that binds on the door sill. I have to lift up on the door handle to get it to clear the plate and latch and lock. all other gaps seem fine. This door leads to our deck and I have tried to create more space by shaving the sill a little but it has a plate for the lock
Rich,
I’m sorry but the problem you’re having could be the result of many different problems, and it’s impossible for me to identify what the cause is without really seeing the opening…and I mean, being there. It could be that the sill was not installed perfectly straight and level–that is probably the MOST COMMON problem. Or it could be that one of the doors is sagging because the jamb at the top hinge wasn’t secured adequately to the trimmer or jack stud, in which case you’ll probably see a large and uneven head gap across the tops of the doors, and one door would probably be higher than the other at the meeting stiles. It could also be that the jambs are not set plumb but in a parallelogram, in which case the doors at the top might not be flush.
I’d call a reputable carpenter or door installer. Get a referral for a respected craftsman from your local lumberyard or door/hardware supply.
Gary
Hey Gary,
This is hands down the best information on fitting doors I have come across!
I have never seen anyone correct the door/hinge sag or the tight gap at bottom of door to jamb.
Superb!
I have one question though.
You have a 1/8 gap up top between jamb. It’s not much I know, but driving a screw in both sides, doesn’t that pull the jamb apart a little?
So if opening is exactly 36 inches and 1/8, then doing screws up would make it 36 and 1/4?
(My measurements might seem strange, as I don’t know imperial, I work in metric.)
Tom,
Funny that two readers made the same comment at the same time!
That’s 1/8″ is so negligible that it won’t make a difference what you do…AS LONG AS YOU DON’T OVER TIGHTEN THOSE SCREWS!!!!
I guess I rarely think of that when I do presentations on installing prehung doors, but I suppose I should. I’ve noticed a LOT of people pull the trigger on their screw gun and don’t let go until the screw is either broken or burried. And with an impact driver, those results are guaranteed if you hold the trigger down.
You HAVE TO FEATHER the trigger on a screw gun, especially an impact driver. That’s the only way to really control the torque. Yes, these tools come with clutches, which are really handy for novice carpenters, but few professionals use them. And I’ve seen many professionals overdrive screws–strip screw heads, break off screws or even tips–because they haven’t made an effort to train themselves and develop more sensitivity for toque, for different woods, for driving screws into steel, like hinge screws. It reminds me a little of an attitude I see more often with framers than finish carpenters–“drive that sucker in there.” I guess I disagree with that approach to just about everything. Carpentry is about ‘feel’ and having ‘good hands’. If you can’t feel the torque, adjust setting on your screw gun. :)
Hi Gary,
I had the same question as other reader’s about 1/8″ gap above .
In your video, you did not say screws #1 and # 2 have to come through shims or not. I watched back and forth video and it seems that they do . If screws come through shims, concern “over tighten” might be not problem any more ? Only when you put screws below shims, then over-tighten is really concerned .
Thanks,
Almost exactly as I was taught by my father 45 years ago.
I’m retired now and cringe most of the time when I see most home and how poorly the doors and trim were installed.
Gary, really enjoyed attending your Roadshow in Lake Bluff, IL, in May – great to see you demonstrate door hanging in person.
I am building new jambs for the existing doors in my 1925 bungalow and I have a couple of questions:
1) What is your recommendation for sizing the head jamb, 1/4″ or 3/16″ wider than the door? Searches on the web seem to indicate there should be a 1/8″ gap between the door and the jamb on both sides but when I dry assemble the door into the jamb on my workbench the hinge-side gap is 1/16″, not 1/8″. Did I goof up installing the hinges?
2) Should I assemble the jamb and door and install it like a pre-hung door (following your techniques above) or can I assemble the jamb and install it first, then hang the door? My guess is the weight of the door might affect how the jamb is shimmed to the RO, so I should probably install the jamb with the door already hung.
BTW, I appreciated your response to Walter S. on adding more plywood shims beyond the ones in the corners. Spent a couple hours yesterday cutting a whole bunch of various thickness shims for the 6 jambs I have to install.
Thanks.
Larry,
I’m glad you enjoyed the Roadshow. Evanston Lumber always does a good job supporting educational events.
I tend to go with a 3/16″ overall difference between the jamb and the door, but that’s a California thing, where you can get away with tighter gaps between the door and jamb because there isn’t much humidity. In other parts of the country, folks go with 1/4″, so you have a true 1/8″ gap on each side of the door and plenty of extra room if the door swells in the summer (humid months). But take care to be sure the moisture content on the door is stable and on the low side (below 10), otherwise, it might shrink in the winter and fail to hit the door stops! I don’t think you ‘goofed’. With a 3/16″ gap, it’s pretty tough split it perfectly and end up with a fat 1/6″ on each side. Now my brother, Larry, he can do that! But I can’t! ;)
I always like to ‘set’ the jamb first. It’s just easier than muscling around a solid core or stile-and-rail door. But when you set the jamb, just pinch the top corners of the headjamb into place with shims. NO fasteners. Of course, if the doors are 12/0, then you might want to shoot one finish nail near the bottom of each jamb leg, but NO MORE. You’ll have to make adjustments down there once you get the door swung. And some pairs, I set the pinch the head jamb with shims, get it right where I want it, then drive fasteners 1 & 2! why not! If you leveled the sill before bringing the frame into the opening, the head should be level!
Gary
Gary,
Thanks so much for the quick reply. I had already cut the head jamb to 1/4″ wider than the door, so I think I’ll leave it at that. I can always adjust the hinges later if need be (Fine Homebuilding has a good article on that topic).
I’m with you on not wanting to muscle the solid core door into place along with the jamb – much to my dismay, at 66 I’m not quite as strong as I used to be. I’m really looking forward to giving your method a try tomorrow. Thanks for the additional tips.
BTW, your coping technique of leaving a 1/8″ sliver at the top of a piece of molding worked great! I notched the opposing piece of molding and the joint was super tight.
Thanks again,
Larry
Hello Gary,
Can I use this same procedure for an exterior front door prefit assembly? If so, is there any other modifications to the procedure that I need to be aware of. My house was build in the 1900-1920 era. It has a 6″ jamb width.
Thank you!
YES. As Gertrude Stein said about roses: A door is a door is a door. They’re all the same and they all install the same way!
Gary
A little over six years later and this “how to” is still going strong. I made custom doors for a few years now been selling doors for the past thirteen years. I had to install my own door recently and I remembered my employer showing me your pair of doors install video. I was impressed with your video so I looked this video up.
I Followed all your steps, (as best I could) and now I have a perfectly operating exterior door. The way I was shown to install doors was wrong, your video proved that to me.
From the time I drove my first fastener to the time I closed my door with a knob on it was less than thirty minutes. Thank you.
Awesome! Thanks for your note. Took me a long time to reply, but I truly enjoyed hearing from you.
Gary
Gary,
Great video and explanation, I was wondering your thoughts on this type of product and if it has pros/cons. It “Appears” easy to use, and seems like it would do a good job, other than the cost, any thoughts on what issues something like this might cause?
https://www.homedepot.com/p/Quick-Door-Hanger-Door-Install-Kit-1-door-pack-201/202366685
Hi Gary,
I framed and trimmed houses in my HS and college days and thought I knew how to hang doors. My son recently remodeled his house and made me watch your door installation video. I was skeptical at first but saw the light after we installed the first solid core door. Then the shame of all those hundreds of doors I had installed incorrectly washed over me.
One additional tip I have is when making the new RO with fixed width spacers is to make sure the jack studs are perpendicular to the plane of the wall and shimming them as required to accomplish that.
Thank you for your note, Andy! I’m glad the system works for you! As for twisted trimmers, I get it! If the trimmers or jack studs are really bad, I leave a little extra room for tapered shims. But whatever works!!!
Hi, Gary.
I’m having troubles with fastener #5: when I replace the hinge screw with a 3” screw, and fasten through the top hinge into the RO , the door sag is fixed, and the top of the strike and hinge jamb reveals sit pretty. But the 3” screw sucks in the hinge jamb enough that there becomes a pretty unsightly gap right above and below the top hinge. Banging my head against the wall. Any advice?
Thank you!
Ben
Extremely helpful post, thank you for taking the time to explain this process!
Hi Gary,
Once you’ve got the door completely set and are done adjusting, do you nail the shims in place so there no worry of them moving?
Also, is the a benefit to using 15ga nails vs screws?
Great article!
JC,
YES, I always shim ABOVE or BELOW the hinges, but only after the first five fasteners are installed. And I shim the heck out of the strike side, too, especially at the foot of the jamb (prevent jamb movement from baseboard installation, etc.), and near the lockset/deadbolt. I never nail through the shims, only drive fasteners BELOW the shims so they don’t move while adjust the fit of the jamb to the door. Watch the Youtube Video: https://youtu.be/gY7o5oSwrdo There is also a video on installing pairs of prehung doors on our YT channel: https://youtu.be/Gr46nuFA1Bw
Gary, your article omits Step Zero, which happens before drywall (in an ideal world…)
In Step Zero, the door hanger surveys all the door openings and checks the usual suspects, but especially cross leg and jambs out-of-plumb in the plane of the wall. Any defects can be corrected, or at least improved, with a framer’s micrometer- 8 pounds is generally a good size. Use the micrometer and a beating block to move the bottom plates to make both jambs plumb or at least parallel. That’s generally not too hard on interior walls. Exterior walls should be bolted down, so they’re harder to move, but even in that situation, you can usually get closer to plumb, or at least parallel.
You can only include so much information in a video or short article. It’s far more important to focus on viewers and readers walking away with the most important information, than it is to try and explain ‘everything.’ In both of my books, and in all live presentations, I always start with correcting the rough opening BEFORE drywall, but not a lot of finish carpenters have that opportunity: these days, finish carpenters aren’t called in until after drywall. So installing a pre-hung door in new construction is much like installing a pre-hung door in a remodel: you don’t have the opportunity to fix the ‘foundation’, you have to work with what’s there.
Gary, I am excited to try out your method, especially after watching a contractor fight for an hour hanging a solid wood shaker door I had painstakingly finished in a whole house remodel as we go. (he blamed it on a heavy door, but now I know better! I have 20 some doors to go and will be hanging them myself as well as trimming out the house with trim I molded. Quick question about the 3 1/2 X 3 1/2 squares to correct the rough opening. In your video, you only needed 1 in each corner. Let’s say the rough opening is much bigger and I need a bigger build up. Do you recommend building up every 12 or so inches that you recommend final shimming? I also enjoyed your sprinter camper build out. Thanks!
Dear Gary,
I don’t frequently hang pre-hung doors as I primarily work on very old houses. I spend most of my time fitting to or remediating existing jambs. I do find this method very useful and straight forward. I occasionally work overseas where it is a common practice to have an uneven spacing of hinges. That is, rather than the 3rd hinge being centered between the top two, it is located about 10 inches below the top hinge. I find this set-up to be very interesting and wondered what your thoughts were on it.
All the best, Laura
Extremely helpful post, thanks for sharing <3
Hi Gary,
Wow, my mind is blown! I’ve always been taught the usual shim behind the hinges and screw/fasten through hinges. I have never been able to get the hinge side reveal/ hinge gap the same all the way down and it’s always annoyed me. Im super excited to try this method. My question is for fastener 5 through the hinge, when the painters take the door and hinges off for painting, is that hinge gap now off? And then you must just have to re screw #5 when the door goes back on to get back to the correct hinge gap?
Thanks you for this article and video. It will be relevant forever. I’ve been successful using it but on heavy doors I’m often tight above the bottom hinge. A little frustrating, but I guess practice will perfect. Any tips? Thanks again.