


I recently took a little job to build a shelter over an entry door for an historical New England house. The budget was low, but the job satisfied my new motto: “Never again will I build something I didn’t design.”
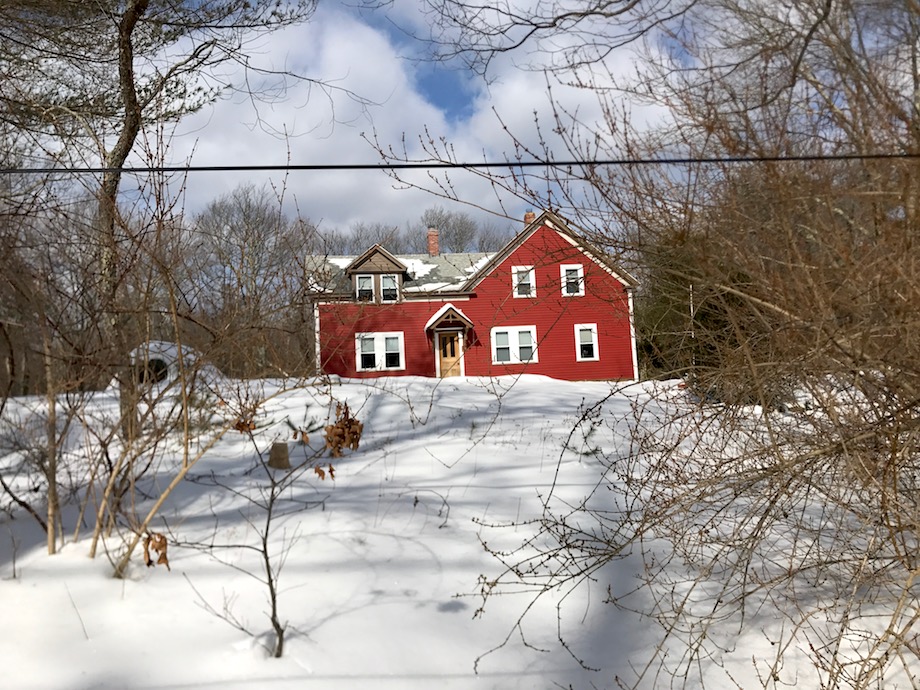
I wanted to build something that could have been part of the original house, but this house presented a little mystery. It’s in rural New England where many Federal style farmhouses were built during the sheep boom brought about by the introduction of spinning and weaving mills in the very early 19th century. Farmers finally made some money producing wool to be made into worsted cloth and could afford to upgrade their houses. Most of these houses were built in the 1820s to 40s.
After the civil war many farmers moved to the less stony Midwest and very few new houses were built out in the country, until after the Second World War. But this house had some millwork and massing that, to me, looked a little more Victorian, which would make it a little later than usual, maybe 1880 or so. I especially noticed the eave returns, which had genuine split-fillet returns with rake moldings instead of the more common crown molding “poor man’s” returns. I think that the house was built, or had an addition with new trim, in the 1880s or 90s. This was pretty well confirmed when the carpenters found pages from an 1890 newspaper used like building paper between the sheathing and siding.
Most people think of Victorian architecture as being very frilly, and a lot of it is. But its real defining characteristic is how it combines Classical and Gothic features. Classical architecture from ancient Greece and Rome is formal, balanced, and carefully proportioned using the golden rectangle. And it uses a simple pallet of ornamental detail, which was pretty well fixed by about 350BC (the Parthenon). Federal houses are basically Classical.

(Note: Click most images to enlarge)
| Gothic architecture is from the Middle Ages—think Salisbury Cathedral—it’s dramatic, vertical and decorated with a wide variety of ornament. |  |
A combination of the two can be a pretty wild mishmash.
 |
 |
But this house is actually pretty tame—it’s just a farmhouse.
I call it Victorian because of its time period, because the proportions are not based on the golden rectangle, and because the ornamentation doesn’t really follow the rules of a classical entablature.
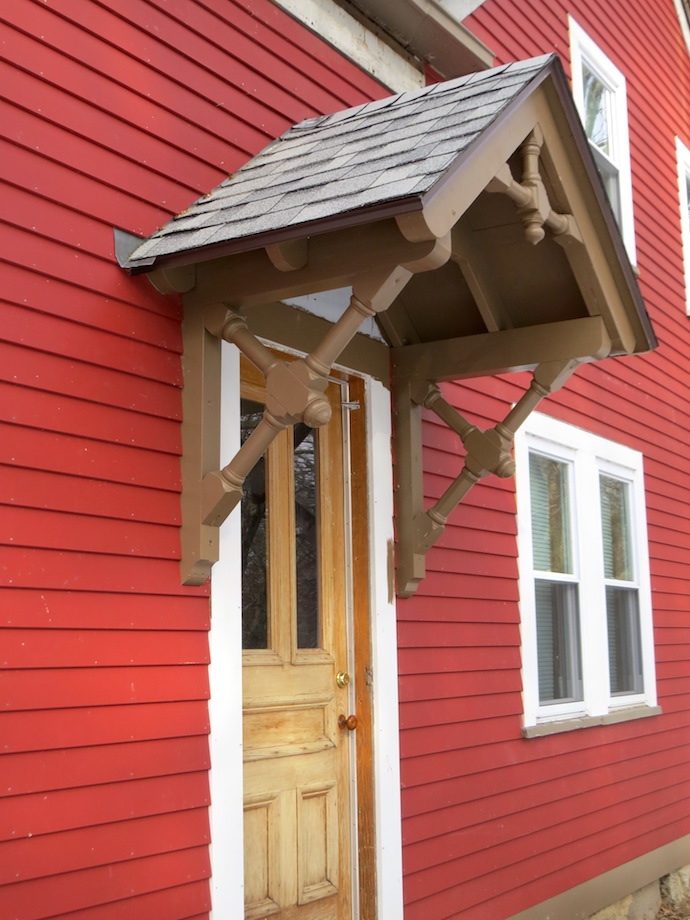
What I wanted to make here is called a flying portico: Portico is a Latin word for a porch which protects an entry door, and flying because it has no columns to support it. The most common type of Victorian flying portico around here looks like this.
 |
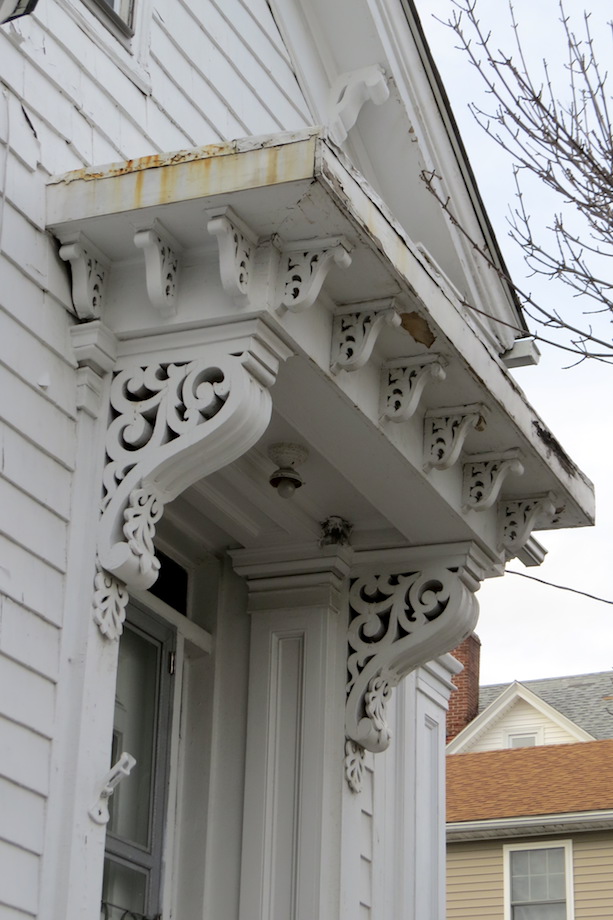 |
The scrolled corbels or brackets are definitely Victorian. These guys are fun to make (those old carpenters must have loved it when they invented the bandsaw!), but they usually have flat or shallow hip roofs, which dump water on the steps. Besides, I wanted to use a pediment (Latin, or maybe Greek? for gable) to match the gables in the roof above. I also wanted to use turnings in the brackets (when you have a lathe, the solution to a lot of millwork problems becomes turnings).
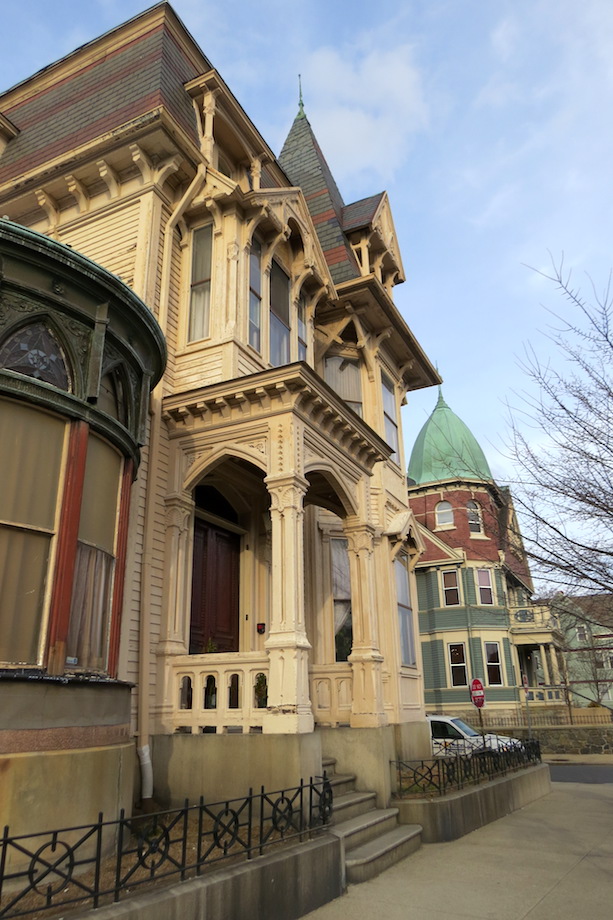
So I decided to do something I learned from my friend Gary Katz: I took my camera to a neighborhood with a lot of cool old architecture—in this case, Broadway on the West Side of Providence, RI, which was developed mostly between the Civil War and 1900. Here are some details that caught my eye, which I stored in my head for future use.
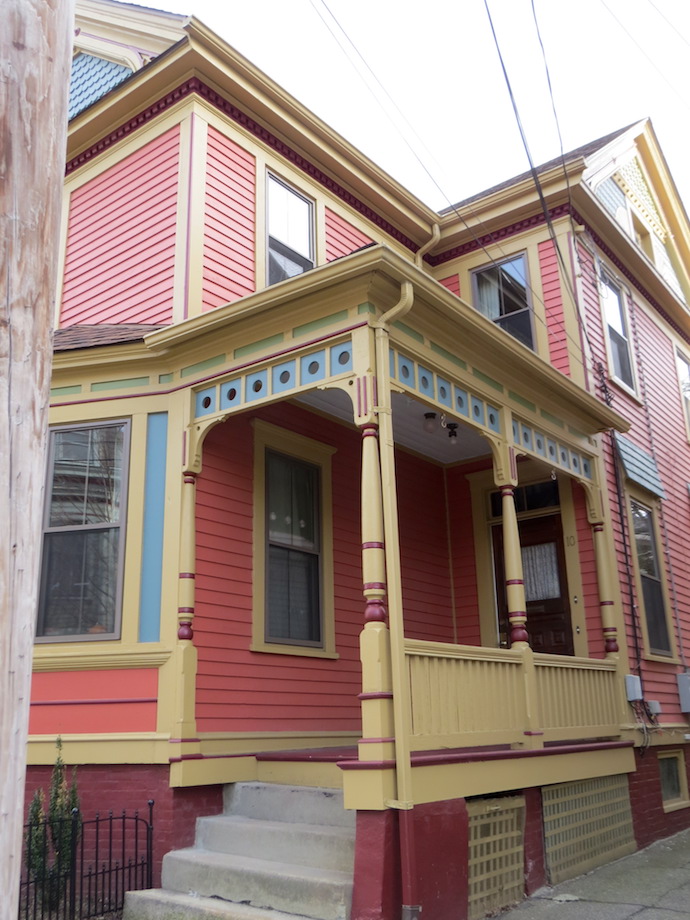 |
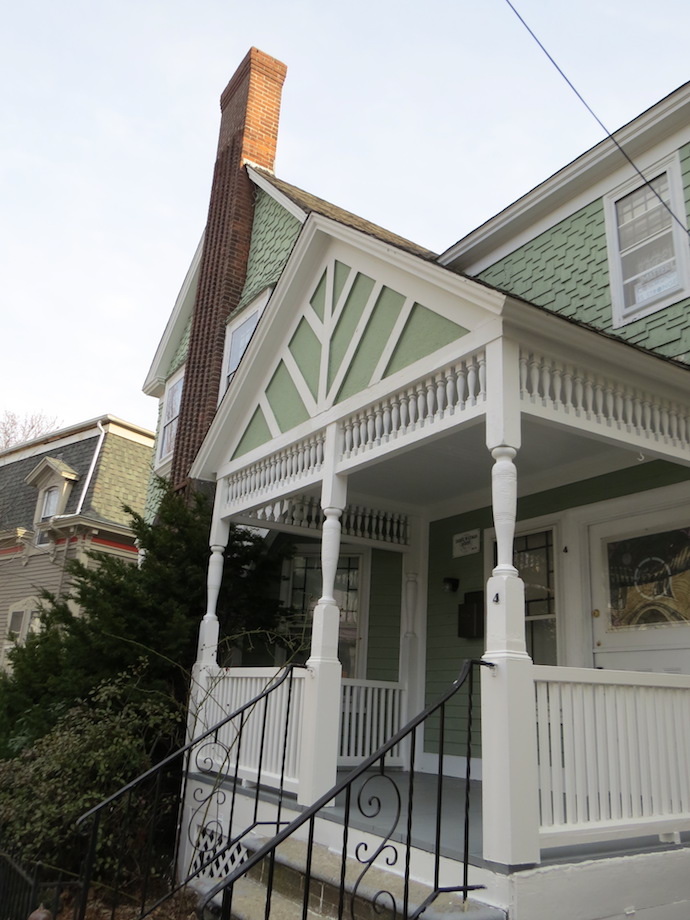 |
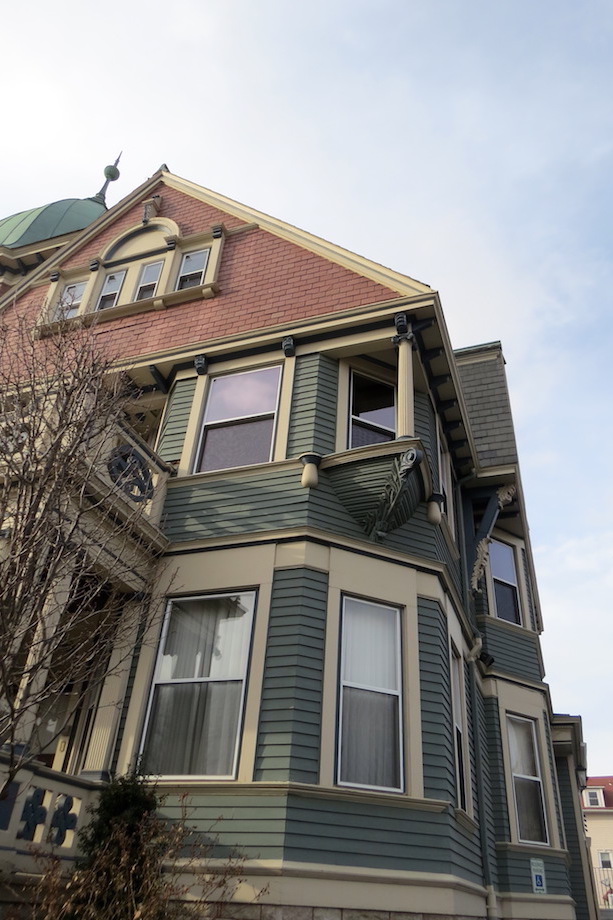
I took a break for a coffee and pecan roll at Seven Stars Bakery. And then, a little farther down the street, on two very different Victorian houses, I found these gable end details for window trim.
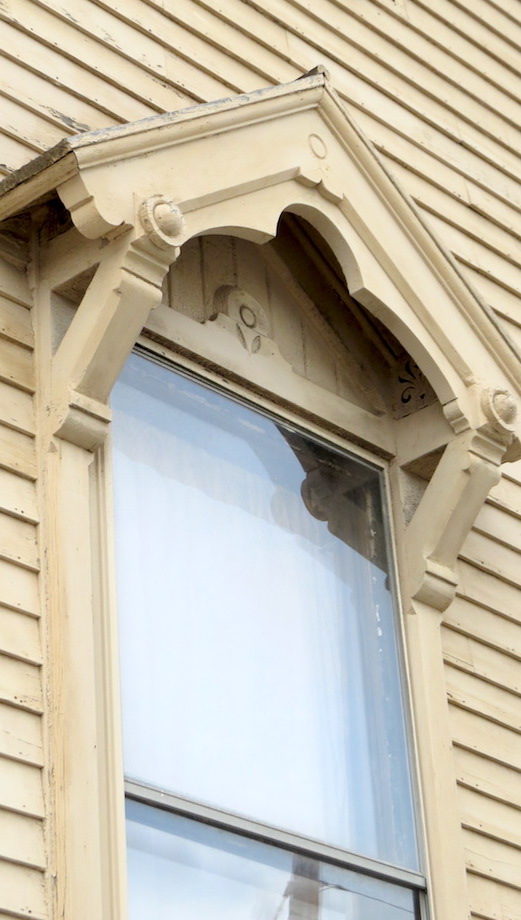 |
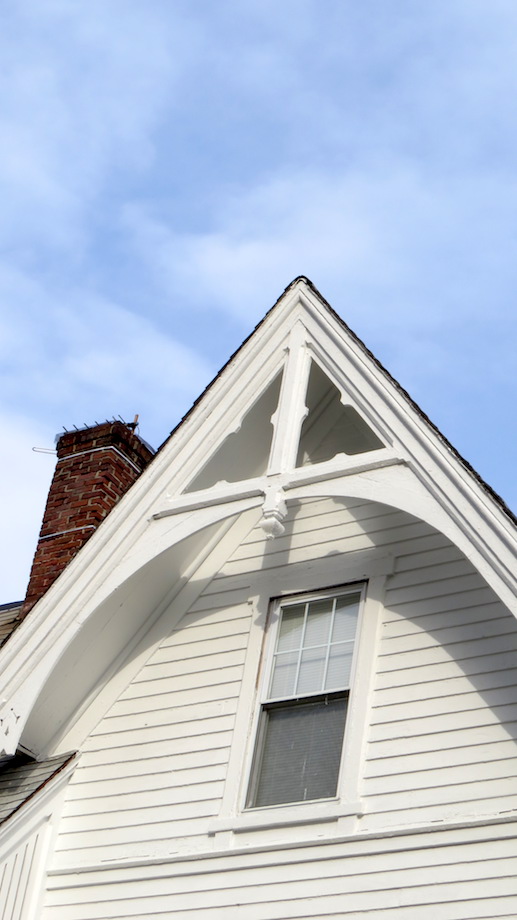 |
This is all I needed to work with.
Designing the portico
First I went to the site and took field dimensions, including the pitch of the dormer. Back in the shop, I did a couple of simple freehand sketches on a scrap of paper, and then fired up the drafting program on my computer.
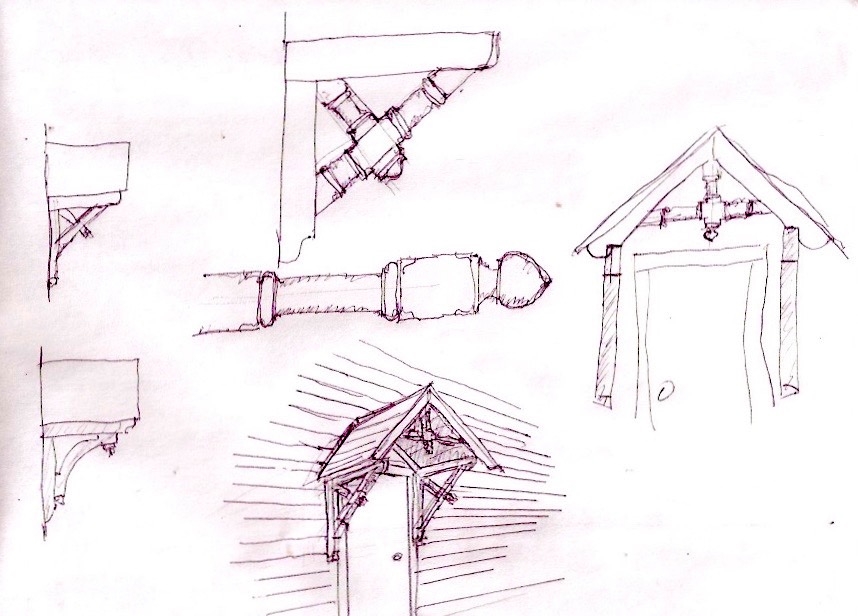
I’ve got as much ADD as any carpenter, and I always want to just start making stuff, thinking I can work the details out as I go along (sound familiar?). But I’ve learned the hard way (over and over again!) that it’s always better to do a complete design before I start cutting up expensive wood.
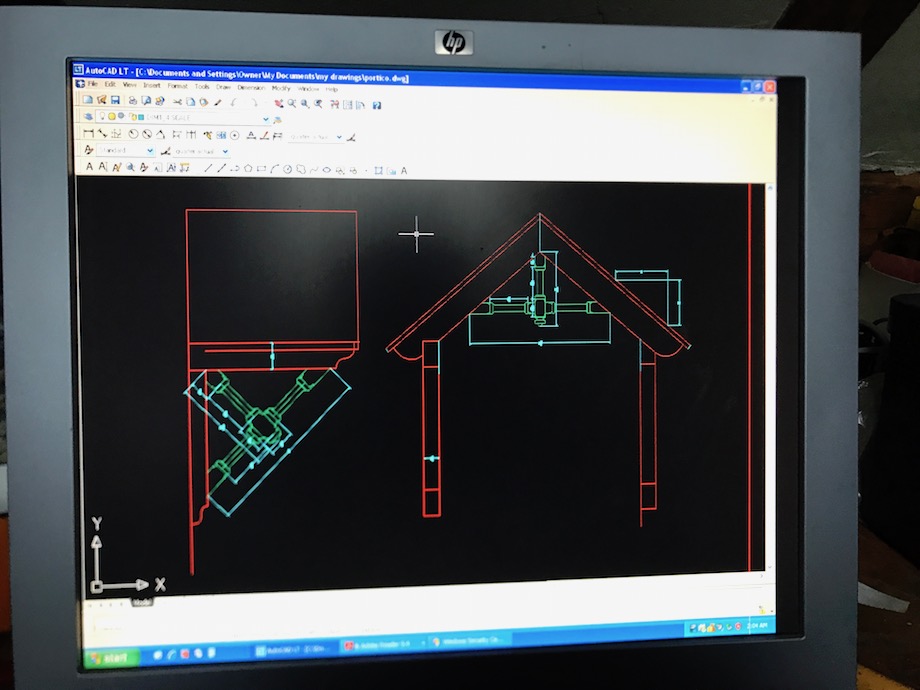
I draw accurately, to scale. Some parts I even draw full size, and I draw every part. When you start with good field dimensions and draw with a computer, you can take any dimension off the drawing and it will be perfectly accurate. I’m using AutoCad here, but Sketchup or Rhino or Turbocad and other programs work fine, too. I took a night class to learn AutoCad (though now I think I would start with Rhino), which saved me hundreds of hours, and made my work better. Before computer drafting I drew full-size on a sheet (or sheets) of plywood painted white with new house primer; I relied on a sheetrock square, a sharp 2-1/2 pencil, and my 8th grade shop class drafting skills. I’d erase the plywood with more paint when the project was done and re-use it for my next job. That worked fine, but it was slow. And after doing the drawing, I had to redo my work to make scale shop drawings for the architect and the contractor, and then make full-scale patterns for the complicated pieces—I built a lot of curved stairs where each tread was different. With computer drawing, you can print at any scale, which means much less repetition.
Here is my design on the computer.
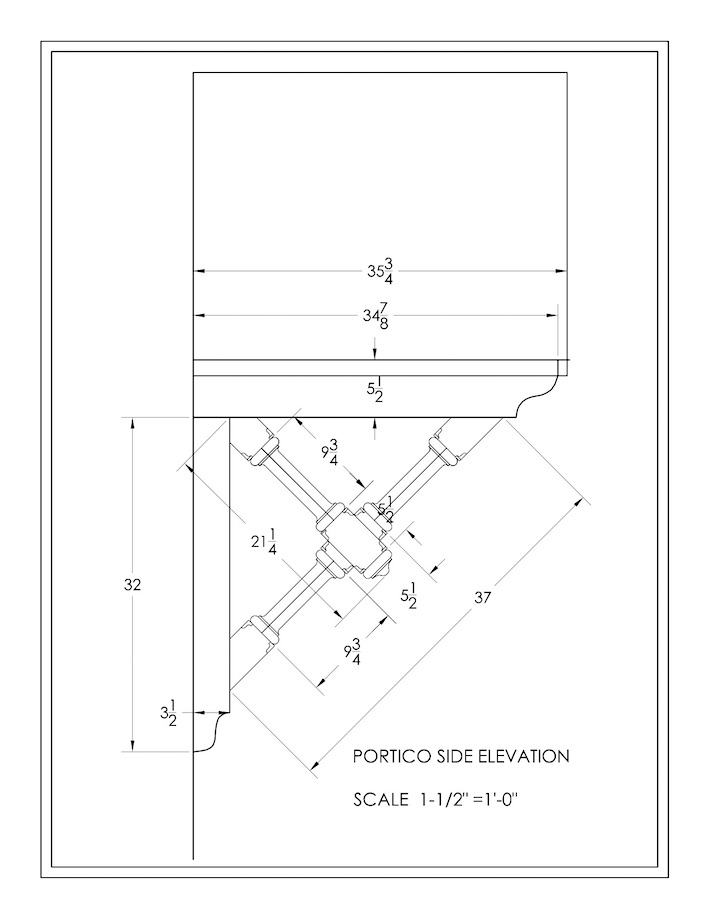
And here is a drawing plotted out one eighth actual size for me to use in the shop.
The last step in design is to make a complete cutting list.

Here are the characteristics of my portico:
- The design is in keeping with the 19th century building and could conceivably have been original.
- A simple gable roof that will protect the entry door and step from rain. The pitch is the same as the existing gable and dormer above. The rafter-tails are exposed and curved.
- The roof is supported with two gothic style brackets which look, and are, strong.
- The brackets are ornamented with simple turnings and lambs-tongues. The outermost rafter pair has a turned collar-tie detail which is smaller in scale and matches the brackets.
Building the portico
The first step to building the portico was to go down to my local lumberyard and select the material.
The budget was low, but I wanted to use single piece clear 4×6 timbers for the brackets and 4x4s for the turnings. I hunted through the pile of kiln-dried Doug Fir 4-bys to find the clearest out-of-heart, most old-growth looking pieces where I could cut around the knots. I also picked through the 2×6 KD spruce framing stock for clearish non-twisted stock. The roof sheathing would be visible from below so I used white pine 1×8 ship-lap barn siding—the kind that’s rough on one side and planed on the other. I kind of picked these for clear too. I know that by picking over lumber at the yard I’m degrading the stuff that’s left. I wouldn’t do it if the 4x6s were just going for rough door headers. But I feel like I’m being respectful to the trees to make the best stuff I can out of them…
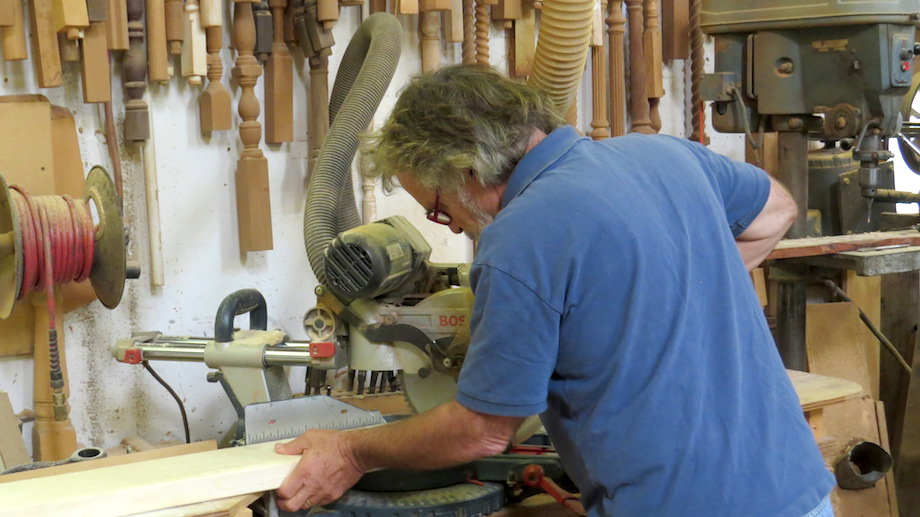
I brought everything back to my shop and, using the cutting list, cross cut all the pieces to length plus an inch and stacked the boards up with stickers in between the layers to try to keep them straight if they dried any more in the heated space.
First I cut out the rafter-collar tie assemblies and assembled them with a temporary spacer so they would all be the same width.
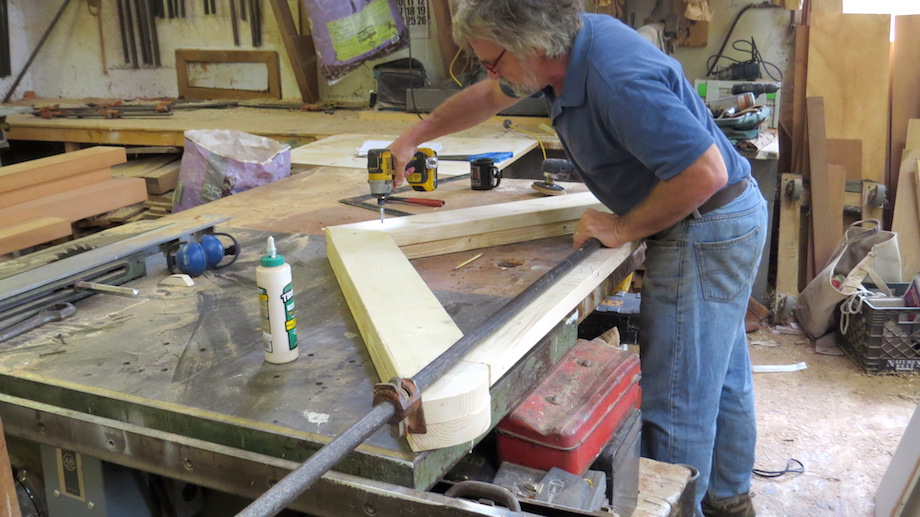
| Then I made the support brackets. I cut the horizontals and verticals from the Doug Fir 4×4 and 4x6s to exact length with my chop saw, rounded the ends on the bandsaw, and sanded them smooth. | 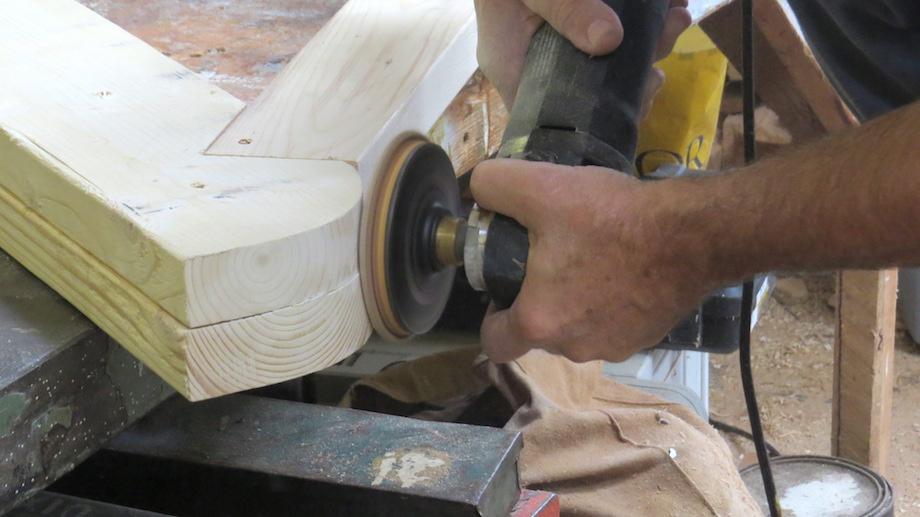 |
| It was easy to draw the radius with a coffee can! | 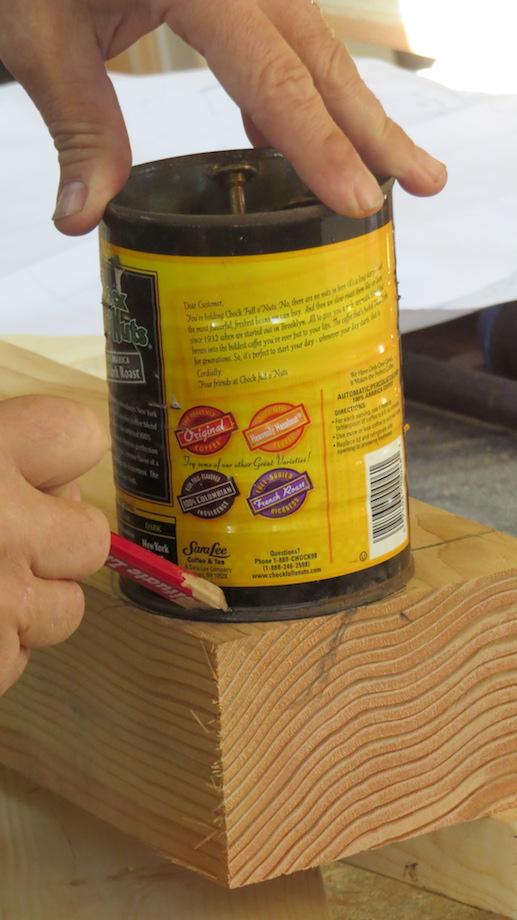 |
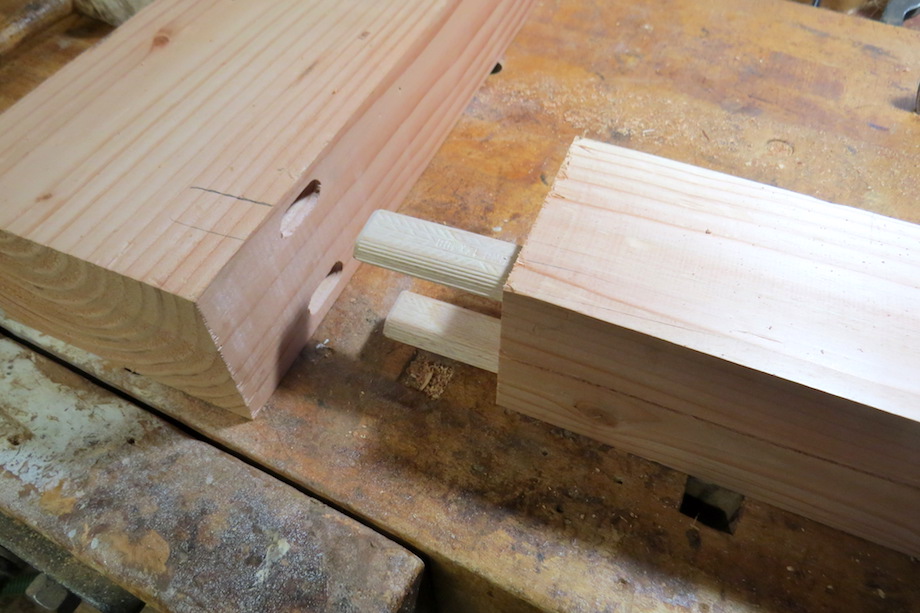
I could have fastened them together with lags, or maybe even cut mortise and tenons, but this was a perfect job for my Festool Domino XL, which is basically an oversized portable mortiser. It cuts mortises deep enough for the largest domino slip tenons, which are 4 in. long and strong enough for a big entry door, or big weight-bearing architectural details like this.
 |
 |
On the vertical pieces I set the width of cut to the narrow setting so the tenons were a tight fit, I coated them with Titebond III, and I drove them in with a mallet. I cut the mortises on the horizontal pieces with the wide setting, which gave me about a quarter inch of adjustability, then I glued the assemblies and clamped them together with pipe clamps, checking for square.
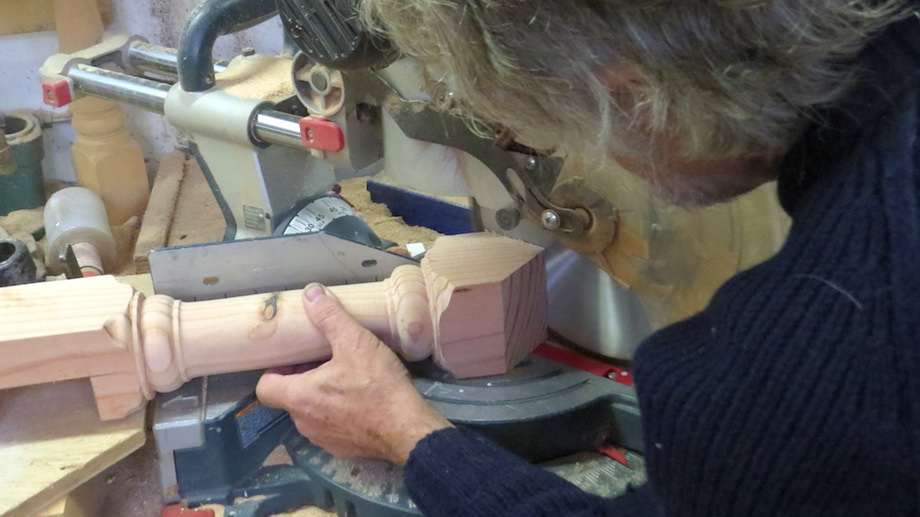
Next I cut the stock for the turned braces a couple of inches over-long, planed them to 3 1/4 in. square, and put them on the lathe. I marked the location of the square and turned parts with dimensions from my shop drawings. The symmetrical bead-land-cove-straight shaft detail is easy to learn.

I mitered the ends of the turnings, and carefully cut half laps.
I glued the laps together with PL premium.
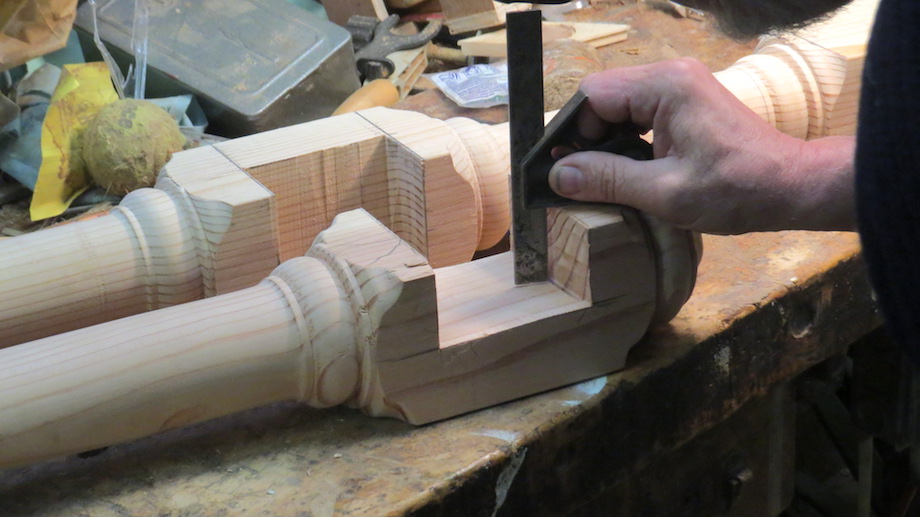
When I fit the turned assemblies to the supports there was a 1/8-in. gap at the end of one of the braces, so I made a little scribe and took about an 1/8 off the strut until the parts fit nicely.
 |
 |
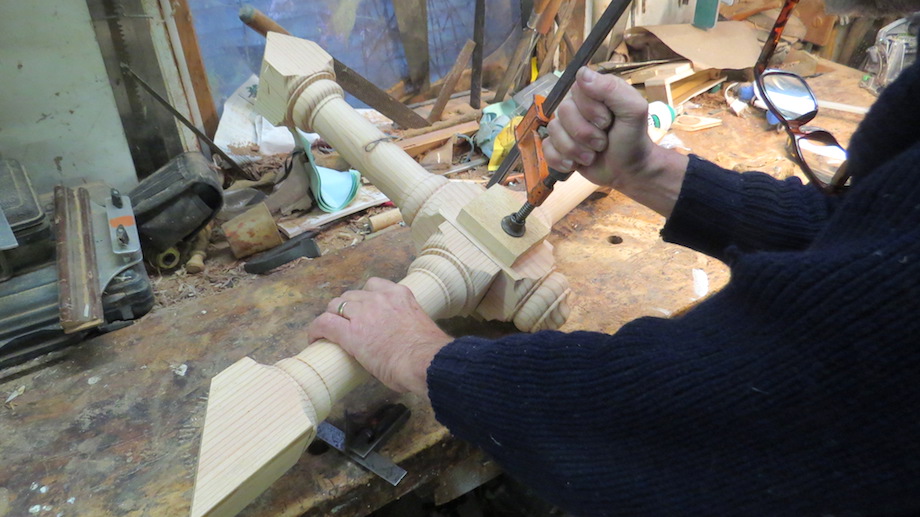
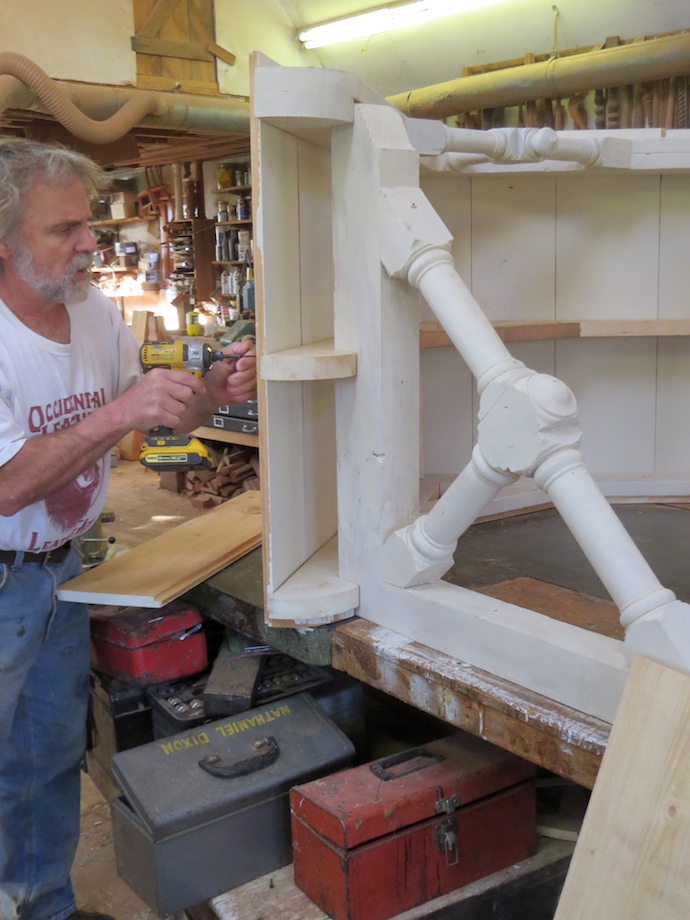
I cut mortises with my Domino XL machine, and then glued the entire support bracket assemblies together.
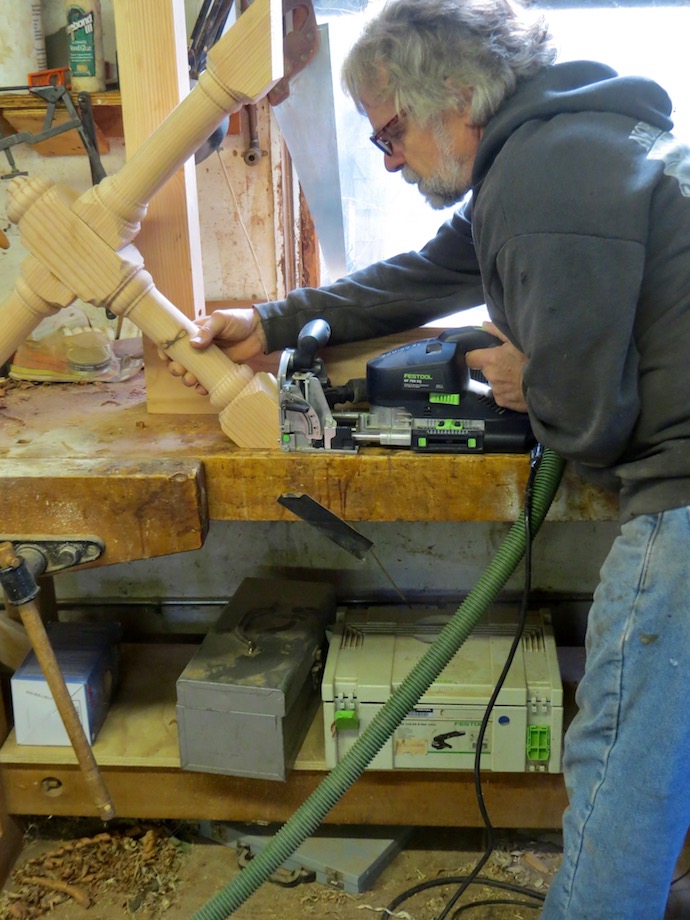
I sanded (and puttied) them a little and primed them. I primed the roofer boards, too, and then used the support brackets to hold things in place while I assembled the roof unit.
I took the brackets and roof unit apart to finish priming and to make them easier to get into the truck and on to the wall at the job.
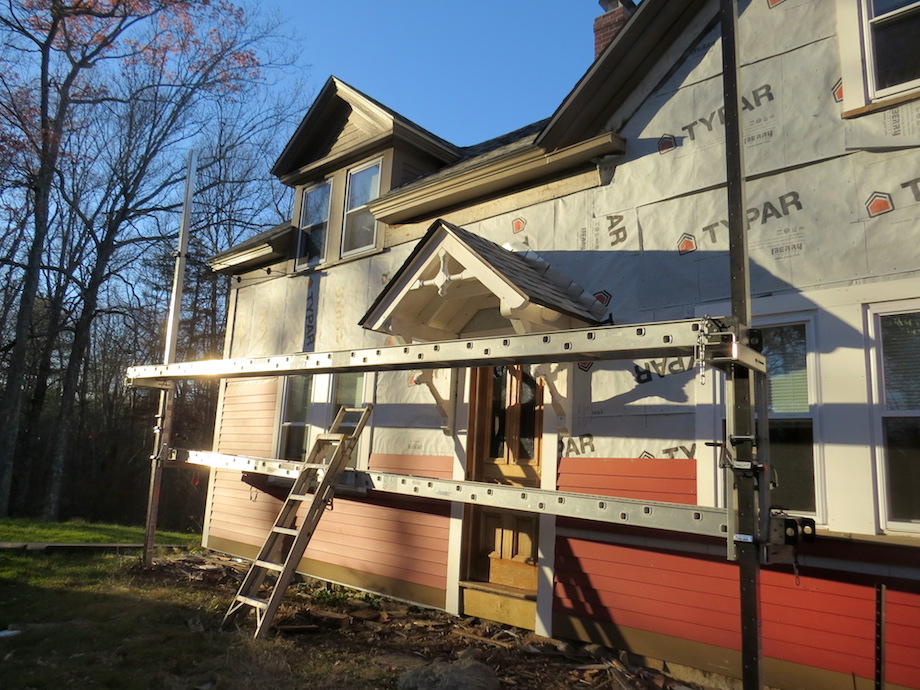
At the jobsite, carpenters Frank and Ben Lusignan had held back finishing the siding so they could scribe the claps to the portico. We located the brackets on the wall, and lagged them through the verticals into the sheathing and the studs and blocking behind. We used half a dozen 6-in. GRK torx lags (carpenters around here call them “gold screws”) for each bracket. Then we lifted the roof unit on and lagged it through the back doubled rafters into the door header and cripple studs above, and through the rafters into the brackets.
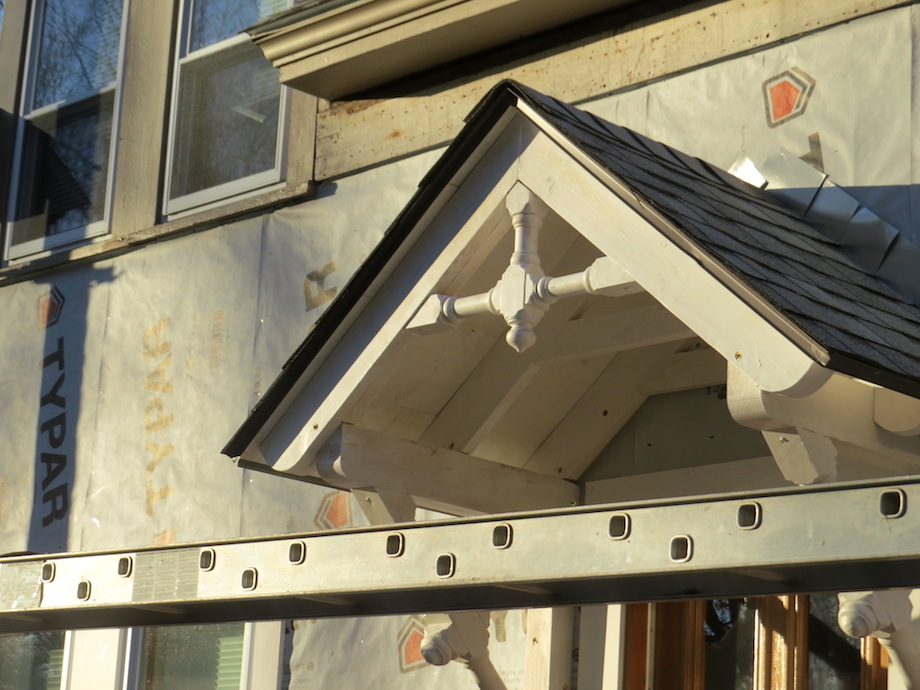
At this point I felt comfortable standing on the portico. So we roofed it with step flashing.
| We didn’t forget to use a kick-out flashing at the bottom on both sides so the siding won’t look like this in a few years. |
| If the lumberyard doesn’t have them, I fold my own out of lead flashing. |  |
I’m sorry I didn’t get more photos of the installation but I didn’t want to slow the site guys down anymore—they had already waited for me to catch up.
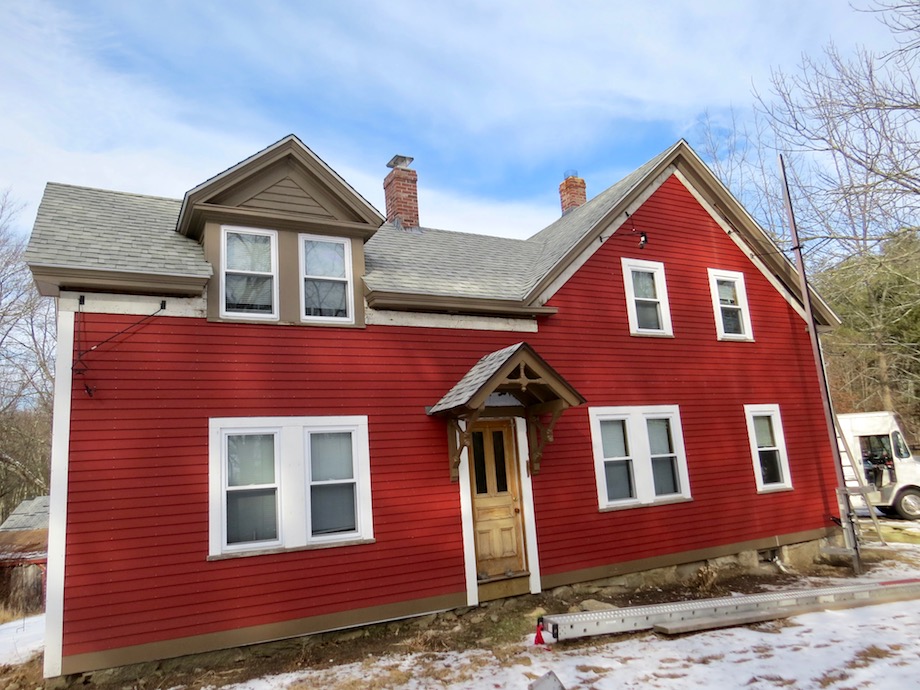
The paint isn’t finished and it’s going to get a big old granite step stone, but you get the idea.
You probably want to know how much this thing cost….The lumberyard bill was about $300.00. The whole project including design time, presenting and defending the design, shop time and installation, took about 40 hours. So at $75.00 per hour the price would be $3,300.00. Did I get that? Not telling!
Here’s what I will tell you:
Carpentry work is fun and rewarding, because it’s creative. We’re also part of a two thousand plus year-old tradition. Carpenters and woodworkers keep this tradition alive more than architects—more than anyone. The more you look at old work, the better you understand new work, and the better designer you become. Whether you are designing and building houses or just deciding where to put studs in a wall, you are the designer of what you make. The more of this design work you can capture, the more fun carpentry will be.
Sweet design, lovely execution, and great attitude and outlook! Thanks for sharing.
Nice work. Good for the looks of the building, good for when it rains, good for the door and the people that use it. And good for you.
I wonder if in a few thousand years from now some archaeologist will make the connection between so much woodwork at this time period with rounded edges and the coffee can?
Thanks for the good post.
Well done! I really appreciate your attention to detail. Flashing might seem to a minor detail to many, but the kick-out flashing is something every carpenter should know how to do. I’ve gotten a lot of work because of carpenters with poor flashing skills, but it kills me to ask customers to pay for damage caused by sloppy/lazy carpentry 20 or 30 years ago. But I digress. Thanks for sharing your work with the rest of us.
Very nice. I always enjoy seeing your work and listening to your lectures. Us old timers may be dying out though. Here we are using domino’s, glue, and lags but I bet if my dad had built this, back in the time, he would have gone with hand chiseled mortises and tenons into the posts and beams. He never trusted glue and screws.
Keep up the good work and reminding us how important it is to be a true craftsman, even if we use new technologies.
My guess is that you didn’t quite get the full $3,300.00 which would surely have been due you. No matter if you got half that amount I’m betting that was perhaps the quickest 40 hours of enjoyable work that you may have had in some time. The owners should know that they got more than the $3,300.00 in value to their home with this detailed project that served a purpose. Most important of all……you kept your promise to yourself. Priceless.
Jed, we met you at JLC in Portland, OR and had the pleasure of ice skating with you at Lloyd’s Center after the show. Maybe 2001 or so.
I guess that one can justify to oneself that making less than an established hourly rate is offset by some intangible “feeling” of accomplishment. But in my opinion its not and otherwise I would be fooling myself. Does your dentist give you a discount because he just needed the challenge of filling your uniquely odd shaped molar? Probably not. In fact, you may have gotten up-charged a little because of the difficulty and skill required. I’ve learned that part of operating a successful carpentry/woodworking business, is developing an attitude and strategy for getting paid commensurate with the skill and difficulty of the project, at a rate that covers all my costs and leaves behind a little profit. Accepting less for the sake of some kind of personal reward devalues my entire market. (I would rather my customers say about me that he is “expensive but worth it” than he is “good and cheap”). Those that do, I guess, would agree with Sara Palin who has a similar attitude about paying school teachers, that must moonlight as Uber drivers to pay for class room supplies, “… the rewards for her work and dedication are in heaven”. After working for 4 decades in this business and owning a successful woodworking enterprise for 2, my attitude is “show me the money”. I’ve built enough monuments for other peoples enjoyment at discount. If I want to bask in the rapture of constructing a fine piece of furniture, it will be a cradle for my grandchild or a blanket chest as a wedding gift. Clients pay my rate period or they can find someone else. I’m not nasty or arrogant about it and have learned that for every client that doesn’t give me the commission at my price there is another that will. I guess I was lucky and learned my lesson early in my career when complaining about a customer not listening to my advise with a college, my mentor and friend. (who was a very successful and talented furniture maker). He asked me how much I was charging. I told him. He then replied with a knowing smile, “That’s your problem Paul, your not charging them enough to have them respect your professional opinion” Accepting less for a project and then somehow trying to let the customer know that they should love your work all the more because they got a great deal sounds like sour grapes to me. And (I’m going to speculate now) it could leave a bad taste in your clients mouth. If your cost of doing business requires you to make $75.00 per hour you need to get that rate. Of course there will be times because of a tangible and strategic business reason to consider discounting an invoice. And of course that should be the exception. But along with the skill, experience and tools, you need profits to stay in business. My operating principle is knowing my cost and then having established my rate and not wavering. Armed that attitude I have insured that my shop will be around in the future and provide the opportunity to do the work that I love, that got me into this trade in the first place.
Paul,
You are entirely right!
For what it’s worth: I think that every woodworking and carpentry and architectural article should include a discussion of price.
Paul,
Wow! Well said! I’d like to publish that comment as a stand-alone article!!
I remember a close friend of mine once said: “Why should I provide a discount to people who live in homes I will never be able to afford? I live in a small ranch home that I can barely make the payments on, and they’re asking me to subsidize their multi-million-dollar lifestyle.”
I’m sorry Jed, but I’m stealing your new motto. Now it’s our new motto.
Nice design. Wouldn’t it look good on the other 2 peaks? I’m just saying.
Jed, what a nice piece of work! Glad you explained your fix on the turned assemblies. Thanks for pointing out the use of the kick out flashing. I use the same technique to avoid the water damage you described.
First off, I’m not a carpenter, though I do appreciate craftsmanship and the skills necessary to create, build and refurbish. You have demonstrated techniques and attention to detail that is unfortunately, sorely lacking in most parts of the country anymore.
Carpentry is ART in so many ways. Which is why I’ve always valued and admired the quality of conscientious carpenters.
You may not have gotten the full $3300K -but you should have and it would have been compensation for a job very well done!
Thank you for sharing your project.
Thanks also to Gary Katz! I look forward to reading and learning from THISisCarpentry.
I have really learned a lot from your articles. Great job!
I really enjoyed and learned watching the design and carpentry but the finished product does not seem to fit the design of the house. The house is plain with simple lines and the Portico is very detailed and elaborate. This might really look even better on a different house.
Paul, There’s something to what you say. It’s alway tempting to put lipstick on a pig, and dress something up with inappropriate ornament. I see it all the time in new work, especially the use of fancy decorative woodwork that’s from the wrong period and out of proportion with the rest of the building. I was a little worried about the portico, because the turned detail I used is a little unusual, even if it isn’t something I just thought up.
But I’m going to plead innocent in this case: The portico really isn’t elaborate, every piece of it is structural; there is no decorative trim; the only ornament is the turning. And in New England there are plenty of simple 19th century farmhouses with original fancy porches.
I really appreciate your casting a critical eye on this design. I like that kind of thinking. If you had done the work and written the article, and I had written the comment, it might have been much the same!
Jed and Paul:
I agree that this might be viewed as a bit of lipstick on a pig. However, I have seen a lot of pigs that could only afford a tiny bit of lipstick and that’s what they went for.
Also, I love your motto. I have worked as an historic architect and designer at a design/build residential firm, and have been a life-long craftsman. You have to be true to yourself and love what you are doing if you are going to consistently deliver your best to your clients.
Thank you for an engaging article. Your message is well-taken and echoed by the other commentators. Craft, understanding architectural details, their proportions and how they relate to the period are critical to good work. The challenge certainly is finding enough people to execute these details and then to have folk understand and pay for the skills and materials.
We try to teach our students the styles, periods and their origins as well as how to record, organize and execute details like these while understanding the other factors like controlling moisture and material selection that contribute to a durable product. Hopefully we are contributing to the field of thoughtful carpenters.
Great work, honest description of precision work. Looks great on the house. I learned a lot reading your article and seeing the pictures.
Thank you for an informative enjoyable piece.
Hi, beautiful job. I am curious to know from a structural point of view, what keeps this thing from moving side to side without rafter ties in the bottom third or a structural ridge supported on each end. Probably not a consideration because it does not stick out that far. I am curious about how to build a 3′ deep overhang that is a gable overhang and also vaulted with no ties. The only thing I can think of is some kind of scissor truss that is hidden behind the fascia or maybe some clever way with lookouts but there is no way to extend into interior framing since this is a vertical, exterior wall. Probably a question for an engineer but would appreciate your feedback.
Thanks,
Wow, this is incredible! I’ve always been fascinated by the idea of building a traditional flying portico, and your detailed instructions are so helpful. I love the way you’ve incorporated modern materials and techniques while still maintaining the classic look. Can’t wait to try this out for myself!
I’m blown away by the attention to detail and craftsmanship that went into building this traditional flying portico. The combination of materials and architectural features is stunning. I especially appreciated the step-by-step guide on how you achieved the curved design – that’s a true test of patience and skill. Thank you for sharing your expertise and inspiring others to push the boundaries of what’s possible in woodworking!
Hi,
Looks great! With the right supports how far out can a flying portico come out from the wall?