


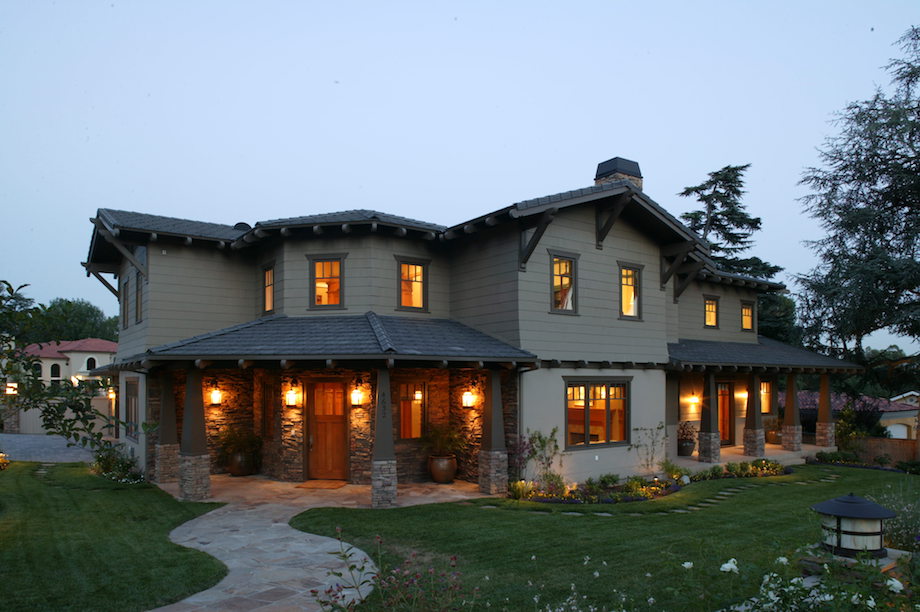
As usual, back in the day things were simpler. When it came to “running trim” or “trimming out” the exterior of a house, we used wood. We installed it with tried-and-true methods handed down from previous generations, and for the most part it stayed in place and provided years of trouble-free service.
(Note: Click any image to enlarge)
But today we need much more than carpentry skills in order to achieve the same results. We must understand moisture movement and thermal expansion. We must also have knowledge of new methods and trim materials and how they interact with other construction materials. In short, for our seams to stay tight and our joints to remain true, we need to alter our methods to account for things that our predecessors rarely had to consider.
Account for the framing’s moisture content
Even though a concrete sidewalk may be thick and strong, if the ground beneath it moves enough, the sidewalk will shift and crack. The same is true for the trim on a house. If the frame to which it is attached moves enough, it takes the trim with it no matter what type of material it is or how well it has been installed. And with it goes your reputation.
When thinking about the stability of the framing, remember that all wood contains moisture and all wood moves depending on the change of its moisture content (MC). The more the moisture content changes, the more the wood moves. Typically, dimensional lumber is available in varying degrees of moisture content depending on the species, drying practices, and storage conditions. Once it has been built into a structure and protected from the elements, it begins to dry out and shrink over a relatively short amount of time.
If you’re working on an existing house that is at least a couple of years old, then the framing lumber has more or less stabilized and movement isn’t a consideration. However, if the house or addition is new, then there will almost certainly be movement (shrinkage) of the dimensional lumber; how much movement depends on its initial moisture content.
Ideally, if you are in charge of the construction and material selection, a good option is to substitute engineered lumber for dimensional lumber wherever you can (such as using “I” joists for the floor system). Engineered lumber has low moisture content and is much less prone to movement.
For any remaining dimensional lumber, order stock that has been dried. The lower the moisture content, the less it will shrink. Green lumber has a moisture content of 19% or more—30% and even 50% MC isn’t unusual for green lumber! Next is surface-dried (SD) and kiln-dried (KD), which run between 16% to 19%, and finally, MC-15 which has a moisture content of 15% or less.
The rule of thumb is that for every 4% change in moisture content, wood moves 1% in size across its width. So if you framed an addition with lumber that had 22% moisture content and then dried to 12% (which is about average), you could count on the 2 x 6 wall studs to shrink about 1/8 in. Likewise, 2 x 10 rafters will shrink about 1/4 in. This will create a noticeable gap in the eaves as your frieze boards get pulled in towards the house while the soffit moves up toward the roof. Of course, it will occur after the painting has been completed. (Click here for more information on moisture content and wood movement.)
No matter what lumber you buy, proper storage on-site is important to reduce moisture absorption and subsequent shrinkage problems. Make sure to stack materials up off the ground and keep them covered. It’s also important to not simply drape a plastic tarp over the materials, especially if the tarp reaches to the ground. This can easily trap moisture from the ground, which the wood will absorb. You will quickly undo any advantage of buying dried lumber by leaving it on the job site unprotected.
| The bottom cords in this patio roof dried out and lifted off the joist hangers, pulling the fasteners out of the ceiling boards. |  |
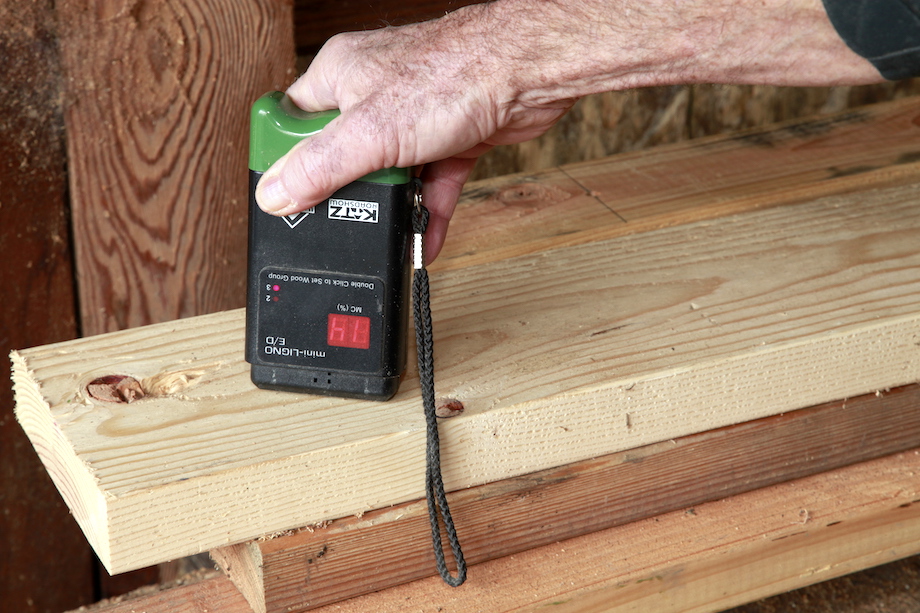
If you are installing trim on a project that you haven’t built yourself, you need to know the lumber’s moisture content in order to anticipate its movement. If you don’t have a moisture meter, it’s time to buy one. It’s become a necessary tool for all carpenters and you can get a decent, digital meter for under $100. Take readings from a sample of the framing lumber and plan accordingly. For example, if the studs, joists, and rafters all have a moisture content of about 15%, then the movement will be negligible. But if the moisture content readings are high, you know the frame will shrink.
Trim selection is crucial
Separate from the issue of the framing-lumber movement, the other key element for a great looking, long lasting trim job is the selection of the trim material.
Today there are a lot more choices of trim material than there used to be. We have more liberty to match material characteristics to the job requirements, such as allowing plastic trim to come into contact with a driveway—something you don’t want to do with wood!
We also have more liberty to create new problems that cause our trim jobs to fail in one way or the other, often before the project is complete. Many of us are handling, storing, installing and finishing all of the different types of trim material with old, one-size-fits-all methods. That’s where the trouble starts.
The best way to keep the trim in place and performing well is to understand its characteristics and limitations. This understanding will help you avoid choosing a trim type that is inappropriate for the project. Once you’ve made the selection, make sure you use up-to-date installation methods that match your specific choice.
Key Factors
Moisture absorption and thermal movement are the two most important factors that can negatively impact a job if ignored. This is where you start to distinguish one trim material from another for the right choice.
Moisture Absorption
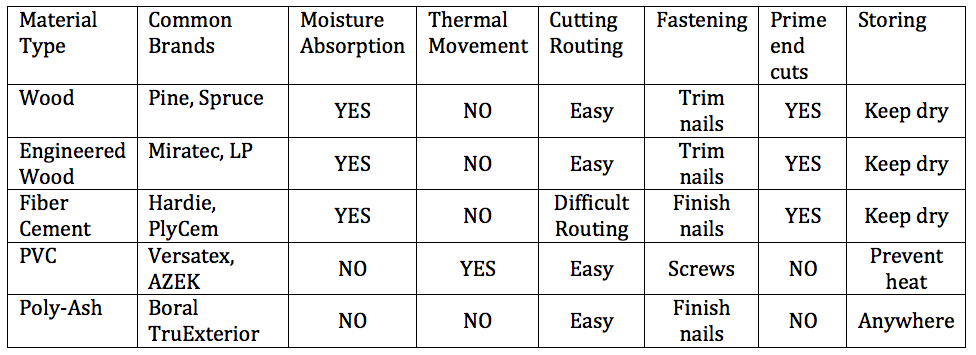
Dimensional wood, engineered wood, and fiber cement are considered reservoir materials. This means that they have the ability to absorb moisture that leads to issues such as movement, paint failure, and rot.
Among the best practices for these types of materials are:
- Store the materials well up off the ground and keep them protected from rain.
- Prime all sides, especially the end grain edges.
- Install materials at least 6 in. to 8 in. off the ground.
- Keep it at least 2 in. off decks and roofs.
- Check the moisture content of dimensional wood and plan accordingly.
- Provide proper gapping for engineered wood and fiber-cement trim.
Poly-ash, and PVC trim are unaffected by moisture. Both can be in direct contact with wet surfaces (roofing, decking, the ground) without any adverse effects.
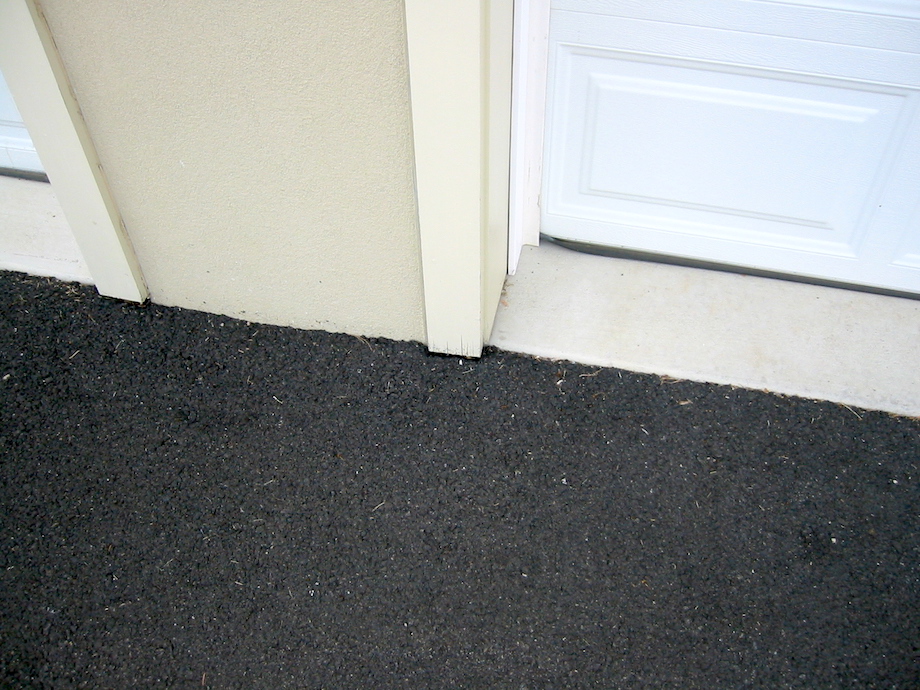
| Wood trim must be 2 in. above the shingles, not the sheathing—which is why this siding is rotting. | 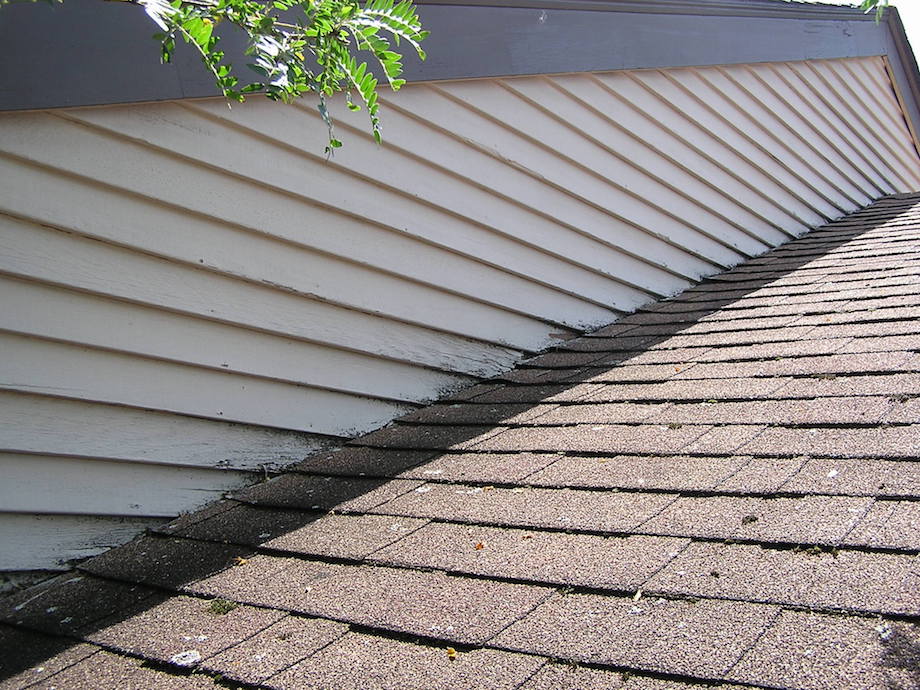 |
| Poly-ash and PVC trim are not affected by moisture but a gap is still required so that the roofing can dry out. | 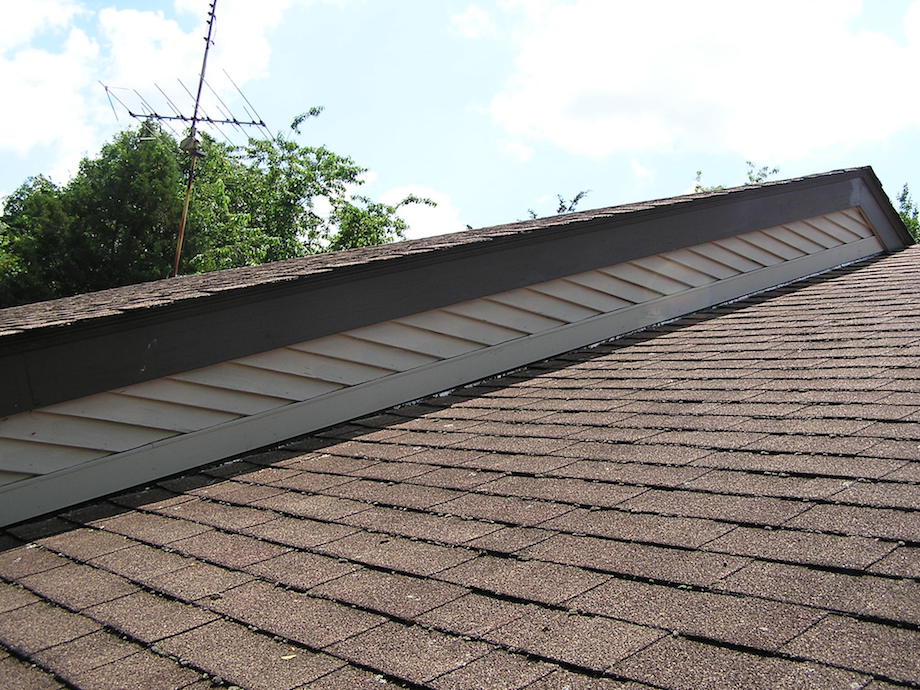 |
Thermal Movement
PVC moves due to temperature change. It expands and contracts along its length as the temperature warms and cools. A temperature difference of 50 degrees can cause an 18-ft. long piece to move about 3/16 in. or more if it isn’t properly fastened.
Also, applying a medium-to-dark colored finish on PVC trim will cause it to absorb too much heat and increase the risk of failure and most likely void the warrantee. Only a paint with a light reflective value (LRV) of 55 or higher should be used. There are some newer paint formulas that are referred to as ‘vinyl safe’ which may allow you to use a coating with an LRV lower than 55. Be sure to check with the manufacturer before you use any coating with an LRV lower than 55.
Best practices for PVC trim include:
- Provide proper gapping based on ambient temperature and length of trim.
- Use screws for fastening.
- Finish with only light colored paints.
- Glue mitered and beveled joints.
Poly-ash, dimensional wood, engineered wood, and fiber-cement trim have negligible expansion and contraction movement due to temperature changes, even with extreme temperature differences.
Other Considerations
The following handling and installation attributes have an effect on the selection of a trim type.
Cutting
Poly-ash, dimensional wood, engineered wood, and PVC can be cut and routed with basic carpentry skills and tools, however carbide blades may be recommended. More specialized tools are needed for fiber cement.
Fastening
Poly-ash and fiber cement can be fastened with a pneumatic finish nailer. Dimensional wood, engineered wood, and PVC require a fastener with about a 3/16-in. head.
Handling
Dimensional wood is the lightest, stiffest and easiest to carry, but it must be stored up off the ground and be kept dry.
Poly-ash and engineered wood weigh about the same (more than most wood and PVC, less than FC). Engineered wood is relatively stiff and must be stored in the same manner as dimensional wood. Poly-ash flexes more when it’s carried on the flat and is more brittle than wood. PVC weighs a little less than fiber cement and is very flexible. In fact, long sections are difficult to carry by one person on a warm day and by anyone under 6-ft. tall because the ends will drag on the ground even if carried overhead. Moisture is not a consideration for storage but it should not be stored on a potentially hot surface such as a paved driveway.
Fiber cement is the heaviest and is also brittle. Heat is not an issue with storage, but it must be stored up off the ground and kept dry like wood.
Priming, gapping and joints
Dimensional wood, engineered wood, and fiber cement must be primed on all sides, particularly on the ends when field cut. Engineered wood must be installed with 3/16-in. gap between details and then caulked, and fiber cement must also be caulked to seal out water.
Beveled joints are not permitted with engineered wood or fiber cement. Neither beveled joints nor mitered joints are a good idea for dimensional wood.
PVC must be installed with gaps depending on the length of the piece and the ambient temperature. Beveled joints should be glued both together and to the substrate to insure it stays closed.
Poly-ash requires no priming, gapping, gluing, or caulking. Beveled and mitered joints are permitted.
Quick View Table
Tie-breaker
In the end, if it comes down to a tie between two material types with similar characteristics, the deciding factors are: cost, available profiles and sizes, product availability, and warrantees.
The ultimate “best practice”
The best practice that you can follow, which will produce the longest lasting, most durable exterior trim job no matter what type of trim you use, is to read the manufacturer’s instructions. Let’s repeat that a little louder, READ THE MANUFACTURER’S INSTRUCTIONS.
The bottom line for all of us, whether installers, builders, manufacturers or homeowners, is that we want our trim to stay exactly where it belongs and hold the finish for a long, long time. These are two things that really shouldn’t be difficult as long as you take basic precautions with the frame of the house, and select and install the trim properly.
The article never really addressed the big question. What changed? Why don’t we just trim with wood like the old days and have it stay looking fine? Is it the wood itself- wider grain, different species, cut from skinnier trees? Is it climate change- then why aren’t the older houses also being affected? Is it regulations- tighter houses that don’t dry out as quickly or efficiently? Or is it a scam by the materials companies that want to sell more expensive materials? I don’t know how to come up with an opinion, but would like to hear someone who really knows. I have been to several seminars on the how to’s and they are always sponsored by the material suppliers who tell you why theirs is best. Not very convincing.
No one wants to maintain wood siding and trim these days. Customers see siding jobs, both old and new, shedding paint and are afraid of the maintenance. The old homes are often just not maintained and look bad, and the new homes with wood siding are peeling paint because of improper installation, no rain screen gap, and inferior materials compared to wood available 75 or more years ago.
Both homeowners and contractors need to be educated on best installation practices and the consequences of ignorance. Customers must be willing to pay for quality wood materials – though the continually increasing costs of the new, alternative materials makes the cost of real wood look better and better.
PW,
The wood has changed. We no longer use old growth lumber, and yet all of our woodworking techniques are based on using old growth vertical grain lumber. The wood we use today is mostly from juvenile trees, not ones that are 400 years old but 20 years old. The wood is mostly sapwood, not heart wood; the wood is also mostly facegrain or mixed grain, not vertical grain. It absorbs moisture much much faster than heartwood, and it moves 2x more when the moisture content changes because it’s not vertical grain. That is the real problem we have to solve, and we solve it by using new woodworking techniques, like priming end cuts (which you now have to do with almost all exterior trim products); by making sure it drains quickly (chamfering or angling flat wood surfaces; rigid flashing (and chamfering the wood beneath the flashing); holding wood 2″ off the shingles; providing a gap behind the wood, between the housewrap and the trim (drainscreen/rainscreen), etc. etc.
Gary
Do you think those drainscreen house wraps like Kimberly Clarks BlockIt are adequate for behind wood siding?
There are a couple of additional points to the article:
It is that it is true that framing shrinks if installed with high MC. The fasteners don’t follow the wood, though. Fasteners move only as much as the point deepest in the wood, and most trim is attached to the framing 2×6 1/2″ ply or OSB that has been installed with 2-1/4″ minimum fasteners. Those fasteners are 1-3/4″ into the framing (hopefully). The nail may move, but it’s only going to move 1/2 of the amount the inner 3″ of wood moves, so it’s going to be a minimal amount. Maybe 1/16 or so. Most of the movement will be wood shrinking away from the head of the fastener, away from the plywood.
On older houses framed with wet lumber it’s common to find either a gap between the framing and plywood, or the nails will be proud of the plywood (meaning that a lot of the sheathing nail inspection is valid only until the house dries- after that, the sheathing isn’t tight unless the house was built with KD lumber).
That frieze board and soffit board isn’t going to create a big crack because the frieze moved back and the soffit moved up- the soffit wouldn’t move up because the bottom of that soffit board is likely going to drop as the wood shrinks because the weight of the roof is resting on it’ in other words, it’s not going to move, although the frieze might move back.
The picture of the deck roof boards with the nails showing is likely a combination of the wood shrinking away from the nail and some truss uplift; the wood doesn’t pull nails from anything because the nails really aren’t moving, the wood is shrinking away.
Screws don’t help with this- nail pops in interior drywall are from the framing shrinking away from the drywall, and the head of the screw slowly becomes more proud of the edge of the wood. This is why gluing drywall reduces pops- it’s not that the install is better, but the glue is only connected to the face of the board. This is also why they recommend not nailing right at the corners- if you don’t have nails within the last 16″ or so, the drywall will likely flex rather than crack the seam. This is also true of ceilings, especially true where the ceiling joist is the bottom chord of a truss- that truss chord will lift and fall with moisture changes, so the perimeter edges should be left unfastened, allowing the drywall to flex, rather than crack the tape or continually pop screws.
Screws are nice for PVC and Fly-Ash products because those move because of temperature, and temperature changes happen far more rapidly than moisture content changes. PVC and Fly Ash products are moving continuously through the day/night cycle, and can work nails loose; wood tends to move on a longer cycle, weeks and months, as the MC changes seasonally.
You can’t fasten PVC tight enough to prevent a gap. Wood doesn’t move much longitudinally (ie, in the direction of grain). It moves less than steel, glass, and almost any plastic. PVC moves more in length than in width (opposite of how wood moves), so the best way to prevent PVC from having a seasonal gap is to create a pattern where the PVC is never in a long enough length to create a visible gap.
I spent many of my early years in the 70’s & 80’s in Pa. involved with production housing. Wet framing lumber was the norm. When the drywall was installed, typically in 12′ sheets where possible each sheet was nailed around the perimeter & then two nails in the center of every other stud. Nothing else, except, glue. Lots & lots of glue. Very few nail pops because there were very few nails. The glue held everything tight as the framing shrunk.
Twenty five years later the company I worked for built a 50,000 sq. ft rehab center. The lumber came out dry but sat without a roof on for weeks during which time it rained almost every day. The drywaller in an effort to do the right thing decided to glue and screw the drywall–a lot. When the heat was turned on there were hundreds, no, thousands, of pops. I was asked to go look at it. After hearing the sequence of events it was obvious what took place. In this case the sub would have been better with lots of glue and minimal screws. The drywall would have stayed tight to the framing when it shrunk. What happened is that the drywall did stay tight to the framing but the heads of the screws stayed proud and popped the drywall.
Yeah, I agree that no one really wants the upkeep for wood siding anymore. Things really just aren’t built like they used to be. That, and the upkeep that people are willing to put in their houses has gone down dramatically (not that I blame anyone). But so many of the old houses with wooden siding and wooden trim that look so good and classic are given TLC by the people who live in them. The rest of the older houses with wood panels just look old. That’s why vinyl siding is so popular. People want a relatively similar look, but with none of the upkeep. That’s fine, but things just don’t look the same. Vinyl siding is basically plastic, and it looks like it, and acts like it. It’s definitely not the good stuff. But, you know, our parents and grandparents were more “renaissance” people, and would work on their houses on the weekends. They also just weren’t as busy as people are now. Anyways, all that to say, those are my thoughts on why wood siding just isn’t popular anymore. Love the blog. Thanks for posting.
So glad I found this site! I just started out in construction and some carpentry. Looking forward to learning as much as I possibly can in here and other similar resources!
It is a real pleasure to read a like-minded effort like you have produced. I am a CPI and Environmental GC with 35 years on-the-job. I really hate pressed board used as exterior trim, so I will be sending clients to your site for wisdom.
Thank You
KS Zenzel
Structural Entomologist
AMER Inc of Virginia
Since 1988
Hello I’m trying to get someone’s opinion on a issue we’re having in our brand new construction home. I just need a outsiders opinion. We have another engineer coming over tomorrow for lots of things due to structural movement and a multitude of other issues. But does it matter if yr exterior corner trim is not even with the other side? As in the seem. We have developed a huge corner crack and it just so happens that the seem looks to be shifting. It’s the cement fiber siding. This crack is directly underneath this side.of trim and the crack literally has developed with in a matter of two months
Great insights! Proper flashing is often overlooked, but it’s the real secret to long-lasting exterior trim. What’s your go-to flashing method?