


Hi TiC Readers,
I have a somewhat perplexing exterior siding puzzle coming up, and I’m hoping that maybe one of you has previously experienced something similar and possibly already figured out an ingenious solution.
|
A Note from the Publisher: This is a “reader” question submitted by Rick Arnold, one of our contributing authors. Rick will be curious to hear from you in the comments section. TiC always welcomes reader questions and we’ll do our best to help you find answers. |
.
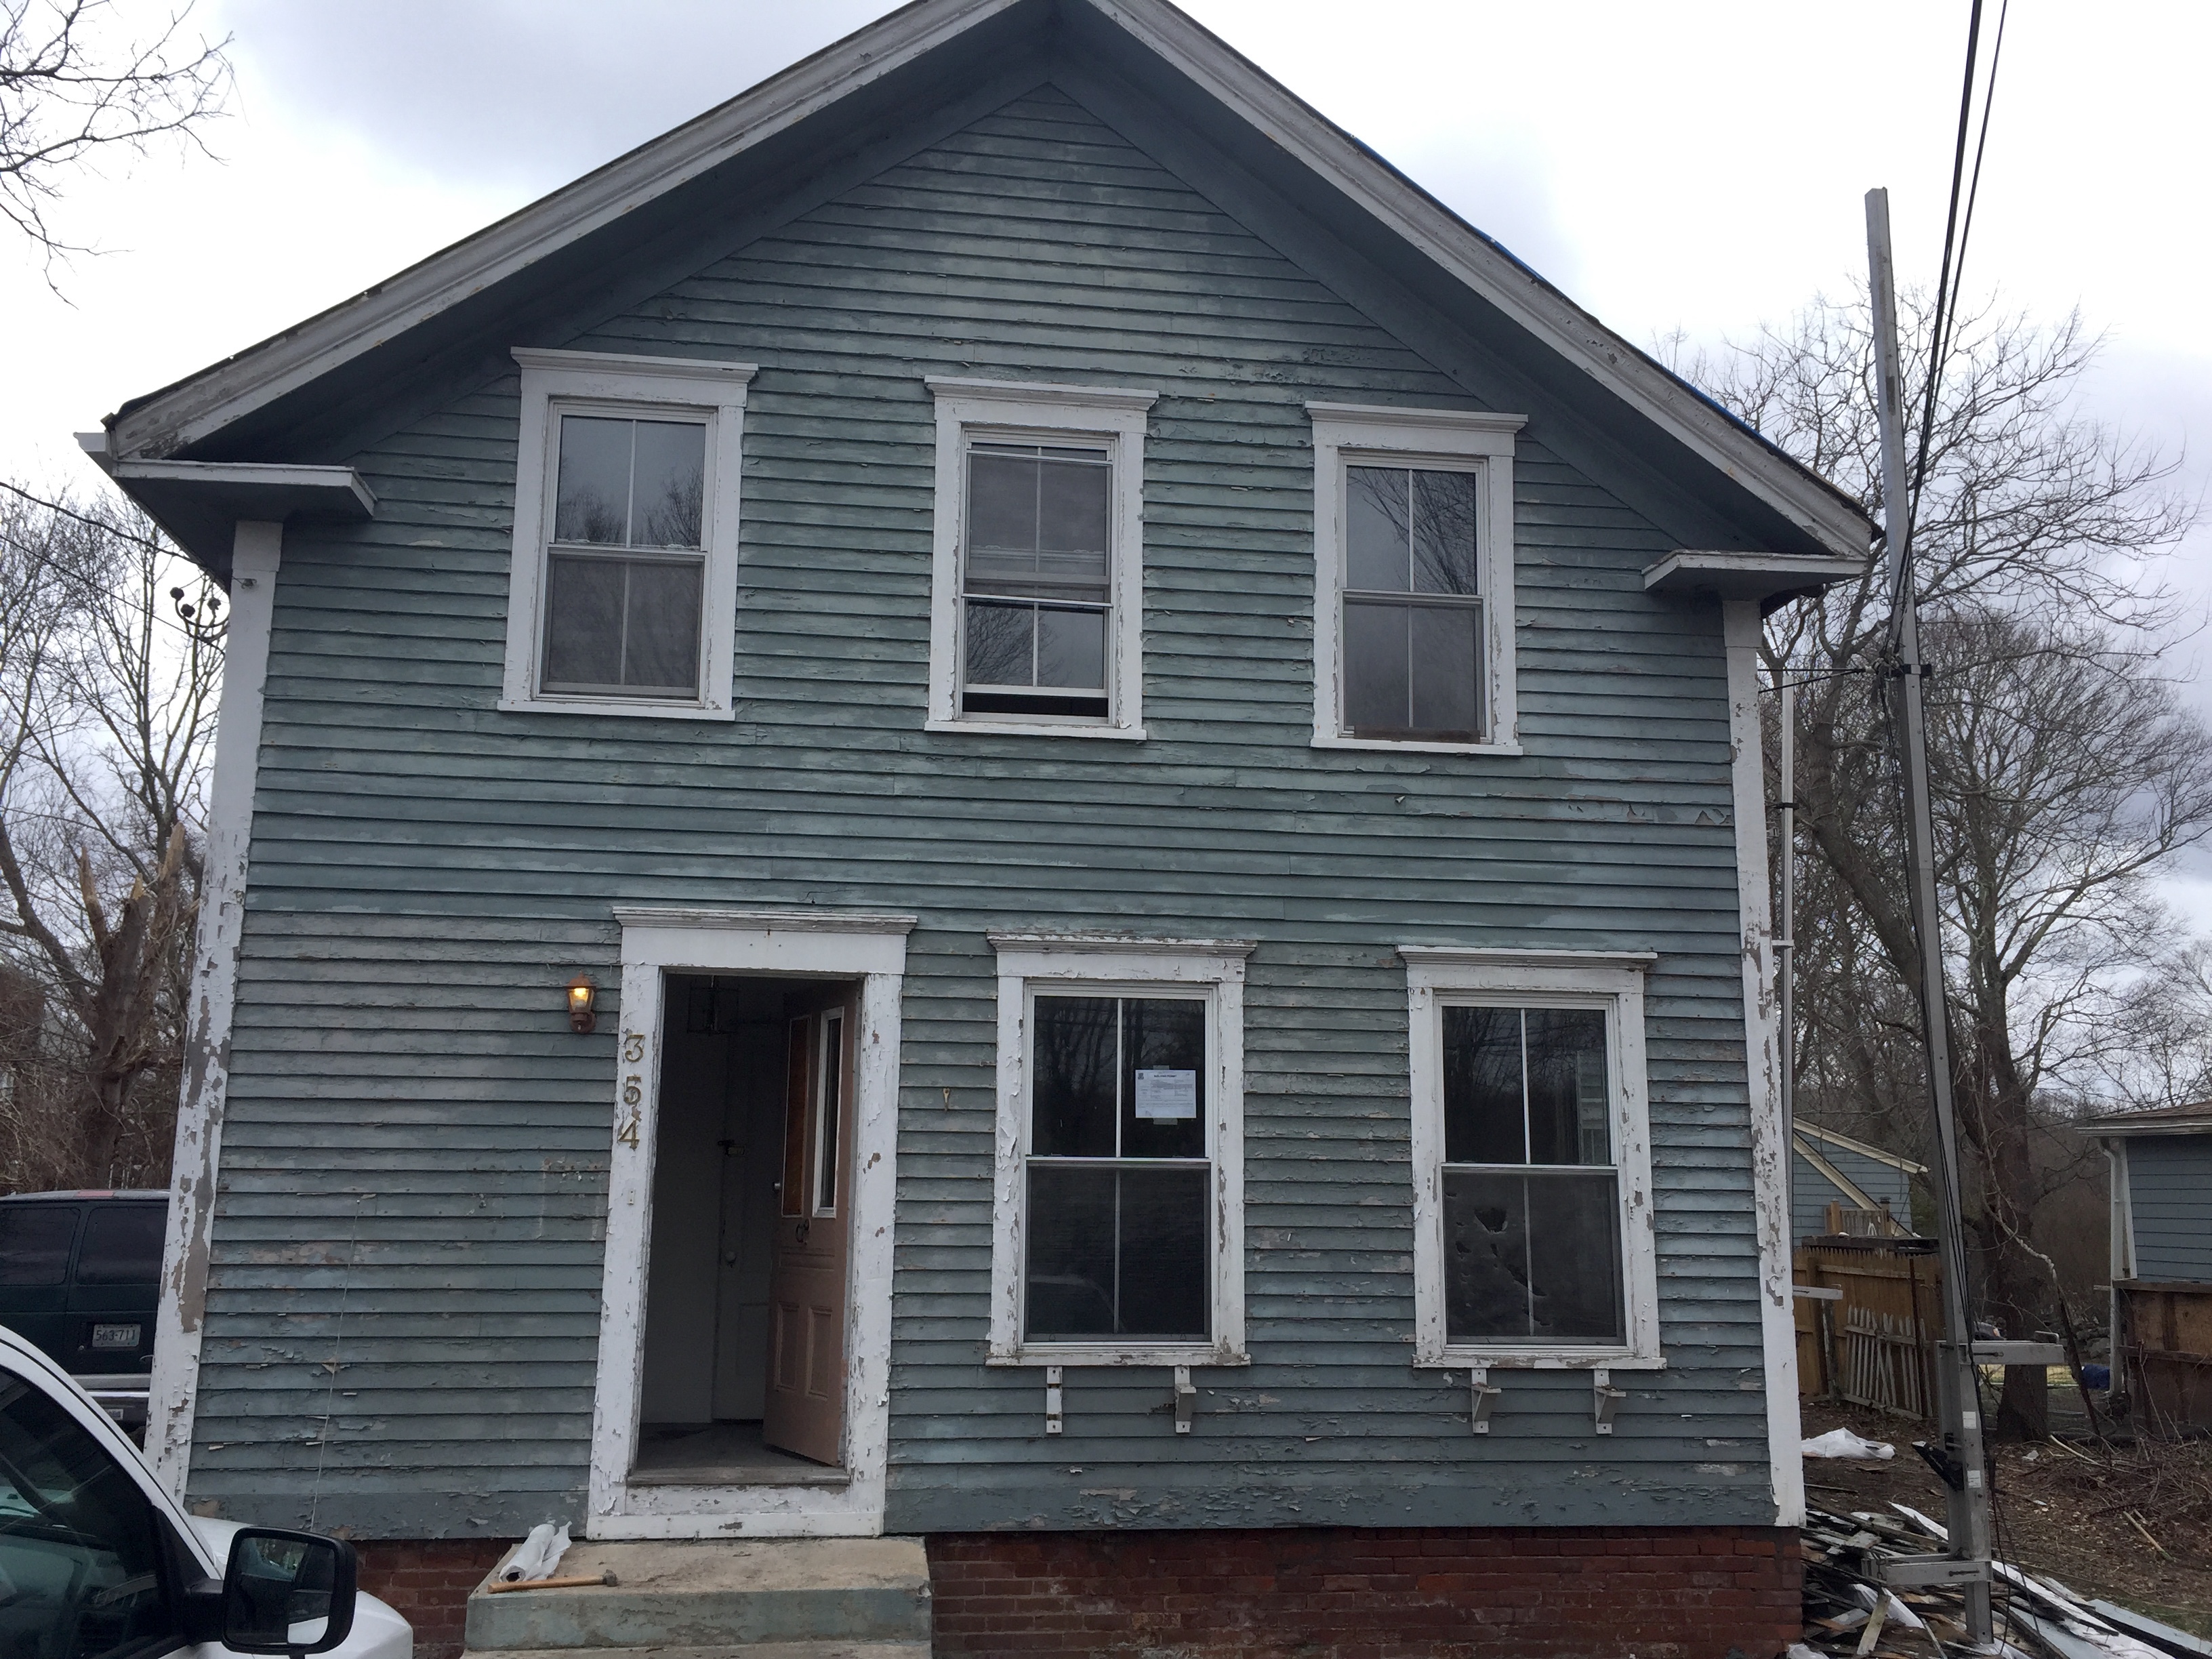
The house was built in 1882 and a square addition was built on the back about 1910. I’m completely gutting the house inside and out, but I want to maintain the look and feel of it to keep with the period.
(Note: Click any image to enlarge.)
On the upper level of the addition, and the upper level of the driveway side bump out, the sidewalls were shingled with alternating double rows of straight red cedar shingles and rounded red cedar shingles. The straight shingles (squared and rebutted) are packaged in random widths. The rounded shingles are made and sold in consistent widths—5-in. wide is what I can get today.
If you zoom in to the upper floor of the addition, you’ll see the problem that I want to avoid repeating, which is having vertical seams of one course line up over the vertical seams of the next course.
What I’m looking for is the most efficient (both in labor and materials) method of installation while avoiding stacked seams.
I’ll reward the person with the best answer with a free subscription to TiC!
Thanks much,
Rick Arnold
The first thing that comes to mind is adding a strip (16″?) of WRB horizontally shingled in behind each course of wood shingles. With the bottom edge of the WRB 1/2″ above the bottom edge of the shingles to be laid on top of it you are basically making the shingles ornamental and the WRB becomes the weather proofing. All this would go on top of the regular layer of WRB you cover the sheathing with before siding.
Hi Rick, beautiful house. I think I’d snap plumb chalk lines on the walls at 5inch increments and never allowing the rectangular rows to land on them. This should give good quick sight lines of where not to land a seam, good luck on your project.
Cris M beat me to it.
The ‘old-times’ way of doing this was to use rolls of 18″ tarpaper. Install method:
Install WRB to wall.
Starter course shingles and 18″ layer TP (tarpaper, not Toilet paper!)
First course shingles and TP leaving your exposure uncovered.
second course and TP, and repeat. Any seams that line up are protected beneath by several layers of tarpaper.
That sounds good for waterproofing but the question posed was I believe in regards to the aesthetics of the seam alignment and the solution for the easiest way to achieve that.
Contact Eric Hollenbeck of Blue Ox Millworks in Eureka, CA
http://www.blueoxmill.com/
Opps here I was congratulating Rick on his house and wishing him the best when I see now he’s not really the owner. I wonder now if I even explained the seam alignment problem properly so I’ll expand on it. First doubled course anywhere but on the lines. Second row containing curved 5in pcs will fall on lines. On the next row the first curved piece will be cut in half. The next row (straights) you will be able to see how they land on the previous curved row. For the second row of straights just don’t land on the lines again and you’ll be fine. Next you repeat and repeat and repeat till exhausted.
It’s terrible that you are gutting the inside and outside. Why not just knock it down. It won’t be historic anymore. Why not sand down the siding and paint it? You’re not a good steward of a historic building. Bad karma.
Rick –
I would make a horizontal storey Pole for the 5″ courses –
A vertical plumb control line , then, while installing the random width shingle , I can see my offsets on the storey pole and adjust my course to eliminate any adverse stacking
Mike
The easiest way would be to snap verticle lines like the others have said and just plan for a decent amount of extra waste.
I also seem to remeber having seen a double course below or under the rounded course that way it didnt matter where the seems landed. This may or may not look good depending on shingle exposure etc.
I would not count on felt paper or any sort of house wrap to hold up in the long term between the gaps. If you wanted to go that route I’d use peices of lead or copper only where the seams lined up
Lots of aluminum flashing. And aluminum nails. Think like a roof repair.
I’d skip the shake siding all together and continue the lap siding so the addition doesn’t look as much like an afterthought. Maybe the shingles were done that way because the builder had off cuts from another job? I think you should do some more period research. You can make it look better than what you started with.
I think you are trying to repeat what was actually a bad idea in the first place. It is difficult to do properly because you aren’t supposed to do it that way. I don’t think it looks good because of too many changes. If you really want some round butts put them in an area or two. Bottom of the wall, top, middle, bottom and top, etc. The alternating is not common and doesn’t look right to me. Good luck either way, looks like a nice house.
Rick,
As was mentioned, vertical lines get snapped every 2-1/2”.
Keep your squared shingles 1-1/4”from these lines.
That original siding was done very poorly. Actually that whole addition is a historical re-muddle which you should be able to improve on.
Get rid of the square shingles all together. They hurt the eye to look at along side the rounded shingle in the same color. I am a big proponent of historical correctness if its original street side architecture but we are talking add on. So say adios to the squares! All rounded side wall will be softer on the eye. Using the same rounded edges but a larger size would work well. Another idea is to tie in the original structure clap board siding in with the existing rounded side wall shingle. Using no more that 4 horizontal runs. Best option would be the larger rounded shingle. Could be same color or not. Look forward to your finished renovation production. Have fun!
When I look at this house, I see the original with character, style, and something worth restoring. But the square addition completely violates every one of those qualities, no character, no style, and I find it hard to justify any worthiness for restoration.
My philosophy when adding on, is to blend the style of the addition so it looks like it was always there. I cannot see any way of blending this square box into the style of the original house. I know that there are always things we have to consider other than style, but so many times when we see situations like this one, there is a reason why the house was allowed to get run down, that no one loved it enough to maintain it, and the addition’s lack of any redeeming features or style may be a very big reason why this house ended up the way it did. I believe that if the addition is removed, and that if there is a need for the space it provides, to start over with an addition that fits the style of the original house, that it might then become a house that people will love. Consequently, this house may then be around for another 200 years, because someone will love it enough to ensure its survival.
Hi Rick,
I hope I understand you correctly but it seems you want to create a random effect like the original, instead of a consistent “running bond” type look. If it was me, I wouldn’t worry about it if you are installing the same pattern of scallops and straights. Who would be the wiser with only 2 rows running before the straight? If you are adamant about achieving the random look, I would space a few out a 1/8″, followed by some tight together. Or if there is a few scallops to a piece, I would cut them into 2 scalloped sections and sand a few down on the outside to diminish their size by a 1/4″-1/2″. Put a few of those together and and you’ll mess up your pattern real quick. I hope this helps.
Rick the first thing I would do is what I was taught as a young carpenter running shingles on Victorians.
We would make an assembly of 1×3 strapping that was hung from a couple shingles (see sketch) that allowed it to line up with level of the bottom of the first course. We would attach a string line at the height of the next course up from bottom course. The string was a guide to nail above to prevent nailing to low. The string also allowed us to shift the shingle to avoid alignment issues of the course below and above. More on that below.
We would hang a plumb line on the wall as a reference guide to the 1×3. On the 1×3 we would mark in increments (in your case the 5” wide) of the rounded shingles. Then when moving up the wall to the next course with the 1×3 we would just shift ½ the increment to the left or right for the round shingles referencing the plumb line.
Using the string as a indicator of the bottom of the next course as we went up allowed for even the double courses to be visually reviewed for alignment as well as acting like an extra set of hands.
And if we chaulked that string, we could snap it for the placement of the 1×3 to the next higher course. Using a shingle hatchet, a file to keep it sharp, a block plane and handsaw we moved right along.
Rick, You should have mentioned this when you were over last week getting the windows. Addison and I have been managing joint offsets with the custom-cut 5 in shingles on my garage.
The basic approach is to mark on the 5″ fancy cut joint pattern on the next to last regular course. That’ll give you the visual cue when positioning the last regular course before fancy cut shingles. And BTW, if you need any fancy cut red cedar shingles I have a few boxes you can grab.
I might suspect that the wood shingles may not be original ??
I would go farther back and use the same Clapboard lap that is on the original section of the home.
I’ve got to say that this is upsetting to read that you feel the need to gut this house. May I ask why you feel the need to do this? I’ve been restoring historic homes like this for most of my life. I will be 60 years young later this year. Why would you gut this house?
Furthermore, it should not be raised. Generations of Americans lived in this house and generations more will and can continue to do so.
If you like email me and we can discuss this and I am happy to help you and advise. It will be worth it, this has been my focus most of my life.
Fix the design. Do 6 and 10.
Make a story pole of the 5in seam pattern. Mark the layout of the seams at the bottom of the random courses and make sure no seams land within 1 1/2” of the upper seams.
Thank you all for taking the time to answer, it’s just the type of response I expected from TIC readers. Like sitting around a job site during lunchtime.
If I was going to proceed with shingles, I would mark the supporting horizontal furring stick with the joints of the lower row of rounded shingles since the upper row of rounded joints will be exposed while putting on the next (lower) row of straight shingles. And use a vertical control line to keep the furring oriented. But if I were having some help doing the install I would snap all of the vertical lines on the wall as well.
However, many of the comments influenced me to step back and give it all a little more thought. After staring at the house for while I decided that it probably would be more in keeping with the design to use clapboard all the way up. I also got my wife’s approval so that’s the direction I’m taking. I’ll probably put a horizontal band of trim halfway up to break it up a little.
As far as those who think it would be a shame to “gut”it. I feel your pain.
I’ve worked on quite a few historic properties over the years and in fact own a 4000 sq. ft. house (originally a tavern) built in 1757 which I carefully restored after a previous 40 years of neglect.
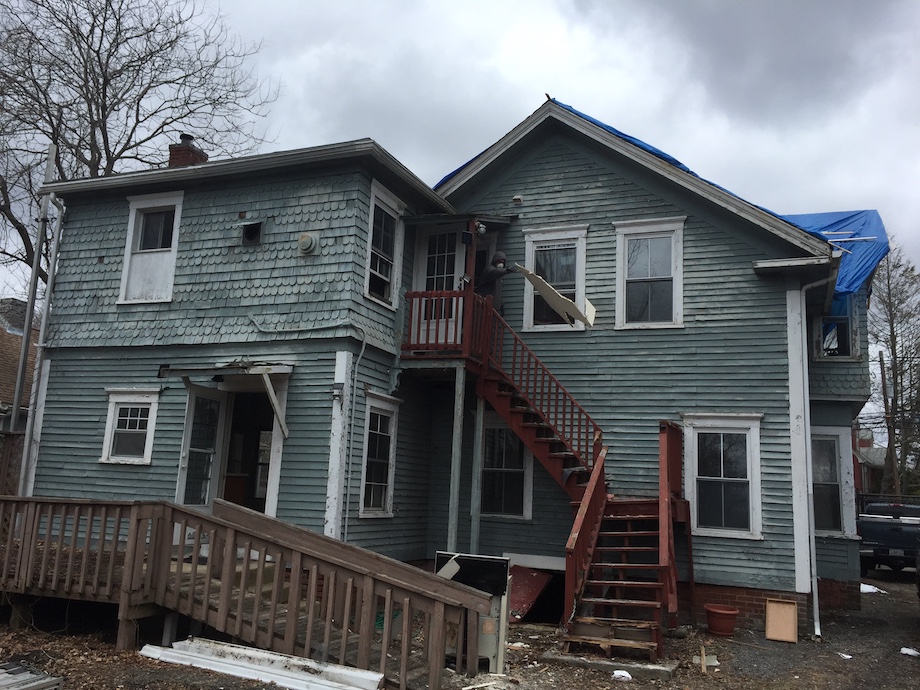
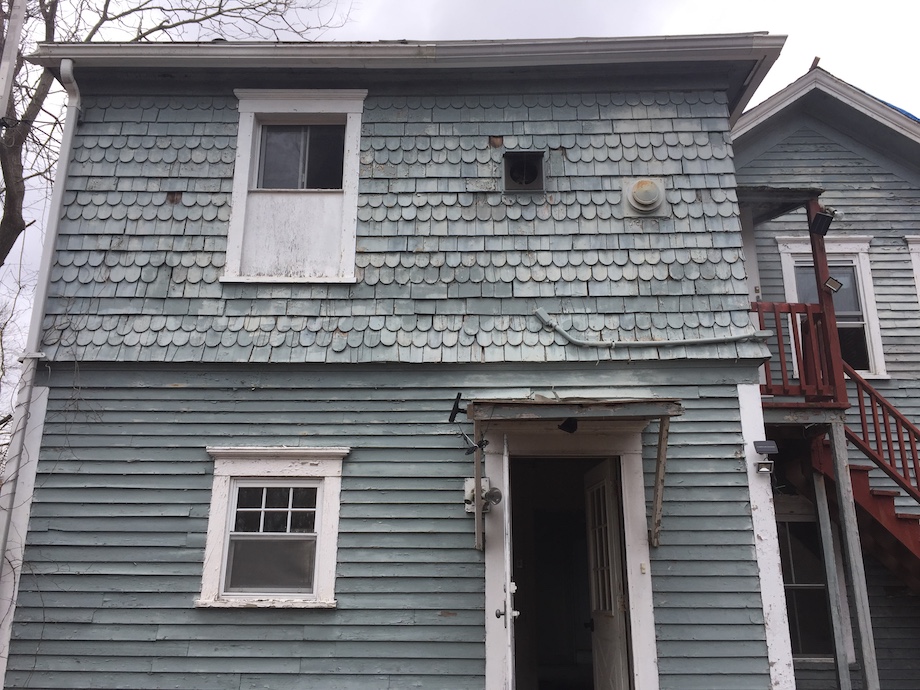
The house in this article was/is ranked number one of the top five endangered historical sites for 2018 in town by the local historian and newspaper. When I was looking at it last winter it was bank owned and had been severely neglected while being used a a rental property for a long time. If you notice in the pictures, the main roof is covered with a large blue tarp. That was the bank’s version of closing the barn door after the horses had run off.
In addition to the main roof leaking, the flat roof over the addition was leaking, rotted and falling in. There was standing water in much of the house, severely damaged horse hair plastered walls and ceilings, and mold everywhere.
There were a lot areas of rotted trim, siding and sheathing (1 x 12 or so, what we call roofers) and some structural damage. In one inside corner there was a hole large enough for a couple generations of raccoons to use as egress into the attic. Mama was not at all happy when we started the work.
The only way to truly know the condition of an old building like this is to remove all of the roofing, siding and trim (there was no paper of any kind beneath the siding). Then you can assess and repair all of the damage to the structure which helps to insure it’s survival for another couple hundred years. Anything less and you may be neglecting some serious problems which could affect it’s longevity.
I’m posting a few pictures in which you can easily see the problem areas I’ve attended to. I’ve rebuilt some wall sections, replaced and reinforced floor joists and mud sills and replace the rafters of the flat roof.
When I’m finished with the outside, it will look pretty much as it did when it was built but with modern materials. I’m rebuilding following the same design and ratios. The inside layout will remain the same but there will be new finishes on the walls and ceiling and insulation in the cavities.
As I proceed through this project there’s not a day that goes by in which I’m not struggling with the aspects of cost vs. design. This is an investment for me and I have to try to balance a limited budget with the stewardship of a 19th century structure.
But, I am enjoying every day I work there and I feel like I’m on vacation. Not something I can say about many jobs in my career.
Again, thanks to everyone for you comments.
Rear elevation
North elevation
Thank you, Rick, for a GREAT response.
Gary
After reading through all of the responses, is to agree mostly with comment #3. I might want to upgrade to something better than tar paper, The other thing is use better materials avoiding, if possible, double stacked seams.
Hello, Mr. Arnold
My name is Brandon Richard, I attend Wickford middle school (School across street). I am very interested in renovating and selling real estate. I was very happy I found this article and the 888 Ten rod rd. I have a few questions for you
1) Will both houses be “Flipped”
2) Will 354 tower hill rd be kept as a multi-family or will it be turned into a single
By the way, I really like the blue on the house.
Also after touring 65 west Allentown rd, we noticed that the renovation was not completed well and looked rushed… just something to keep in mind.
Thanks and Good Luck, Brandon
Hi Brandon,
It’s nice to hear from our future generation of craftsmen.
I don’t plan on flipping either house at this time but….
Tower Hill Rd will be kept as a 2 family residence. I did toy with the idea of turning it into a single family residence because my Real Estate broker told me that it would be worth a little more but again, I don’t intend to flip it so a 2 unit makes more financial sense to me.
I don’t know of the West Allentown Rd project but my guess is that if it was rehabbed simply to be flipped then I’m not surprised that the quality isn’t up to par. I find that that’s the rule rather than the exception of flipped projects.
I must have had at least 20 people stop at the Tower Hill project this summer asking me what color I used on it. FYI it’s called “Evening Blue” and is pre-applied onto the HardiePlank Lap siding.
Thanks for your interest and feel free to stop by if you see a black pickup truck at either site.
Rick A.
This is a really interesting puzzle! I can see why the homeowner would want to avoid repeating the mistake of stacking the vertical seams of the shingles. It sounds like a tricky problem to solve, especially given the desire to maintain the look of the original house.
Out of the solutions mentioned in the post, snapping plumb lines seems like a relatively straightforward approach. Have you had any experience using this technique on a similar project? I’d be interested to hear your thoughts on its effectiveness.
Great discussion — this is exactly the kind of problem that looks simple until you’re actually on the wall with a bundle of random-width shingles in front of you.
The story pole approach combined with a plumb control line is what I’ve found most reliable in the field. What I’d add: before you ever touch the wall, lay out a dry run of the rounded course on a flat surface and mark all the joint locations on a spare furring strip. Then transfer that to your story pole. You now have a physical reference for every rounded course joint before it goes up — and you can plan the straight courses around it rather than reacting to problems after the fact.
The extra 20 minutes of layout at the start saves a lot of head-scratching mid-course. Rick’s decision to go clapboard makes sense given the scope, but this technique has helped me keep the pattern clean on similar projects where the original shingle look needed to be maintained.