


When I first read Norm’s article on skirt scribing, four thoughts immediately came to mind:
1) He and I both learned the technique from the same instructor, Don Zepp.
2) Norm’s explanation of the process was spot on.
3) I had a bunch of photos of a skirt board I had installed that I should share with others.
4) I felt exactly like Norm did: Don Zepp was absolutely the best instructor I’ve ever had the good fortune of learning from.
Most carpenters never even consider scribing a skirt board to a finished set of stairs. I mean, after all, it’d be foolish to think that you could make so many intricate cuts and expect to end up with a flawless fit.
The truth is that the process is quite simple, and it can be done without ever touching a tape measure…really.
As you’ll see, the photos I took 20 years ago match up almost perfectly with the illustrations in Norm’s article. I’ve included my comments and observations on the nuances involved with this scribing process below.
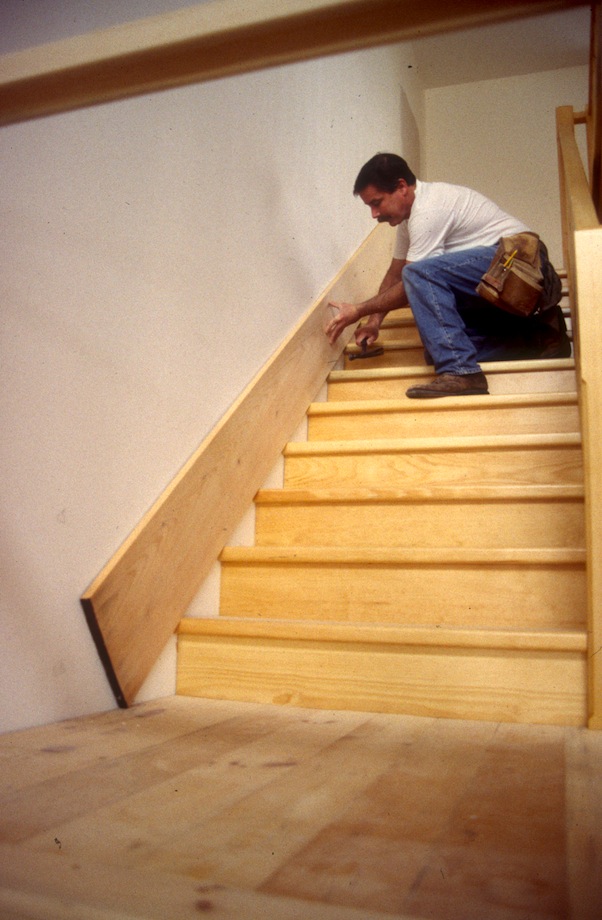
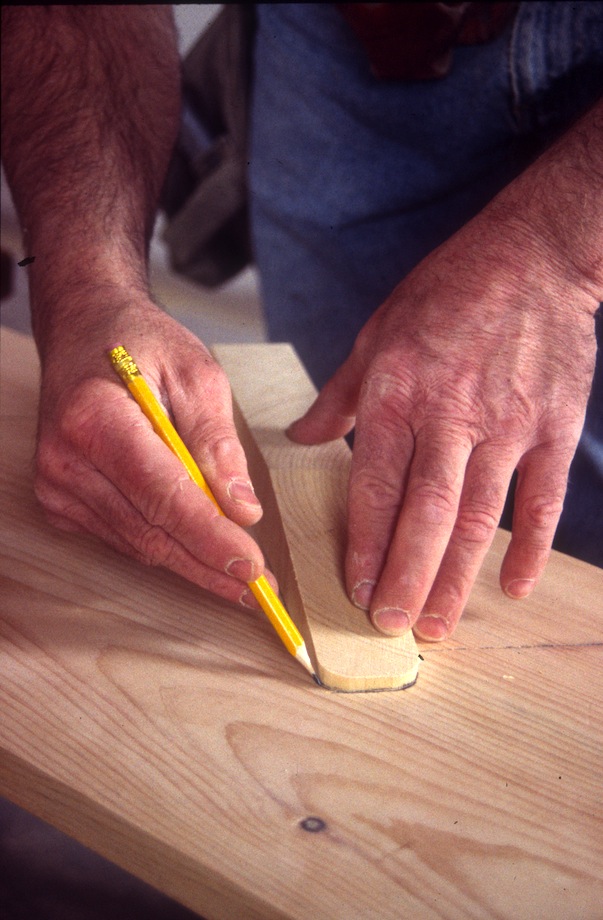
| After tacking the rough skirt board on top of the treads… |
 (Note: Click any image to enlarge) |
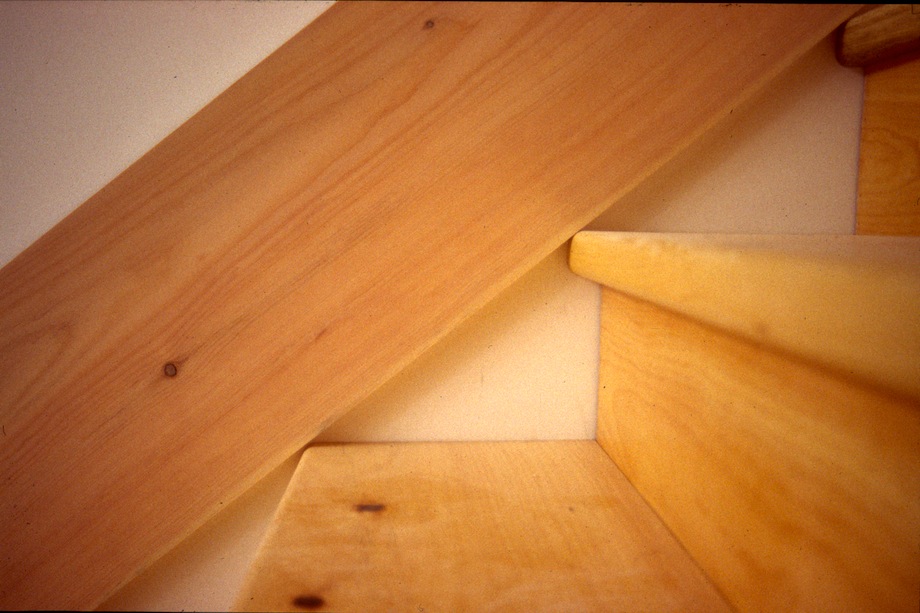 |
…you’ll notice that the lower edge of the skirt doesn’t touch the edge of each tread. |
It’s been my observation that no matter how fussy you are with the riser/tread layout and installation, there will always be some minor discrepancies along the flight. That’s why this scribing technique works so well—it accommodates any irregularities found in the final positioning of the treads and risers.
| I start by transferring the top height of the tread onto a 3/8 x 3/4 oak scribe stick that’s a couple of inches longer than the tread depth. | 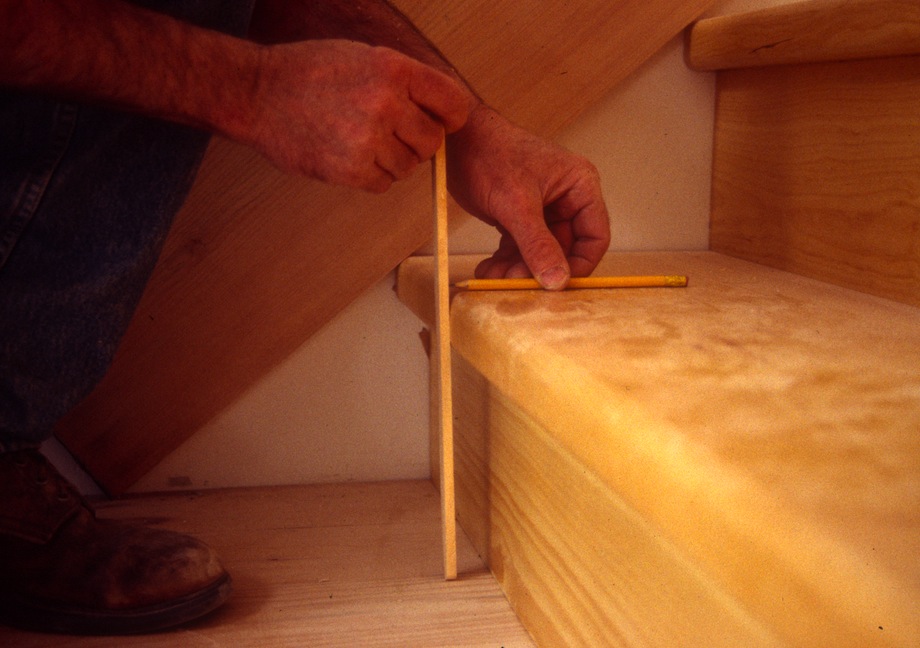 |
| Then I carefully drill a pilot hole slightly smaller than the diameter of the brad, and drive a brad through the stick. I like to sharpen the brad point for a near razor-like scribe line. | 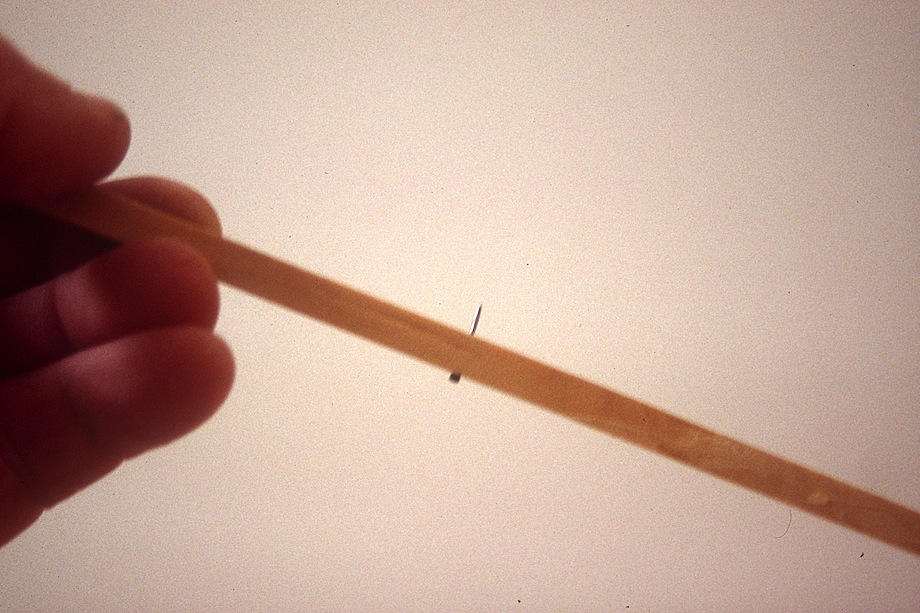 |
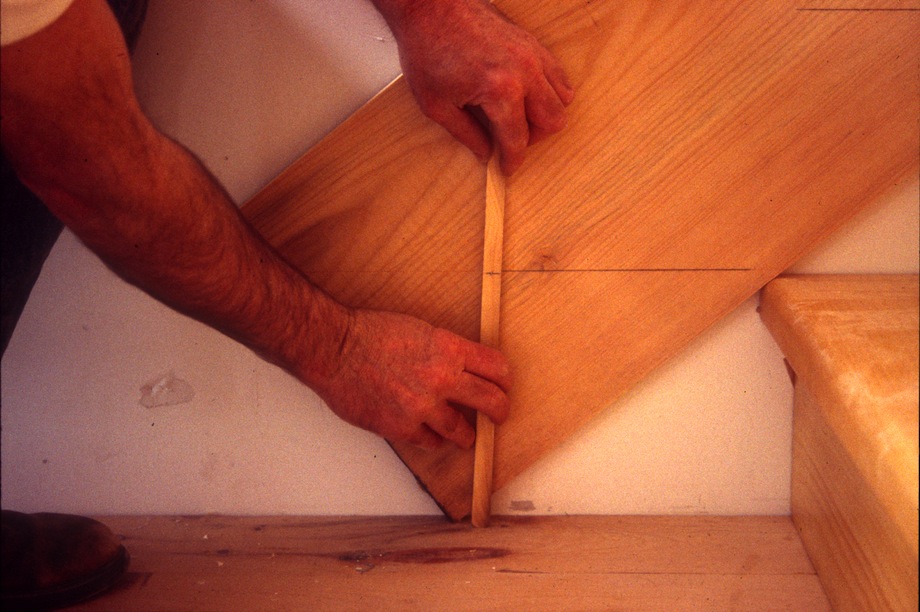
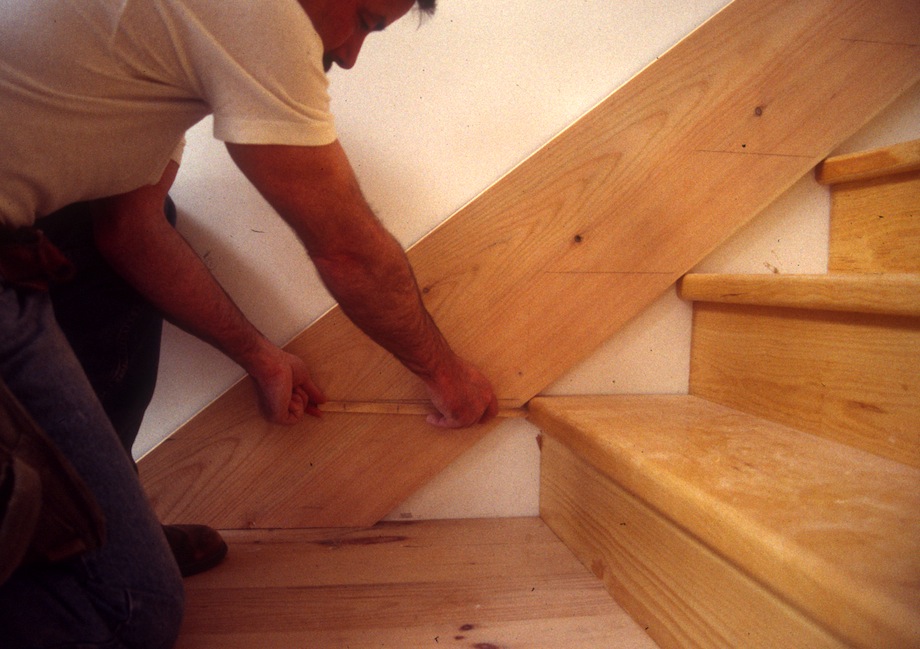
Next, I scribe the level lines onto the skirt board, starting on the finish floor, and working my way up the flight of stairs. It’s important to keep the stick plumb. I typically make one light pass to “set” the initial line, and then follow up with a couple more passes to really engrave the line in the skirt board.
| Making a thin, deep scribe line goes a long way towards preventing tear out when you start making the cuts. I darkened the scribes lines using a pencil to make them more visible in the photos. | 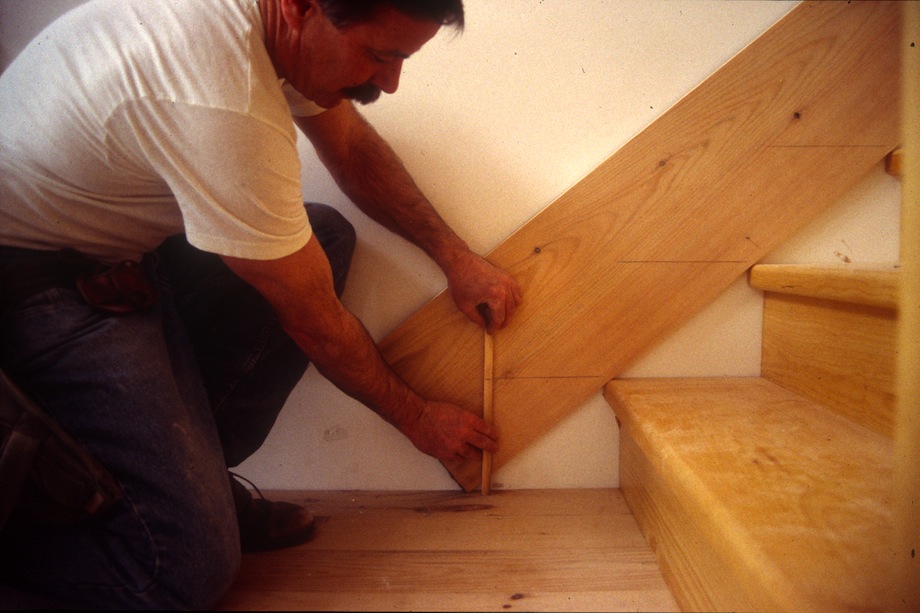 |
 |
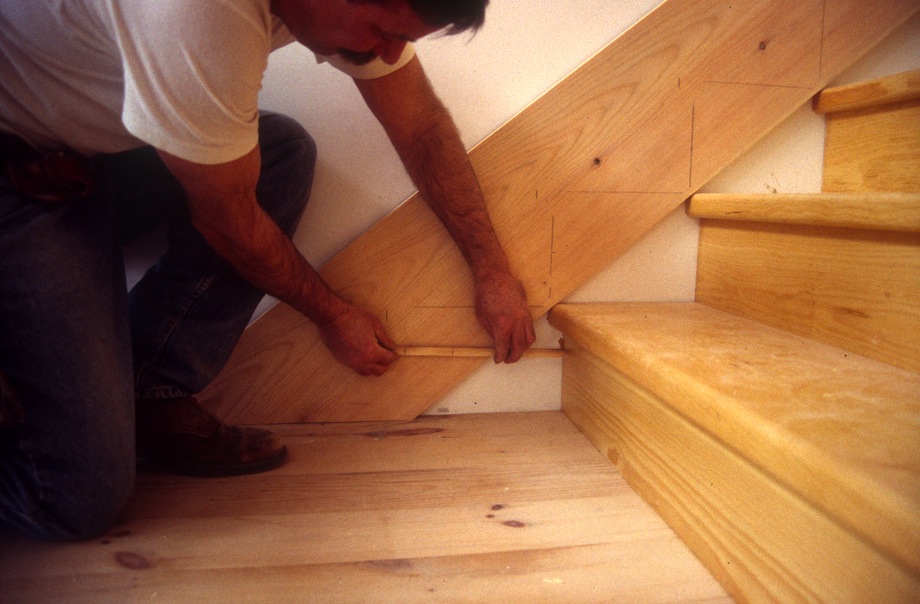
The line in the photo extending from the top of the tread onto the skirt board is referencing the tread below the line. The scribe line has no relationship to the tread it extends from. In this photo, the scribe line I’m working on is referencing the finish floor—not the first tread. |
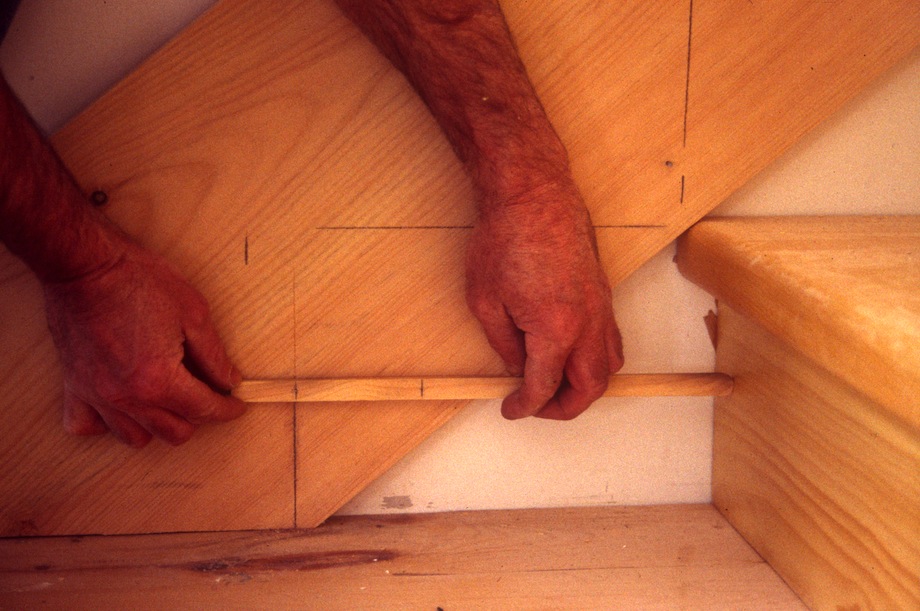
| When I’ve marked all the level (tread) scribe lines, I mark a reference line along the top edge of the skirt so I can reposition the skirt accurately—at precisely the same angle—when it’s time to scribe the risers. | 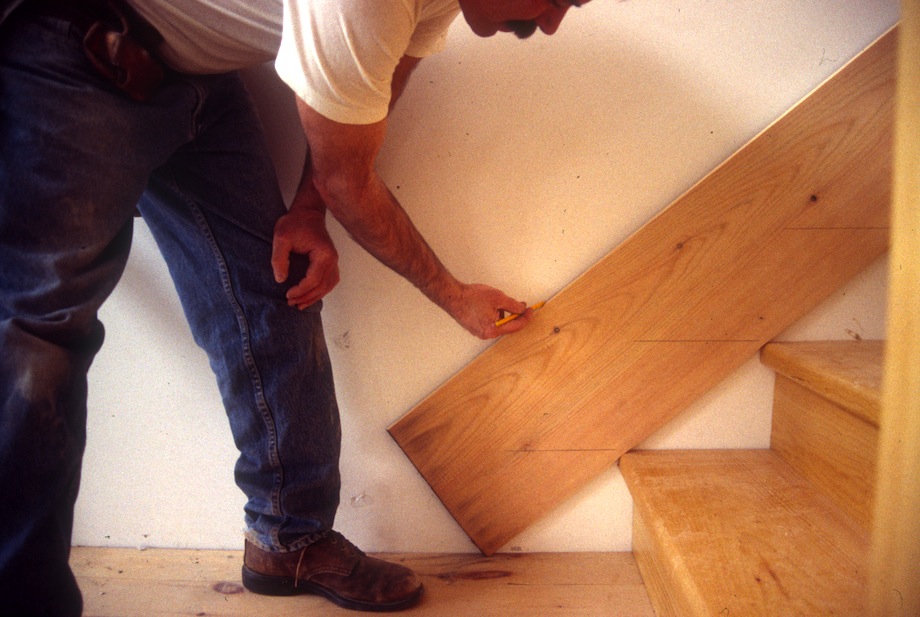 |
 |
After pulling the skirt off the wall, I cut the bottom of the skirt at the lowest scribe line, and tack it back up on the wall, using the reference line to position the skirt at the original angle. |
| Next, I remove the brad from my scribe stick, and I transfer the nosing length of the tread onto the scribe stick. | 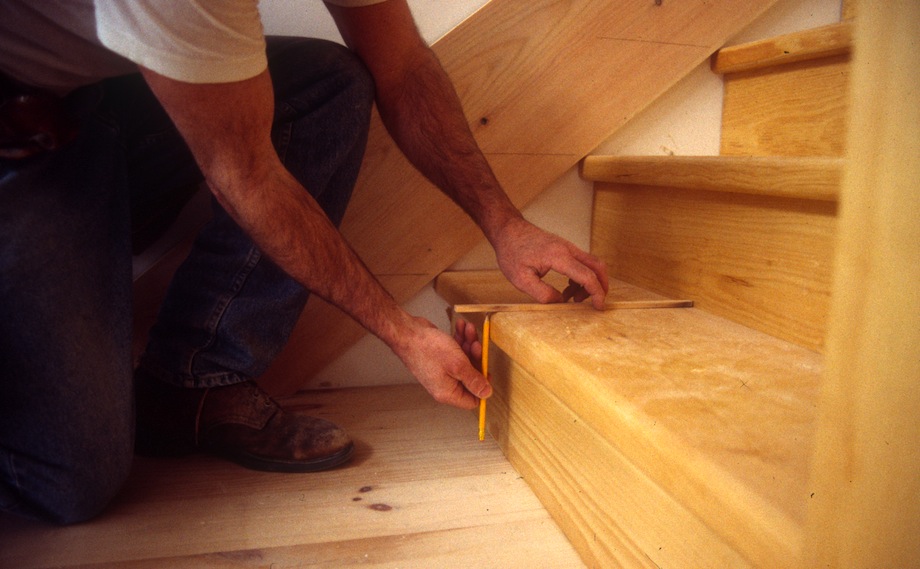 |
 |
Then I drill another pilot hole at the mark, drive the brad through the stick at the new location, and start scribing the nosing edge and the riser faces onto the skirt board. |
 |
 |
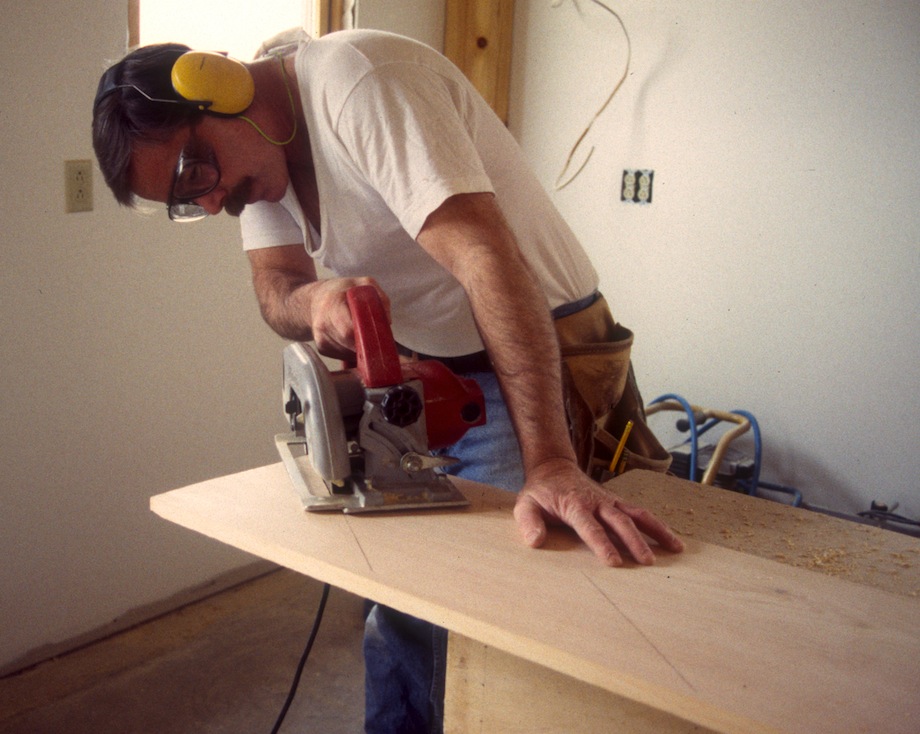
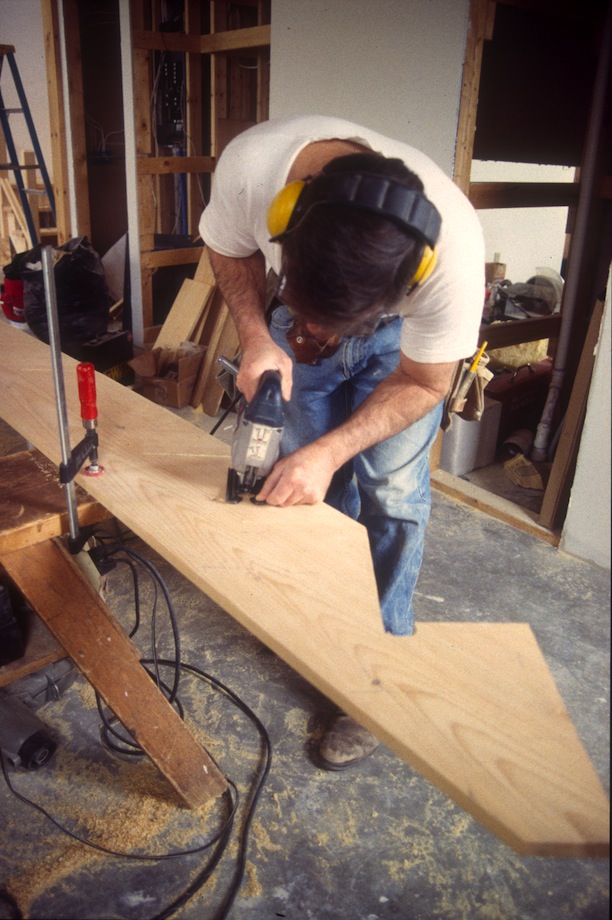
After I’ve scribed the risers and nosings, I pull the skirt off the wall and I set it on some horses. Using a scrap piece of tread material, I connect the dots between the riser, nosing, and tread for the entire flight of stairs. When all the steps are marked out, I break out the saw…
 |
 |
| …and I carefully cut just to the scribe line. | 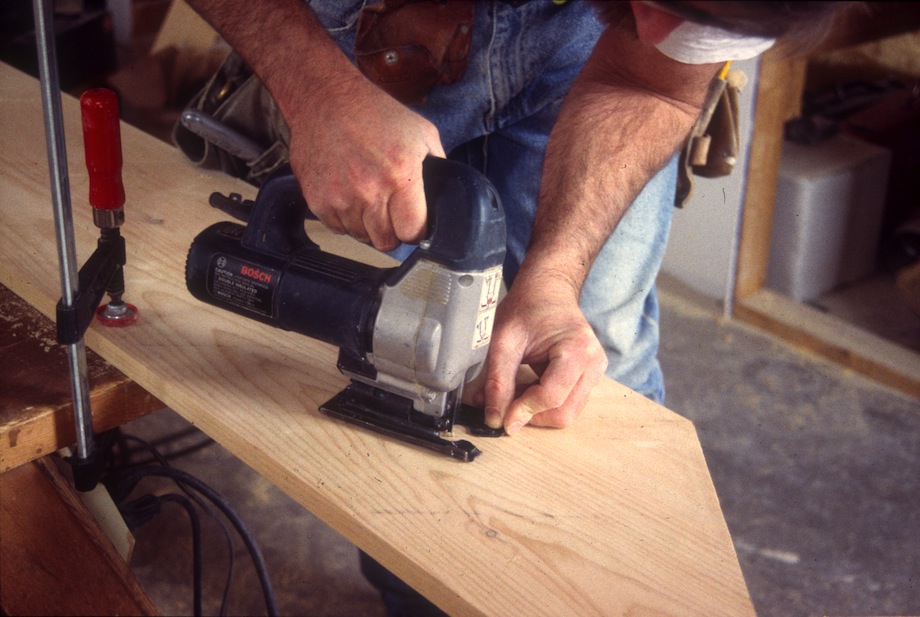 |
When the scribe lines are cut sharp and deep, and you’re careful not to cross the scribe line with the saw, there’s virtually no tear-out. I use a slight back-cut angle of about 4 to 5 degrees—this helps ensure a really tight fit when the skirt is driven into place. While the skirt is on the horses, I also cut the ends to match the baseboard at top and bottom.
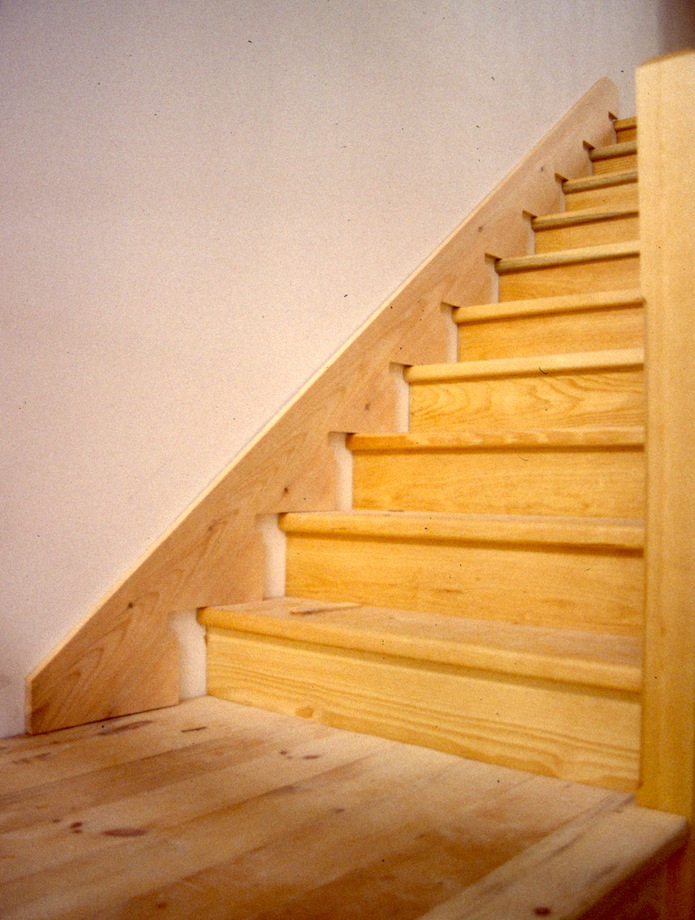 |
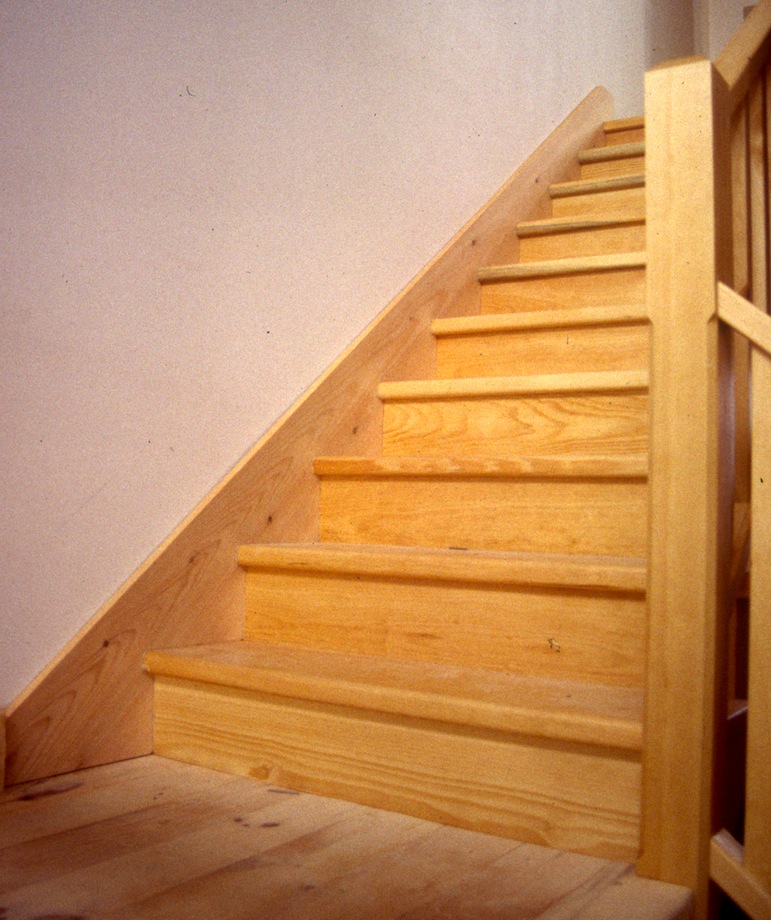
I set the skirt in place a few inches shy of its final position, and slide the skirt as far as I can into its final position to confirm all looks right. |
| Once I’m satisfied that it’s a good fit, I use a block to drive the skirt home for the final fit. | 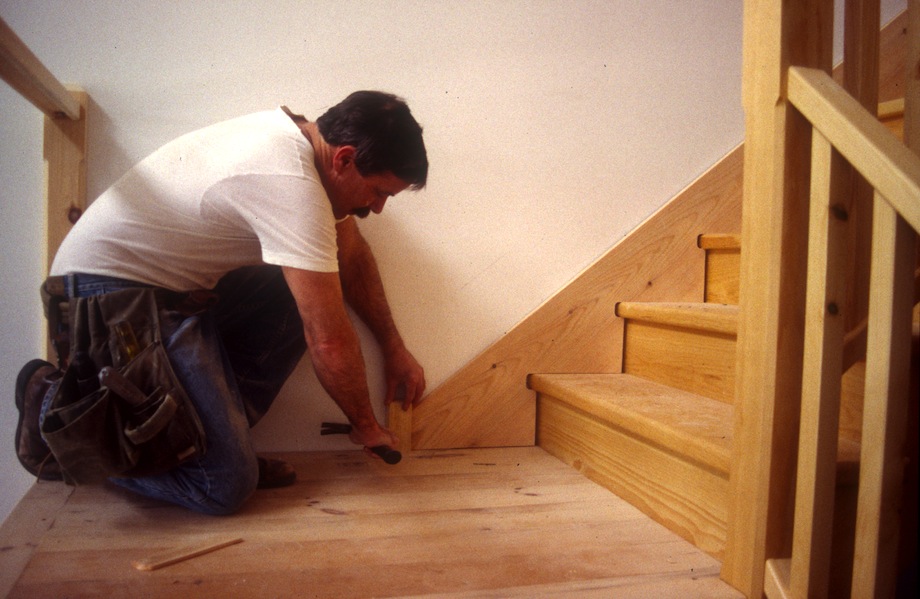 |
If you’re attempting to scribe a skirt for the first time, here’s my best advice: get a piece of scrap that will cover two or three steps, run through the process I describe, and confirm you get a good fit. You’ll only need to practice it once—it really is that simple.
A word about craftsmanship…
Learning your craft in the world of trades is a unique proposition. Most of the learning takes place on the job site, with veteran tradespeople parsing out nuggets of wisdom and dazzling co-workers with an elegant approach that includes quality, ease, and speed.
Reference resources abound (TiC, the Journal of Light Construction, WOODWEB.com—the list goes on and on) and are also great ways to learn.
And there are hands-on demonstrations, like the Katz Roadshow and JLC LIVE.
I was fortunate to have attended a three-year, post-high school trade/tech school, the Williamson Free School of Mechanical Trades. My three-year trade degree was in masonry, but while I was there, I was always keeping an eye on the carpentry shop. With Don Zepp at the helm, the building trade students at the school considered it the place to be.
After I graduated, I asked Don Zepp if I could sit in on his theory classes. Thankfully, he welcomed me. So in some ways, I double dipped my trade education. I’ve been fortunate to have spent time around some of the best tradespeople and craftsmen in the business.
The key to learning, regardless of the venue, is to always pay attention.
And keep in mind: while it’s true that you learn from your mistakes, in my experience, it’s way more productive to learn by observing the other guy’s mistakes.
• • •
AUTHOR BIO
 Carl Hagstrom graduated from Williamson Trade School in 1974, and he has been involved in residential construction-related activities ever since.
In 1982, he and his wife, Bev, moved to Montrose, PA, where he continued to run his own construction business.
Carl started writing for the Journal of Light Construction in the late 80s, and is now a contributing editor at the magazine. In 1994, he became certified as a professional building designer member of the American Institute of Building Design, and in the same year he started WOODWEB.com with his business partner, Michael Poster.
Acknowledgements:
Carl would like to give a tip of the hat to Todd Murdock for putting together the illustrations for Norm Yeager’s article—it’s uncanny how Todd’s illustrations mirror the photos Carl took 20 years ago.
The timing of this learning lesson is uncanny, thank you.
Our Boss informed us if we had to do all this cutting to put in skirts.. We would be Fired! And why? We place the skirting before the actual steps are put in place. We save time and expense on the stairs. Since we build 5k to 10k Sq ft homes, its a must to save time, when building and getting it done fast to be used. But this idea of Scribing “If” you have an older home that has no Skirting is time consuming. And this is an effort thats totally up to you to install. I would have to say its worth it.. if your wife says you need to do something.. to make the home look desirable to use everyday.. more appealing and a thrill knowing you did this yourself after.
I agree with most of what you said. When it comes to making money time is everything. On bid jobs it’s hard. So I understand that it makes sense to put skirt boards on first. But….not all woods are created equal. Treads and risers risk more shrinkage due to the direction of the grain when installed. I will inform the customer of this and actually try to store the material at their house for a week to acclimate if possible.
Wow…remind me not to hire Phil. I would appreciate the contractor working on my place to go the extra mile. I suppose that is why I will keep my guy around. Understandably many would rather a lower cost but if I am paying for 10K sq ft home a couple hundred dollars for the quality doesn’t seem like a bad trade off.
If you read everything he wrote you’ll see what he says makes sense. He’s saying upfront it’s easier and faster to put in the skirt, THEN the stair treads.
He also said he agrees that after the fact this is smart.
Brett, the difference is many hours of work. And every measurement and every cut must be done nearly perfect. And it is hard to do. If you make a mistake, then you have to start all over again. The difference in cost will be quite large.
Spot on ,Thanks.
Very nice and simple process. Who would think it could be so simple. Nice article,
Mike Hawkins
Thanks for the great tip.
That makes a hard job easy.
Carl,
Great article. Don Zepp would have been proud of you – passing the baton to future generations of craftsmen!
For renovation work on ‘older’ homes with many inconsistencies in rise and run, how have you modified your technique? After making the first bottom cut do you go back and modify/adjust the tread layout to match, then the risers? Or are there other tricks, lessons learned for dealing with not so perfectly layed out stairs?
Thanks for sharing.
@ Kirby, re “inconsistencies:”
The important thing to realize is that each possibly-irregular surface is used as the scribe reference for its own cut.
Looking at the last picture before the saw comes into play, it’s easy to make the mistake of thinking that you could make the horizontal scribe lines by tracing the underside of a straightedge laid on the treads.
THAT would get you into the kind of trouble you refer to. But with Carl’s technique, each surface is the pattern for its own cutline:
The horizontal lines are all scribed with the stock directly ABOVE its finished position, and all of the vertical lines are scribed with the stock down to finished level, and directly to the LEFT of finished position.
The only thing that could go wrong would be if the existing floor sloped up and away to the left, holding the stringer a bit too high for the vertical scribe process.
But Carl has left a little gap there for shoe, so he has removed that risk.
I love my old pencil-compass scriber by Starrett, with an old Lady Cross (no pocket clip) mechanical pencil for extra stiffness and a line that stays in exactly the same place, even if I break the lead, and have to “sharpen” it.
But a Veritas log scribe would probably be the best tool, with its level bubbles to help guard against tipping the scribes.
precioso, muchas gracias¡¡¡¡
Carl,
Thank you, Norm and Don Zepp for a wonderful method of installing the skirt board. I believe that Don would be very pleased to see you passing on his knowledge. Whether you are teaching, as Don did, or through a platform like this, the propagation of this information continues. No one can ask for more.
Thank you,
Fred
I was a custom home builder for 25 years before ‘retiring’. I started teaching HS Carpentry 10 years ago. (Now, Woodworking, as budget cuts made the resources needed for Carpentry too expensive.) This article touches both my contractor and teacher hearts. Well written article that offers an easy, yet elegant, solution to the problem and opens the door to solving so many other ‘like’ issues.
Makes me want to strap on my belt again and start scribing stairs just for the pure self-indulgent enjoyment of doing good work.
Thanks for that…
Joe
Great article. Do you think this would work on carpeted stairs?
Hi. Nice work! Looks great.
Dave said:
“The timing of this learning lesson is uncanny, thank you.”
Yeah. I was just doing this two weeks ago for a stair that they forgot to space the carriage away from the wall on.
Didn’t mean to reply to Keith with that.
However, I did want to say to Keith that it could definitely work on carpeted stairs. Before the carpet goes on would be best though (if that is the case I wouldn’t cut the nosing on the skirt but rather a square notch from the nosing of the stair).
Thanks,
I don’t do much of this kind of work but it’s a trick worth knowing and holding onto.
Chaim
Very nice. Several years ago I had to install a skirt board on existing steps. I sure wish I had know about this great trick. The pictures are worth 10,000 words!
Thanks
How wide is that skirt board?
I first scribed a skirt like this back in the 70s. I had scribed boards before that needed to be slid in on a 45º angle or so — irregular wall meets irregular ceiling, and things like that. For those situations, you had to hold the scribers at a 45º angle, and scribe both edges in the same process.
But when I took on that skirt job, it was clear that a one-step process would not work. Some other technique was needed, and I muddled my way into a two-stage process very similar to the one described here.
One thing that always helps those of us in the trades is a common language. Are there folks out there who have a term for this process? If not, what do you guys think works best:
Compound scribe?
Two-stage scribe?
Two-plane scribe?
X/Y scribe?
If there isn’t already a term for it, I guess I’d lean towards that last descriptor. Or perhaps better still, to communicate a bit more clearly what is needed,
Two-stage, X/Y scribe.
Great article. Thanks.
Great, just great.
Next, could someone do a blind dado for stairs in a skirt board?
Do you mean for a ‘mill-made’ stair? I have thought about doing an article on that…
After pulling the skirt the first time and cutting the bottom of the skirt to rest on the floor, it seems to me that you just moved each of your scoring marks down one stair. If the risers happened not to all be exactly the same height, wouldn’t that throw your measurements and ultimately, your cuts off?
In photos #5 and #6, the author is shown scribing the bottom of the skirt to the floor, and in the very end, it will drop straight down from there, on the Y axis. Likewise with every tread — any hollow or hump in each tread is transferred vertically to the skirt board.
But in order to scribe the risers and nosings, the skirt has to be on the correct X axis, which the author can do once he has made the bottom cut on the skirt.
You are correct that the author slides the skirt off to the left, and out of position vertically. After all of the cuts have been made, though, he will slide it back along the X axis, until it has returned to the original Y axis.
It is impossible to scribe both axes cleanly in one operation.
I’m going to have to read the first article but I just got it, along with the comment from Kirby that it’s scribed to each relative part. Thanks so much.
Carl. I just read the article and saw that you graduated from Williamson. I also went there – 9W8 I was a “bricky” as well. Construction Technology – Masonry. We should connect sometime. I have had my own business for a little over three years now. Jon
Carl,
I have been educated. Job well done. Thanks so much for the great article, which I am sure will be utilized someday soon in a future customers home. Would anyone build a set of stairs in a new home with the plan of installing a skirt board with this scribe method rather than doing the typical 2×4 space between studs and stringers and “dropping in” the skirt board before risers and treads are installed? Perhaps some think the scribed skirt board is less work than scribing each tread to the skirt? Any comments would be appreciated. Thanks. Tim
I completed eight flights just this week using this technique. I don’t think there was a plan in place that the stringers would be scribed-in, but I would plan to do this from the beginning. It has the benefit of hiding the cuts when viewed from above and also locks-in the treads and risers (from the front and top, anyway),like a housed stringer.
JW
What’s the bevel setting of the jigsaw ?
5 deg too much ?
Article states “4 to 5 degrees”
If the treads differed in height slightly wouldn’t that affect the accuracy? Would you than have to change the height of the brad for each tread? Great article !! I really appreciate it. Thank you
“If the treads differed in height… Would you than (sic) have to change the height of the brad for each tread?”
No, the basic principle for any kind of scribe is that the entire finished piece has to move over (or up, or down) a set amount, dictated by a single setting of the scribing device. This amount should be equal to, or slightly greater than, the largest gap.
If a given tread is lower, or has a big hollow in the middle, say, then the scribing device won’t reach up as high, referencing as it does off of those low spots. The scribe’s mark will then be that much lower on the skirt:
If one tread is 1/16” lower than all of the other treads, the scribe mark will reflect that, and tell you to remove that much less waste stock right there.
Likewise, if one tread is 1/16” higher than the rest, the scribe mark will tell you to remove that much more waste stock, which would otherwise have kept the finished piece from settling into place on the rest of the treads.
Good point, many times over the years I replaced treads and risers with oak keeping the original stair horses. I learned this system from Don Zepp and Norm was my senior. The first time I came across a rise to be a little different I adjusted. A trades person has to know the basics and for sure messing up a skirt the first time will teach you. I carried a set of large dividers instead of using the scribe stick. Don taught this method based on building a new set of stairs which he perfected in the 50’s housing boom when all stairs were built on the job.
Carl,
I was very pleased to see Don’s method described so well. I too went to Williamson 8W5 and had the privilege to learn from such a great carpenter/stair builder. One thing that you forgot to mention though is that when he used to demonstrate this method he also used to tell us that when he was done, he would tell the customer that if they could slide a new dollar bill between the skirt board and the treads or risers anywhere along the stair flight, he would do the job for free. He was that sure of this method. Oh, and by the way, he always used hand tools when he demonstrated it. He was also a very gifted master stair builder. We were all very blessed to have studied under such a great man. He may no longer be with us, but his methods will stand the test of time. Thanks for the memory.
Wayne McWilliams 8W5
I was very pleased to read the first version of this article a few months ago. I also enjoyed the clarifications in this article. I am always excited to learn new techniques. Shortly after the first article was published I was called on to do this exact thing on a completed house. I must admit I was skeptical but I am a believer now after having completed my project. Excellent article. Keep up the good work.
Who is that young guy with the dark hair in the photos? He looks so familiar but then….. my memory is fading…
Thank you so much for sharing this information! I can’t believe I stumbled onto your post this morning.
Do you have a lesson in how to close in a stringer? I have two flights of stairs so I can build a wall on the upper one.
Thank you!
Penny in Colorado
Can’t…can’t build a wall. Could I attach a piece of plywood approximately 12″ high and run it up the side of the treads and risers?
Thanks,
Penny
Great article.
Don’t builders these days typically leave a gap between the tread and the wall on purpose? In this way there is no cutting the skirt to fit “on to” the stair but rather the bottom and top of the skirt is cut and the whole piece just slides into the gap. Or is that only done by builders when they know that the stairs will only be carpeted?
Bill
I finally got a chance to put this method to work for me.
I had a series of flights of stairs in a new house where the treads and risers were installed before the baseboard detail was decided upon.
Had I never read this article, I might have had much anxiety about scribing in a skirt board, if that’s the way it played out. Instead, I was looking forward to it, as scribing-in is one of my favorite tasks.
Indeed, skirts were the call. The treads are of the same distressed oak as the floors (and some are 18″!), so I’d have lost the $20 that Mr. Zepp earned with his micro-tight scribes, but my results were quick and clean.
I missed Norm’s article the first time around with the tip to round the bottom of the scribe, but figured it out in the field. Also, I found that the little OOK nails, the black ones with the brass, knurled collars, from the picture hanging kits made great sharp and reusable scribers.
Thanks, again, to TIC and all the contributors.
JW
Can I trace the completed board on to another board for the opposite side. I’m pretty sure I know the risks.
Hi Rick—
This scribe method is such a slam-dunk. If you’re happy with the one side, you’re probably getting the technique down. With the inevitable differences from one side to the other, I bet you’d end up tossing the traced side and starting over.
JW
I’m glad Google pointed this article. Great info for the DIYer. I have a question for Carl or any other people here. I just took off carpet from floors and stairs. What’s left is plywood treads and risers. I intend on putting new treads on top of the plywood.
1. Would it be better to install the skirt first and then the treads on afterward flushed to the side skirts
-or-
2. Install the treads first and leave 1/8 expansion gaps on the ends and then cover that up with the skirt? Do treads expand at the ends? I’m not sure. Carl’s pic of the treads look like they’re pretty flushed to the walls at the ends.
I too am in the same situation as Vu mentioned above. It seems like installing the skirts first and then cutting the treads and risers with a 5* back-cut would give a very tight and clean fit with less effort. Any insight from a professional would be appreciated though as I am just a DIY’er
I sure would love this made into an instructive Youtube video. Any hope of that?
I will try this technique.
thanks for taking the time to put this article together, it has helped me no end, ive been worrying about doing this job at home and now i have the technique i feel confident. thanks again.
A great big thank-you to Carl for posting this informative article, and for all that have posted responses on this discussion string. Sure do appreciate you passing on your wisdom for others to benefit from. I wanted to ask a clarification question on an earlier post above where Ray was answering Keith’s question about installing skirt board on an already carpeted set of stairs. Would I gain anything by taking a utility knife and narrowly cutting carpet away from the edging by the stringer, rather than cutting a square notch where the nosing, carpet and skirt board meet? I wasn’t planning on replacing the carpeting just yet, but am wondering if doing so would force me to prematurely replace the carpet in the stair way.
My English major trained brain is still trying to figure out why this works with risers and treads never being exactly the same. It does, it just does! Don’t ask questions, go with it. Thank you very much Carl for this posting. I’ve built a lot of homes for others as a developer, and framed houses when I was a youngster, but haven’t personally done a lot of stair work. I used this on a remodel I’m doing for myself, and it works like a charm.
I am very pleased to come across this site for I am one of Zepp’s carpenters that was graced with his ability to do any aspect of woodworking from framing, stairs, cabinetwork, and roofing!
After using my trade skills in Vietnam, I came back and worked in various aspects of the trade, I became a Carpentry teacher and did that for 25 yrs. in the vocational public school system. Now retired,
I often look at Don’s picture I have posted on my bookcase at home and still can’t believe how he could crosscut a 1×12 perfectly square with a hand saw and no line to follow. Great man, teacher and tradesman!!!!!!!!!!!!!!!!!
Loved the article and will help me add a skirt to some existing carpeted stairs, if I can solve another problem. I am a DIYer and love learning new techniques and tricks. Wondering if you have any suggestions on how to add a skirt board to closed stairs that have a 180 degree turn with steps around the turn that are placed on radials. Thus the stair run at the wall is much wider than in the straight sections. Any ideas? Thank You.
The only thing that throws me off is after he scribed all the treads (horizontal scribes), he cut the last scribe so the skirt would rest on the floor. He then began to scribe the risers (vertical scribes). When he cut the bottom, he essentially dropped all the tread scribe down a step. Meaning his scribe line for step “A” was now in position of step “B”. If the the rise on each step is exactly the same, this won’t matter. But I would scribe the first step, running my scribe on the floor, make my cut, then proceed to scribe the entire stair case. Also you can do this with a straight edge for the treads as long as your wood doesn’t have a crazy amount of crown in them.
Phil: The scribe line for A IS for A, you’re not seeing it.
Try this: imagine one extremely cupped tread. The scribe line above it will match that cupping. When the skirt board bottom is cut and the board slid down, now that cut line for A is on the same horizontal plane as the tread for A. Before it was above it, and now it’s alongside it. Then once the board is cut, it will be slid into place, exactly matching to it.
Soooo, am I an idiot? All the comments make this sound fool proof.
This is what I got/where I’m at. After an hour of contemplating, and running through the comments. I just did the scribing as instructed, I’ve cut the part that rests on the floor, but my scribe lines are 3/4-1″ above the steps and looking at the photo his rests level with the treads, so… Any help would be appreciated. Thanks!
DP
thank you soooo much !!! for the photo to!(excuse my english i’m french from quebec canada!)
I did fine on the lower 3 steps below a landing. The system above works great! My problem now is the 10 steps above the landing that go from the basement to the first floor. There is a door at the top of the steps. The wall and door frame are in the way when I start to position my board on the wall. How do I work around this? Thanks
I also have this problem and am not sure how to tackle solving the issue of a door being in the way. any thoughts?
Been doing it this way for years. Great article. The only thing i would add is when you mark for your brad find the longest tread and riser for marking purposes. If you just go with the bottom one and it is a short one then in the corner on the back of the tread meets the riser you may have to add a piece. Most stairs are pretty uniform so it won’t be an issue but I have run into some that were a half inch off and had to recut because of it not reaching in the corner. Now I measure all just to be sure.
Thank you so much for sharing your knowledge.
Great article. My stairs require a 18’6″ skirt-board. Any ideas how to join pieces together seamlessly?
In the same boat John. I’m thinking of a miter cut to join the splice; tacking both pieces up at the same time for scribing; cutting them; then placing the upper piece in first followed by the second piece before final nailing in place.
Awesome tutorial, i spend more time than needed making my stairs out, and this just made my life EASY. Very straight forward for any finisher to accomplish without the hassle. Thanks for the great idea.
For those who battle OCD but still battle ‘good enuff’ after you have battled the clock. Try this. Find some stiff quality cardboard and rip it down to the size of your skirt stock and go through these steps and perfect your scribe to stairs. This ensures you will get the best cut on the cardboard you can trace onto your board. Save a board save a trees.
* the biggest difficulty is scribing the nosing and ensuring your scribe stick is level or 0 degree perpendicular and not getting a bunch of chicken scratches that create a tendency to get sloppy when it comes time to cut when it counts.
Nonsense and a waste of time. Just follow the directions and cut the wood. Cutting cardboard is a pain in the neck.
Gary
Gary, I can understand the wood scribe is the ideal, but would card be a good solution for me if my stair is inset in a stairwell and has walls rising at either end? I don’t have room to measure on one board and then slide it back as described.
Currently I am thinking about making a scribe which offsets to the side by the distance from bottom step to the wall and then doing something similar at the top with a mitre in the middle. Perhaps a cardboard template is a more “flexible” option for me?
I may be out of my DIY depth
I am a mechanic by trade but have done a lot of rents around my own house and will nip away at a board until I get it right or start over ( maybe some OCD) I believe almost everything complicated is only made up of a lot of very small simple things – it must start somewhere . This a fantastic lesson I understand completely
Simple answer to a complex problem.someone sat back a minute and said there must be a simple way to do this!
Thanks
I am so appreciative of this article and each step-by-step picture and explanation. We have carpeted, already-finished stairs that I already added a chair rail to but it didn’t look right to do board and batten while not having the bottom anchored to something else. I’m a mother of three (soon to be four!) and am exhilarated by all I’m learning. Thank you so much for this!
Hi
I’m contemplating putting a skirt onto my stairs and was going to use your scribing idea but all my steps are different heights and lengths .. Do I have to adjust the scribe for each of the steps in order for it to fit correctly ? If you could answer this I’d be most grateful..
Many thanks
Craig..
Thank you, thank you, THANK YOU….You Tube has failed miserably on this particular need. You should consider a video for general consumption by we DIYers that will reference your site, which, incidental, is a true wealth of expert wood working knowledge. Your site is now my finish carpentry bible.
Excellent pictures that really explain the technique here. Thanks for posting this! Had almost abandoned the idea of skirting the stairs I’m working on but now I know it’s possible with simple, careful steps. Much appreciated!
I sometimes cut the nosing with a Japanese foil saw using the stock material as a float for the saw to ride on and break it off with a chisel, that way I don’t have to deal with cutting the nosing detail into the skirt board. It always comes out superclean ..However I will most certainly take on this scribe technique.
Thank you for sharing
I recently removed the carpet off my staircase and will be installing new hardwood treads and risers. I have left handed open treads and I wanted to install skirt board on the right side against the wall. My question is is it better to install the skirt board before retreading the stairs or after? I was thinking to scribe and install the skirt board before retreading and to cover the existing rough 2 x 12s with retrofit treads.
Thanks.
Great article. Thanks for sharing. One question I have is rather than using a stick to scribe, why not use a block (say 8″ wide) and 2 or 3 brads so that you can scribe without worrying about how plumb the stick is? Some of the brads would run out and off the skirt, but the others would come in behind and finish up the markings. On stained material this may not be advisable since the scribe marks would extend beyond the cut lines, but for painted material it should be ok. And on stain material, what about using lead from mechanical pencils rather than brads?
Excellent article! Exactly the instructions and advice that I needed. Glad you mentioned the trial run with a short piece of scrap too, I think I will need it!
Great thorough article. I thought this process would be damn near impossible to attempt. Very slick and easy to apply . Bookmarked and ready to implement. Thanks
How to tackle issue with door upstairs? I was thinking to cut the board up top to butt to the door trim and mark my treads. The once I cut the bottom of the board to lay on the floor, the part that faced the trim will now butt to the top riser. Am I correct in my thinking?
Great instructions! Beautiful work. What a large number of readers don’t realize is that this is not the only way to perform this task. With that said, learning different ways to achieve a goal gives you a broad base of knowledge to rely on for problem solving. I have faced repair and re model work that brings several different skills and methods together for one such task. Time IS money. Knowledge and application saves time!
I have the same door at the top problem. Anybody sort that out yet?
How far is the door from the top step? It may not pass building regulations. (In England!)
Well done article! Would the same technique apply if a skirt was to be added underneath treads that are designed to stick out past a finished wall? I’m working on a remodel now and would like to add a skirt board under the bottom of the last six treads. The upper treads are all enclosed in the staircase, but the lower treads are exposed on one side.
I just used this technique on my last job and it worked extremely well. Thanks so much for both the original article as well as this one. The photos were a nice touch. Very valuable information here.
This string is very simple. The difficulty is at the top if you have an immediate left hand 90 degree turn. What do you do with the varying different heights of the skirting board if it has top and central moulding? My skirting is 325mm high.
I have two questions.
1. Will this technique work when the span of stairway is longer than the skirt board that you can purchase (stairway is 19ft long) so you would need to butt two skirt boards together.
2. What do you do when one side of the stairway does not go to a floor? (it ends on a step) Can you do this without cutting the bottom “floor” cut? (see picture)
This is what I did, using 8’ 1×12. I’m not a contractor, I’m a computer tech. Got stuck with a half finished house when Jim Walter homes imploded and 8years later, finally finishing the stairs. This scribe technique is pretty cool.
Thanks!
When I sit the skirt board on the treads, there are three treads where the skirt board is inches above the tread. And the risers are
are not consistent widths. The bottom three steps are triangular as you turn 90 degrees as you exit the last (bottom) step. this bottom platform is throwing everything off. Do I need to change the approach or follow these instructions regardless.
First time to attempt scribing
As a working carpenter for the last 40 years I have used this method at different times in my career when necessary. I also prefer installing the skirts prior to tread and riser installation. I have a jig/tool that I created to get each tread and riser cut to the proper length. The only change that I would suggest is to cut the nosing off of each tread to save the laborious task of scribing each treads nose. The cut is completely hidden when the skirt is pushed home. I do believe that I also read Norm’s article.
Like others, I was concerned that by cutting the skirt board at the last line, I would effectively be dropping every measurement by one step height.
UNTIL it dawned on me that we would be tracing the step below for each line. Now it makes sense.
However, if you are dealing with shoddy carpentry (from previous builder), wouldn’t you have to relocate the scribe point for each tread (horizontally)? Yes, I realize (as stated earlier) that you are effectively tracing the step below the one you are working on but what if the step below had a rise of 7″ and the next one had a rise of 7 1/8″?
Just seems as if you would have to reset your scribe point with each tread.
For readers having a difficult time visualizing the scribe I’ve attached an image below. It may clear up some of the confusion.
Even though this is a two-step scribe process, it still follows basic scribing principles. You have to remove enough material so that the scribed piece fits into the deepest recess of the profile you’re trying to match. That means you must use the largest rise and the largest run at a MINIMUM when scribing the stair. Any variation in tread height and depth will be transferred directly to the skirt board automatically.
Regards,
Todd
_
Wm. Todd Murdock
Art Director, THISisCarpentry.com
This explanation and picture is priceless! It answers the questions of irregularities and the basics of the scribing method so simply! Thank you for posting.
This method assumes each rise is equal in height, most often that is not the case. It is better to scribe up from each tread then to mark a plumb line from each nose. You will need to measure each overhang on the treads to finish the layout. Depending on how accurate you need to be it is sometimes best to, if your tread overhang is 1 1/4 to only cut it at 1″ to leave room for a final scribe to allow for error in your plumb lines.
Steve,
The beauty of this method is that by scribing the actual stair condition to the skirt board material transfers any irregularities automatically. Any variations in tread height, depth, overhang, as well as any cup or twist in the treads and risers, will be accounted for.
Todd
” This method assumes that each rise is equal in height, most often not the case”. Not at all. The height of the scribe stick is never changed which puts the cut on the skirt the same distance above the treads which accounts for whatever height differences in the treads. No different than any other type of scribing.
Hey.
How do you scribe the nose part on an old stair case if you don’t have a Spare tread or material to act as the nose template
ThanksG
Our daughter bought a 1800’s farmhouse and we have been updating it. We intend to use retrofit stair treads that go over the top after the skirt is in place. No two steps are the same. I thought I understood the process but the result was way off. Are you still in Montrose PA? We are up route 81, just north of Cortland.
Any interest in a road trip?
Thanks,
Mary
Hi Mary,
From your photograph it appears that you didn’t remove enough material from the skirt board. When you setup your “scribe stick,” be sure to use the rise of the TALLEST step and the run of the DEEPEST tread (you can even add a little more to be safe). This may seem counter intuitive when you are dealing with variable tread heights and widths, but it is essential for this system to work. See the illustration posted in comment #66. I’d also recommend following the link to the original article written by Norm Yeager that’s mentioned at the beginning of this article. I hope this helps and good luck with your project!
Regards,
Todd
…
Wm. Todd Murdock
Art Director, THISisCarpentry.com
Todd,
Thanks so much for the reminder to use the tallest and widest step. We have used this 2 more times. We did have to tweak just a bit to perfect it but we are now sold on this process. Thanks so much for making this kind of help available. I have no idea how we would have done it otherwise.
Thanks again!
Happy New Year. Mary
I am an average (at best) DIYer and this method worked excellent for me. The only thing that kept the skirt from turning out perfect is my below-average carpentry skills. It is CRUCIAL that you mark your scribe for the tallest rise and longest run, and scribe each step with that. DO NOT adjust the scribe for each step or this method will not work. I made the mistake of adjusting for each step and couldn’t figure it out until I dug deeper into the comments. Luckily the mistakes were made on scrap pieces used to practice using this method.
I will be using this method again for the lower set of stairs (I have a split-level home). The nose of the tread on my steps is also 1″ dia. round, so I used a 1″ hole saw to cut the nose on the skirt. It made the rest of the cutting very easy.
WOW! Thank you to you and Norm and Don Zepp! I cannot quite comprehend the amazing brain that figured this out – even my carpenter friends were stunned and amazed. My stair risers are very inconsistent heights, and this method worked like an absolute charm, accommodating all irregularities. I am definitely an amateur DIYer – this was my first project with a jigsaw! And I am so glad to finally have finished stairs after 25 years in our home.
Shannon
This was a great explanation. I have a bit of a quandary. I have construction grade stairs going to my basement. I figured I would put on new treads and risers and a skirt. However, I noticed there is no space between the stringer in the right and the finished drywall. I can’t “slide” a skirt down the side as I can on the left. Suggestions?
One thing I didnt see covered was how to choose the width of the plank you will use. I need a skirt board that will meet 1×6 baseboard at the top and bottom of the steps. So because of the angle, do I use a 1×8? 1×10? 1×6 doesnt seem to work.
Hi Douglas,
Typically a skirtboard is 1 x 10 or 1 x 12 material that is fingerjoint or clear grade (unless you’re after a knotty alder look). Anything smaller (1×8 and under) and you run the risk of it breaking after transporting it back inside from the saw horses or it just won’t clear the top of your treads just the same.
To determine how to terminate the skirt board into your baseboard you need to place a scrap piece of the baseboard next to the skirtboard (after your skirtboard scribing and cutouts are done) and intersect the base and skirt at a vertical point on the wall where the top edge of the baseboard meets a vertical aspect of the slope of the skirt board. (
So dryfit your skirtboard into its final position and then draw a plumb line (use a level) on the skirtboard from that determined intersection point of the baseboard and skirtboard then the baseboard will transition into the skirtboard nicely after you cut the skirtboard on this plumb line.
Other times such as if your stairs don’t have a long wall at the bottom or there’s a kneewall on the second floor the skirtboard angle might not allow for a seamless transition into the baseboard or perhaps your baseboard is too short as well.
In this case decide how much taller you want the skirtboards highest point of the plumb cut to be from top of the baseboard and go with it. A couple inches in difference can add a modern look to this intersection and looks nice as well.
Hope this helped.
When I lay a 1×12 over the treads of my stairs, the 1×12 fails to touch each stair tread. If I’m at the bottom of my stairs and I push the 1×12 down so the bottom makes contact with the stair tread and the downstairs flooring the top of the 1×12 sits about two inches higher than the top stair tread. I’m unsure how to properly set up my scribe due to this unexpected problem.
Should I set my scribe for the height of the tallest riser then add the distance the 1×12 sits off the top of the upstairs tread? Or do I just use the tallest riser as the height for my scribe when scribing the risers into the 1×12?
Thanks in advance for your time.
Would this method work if the stairs are carpeted? Any advice?
eefe007
Hire a freelance SEO specialist
The drug has been used as a bitter tonic and a digestive aid. best price buy https://www.nuvm.com/clomipheneusa/ clomid usa https://www.nuvm.com/buyclomifene/ no rx ACPE standards, and changes in higher education and the healthcare environment.
Heya, pal! Haven’t seen you in forever. How’ve you been? Greetings! Your website is exceptional. Let’s work together to raise awareness about ethical battery recycling and disposal Recycle drone batteries for money Keep the positivity alive, and goodbye
Mguheidjwdhwfhwj jhiwhfbewjfnwqjfhew jbijfwfkwjdbjkewde fewjnfwqjbdwefhewofhewjbgf qwjfewhfewijbfewihgfewjknfewjkfje bjfewfjewjgbrejgbrehbg cceye.com
это mailsco
i removed the carpet 3 years ago on my stairs leading to the basement. i have read this article 30 times and i just cant do it. i was feeling pretty bad about it too, until i had 3 “contractors “ who said no to the job. im in kansas i have the treads that are rounded. my home was built in 1976 i want a stair skirt. 1. how much would this cost in kansas to have a contractor do(if i can find one) 2. may i purchase the carboard templet from you ?