


Van racking is basically just trim carpentry with loads of scribes, using elements of North American face frame construction and European box systems of cabinet making. But it’s also an exercise in extreme organization. Getting it right can save you time and energy on the jobsite—both of which lead to increased productivity and profits.
I’m a lead carpenter—if it’s wood, I do it. From framing roofs to trim carpentry, kitchens, cabinet making and housed string staircases. My van racking system must carry any subset of tools.
(Note: Click any image to enlarge)
The make and model of a van is immaterial to the process of van racking. The van in this article is an LWB Trafic—slightly smaller than a standard Merc Sprinter. Racking a moving toolbox is typically done with ply, 2x and 1x. (If you want a “pimp my van” job, you’ll have to spend your own money!).
Security: Shake, Rattle, and Roll
In heavily populated areas, parking is often far away from the jobsite. You might want to consider fitting deadlocks on the cargo doors. Bulkheads between the cab and cargo area can also increase security, as well as provide wall storage.
This van will eventually get a limo tint, and an internal security cage on the rear tail lift—bricks can open windows!
Everything in the cargo area is subject to shake, rattle, and roll. Tools and toolboxes must be secured so they don’t fall out. Simplicity is always the key. There is nothing more annoying than a squeak you can’t locate. The design and build should take these matters into account.
Ply Lining Kits: A No Brainer

I replaced the wheel arch covers with 3/4-ply.
A ply bed in the van reduces drumming and provides a fixing surface—something solid to which other components can be secured. Ply lining to the walls protects the panels from being dented from the inside while also providing another fixing surface. Re-sprays are expensive; ply lining kits are cheap. It’s a no-brainer.
This van came lined, so my first job was to replace the wheel arch covers with 3/4-ply to take weight, and to act as a fixing surface. I’d recommend rebuilding the wheel arch covers in smaller vans with 1x and 1/2-in. plywood to improve strength.
 Ply-lined sides make locating the side ribs for fixing points more difficult. Roof ribs are far more useful. Ply sides are fixed with self-tappers, so they won’t take any weight on their own.
Adhesive/sealants like Sika EBT (an elastic polyurethane adhesive/sealant similar to DAP Polyurethane) are the best choice when incorporating ply linings as a monolithic part of the racking. They also significantly increase the load-bearing capacity, and they take paint if you want to spray the racking.
Don’t use silicone as a cheap alternative—the joints will fail after a couple of years of constant shaking in a van.
Tools Dictate Layout
 Long, relatively delicate tools are the greatest challenge for racking layout, since they have to be carried flat. If you plan carefully, you can also build slots for door-hanging levels. Long saw tracks are another matter—they can only be stored down low or high up, and they’ll need protection (see photo, right).
The size and weight of chop saws and portable bench saws means they’ll want to sit on the bed, against the bulkhead. This is also the best place in an emergency stop. Plus, the sliding side door will make for easy access.
Other heavier items, like dust extractors or portable thickness planers and compressors, are compact in size and easier to lift. You can be more flexible in their placement. To avoid stressing your spine, consider positioning them so that you can lift them in and out without bending forward or twisting sideways at the same time you’re lifting. Wormdrives, heavy sidewinders, and transformers should also be placed with careful attention to your back.
Today, the bulk of carpenters’ tools come in boxes—and good boxes, too. The more regular the box sizes, the more compact your racking can be. The remaining space is for everything else.
Measure the Van
The van you have may be the right size for the work you do, but before building any racks, measure it carefully. This van revealed a floor length that will take a 2.7 metre (106 inch) Festool track. The rear lift tailgate makes loading plywood vertically—on its long edge—a bit complicated. However, I had just enough room between the wheel wells—48 1/4 in., after allowing for plywood build-outs—so I opted to transport plywood flat. Building a false floor (see below) made it easy to store my long guide rail, and it made it easier to load and unload plywood.
For this kind of project, you don’t need drawings. I’m no good with 3D drawing packages anyway. Use the tools themselves—draw around them with duct tape on the ply lining.
Identify Fixing Points and Layout Boards
The bed can be a stable, fixing point, as are the now-strengthened wheel covers. The steel bulkhead between the cab and cargo area invariably sports a rib or two. Screw a piece of 1x as another fixing point and leave it long for the moment—you’ll know when it’s time to cut it to length.
If there is no bulkhead, consider installing one! If you use 3/4-ply, it’ll provide more storage space and increased security. Most vans have nuts spot-welded to the wall and roof ribs. If they are available, and in the right place, they make good mounting points.
 Fix ply layout boards to the roof ribs for transferring layout lines from bed to roof, and then longitudinally down the van. Occasionally, they will become a permanent part of the racking. The Trafic’s roof ribs have 6×3-in. flat spots at either end, so fixing was easy. Most of the time, the best direction for layout boards is across the van. If you spend some time getting the layout boards parallel to the van bed, in both directions, it’ll make things even easier.
First Item: A False Bed (if required)
 I used 2x3s on-edge, which gave the depth of false floor required. Lay the tools on the bed set 2x around them, and screw the lumber down to the existing ply bed. I used screws long enough to fix into the existing ply bed, no further—if you minimize the number of screws used in the metal beds, you’ll reduce the risk of water penetration and rust.
Laying a 4×8 sheet of ply on the 2x gave the position of the “slamstop” in front of the metal bulkhead, and created a possible storage area between it and the bulkhead.  The slamstop is constructed from 3×2 framing material. I made mine tall enough to stop 10 sheets of plywood or MDF stacked flat in the truck. I was in a van crash once, and the load acted like a dead blow hammer when it hit the metal bulkhead. I wouldn’t want to be driving a truck if the lock came through the bulkhead! Hence the slamstop: it’s meant to fail in an accident, which will hopefully absorb some of the dead blow effect (like a crumple zone). I secured the slamstop framing to the ply floor with dominoes.
 I installed the false floor ply in sections, which allows for future (and easier) alterations, and provided removable panels for easy-access to other tools. All corners and edges of the ply here—and anywhere else in the racking—should be beveled.
Since the Festool track has neoprene anti-slip runners on its underside, it has to be transported upside down. A length of UPVC soffit board on the ply lining bed allows the track to slide in easily. A second piece, ripped narrower and glued to the first, prevents the track from sliding sideways and damaging the guide edge.

Bulkhead Storage
 Bulkheads tend to follow the shape of the seats in the back of the cab—down low will provide space for larger, longer items, and high up will provide space for smaller items. Bulkheads often have ribs that make for useful fixing points.
I attached two different battens to the ribs, one above and one below the viewing window, which gave a vertical fixing area. I then temporarily screened a 3/4-in sheet of ply with a cut-out for the viewer. This became the back panel to a face frame/box beam cabinet. I couldn’t put any ribs down low, so I found that bonding a 1/2-in. sheet of ply to the steel was a good solution.
 Since I installed ribs to the back panel for strength, shelving, and storage, I re-hung the cabinet as a single unit. Before installing a face frame, I bonded shelves for Kapex extension legs and the Festool crosscut system to the raked bulkhead ply below the unit.
I then installed a 1/2-in. ply face frame to bind the bulkhead storage spaces into a single unit, and I incorporated the slamstop, which I fixed to the floor through the Kapex extension leg storage and the installed unit around the viewing panel.
 In the end, these storage areas also had space for a 36-in. wrecking bar, a yard broom, and a counter top routing jig (see photo, right).
Partial Rebuilds Aren’t Uncommon
I built the lower bulkhead storage so that everything could be slid in and out through the side door. However, once finished it didn’t feel right! The Kapex extension legs are an irregular shape, both on plan and side view. Sliding an irregularly shaped object into place requires a regular oblong space, built to the maximum dimensions of the item. Don’t fall into the trap of thinking you have to live with something that doesn’t make your job easier.
I decided the solution was to face-load the extension legs, which gave me more room and increased the shelf sizes around the viewing panel (those bugged me the most).
Unscrewing the face frame was easy—that’s why screws should be the first option for mechanical fixings for racking; besides, nails loosen within weeks in a moving van. I extended the box beam to get more useful shelf sizes by gluing and pinning 3/4 x 3/4 with 16-gauge nails. Since the box beam takes a good deal of weight, I fixed the new face frame with longer screws so the 16-gauge nails weren’t structural, nor was the PVA glue.
Around four hours spent on a rebuild is nothing compared to years of frustration loading a van with a poor detail.
Maximizing Storage Capacity
Having drawn around the Kapex on its stand with duct tape, it can be left until later.
After laying out enough space for the Kapex,


I installed vertical supports for the tool box shelving.

| Be sure to plan locations for odd-shaped tools before tackling all the tool boxes. I included a spot for my compressor that was easy to access. |  |
| But later, I realized I had to store my dust collector there! |  |
 |
Because I use my compressor on almost every job, and because it’s HEAVY, I found it handy to keep the compressor closer to the doors—after all, the dust collector is on wheels! Yes, expect to make several modifications to your layout plan. |
Tool Box Storage
Now, on with the quick part of a racking job: the carpentry tools that come in boxes!
The regular footprints of systainers make them ideal for maximizing the storage capacity of a van. But other makers in the European market use the same boxes, like Metabo. All toolmakers buy boxes from Tanos. Hilti’s HIT chemical anchor system is sold in a different box, but the footprint is the same.
| With careful layout, I was able to accommodate my large double-size systainer above the dust collector, along with a standard Festool box and a Sortainer. |  |
Accommodating half a dozen boxes from several makers feels slower than accommodating Tanos boxes—you need to spend time coming up with a standard footprint that suits the boxes you have. I rack sections for these other tools in separate vertical racks to those for the Tanos footprint.
 |
My biggest fear is that Festool will come out with another must-have tool. Then I’ll have to do a little more remodeling to my racks |
Removing the innards of a Festool box means that more than one tool can be transported in a single box. One of my boxes now carries three sanders, and the other two didn’t go to waste! One has both a Fein MultiMaster and Metabo die grinder—both tools always get used on the same types of work.
 |
 |
 Another box, with suitably modified innards, holds a 16-gauge angled Paslode gas nailer (this means I have one less awkward-sized Paslode box to worry about).
Biscuit joiners fit into systainer boxes, and even Lamello ditched their trademark wooden boxes in favor of Tanos. All 4-1/4 inch angle grinders will fit with plenty of room for spare blades.
All of these space-saving and storage techniques translate directly into your shop storage, too. No shop is ever big enough!
Production Techniques
Having used face frame construction for the complicated bulkhead, I turned to the European system of cabinet making for the tool box storage. In essence, the system uses standard side elements and standard tops. The shelves are not movable, so they are the same as the tops. There are no 32mm hole positions to bother with!
 The standard tops and shelves in van racking need a cutout in the front to allow you to pull out the boxes. I always install a hole centralized over the Tanos box handles, since seeing through solid shelves isn’t possible, and this makes box removal easier. It also makes for useful fixing points, so you can strap down materials or objects carried in the body of the van.
 I made the width of the shelves 3/8 to 1/2 in. wider than the boxes. The depths of the shelves are all liable to be different—each one needs to be scribed to the back of the unit (the ply lining). Just make a template for the shelf and rout away!
Similarly, the sides of the units are all the same regardless of the back scribe. The heights are all the same because your roof layout boards are parallel to the bed. The top part of the scribe is the same on all the sides, where the ply lining and roof meet.
The top part of the scribe must be loose, so allow about 3/8, as all vans have wiring looms in this area. This “scribe” can be done once, as a template, and then transferred to all the sides you make. Scribes against the ply lining need to be accurate and should have a 1/8-in. to 3/16-in. gap. This gap will be filled with a sealant/adhesive. Using caulking shapers will increase the strength of the joint. Tight scribes squeak, and no standard wood glue lasts long in this position. The movement of the van will eventually pop glue joints or even crack the wood itself.
Prevent your tools from crashing to the floor
The three simplest ways to prevent your tools or boxes from crashing to the floor when you’re driving are back-angling the shelves, shelf upstands, or dowels. In a racking job, you will use at least two, possibly all three. Other methods are just too clever to use in a moving toolbox.
Back angling shelves often works well. Nine degrees is a good number for soft tool bags, but for solid objects or boxes, you’ll have a point load. Point loads always squeak in a van.
 Shelf upstands—or recesses—are a good solution, but they reduce the vertical space available for other boxes. Of course, for some tools recesses or cut-outs are best: they don’t have to be just along the face of the shelf. Wormdrive saws typically don’t come in boxes, and a piece of ply with a cutout that’s the same size as the baseplate for a sidewinder is an effective upstand. You’ll obviously need a slot in the shelf for the blade guard, too.
 In my opinion, the most efficient option is a flat “shelf” with dowels. Dowels do the same job as a fixed shelf upstand, with no loss of vertical space, especially if the dowels are removable. Dowels also increase shelf width more than an upstand, and I believe this system wins based on efficiency.
 Miller dowels are the best for the job, although it isn’t obvious because they are designed for a tight fit for joinery purposes.When racking, you enlarge the hole slightly so the dowels are removable. Drill a 10-mm. hole through the shelf to take a Miller dowel (10 mm. is half a millimetre larger than the first 3/8 shank of the dowel). The 1/2-in. head of the dowel stops it from falling through, and forms the upstand. The 10-mm. hole also makes the dowels easy to remove, but tight enough so that vibration won’t “jump” them out.
Don’t crowd the rear door pillars
| All vans have wiring looms in the rear door pillars. These are good access points for bulb changing or electrical connections, or bolts for changing out complete lamp assemblies. Anything in this area must be easy to remove. The rule is if you can’t get your hand in, or get a ratchet on a nut, neither can your mechanic. |  |
The nooks and crannies are up to you
Having built the racking to this stage, there will be nooks and crannies all over the place. Of course, you’ll need every single one of them if you plan to store all the requisite caulking, sealants, glue, adhesives, etc.
 |
 |
The rest of the job is up to you, your imagination, and the tools and sundries you need to carry. Guys needing to transport large numbers of Bessey K clamps will find rows of plastic waste pipe ideal. I recommend putting a back rake on the tubes so they don’t shoot out.
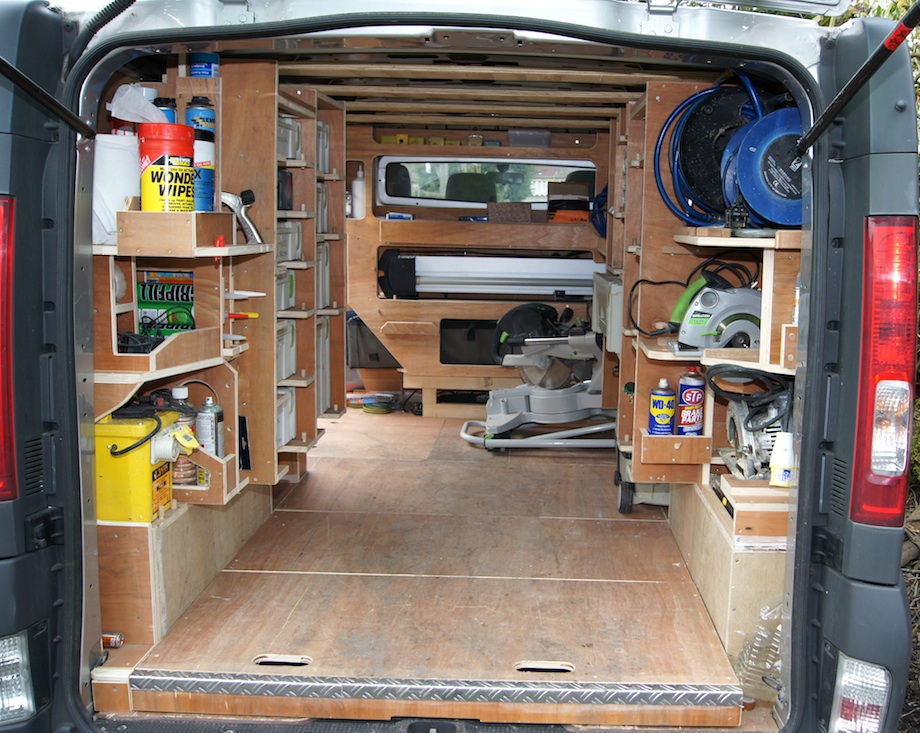
Here’s the van, fully racked and loaded:

• • •
AUTHOR AUTOBIO
 I learned how to renovate houses at my Mum’s knee, not my Dad’s. We moved from house to house restoring Victorian and Georgian buildings whose features had been ripped out in the “modernization” of the 1950s/60s. Then came half a dozen English timber framed houses in the 250 to 500 year-old-range. Mum was an artist, a ceramic restorer, and wove tapestry for relaxation. In her spare time….?! She also did guilding!
I speak in the past tense because she now has Alzheimer’s, but we’ve found her a care home which is full of architectural details that she loves.
I’ve been in construction all my working life. (I didn’t “make it” at the 16-year-old exams at school and ended up in what we call “technical college.”)
I was second in command of a 253 million (pounds sterling) job—the A13 road out from Canary Wharf. Of that 253 million sterling, I was personally responsible for 80 million pounds (sterling). My smallest sub-contract was 5 million sterling.
Now I’m a carpenter, and small-time contractor. And I mean small.
Very impressive thought & execution! Too bad you didn’t leave room for a bed and lunch table (smiley face here). Maybe next time. And yes, you will need to modify for the next Festool. That’s the good and bad of it. Some good tips for reworking storage even in the shop. Great article. Thanks.
Great article Tom! It is clear you put a lot more thought into racking your van than I did. I’m always swapping out more tools than I need going from one job to the next. Maybe this is the incentive I need to plan a real workable system.
Tom, very good article! It would seem this isn’t your first go around with fitting out a van. I didn’t see a table saw in there any where. Do you use one on site?
Keep on keep’in on brother!!
Really impressive. Truly gives me a great idea for setting up my enclosed work trailer. I typically work alone and have memorized nearly where all my tools are, but the organization youve established in your van is great. Takes away guess work. Thanx for the pics too
Tom a small contractor with a large brain and big good ideas. Great execution too. Sorry about your Mom’s present condition. It’s pretty clear she did a great job raising a son. Thanks for showing us your work.
Thanks for the comments guys.
Kent i do use a bench saw but the Festool Preciso 70 is is a heavy beast so i take it to site only when i really need it
My workshop is small so its racked in similar manner
Would you be persuaded to do my van?
Some good thoughts there. I am in the process of outfitting my van and your thoughts on working around the tools is how I did it. I am actually glad no one was watching me work. I spent a lot of time scratching my head, turning around in my van, placing a tool here or there to see how they fit, what type of box to use. And like you mentioned, as soon as I get a new tool I will have to figure out where it goes. Like you, I would rather think it thru now than later.
Nice article. We see a lot of commercial type storage systems from various vehicle re-fitters, but most of them don’t have the “custom” storage necessary for our career. Good solution on your part.
One thing though, I don’t see any lights in the van, are there any?
Nice job, I’m assuming you are based in the UK, I’m an expat living in the Hill Country of Texas who used to work for one of the ‘mega contractors’ in London back in the day (I too am now a small millwork/carpentry contractor). I seem to remember, back in the 80’s, the Met Police used to use ‘Ford Transit’ vans and I had a friend who worked as an electrician for them; they had a paper/masonite template kit for installing the plywood interiors to the back of the vans which saved so much time and were a really great fit we ‘borrowed’ one and used it).
I’m wondering if there are any companies out there making templates for the wide array of trucks and vans now in use, here in Texas we all seem to use pick up trucks which could certainly benefit from a certain amount of ‘racking’.
Anyway, good luck and keep up the great work..
Steve Donnelly
You should go into the cabinet making business, ha-ha, just kidding. I have done similar things to my Sprinter truck but not nearly as advanced as yours. Great job!
mark bisig
Mark, the “concept” of this method is standardisation, to maximise storage space in the van. Odd size boxes waste space
My newest tool is a Virutex RA17D, it fits in a tanos / systainer box so i “threw” the makers box. I will have to spend a couple of hours making the innards to suit the tool, just like the paslode photo. It is worth the time
mgfranz
in the high lattitudes where i live. late autumn (fall) / winters / early springs have barely 8 hours of light
i will add cargo lights before mid september
steve donnely
vans in the uk are the “standard vehicle type” for tradesmen in the uk
any number of companies make ply lining kits for every van that is sold here, that is what make the kits cheap
I have a Ford E250 with Adrian Steel racking. Very typical configuration in my area. Durable quality setup but with the concave body style of the e250, there is a lot of wasted space along sides and top. Have not found template for e250. Considering making my own templates. Suggestions?
mike rogo
now ive explained and shown you how simple it is
all you have to do. is do it
I am in the process of “remodeling” the storage in my Sprinter, thanks for the ideas and inspiration.
charles
gary katz’s book on hanging doors told me how easy it is. IF you follow a system
this artical is MY attempt to “give back” what gary has given me
my english peers dont give a monkeys, but maybe you north american guys might gain advantage
giving another professional an idea or a possible advantage is a good feeling
Tom,
This was article exemplifies what sets craftsman apart from consumers. I have been working out of a Dodge Ram for years and my business has finally grown to the point that I have purchased a Sprinter. I was banging around the internet looking at storage solutions when I came across this fine example of “solving your own problem”. The appeal of custom work and pride of making it myself makes the thought of spending $1000 to 2000 on metal silly. Just looking at the beautiful job you did made me sigh with anticipation. It’s a rare talent you have, whatever you are charging, charge more. Thank you for taking the time to document what you have done because there is a big leap from technically capable to creative competence and without your landmarks my van would always look like a high school carpentry project. I will say a prayer for mum, it’s a burden few understand.
Inspiring work! Thank you for all the details, Tom. I’m slowly designing a trailer for my tools and this article will come in very handy. Best of luck with your work!
Tom great article. Can you take a picture I about 2 weeks to show it filled up and can’t walk in it! Great ideas. !
kreg
if i posted tommow morning’s photo’s it would show less festool boxes in the racks
but there would be four storm casements i made over the weekend and the four eight four, argon filled “E” glass double glazing units all ready to install
:)
Nice system and very well thought out. Do you use a trolley to move tools from the van to the jobsite?
Tom- Wow……..your life, your parents, your work….and your van, of course, just spell out L-O-V-E. You are a blessed person.
Tom, while reading your article- –and your education bio in particular…because I ‘fell’ into a very similar category–square peg for a round hole world, I guess– I was entranced by YOUR love for what you do. And…just think, Tom, you could have been the “…verger of St Peter’s, Neville Square!”- (W. Somerset Maugham’s wonderful short story ) .
I must ask about the van…the Renault Trafic looks like it is truly intended for us tradesman—being squared-off, etc. And I think it is one of the coolest looking retrofits I have ever seen. In particular I like your subfloor solution for long, delicate and expensive tools. Is the van efficient -fuel wise- and is it fun to drive, or is it a beast on the road. Also, how is it for cornering , especially on your single cart lanes?
Thanks for a wonderful and inspiring article, and the best of luck to you.
Ed Latson…….Danby VT
keith
i very occasionally use a sack barrow with a piece of ply bolted to the foot to take the festool boxes. i hope sack barrow is a term that crosses the atlantic
ed, thank you
two other van makers sell the same van under their own badges. vauxhall sell it as the vivaro, nissan sell it as the primastar
vans, all vans these days, drive like cars and corner like they are on rails
i get between 700 and 800 miles out of an 80 litre tank of diesel, it has a 2 litre engine. at illegal speeds the mileage drops like a stone. these vans are good for 95 mph plus
finally a bit of myth busting, single track roads are hard to find in england, except in remote rural areas
Tom- Our last trip to England was our 4-week “Pub and Cathedral Tour” in 1993—also called” The Save the Marriage Tour”-which it did after just 3 days in Spittlefield. At the time -and with the aid of our trusty Royal Survey guide- we did seek out many old lanes. Our tour was a cat’s cradle tour from Victoria Station/4 days in Spittlefield; off to to Painswick; down to the Wallops; over to Cheltenham (sp?); down into Devon-Oakhampton, Throwleigh,Chagford; back down to Salisbury/Stonehenge; again to Nether Wallop and the 5 Bells; up to Avebury; down to Brighton/ the New Forest; somewhere in there to Glastonbury Abbey, Wells Cathedral….countless other country churches and meeting houses…pubs too numerous to mention etc….and country people so polite, so gracious, kind and generous……and numerous side trips to stop and talk with chippies on an assortment of job sites.
And I can -somewhat- sympathize with you about your Mother…my wife and partner of 37 years is in a situation similar to your life story. She is and has been the driving design and sales spirit for our business for 31+years—fabrics/colors/paint/special finishes/furnishings/architectural design/interior design….and we, too, have been specialists in our older homes—-1750- Edwardian era/WW I…OUR version of old homes…..
And thank you for the input on the van, too. I’ve beeen looking at the Ford Transit Connect—poor fuel consumption; quite small; to short…but-Hey! It’s America- land of the Big Mac-the SuperSizer-54′ long box tractor trailers-ha!
Again, thanks for your enlightening attitude and excellent article.
Ed
PS- That was our 6th trip to Europe, our most extensive in England, and we came back home with a tremendous respect for English craft and craftmanship- in all the design and building arts……a most lasting impression.
Tom- Just received email from Nissan-North America:
“Mr. Latson- The Primastar is not available in North America. And thank you for input.” Atv 33-38 mpg…COME ON NISSAN! -Ed
ed an update
unlike the american market, which seems to major on pickups for tradesmen ? (perhaps that is an english myth about america, just like single track roads are an american myth about england)
the british market is fundamentally different. “vans” are the vehicle type of choice for british tradesman. it is a highly competative market 16 vehicle manufacturers selling nearly 50 different models. and many of the 50 different models are avaliable in different lengths AND heights
ford england had an advert in the 1980s saying that “the van” was the backbone of britain, how right they were
Tom–Yes…pickups….the bigger, the better….then you buy 1 or 2 trailers…you must remove them from the jobsite–in many cases—each night. They can be opened like sardine cans from their weak spot- the roof….
The pickup is America’s spine, backbone, and-probably- its’ trunk.
Thank you.
Ed
Tom,
Excellent storage solutions!!
I try to adapt my van to my particular needs as do you, and up until I read your article I was pretty happy with my layout. But since reading about yours I keep re-thinking my design.
You speak of the Tanos boxes as though they are common in Europe but over here as far as I knew (until I “goggled Tanos”) they only came with Festool tools. Since finding they can be had separately I’ve been re-thinking how my shelves are laid out. I’m thinking of trying your system. I have a GMC Savana.
Also I like your idea of keeping the worm-drive and plunge cut saws in their own little nook without boxes. I made a box for a Skil Saw Mag that I had gotten cheap at Lowes, $63! It had no case or blade so bought a blade and I built my own box. I built the box with as small a footprint as I could but it was still too big to fit on my shelves so now I only take it on jobs were I need a heavy duty saw. I had been making my own boxes for all my different tools with little thought to standardization but after seeing your system a can see where a standard would really save a lot of room.
I enjoy seeing others workshops and work trucks to see how other people have overcome different challenges. Maybe we can get Gary to put up a new category for work trucks/shops to see other ideas at work.
BTW what’s a sack barrow? A hand truck?
i very occasionally use a sack barrow with a piece of ply bolted to the foot
dan, hand truck is correct
Whoa,whoa,whoa!
At 80 litres, you can travel from 700-800 miles? I just took the time to do the math…..that equals =+-21 gallons….so you are getting between 33 and 38 MPG….and this is you doing 75mph, going downhill, with a 45 knot tailwind, van is loaded with12 kegs of Devon Glory and you have a truck pushing you from behind?
I have emailed Nissan-America to see where/if the Primastar is even available this side of the Atlantic. They do have a largish fire truck looking van, but nothing as artful as the Renault/Vauxhall in their website pages.
Wow!…..33-38 mpg…….Ed Latson
I have the vivaro. great van, quick too. I get 28 mpg, thats it, no matter how slow i drive, if its empty, 28mpg.
ed, i checked the on board computer this afternoon, i was giving the best figures
full to empty is actually 85 litres and works at 750 to 800 miles per tank at a steady 56 mph. it still isnt bad
in town with heavy traffic calculates at 700 miles
at 90 mph its under 600 a tank, this figure is rough, 90 mph is illegal so i didnt do it for long
WOW……Tom, even with your adjusted fuel consumption, you’re still looking at 31-35+mpg–this is based on your 700 mile- 800 mile range as you noted. Man, that is excellent.
Question Tom –in your photo above your heading entitled ,’Tool Box Storage’…what are the 2 tapered wood ‘legs’? They are strapped in with a bungee cord next to your Kapex…
Also, it looks like Bosch might be doing a decent job with their L-Boxx storage system. This appears to be their version of the Tanos/Systainer.
And, again, thank for the inspiring article, and your terrific feedback.
Ed
FYI-
Check out http://www.systainerworld.com and the new 1-latch locking system for the new systainer; some pretty good videos on the site; and an explanation of why their boxes are superior to the L-Boxx…Ed
ed, the legs
ive recently been working in small basements with only ladder access (on occasions) making my festool workbench unmanageable, traditional western sawhorses are no better either on ladders
so i made a rough copy of pair of japanese sawhorses, they are put together with wedges in under a minute and come apart just as quickly
bosch’s L-Boxx sorage system has a different foot print to the tanos and doesnt come in as many different variations and sizes
as for the diesel, i dont rush around, first i work in central london so you cant rush and second diesel is 1 pound 38 a litre…………. in dollars thats approx $ 2.25 a litre
Hi Tom ,
Good to see a fellow Englishmen here, like what you’ve done with your van. I have a VW T5 got it new in 2009 still not fitted it out fully. I ended up whacking my old van vault in it and thats it. Obviously I ply lined it but I had planned to build huge pull out drawers to take systainers. Maybe one day i will fit it out properly just never seem to get the time.
chris, my method isnt a “one fits all” solution, you havent changed your layout for good reason. i reckon it doesnt fit the work you do
my guess is your range of work is more restricted than mine, i know a number of carpenters for whom a van vault (or two) is sufficient
i did look at a “v dub, T5” but the renault came up first
anyone who is looking at the renault trafic or nissan primastar, the swb (short wheel base) … the standard size.
it wont take an 8×4 sheet of ply, you need the lwb (long wheel base)
Hello Tom-
I really enjoy coming back to your fine article. It’s been several weeks since my last rereading and perusal. One of the many things I find appealing about your system is how you have developed a solid storage ‘core’ for your basic tools and components. And the smaller bits are in units that are easily readaptable, or able to retrofit additional Tanos boxes ( when you buy the next great series of have-to- have Festool products).
Very saavy, very smart and also an economical use of materials and thinking about the weight issue.
As an old friend would say about your rig…”It’s a weeper—-so nice it makes you wanna cry”–also can pertain to a well crafted set of stairs, the perfect miter joint, etc.. Again- wonderful and inspiring piece of workmanship–Ed
Tom- Also….? What type/species of plywood are you using?
Curious….Ed
ed thank you for your compliments
positioning of heavy tools for crash safety, avoiding tool damage and back problems is important, you cant put an old head on young shoulders but i hope ive put it in peoples minds
the plywood is exterior grade, softwood ply, wbp (water boil proof glue) with B/C faces, i dont know what the species is. it is fsc guaranteed and made to british standards
american plwood standards are different, but the information above should give you all the clues to what ive used
Tom
Excellent article! I have struggled with van organization for years and will certainly be consulting this piece on our next set up project. I dream of such efficiency.
scott, read the article . then adapt “the concept” to your needs
this knowledge was hard won. several iterations of various vans, for me, and installing layouts for other contractors
good luck in your endeavours
I like the racking but think you could have paid more attention to the weight of the materials used.
d jones
The article was about racking. The weight depends on what racking you build and the load carrying capacity of the particular make and model of van being racked.
It also depends on the weight of the driver, passengers and in the case of this van, it has a towbar. All this would have been a distraction from the article.
The figures are as follows. This model of van can carry a load of 1236 Kilos (2725 Lbs) out of the factory. In reality the weight capacity is 1137 Kilos (2507 lbs) because the van has driver (me) and the tow bar has to be deducted from the 1236 Kilos
The racking including ply lining weighs in at 169 Kilos (373 Lbs) as follows.
Ply lining kit = 20 Kilos, 18mm plywood = 105 Kilos, 12mm plywood = 24 Kilos, miscellaneous 2×3, battening, screws and EBT = 20 Kilos
So having racked the van I have 968 Kilos (2134 lbs) for passengers, materials and tools.
Had I not installed a false floor the weight capacity would have been around 45 kilos (99 lbs) greater.
AMAZING! Awesome job, I love the way it all just functions, and Im fixing to do it in an 18×8 trailer, pics up soon… Thanks for some good ideas!
Tom,
Love the fit out of your van, I’m an english chippy who does give a monkeys, I’m fitting my van out over the christmas and your ideas have really helped. Pukka
tommy and adams,
good to hear that my ideas are strike the right chords
just by pure luck, last summer, i met mr festool uk at my local toolshop in leyton.
“Spud” suggested he checked out the back of my van, i was hauling family furniture that day, so the effect wasn’t as good as it could have been, but he still took a couple of pictures
hello there tom, iv searched for years to find a decent van racking design that is so smart but also works well with festool kit like myself. 1 question i do have to ask is how have u secured the shelving as you can’t see any fixings except silicone , to me it may look like you have secured to the 3 x 2 floor and cut the ply around it, not 100percent sure about the top swell. may b you could shed one light on it. my name is katie page, female carpenter in the trade for 10 years and 6 years self employed. many thanks for showing this great job for ppl to admire! :-)
katie, thank you for your comments
You are correct about the base fixing of the verticals away from the wheel arches. Over the wheel arches, the bottom of the verticals are screwed to the bottom shelves. See this Photo http://www.thisiscarpentry.com/wp-content/uploads/2011/04/DSC00523_1.jpg
The top of the verticals are fixed in a similar manner to the wheel arches. In top left of the following photo you will see I fixed the verticals to the top shelves. (The top shelves are screwed to the cross members on the roof ribs)
http://www.thisiscarpentry.com/wp-content/uploads/2011/04/DSC00493_1.jpg
thanks for your reply! great help, if u wudnt mind answering a few more questions for me that would be great!! i think its 18mm best ply you have use for the shelving and 1/2 inch for the floor or is it 18 on the floor??, do u ever find things fall off with only using the miller dowels ?? also if you could shed a little more light on the front section , can’t quite see what you have done there in total,as i like how u have the rail bag underneath with the chop saw legs above!!
trouble i will have is i changed my van from the traffic back a few years ago and have now got a lwb citron relay at 3500m long and 6ft wide. great size , but i do plan on using a few of your designs as i goto say its rally thought out! thanks
i take it the sides of your shelving isn’t fixed to the side of the van at all just top and bottom?, thanks again for u reply!! :-)
katie, no problem
The design concept can be adapted to any van of any make or manufacturer. I’ve installed systems like these to half a dozen different vans, so you changing your van won’t make any difference, the internal shapes are just a little different each time.
It’s all 18mm ply except for some of the small dividers near the rear posts.
Boxes only fall out if you forget to put in a dowel :) and one dowel is all you really need.
The rail bag is slid into the slot from the side door. The Kappex legs are slightly different. You face the bulkhead, slide the right hand end of the legs into the recess on the offside then push the left hand forward and put in a single Miller Dowel in at the left hand end to stop them falling out.
For any North Americans following this reply, you would build the Kappex leg slot handed, IE put the left hand into the offside
The vertical sides of the shelving are fixed to the ply lining with Geocel “The Works” avaliable from Selco and Screwfix. Don’t use silicone, it gives way after a few years.
The scribe between the verticals and the ply lining MUST be slightly loose, about 3 or 4 mil so that you don’t get ply touching ply (it will squeek and you will never find it, a real mare…….. )
To clean up the “The Works” or Sika EBT, I use silicone moulders, like these from screwfix
http://www.screwfix.com/p/no-nonsense-smoothing-tools-straight-joints/92313
tom
thanks for your reply! i was wondering if i could b a pain an ask for a closer pic of the kappex leg slot, I’m not 100percent sure where u are saying the miller dowel goes? many thanks
Hi Tom,
You are one of those people who are just so inspiring to others. There are not too many professionals out there who have a conscience and take pride in their work. I have a Mercedes vito lwb. Because I have got 2 sliding doors on either side, I have been trying to figure out the best thing to design. Have you any ideas that would work for me? Or have you ever fitted out a vito? Many thanks
Darren
I was just searching on the web to find some examples of racking, when i came across yours, its fantastic.
Im not sure i can plan it so well as to have a space for everything but what you have done is great.
I only have a Peugeot Expert so space is limited, i am def going to put a false floor in to hold my hop up, ladder and spirit levels, then the shelves will follow.
Thanks for the inspiration…
Ian
hi there again tom, I’m looking for a bit of help ,, I’m at the stage of going to put in my shelves an really could do with some help with the fixings side of things!! we have sed before the bottoms of your uprights are held in by the ply on the floor and all u have is glue at the back??? and some kind of design on the roof. I’m hoping you can shed some more light of useful hints and tips on this so i feel more cumfortable before i go ahead and tackle them! many thanks.kaite
I am weeks behind, business calls at this time of year. Katie, Darren and Ian
Katie, I WILL get the photo you require as soon as I can
Darren, I have fitted a Vito for a sparks. What we did was to get his tools into Festool/Tanos boxes on one side of the van the remainng space and other side was racked to take coils of wire and his other stuff. Ladder(s) on a roof rack and conduit in a 3 metre tube (10 foot)
For carpentry on a Vito you must get a roof rack to take sheet goods (the Vito’s cargo space won’t take 8x4s either fully flat or fully vertical unless you accept some damage to the goods OR the van internals) Use your cab/cargo bulkhead to advantage.
Rhino roof racks (UK) and their storage tubes are some of the best avaliable, they exceed German regulations, are crash tested to 20 G, are powder coated steel (the tubes are anodised aluminium and lockable) the nuts bolts and fixing washers are stainless steel
Ian, Peugeot Expert http://www.peugeot.co.uk/showroom/peugeot-van-range/peugeot-expert/
Ian, you can do it, just take my ideas and adapt them for your own use, use the Vito ideas as well ‘cos the Expert cargo space is similar to the Vito, it tapers from wider at the bottom to narrower at the top.
I’m hoping to sort the shelving part this weekend com in if possible to help me out before then so i can understand the shelving a little more as at the moment I’m not 100 percent an i don’t wanna rush it an spoil it or do it and it isn’t firm enough
Great work on your van system! It appears that your floor bed boards are all removable compartments. How did you fasten them from popping up or sliding?
Jeez, – You just cost me a fortune and lost me the whole weekend!
Thank-you very much Tom! lol
I found your article whilst searching for van racking and ended up having to do something like yours. Particularly like the ideas with the circular saw holder and maximising the space using the nooks and cranies. Got about 1/4 way through it this weekend.
One question for you though – You say you bonded the lower half of the bulkhead to the metal bulkhead – what did you use to do this with? Just construction adhesive? No more nails etc.
Tom,
Thanks for the reply mate. I don’t suppose you have any pics of the sparky’s vito?
Thanks
Treganin and Darren
Treganin… Sika EBT it is a construction adhesive/bonding/caulk that is permanatly flexible, and unlike silicone is paintable.
Darren, no photos of my mates Vito. It was just another job, so I didn’t take any photos
Tom
Daniel
The van bed is ribbed steel, with a 6mm plywood lining. The compartments are not removable.
Compartments made of 3×2 (CLS ie american sized 2×3 lumber ) finished size 38x63mm.
I located the 3×2 over the “valleys” of the steel bed and specifically used 2-3/4 inch screws (2-1/2inch plus 1/4 inch) so they might scratch the steel bed but would not penetrate it even if i got the 2×3 position wrong.
Tom
Katie, I hope this image works
http://s1200.photobucket.com/albums/bb340/TomBainbridgeCarp/Van%20Racking%20Details/?action=view¤t=RoofLayout.jpg
It shows plywood attached to the roof ribs of the Renault Trafic. With the Trafic it was easy, it has 6×2 inch flat spots. Other vans have captive nuts in the roof ribs, other vans require careful scribing
Tom
Several people have asked how the uprights for the shelving are connected to the ply lining, without mechanical fixings.
I got the idea from fillet welds used by enginners/welders
Here are two photos that explain the method. When you look at both of them the explanation becomes clearer
The first is the joint detail. The chamfering of the uprights are to increase the surface of ENDS of the 18mm from 18mm to 23mm (about 30 percent increase in area)
The EBT photo shows that the surface area of 18mm on the ply lining can be increased from 18mm wide to around 28mm (also about 30 percent)
The 3 to 5mm gap is there for several reasons. A gap ensures that there is no possibility of a squeeks that you cannot find and eliminate. The gap can be filled with EBT and it means that your scribes don’t have to be perfect, so they are quicker to do.
The second photo shows the EBT joint, which mimicks a welders’ fillet weld
First http://s1200.photobucket.com/albums/bb340/TomBainbridgeCarp/Van%20Racking%20Details/?action=view¤t=PlywoodJointDetail.jpg
Second http://s1200.photobucket.com/albums/bb340/TomBainbridgeCarp/Van%20Racking%20Details/?action=view¤t=EBTJointDetail.jpg
Tom
Hi Tom,
Excellent, inspiring article. I’ve been looking for storage solutions for my van and some of your ideas will form the basis for my own adaptation. I’m in a different trade, and have a whole host of different tools, but the bulkhead storage unit looks fantastic.
Sean
Tom this article is fantastic I’m glad you have taken the time to put it together,I live in the sunny south of England and over the years racked out many vans and each one has had its own touch.other trades I know mock my designs as too fussy but I would much rather a tidy efficient work space to the usual pile of tools.
Again fantastic quality there in your work.
Many thanks Tom
As Tom has just said, I’ve also shelved out numerous vans each with detail and time, just looking at the moment for a new project and one that’ll save time in the future, like everyone else a huge thanks and a heart felt sorry for the latter but fully understood by all, too many I’m sorry to say, cheers Q
Just getting out of the pickup/job box routine after too many years and annoyed by all the high-budget storage systems…
THANKS TOM for sharing your great ideas…as others have said: so well thought out and expressed…you ought to write a book!
Peace and long life to you and yours…!
Thanks very much for the inspiration, found your pictures whilst searching for ideas for my van. Took a while but now everything fits in a neat and tidy way, the false floor overcame many storage problems I had whilst maximising the space. If I ever figure out how I will download a couple of pics.
Martin pearce. thecaravanmedicswindon
Hopefully this will have a picture attached.
And again.
Last one!
Fantastic article, many thanks. I’ve recently have made a similar move from London Bank based IT to handyman etc and loving it. Money isn’t everything! Just purchasing my first van and looking forward to decking it out, this will be most useful.
What trestles have you found best for supporting timber/sheets for cutting on site ?
Kind regards.
Tom… Little help please. Where did or how did you get that worm drive? I’ve searched everywhere, I don’t want to risk importing one from the US to find out I can’t swap to uk 110volt.
Cheers
Tom ward
Tom:
I have recently bought a Ford Transit Connect and was just browsing the net looking for ideas of how to fit it out to accommodate the bits of my pest control business. While your basic ideas are to be expected (neatness, organization, flat spaces and standardized box management) your added touches such as the false floor and your tips on how to avoid squeaks are over the top. But what most impressed me was your execution. I am only an aspiring and amateur woodworker, but while you may see your finished product as just a means to an end, from my perspective it is a work of art! For you that’s just a work truck but I’d be proud to get these results if I were remodeling my kitchen!
I will be taking liberties with a couple of these innovations with the transit, though some things are difficult in wood when one uses large quantities of chemicals. Metal or plastic are preferred. But perhaps with some spray on truck bed undercoating I can get away with that false floor. Since all of my tools are smallish I will need a slide out solution for below. My preference would be to MAKE these but given limited talent I will likely wind up buying an existing system. The TC does not have a bulkhead and what is offered in aftermarket prohibits reach back from the cab. I am thinking a simple plywood half-height partition there. Once it is under weigh I will try to post pics here. But thanks again for the inspiration!
Tom from the U.S.
How are the shelves fitted in this? Looks like they have no fixings in the side, or supports underneath. It looks very neat and would love to try this in my transit van. Any advice for a novice would be appreciated
Lee
This was a huge help! I have been looking for some tips on doing something like this to the Ford Transit . It’s very compact as far as “vans” go! So I really to optimize every sq.inch!
About to do a panel out on my new Transit LWB Hi Top….. given me some great ideas… thanks for pics :) great work.
Really inspiring Tom!
I now want to replace my metal shelves with custom wood racking in my Ford e250 handyman van. One question; how are the shelves for your systainer boxes fixed to the verticals? looks like just a couple screws put in horizontal through uprights? no cleats to hold the weight of boxes? didn’t seem like edge-screwing ply would be strong enough for your boxes with power tools.
Any insight would be most appreciated.
Thanks,
Bill
hi
is there any reason why you have used 18mm ply? I’m thinking of using 9mm, have you tried any racking with 9mm?
Tom, WOW!
Tom,
I have been given a new Ford Transit, about the size of a Merc Sprinter. It has a rubber floor, but is otherwise unlined.
– do you have any suggestions about attaching a plywood floor? or would you just use the “bulkheads” to press the floor down?
– I would like to use foam core ply for the bulkheads, and maybe for the shelves, glued in with your Sika EBT. I want the foam core to reduce weight, save gas, save tires, improve handling. Any thoughts?
Hi Gerard. I’m also looking for advice on the same van. What are you using yours for?
Tom
This is my SWB Transit mk6.
I basically ripped off most of your design. Sorry. Best investment I ever made. Only difference is I battened the length of the van roof with ply strips, rather than the width. They’re bolted to the ribs. The storage is all butted against those, so it’s rock solid.
There’s some work to be done on the bulkhead area, I think there’s some more storage to be had there above the ladder.
The addition of LED strip lights is highly recommended, I used to go mad with the pathetic factory lighting in there! I now have the equivalent of nearly 2x 100w lamps. The 12v can be simply wired into the existing lighting circuit, very easy.
I’ve also invested in Armourshell locks
http://www.tvl-ltd.co.uk/content/armour-shell
Clifford alarm, tracker and a steering wheel lock for good measure.
What you’ve done is by far the most useful info on van racking to be found on the web, thanks a million!
Hi Tom
I’ve just been looking around at some ideas as I have just spent a lot on a new van and wanted to do the best I can in the back. Just wanted to say nice work and you have some cracking ideas. Keep up the good work.
Regards ,
Joe
Nice article but one thing I’m struggling with is the fixings that attached the wooden lengths to the roof fixings?
What type of fixings are they please?
Hi, great job, am a little worried now though about my own van. Didn’t quite understand what a slamstop is or how you built it to take ten sheets?? Please can you explain what it is.
Many thanks
Great article but you don’t show where inner rails are for fixing ply to van sides. I have a Sprinter already lined but cant seem to find where wall rails run on sides of the van to allow me to fix a securing bracket for a top heavy tool box any sizes or positions would be most helpful
Best Regards
Alex Mulholland
Tom,
Great job! I was looking on some tips for building some storage shelves in my van and found this and has blown me away. I’m scrapping my original plan and going all out like you. Nice idea with the false floor by the way. My only issue is I have a caddy van, so limited space but will do my best.
Keep up the excellent work my friend!
Jake
can you use 15mm ply or 12mm ply many thanks
“my english peers dont give a monkeys”
Hi Tom,
As a UK plumber, I would hope I’d be considered one of your peers. Well, I give a monkeys – I’d love to have a van as tidy as yours. Sadly my Peugeot Partner is always going to be tight on space, but if I racked it efficiently, I’d not have everything in shoeboxes et al. all over the loading area. Standard racking won’t do – it’ll have to be bespoke to make good use of what space is available.
I know precisely where everything is, but it can be tiring to have to lift boxes to get to the boxes underneath and always have to reach into the far corners from the door because I can’t step into the van.
Great article – I just need to read through it a few more times until it sinks in fully.
Cheers.
Hi there. I’m living in Cambridge and I have a vw t25–I need panels out. Are you close to here?
Thank you for sharing your craftsman ship and thought processes. Brilliant work. Will share with my son!
Hi Tom,
Firstly can I just say what a fantastic & detailed piece, which makes for a great read & really is inspirational.
I am a sole trader electrician & have now just got my 5th van. I have always racked out my own vans & each one is an improvement on the last. I have had 2 Renault Traffics both with twin sliding doors but now switched to a LWB Ford Transit Custom crew van. As I now have less load space & only accessed from the rear doors I have to be a bit more creative as well as having a cull on what I carry. As well as power tool cases, I have a lot of plastic organiser cases & am planning to get more to replace my lin bins.
For my Traffics I used 9mm ply shelves with 25mm x 50mm batten for the uprights & shelf supports top & bottom. I note that you used 19mm ply all round, do you know the likely weight & strength difference? Also what is the best way to secure the shelves to the verticles?
Andy Breeze.