


Carpentry is more than a job for me, more than just a trade, and more than a profession, too. Carpentry is rooted deep within me, along with my Swedish origin. I know this for a fact because I spend more time appreciating other carpenters’ work, and appreciating architectural ornamentation, than I spend doing anything else in my life—other than installing finish work, of course.
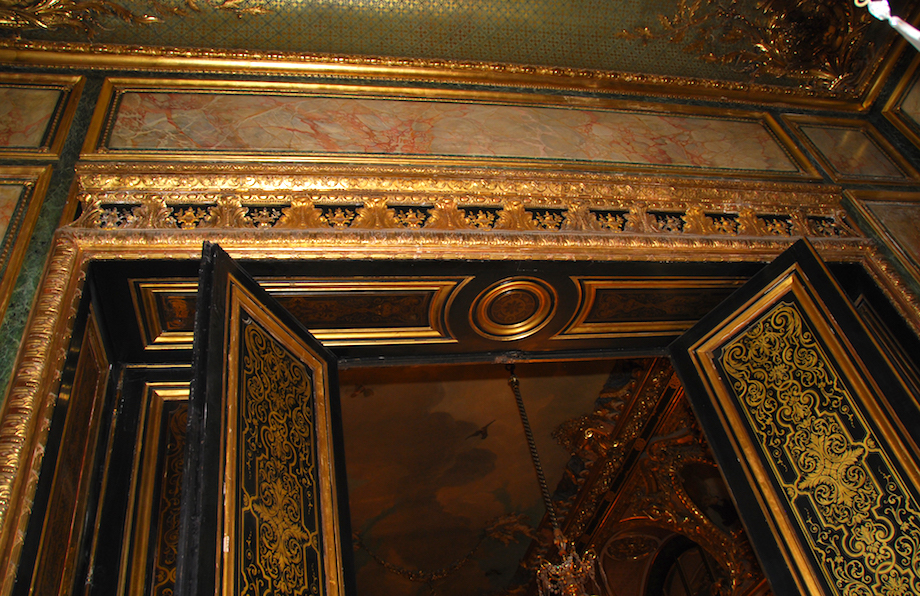
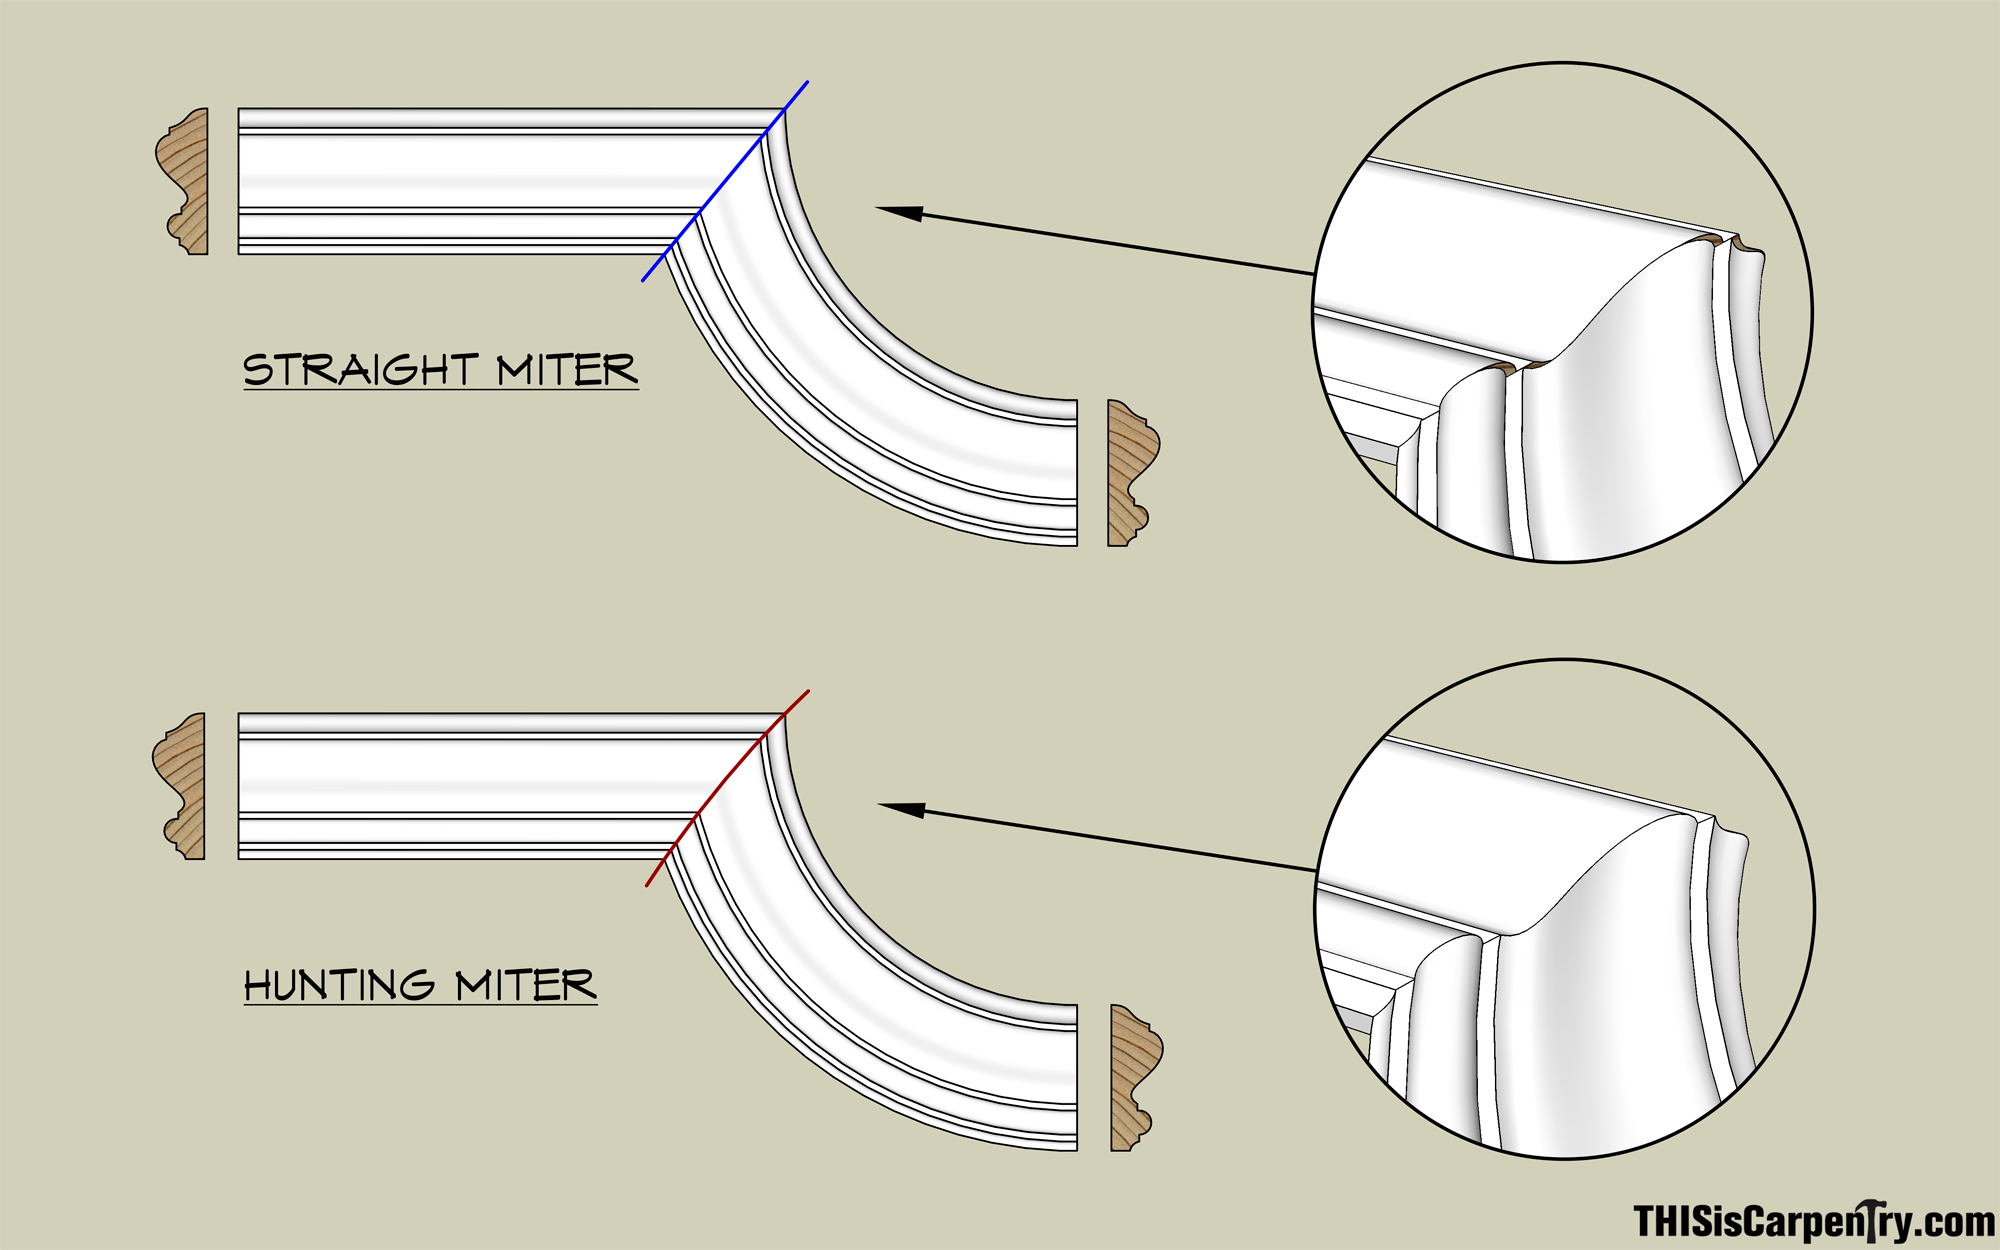
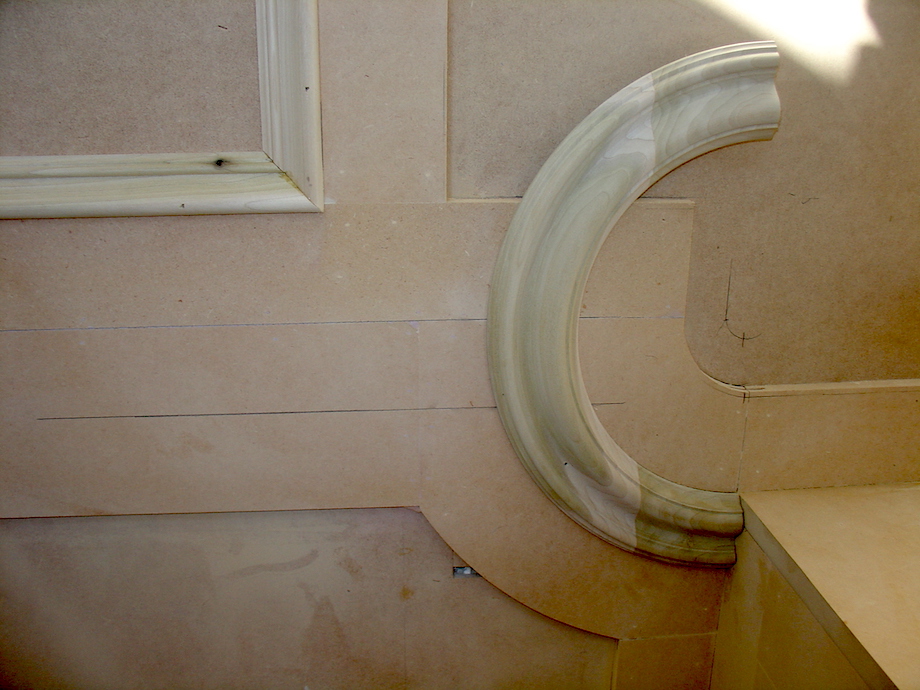
I return to Europe regularly, to visit family—at least that’s the excuse I use, but in truth, the siren of historic architecture lures me. I’ve taken so many photographs of architectural details that I can’t keep track of them. One detail that has always intrigued me is the hunting miter—a curved miter joint used when straight moldings and curved moldings intersect.
|
A Note from the Publisher: Parts of this article also appeared in JLC magazine (September 2008). We thank the folks at JLC for their wholehearted support of craftsmanship. |
.
 |
 |
Note: Click any image to enlarge.
Like a lot of carpenters, I’ve cut countless miters in arched door and window casings. But like every other carpenter, I’ve also noticed that the details in the molding profiles never seem to mate-up perfectly. Even when the short points and long points meet, and the joint is air-tight! Like those carpenters, I’ve also put in my share of time when it comes to carving and sanding those profiles to make the transitions look acceptable.
However, when the molding transitions from straight to curved at a more acute angle, typically on chair rail or panel molding…forget about it! No amount of sanding and carving will solve the problem adequately, at least not on the high-end jobs where I work. A hunting miter is a better choice.
While reading George Collings’ book, Circular Work in Carpentry and Joinery, I learned that a curved miter isn’t the only solution to this problem. Another option is to create a new profile for the curved molding; this process is similar to the one used for developing rake crown profiles for pediments and eave returns. While this technique has its place, it’s not always the most practical solution and it won’t work in every situation.
My first attempt
My first attempt at cutting a hunting miter was years ago, on a job that Dan Parish and I worked on. After that job, we were visiting Gary Katz and had a great conversation about the joinery. Here’s a video of that meeting (remember, this video was filmed more than ten years ago—we were all much younger then!):
The intersection matters—a lot!
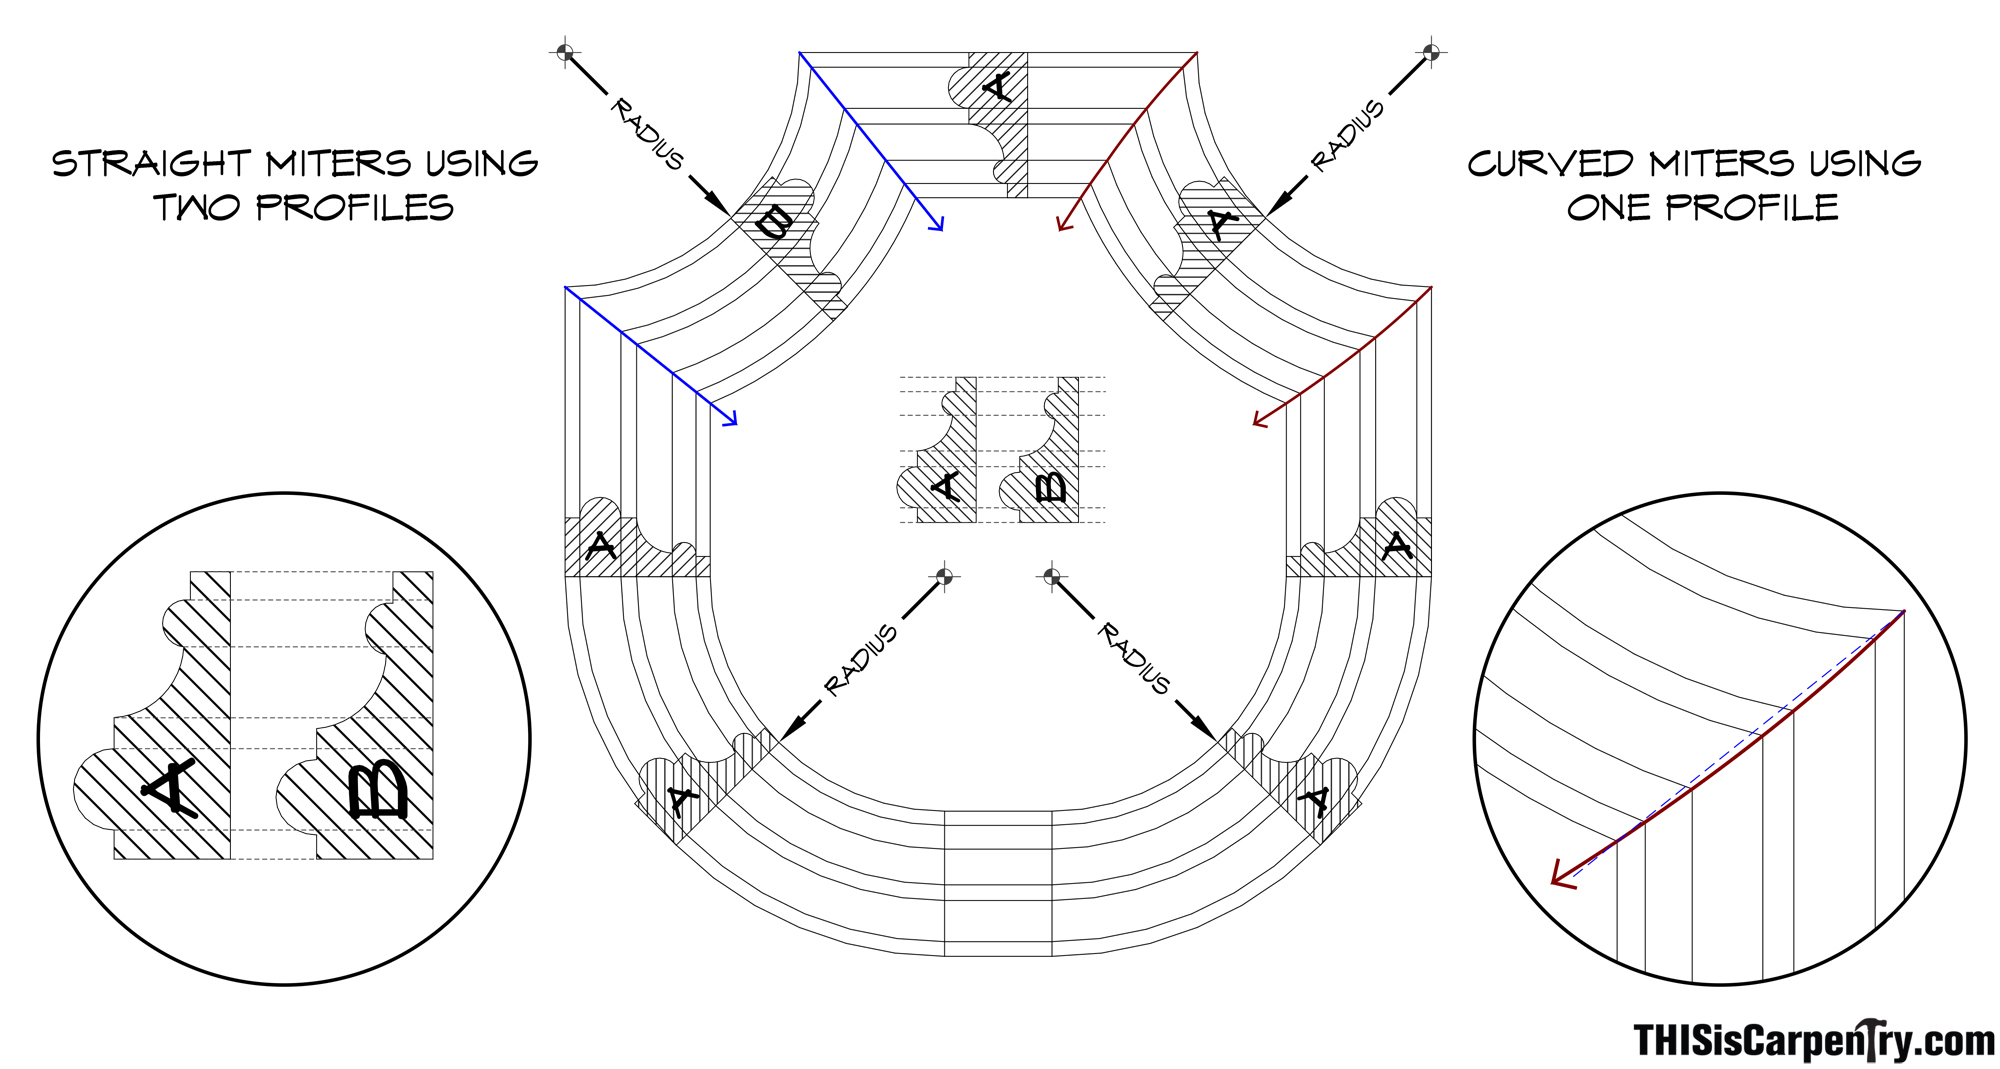
Since that job, I’ve used hunting miters on several projects and learned a lot more about the joinery. The required shape of the curving miter actually has more to do with the layout and how the two moldings intersect than the size of the molding or the radius of the curved piece. How the two pieces intersect can have a huge affect on the shape of the miter—even when using the same pieces of molding!

For instance, if the straight molding intersects the radius molding near its center point, the required miter has only a slight curve. The farther away from the center point the moldings intersect, the more acute the miter angle becomes, and the more dramatic the curved miter needs to be in order for the profiles to mate seamlessly.
Developing the correct curve
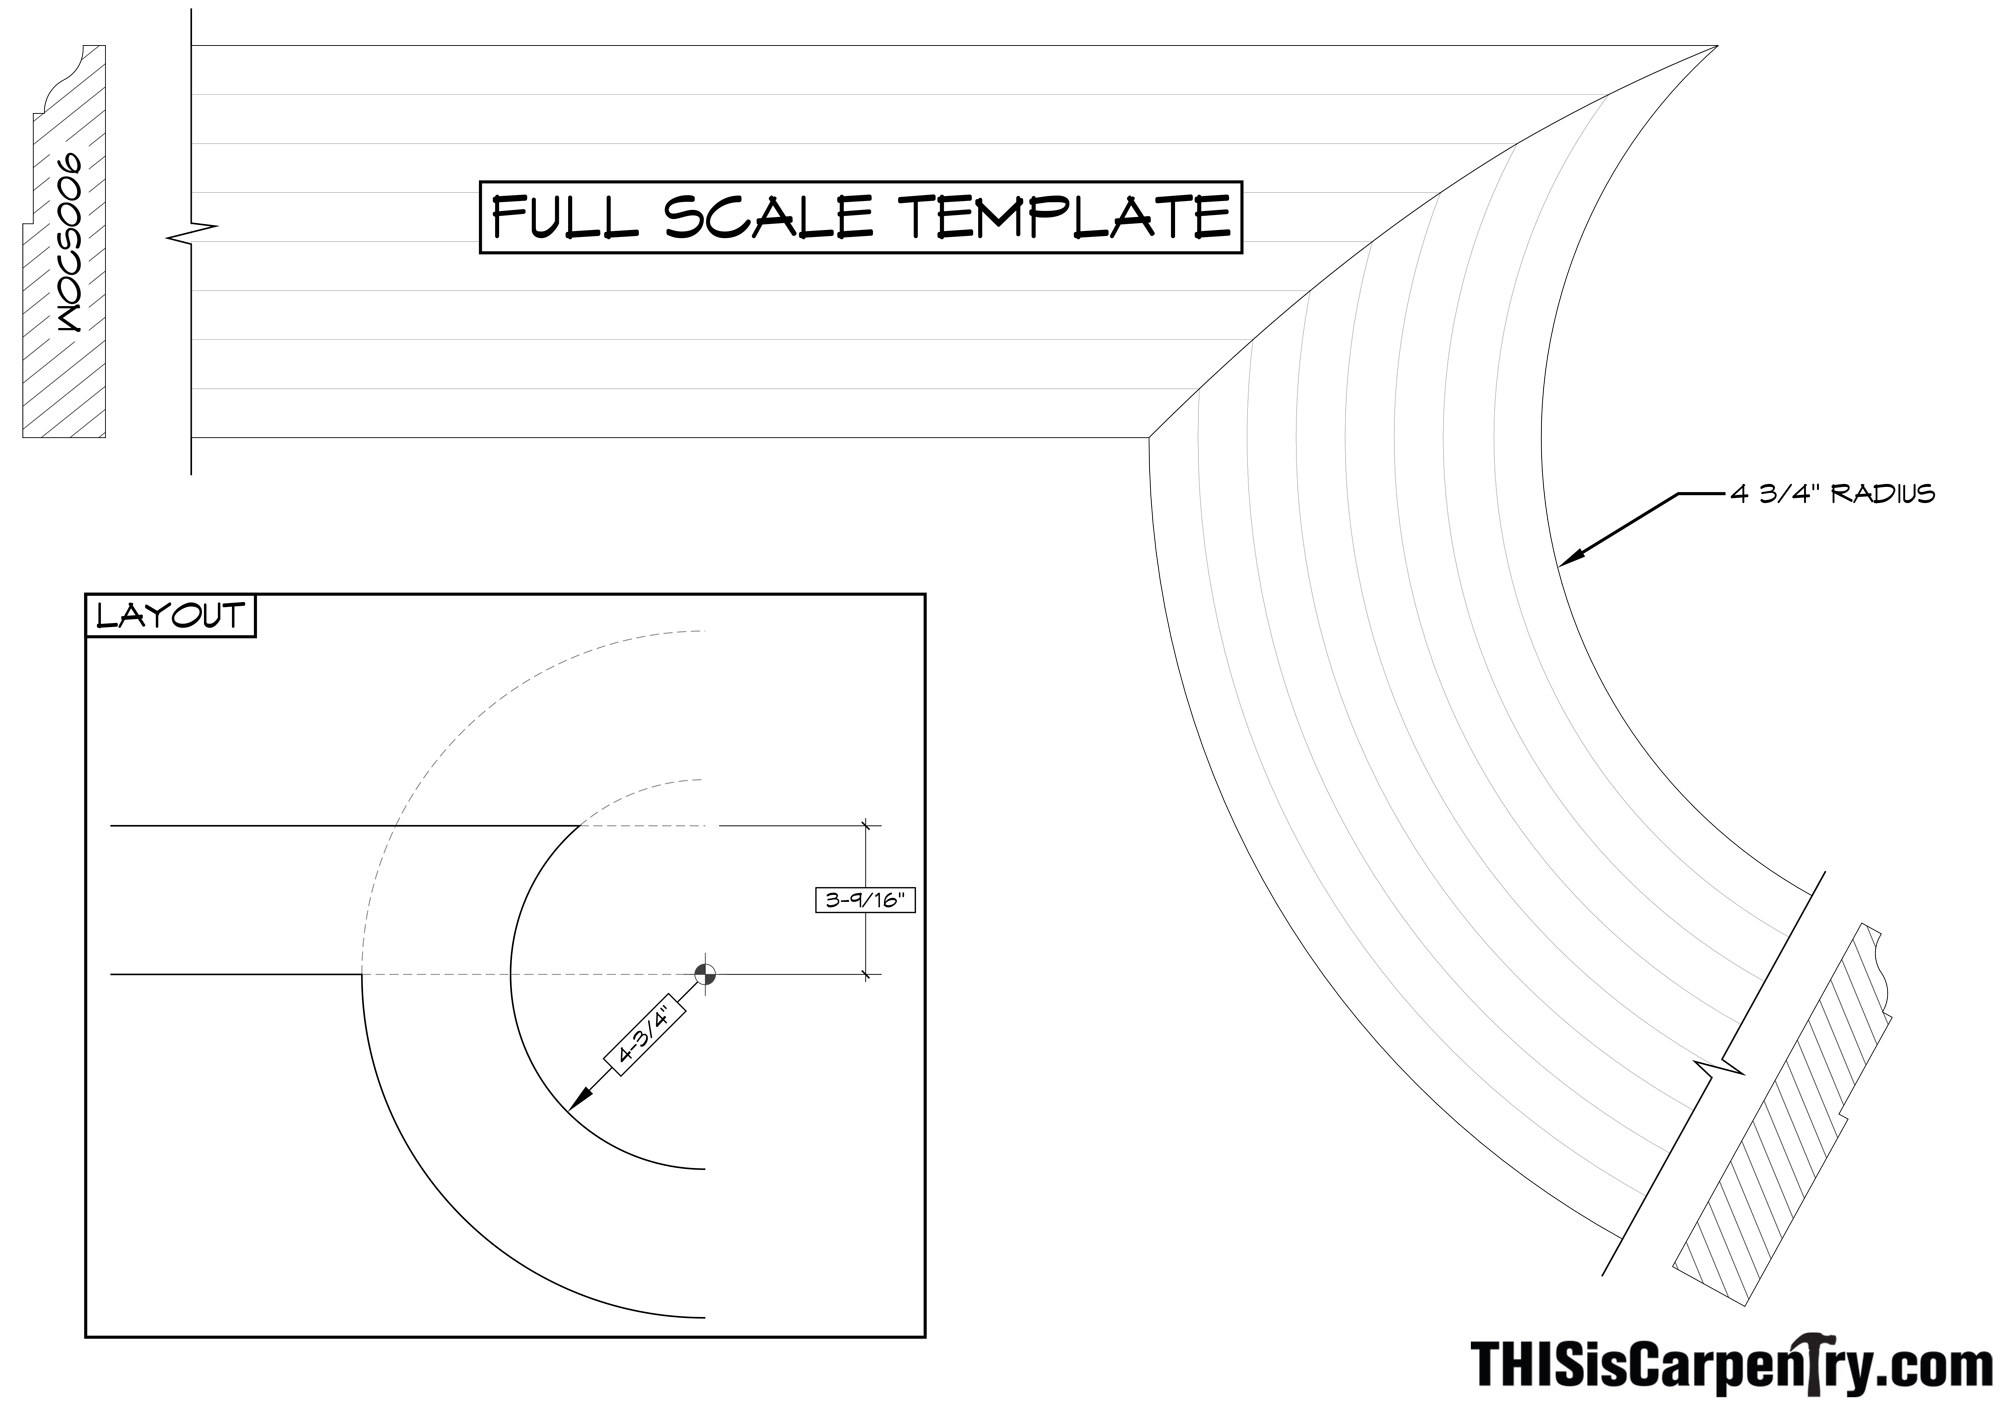
Since the shape of the miter will vary depending on the intersection point, as well as the width and radius of the moldings, it may sound like a complex task. But fortunately, this isn’t a math problem! The correct curve is easy to develop by projecting key elements of the molding profile.
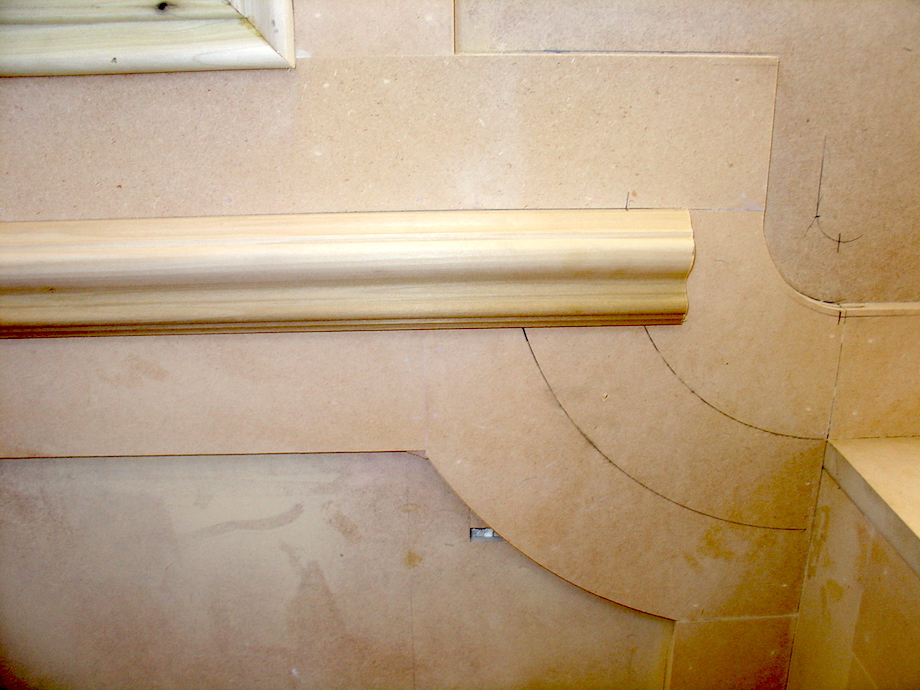
First, like laying out any miter between straight and radius casing, I start by tracing the outlines of the two pieces on the wall and marking the intersection points on both pieces of molding.
 |
 |
| I make the cuts slightly long and use a clamping fixture on my miter saw to be sure the molding doesn’t move. | 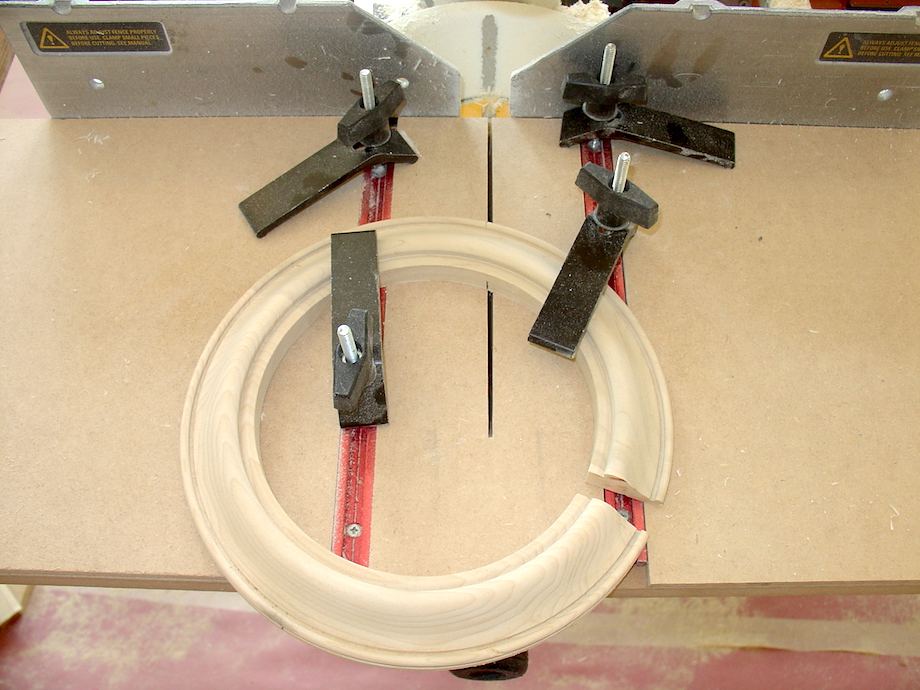 |
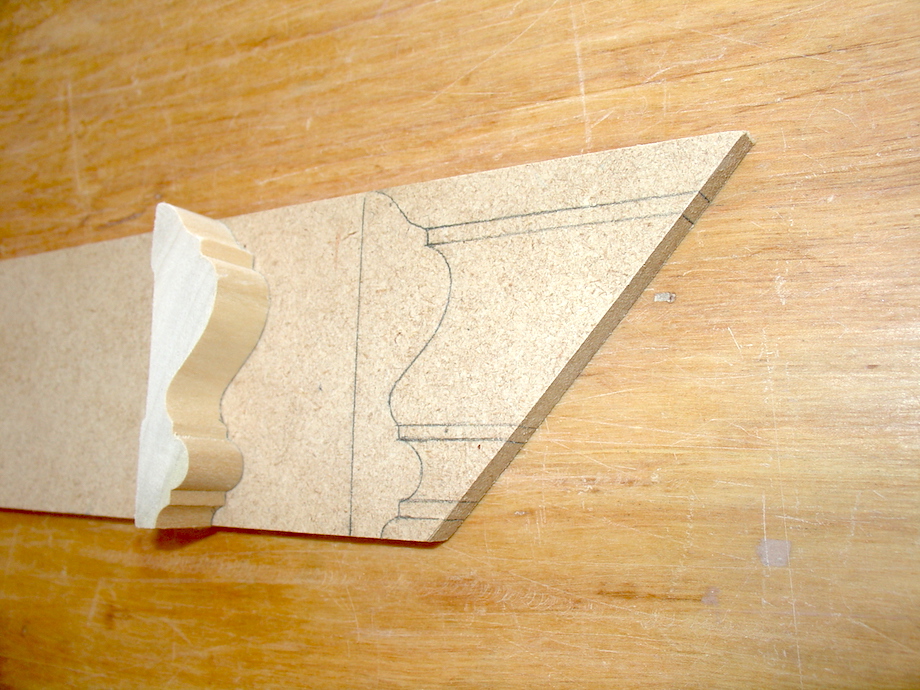 |
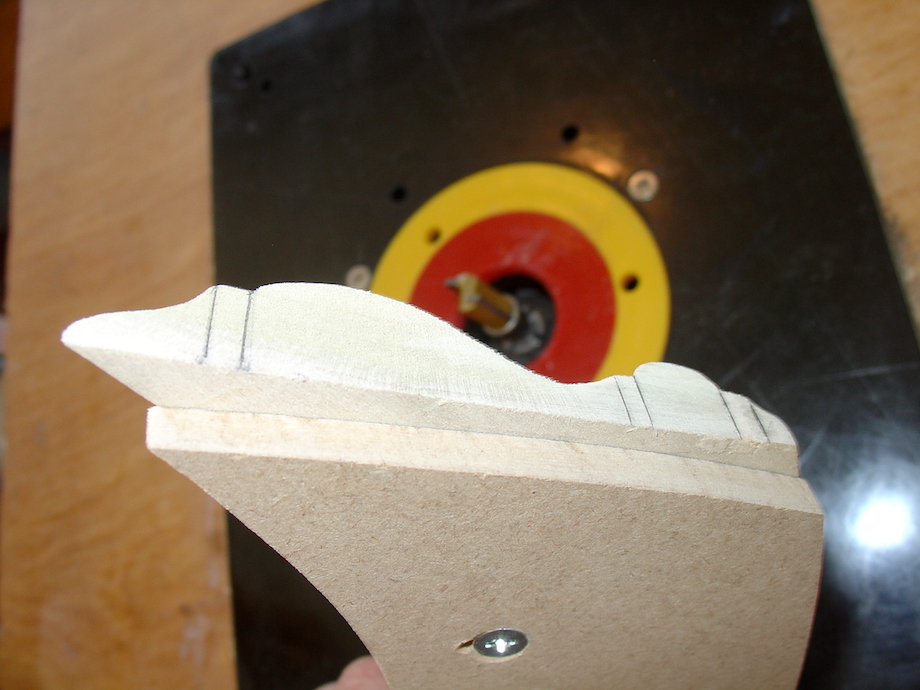
Next I make templates out of 1/4-in. MDF for cutting the curved joint. I start with two pieces of MDF the exact width of each piece of molding. The straight template is easy: I trace the profile, and then project lines from the flats or fillets to the edge of the miter as reference points |
| The template for the curved profile is trickier. Because each of the reference points is at a different radius, I shift the piece along the template blank and make a series of dots at the same fillets, and then I connect the dots—projecting the fillets right to the miter where the joint will fall. | 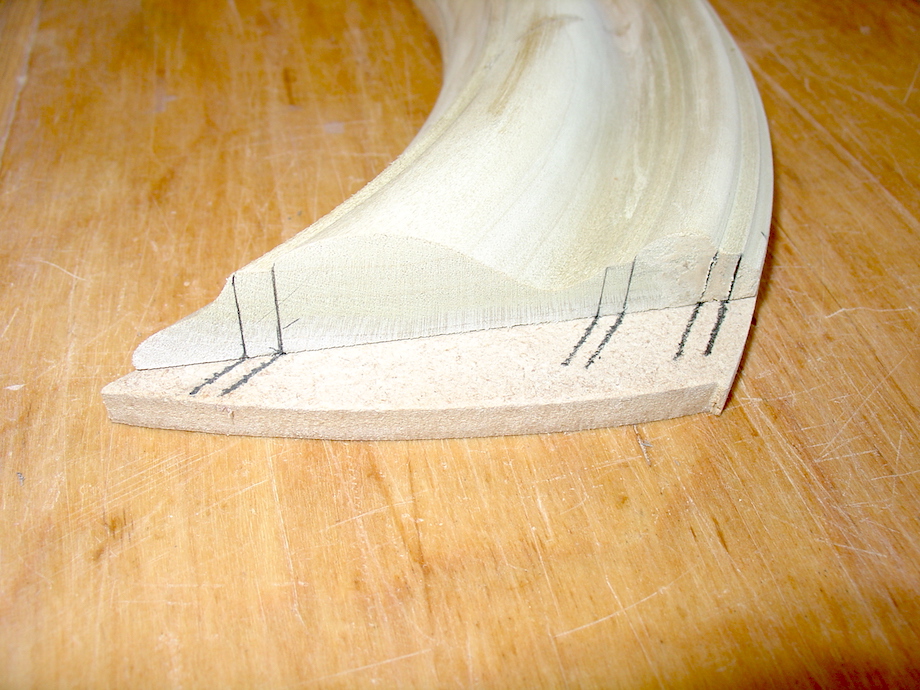 |
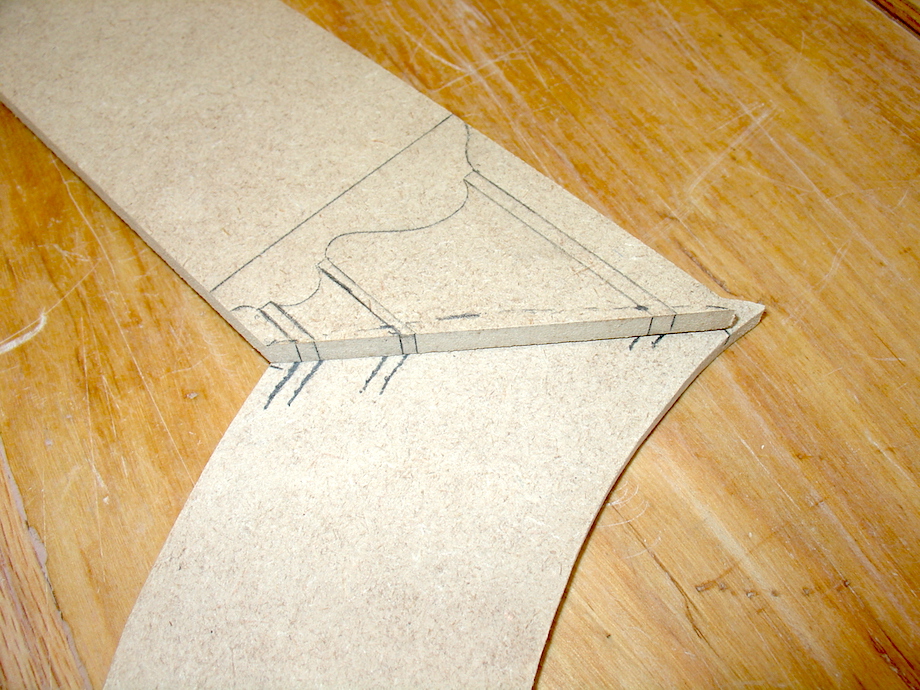 |
Placing the two templates together shows how the profiles would meet—or rather how they would not meet—if cut as a standard straight miter. |
| Using a flexible protractor as a guide, I strike a curve that allows each projected fillet to meet along the miter intersection. | 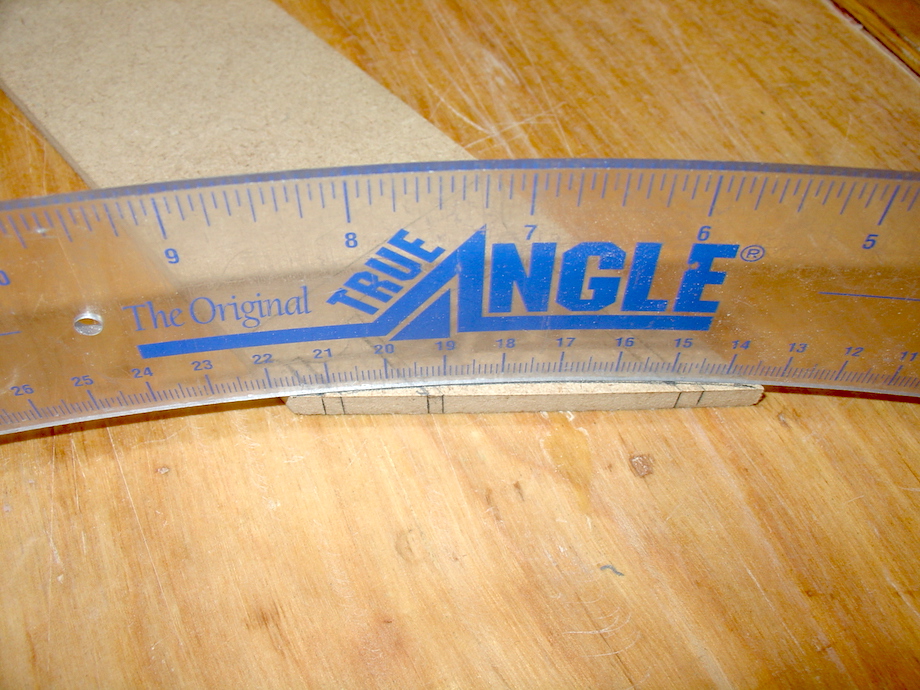 |
| Of course, the curve requires a little fairing or tweaking to get it just right. | 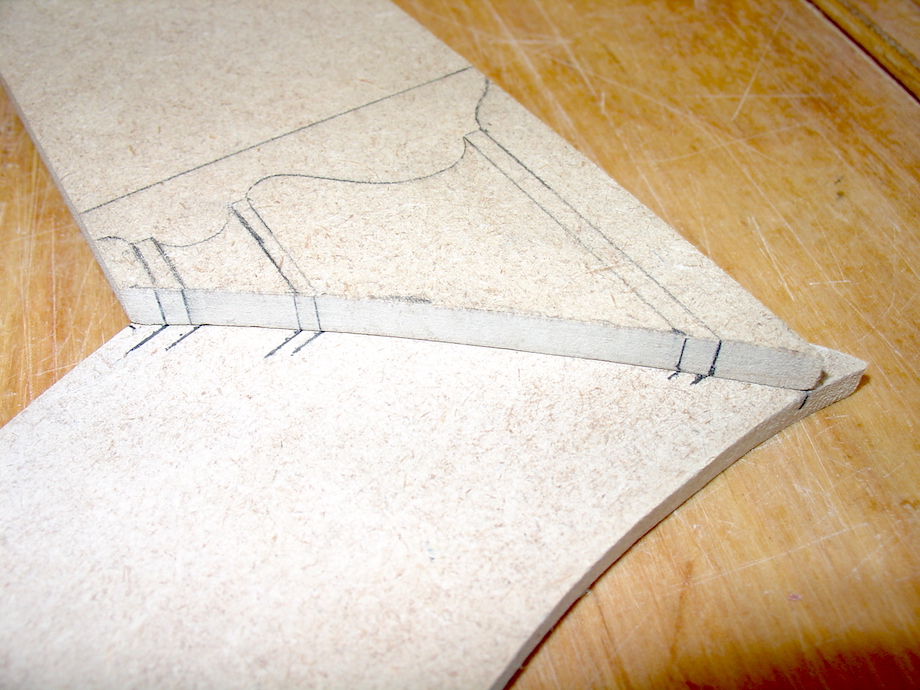 |
| Because these are templates, the curve and the miter must be perfect—the two pieces of MDF must fit together as tightly as possible. | 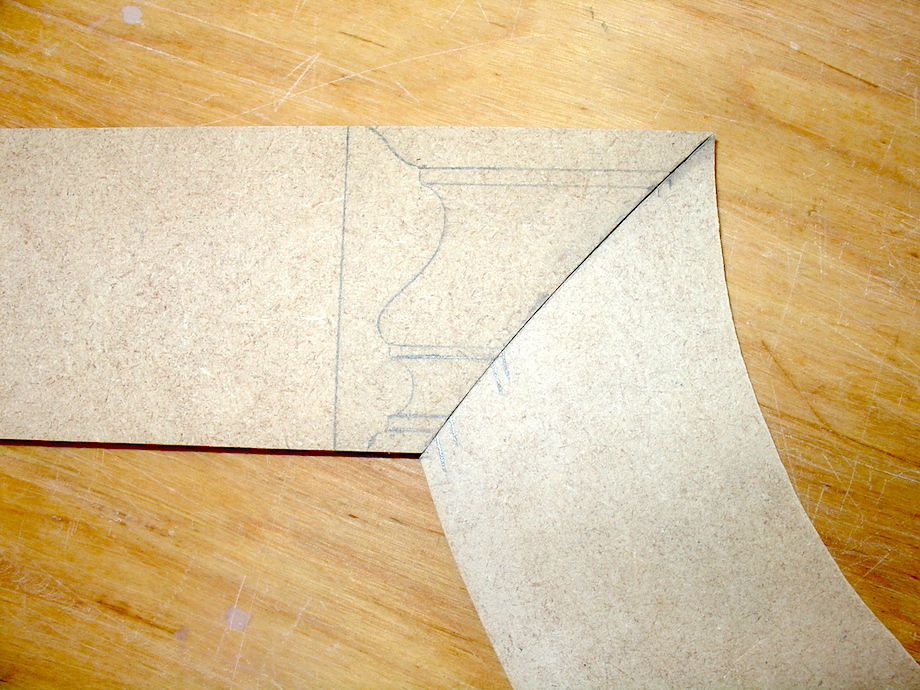 |
 |
As I said earlier, I cut the molding a little bit long. I fasten the MDF templates to the back of the molding with screws, leaving that extra length proud of the template. |
| I use a top bearing bit to shape the curved miters. | 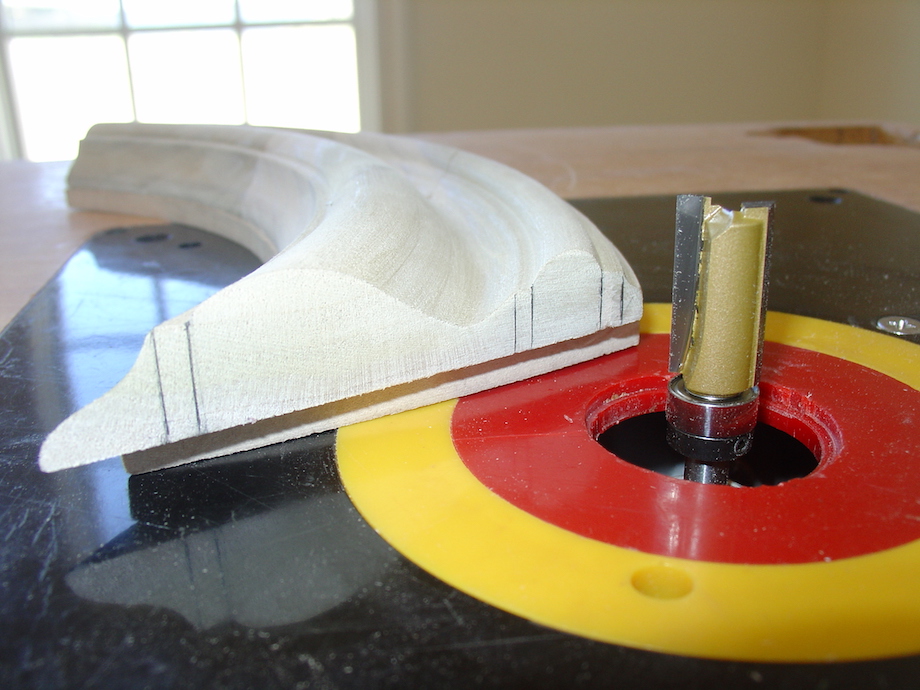 |
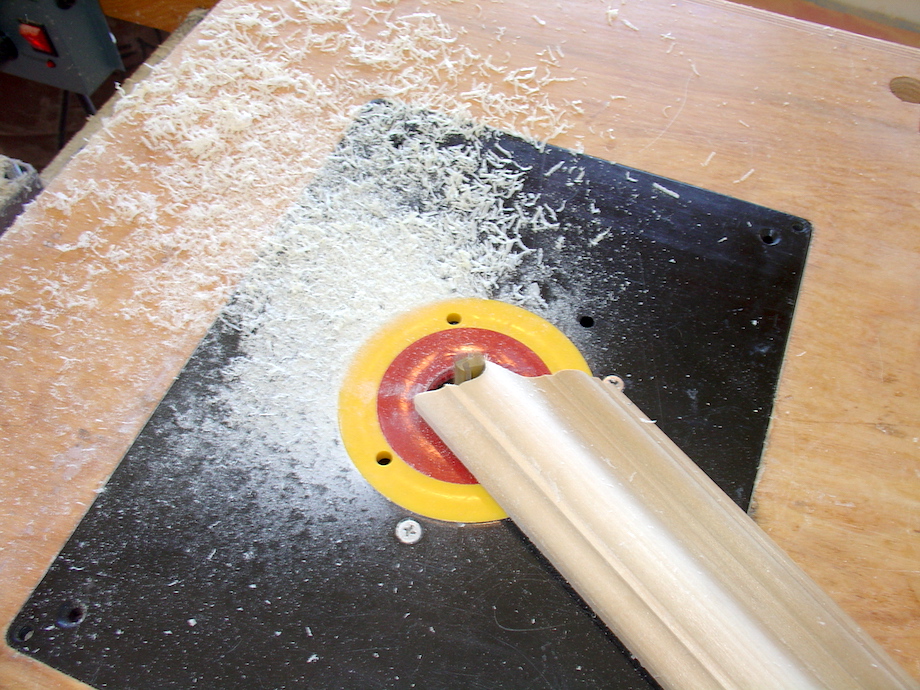 |
One tip I should add: It really helps to use a post or starter pin on a router table for this operation, so that the template and workpiece are supported, otherwise, it’s difficult to hold on to the workpiece. |
| With a bit of fine-tuning, this joint is so sweet it will put a smile on the face of any finish carpenter. | 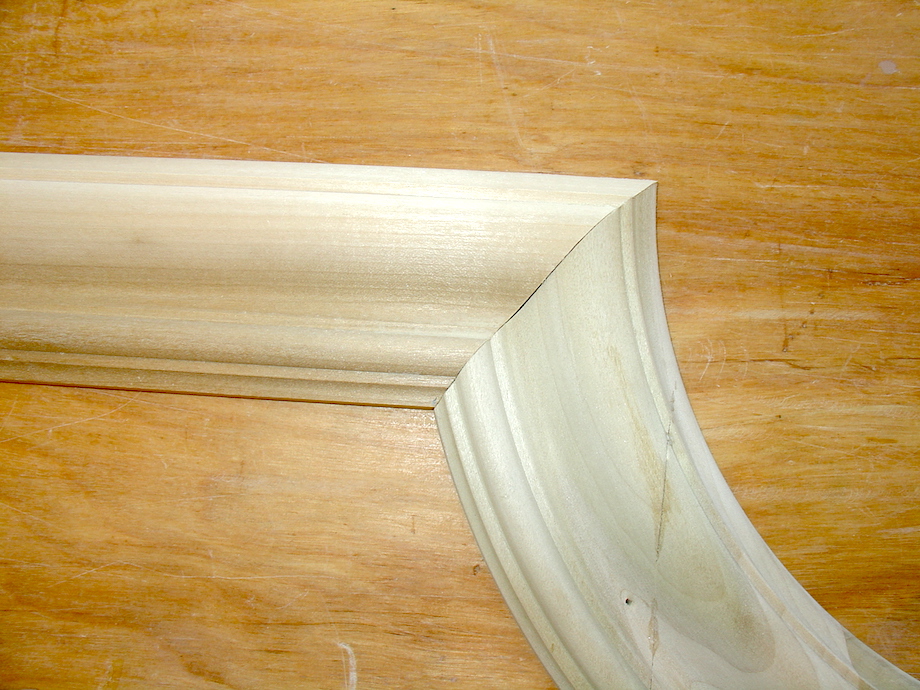 |
Of course and as usual, shortly after learning this technique, my company contracted for another far more elaborate job of finish work where there was no shortage of hunting miters.

Afterword by Gary Katz
Hunting miters have intrigued me since I first learned about them during that conversation with Dan Parish and Jesper Cook at my dining room table.
And the technique Jesper used—making an MDF template and using a router table to shape the joint, is the same technique that Steve Phipps showed me about a week later!
Todd Murdock and I were both eager to republish Jesper’s article: Todd was fascinated by the geometry of a Hunting Miter, while I just wanted to turn that radius molding donut on my lathe! I’d watched Jed Dixon do it once a few years ago and I never forgot the experience.
We decided to take a different approach for our templates—creating them in a CAD drawing program first, and then printing them as full-scale patterns to glue to the template material. We also didn’t rely on the fillets, quirks, or sharp transitions in the profile to create the benchmarks that define the curve. We used several equally spaced guide lines along the straight and curved molding pieces to plot out the curve. The more points of reference you have, the more accurate the shape of your curved miter will be. For moldings without easily defined points in the profile, this is the only way to develop the curved miter.
Turning the donut
If you look closely at Jesper’s photograph of the ‘donut’, or if you watched the video, you’ll learn that the turner inserted a piece of the straight molding in the blank so that he could turn the circular blank precisely to the shape of the molding profile. That’s exactly what I did, and it worked the first time.
But cutting the hunting miter with the template didn’t work the first time! Though Todd created a paper template for me, on my first attempt, I cut the paper template before applying it to the MDF, which made it difficult to fit the miter water-tight. I tried it one more time, but glued the entire template to the large piece of MDF before cutting the miter. I cut that miter on my scroll saw and never sanded it at all, which left it a little rough. That joint actually ‘keyed’ together.
Whether you’re a finish carpenter, a furniture maker or a woodworker, the process of cutting a hunting miter is loaded with techniques that are applicable to a variety of tasks.
| This photo shows a side-by-side comparison of the same transition, using both a straight miter (top) and a hunting miter (bottom). | 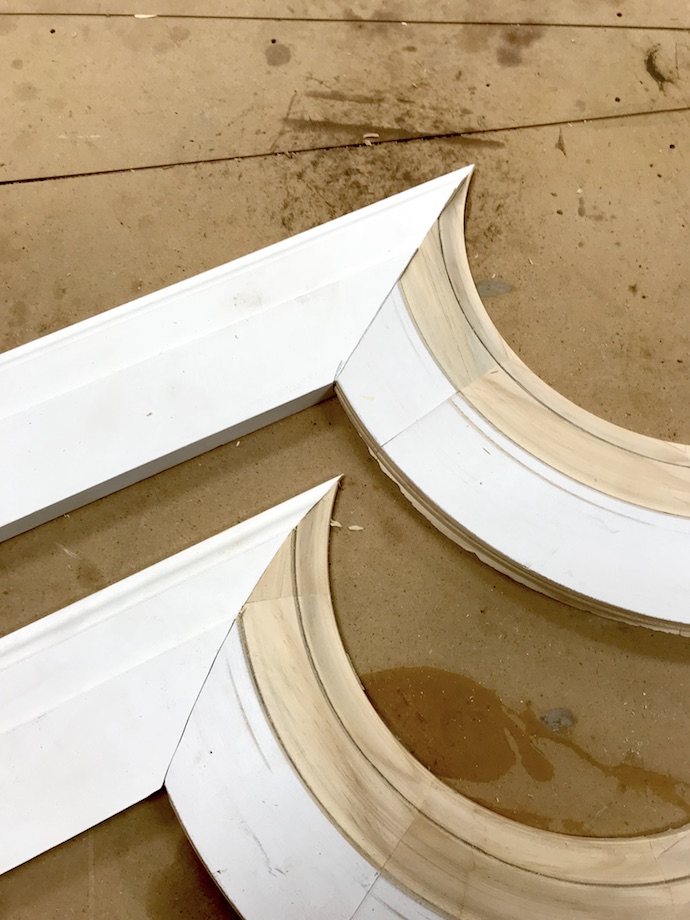 |
| A closer look at the straight mitered joint reveals the disparity in the profiles as they meet. | 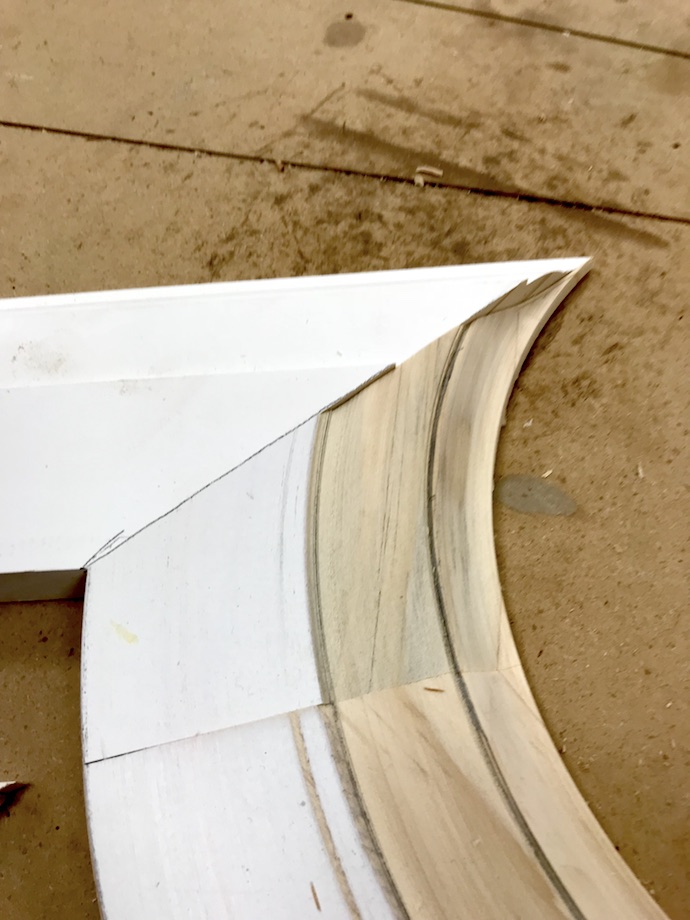 |
I note that in the picture of the hunting miter, there is a slight projection of the straight piece on both the outside and the inside angles of the finished joint. That is not so for the straight miter. The profile match is clearly better for the hunting miter. How would one “correct” the hunting miter to eliminate or hide the projections?
Probably by turning a perfect donut–I suspect the radius of the donut I turned wasn’t EXACTLY the same radius as the pattern Todd drew for me. But since that was the first donut I’ve ever turned–the very first–I’m good with it. :)
Gary
Hi Jesper / Gary,
How do You make a curved molding?
Need to make a curved molding for several windows, matching another profile (Door casing).
How would You do it? Live in Sweden, and we don’t have some of the nice machines you guys have over there for making flat curved profiled moldings. Or at least I don’t.
Any good tip?
Thanks for a VERY GOOD article
Jan Friberg
Sydsnickeri / Sweden
Jan,
If you’re going to paint the molding, you can buy flexible molding made from resin. If it’s casing for a window or door, you’ll need to know the radius so that you can order the proper sized piece. If you plan to stain the molding, you’ll have to find a millwork shop to make it.
Gary
I was trying to find our what books you were using as reference.
Thanks
It’s in the text above but easy to miss: Geo. Collings’ 1886 treatise.
https://amzn.to/2Q5qOh1
Hope this helps someone
JLS
I’m just seeing this now for the first time. I’ve been getting into the H.H. Siegele book The Steel Square. There is a small paragraph about hunting miters in the book and when I looked it up on the internet, your article came up and it’s a great, practical method for getting and cutting the hunting miter. Much appreciated, and I hope to implement soon on a remodel here in Minnesota!
I loved this article and the accompanying videos/photos and sketches!
There are countless times over the years that I’ve opened “The Steel Square” only to close it with a headache and a wish that I could have Siegele (or Will Holliday) actually show me what is happening when two pieces (molding, rafters etc.) intersect.
Thanks to everyone who contributed to this article, and thanks to the Internet for bringing it to life.