


Years ago, in a Fine Homebuilding article, I explained how to build corbels for an Italianate mirror frame. I ran out of pages in that short article before I could discuss how to layout the pediment. I have plenty of room here, so I’ll cover that part of the story, and I’ll include all the material that we couldn’t fit into the Fine Homebuilding Master Carpenter article.

(Note: Click any image to enlarge)
The Design
I’m sure you’ve heard me say this before, but I’ve been lucky to travel all over America for Katz Roadshow carpentry clinics, JLC LIVE, and other trade show events. It seems in every city I visit, and every small town I drive through, there are wonderful examples of American architecture, and most of them are founded on Greek Revival designs—pedimented window and door trim.
The Pediment
If I’m using a pendant or a corbel, I layout the wing of the pediment using the dimensions of the corbel plus the crown molding.
With the corbel centered above the casing, the wing must extend just beyond the projection of the crown molding before the rake begins to climb. Mess up that detail and the crown molding won’t be able to make the transition up the rake, and you’ll be starting the whole project over just when you think you’re almost finished. Trust me. I learned this the hard way.
Remember, when crown molding is run normally, on a level ceiling, every turn and corner occurs at the bottom of the crown, and that’s where the pieces are measured from. But when crown runs up a rake, every turn and corner occurs at the top of the molding, and that’s where the pieces are measured. More on that later. For now, be sure to allow room for the full extension of the crown on the inside of the corbels before the pediment begins to climb!
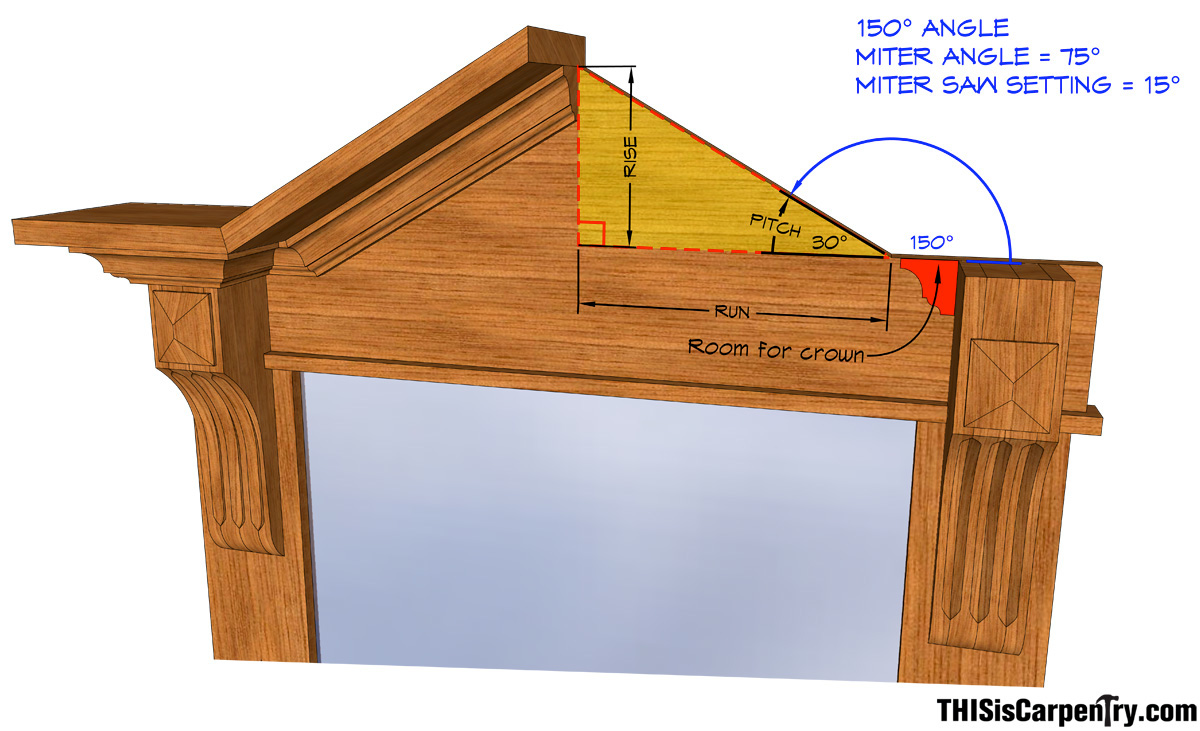
The Pitch
Pediments come in all sizes and shapes, but I’ve found that it’s best to use a 30 degree pitch, which has good proportions, and even better, the important miters land at the 15 degree detent on a miter saw (watch the first video, above!). Using a 30 degree pitch, it’s easy to calculate the precise rise of the pediment, and the exact diagonal length—which is also the exact measurement for the top cap and the crown molding.
On my construction calculator, I enter 30 for the PITCH. For the RUN, I enter half the distance between the wings. Next I press RISE to determine exactly how much the pediment rises to the peak, measured from the top of the wings. By pressing DIAGONAL, I can check the rise measurement and the intersection of the ridge (watch the first video, above!).
The Corbels
I’ve always been attracted to Greek Revival and Victorian trim details. I’ve visited hundreds of historic homes and shot gobs of photographs. I’ve used those examples to build a lot of Greek Revival exterior and interior trim, but the one thing that’s always stopped me from tackling a high-style Italianate pediment is finding the right corbels.
| While visiting Pittsburgh for a clinic at Allegheny Millwork, I noticed some corbels on one late 19th century home were made of three pieces. I remembered seeing the same thing in Denver, CO, on the Molly Brown home (right). Look closely and you’ll see that every single one of those beaded flutes is made on a separate lamination. | 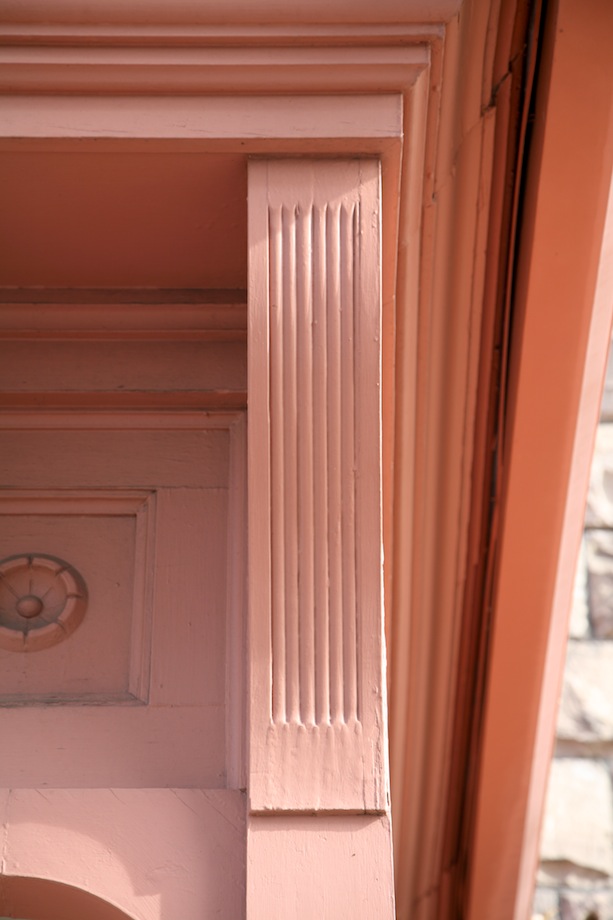 |
For more than a year, I thought about those corbels. I knew I could make all the laminations with a router and pattern bit, but I couldn’t figure out how to stop the beads or flutes at precisely the same place.
The Laminations
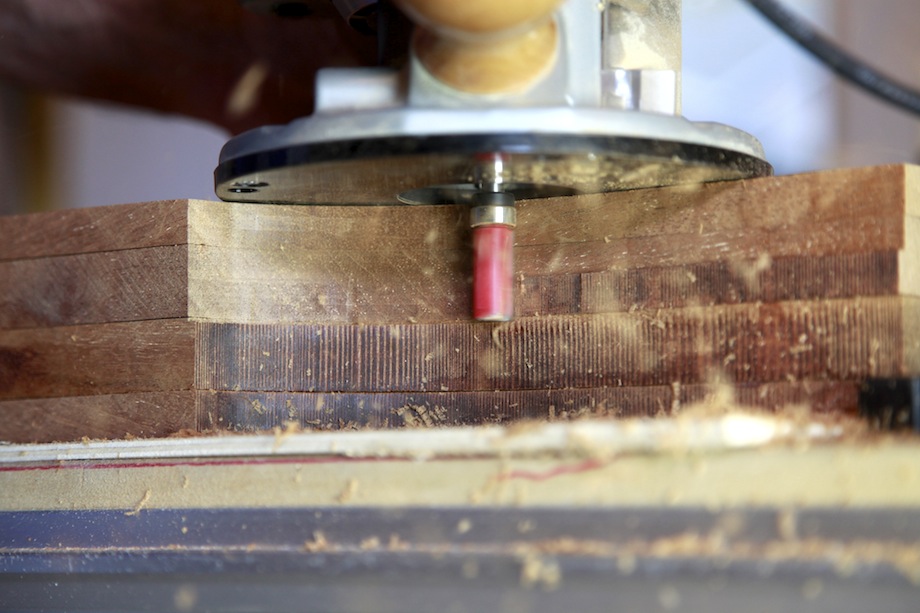
In the Fine Homebuilding article, I described how to temporarily glue the corbel pieces together, along with a template, then use two different pattern bits—a top-bearing and a bottom-bearing bit—to shape the pieces. The whole process is a bit complicated.
I temporarily glued the pieces together with 2P-10, and I glued the template on top, too. Then I used a top-bearing pattern bit to follow the template. After the first pass, I removed the template.
 |
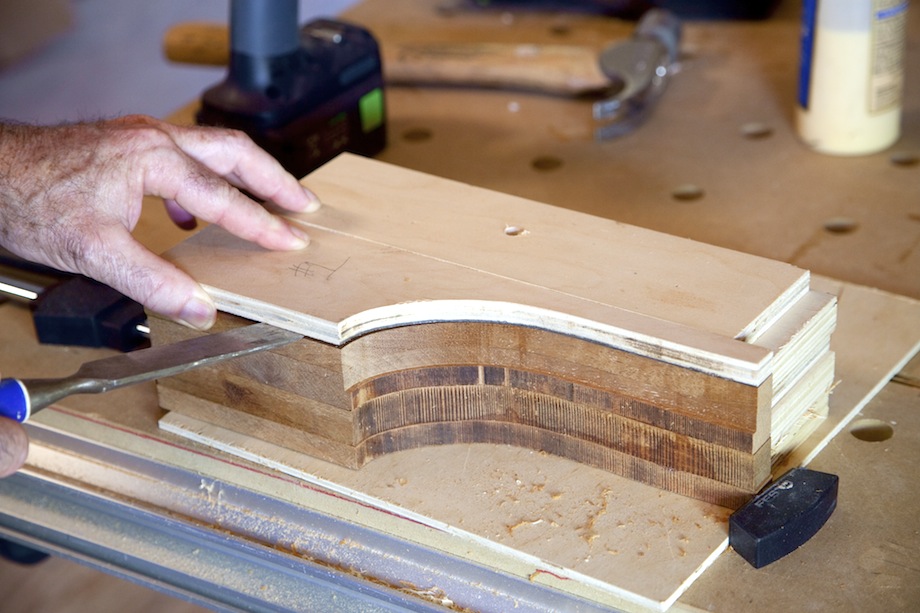 |
I built up a platform behind the corbel so the router wouldn’t tip. I made the top layer of the platform from the same 1/2-in. plywood as the template, so when I removed the template, I could remove that top layer of the platform and still have a level surface to support the router. For the second pass, I lowered the router bit so the bearing rode on the first pass.
 |
 |
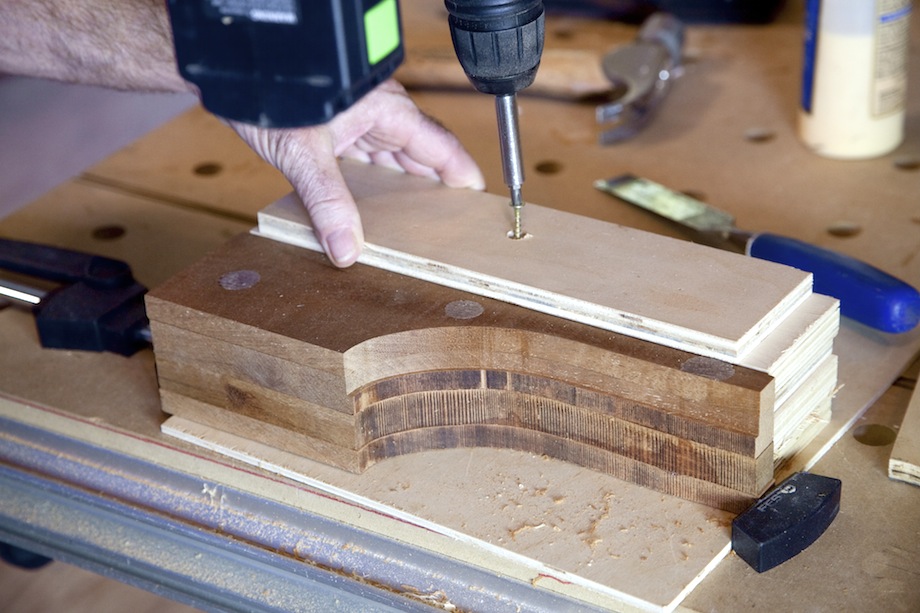
For the last pass, I turned the corbel upside down and used a bottom bearing pattern bit. After splitting the pieces apart, I had to sand off the glue spots before routing the flutes.
 |
 |
If you have a router table, I’d suggest building a template jig with hold-down clamps, so you can shape each piece individually. Trust me. It’s much faster, more precise, cleaner, and a lot more fun. Watch the video below and you’ll find out what I mean.
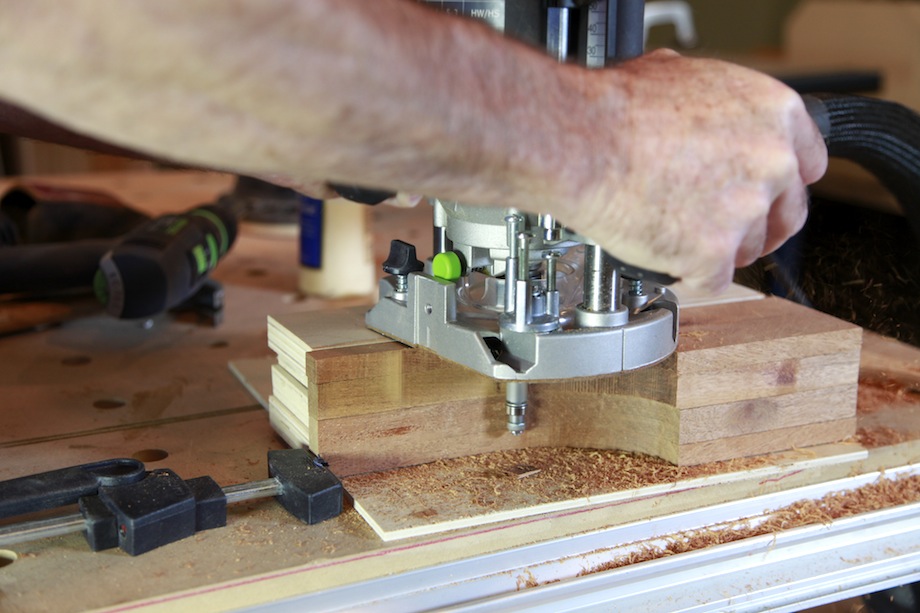
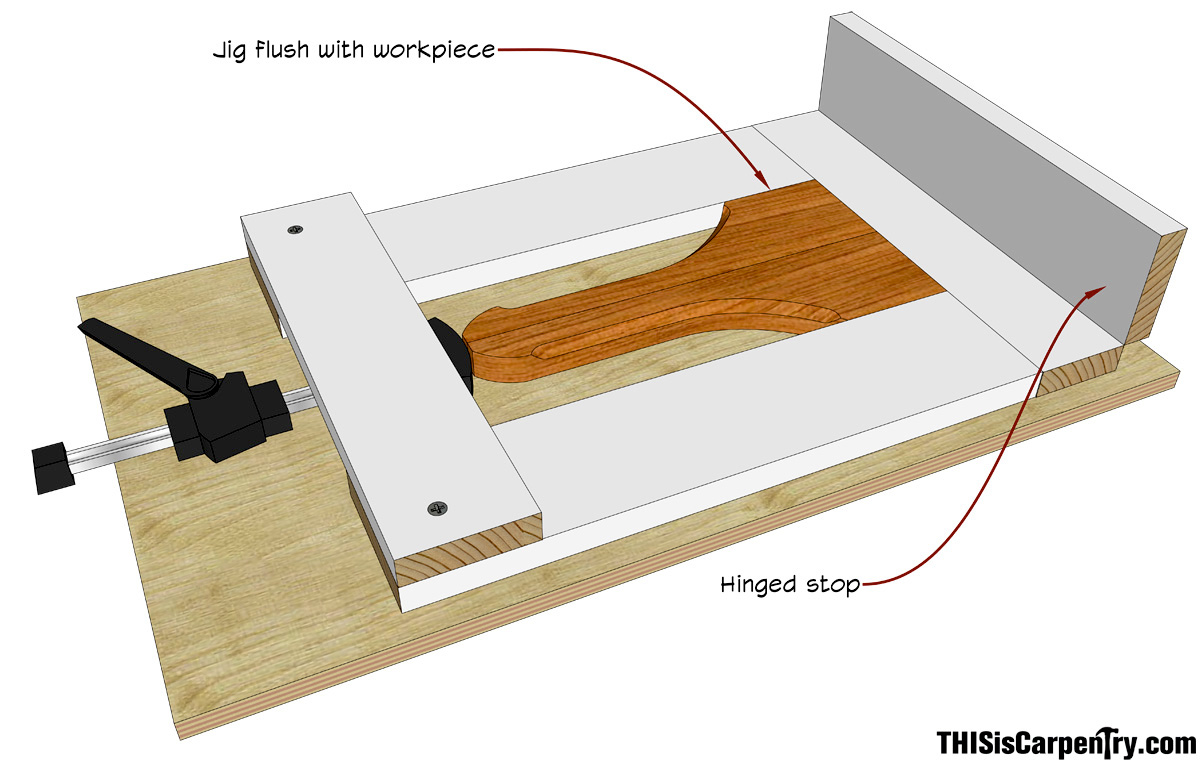
The Router Jig
Cutting the flutes was the next challenge. Todd Murdock came up with a great idea for a router jig and sent me a SketchUp drawing. While working with the jig, I made a few modifications. I used a Festool Clamping Component to secure the work in the jig. I clamped the whole jig down to my MFT table, so I couldn’t use the lock knob on the bottom of the clamp, but after drilling a tight hole for the clamp, I realized I didn’t need the knob.
The top stop, near the clamp, is screwed in place, which allows some adjustment. The bottom stop is hinged, otherwise you can’t remove the pieces from the jig without removing the whole clamp (one guess how I figured that out).

With the hinged stop, the pieces can be removed quickly and flipped over or replaced with the next set.
The Routing
The Decorative Diamonds
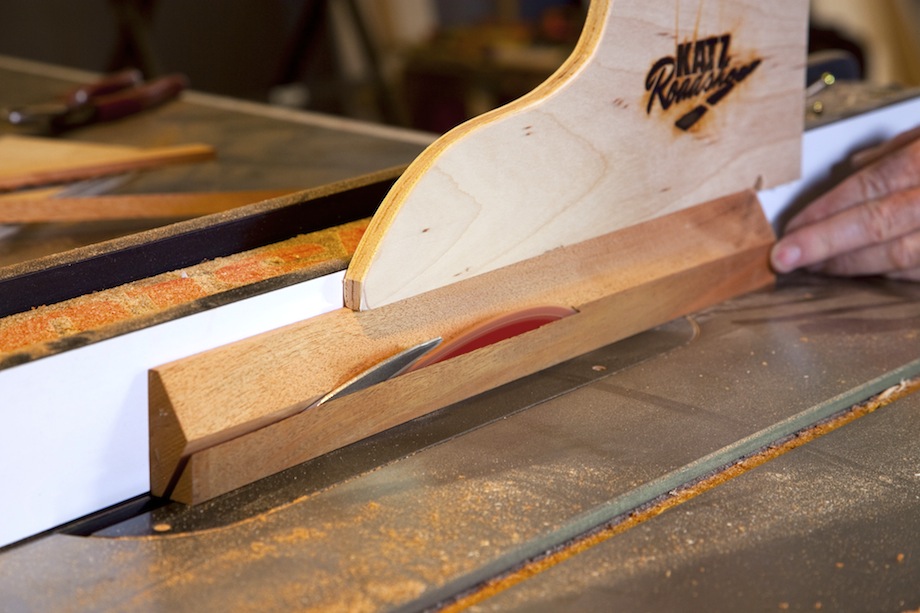
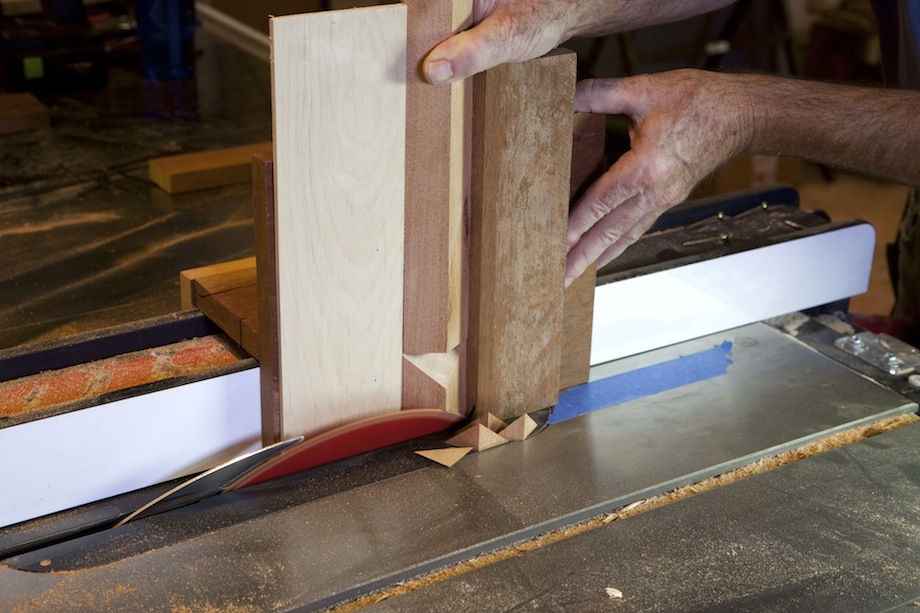
At the end of the previous video, you saw me cutting the diamonds on my table saw. Cutting small pieces on any saw is a risky business. I use a homemade tenoning jig to help secure the material. Usually I’m able to get a clamp right on the piece I’m cutting, but in this case, the diamonds were too small.
To hold down the small 2-in. diamond, I used a short piece of the same stock. I ripped that material on my table saw and put a bevel on both edges before cross-cutting the 2-in. pieces.
 |
 |
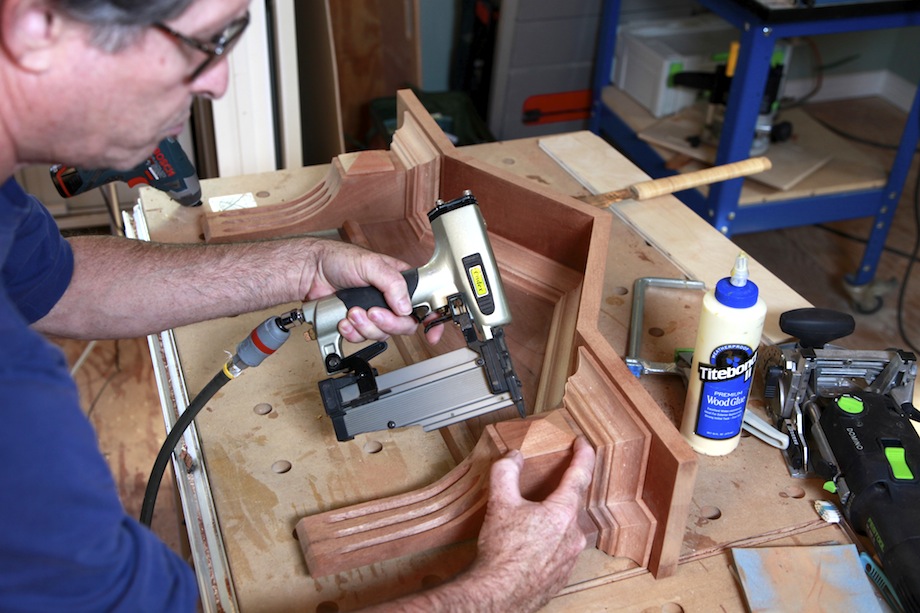
I applied the diamonds to the corbels after installing the top cap and crown molding.
| If you watched the previous video, you probably also noticed the router jig I used for cutting the climbing flutes in the casing. Jim Chestnut taught me how to make that jig, and Mike Sloggatt showed me how to use a Festool 1400 router and template guide attachment so it’s easy to snap the router on and off the sled. To learn more about cutting climbing flutes, check out “Tapered & Fluted Newel Posts.” | 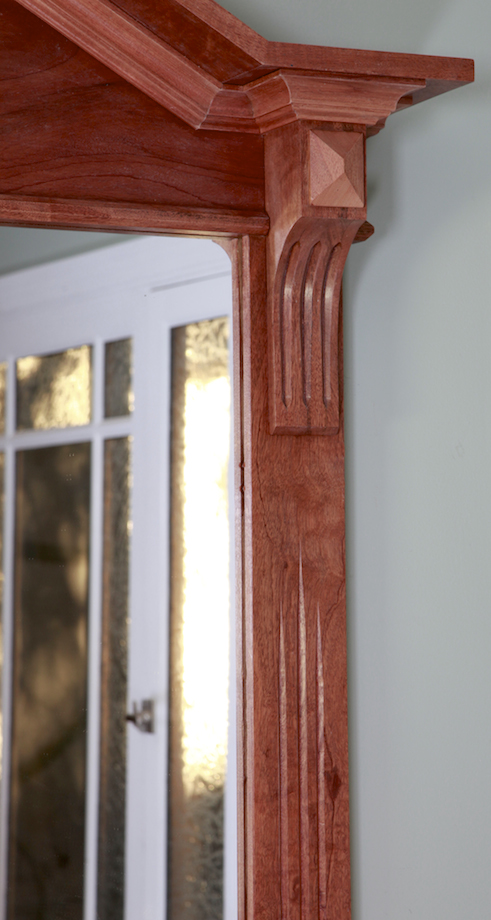 |
For step-by-step instructions on cutting the crown molding on a paint-grade pediment, watch the video below.
(This article originally appeared on GaryMKatz.com.)
Thanks Gary… Great presentation.
How are you fastening the 2″ diamonds to your jig for the crosscut? pins? 2p10?
and, thanks again.
steve
Steve,
I’m actually just holding that little piece with the pointy end of the bevel on the longer piece in my right hand–pushing it down against the table. The jig has a stop on the back, which is what really holds the piece still. I know, I know….but it does work. :)
Thanks Gary…. I see it now. Not to be tried with a dull blade!
I know I know…
btw…. like the human confirmation slide !!
I have got to get back into the practice of making jigs. If you have to do it more than twice it’s worth the 20 minutes to make a proper jig.
Thanks for a great article.
Great article I picked up a load of tips from it. Your jigs are very inventive, your right you should do more about jigs maybe a full article
Cheers
John ( in UK )
Wow – what a treasure trove of information.
I’m 75 and learned a lot.
I guess you CAN teach an old dog new tricks. (:-)
Hey Gary,
Great article. I was wondering what you think of those cadex guns? Would you say they are comparable to grex?
Yes, the Cadex guns are very similar to Grex and Max. Cadex has an air blower that is kind of handy for clearing debris and sawdust away; and Cadex guns will shoot pins and brads, not just pins, like the Grex and Max. I’ve been using a 21 ga. Cadex lately and really like it a lot. Some of the guys on the JLC forum turned me on to 21 ga guns and they’re sweet–almost the same size hole as a 23 ga, but isn’t deflected by grain, so you can shoot a longer nail/pin without worrying so much about each one bending around and coming out through your finger.
Gary