


![]()
After watching the video and using the drawings included in this article, if you have trouble making a wooden miter saw stand….you probably shouldn’t be using a miter saw. :-)
I’ve been using an old Ryobi miter saw stand for about thirty-five years. Yes it lasted THAT LONG! But Ryobi doesn’t make it anymore—maybe that’s why, it was indestructible. Before I found that stand, I lugged around the most awful things, beasts with two heads and four legs, some I loaded on my lumber racks and left outdoors in the rain. It wasn’t until I found the Ryobi stand that I could effortlessly set up my saw and extension wings quickly, and move my saw just as fast, either up or down a flight of stairs, or back out to my truck at the end of the long hard day.
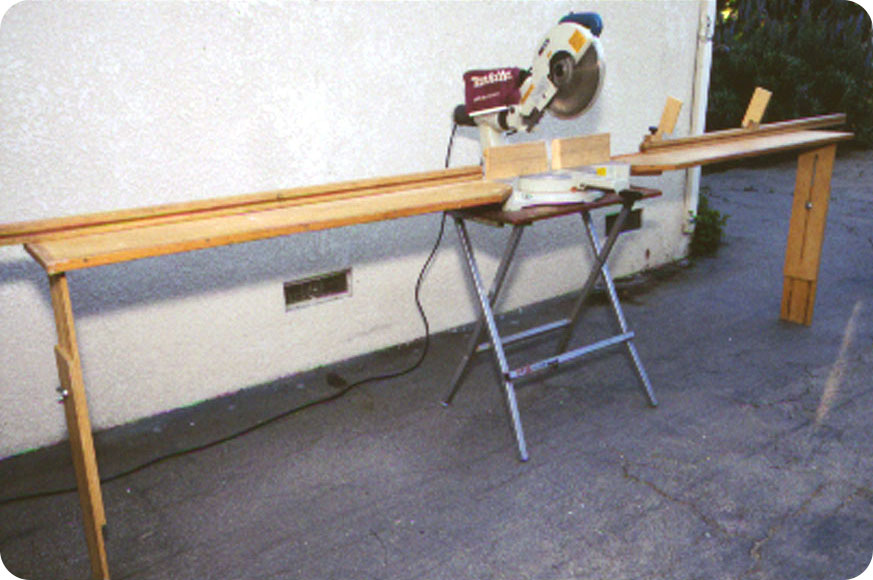
I always wanted to make one entirely out of wood, a little like Lamar Horton did in his TiC article back in June 2010. But the Ryobi design impressed me most because the tops press together and that compression adds to the rigidity of the whole stand.
After studying the confusing design for years—especially the legs and strange top supports, I knew the project was going to be a challenge and planned on encountering a few hitches, after all, the thing unfolds like an origami sculpture. With perseverance, along with moral and graphic support from Todd Murdock, I managed to make three stands, but not one without some do-overs.
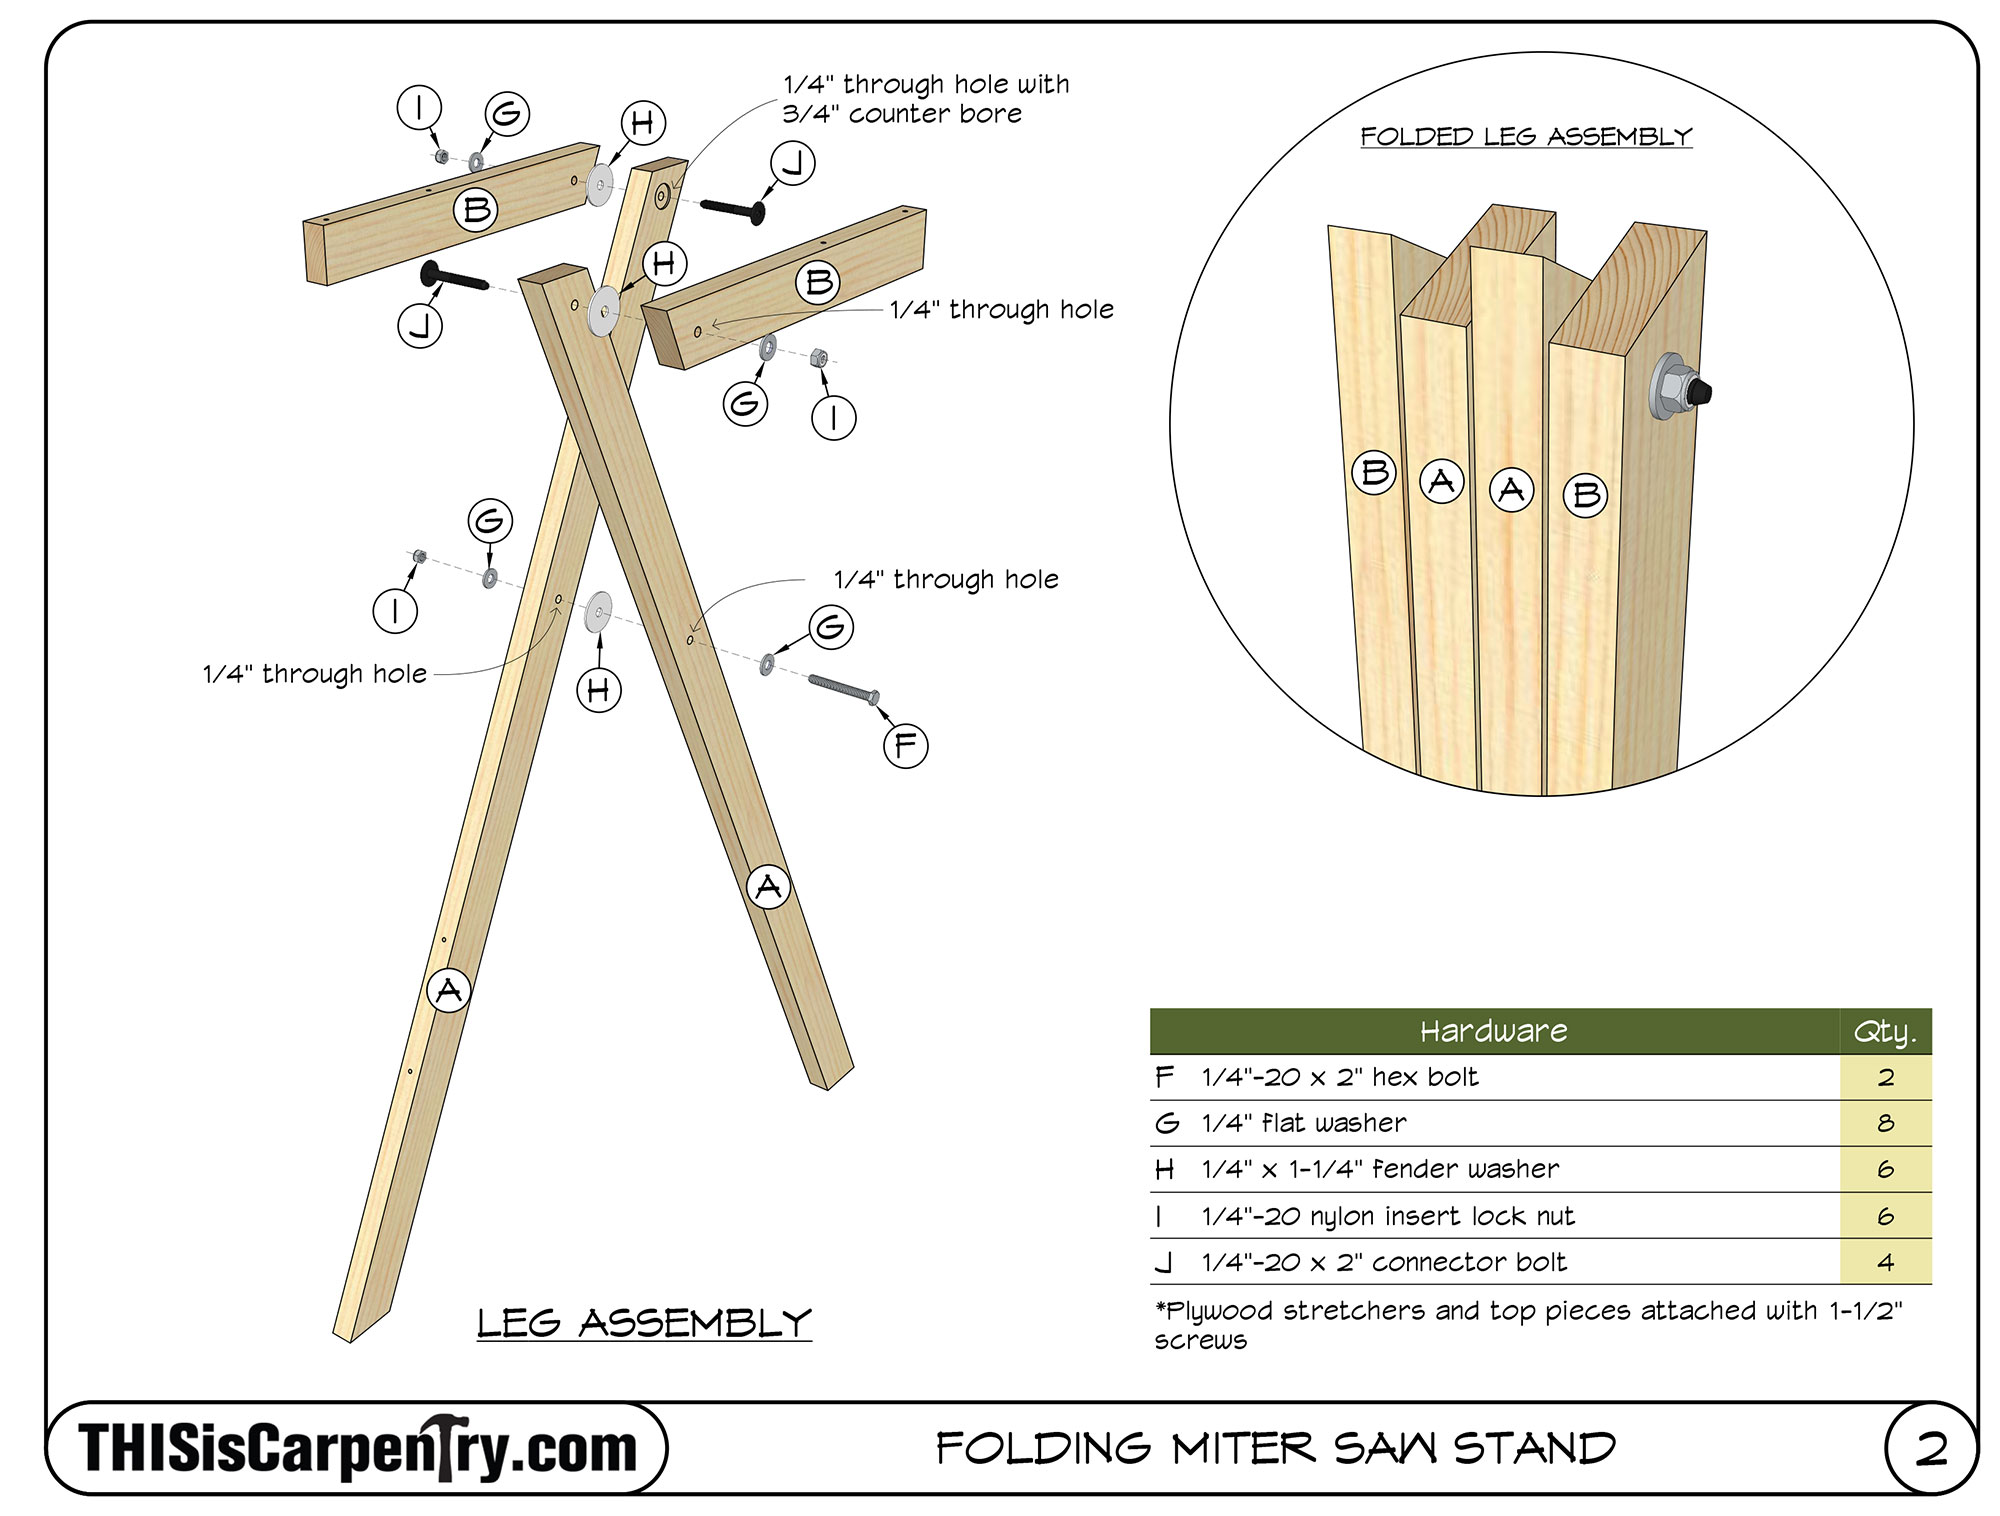
But you don’t have to worry about all those mistakes. I made them for you! Along the way, I learned a lot of lessons about this design. At first, I thought the measurements—the length of the legs, the location of the pivot point—were critical. But they are not. Rather, the five most critical elements are:
- The leg sets or pairs must mirror or oppose each other.
- The miters on the top supports must oppose the miters on the legs (all miters must oppose adjoining miters)
- The long stretcher is attached to the outer legs, and on the same edge as the long point at the bottom of the legs.
- The short stretcher is attached to the inner legs, and on the same edge as the long point at the bottom of the legs.
- The tops are attached to the top supports on the same edge as the long point of the miters. (If you layout the location of the stretchers and the tops by hooking your tape measure on the long point of the miters, you’ll be good!)
Here’s a video of the whole process.
And here’s a TiC Miter Saw Stand Plan, with dimensions and a material list!
For those of you who may want to build a stand with a custom height or width, or out of alternative material, we’ve also included the Sketchup drawing here for download or you can visit the SketchUp 3D Warehouse here, so you can alter any dimension you wish.
Happy to see you back creating content for this website. Looking forward to the extension wing video.
Thank you for this article. I built this design on a Sunday afternoon watching the video. The video and plans are absolutely clear— though trying to wrap my mind around the build steps was not always so clear. I can not imagine designing this origami table!
This was the most satisfying project I’ve built for myself recently. I use it as a work table. I used scrap fir and 1/2” plywood.
Cody,
GOOD FOR YOU!!! I know, I know, it’s mind-twisting project. But the results are definitely satisfying! Glad you enjoyed the process and the using the table.
Gary
Why not provide the file in commonly used pdf format. i’ve been trying to find a way to view the file and ended up in a nightmare of dodgy shareware software and companies trying to charge me a fortune. I’ll just try to work it out from your youtube and this article. btw. looks like a great project thanks for that.
Nigel,
WE DID! You must have missed the link, it’s right at the end of the article, in this sentence:
“And here’s a TiC Miter Saw Stand Plan, with dimensions and a material list!”
Take another look and you’ll find it. We provided BOTH the PDF and the Sketchup drawing because some folks, like you, might want to build it exactly as we did, so the PDF is available for FREE. But other people may want to change the dimensions, and the Sketchup drawing is provided FREE for that purpose.
Gary
My Mom and Dad had a version of this table sized as a TV tray table. When I first looked at them I thought they were simple but never built one. This turned out to be deceptively complicated. I built a ummmm…. prototype before this one! Lots of up/down, left/right and inside/outside issues to make you just a little crazy. Thanks for the great plans!
I altered the dimensions to make a smaller table for TV watching. Table is 16″Wx20″L x26″H. Legs are 28-1/2 inches. the pivot point is the same. Measure from the top of the leg 12-7/16″ to locate the pivot point, rather than 24-13/16″ from the bottom.
Pic
Great article, very helpful! I look forward to building my own.
When do we get the side supports?
Thanks,
Kasper
Great article! I’m super stoked on beginning to build my own. This will definitely make my projects a whole lot easier! It looks pretty structurally sound. How has yours held up over time?
Scott,
GOOD for you! I’m glad you enjoyed the article and video and hope you don’t have as much trouble making the stand as I did! I suspect you won’t because I was pretty careful with the instructions. And yes, it’s a rock solid stand, even if you build it out of green wood. I made one from wet sycamore and the logs bowed–fortunately in opposite directions, but the stand is totally stable.
Gary
Great article and even better plans and video. I gave this a shot yesterday with not the best 1×2’s from the big box store and scrap plywood. I figured this would be a prototype but surprised on how good it came out. I had a little trouble following the ‘jig’ you made to drill the holes and I don’t have a drill press. Instead, I lined up the opposing miters and scribed a line the width of the stock. I then used a straight edge and drew an ‘X’ from corner to corner. Where the lines met I marked it with an awl and drilled. It worked perfectly! For my next stand I’m going to go up in size a bit from 1×2 for added rigidity. I am also going to build the wings that were included with the ‘Mastering the Miter Saw’ dvd. Thanks for the awesome plans and teaching as always, Gary. Anxiously awaiting for the next video with extension wings.
Lou, I’m really glad it worked so easily for you! That was the point. And nice technique for finding the centers!!! I’m afraid I won’t have time to do a video on the extension wings for while. I’m completely absorbed and focused on finishing my book on American Mantelpieces: A Carpenters Journey Through Architectural Styles. I expect I’ll be tied up with that project for another year. But I’m determined to finish the project before I’m pass 70, which I’ll reach next June. :)
Gary
Sorry, forgot to add the photo.
When will you make the extension wing plans available? I have seen some others(paulk etc.) but like how light and simple your set up looks
Made a second saw stand this time with better material. I modified it to use my existing extension wings but I am eagerly waiting for the plans for the homemade setup. I keep trying to come up with plans myself but just can’t seem to find the best way to setup the wing support blocks to the saw like Gary had attached to his Dewalt. Good luck to anyone attempting this build. It is well worth the time and material and Gary made it a breeze with the sketch up and video!
I made a second attempt at a table (compared to the one above that I used scrap material for). For this go around I invested in a very entry level drill press and some better wood. I also squared off the table top at the end using my track saw for a nice fit. The top is 3/4” Baltic birch. I modified the table top to use my existing extension wings but I am eagerly awaiting the plans from Gary for the homemade setup. They will complement this stand perfectly. I keep trying to come up with plans myself but I just can’t seem to find a way to attach the wooden blocks to the saw perfectly like they appear to be attached to Garys Dewalt. Good luck in anyones attempt to make this stand. It is well worth the time and material and the plans make it a breeze!
Gary, Thank you for this table plan and informative video. I made two to get one good one. It was thought provoking. I am really looking forward to the plans for the wings. Thank you.
Thanks for a great video, I am trying to build my garage workshop and will have a go at this stand ,thanks a lot Stewart Greenhalgh, from across the pond.
Thanks for this, Gary.
I got an American Saw metal version of the folding legs and have to bolt the table to the saw which makes it kind of clunky. Like the feature of the two halves making things snug up.
Hey Gary, Thank you for this informative video. I’m awaiting for your next video with extension wings.
Thanks for the article, plan and video. I was able to build this in an afternoon with no serious mistakes and love that I now have a place for my mitre saw other than on my shooting bench! And you’re so right—it’s rock solid
I’m no pro, but an avid DIYer and have found your website and articles invaluable. They’ve given me the confidence to build a porch, with three sets of stairs, as well as a pool deck with stairs and landing. Thanks!
Thanks for the plans and writeup Gary. Love my stand. I keep checking back to see if you’ve uploaded a guide for the wings!