


A handsome staircase is always the glory of any home interior. It is also subject to many onerous contemporary code requirements, and requires the highest level of finish carpentry in the house. Planning ahead is all important. Many carpenters and not a few architects have heard me say that the best way to design a house is to design the handrail first, then the rest of the stairs, and then the rest of the house will fall in around it. I’m joking—or at least people laugh at me! But after all, how many of us haven’t faced the miserable puzzle of squeezing a code stair into an inconvenient (or worse) space? So it’s important to design the stair before you build it.
I wanted to write a stair book from a carpenter’s point of view but with an emphasis on design. But my friend Gary Katz is also my editor; he let me know that neither of us is going to live long enough to write my book and still spend enough time fly-fishing. Besides, you carpenters need to get going and make some sawdust and some money. So with Gary’s help and encouragement, I’ve distilled what I’ve learned (the hard way) down to twenty-four issues which can make your stair project a joyful success or a miserable failure. Thanks Gary, and thanks especially to Todd Murdock, whose excellent illustrations demonstrate once again that a picture is worth a thousand words.
1. Review the architect’s drawings carefully. Don’t assume that they know the code requirements in your area or have accurately measured the site conditions. This is especially true if you are working from a 1/4-in. scale drawing.
(Note: Click any image to enlarge)
2. Measure the site carefully; be sure to check for out of square and out of level walls and floors. Rough stairs site-built by framers will almost invariably have problems.
| 3. Check your rough floor-to-floor measurement along the walkline, in other words, from where your feet start up the stair to where they get off (the walkline is usually 12 in. to 15 in. from the centerline of the handrail). | 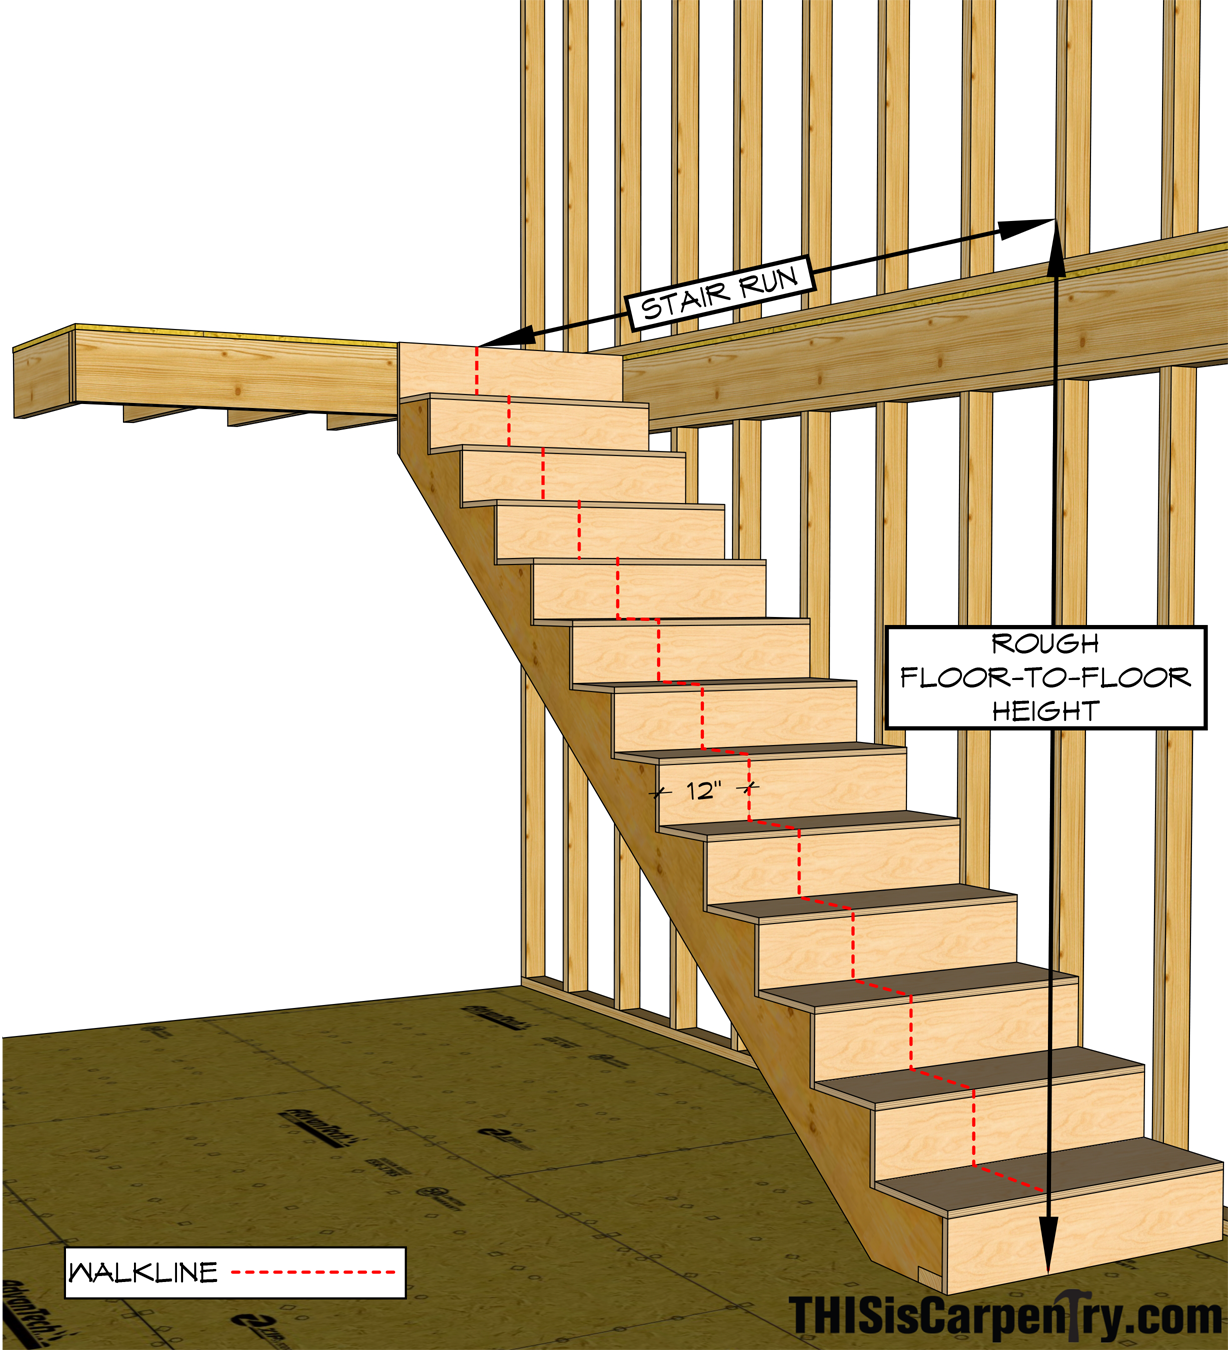 |
| 4. Lay the stair out completely on paper or plywood. Lay out any confusing details full-size, and be sure to check for sufficient headroom (6 ft. 8 in. minimum above the tread nosing line). Make a story pole! | 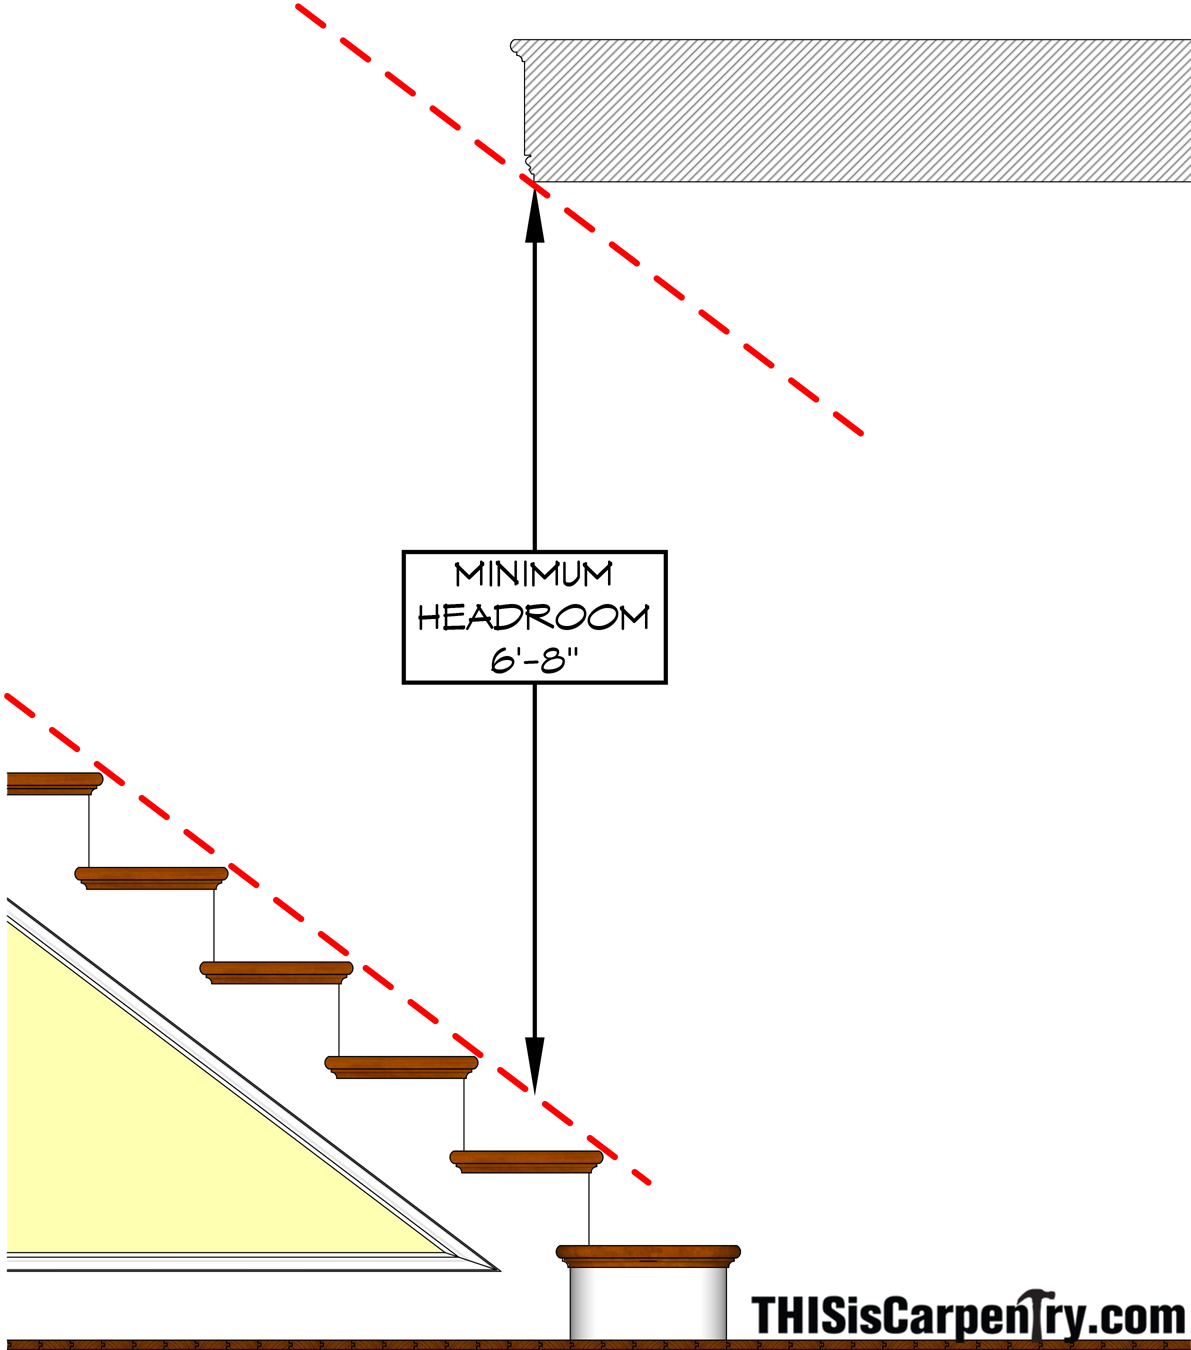 |
| 5. Make sure you know the thickness of the finish floor—top and bottom, and adjust your floor-to-floor height accordingly when you make your calculations. Don’t get caught by the 1/2-in. hydronic sub-flooring that nobody told you about. Make a story pole. Always start your design from the finish and work backward to the rough. The finished stair is all that can be seen and used; you don’t want to compromise the finished stair because the rough frame is wrong. | 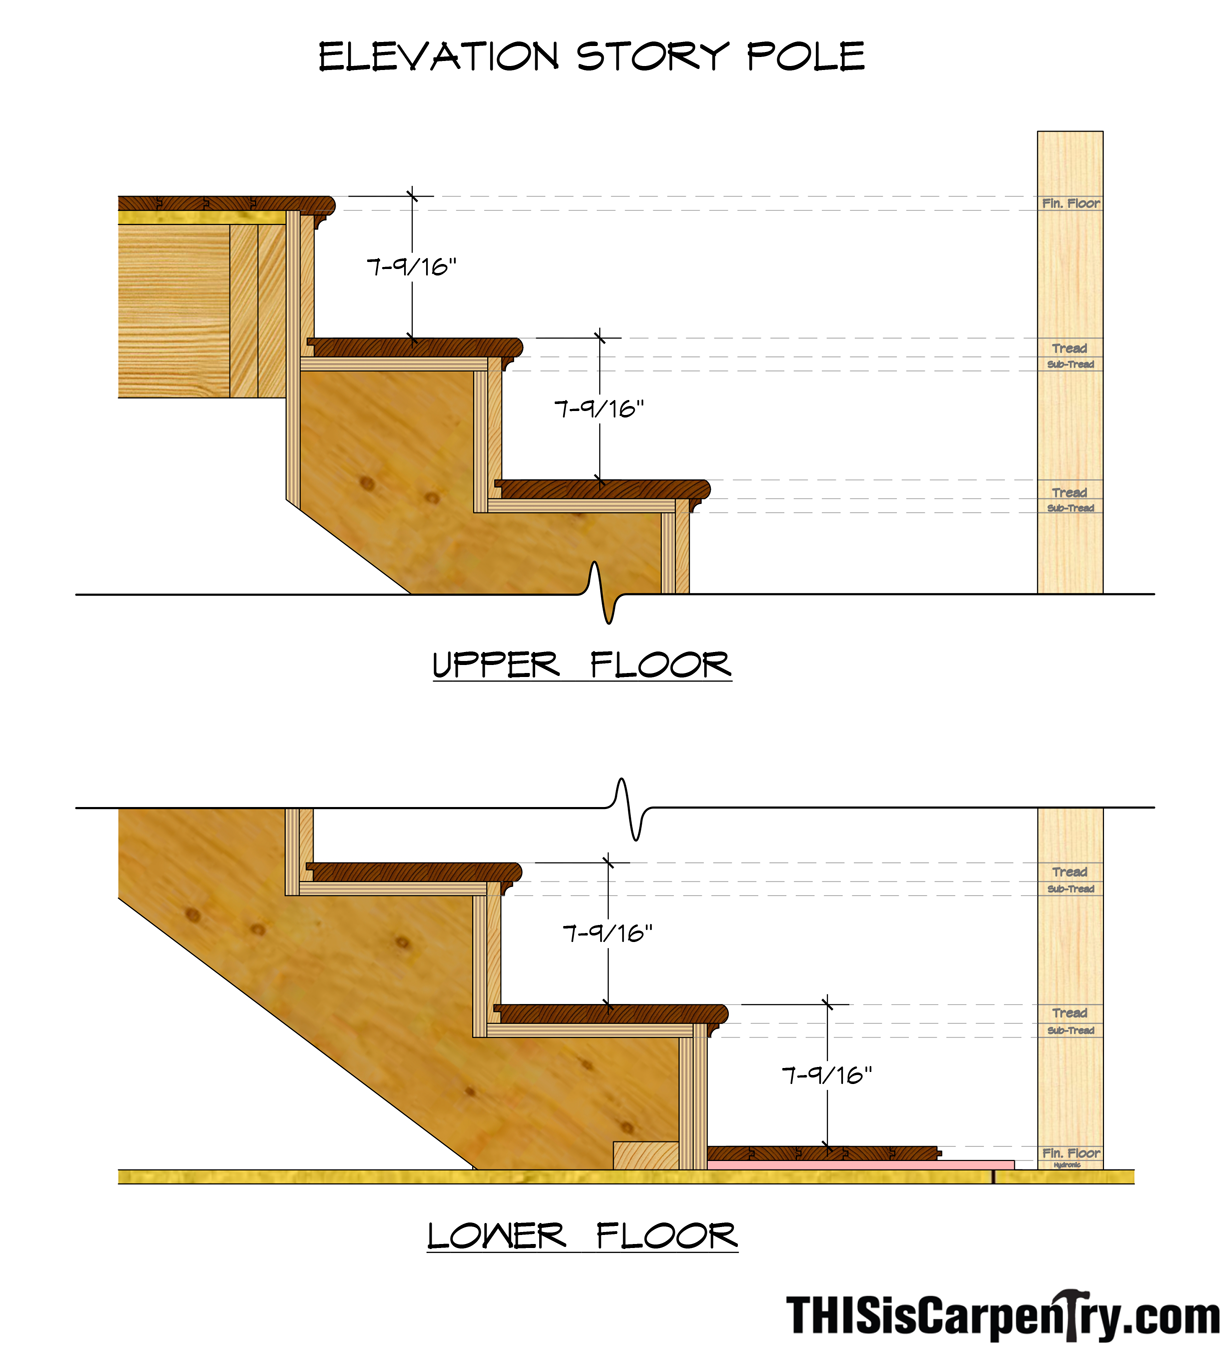 |
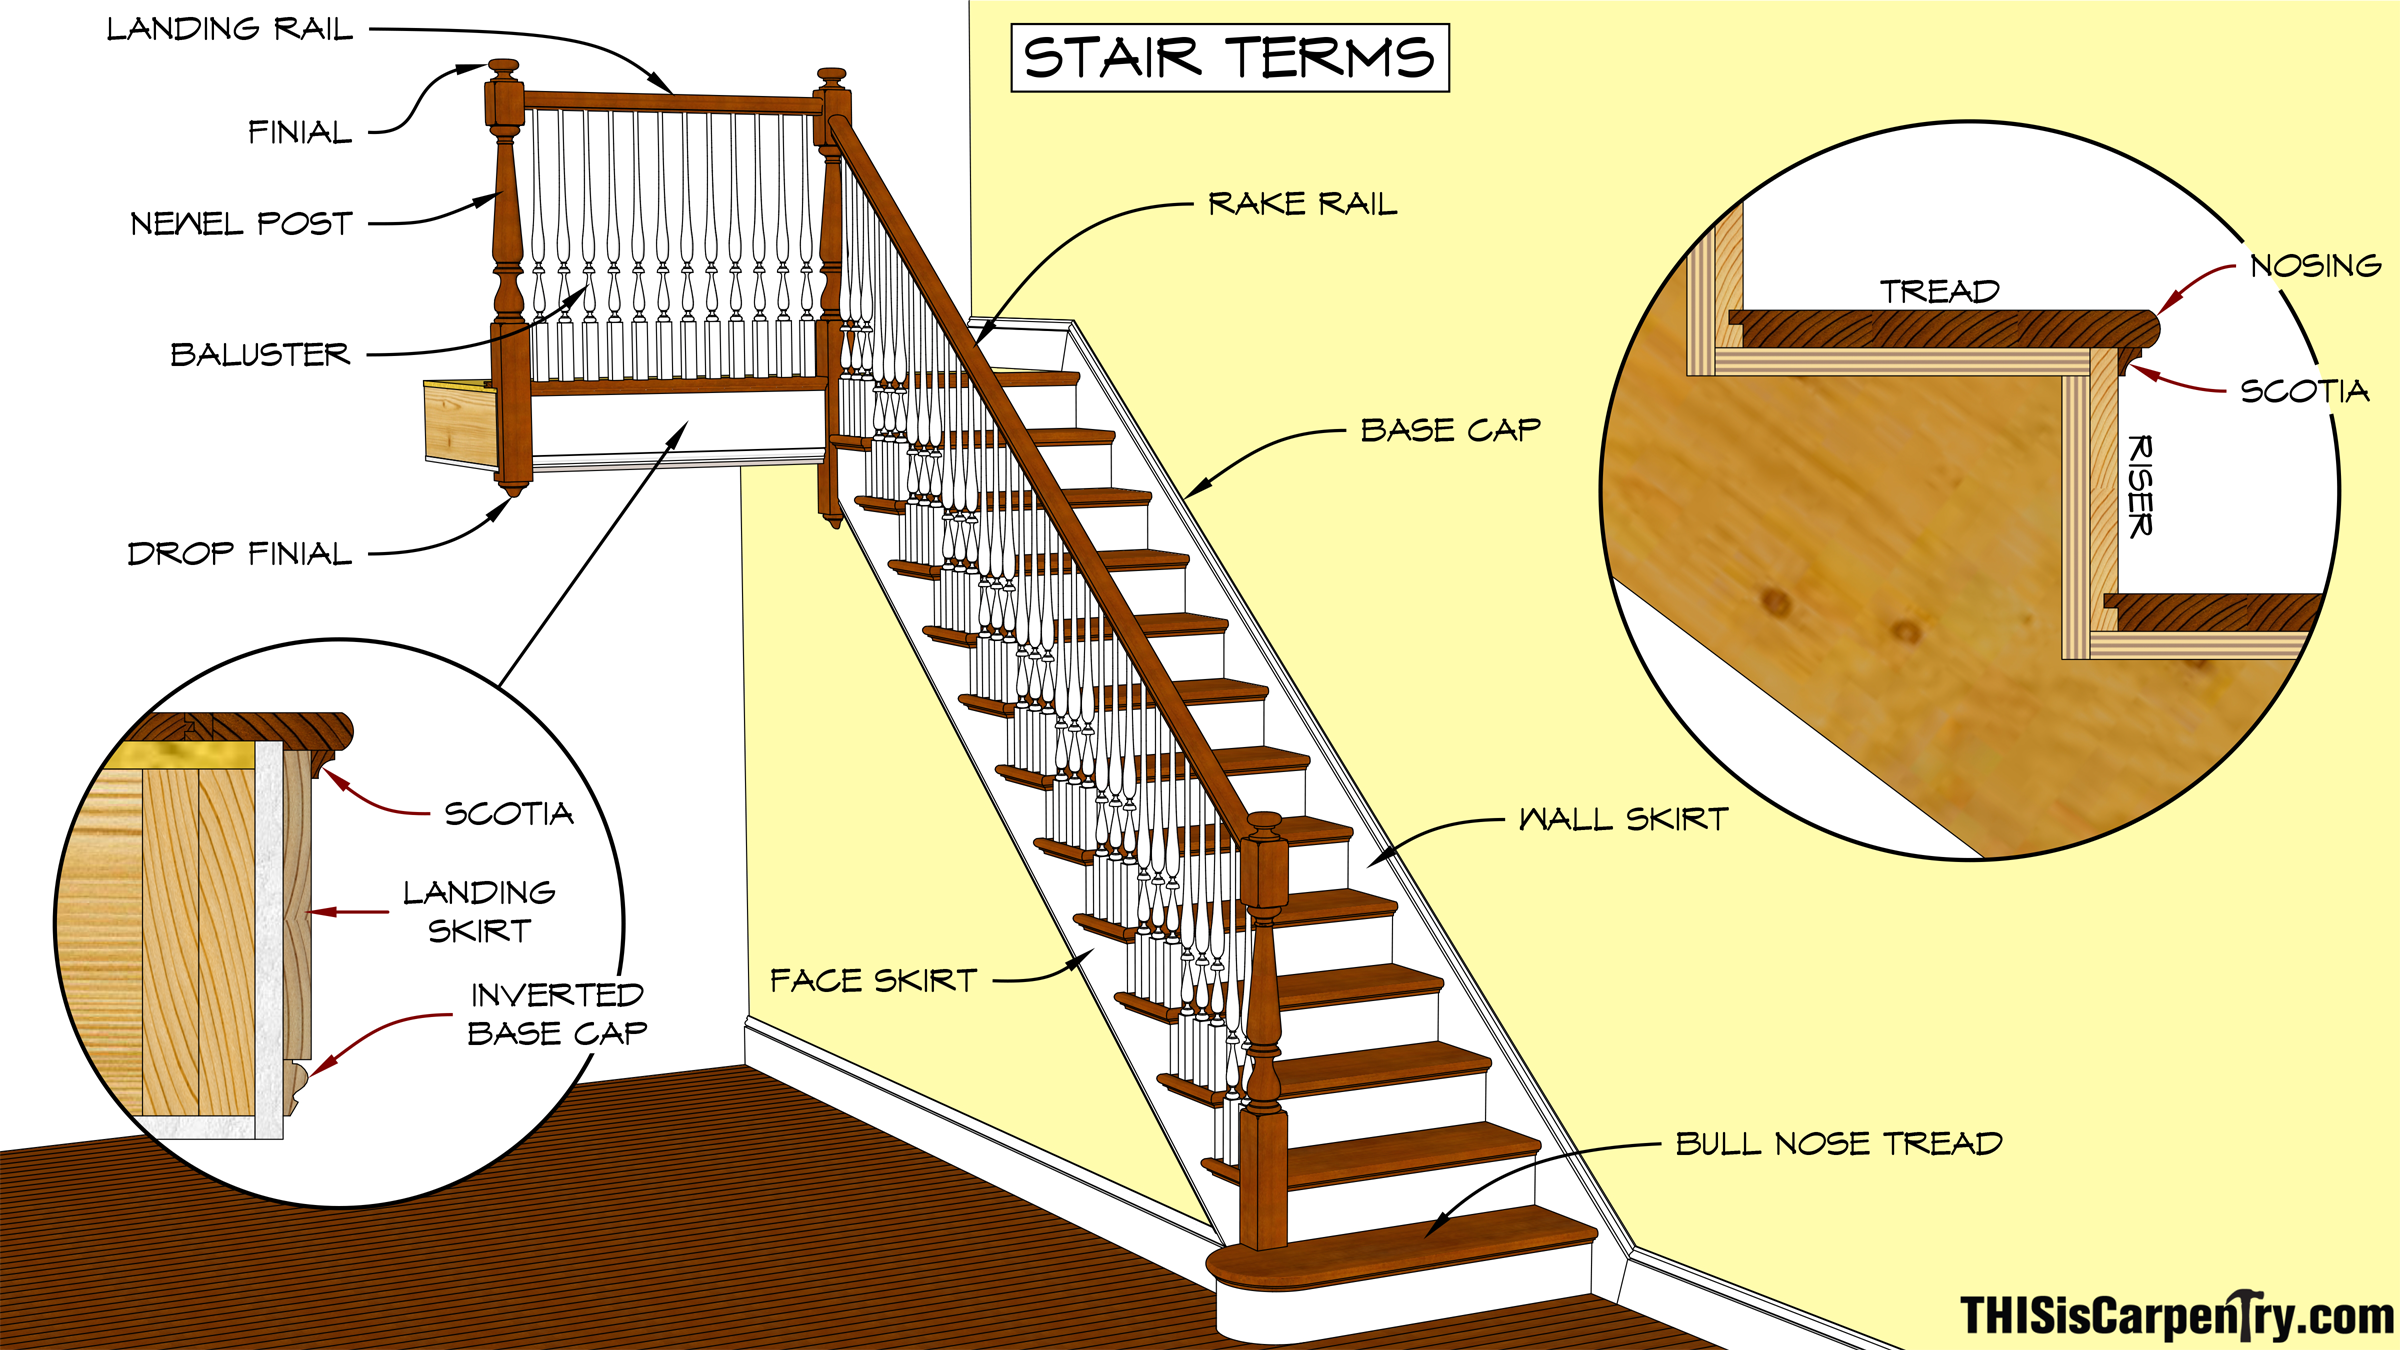
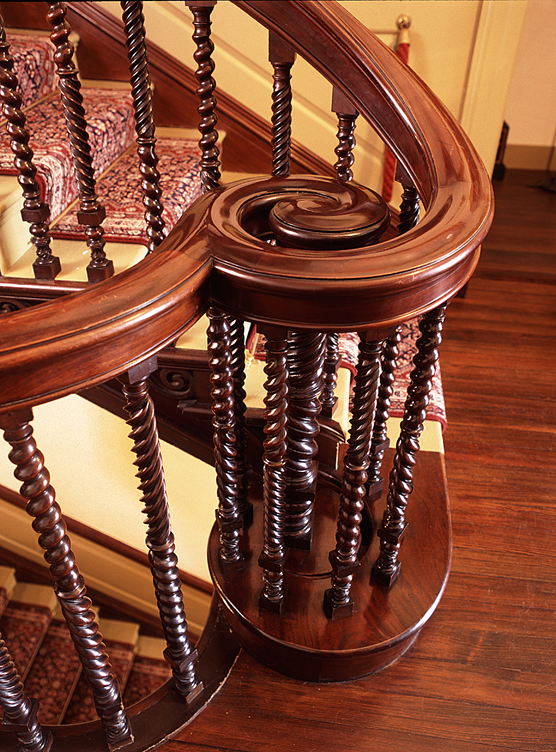
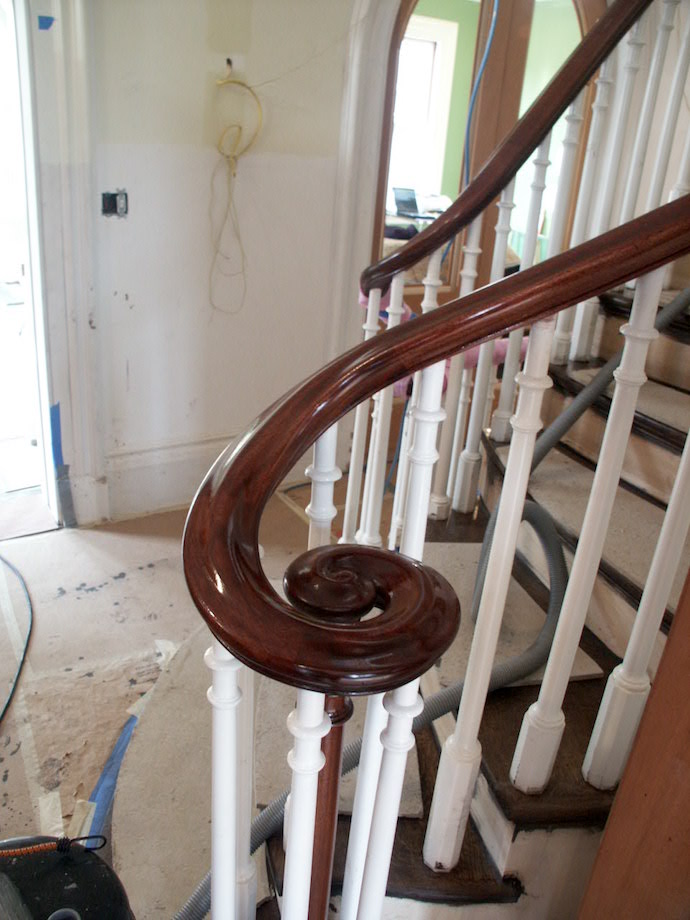
6. On a traditional wooden stair, the centerline of the handrail is always one half of a baluster width in from the face skirt, and the center of the front baluster on each tread is always one half of a baluster width in from the face of the finish riser. This way, the square faces at the bottom of the balusters line up with the face skirt and riser below them. Study the illustration. This is how it has been done for at least 2,000 years and it looks right.

7. I believe the best formula for the relationship between tread and riser widths is two risers plus one tread equals 25 in. This means that adding a riser will make the stair more than one tread width longer (in plan), while eliminating a riser will make the stair more than one tread width shorter. As a stair gets steeper the total step gets shorter. Remember, most codes require a 10-in. deep tread.
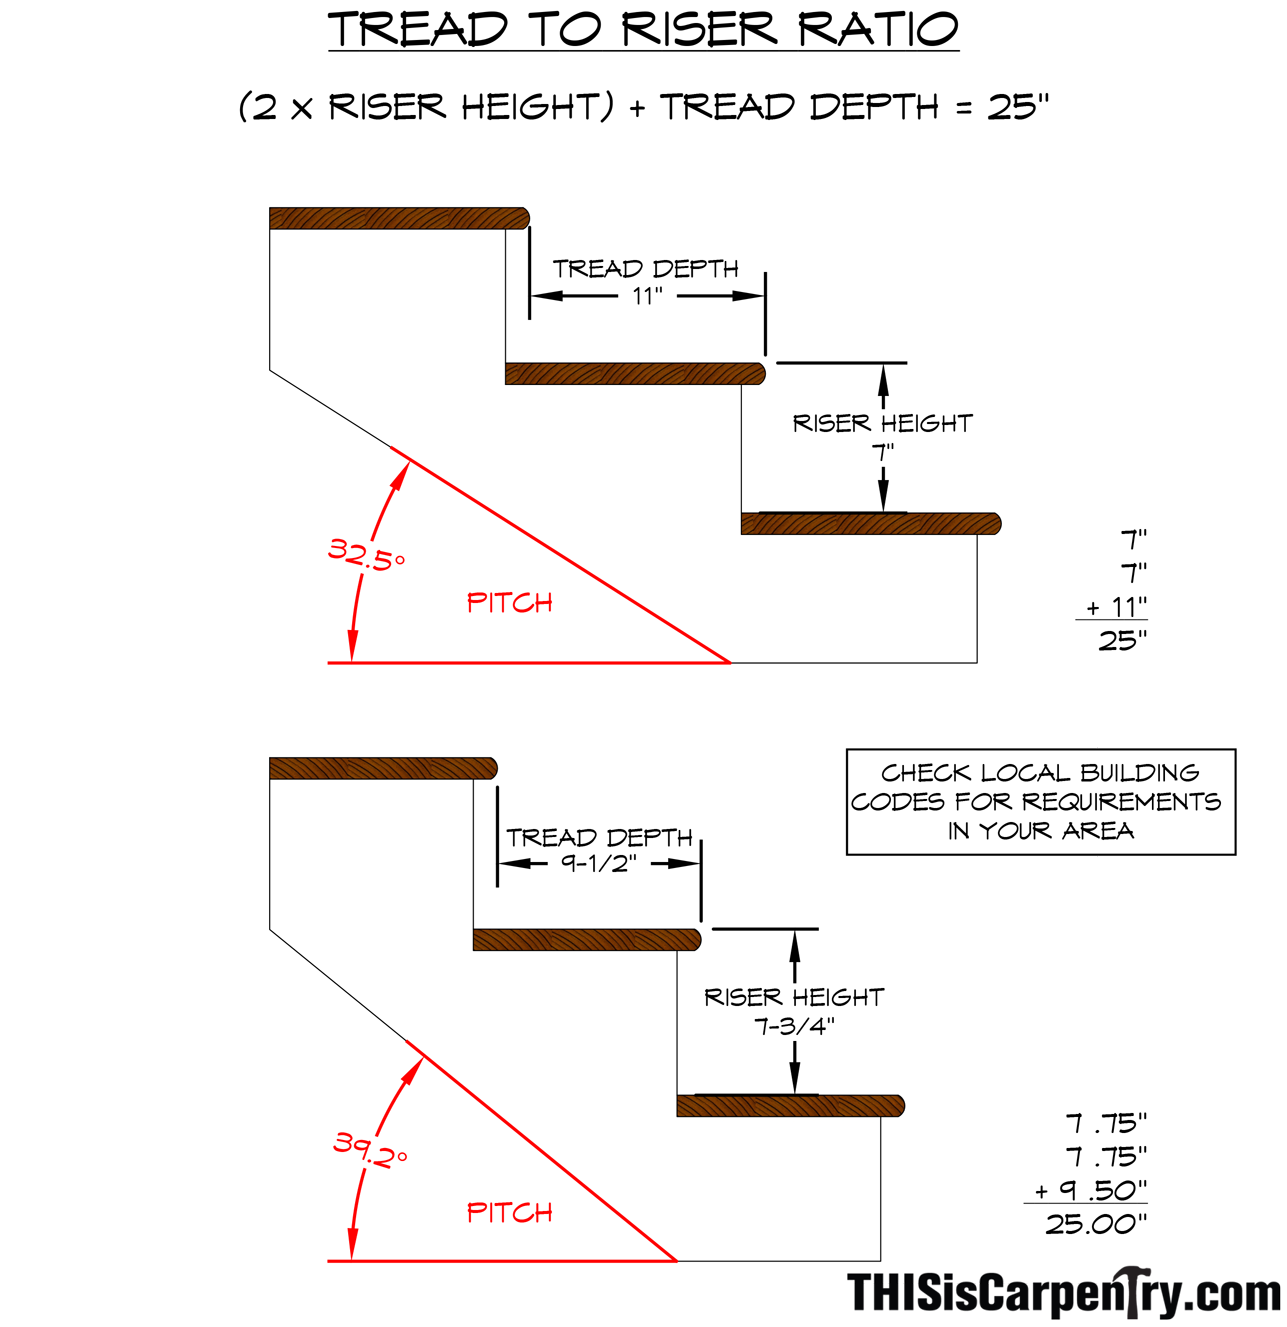
Both of these stairs are comfortable to climb and code compliant for residential work in my area. Check your local building code for requirements in your area.
8. RISER HEIGHT SHOULD BE THE SAME, TOP TO BOTTOM! While most building codes allow a maximum of 3/8 inch variation, I prefer to work to a 1/8-in. tolerance. This is the most important step in making a stair comfortable to climb. If the landing or the floor are out of level make the risers the same height along the walkline and make all the treads level. A stair with uneven rises is dangerous.
9. The treads should overhang the risers 3/4 in. to 1 1/4 in. I like 1 1/8 in. in most cases. Make them all the same.
10. Treads should be level front to back. If they are out they should pitch downhill, not uphill, and no more than 1/8 of an inch.
11. Tread width should be consistent top to bottom. If there are winders their width should be constant on the walk line, about 12 in. in from the centerline of the handrail. An exception to this is that the bottom tread may be an inch or so wider than the others. This actually improves the climb-ability and grace of a stair, and is time honored, though I have never seen it addressed in any code.
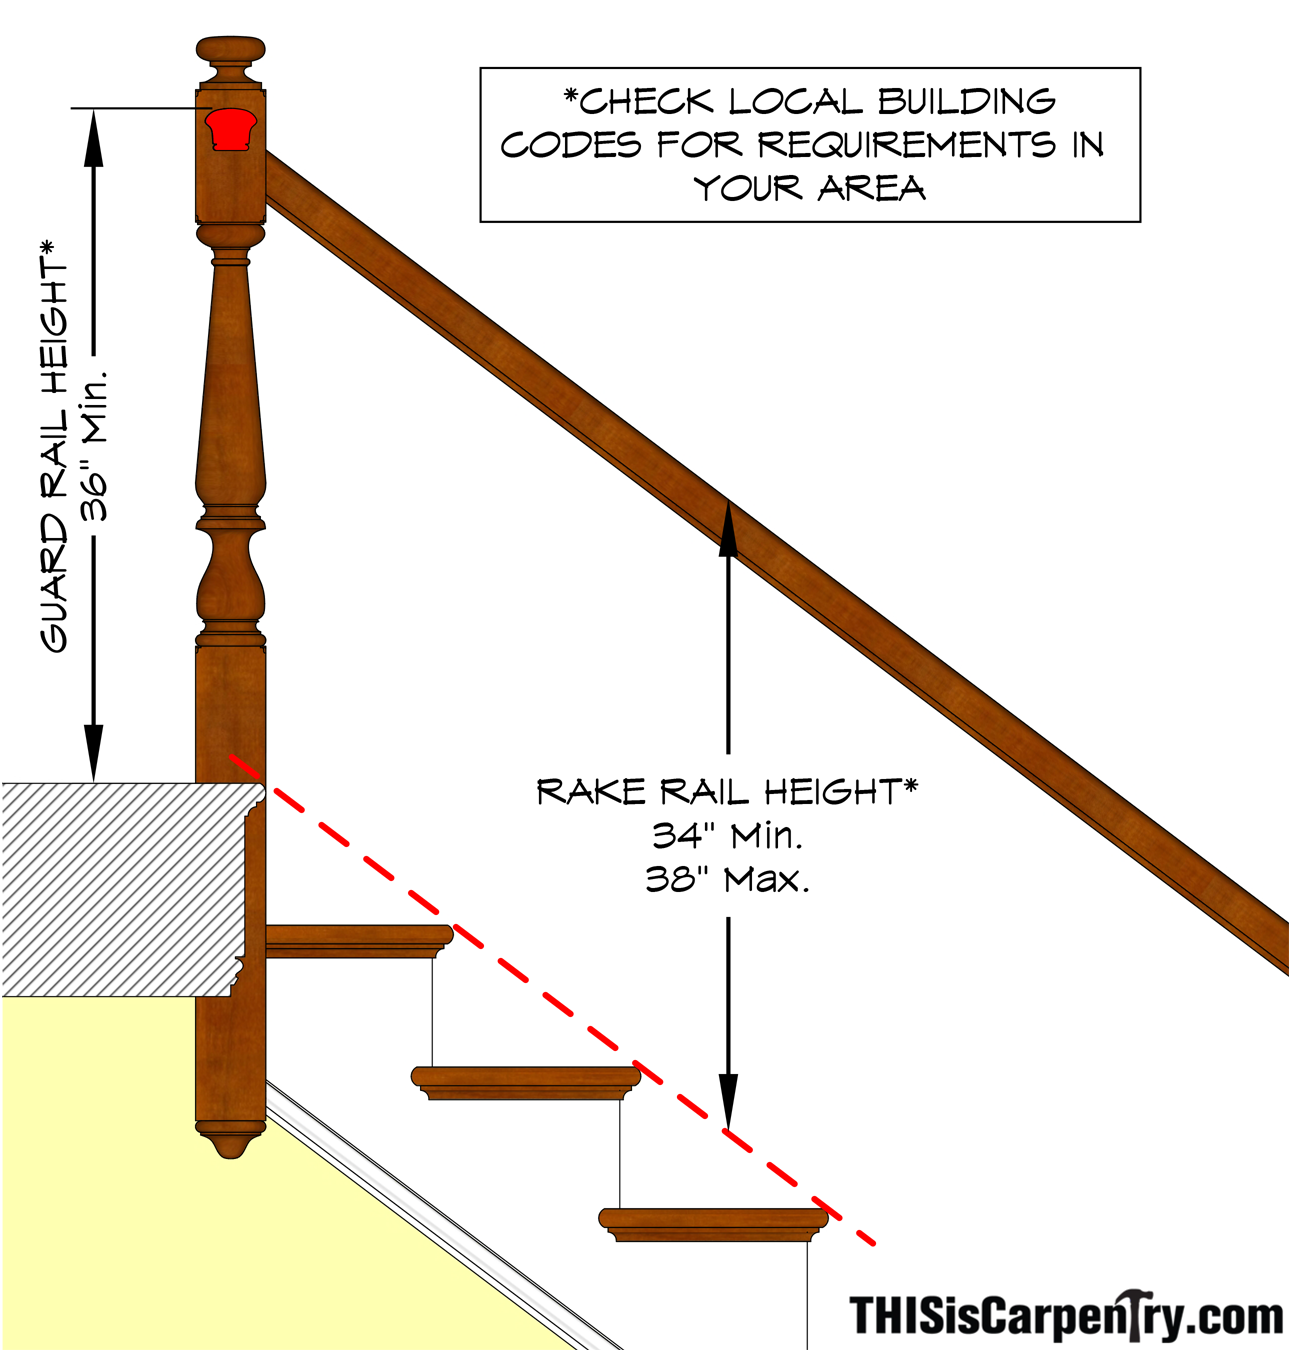
12. Currently most residential codes call for 36 in. high guardrail on galleries and landings, and handrails that are 34 in. above the nosing line on the rake. In my opinion this landing height is fine but the rake height is 2 in. to 4 in. too high to be comfortable. People fall down stairs, not over the rails, but you’ve got to do what your local building inspector requires. But make your rake railings as low as is allowed and they will be at a comfortable height for most people.
13. One thing I can tell you: A building inspector smiles on a staircase that is well-made. The stair should have the nicest carpentry in the house.
14. Balusters should be spaced so that there is no more than 4 in. of space between them. In other words, you should not be able to pass a 4-in. ball through any place in the balustrade. But check your local code! Closer is almost always better.
| 15. Figure and order your stair parts as soon as possible, consider custom parts and learn how to make them. |  |
| 16. If you are responsible for the stair trim, try to do the framing as well. If you come to trim out a stair that has been framed by someone else, check it carefully; chances are good it has problems. Seriously consider tearing it out and reframing. Put this in your price as “remedial framing.” | 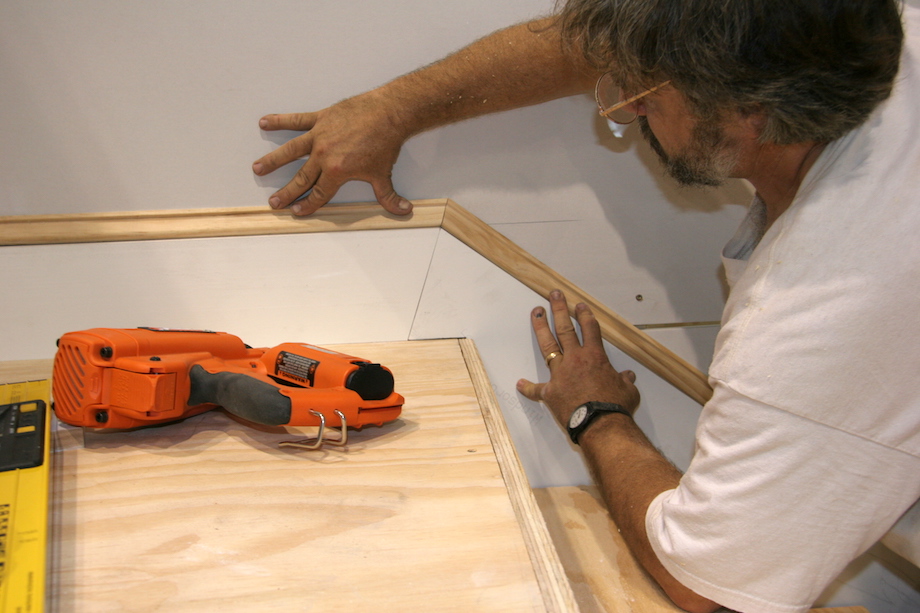 |
| 17. I recommend using permanent 3/4-in. plywood sub-treads and sub-risers, and LVLs for stringers. Use construction adhesive to prevent squeaks. This makes a good, safe jobsite stair and can be installed as soon as the building is tight to the weather. | 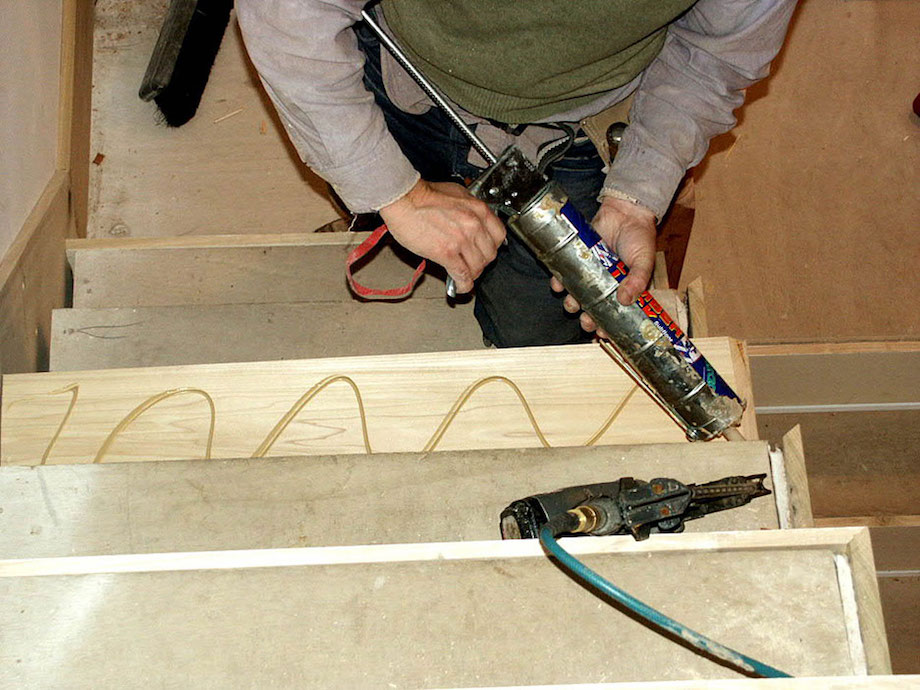 |
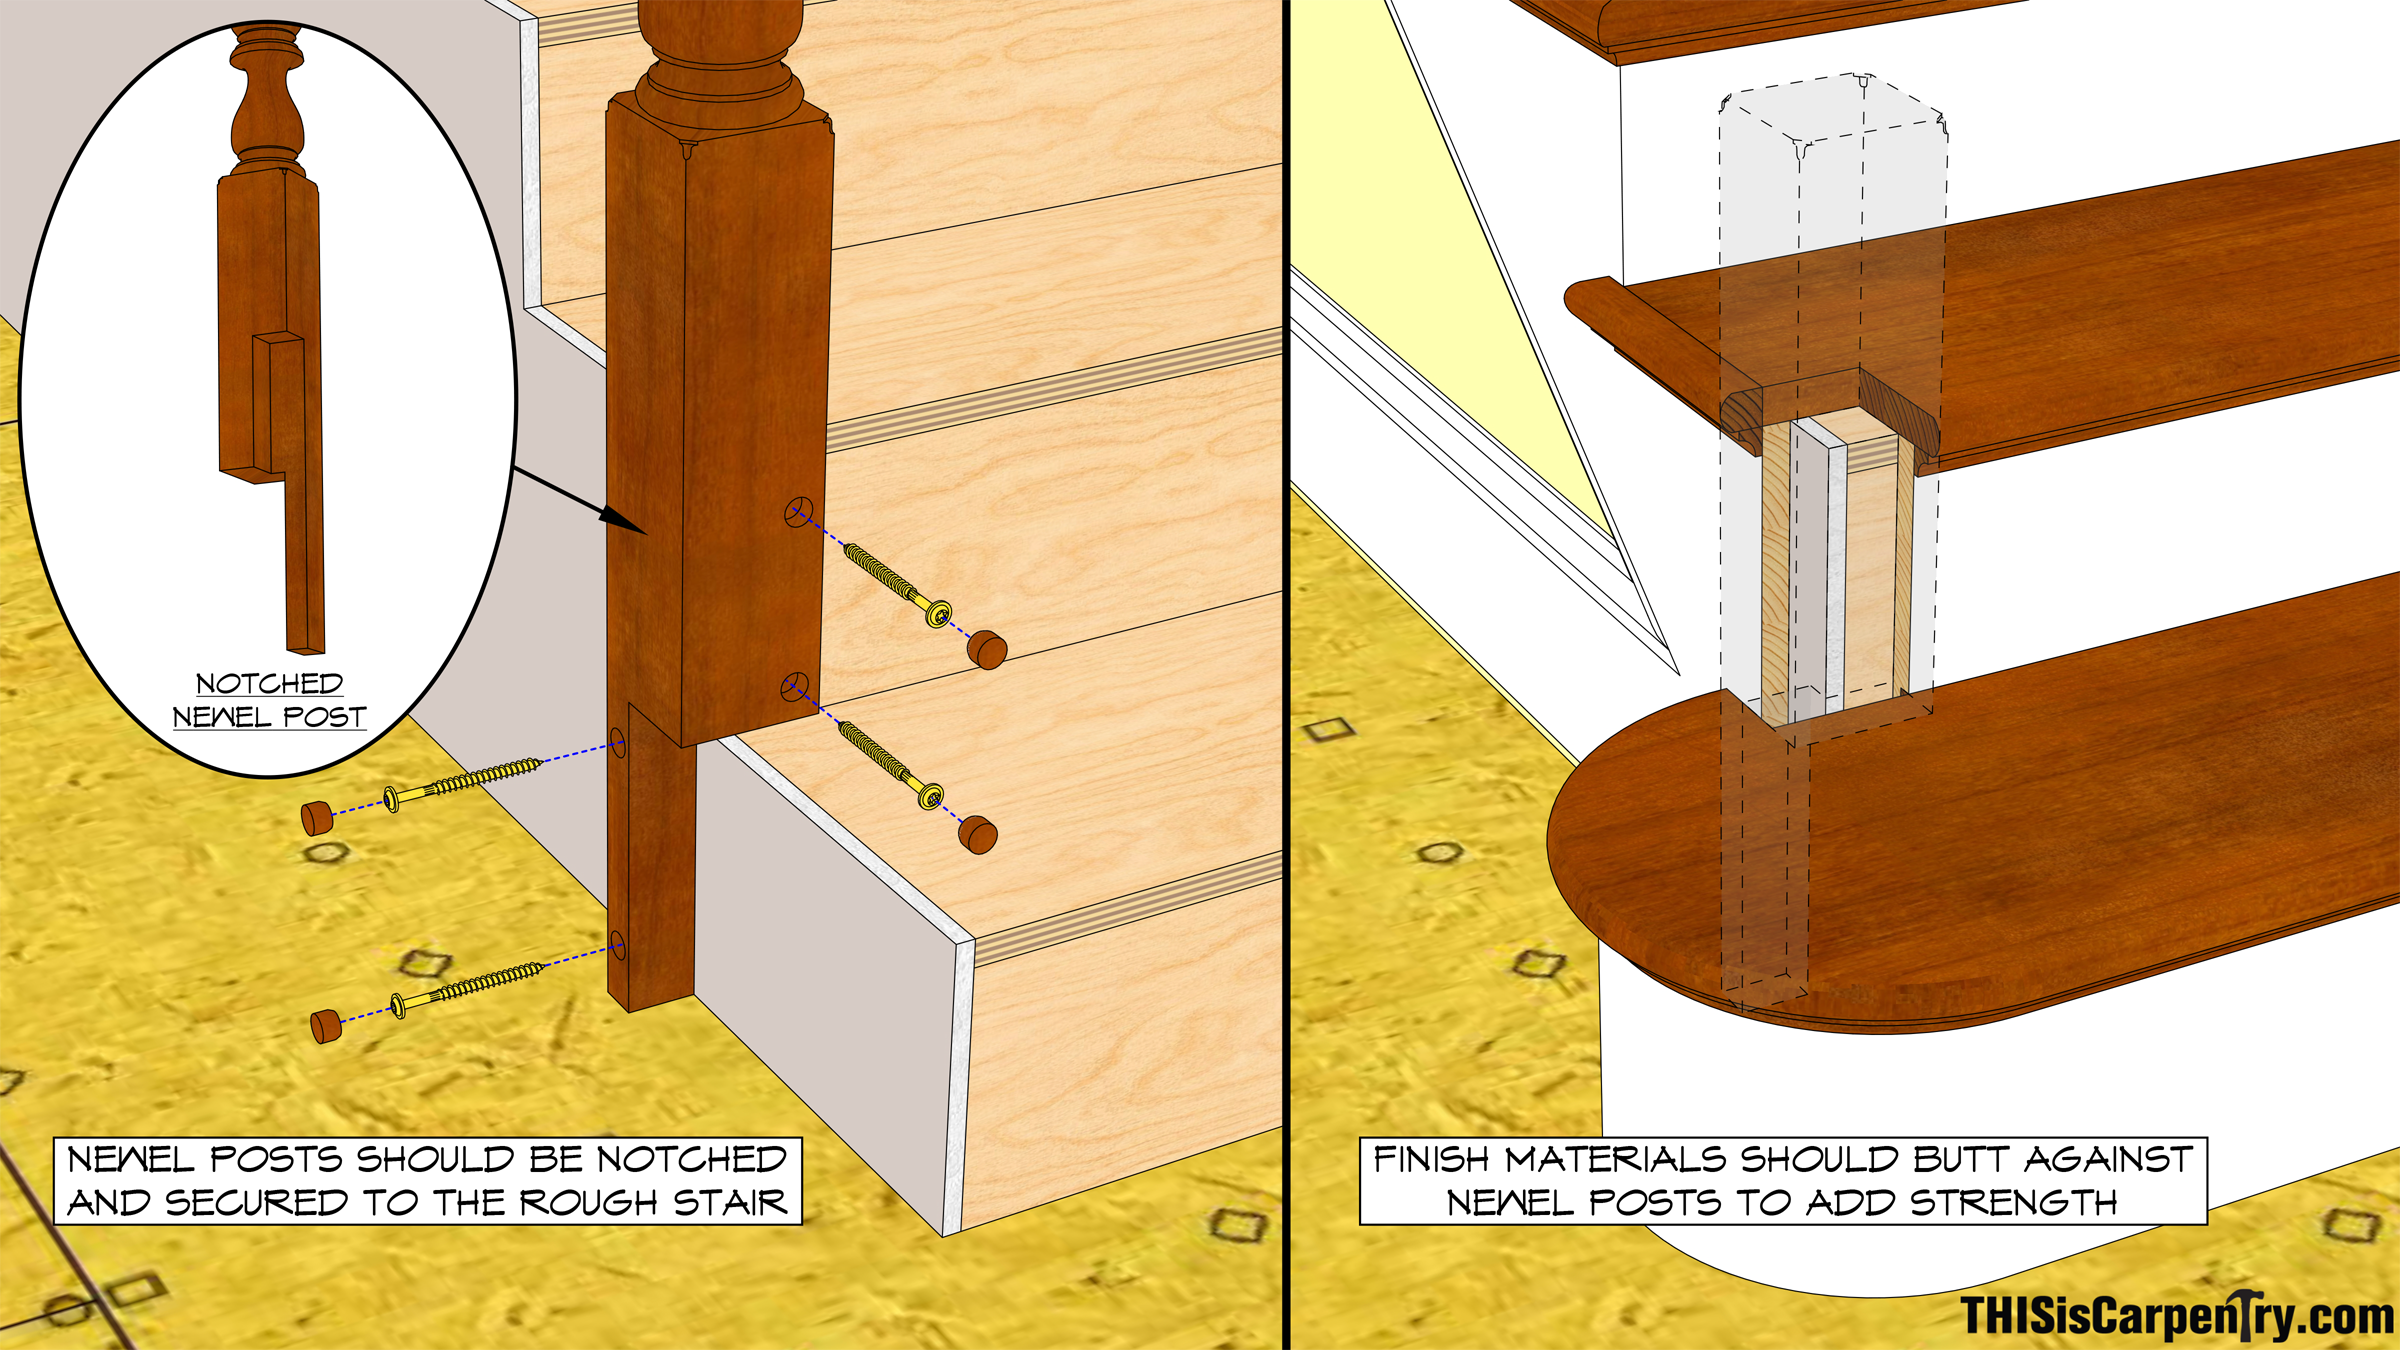
And don’t forget blocking and backing in the walls for handrails and at the location of the newel posts if they need extra strength.
18. After you install the frame, screw on a nice 2×4 temporary rail and mark the location of the wall studs on the floor and the treads with a lumber crayon. That way you will easily locate solid backing when you install the trim.

19. If the design allows, install your newel posts before the rest of the finish. Your treads, risers, nosings, etc. will all butt to the newels and make them stronger. The strength of your rails comes mainly from the newels.
20. Let the painters have the balusters ahead of time to get all but the last coat on, and leave a scrap of the treads and rail for them to do finish samples. Always be nice to the painters—you need them to make you and your work look good.

21. Wear kneepads if you think you might want to go skiing when you are 60; wear earplugs if you want to be able to hear what your grandchildren are saying.
22. Do your best work and charge for it. If we both bid a job and you get it, let’s be sure the reason is because the customer thought your work was gorgeous…and on time!, not because you didn’t ask for enough money.
23. Look at old work for inspiration.
24. Be glad you’re a carpenter. Hold your head up high. You’re making beautiful things with your hands that will last several lifetimes. There is no higher calling…except raising children.
I’m a carpenter in the Midwest. 18 years now. I really appreciate what you’ve just shared in that I’ve learned many of your points through time, grace, mistakes, watching, reading, and ideas. Thank you for sharing your wisdom with those of us who as you said, “need to get going and make some sawdust and some money.”
I’ve been fortunate to have learned three of your points well. Be friends to the painter, charge what your worth, and for me I treat every stair as the most important furniture in the house.
I get rewarded for that by compliments from the homeowner, builder, painter, inspector, and on going referrals. It’s deeply satisfying to perform A-quality work for people who are appreciative.
If you’re in Iowa sometime I’d be honored to come to one of your workshops. For, as I’ve also learned there’s always new things to learn, improve on and be interested in.
Thanks for all the information, very well done and I concur with Dwayne’s remarks also. I am now retired after 51 years in the business but this type of work always excites me, also is there any thing out there showing bend rails? Those in the pictures are really nicely done.
“Remedial framing”, now that’s funny.
This information is greatly appreciated. Well written and explained. It’s reassuring to realize that there are skilled craftspeople out there willing to share their knowledge and wisdom. Thanks.
Great article , as I am Jed Dixon fan and have learned much from his articles over the years .
Number 24 was the greatest of all for me ,
I was reminded of when I was younger, I was encouraged
like many , to get a job with benefits and a pension and not to pursue a career of woodworking / carpentry.
I am so glad that I choose the latter as the most rewarding aspect of carpentery is getting to see what your hands have made.
Thanks Jed.
Thanks for a good article and for sharing your knowledge all these years. Can’t believe it’s been almost 20 years since I saw you present at JLC live in Portland, OR.
What a terrific article! Twenty-four points well taken. My favorites are numbers 20-24. At age 73+, there’s wisdom in “them thar wurds.” 20. Yes. Be kind to the painters. (Be kind to as many people as you’re able.) 21. Think ahead, ie. protect yourself. Your mind & body are your most important tools. 22. “Do your best work and charge for it.” And, 24. “There is no higher calling…except raising children.”
Very well done!
PS. What app was used to create the drawings?
Oh yeah. 23. Look for inspiration. I left it out!
I did the original drawings in AutoCad. They were regular 2D drawing like you’d get from an architect- plans and elevations. Todd was able to open them in Sketchup and magically make them into the 3D drawings you see in the article.
Any carpenter can read drawings-“prints”. I’ve always been amazed how many others can’t make heads or tails of them, for example: a lot of home owners. Most carpenters can draw too. How often have you done a little sketch to explain some molding or framing detail to another carpenter, sometimes just on the plaster board or a 2by?
I encourage you to get a sketch-book and draw any architectural detail that appeals to you. You’ll learn a lot. More than once I’ve done a little sketch on the program for a wedding or funeral if the church is an old one and has dome cool moldings or turnings.
Jed, are you Andy Dixon’s brother? I worked for Bob Flood in Boston and went to Andys shop all the time
Great bunch of info. 23. Look at old work for inspiration. There are so many wonderful finished carpentry photos floating around on Face Book and Instagram. Take advantage of the experience of all those finished carpenters that came before us, their work is an inspirational treasure trove.
Having built stairs for the last 40 years I was very impressed by this article. Here on the east coast we build our stairs a little differently, preferring to use routed stringers and wedges. But the main points Jed Dixon makes hold true for all stair builders. The one thing I would add would be: be willing and glad to train the next generation of craftsmen. I have had the privilege of training several very talented young men over the years. While only a couple chose stair building as their main trade, others became excellent in other aspects of carpentry.
I’ve been building stairs in ireland for the last 19 years and I love reading these articles on stairs. Great information for craftsmen in the stairs industry. Its great to see and hear how things are done in your country. All our wooden stairs are built in the workshop and brought to site for the final stage of fitting. I’m attaching a photo of a stairs we finished last week. Keep up the good work guys.
Brian MacDonald, awesome work. I would love to work for someone who does work as impressive as this.
I always tell my customers that a stairway is the first piece of furniture that you see when entering a house!
In California the minimum landing height is 42″.
Excellent article.
15. “…consider custom parts and learn how to make them.” That’s the hardest part. Would be nice if you were to cover jig making, layout, etc. in another article. Thanks for the info.
I love the points about PPE and being able to use you body when you’re older. This is something I preach to everyone that will listen and even to some that won’t. So extremely important in the later years especially.
I have been a carpenter since 1971. This article is well written and
Illustrated. A must have reference for carpenters starting out.
Thank You
Just learning about stair building. THANK YOU so much for this write up. SUPER helpful!
Always interesting to see the different ways stairs are constructed, having never “framed” a staircase if that’s the correct term, it is something I am learning more about.
We make our flights in the workshop and house the treads into the stringers, then just prop them up into place on-site, as mentioned by Brian in comment 11.
Point 24 very true, I have worked on stairs that are over 200 years old and will probably still be there in another 200 years, great satisfaction.
A fellow carpenter from a group called master’s of finish carpentry shared a link to this article. I had asked where to find good literature to read up and improve my skills as we all learn every day and I’m one that looks forward as much knowledge as possible. I would like to thank you fir this wonderful article. It’s presentation it’s perfect. Very well done. I really like the illustrations, they complete that mental image you get when you read something. Very much appreciated
Great information! And I thank you much. If your ever around the St. Louis area for a seminar I would love to attend.
It’s been a while since I built a staircase but I’m about to do one and was glad to find your article. A great refresher for me! I love all the life wisdom you threw in there as well. I work part time at Home Depot and often refer customers to Thisiscarpentry for help in their projects.
Thnk you
Hi Jed, this message comes from out of the blue and the deep past, 1972?. But congratulations on your achievements here on TIC. It looks like your work is very rewarding. I am trying to find out about Andy and would like to reach him if possible. I too am getting old, and as life comes full circle, I want to value who and what has been important even as so many chapters have gone by. I am your age, have three kids and four grandkids. I met you and Andy through my high school classmates Paige Allen and Jan Fisher. Jan is now gone as I’m sure you know. Anyhow, I hope this reaches you, but the dates here are precovid. If you can share anything about Andy, I would so appreciate it. Email above. With Gratitude, Becky Rebecca Maddox Narva.
I love how you point out that a quality staircase needs the highest level of carpentry in the whole house. My sister wants to custom-build her dream home and she loves the idea of a grand staircase. We’ve been looking to find some experts she can work with to get the most beautiful staircase that will match the rest of the house.
I have a vision of an arts and crafts bungalow- found my dream front door from a carpenter in Wyoming- need to find what areas have carpenters that can craft a wrapped craftsman staircase…any ideas?
Thank you for mentioning that most people will find your rake rails to be at a comfortable height if you design them as low as is legal. My sister expressed her desire to have her home renovated. She wanted to give her steps a fresh makeover. I’ll advise her to buy custom wood railings so that they may be a suitable height because she has kids at her property.
Nice guide and tips that home owners can refer through. Thanks for it.
Thank you for sharing these invaluable tips on stair building! I found the insights about tread and riser calculations particularly helpful. When it comes to selecting materials for stair building, especially for outdoor stairs, what would you recommend in terms of durability and maintenance, while also ensuring a visually appealing finish
I’m currently learning about stair building, and I wanted to take a moment to express my gratitude. THANK YOU so much for this incredibly detailed write-up. It has been SUPER helpful and has provided me with a wealth of information that I didn’t have before. Your explanation of the various steps involved, from the initial planning and measuring to the final installation, has been invaluable. I now feel much more confident in my ability to tackle this project. Your insights and tips have made a significant difference in my understanding of the process. Thank you again for sharing your expertise!
Jed Dixon’s stair-building guide is a masterclass in precision and foresight. His emphasis on starting with the finish and working backward ensures that every step—literally—aligns with both code and craftsmanship. A must-read for anyone aiming to elevate their carpentry skills. 🛠️📐
Those handrails are absolutely amazing!
I’m an architect and have rarely seen such beautiful details. Congratulations
Fantastic tips on stair building! As a deck builder, I know how crucial precise measurements and proper support are for safety and durability. The step-by-step advice and practical insights here are really helpful, especially for anyone tackling stair projects for the first time. Great resource!