


Raise your hand if you have ever cut what you thought was a perfect crown cope only to find out it was open on the top or bottom? I’m raising my hand, too!
There is a great deal of misunderstanding about how copes work: for many carpenters, pressured by the need to ‘get the job done,’ cope joints are mysterious puzzles they haven’t the time or the patience to solve. But if we understand what makes a coped joint work then every cope can fit perfectly on the first try.
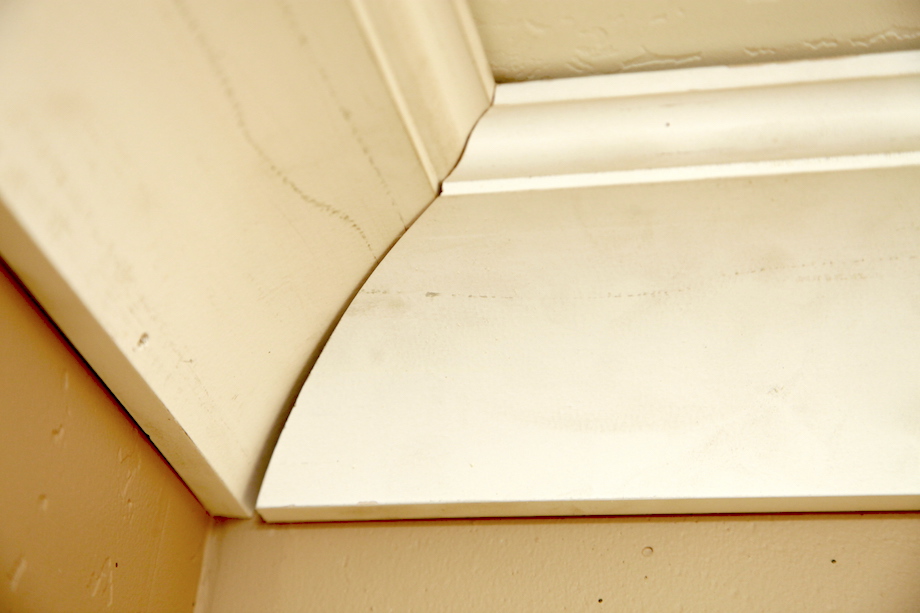
This cope is open on the bottom because the preparatory miter was cut incorrectly! (Note: Click any image to enlarge)
I’ve heard all kinds of reasons why cope joints won’t close up tight: The framing sucked; the walls were out of square, the building was 200 years old, or most often, the sheetrocker was a slob. Sure, those are fair points to make, but cope joints solve nearly all those problems! To prove my point, I built a mockup corner with a moveable wall, which demonstrates conclusively that a proficient trim carpenter can overcome a lot of jobsite chaos.
Cope joints are fast and flexible
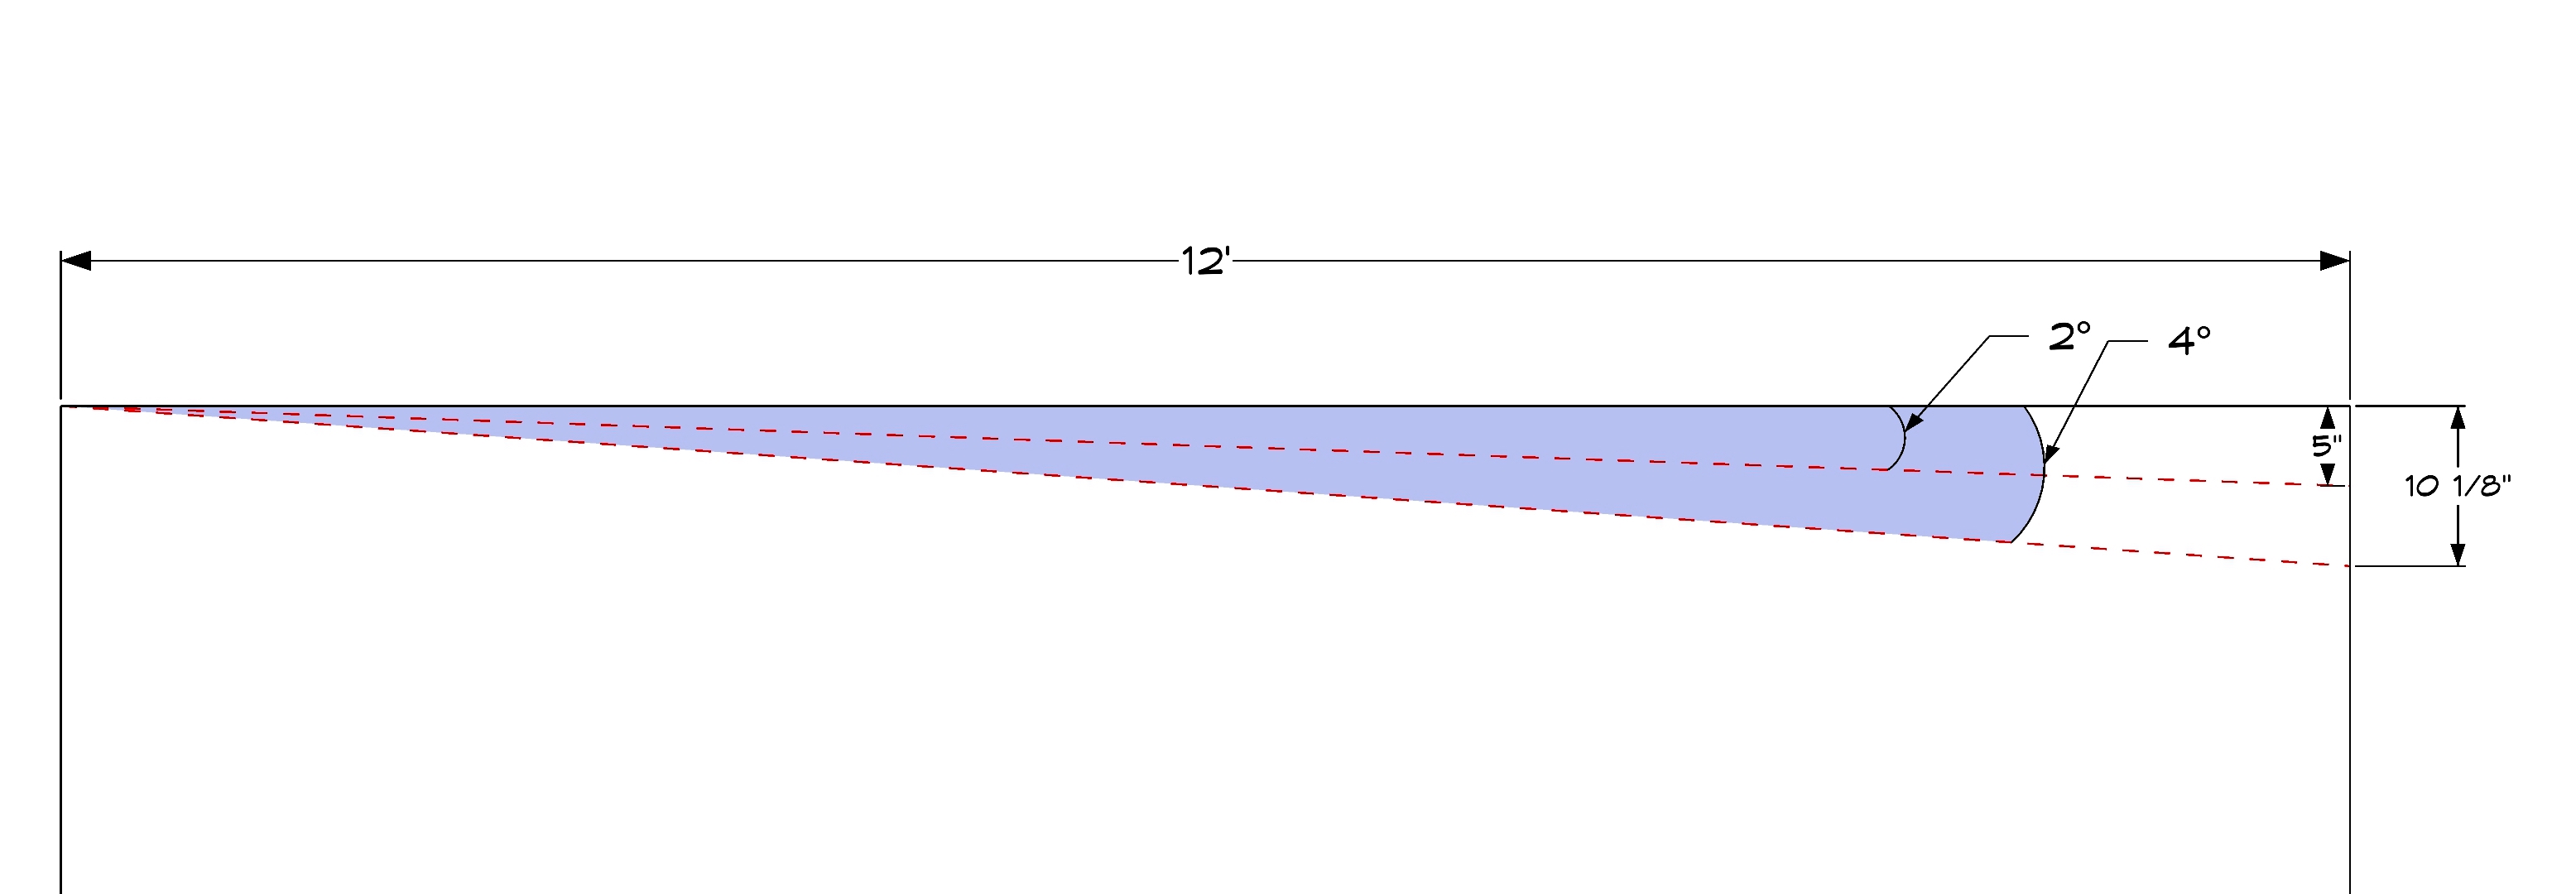
The mockup I designed in the previous video that Gary used proves that—with a slight adjustment—a cope joint will accommodate a corner that is 2 degrees out of square, and 2 degrees over a 12-ft. wall is 5 in. out of square.
A cope joint can still close tightly, even if the ceiling is out, too. This is why progressive carpenters who care about craftsmanship, as well as production finish carpentry crews, cope all inside corners. The joinery is tighter, and coping is faster than mitering. Cut a cope a little long and snap it in place—it will close up even tighter. And if you cut that square end a 1/16-in. short? No problem! A cope will cover all of it but the very bottom edge.
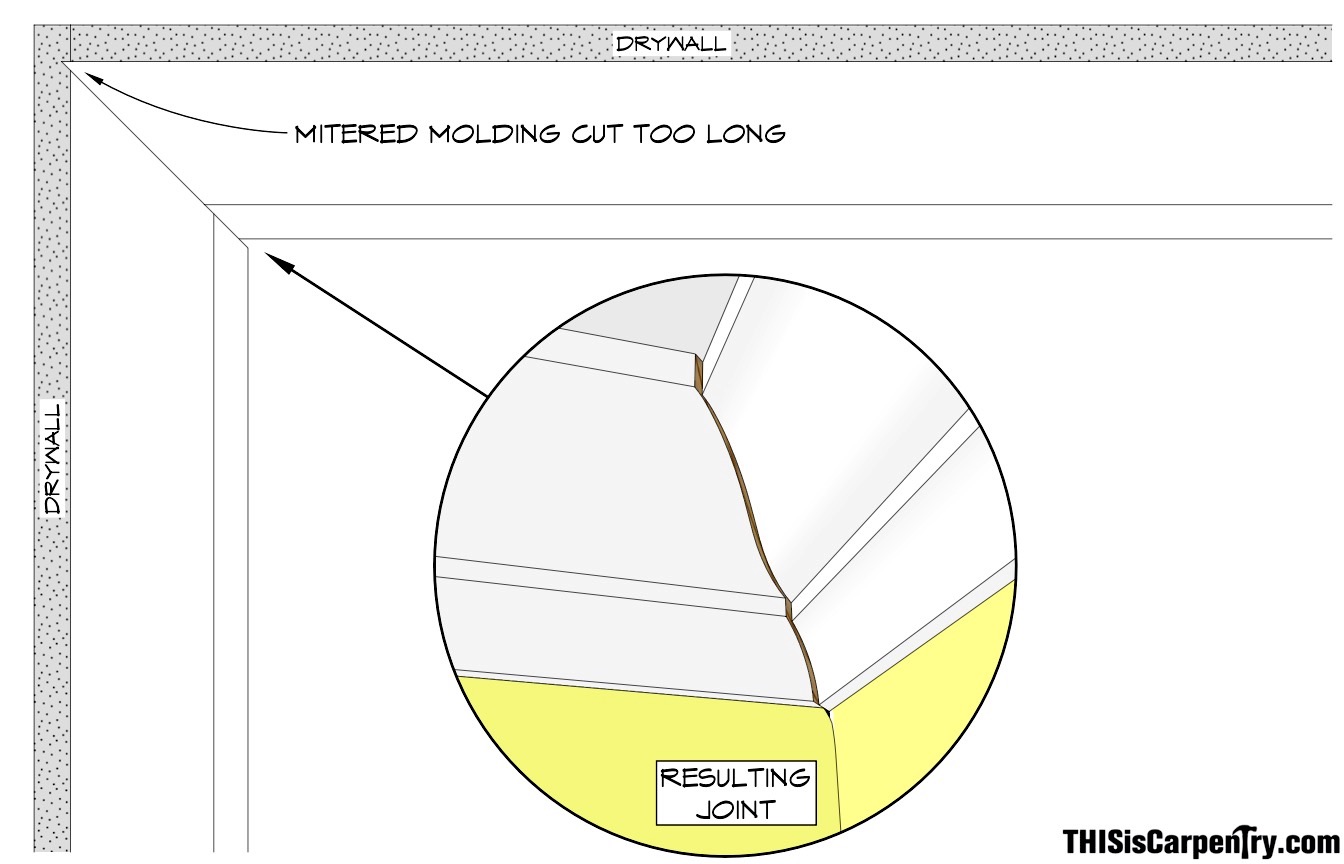
If you do cut miters for inside corners, each piece must be cut precisely the right angle and length. If a mitered molding is too long, the long point will bury itself in the drywall, making it impossible to mate the miter joint. Cut a miter too short—well, you all know what that means—cut a brand new piece.
Why copes work better
When we cut a 45-degree miter joint on baseboard and discover it doesn’t close because the walls aren’t square, there’s no choice but to re-cut the miter. However, that’s not the case with a cope joint.
If you look at the bottom of the base with a miter cut, you can easily visualize a 45-degree right triangle. Remember back to high school math: in a 45-degree right triangle, both sides are equal. So if the molding is 3/4-in. thick, then the base of the triangle must be 3/4-in. long. That means the miter cut is 3/4-in. deep from the long point at the back of the molding, to the short point at the front of the molding.
Now imagine a cope cut following that miter: the cope will be precisely 3/4-in. deep, exactly the thickness of the molding, and the joint will fit perfectly every time. At this point, I think it is important to stress what the word “cope” actually means: this isn’t a psychology class or a self-help book; in carpentry (and in life, too!) we don’t cope with molding, we cope to molding—we cut molding, shelving, countertops, decking, casing, and cabinets so that they fit to other surfaces or features. And that is a task of skill and beauty.
Sprung crown
Now let’s go back to the first sentence in this article: How many of us have cut a sprung crown miter and noticed that the cut was off? I mean, from just looking at the miter, not the joint. On baseboard, it’s easy to notice a poorly cut miter; on sprung crown, it’s tough to see if the cut is correct.
At presentations and carpentry clinics, I call this a shell game: can you spot the correct cut? Here we have three miter cuts all done at 45 degrees. To find out which cut is correct we need to measure each piece. With solid crown and baseboard, it’s easy to measure the right length of the miter—it needs to equal the thickness; with sprung crown, you need to know the ceiling projection in order to be able to measure the length of the miter cut. Remember to think of the ceiling projection as the thickness of the crown if it were solid.
Miter saw setup
So how do we make certain that our preparatory miter for a cope cut is perfect?
When I first started installing crown molding, I was taught to place the molding in position, “upside down and backwards,” in my miter saw, then rock it until it was bedded flat against the base of the saw and the fence, too! Then draw a line across the bottom of the crown (that’s the top when it’s upside down in your saw) marking the miter saw fence, and try to hold the crown at that line while cutting it. But there are two problems with that approach.
First, you shouldn’t attempt to position the crown so that it’s flat against the fence and the base of the saw. Focus only on the fence! If the crown molding is flat against the fence, you’ll be cutting it at the intended spring angle—the spring angle is the angle the molding ‘springs’ from the wall, and the fence represents the wall! You’ll also notice that with the crown flat against the wall or your miter saw fence, the shoulder at the ceiling should touch only on the very outer edge of the crown. That is the way well-designed crown should land—so that irregularities in the ceiling won’t prohibit the crown from contacting the ceiling.
Check out this video Gary did with still photos for his original Conquering Crown DVD:
The second problem with that old-fashioned approach is the pencil line. It’s really difficult to hold the molding right on the pencil line, and if you do, you have to lock your hand dangerously on the crown. And even then, if your saw blade is a little dull, or the material is dense hardwood, the molding will resist the blade, the blade will push down on the material, and the spring angle will change as you’re cutting the crown.
Holding the crown in position by hand does not work. And it’s dangerous.
Cutting on the flat isn’t the best solution either and introduces a host of other problems. If the crown is cupped—and most coved crown has at least a slight cup because that’s the nature of wood—it is almost impossible to get consistent cuts because the molding won’t lie flat on the base of the saw, which changes the position for each cut. Further, when I have to cut on the flat, I often have to use a crown chart or an angle finder, like the Bosch angle finder that provides miter and bevel settings for crown molding with any spring angle. For those reasons, I cut on the flat only when the crown is too large to cut in position. Plus, who wants to set miter and bevel angles to a tenth of a degree.
A simple crown stop
I like to use a crown stop for all my cuts, both for copes and outside miters. One setup covers everything. And I use a crown holder, too. Here’s a video that explains the saw setup, crown stop, and how to make a crown holder. Don’t just use the crown holder for the cope joints, it’s great for outside miters as well!
Like many finish carpenters, Gary Katz prefers to use a crown holder—a lesson he learned from David Collins, which works just fine for the majority of jobs. But if you’re working in a home with ceilings that aren’t anywhere near flat—bows and bellies and waves, then cut a 24-in. piece of crown with a cope on one end. Use that coped piece, along with a straight cut piece, to mark the drop of the crown in each corner—when those two pieces fit together tightly, you’ll know the drop is spot on!
•••
AUTHOR BIO
 Bill Shaw studied mechanical engineering and spent a year in the corporate world before deciding it was not for him. During the next ten years Bill started and co-owned an auto repair shop and then worked as a cabinetmaker.
The cabinet shop manufactured flooring on cabinet-making equipment, which seemed very inefficient. Thinking there was a better way, Bill opened his own business, with a leased Weinig moulder, knife grinder, and a used straight-line rip saw. The next 20 years were spent manufacturing custom moulding. While delivering the moulding to the job sites, Bill would check in with the customers asking if there was anything else he could do. More than one customer answered by saying, “Yeah, why don’t you cope this stuff before you deliver it.”
With that goal in mind, Bill collaborated with his father-in-law, Martin Scott, a retired engineer/machinist, which led to the development of the Copemaster. Two years of field testing produced the first version, which won the prestigious Challenger’s Award at the 2002 International Woodworking Fair.
When not producing Version 2 of the Copemaster, Bill can be found with the love of his life—his wife Loure, and in the machine shop, wood shop, or out on his dirt bike (a 50-year passion, which started at age 18).
Hi, first video has no sound
Works for me. Could be the video is only outputting on one channel, either the left or right and you are not out putting that side. Just happened to me where I only had one speaker working.
Even though I am retired after over 40 years in the construction business, I always learn something new and helpful by your carpentry videos. Have met you several times during your treks to Philadelphia. Always interesting, always great useful information. Keep up the good work.
Great article , I would love to try a copemaster .
We are currently coping crowns (that are under 6 inches )
With a speed coper jig , I haven’t tried the Collins coping foot
I would add that I prefer cutting on the flat . It is the most accurate method that I have found to consistently cut large quantities of crown , providing one keeps sharp blades.
The only time I , or my crew prefers to bed is when cutting a lot of small pieces for mantels or such or , running vaults
Thanks , great article , well written , love the videos.
Too bad you’re cutting everything on the flat. Cutting nested, or ‘in-position’ is twice as fast, and you can cut mating miters–grain matching every single piece in a stain-grade room, with incredible ease. Cutting on the flat with a sharp blade may seem efficient and precise, but if the crown has even a small cup on the back, it will throw off your compound miter in wacky ways. But, as I like to say: If it works for you….!
As I stated in my comment , cutting on the flat
Is our preference on large quantities of long
Wide profiles , however cutting nested is (definitely) not twice as fast , I do agree with the mating stain grade corners.
As for the crown being cupped , you are correct , however
Cutting nested is not perfect either , you will still get an inaccurate cut in the center where the cup is located.
Jeremy
Saw manufacturers make both types of saws for a reason. We all have preferences. For large crown with a cup I will double stick tape shims to the saw table to keep the crown from rocking. For a outside miter on a 7″ crown with a spring angle of 41 degrees and a corner that is 89 degrees, I would prefer to set a crown stop and swing the saw to 45.5 degrees instead of doing all the figuring and then setting the two angles to tenths of a degree. In position might be quiet a bit faster in that situation.
Some of us cut all of our cope cuts at 45 degrees while others will measure the corner and adjust the miter angle for the cope cut. For larger crowns and corners 1 degree out of square or more, that can help with the fitting of the cope. In that case I again would prefer in position to avoid calculations and two setting.
Great article as always. Quick question. In the second video, the extensions on Gary’s saw, are those these just without the fence? http://www.garymkatz.com/ToolReviews/extension_wings.html
Bill,
I am trying to understand your last statement in the article. I’ve run into this a few times and I am trying to figure out the best way to correct it. In my situation, the ceiling is wavy so in the corners, the first piece is high and tight to the ceiling and the coped piece coming into it is dropped down leaving about an 1/8″ or so gap between the crown and the ceiling (just in the corner about 4″ – 6″). So are you using your test pieces that you describe to mark how low the first piece should be installed to put it on the same plane as the coped piece? How are you eliminating the gap? Do you scribe it? Do you have any pictures to illustrate what you are talking about?
Mike J
Mike
In the first video with the movable wall you can see the coped piece is setting the square cut piece. If the wall and ceiling form a 91 or 92 degree angle then the coped piece will be going uphill as it goes away from the corner. By using a two or three foot coped piece to set the square cut piece you will be compensating for the rise. I still leave the square cut piece free for the last 4 or 5 feet and let the finished cope piece do the final locating. With a situation as you describe I would think floating the ceiling the best result. Not a big fan of scribe or caulk as it changes the look of the top edge of the crown but sometimes its unavoidable due to cost and time constraints.
Mike J, we glue all of our crown and where the ceiling isn’t flat we will persuade the crown to bend to fit with pole clamps. I’d love to have seen a short video demonstrating how you’re actually cutting & coping a few pieces and then installing it, I’ve coped crown occasionally but usually default to mitered joints. We almost always use 6″ crown (or larger) and thus it gets cut lying flat instead of in position. I LOVED the hint about the Carvex light. I bought the Carvex after using a friend’s to cut through 1 1/4″ MDF for some decorative shaped gables for upper cabinets. The blade stayed straight and the cut required very little sanding. After buying it though, I find it actually goes out of plumb just as much as my old makita cordless. The strobe light is annoying, not helpful. The zero clearance plastic chip guards splinter close to the blade and just obscure the view of cut lines. Combining the chip guard and the dust shroud shield, makes it almost impossible to see and it still doesn’t do that great a job of sucking the dust, not to mention the hose tends to drag or catch on the edge of the material and try to force the jigsaw to go astray. I get so annoyed I almost never use it.
Just ordered the Copemaster 2! Bill walked me thru what to expect and how it worked and what to do! If I dont just completely screw the pooch on my cuts this thing should make me money hand over fist coping both crown and base!! Super stoked to get the CM2 this week and get my money printing press in action!!
Matt
Will talk you thru it on the phone. To hard to write a comprehensive instruction set. The videos on your website will get you going and you can always call with questions.
Bill
Hello New Bestie!
I am taking Heritage Carpentry and Joinery in college right now and we are replicating moulding for a project in Architectural Millwork.
It was suggested that we read this article and I have found it truly informative and influential!
I love the videos and the instructions are dead on what our Professor is teaching, he really likes your stuff too.
I will stay tuned for sure from Ontario Canada!
Hi Shawna
Glad to see that type of course being taught. I manufactured custom moulding for 20 plus years and reproduces lots of profiles.
When redoing a crown moulding, don’t worry about the spring angle. Try and keep the back side parallel to two high spots(as far apart as possible) on the front side. This will reduce the thickness of wood needed and allow the chip breaker to hold down the moulding as it exists the moulder, reducing chatter.
Well if you ride a Beta you got my attention ! Lol Trials bike also, very cool. Nice article about Coping too, by the way.
Few things are more enjoyable than clean coped joints and Beta motorcycles!
There are so many ways to cope crown. We has a 58 degree spring crown with a 4 1\4 inch rise 7inch run, that you couldn’t cut beded against the fence. The tool would collide into the material and not cut all the way through. Couldn’t cut it on the flat as it was so cupped and twisted you couldn’t be consistent. So we had to cut it upside down seated at the spring angle backwards on the chop saw. Where you would pull the saw into the crown to make the cut rather than push through the cut. (As a simple illustration of the set up.) we didn’t plunge cut into the material, but could have. Dangerous cut to make.
Stiller
You don’t see that spring angle to often. Bad enough to see a 52/38.
We are working on a 12″ miter box that can cut a 10 1/2″ crown in position. It would be interesting to see if it would cut yours. Every crown is its own challenge with the spring angle, projections, profile and wood species influencing the cut. An 8″ version of our new saw will cut a 6″ crown in position and a 5 1/2″ base standing up. Hopefully the new design will end having to cut on the flat.
Bill
Hello. I’m impressed to see the videos and read y’all chatting about the finer points. Therefore, I thought I’d throw in my question since I cannot find anything about my situation in all my searches.
My 15’x35’ room has a vaulted ceiling at 112°. I have windows at each end of the room with only 5-3/8” of wall space between the window and the ceiling. I want to use 5” vaulted moulding that’s made to fit with a 68° spring angle on my long 8’ wall. The 5” is too large for the end walls because of the windows, plus I don’t know if I could cope this since it isn’t 90°. I thought I’d use a 3-1/4” crown for the end walls, but it’s not possible to cope against the 5”. I figure my only choice is to use blocks in the corners, although I really don’t think they look appropriate for this room.
What would y’all do in this situation?
Thanks for any assistance.
Hi Greg
Search this website for crown transition or crowns and vaulted ceiling. Gary Katz has done videos on this subject. That is if I am reading this correct–that you are trying to run a crown down a wall and then up the gable end? The 5″ crown sitting at a 68 degree spring angle should fit in a 5 3/8 space since most of the crown would be on the ceiling.
I have 4″ colonial crown (with 47 degree spring angle) Having a hard time getting coped joints to match. Inside corners are like 89 degrees. Any suggestions?
Attached an image of the profile
It would be interesting to see if the bedding feet are undercut both at the top and bottom. Check with a framing square. If so it is most likely a 45 degree spring angle with a two degree undercut, top and bottom. To get a good miter cut, set the crown in a framing square they way you want it to set on the ceiling. I would set the wall foot flat, tight to the wall and let the top foot have all the back clearance. This would make the two spots where the cope will get paper thin to be a little less so. Measure the ceiling projection off the framing square as it will be installed and cut in position with your fence set to that dimension. If the top and bottom bedding feet are undercut 2 degrees and you set the wall bedding foot flush, the spring angle would be 43 degrees, not accounting for any cupping.
Great tutorial! I’ve been wanting to add Crown Molding to my home for a while now, and this post has given me the confidence to give it a try. Thank you for sharing your experience and tips!
I know this is an older post but it’s still relevant till this day. This is the kind of stuff I love to learn about. Crown Molding is beautiful and timeless in my opinion.