


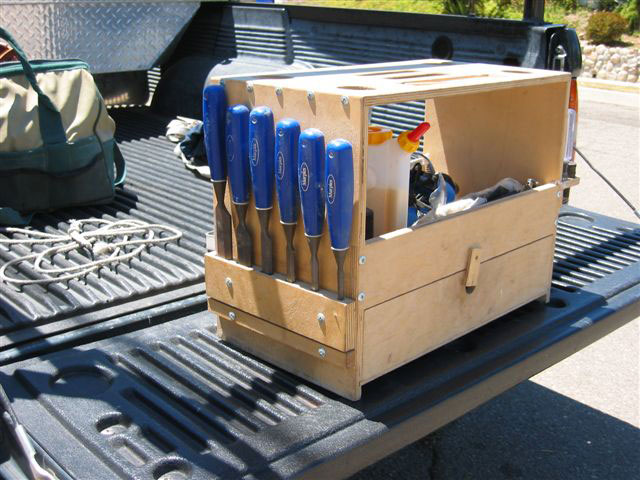
Years ago, after all the trips back and forth to my truck for small hand tools began to tire me out more than the work, I started carrying a milk crate, fitted with a shoulder sling. But all the smallest tools, and the screws, driver bits, drill bits, wrenches, etc., ended up in a confused mess at the bottom.
I needed something I could organize and something I could stand on, something that would get me to the very top of a 6/8 door, something that would help me reach the pins on an 8-ft. door, something that would let me see over the top shelf in a closet. And I wanted something I could sit on, too, while chiseling tricky mortises in a jamb or drinking a cup of coffee on a break.
I came up with this tool tote and it’s be a good friend ever since, except for when I don’t keep it organized.

(Note: Click any image to enlarge)
Once a month, I go through it and remove anything I haven’t used recently. Otherwise, the tote gets too heavy and I have to hire someone to carry it.
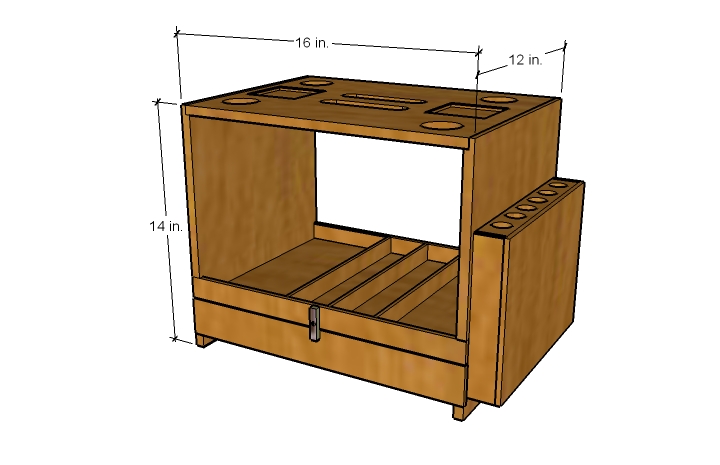
I made my first tool tote so it would fit inside the milk crate I use for hauling armloads of power tools. That way, when I need a little extra room in my van for materials, it’s nice being able to stack the tool tote inside the milk crate.
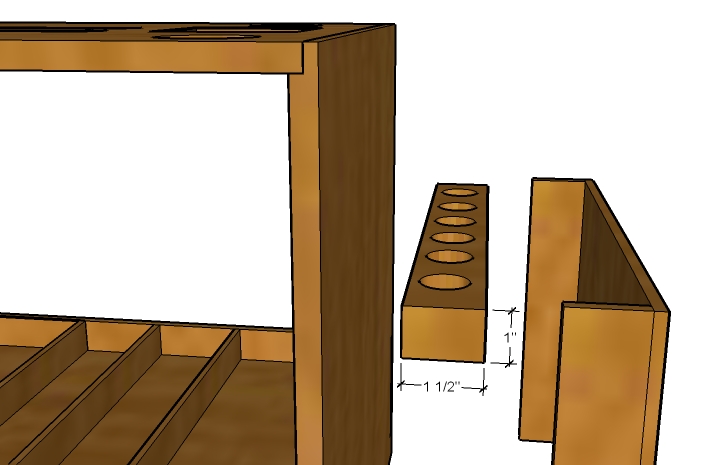
You can see from the drawing below that the original design didn’t include a protective cover around my chisels. That’s an improvement I discovered the hard way.
Be sure to check the diameter of your cordless drills before drilling the four large holes. Impact drivers do NOT require a very large hole. I usually sit on the end opposite the chisels and face the chisels, with a driver and a drill motor in each of the two front holes, and the chisels within easy reach.
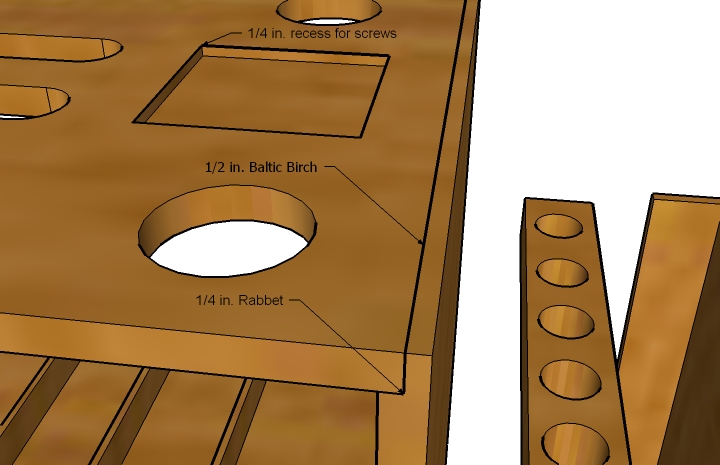
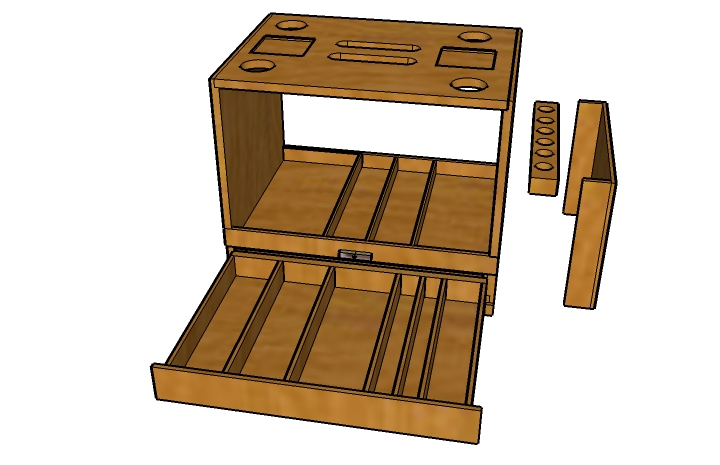
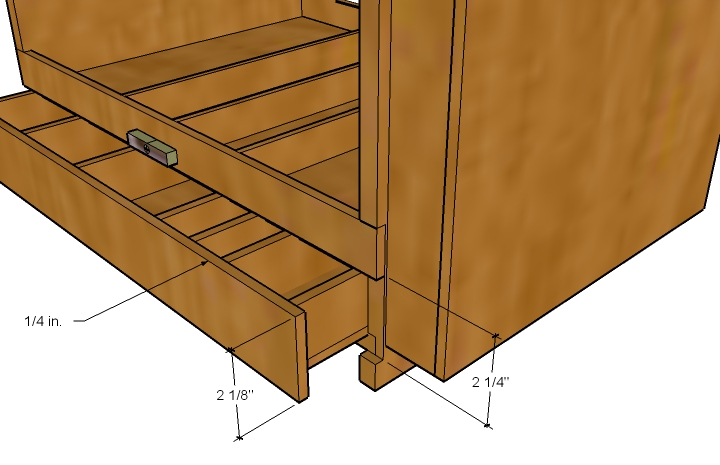
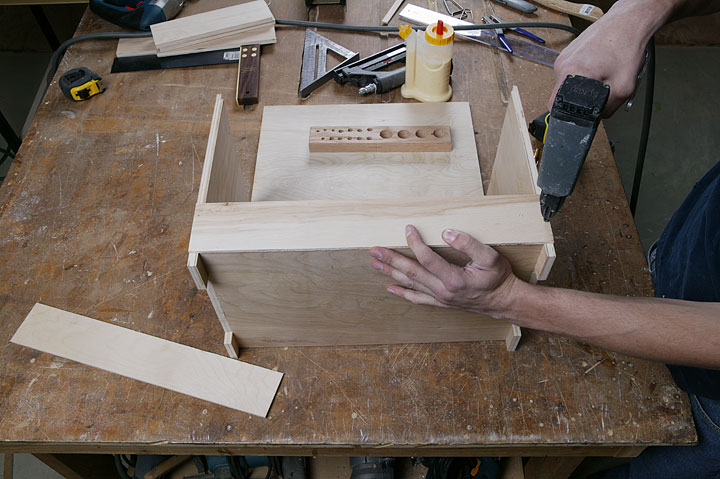
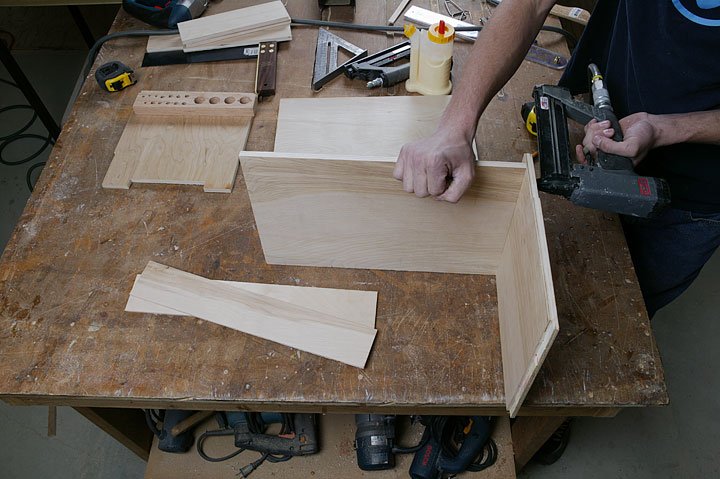
1/2-in. Baltic Birch plywood is a good and durable choice for the sides and the two bottoms. I rabbeted or dadoed those joints, too. The same material works for the top, but 3/4-in. plywood is better, especially if you rout in the screw trays and you intend to use the tote as a step stool. I used 3/8-in. plywood for the drawer bottom, sides, front, and back, then 1/4-in. plywood for the dividers.
This is just one idea for protecting your chisels. Leave the bottom of the cover open so sawdust will fall through.
This Tool Tote isn’t mine! It’s a clone… at least almost. Eiji Fuller, from Anaheim, CA, built this one. He designed a much simpler way of safely storing his chisels!
(This article originally appeared on GaryMKatz.com)
The one main suggestion would be to dovetail the top instead of rabbiting it. Screws are ok but add weight and also do not hold as well as a good dovetail joint imho
Come on Phil, there can always be improvements, it’s could be made of made of Aluminum plate and MIG welded all around too, whats the point?
What a great idea! I often wish I had fooled around more and learned how to cut dovetails, but I had too much work to do, had to pay bills, put food on the table, pick my daughter up from school, etc. BUT…I think dovetails are on my current list of things to learn before it’s too late!
Hi Gary, look for an article written by Tage Frid on cutting dovetails. You too will become hooked! We mastered dovetail joinery on timber frame construction however, once you make a few for a cabinet (or tool tote) you’ll be glad you did!.
My Gary Katz tote is easily 10 yrs old with rabbet joints and it’s doing just fine FYI, other than the organization thing
Hi Gary Looks good. How much does it weigh?
Too much when I forget to take out unnecessary stuff that I don’t need anymore; not too much when I keep it to necessities only. So the simple answer is: most of the time it weighs too much! :) But I still use it! It’s in my shop right near the door.
Refined and pragmatic design, thanks! But what happened to the shoulder sling mentioned in the first sentence? Seems like a clever attachment for a webbed belt would make it even more useful, also for tying off on a sloped roof, attaching to a ladder, etc.
Dave,
Good catch! I hope you include a strap on your Tool Tote! I forgot to include one in that version for the article.
Nice to have a built, rather than bought tool!
I sense a sawhorse article, or how about a judged competition?
You won’t be seeing a sawhorse article from ME! I’m not a Saw Horse guy. Door Bench, yes, Saw Horse, no. :)
hi gary i copied this box from you an age ago and it certainly has earned its keep! the one head smacking oversight i experience everyday after building this box is not having enough room for my 12 inch combination square in the tray. next rainy day weekend afternoon i will assemble a box
12 1/2″ clear in the tray for the above tool. thanks for your work gary- a great design.
You are more than welcome. It’s always a pleasure to share something that makes life more enjoyable.
Gary, I looked at your design many times. I remodel bathrooms and kitchens in modest homes. These are 1-2 week jobs. I tried a box with a solid top but when I wanted to use it as a stool, the top was cluttered with told and whatnots. Thank you for all you do for our craft.
Bernerd,
Hah hah! I can’t tell you how many times I had to move a drill motor in order to stand on my Tool Tote. But it was always worth it–not having to carry a ladder, too! You Tote is sure more attractive than mine! Especially the one I’ve been using for more than 20 years. :)
Attractive? But yours has SIX Marples chisels on the side! I’m more of a razor sharp (7 stitches in my forearm) 1 1/4″ demo chisel and another 1/2″ for mortises. The two handles on top are just right to stand on to reach the ceiling and save me leaning over too far to lift it. It weighs in at 44 lbs and that’s near the limit, any heavier and I’m tempted to grab the tools I think I’ll need to pull a counter top , etc.. the job always goes better and quicker with my tool box at my side.
Thanks for looking at these posts.
Oops that was Eiji’s, your’s is top pick with 2 chisels, your my kind of guy. I zoomed in and saw what looks like a Japanese block plane? I love mine for the weight savings alone.
This is great stuff. Seems handy and aesthetically beautiful as well (not those tool boxes that you can easily buy out there). As a person who appreciates custom-made, handcrafted tools I’ll choose this any day over those ready made ones.
Elon,
The simple truth is that the tools and jigs we make ourselves are the most important ones we use. Period. So make them nicely. Make them to last. And enjoy them.
Thanks G, we are carpenters. Make your own stuff. 5 gal buckets work but my handmade stuff always makes me happy.
Gary,
When I first Meet you back in early 2000 at your first show in Pomona at a hotel I saw Your tool tote and thought how cool !! So I looked At it and went home and made one that I still Have and use today ! Like 15+ years ago
And I remember that day like it was last week. There was this short, loud guy with a high-pitched voice who had endless questions and wouldn’t stop following me around! :)
WTF have you been Kreg McMahon?!
Gary
Hey Gary;
I saw pictures of your tool tote and added a few twists of my own. I did this in about 2013 or so. Didn’t see all these comments til now. It has dovetails, dog holes, a chisel rack, and a spade bit index. Might have overdone it a little, but it still brings me satisfaction, even though it mostly lives in the shop on a rolling cart. It does make a good mini bench when placed on a table top though.
Doug
I second that Gary
Yes Kreg, where have you been?
Some of us truly enjoyed your videos, your humor and wit.
Hi Gary,
When I started carpentry back in the early 70’smin RI, when it came time for the trim we always made “finish stools ” to carry our tools and for a step up. Left them on the job at the end.
Nice to see your evolution of the stool.
Mine took a different turn. It evolved into a rolling 3 piece shop. I always found that I need something that didn’t make it in, so this about covers it. Broken down you have a dolly and a 2 step stool.
Been semi-retired and do consulting, but I just can’t stop building things.
Brian,
PHOTOS PLEASE!!!
Had trouble with the upload. Hope this works.
.
Brian Stamp,
Fantastic work, thanks for uploading the photos! So many refinements are visible that it cannot possibly be your first attempt…
Thanks Dave,
Here’s my 1st box from the 70’s. We had to show up on the job with every hand tool needed for any task. I got tired of the carpenter boxes at the time with 1/2 the framing square sticking out and tools just thrown in.
No power tools except for a circular saw. Even used a Miller Falls hand miter box for trim on the job. I had a big leather strap to carry it over my shoulder. A double hernia later I started putting it on wheels.
Time’s have sure changed fast, huh? No more Yankee Screw Drivers (THANK GOD!), no more Brace and bit, and a LOT more tools than we had then.
Hey, those were the original cordless screwdrivers! Fantastic tool! And we were able to do the same work with 1/4 of the tools I lug around today.
Brian,
AWESOME! THANK YOU for persevering with the upload!!!! What the crenelated (notched) top? is that for holding stuff while you cut it?
Most definitely wheels! :) But you certainly have everything with you except a compressor and nail gun. :)
Gary
Thanks Gary,
The notches are for clamping. I have a set of Dewalt clamps for there track saw in the stool. The top also has a v-groove to steady dowels for cutting. The dolly idea evolved when I became tired of dragging the stool while sitting doing base. I can fit it all, plus a Kreg bench and saw horse I modified and my full set of cordless tools (compressor less nail gun) in the back of my Avalanche.
You tool tote has been a required project for my 3/4th quarter students. I have my own slight twist that I require to student to do, but in the end. they have made some impressive totes.
Thanks again for all you do for our trade and my program.
Sincerely
Glen D Martin
Lead Carpentry Instructor
Green River College Auburn Wa.
http://www.facebook.com/GRCCCarpentry/?ref=settings
Hello – just a small note – I think you’ll find that a tomato paste can is just the right size for a drill holster.
Hi Gary,
Hope you are well, just finished up one of these to help keep me a little better prepared for some remodeling on our cottage on Lake Ontario. Thanks for sharing your hard earned wisdom!
Kevin Enders
Hi
I’m Michael from Hamburg in Germany (again).
I did not exactly notice the dimensions of the Gary Katz original toolbox. My box is higher but not wider and deeper.
I’m sorry.
Inch and feet are not usual in my world. A quick glance at a number and my brain notices it as centimeters. Or meters or kilometers, or kilograms.
I apologize for my mistake.
Anyway my toolbox is very helpful for me.
Best regards
Michael
Hello to Gary and to every other craftsmen/craftswomen(?) in the USA.
I’m a german plumber since 1981, I live in Hamburg.
The last 28 years I did maintenance and repair on heating devices, oilburners, gasburners, boilers, pumps and so on. I’m a man of average size and I often need to be taller than I am. Therefor I build me a toolbox like yours. Mine is a bit bigger all around, 42cm high, 39cm wide, 27cm deep. More or less 16 1/2 inch high, 15 1/2 inch wide, 10 1/2 inch deep. The box is made quick an dirty out of waterproof plywood 12 mm thick (1/2″) and a handful of screws. I used a jigsaw and material I had at hand, the toolbox is not really beautiful but does its work. I can stand on it and I can sit on it and I have the usual tools at hand.
I did see your toolbox many years ago but never tried to build me one, I wanted it to be perfect.
But I’m more a metalworker, an electrician and a computerscientist at work (really!), I have no chance to do fine carpentry, I’m too impacient. But your toolbox inspired me.
Good luck to everyone!
Michael
Hi
I’m Michael from Hamburg in Germany (again).
I did not exactly notice the dimensions of the Gary Katz original toolbox. My box is higher but not wider and deeper.
I’m sorry.
Inch and feet are not usual in my world. A quick glance at a number and my brain notices it as centimeters. Or meters or kilometers, or kilograms.
I apologize for my mistake.
Anyway my toolbox is very helpful for me.
Best regards
Michael
Hey Gary, I’m a starting carpenter, and I was wondering if this would be easy enough to build with hand tools?
Please get back to me ASAP.