


This article might not appeal to all TiC readers, but that’s not the point of THISisCarpentry. Our goal isn’t to reach everyone. Our mission is to provide quality educational material for carpenters, even if it’s only a few of them. Still, I expect that even if you never have to install doors to meet HVHZ code, you’ll learn a few interesting things from this demonstration, things that will probably apply to normal door installation, too.
(Note: Click any image to enlarge)
Installing doors in coastal areas, where builders have to meet stringent High Velocity Hurricane Zone (HVHZ) codes, can seem uniquely demanding, especially working with a masonry wall and wood bucks. But in some ways, at least if you use 2x bucks, the job is actually a little easier because the bucks add a additional level of adjustment that’s often not available in new construction, and definitely not an option on a remodel.
The full-length video at the end of this article covers the basic installation steps, but still leaves a few areas that require more detail, including positioning the bucks, correcting for cross-leg, and preparing the sill.
Flush or Recessed Frames?
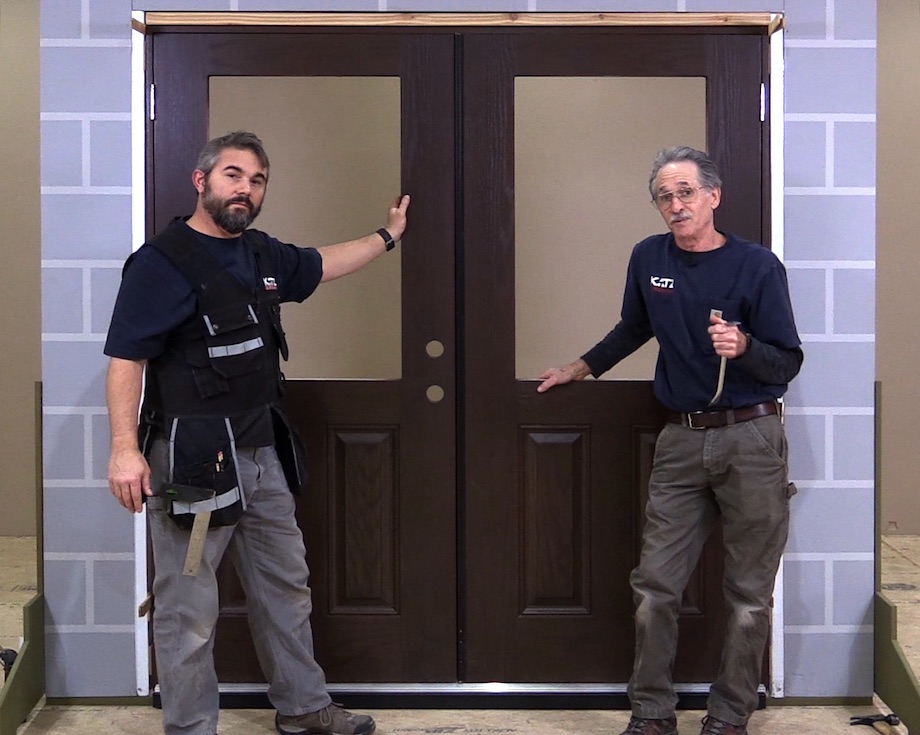
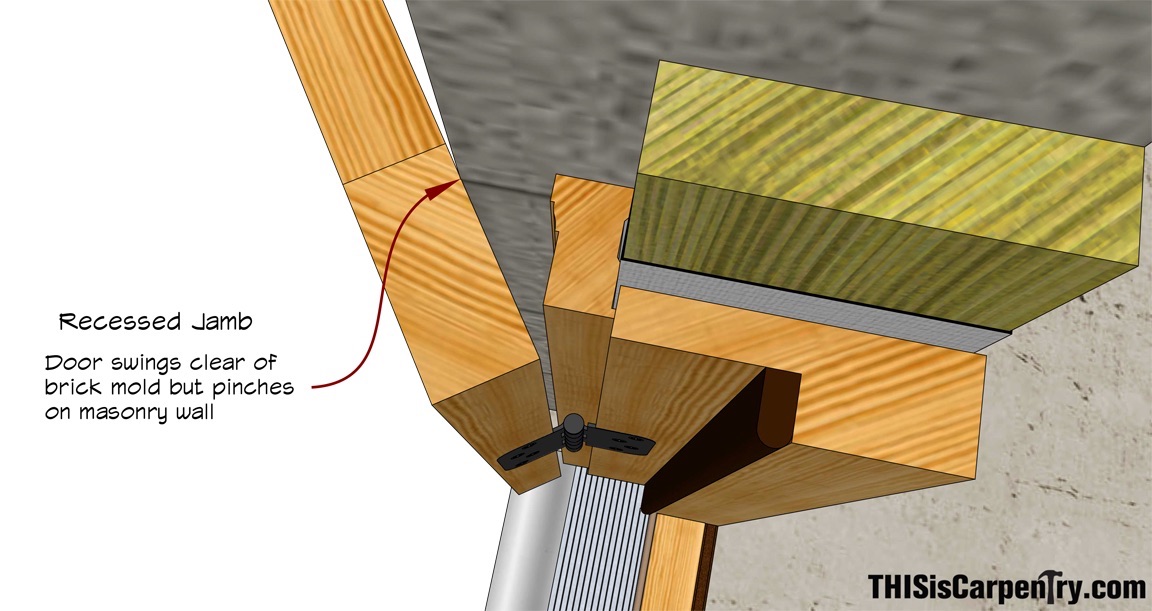
Unlike stud frame walls, wood doorframes are never the width of a masonry wall. They can be installed centered in the masonry wall, flush to the inside, or flush to the exterior of the wall. Because exterior doors in HVHZ zones cannot swing in but must swing out, I prefer to mount the frame flush to the outside of the wall—for two reasons. It’s easier to achieve a waterproof barrier at the face of the exterior wall, it’s easier to apply the brick mold or exterior trim, and if the blowing wind ever catches one of the open doors, the door can swing 180 degrees without pinching on the edge of the masonry opening. If the frame is mounted inside the masonry opening, and wind catches the open door, the door will pinch on the outside edge of the opening and the hinge stile will rip off.
According to the Plastpro assembly instructions, either 2x or 1x wood bucks can be used to secure the door frame to a masonry opening. 1x wood bucks add no additional level of adjustment because they must be fastened with 1/4-in. x 3 3/4-in. concrete screws, which have to pass through the jamb and the buck and penetrate the masonry wall, making it difficult to adjust the location of the buck and correct for cross-leg in the opening.
Door installation instructions from several manufacturers require that the masonry openings be plumb, level, and the exterior face of the opening in a flat plane with less than 1/8 in. of twist—or cross-leg—from corner to corner.
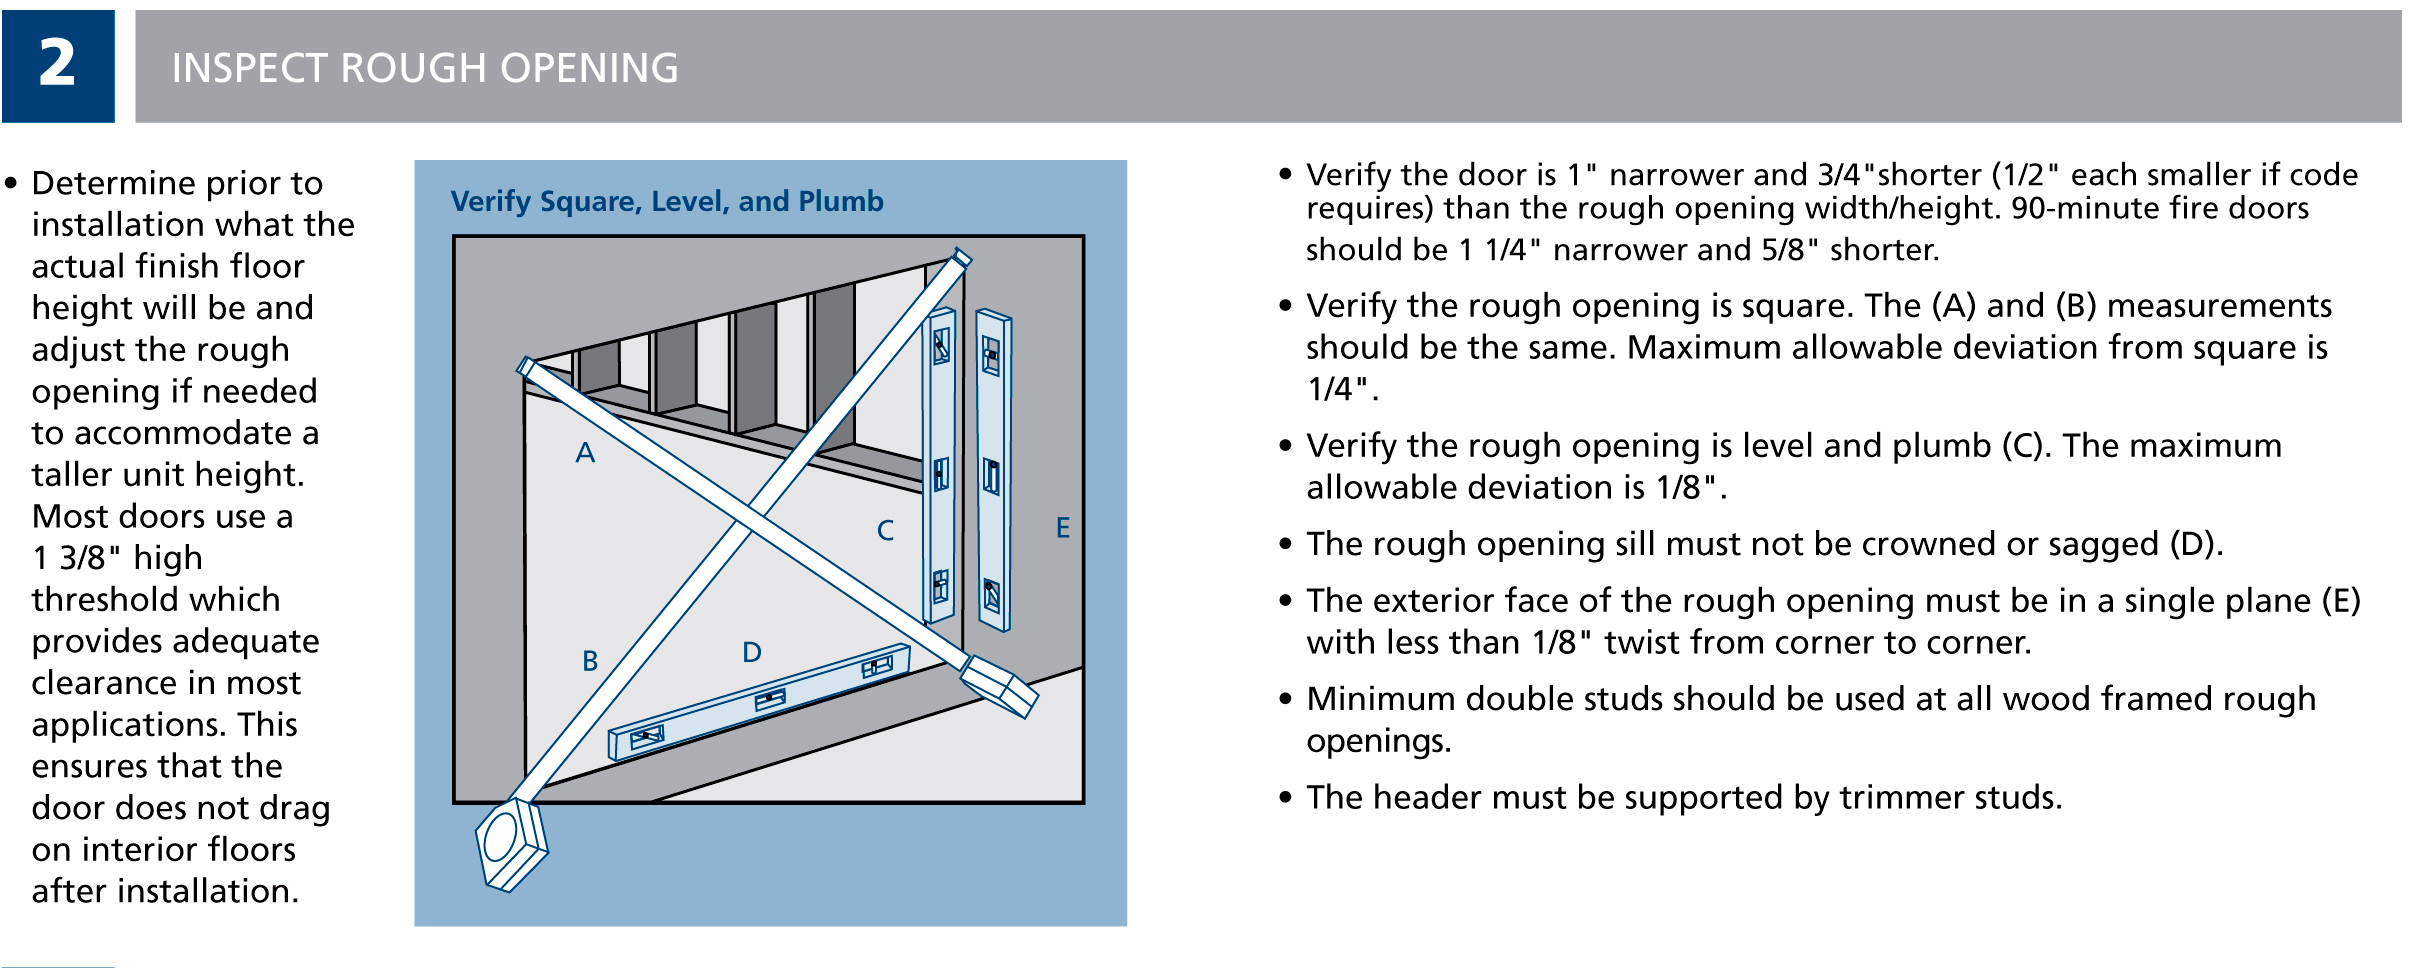
Most carpenters know that typical jobsite conditions do not meet those requirements—not any of them. Which is why it’s important to employ an installation system that incorporates levels of adjustment that allow carpenters to correct rough openings before setting door frames.
Installing 2x Bucks
According to Plastpro’s installation requirements (see pages 10 & 16), 2x bucks must also be secured with 1/4-in. x 3 3/4-in. concrete fasteners, but those screws do not have to pass through the frames. The frames can be secured to the jambs with #8 x 2 1/2 in. screws, which allows installers to make critical adjustments for cross-leg and twist or wind/warp in a door—and make those adjustments easily during the installation process.
Of course there is a specific fastener schedule: the screws securing the bucks must be within 4 in. of the header, with a maximum on-center spacing of 16 in.; the screws securing the jambs must be within 6 in. of the head, with a maximum on-center spacing of 14 in. The head buck and head jamb, as well as the threshold, also have specific fastener requirements—4 in. from the ends, 4 in. from the center, etc.
All these requirements sound daunting, but the task is really pretty easy. Start by applying two large beads of sealant on the backside of the leg bucks, then fasten those bucks to the masonry wall 4 in. down from the head. But don’t install any other fasteners—not until you cross-string the bucks.
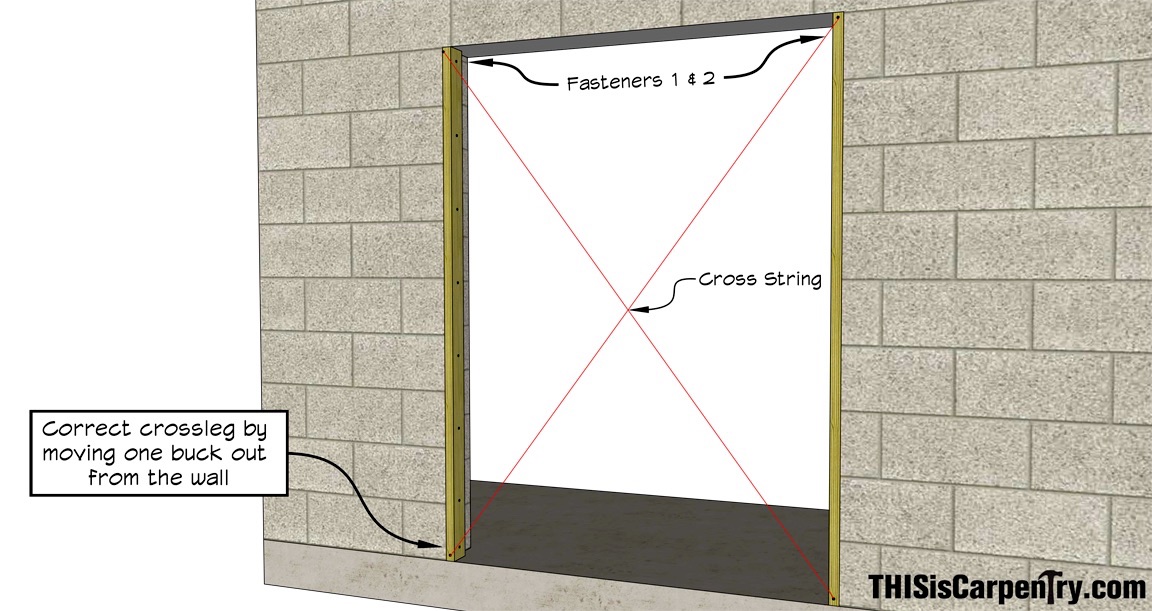
The strings don’t have to touch perfectly, but they have to be close. You’ll have two other opportunities to correct for cross-leg and for wind or twist in the doors—when you install the frame. Because you can’t push either buck back from the face of the wall, move one of the bucks out from the wall until the strings are touching or close to touching. Then drive the remaining fasteners and install the head buck.
Flash the Bucks
Because the bucks are in direct contact with the masonry wall, they must be pressure treated. And the bucks must be waterproofed, too. Some manufactures recommend liquid flashing, applied to the buck and the masonry wall, which can be messy. And if the wall isn’t being veneered, paint may not stick to the flashing. Peel-and-stick flashing provides a cleaner alternative, and can even be trimmed back once the brick mold is installed.
Level the Sill
One of the most important differences between a typical door installation and installing doors in HVHZ zones is the approach to weather and waterproofing. These days, many manufacturers recommend using the “Drainage System” for installing windows and doors in most parts of the country, which means applying a cant strip and sloped sill pan under the door or window sill, so that any moisture that penetrates the opening can be directed outside.
But in HVHZ zones, a cant strip is not approved—the threshold must be waterproofed using the “Barrier System,” which means a liberal two-bead application of sealant between the threshold and the concrete sill, one bead at the front of the threshold and one bead at the rear of the threshold.
But that doesn’t rule out a pad strip, and a pad strip can make the entire installation easier—as long as the height of the rough opening allows for the additional thickness of the padding. A pad strip solves two problems: it helps level the rough opening before setting the frame and threshold; and a pad strip helps support the nose of the threshold, which often projects an inch or more behind the foundation.
Start by cutting the pad strip the full length of the opening—from buck to buck. Rip the pad strip to the width of the frame plus the thickness of the brick mold, then subtract about 1/4 in. for the sill nosing. Notch both ends of the padding so that the pad strip doesn’t interfere with the brick molding, which should reach past the bottom of the threshold, to wherever the siding terminates.
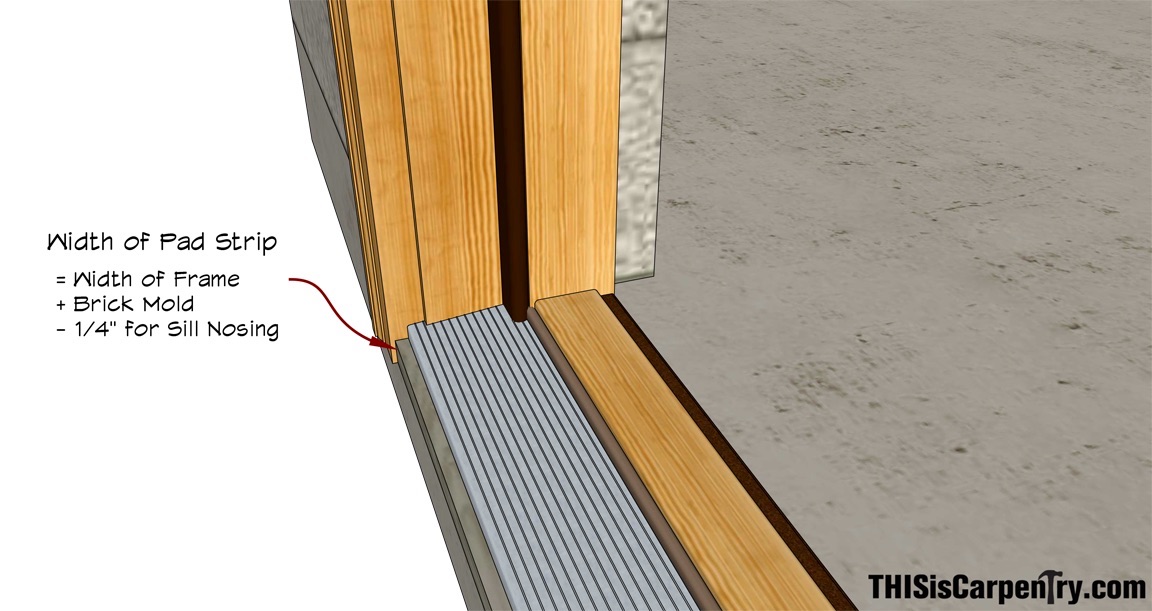
Shim the pad strip until it’s perfectly straight and level, then carefully lift the pad and secure the shims with small beads of sealant, then apply two continuous beads of sealant across the opening, right over the tops of the shims.
![]()
Secure the pad strip with concrete fasteners, then waterproof the padding with a flashing membrane.
Before installing the frame, cover the padding with a sill nosing—an anodized aluminum weather-sealing product that all door installers should be familiar with.
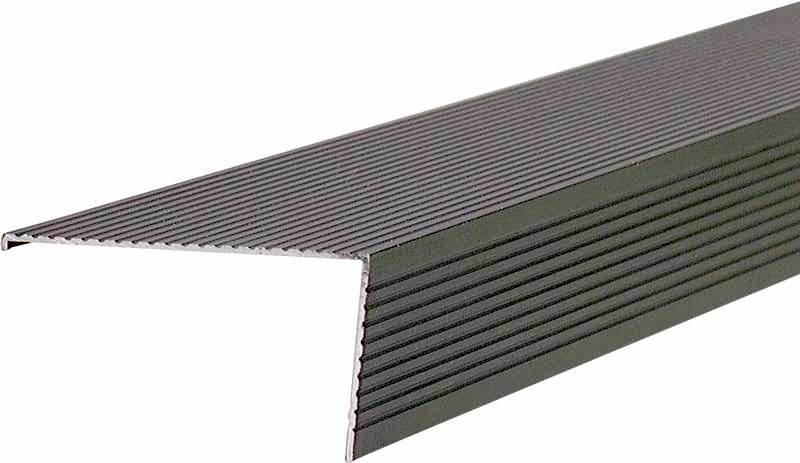
A sill nosing is especially handy for recessed door frames—when the threshold doesn’t even reach the edge of the concrete or wood subfloor. Used in conjunction with a pad strip, the sill nosing covers the sill-pan flashing, dresses up the entire installation, and helps support the threshold!
Now that the bucks are fastened in one flat plane and thoroughly flashed, and the sill is properly prepared, installing the frame and doors is a snap.
Good starting point for the article. At my previous company, we built numerous houses in HVHZ zones that are seaward of the CCL. About half were IBHS Fortified. All were either grouted CMU, cast in place, or a combination of the two, with traditional stucco exterior finishes.
Over the years, we changed from 2x to 3x PT bucks for a few reasons. They allow for stucco returns to the applied brick moukd, and you can scribe/trim bucks if you have to account for minor discrepancies in RO.
For waterproofing, a cementious type is applied to the concrete/CMU, with a liquid type for the bucks. Bucks are installed and countersunk with Simpson Titan HDs per the EOR.
Window and door sills are cast concrete with windows have slopes sills that allow for the finish stucco to meet bottom of sill nosings on windows.
Doors- sills are cast in place creating a recessed concrete pan that allows the top of the door threshold(sometimes several inches thick) to finish flush with interior finished floor. Anodized aluminum aluminum is not used due the salt environment and how easy it scracltches. We create a second recess area under the sill extension to allow for installation of a stone trim sub sill extension.
Typically the jamb is set flush to the interior to create recessed windows and doors. It is a must to have a positive door stop with this installation. Usually a custom piece is cast with an integral bumper.
After installation and before interior and exterior finishes, the assemblies are water tested for leaks.
Hope these tips help.
RL, Nowhere in any of the manufacturers engineered installation instructions do they reference 3x bucks. They provide fastener schedules for 1x and 2x bucks, so I’d be hesitant to tell folks to use 3x bucks without documented engineering. Also, the anodized aluminum sill nosing is not in contact with the concrete, but is isolated by the self-sealing waterproof pan (which we covered in the video) and the anodized aluminum threshold is in contact with the sill nosing. The majority of pre-assembled jambs are shipped with those thresholds, so we tried to cover common issues on jobistes, though I sure liked your idea of a concrete sill, and a splayed jamb!
Gary
I forgot to mention that most of the exterior door openings that are used regularly typically are splayed/stepped to help with the doors hitting the corners when opened.
Awesome article! Thorough, clear and comprehensive.
I would love to see one done for 1-3/4” interior pocket doors for 2×4 walls. If possible! Looking for best manufacturers and best practices. So many systems and still so many call backs. As a mid century modern builder and restorer in LA and Palm Springs, I often run into installing new pockets and doors and the clients want the thicker doors with tight (1/8”-3/16”) gaps. The doors often have slight bows and the split jambs can bow as well. (Even tight grain fir) I’m now thinking the drywall and extreme moisture could be compounding the issues. Constant rubbing and sloppy guides are the main culprit though.
As soon I recommended increasing the wall thickness they scoff and say no way are you CRAZY! So hoping maybe you or one of your readers have a bulletproof system. Many thanks!
Tim,
I expect you’ll see an article on pocket doors soon. :)
Gary
Gary and Scott,
Great job guys. I always learn so much from your videos. Lots of great tips and info that will help me on my future door projects. I only installed one set of double doors in my career and that was twenty years ago which wasn’t the greatest install I did. I wish I knew all this great info then. Would of made my installation easier and turn out a lot better. TIC is a great source of knowledge. Looking forward to your next article and video.
Thanks again
Emanuel
Being an interior finish carpenter & having lived in a HVHZ Zone for 38 years, I can not emphasize enough the importance of setting your door frame in a properly flashed pan. As John Tooley often points out, first, you keep water out … then you design to get rid of the water that gets in – and it will!.
We always level our opening with layers of self-adhesive bituthane, use a urethane adhesive to secure the pan to the sub-surface, properly flash the jacks to the inside of the pan & only then, hang the door in similar fashion as to what you described.
Leveling the opening & proper installation of flashing & pan are key to the unit’s longevity.
Paul,
Exactly the points we made in the video, though bituthane is no longer the best flashing to use. Several manufacturers now provide peel-and-stick flashing with an acrylic adhesive (Zip Stretch Flash, Hydro Flashing from Benjamin Obdyke, Grace, etc). Unlike bituthane, which Grace still makes with an asphalt adhesive, and unlike butyl adhesive, both of which have trouble adhering to concrete, dusty surfaces, etc., acrylic flashing will stick to just about anything, and can be applied even if the substrate is slightly wet.
Gary
Pans are a definite. We used custom bent and welded 316 SS pans.
RL,
Precisely why we demonstrated the cant strip and self-sealing pan in the video. We prefer to use a self-sealing pan so that the fasteners used to secure the threshold–required by code–don’t cause the pan to leak!
Gary
Gary,
The 3x bucks and fasteners were prescribed by the engineer of record. The EOR has done the calcs for this installation method, otherwise we would not have proceeded in this manner.
As for the pan, we have not had much luck with self sealing membranes adhering to concrete. In lieu of this the pans are laid out in the double recess concrete sills. Theses concrete sills are already waterproofed using a cementious type waterproofing product. Once the door is ready for installation, the pans are set in place, holes are marked and drilled. The pan is then removed, dust cleaned, and then we pump/fill holes in the concrete thresholds with a single component, elastomeric polyurethane, and install beads of the sealant under the pan and on top of the of the pan, and the door assembly is set.
Hope this explains the installation a little more clearly. Keep the good work coming.
Hi Gary,
Awesome article we’ve learned a ton. We recently started our door installation service and came across this article. Really appreciate you taking the time to educate us on this. The consideration for a waterproof barrier is great info that may fly by people’s heads. Thanks a bunch.
You are very welcome. I’m glad you found the article and video helpful/useful.
I noticed you are in Scottsdale, AZ. That’s not an HVHZ zone: you don’t have to install bucks or a barrier-system threshold in Arizona. You should watch some of the other door install videos on our channel:
Here’s on one installing a pair of doors–with more emphasis on your location: https://youtu.be/Gr46nuFA1Bw
And here’s on on installing a single: https://youtu.be/gY7o5oSwrdo
Best,
Gary
I’m replacing my double exterior doors with Plastpro fiberglass, which are not as wide as the wood doors. Therfore, the existing bucks are too wide by approximately 2 inches.
Can I add 1x’s or 5/4 P/T boards to existing bucks?