


DeWalt DW079LG vs. Stabila LAR120G
Installing trim packages in luxury custom homes today requires a stricter level of precision than ever before. When millwork is meticulously shop-drawn room by room and trim details flow between spaces, it’s crucial to have agreed-upon reference lines that are understood and trusted by multiple trades. Typically the General Contractor will set a benchmark, or horizontal axis line, at 48 or 60 in. AFF (above finish floor). Floor and ceiling planes are determined from this line, as well as door heads, horizontal trim elevations, and device heights. Grid lines may also be established on the floor to keep finish wall planes square and parallel. Collectively, all of these lines are referred to as axis lines, and serve as the three-dimensional starting point for locating finishes.
As carpenters, we are making layout decisions and tradeoffs every day. This being the case, it is vital that we develop a working knowledge of what I will term formal layout principles: every element having a designated “home” in 3D space. These elements are drawn in advance to maintain orderly relationships or maximize aesthetic appeal, and are then (sometimes painstakingly) located within the surrounding layout in the field. The multiple large spaces within a home interrupt clear “master” lines, so layout must be continuously extended and extrapolated. With time, you develop “a sense of where you are” in the layout grid, and learn to identify when additional lines or double-checks may be necessary. Every project is a new puzzle that must be carefully solved if the end result is to be accurate, and faithful to the design intent.
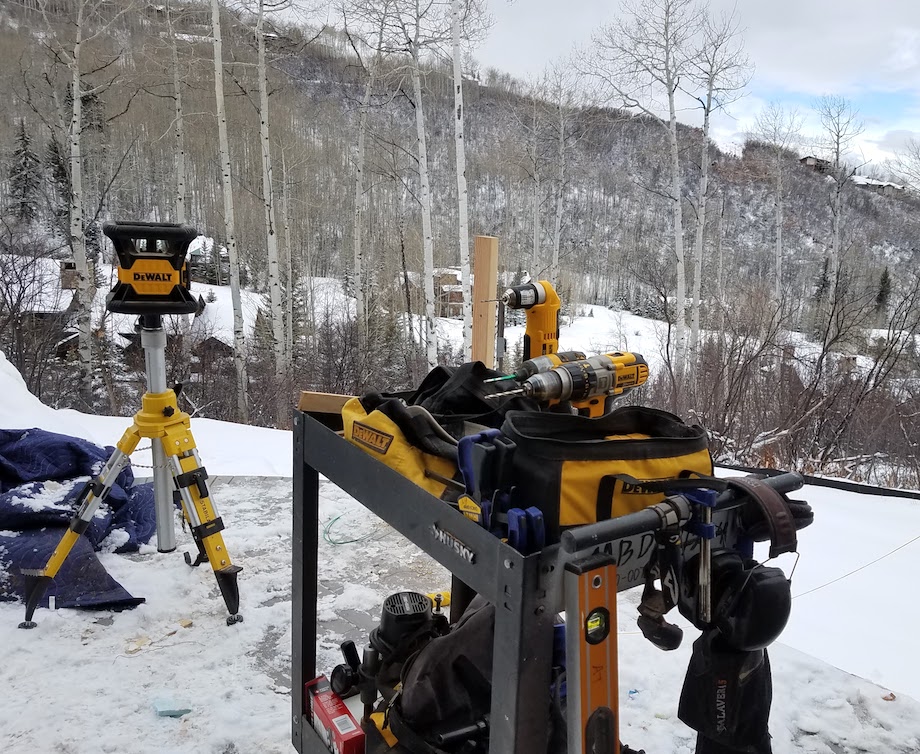
The PLS HVL-100 line laser is the go-to instrument for most of the professional carpenters that I know, and I’ll share some tips for this instrument at the end of the article. The accuracy is listed at 1/8 in. in 60 ft., which is perfectly acceptable for everyday layout tasks. However, whenever we’ve had a couple of these units running in a large room on a formal project, it seldom took long for the arguments and finger-pointing to start. It was clear we needed something more definitive.
I had been thinking about this problem for awhile when I came across DeWalt’s new DW079LG rotary laser, which advertised a tolerance of 1/16 in. in 100 ft. This was more than twice as accurate as the PLS, and I was intrigued. With Gary’s help, we secured one of the DeWalt units, along with a Stabila LAR120G, and started testing.
Both lasers are rotary, self-leveling, green-beam instruments. Both spin a level line when upright and a plumb line when laid on their side. The Stabila is advertised at 1/8 in. in 100 ft., but the sales representative informed us that their tolerances are conservative and the actual accuracy would likely be better. We intended to find out.
Out of the box, the DeWalt projected a surprisingly faint line. It was hard to see indoors if there was any significant light coming in, even at relatively close range (20 ft.). With both lasers available, I found myself reaching for the Stabila more often than not, as the DeWalt was more cumbersome, beeped a lot (more on this later), and had such a faint line.
(Note: Click any image to enlarge)
If you have been primarily using line lasers, be prepared for a learning curve with rotary instruments. The flashing line is noticeably harder on the eyes, there are new features like RPM settings and scan modes to understand, and repositioning or other setup disruptions require a power-cycle to allow the unit to re-level itself. Both kits include remotes, which allow you to activate specific functions or change settings without touching the instrument itself.
Back at home, I conducted some methodical testing to judge accuracy. I set the lasers up for multiple checks, at 90-ft. and 300-ft. ranges, and took notes on idiosyncrasies with the instruments and their detectors as I went.
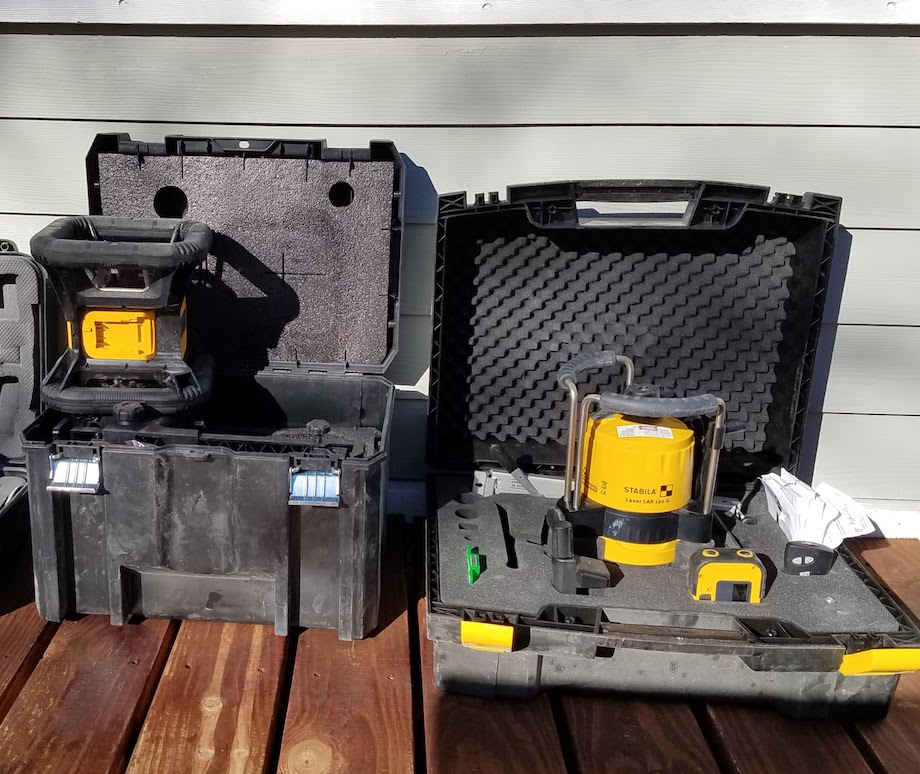
Cases
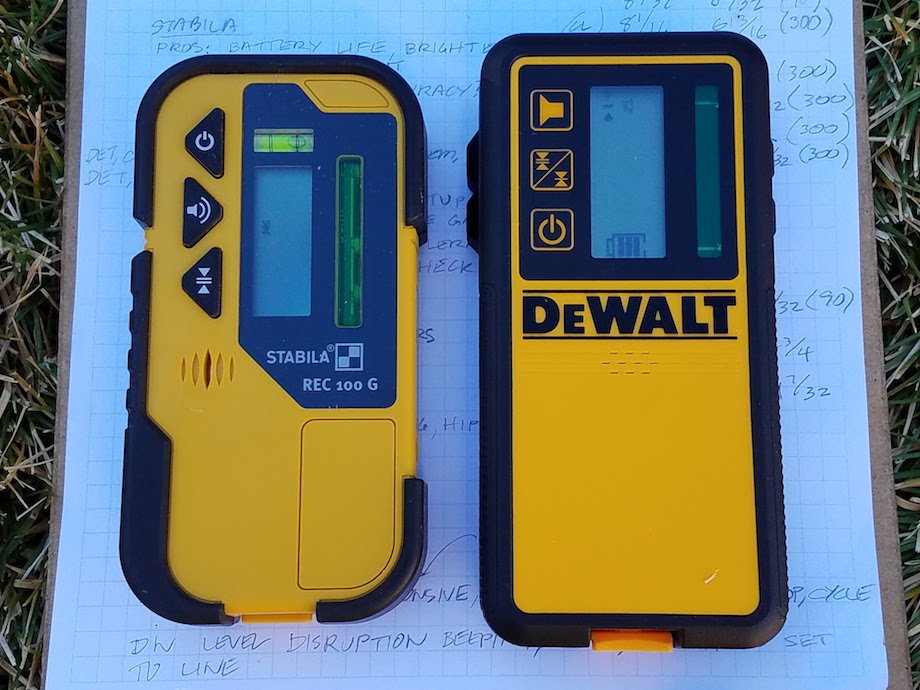
Both units boast generously-sized cases, with good foam padding and adequate room for accessories. The DeWalt case integrates with the popular TStak® system, and the laser fits in its rigid foam cutout even with the battery installed. The Stabila is a little more roomy and grants easier access to the various items in the kit.
Instruments
The DeWalt is ruggedized, making it ideal for heavy use on chaotic sites. (There is Youtube footage of the unit being tumbled in a clothes dryer, with the electronics on!)
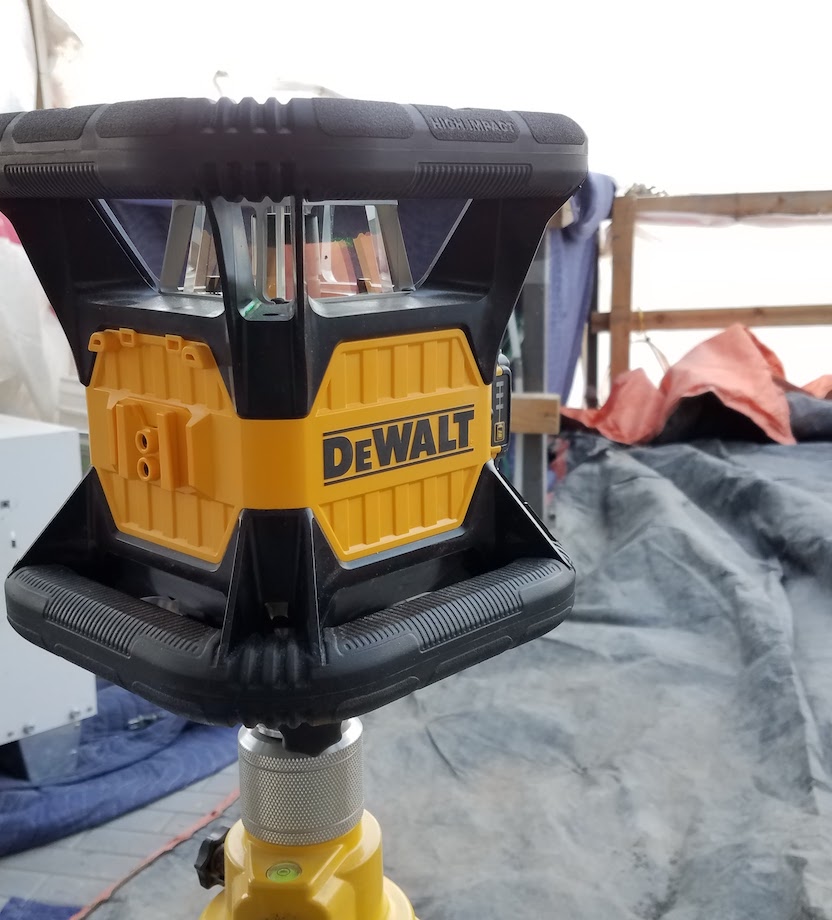
The tradeoff is that it is somewhat bulkier than the Stabila (DeWalt with battery pack: 5.54 lbs. / Stabila with batteries: 4.66 lbs.). Shooting some elevations on an exterior jobsite this winter, the Stabila started shutting itself off immediately upon startup. I assumed it was batteries, so I ran to the hardware store for some fresh cells. The instrument was still shutting itself off with the new batteries, so I could only conclude that it was the cold, or just a random malfunction. Either way, the issue forced me to switch to the DeWalt for the day, which had no problems with the temperature.
The Stabila’s line is much brighter and crisper, and the instrument responds to disruption by simply shutting off the line—a nice contrast to the DeWalt’s beeping alarm.
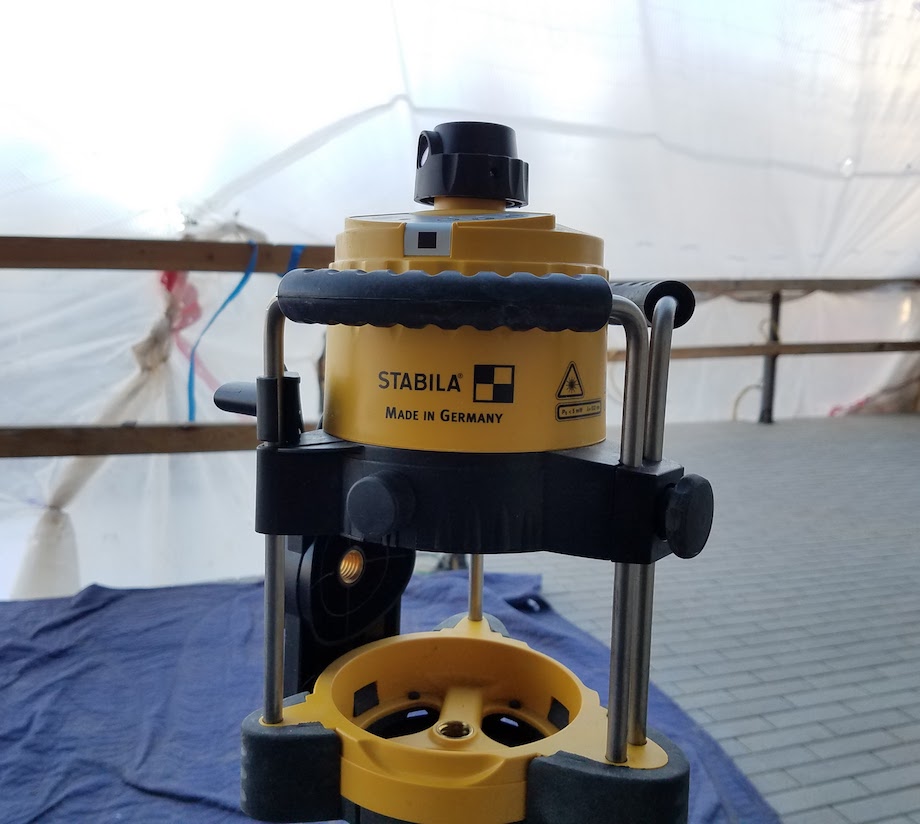
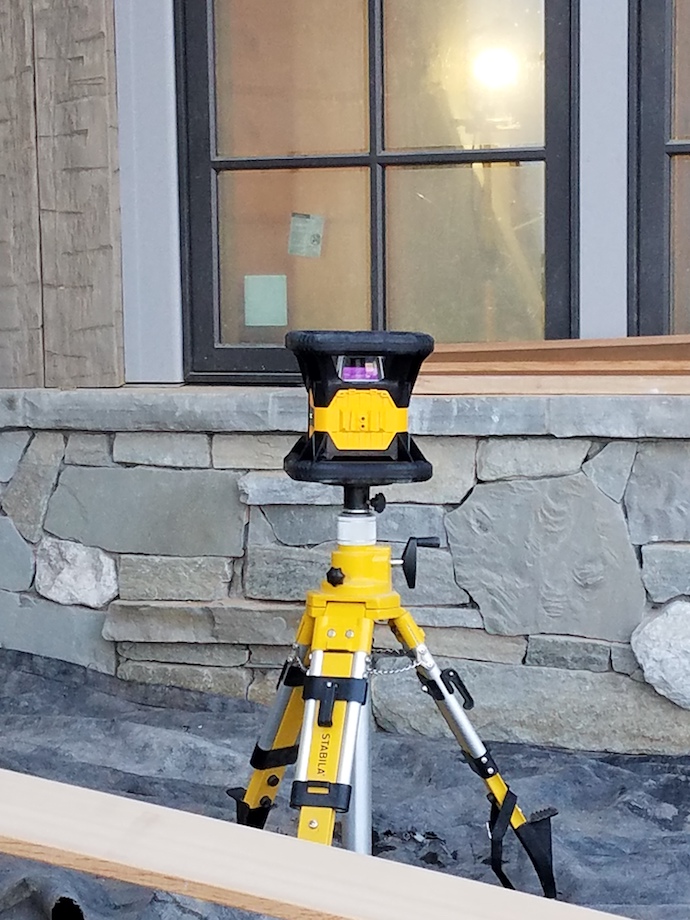
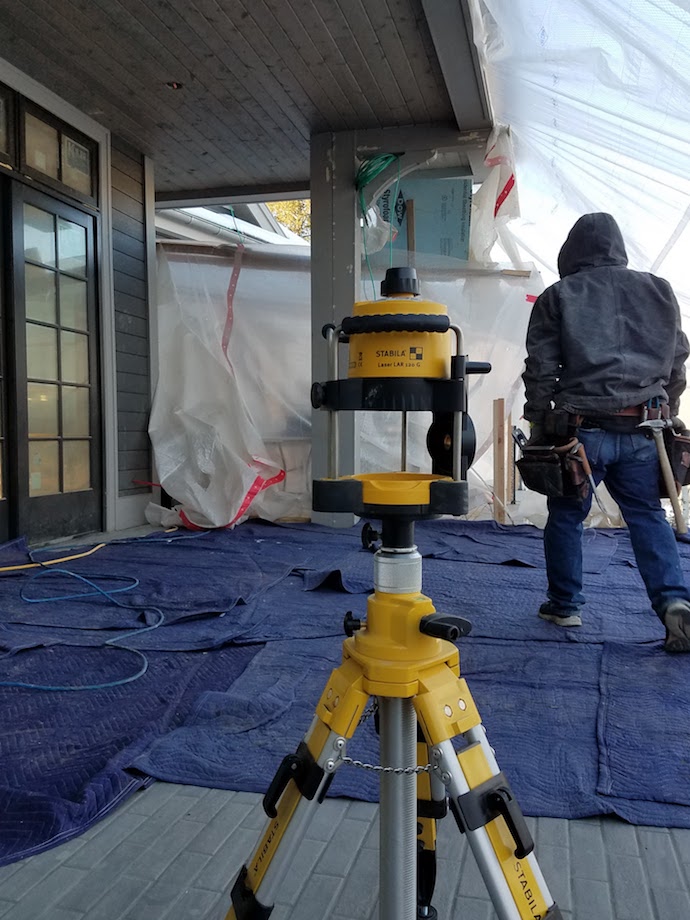
Both lasers have minor blind spots, though the Stabila’s can be eliminated by raising the unit up above the rail cage. The Stabila threads directly on to a 5/8-in.-11 tripod thread, while the DeWalt requires an adaptor clip that sometimes disengages unexpectedly when the instrument is being moved (don’t ask).
Batteries
The Stabila takes two “D” cells and advertises 120 hours of runtime. This might be an optimistic estimate, but the supplied set lasted for multiple months of intermittent use. The DeWalt runs on the 20v MAX system, which is a huge plus for me as this is my favored cordless platform, and I’ve grown tired of constantly feeding AA’s to the power-hungry PLS.
Detectors
The DeWalt detector offers multiple volume settings for above line/below line signals, and features crows-foot style cutouts for accurate marks on a wall or grade stick. The Stabila detector was noticeably more sluggish than the DeWalt, requiring several seconds for the reading to register on the display. (Increasing the RPM’s on the instrument helped with this, but not enough to match the DeWalt’s near-instant response.) Similar to the DeWalt, the Stabila has multiple volume settings for above line/below line signals, but they were all too loud for me so I ended up running it on silent most of the time. Both detectors included a rear window and were interchangeable between instruments.

Wall Mounts
The DeWalt wall mount is ABS plastic and rather bulky. It includes an adjustable standoff at the bottom to aid in leveling the unit when mounted on an uneven wall. The Stabila wall mount is precision aluminum with a very nice micro-adjust for fine-tuning the instrument elevation.
Other Accessories
In addition to the items listed above, the DeWalt kit includes a remote, a battery charger, a grade rod detector mount, extra tripod mount clips, laser enhancement glasses, and two detector cards. The Stabila includes a remote, detector card, and grade rod detector mount.
Accuracy
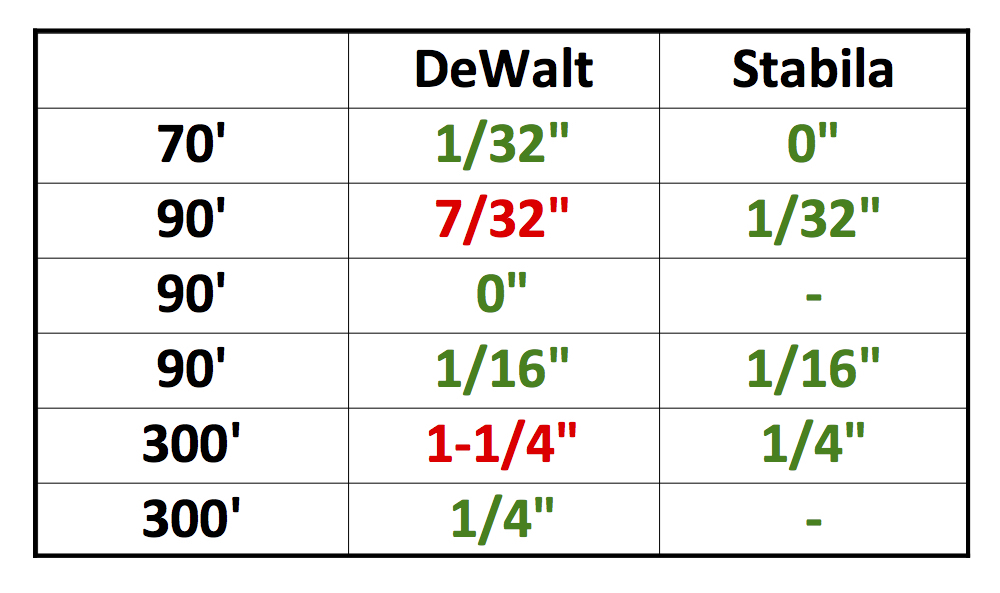
I ran both instruments through a series of rigorous accuracy checks. I designated two targets as A and B, set up near point A, made a mark at A (A1) and a mark at B (B1), and then set up near point B at a similar (but not exact) elevation and made another two marks (A2 and B2). Measuring between the two pairs of marks and then noting any difference between the two measurements tells you how accurately the laser is performing over a given distance (for this exercise, it is the distance between A and B, doubled).
A couple points about the testing:
1. I made two passes with the detector for every single mark—one moving up and one moving down. Both detectors will show “level” over a vertical span of about 1/16 in., so to be really precise it’s important to come from above and below, slowly, and note where the detector first shows level. Averaging these two marks gives you the best reading.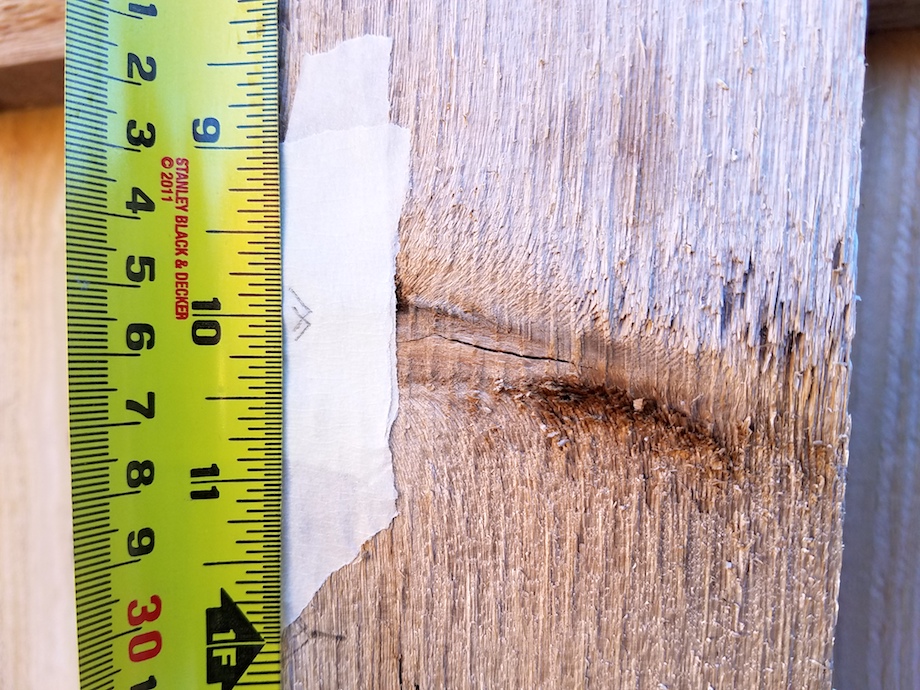
2. I used a 0.7mm mechanical pencil, making the marks on white masking tape over a rough surface, similar to how you might mark a stud face on site.
3. The measurements in the summary table are the total difference between the A1-A2 measurement and the B1-B2 measurement for the test. These results are determined to be in or out of tolerance by doubling the test range and noting the expected variation over that distance (e.g., the DeWalt should be within 7/64 in. at 180 ft. and within 3/8 in. at 600 ft.).
On the whole, both instruments performed quite well, and I would take either to a demanding site with confidence. The DeWalt gave two readings that were out of tolerance, one during the 90 ft. test and one during the 300 ft. test. These bad readings prompted an additional check, and I tested several different theories as to why they occurred, playing with new setup locations and trying to tell if deliberately setting up the unit “out of level” made any difference in the reading. None of this seemed to shed any light on why the instrument gave me a bad mark (these bad readings are why the DeWalt has more data sets in the summary table than the Stabila). The Stabila was consistent throughout the testing, reading well within tolerance for every check.
 The moral of the story: if you are shooting level over any significant distance, take two readings at either end of the setup path, and check that they agree within your tolerance before you commit to the layout. This applies even when using a precision instrument.
Summary
Both of these instruments are capable of establishing good long-range benchmarks. I really liked the DeWalt’s detector, battery platform, and tough design. However, the line is so faint that it makes visual marking almost impossible, the wall mount is clumsy, and the adaptor clip for tripod mounting is stupid. The instrument also gave a couple of disconcerting bad readings. The Stabila was consistently very accurate, with a brighter line and a much nicer wall mount. Unfortunately I feel the detector is inferior, and adjusting the instrument vertically within the rail cage is frustrating because it is so tight.
Choosing between these two units is going to depend on which features and advantages are most important to you and your work. Overall, the DeWalt seems better suited for exterior tasks, and the Stabila to interior.
Let’s be clear about applications: rotary lasers are an excellent way to establish accurate reference layout, but they will be cumbersome for most everyday layout tasks. My ideal layout kit would consist of one of these units in conjunction with the PLS HVL-100. Below are some hacks and pointers for using this instrument effectively.
PLS Hacks
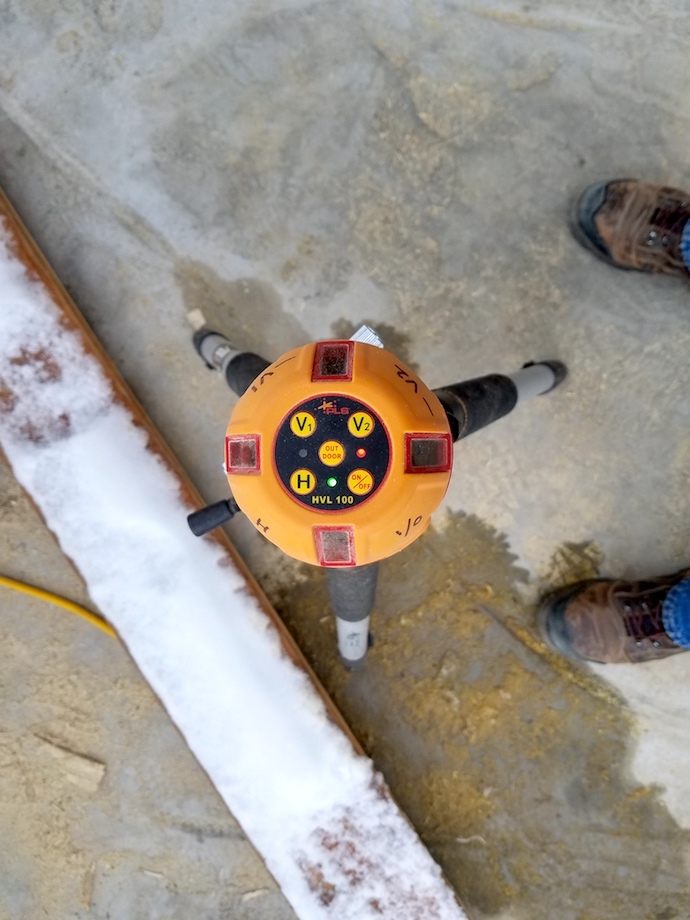
1. Credit for this tip goes to Tony Watson from Los Angeles. While working together on a trim package, I noticed he had marked the housing of his PLS with the corresponding button functions on the top of the laser. This allows you to control the unit when it is mounted on a wall or tripod, without getting on a ladder. Brilliant.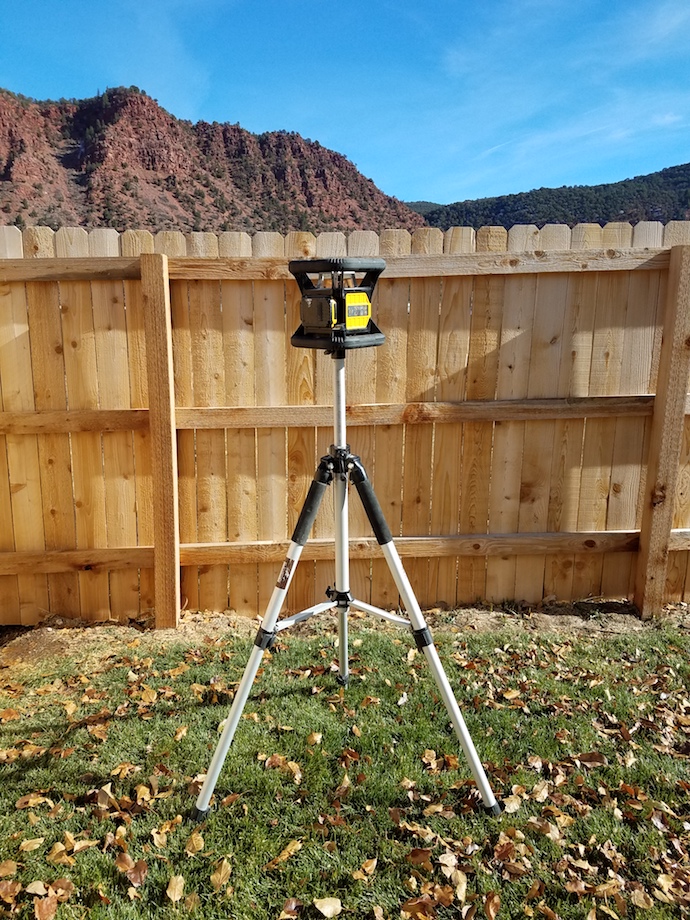
2. The PLS-20513 elevator tripod is a crazy useful accessory for your layout kit. It is light, compact, and extends to a working height of 9 ft. The height can be fine-adjusted by means of a crank arm and notched center post. Also, the center post is hollow to allow picking up a point on the floor with the plumb dot.
3. I’ve pushed some washer-head screws (and some 8d nails for snapping lines) into the foam insert in my case. This way I always have something handy to attach the wall mount without going looking for fasteners.
4. Many operators are not aware that the minimum range on the PLS detector is 20 ft. If you are using the detector closer than this it will not be accurate. I’m not sure why the detector has a minimum range, but it does.
Layout Hacks
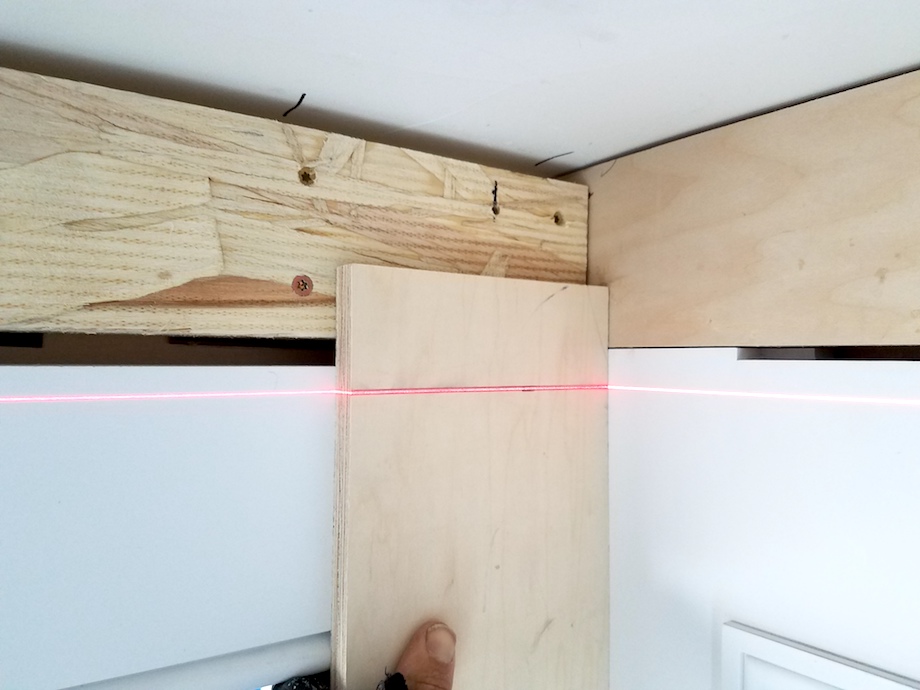 1. When setting a benchmark around a room, I like to set the laser up several inches above or below the desired line height. I cut a clean, square-end on a piece of 3-in.-4-in. wide scrap, and draw a pair of lines 1/16 in. apart, centered at the desired offset. This way I no longer have to strain my vision to mark the center of the laser beam—I simply hold the marking stick so that the lines bracket the beam, and make a crisp mark against the end of the stick.
2. Another way to mark a precise elevation or plumb line is to take 1 1/2-in. white masking tape, draw a line across the width, tear off the section of tape with the line, and then carefully place the tape on the working surface so that the line splits the beam. Sometimes it takes a couple of tries, but this method is hard to beat for putting the line exactly where you want it. 3. When shooting a plumb line, try to shoot perpendicular to the wall or target. If you shoot at an angle and the wall happens to be leaning in or out, your projected line on the target surface will not be plumb.
4. When shooting perpendicular axis lines to create a square layout, mark your points and then rotate the laser 90 degrees. It only takes a minute, and it’s an easy way to allow the instrument to self-check the layout.
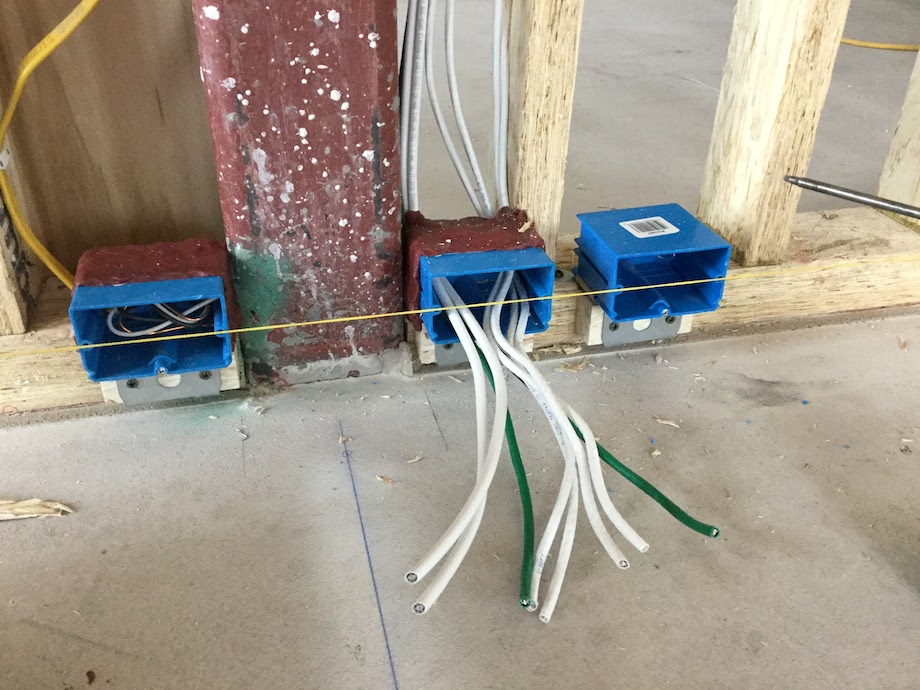 5. Put the laser away! I am a firm believer that shimming to a stringline, when properly set up, is faster and more accurate than shimming to a laser line. This technique is not always practical, but when it is, use it. In this photo the string is setting both the centerline elevation and the face plane for these boxes.
One last point that I can’t stress enough: do not rely on any laser to accomplish the layout for you. Think through the task geometry and make sure you have a clear idea of what you are trying to establish or “find out.” Only then should you begin taking readings, collecting information, and making marks. Always be aware of the tolerances of your instrument, cross-check when necessary, and form habits to avoid accumulated error. These principles will put you well on your way to solid, accurate layout, which is the secret ingredient of every successful project.
Thanks for the article. Very good.
I use a PC RoboToolz RT-7690-2, and I’m very happy with it. It has both H and V beams, so you can switch back and forth without having to lay the tool on its side, meaning that you will return to the same line when you switch back. Handy.
I have no reason not to trust the remote, using Aaron’s technique, but I feel much more comfortable going visual. So I often wait until it starts getting dark to lay out, to at least return for a quick double-check of my daytime remote work.
Once, I was working on a house about 120′ away from a school, so I shot a line, rotated the level 180º (as RT recommends for calibrating), and was within 1/16″. Good enough, I guess…
I don’t like to mark in the beam –– too hard on the eyes, too sloppy. Instead I shoot a couple of inches low –– it doesn’t have to be exact –– then use a 1×2 or 1×4 to get me up to my line.
First I square a line across the stick, center that line in the middle of the beam, mark the stick at my actual desired height, and square-cut it there.
Several advantages –– easier on the eyes, easy to locate the line exactly in the center of the beam, and then, because I’m using the end-cut as a guide, I get a nice, crisp, unambiguous straight line on the wall, which can be as long as my stick is wide, and thus way easier to find than a crow’s-foot when I come back to it.
Six different line lengths of dither when using visually, so it works quite well in different lighting situations.
I got a nice movie-grade tripod from some folks who used to shoot a lot of commercials, and I like it a lot. A LOT of height adjustment –– 20″ in the legs, and over 16″ in the screw-adjust neck, so I can move around, dial in and recalibrate on an existing mark, continue around U-shaped rooms, drop down several steps and continue, etc.
Only drawback was the 1/4-20 thread on the tripod. I asked for advice on an online forum, and received a PM From Mike Tramontin, of PLS, out in CA. Turns out I had worked with his brother and uncle here in MI! A couple of days later, a cute little brass 5/8-11 adapter arrived in the mail, at no charge.
harlan
Good write up, thanks. Lasers are a relatively new thing for me, but now I wouldn’t want to be without one or two. Also, since I’ve been a Sketchup user for a long time and learned to use guidelines for drawing many things, lasers are like being able to bring guidelines from the computer to the job.
It’s interesting to think that 1/8″ in 60 ft wouldn’t be accurate enough. I mean, just a few years ago you would have been setting your bench line marks around a room with a 4 or 6 ft level and a pencil.
I’ve been using rotary lasers for years. Topcon and Hilti have always been my go-to. I tried a DeWalt years ago but even then it was lacking.
I love rotary lasers. I just sold my Bosch because it sat idle with my new job. If I need another, I will refer to this article, thanks.
Oh, FYI, I made my own adapter from a 5/8 – 11 bolt that was fully threaded. I clamped it in my drill press, drilled a hole with a #7 drill bit in the hex head and tapped the hole for 1/4 – 20. I cut the bolt so it was only 1/2″ long and now have an adapter for a couple of bucks and a few minutes of work.