


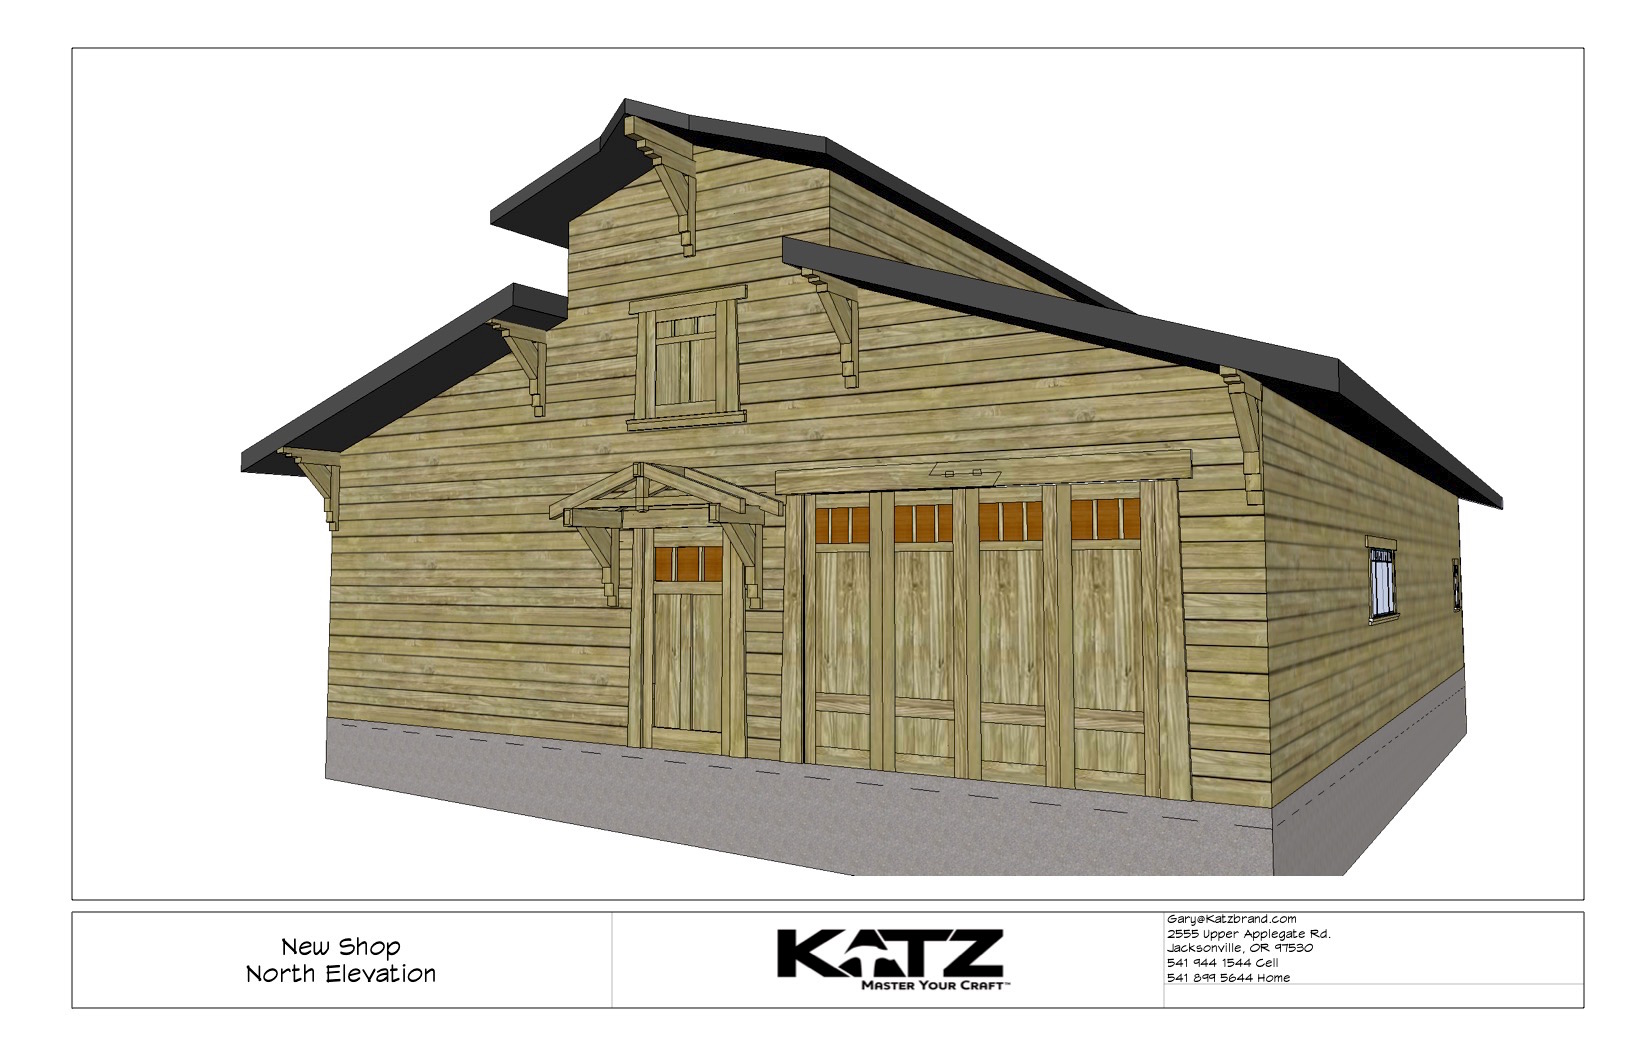
I designed my new shop to look like an old horse barn, so it would blend in with the rural area of Southern Oregon where I now live. Being from Los Angeles, I went all the way with insulation and energy efficiency when I designed and built the shop. I even put in a radiant slab so my timid feet would stay warm in the cold, cold winters (it gets down in the low 20s here; sometimes even below 20 degrees!). So when it came to the 12-ft. wide x 9-ft. tall roll-up door, in order to get a good R-rating, I knew I had to use an insulated steel door. I found one rated at R-17, but it looked like something you’d see on a commercial building.
(Note: Click any image to enlarge)
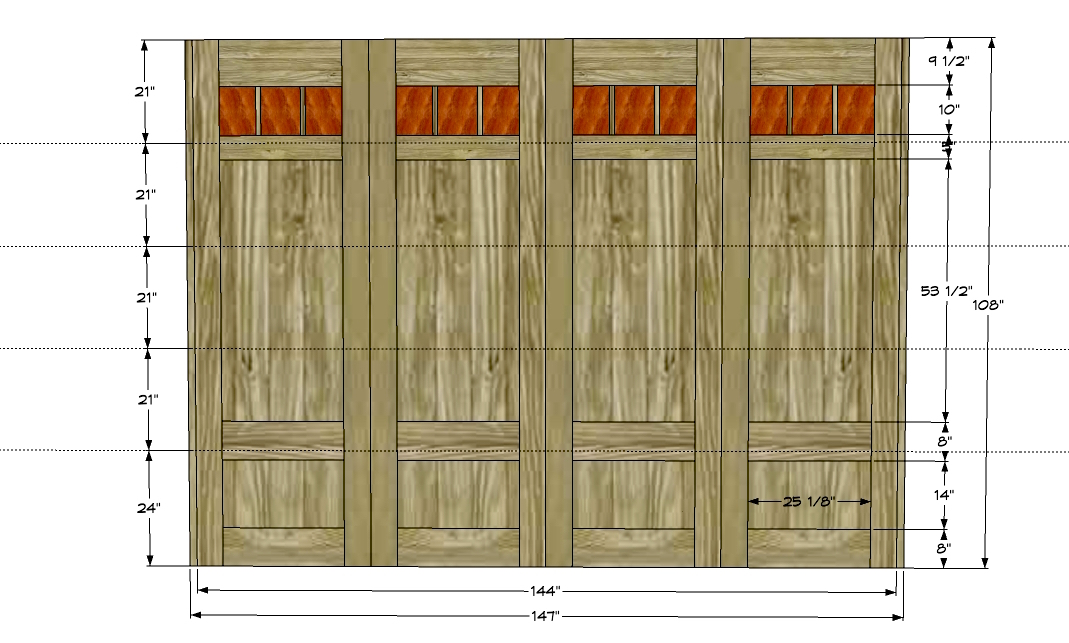
You can buy custom-made wooden sectional roll-up doors, but not with a high R-rating. And I wanted the door to fit in with the overall design of my shop, which meant using the same “Windswept” siding and trim material, too. So I decided to build decorative carriage doors myself and apply them to the insulated steel roll-up door, which meant they had to be laid out carefully so that the ‘cuts’ or panel separations landed on rails whenever possible.
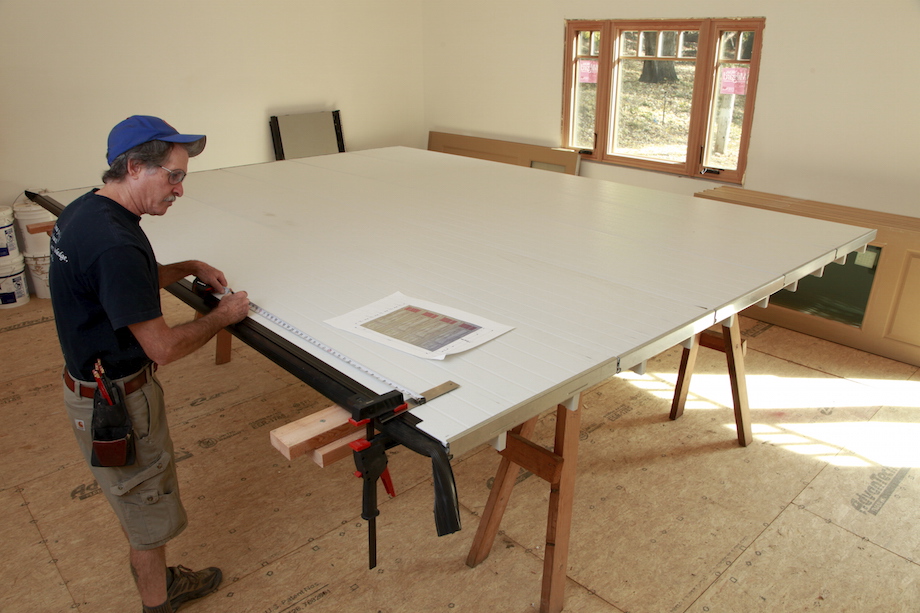
A big set of saw horses
My plan was to make the four carriage doors, glue and screw them (from the back!) to the steel roll-up panels, then cut through the carriage doors along each of the roll-up panels, using a Festool TS75 saw and long guide rail. So the first step was assembling the roll-up door on a large set of horses. To be sure the saw kerfs would close up tightly after I cut through the carriage doors, I separated each of the roll-up panels with an 8d box nail. Then I screwed blocks down to the horses so the panels wouldn’t move.
The rollup door was 3 in. wider than the I.D. of the door jamb, which allowed the panels to fit inside the tracks. I wanted to be sure the exposure on the carriage door stiles remained the same, even on the first and last doors. I allowed for that additional 1 1/2 in. on each side by making the end stiles wider, so when I laid out and measured the width of the carriage doors, I first measured in 1 1/2 in. on each side of the roll-up door, and then measured the remaining space between.
Assembling the panels
Once I had the O.D. dimensions of each carriage door, I made the panels first, so I could glue them up and let them sit in clamps while I cut and assembled the stiles and rails. The siding is all ship-lap, which wouldn’t have made a very strong panel. I ripped the rabbets off both sides of the panel boards, then reinforced the glue joints with dominos.
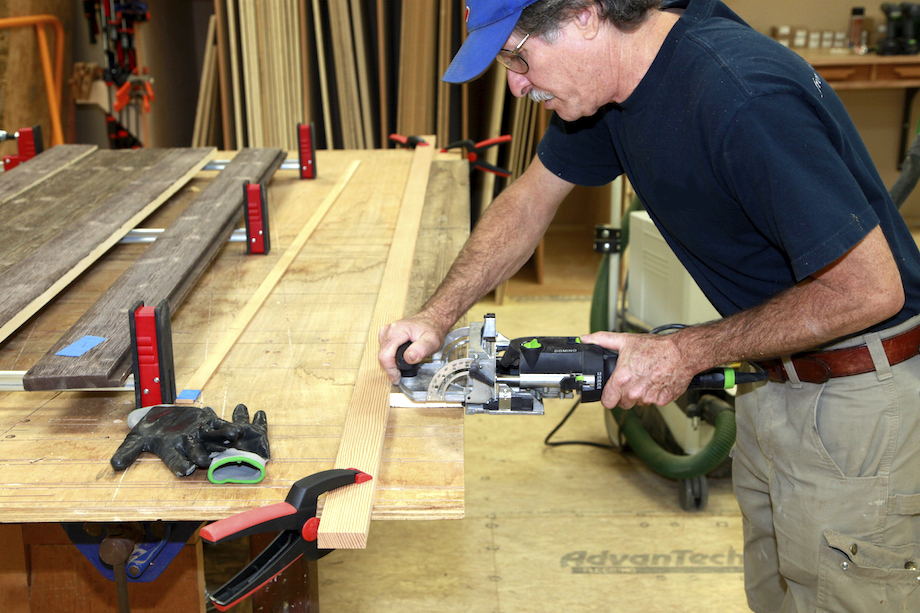
| Behind me on my right you can see the temporary door we built to secure the shop. | 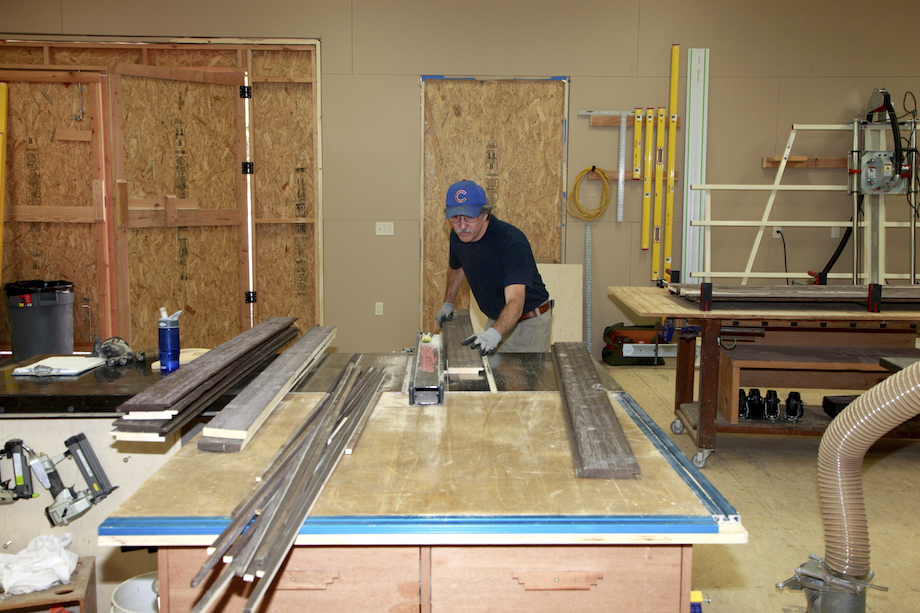 |
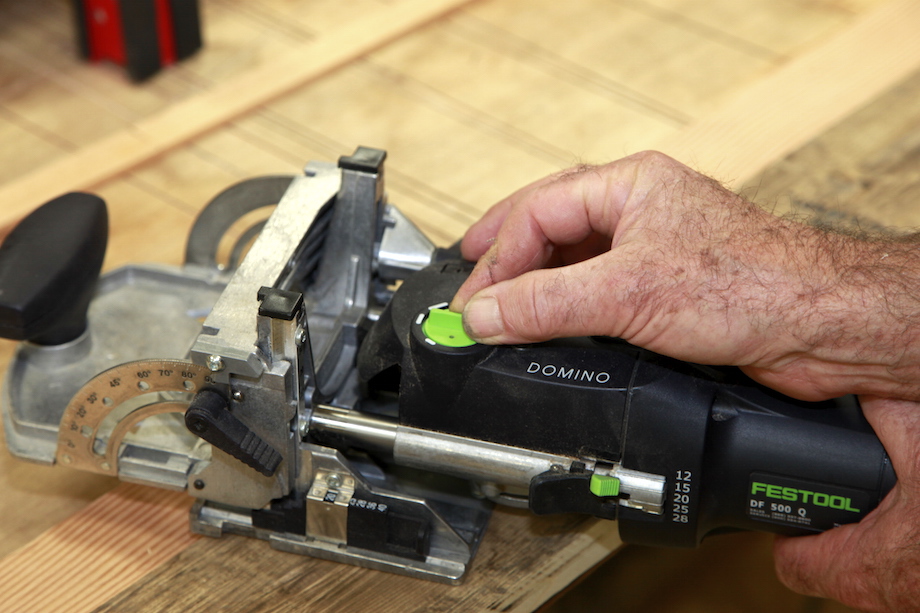
| Because I was installing so many dominos, in a lot of boards, I made a story pole. The story pole also ensured that none of the dominos would land on the cut lines along the roll-up panels. | 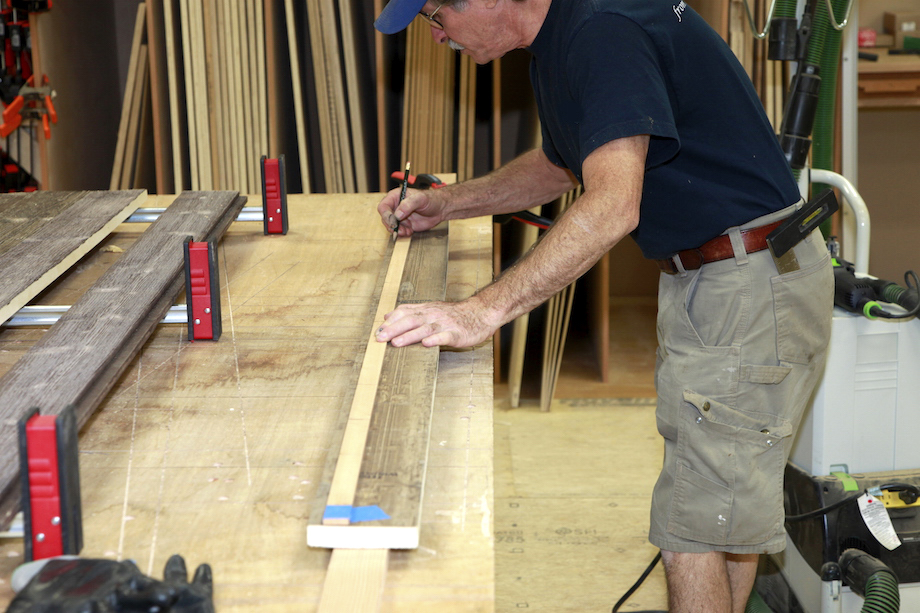 |
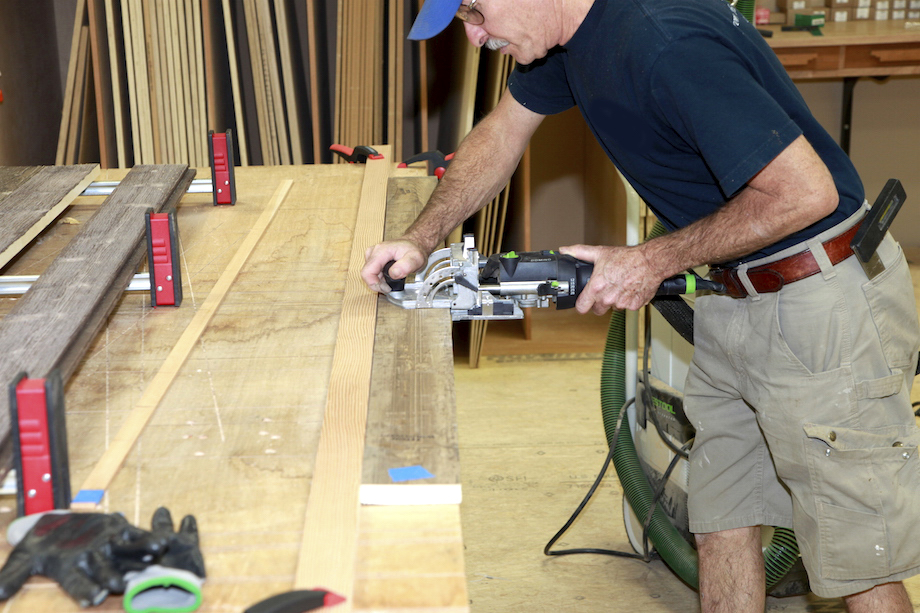
I cut the mortises at each end of the boards, tight, using the index pins on the Domino to register the mortise locations, that way the boards aligned flush on both ends.
 |
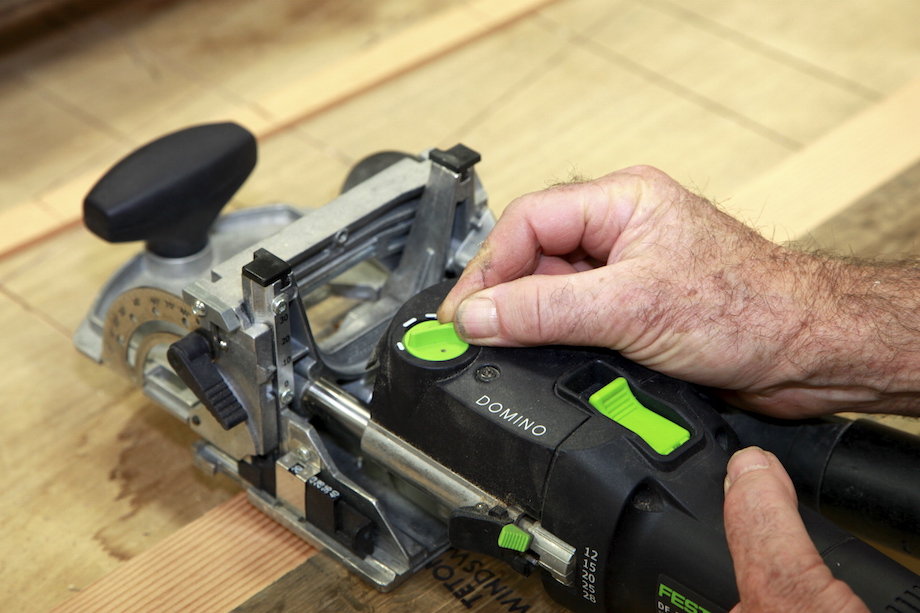 |
I cut the field mortises loose, allowing some wiggle room so it would be easier to assemble the panels.
 |
 |
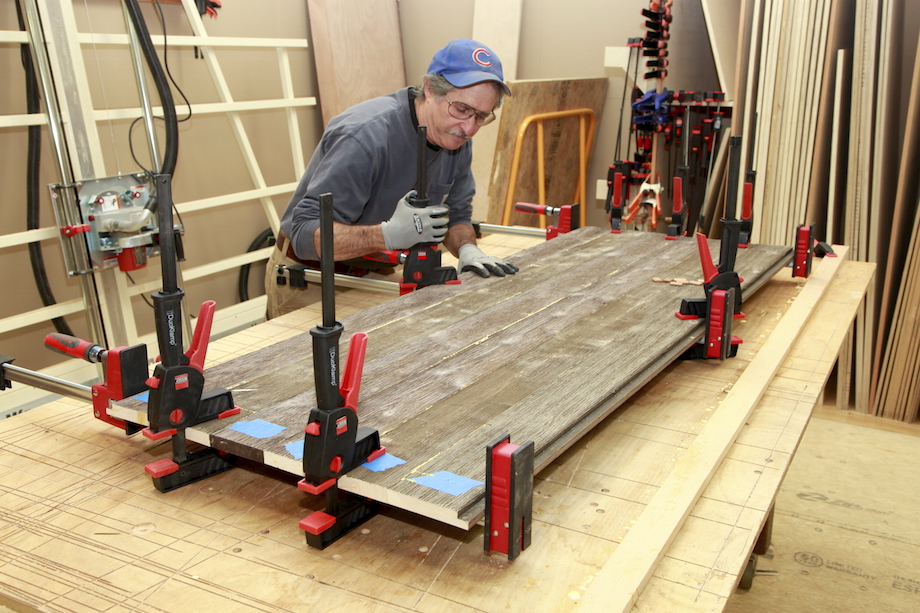
Because the panels were being installed outside, I made sure to coat all the unfinished edges with a liberal amount of glue. I used Titebond II because I find it easier to work with than Titebond III. Titebond II is water resistant. Titebond III is waterpoof, but I prefer using Titebond II because it seems to have a longer open time, even though the manufacturer says that Titebond III has a longer open time.
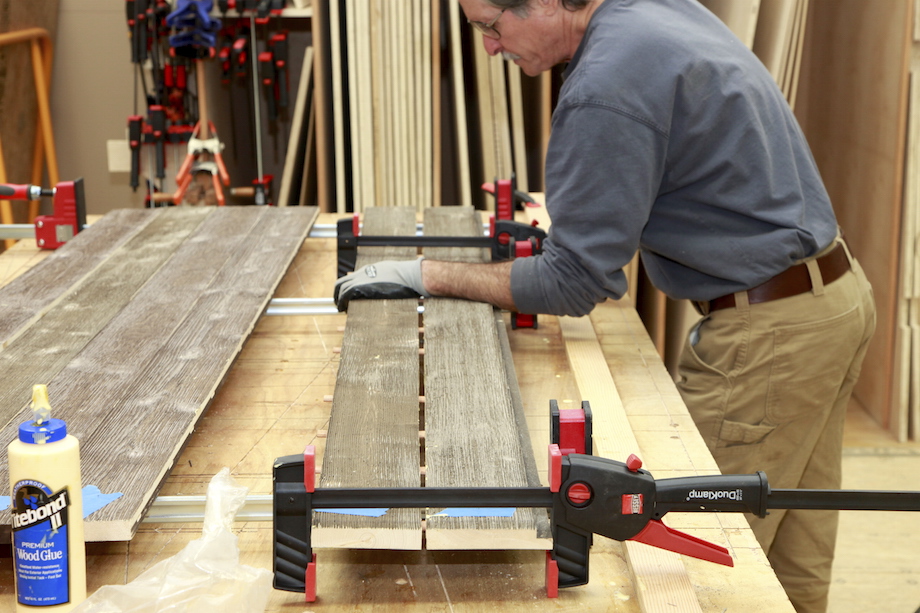
When I assembled the boards, I relied on my bar clamps to keep the panels flat, applying squeeze clamps to draw the panels tight against the rigid bar clamps.
Assembling the frames
Mortise and tenon joinery used to be a time-consuming task. But jobs that I used to sub out to millwork shops, I can now do myself with a Domino XL.
| All I need is a fair sized workbench and a story pole for the stiles and rails, too—to ensure that all the doors are exactly the same. | 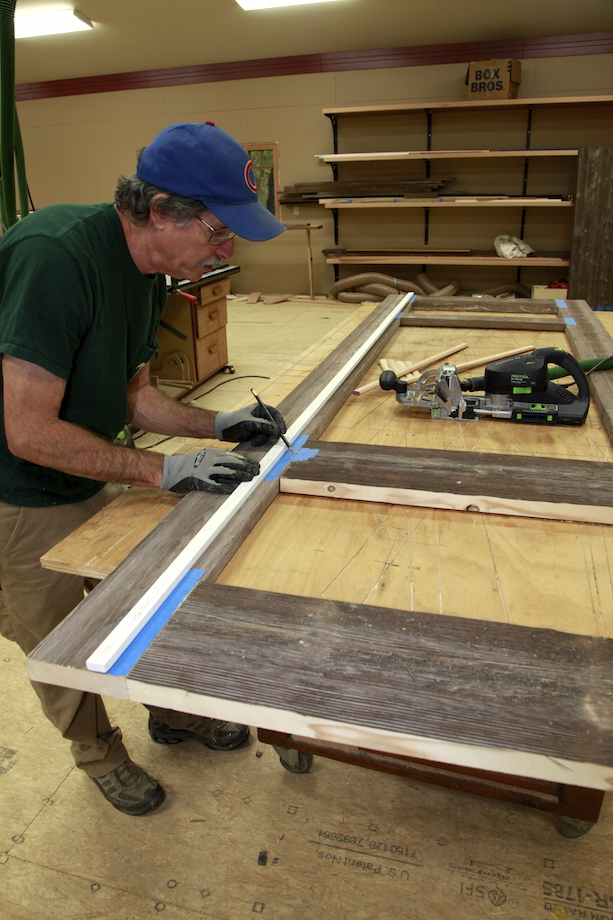 |
I use story poles for almost everything, after all, nearly everything we do is repetitive, and these carriage doors—four of them—are a perfect example. The story pole ensured that all the pieces would fit precisely, and that they were interchangeable, too, so I could match or mix grain and finish colors between boards.
| After marking the mortise locations on the stiles, I transferred marks to the rails. | 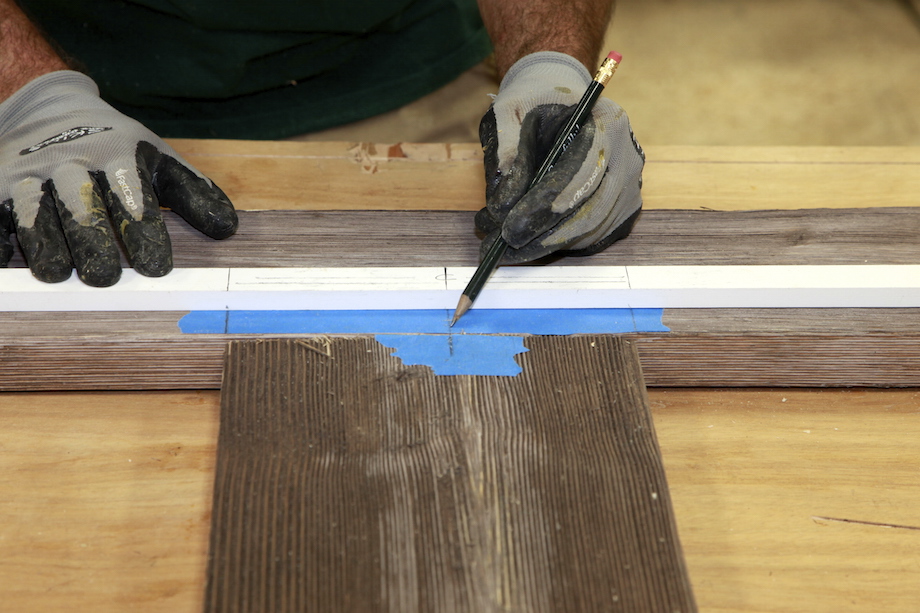 |
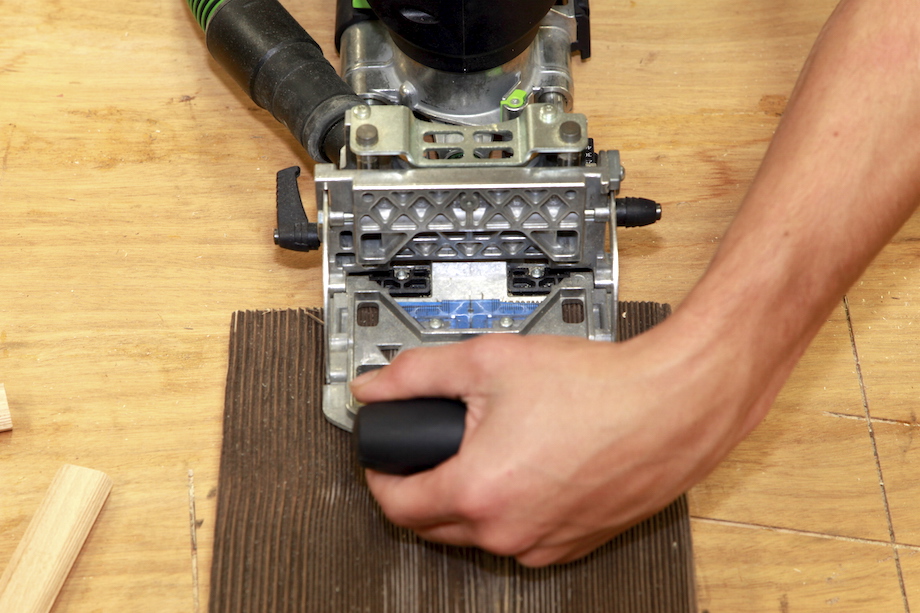 |
To cut the center mortises in the rails, I aligned the layout lines with the center mark on the Domino. |
| To cut the mortises near the edge of the rails, I used the first index pin, placing the mortises 20mm from the edge of the board. | 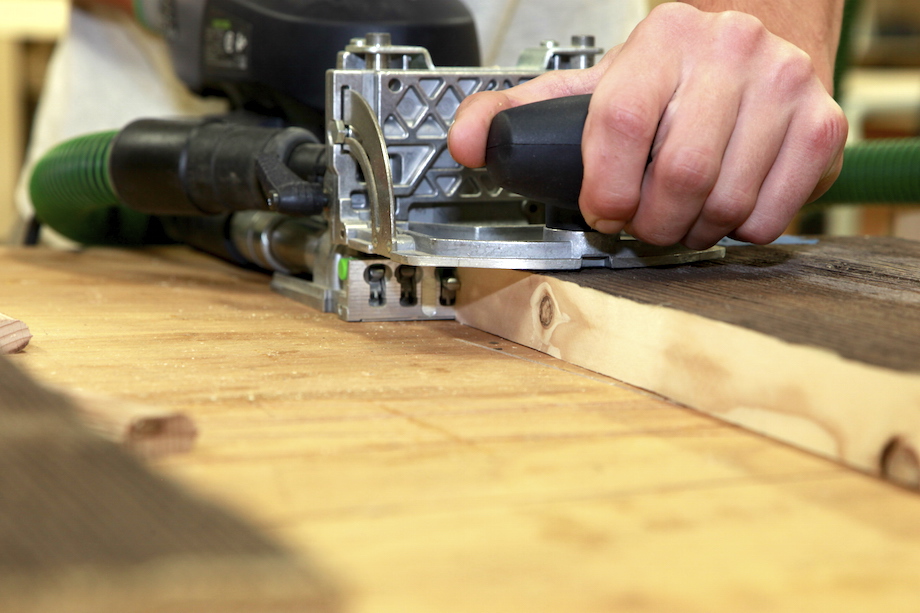 |
To cut the corresponding mortises in the stiles, I used the 20mm offset mark on the Domino index plate.
Trust me, laying out and cutting the mortises didn’t take much longer than writing the last few paragraphs. And I was so confident the system would work that I didn’t even take the time to test the joinery with a dry-fit.
| I glued up the mortises first, using an acid brush to coat the entire cavity. | 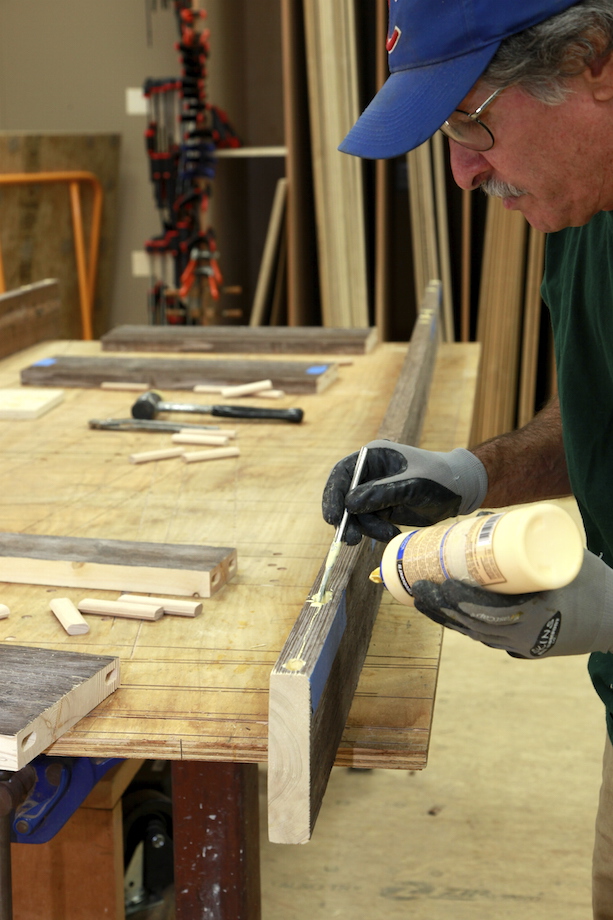 |
| I made sure all the end grain was painted thoroughly with glue, too, so it wouldn’t wick moisture and swell up and maybe even rot. |  |
| I clamped one stile to my workbench, which made it easy to insert the 12mm x 100mm dominos, and then I assembled the frames, smacking the stiles and rails together with a mallet. | 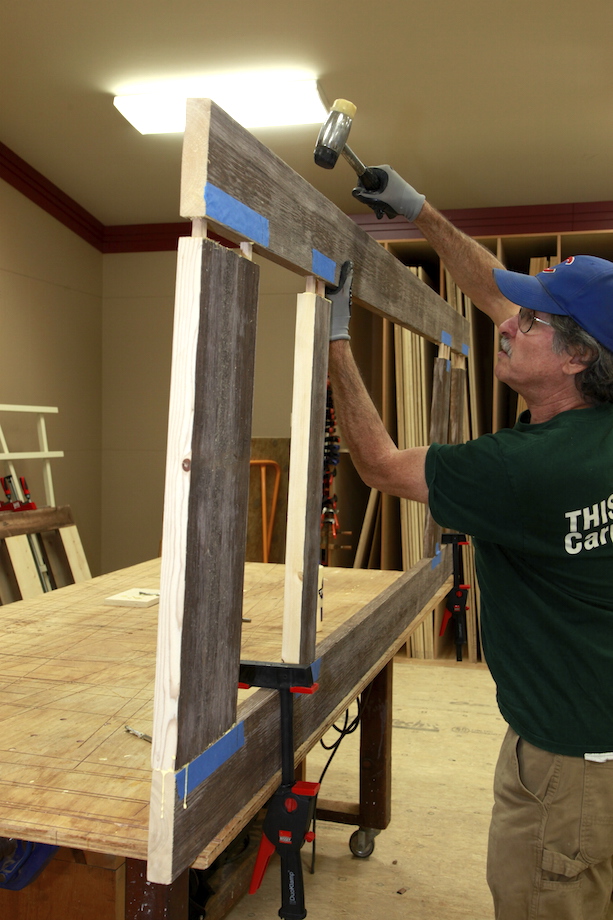 |
Installing the panels
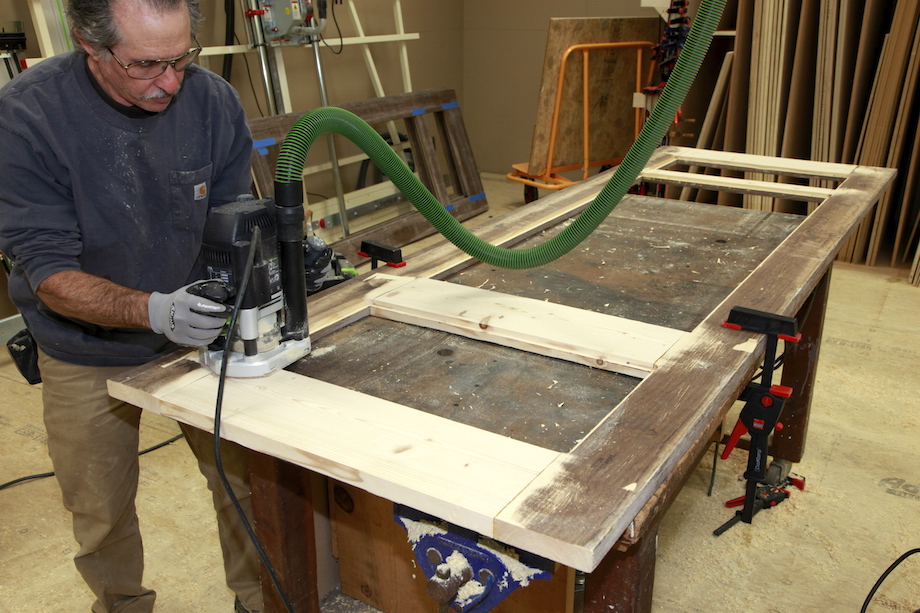
I left the four frames in bar clamps overnight, then I went at each opening with a router and rabbeting bit. I cut a 1/2-in. deep by 1/2-in. wide rabbet to accept the panels.
| I squared up the corners with a sharp chisel. | 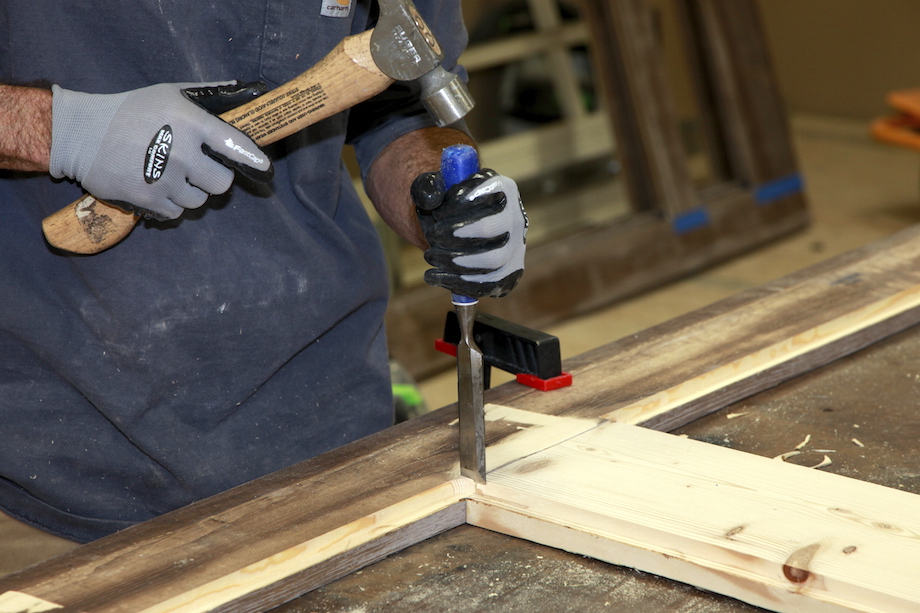 |
| Next I sealed all the bare wood and installed the muntin bar for the top panels. I re-sawed the muntins so that they’d be flush to the face of the door and flush with the rabbet, too, then fastened them in place with pocket screws. | 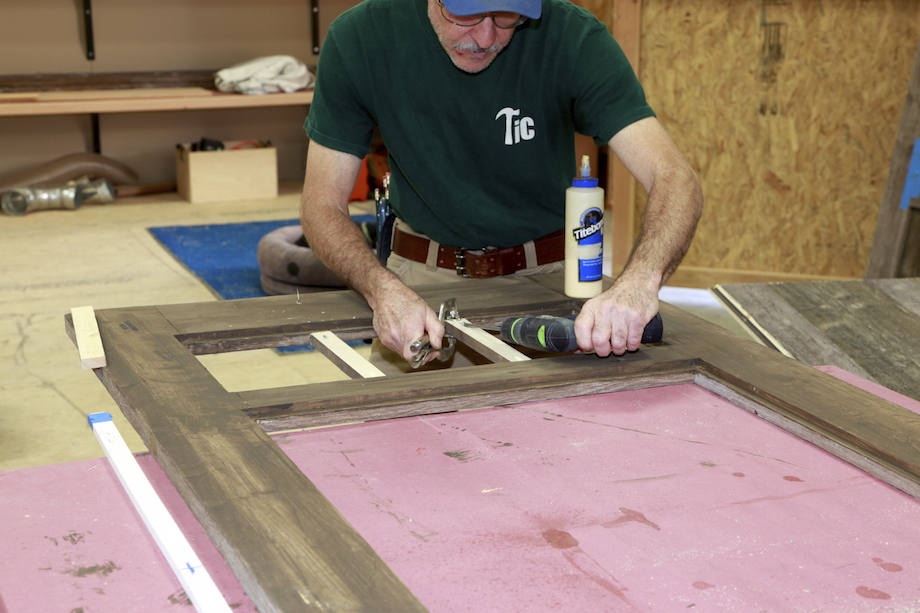 |
With all the routing done, I was ready to cut and install the panels.
| But before starting, I checked the moisture content of the panels and the stiles and rails. The panels were fairly dry, only about 8%, so I knew they’d swell up a little once the doors were installed outside, probably reaching 12% MC and growing about 1/8 in. in width. | 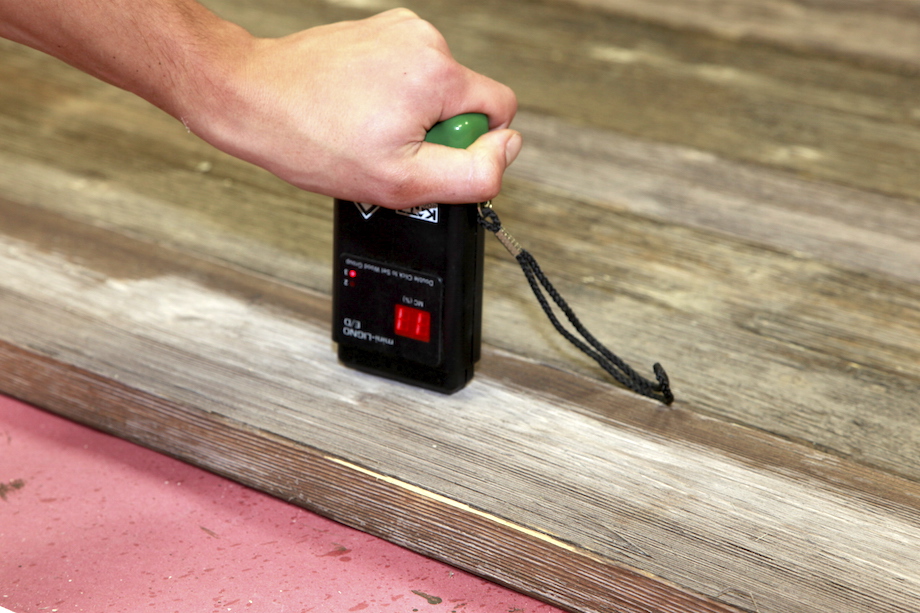 |
The stiles and rails were already at 11% MC, so I knew they wouldn’t swell much at all. When I cut the panels to size, I measured from the top of each rabbet and subtracted 3/8 in., adding a little extra for swelling and wiggle room. After all, those 1/2 in. wide rabbets were pretty forgiving.
Next I ran the panels through a Shaker-style raised-panel bit mounted in my router table, which both rabbeted the outer edges of the 3/4-in. thick panels and cut a bevel around the inner edge of each rabbet.
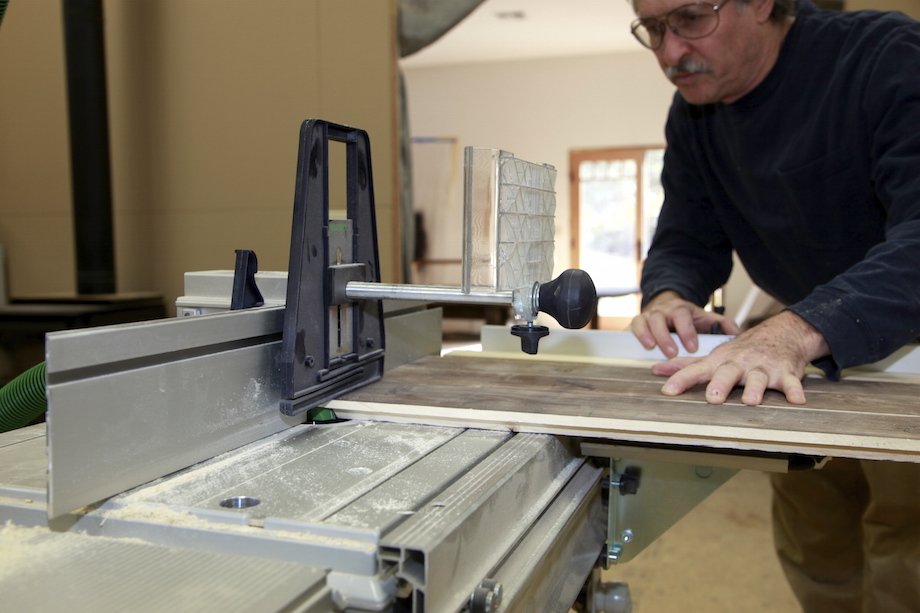
The rabbeted panels lay flat and flush with the rabbeted doors.
| A few screws is all it took to secure the pine panels. I kept my story pole handy while driving those screws, just to be sure one of them wouldn’t land where I’d be cutting the panel lines. | 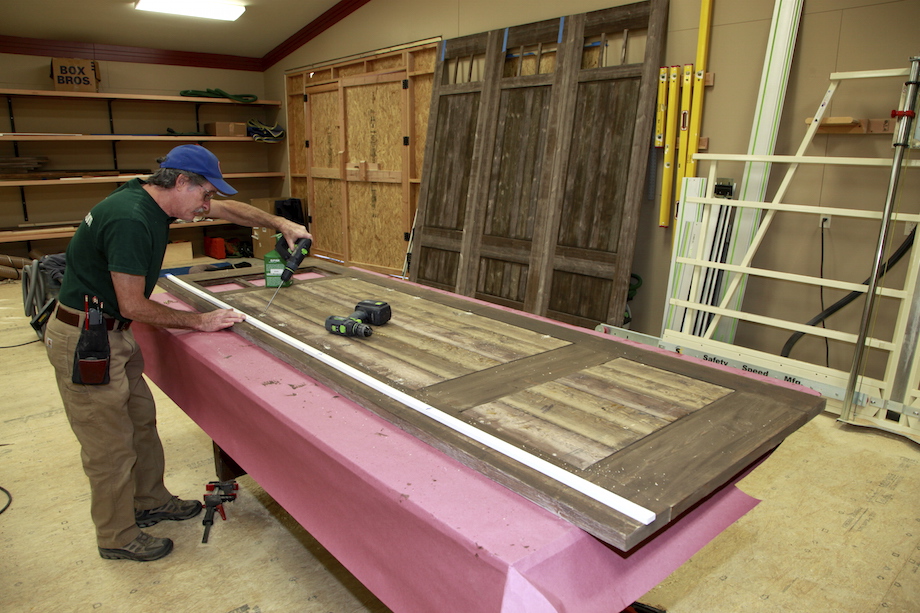 |
| I made the Douglas fir panels for the upper “lites” exactly the same way, then prefinished the raw wood and installed all the panels into the backs of the carriage doors. | 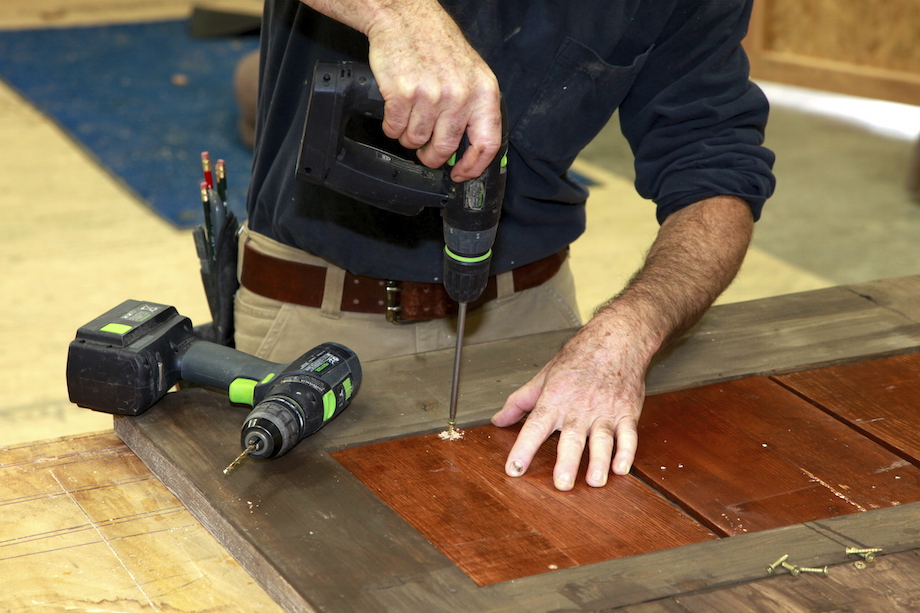 |
Installing the carriage doors
After all the careful layout and woodwork, the rest of the job was pretty easy.
| For each carriage door, I applied about 2 tubes of PL Premium Advanced to the front of the roll-up doors. That adhesive adheres to just about anything—wood, steel, plastic, glass, etc. | 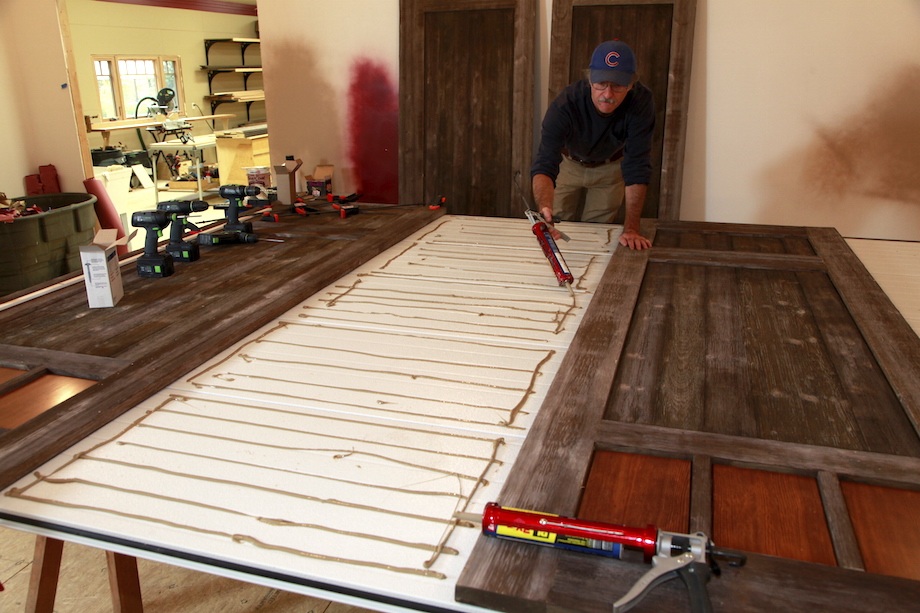 |
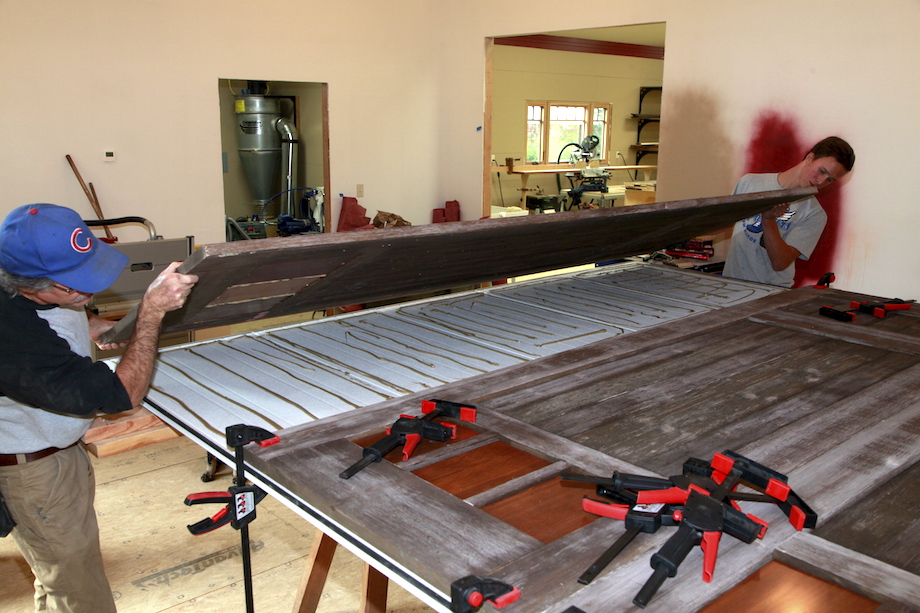
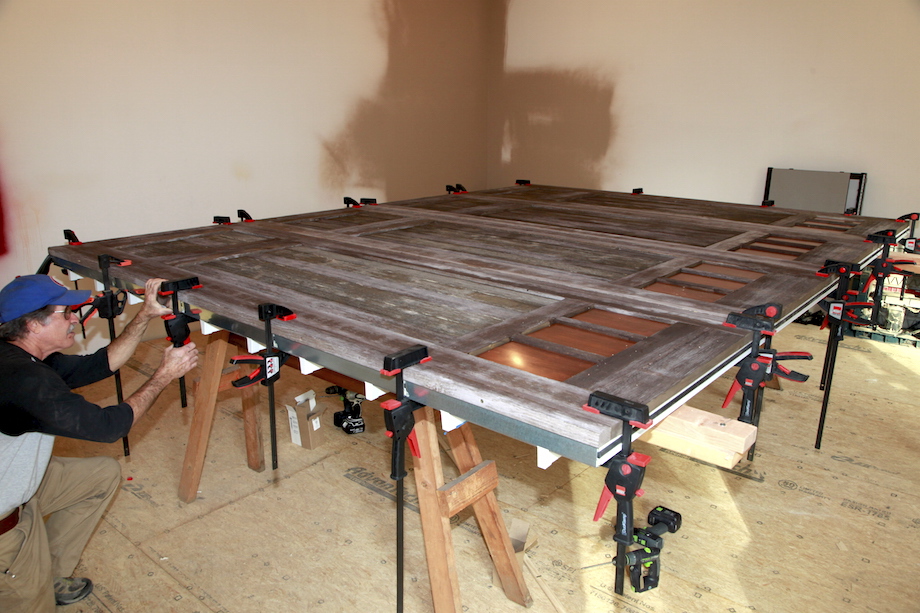
I set the wooden doors down in the wet adhesive and positioned clamps wherever I could.
With all the doors in place, I crawled around under the horses (thanking myself for using tall saw horses!), and drove a few hundred 3-in. self-tapping coated screws through the backs of the roll-up panels into the stiles and rails of the carriage doors. In a few places, where a roll-up panel broke across the 3/4-in. wooden panel, I used shorter screws.
 |
 |
I let the adhesive dry for two days before cutting through the doors. I set the saw at a 2%-bevel, so any water collecting on the edges of the panels would shed off. I positioned the guide rail by eye, so the kerf would land pretty close to center on each space between the roll-up panels.
The rest of the job was even easier! I just got on the phone and called the commercial door company to come out and install the track and doors! Everything was pretty normal, as far as a rollup-door installation goes. They installed the track on both jambs first, then started stacking each panel in the opening.
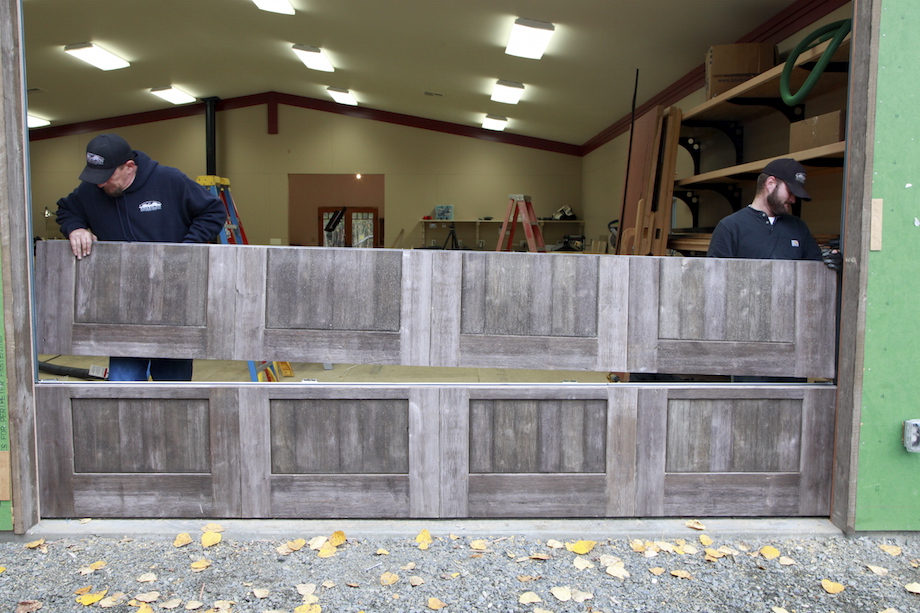
| After sliding each panel into place, they attached hinges and rollers. | 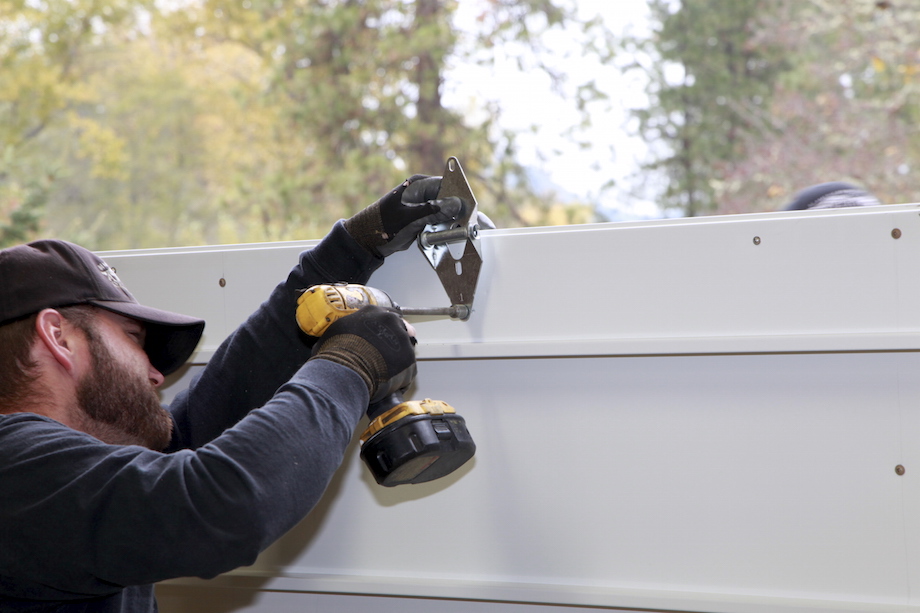 |
| Once all the doors were in the opening, they adjusted the springs until the doors were completely weightless (all together, they weighed just under 600lbs). | 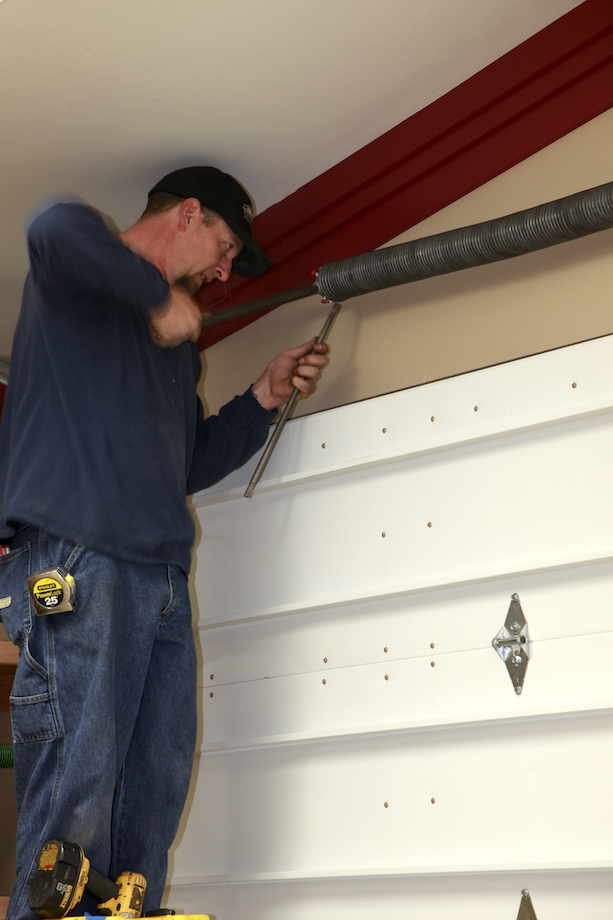 |
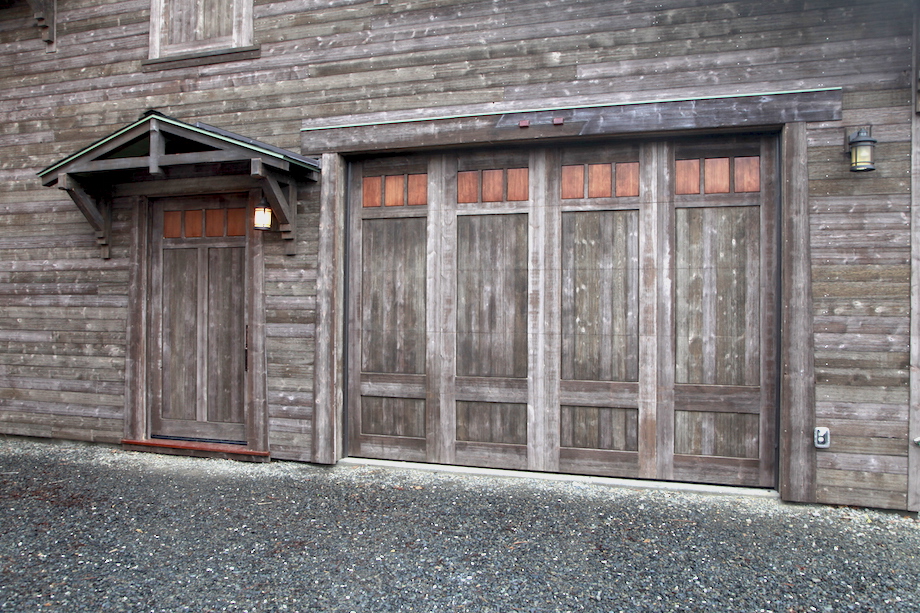
Once we installed the shop door, and all the tapered casing and head trim, the final look was far more than I’d hoped for.
Conclusion
Now it’s four years later and I expect some of you will want to know how the doors are holding up. They look great—from three to four feet away.
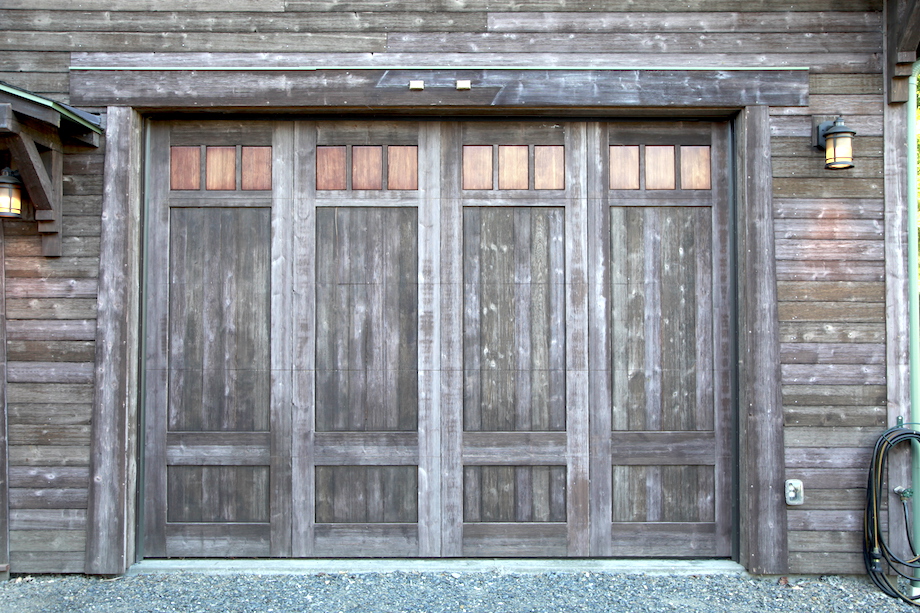
| But one panel in each door has split and separated, mostly right along the glue-joint—you can see the dominos and the ‘stretched’ adhesive. But none of the woodwork has come loose from the underlying steel doors—it’s all still very solid, which is a testament to PL Premium adhesive! | 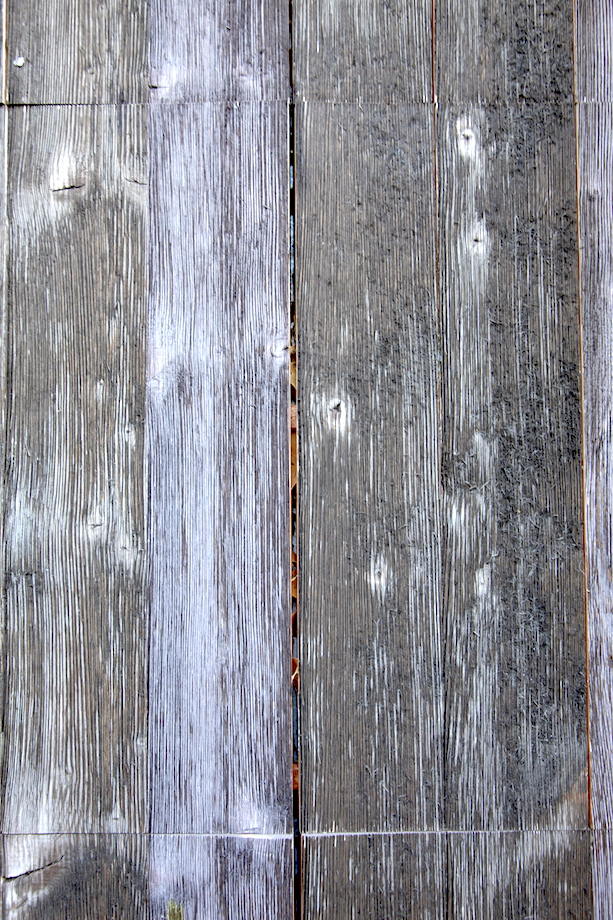 |
I expected some movement, but not quite so much; after all, I checked the moisture content of the wood before installing it. It was pretty close to 10%, which I anticipated would be the equilibrium moisture content outside my shop.
| However, in the summer, the sun comes around the corner of my shop and directly strikes that door. In August—the hottest month of the year—the MC of that wood measures 6%, and that is a 4% change in MC, which means a 1% change in size. So those panels, which I glued together forming one piece of wood, should have contracted about 1/4 in. | 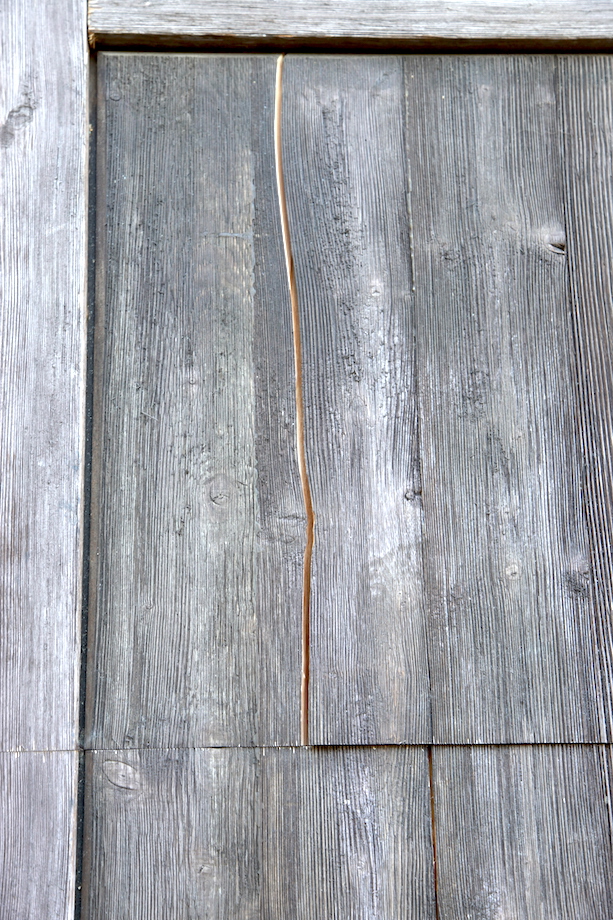 |
| And they did. In fact, the major separation occurs right in the center of the panels—where the MC change would have the greatest impact. But adding the crack between the panels and the increased gaps between the panels and the stiles equals much more than 1/4 in. And in one panel there’s also an awesome stress crack! What happened? | 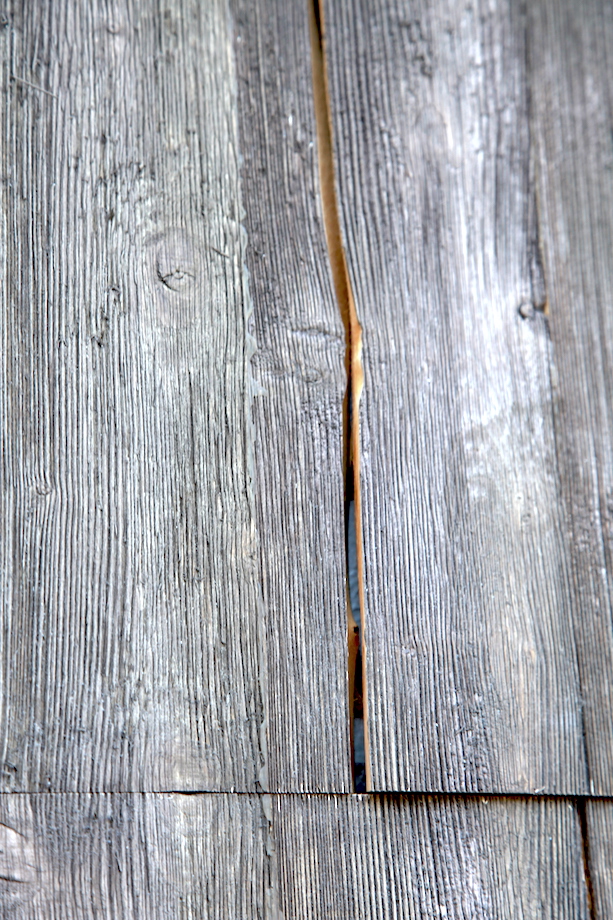 |
Dissimilar materials, that’s what happened. The steel door expands in the heat and shrinks in the cold, exactly the opposite of the wood panels. And each winter the cracks and gaps in the doors close right up, proving that the doors contract. What’s the answer? Maybe I should have built the doors from wood, too, which wouldn’t have been that hard, but I didn’t have the time and I didn’t have the know-how. I think these will do just fine for me. After all, from four feet away, they look great!
I wonder how it would have fared if you had only glued the rails and stiles to the steel, allowing the panels to float?
Bill,
I thought about that–seriously, too. But I had to cut right through the wood panels at every horizontal joint in the five-panel roll-up door, which would have allowed the wood panels to fall right out of the stiles and rails! So there was no choice…the wood panels had to be attached to the steel doors.
Gary
I was thinking the exact same thing as Bill. Gary is right though in that the panels can’t completely float or they would slide right out. I wonder how well things would have fared if you ran a single bead of adhesive and screws down the center of each panel? That would keep them in place and prevented splitting as each end could float. Oh well, you know what they say about hindsight…
Either way, that is one darn good looking garage door.
Jeff,
My thoughts exactly. I try to think of everything I can when I’m making stuff–you know, like most of us do, to try and avoid mistakes and plan ahead, but I also know that most of the things I’ve been building I’ve never had much experience with and so at a certain point, I have to surrender all the attempts to avoid problems and just get to it, knowing I’ll be learning some ‘big’ lessons real quick. More than anything, over the last four years of working on my new home, that attitude has saved me from severe depression. Yes, there have been a LOT of mistakes! :)
Gary
Gary,
I’ve always thought that your shop/barn was one of the best looking shops I’ve seen. Love the crow end gables.
I built a house for my mother in-law in 1986 here on the California Delta. I’ve replaced the exterior trim on the south side of the house 3 times in the last 30 years, from the same problem your having. With the wood MC being about 5-6% in the middle of the summer. You could see where the wood almost decomposed from lack of MC. The only solution is non-wood products, that usually don’t look as good as real wood. Leave the cracks in your doors and fill it with silicone or something.
Sim
Gary:
Many years ago I was responsible for the installation of store fixtures for a large retail business. We had built soffits across the width of one back wall in Indianapolis. They were installed in the summer and when winter came the humidity inside the store dropped and the MDF panels shrank so much they left an inch and a half gap at one wall. After that happened I redesigned the soffit to allow for expansion every four feet. It was a simple tongue and groove joint vertically that allowed the movement to be disguised and go on year around. Maybe something like that would help you. Your doors look great anyway. You are my favorite genius.
I had a customer ask me about adding panels over and insulated roll up doors and was wondering if you could give me an idea of the amount of shop time it took you to fabricate and install the wood panel.
Thanks
Paul J
Paul, I probably spent two days milling and making the four wood ‘doors’. It was repetitive and easy work–mostly pocket hole joinery and the Domino. Gluing the wooden doors to the steel panels, and reinforcing the lamination with screws, probably took 3-4 hours–once I had the panels on long saw horses and spaced 1/8″ apart. Cutting through the panels was the scariest but easiest part–about one hour and we were done. Of course, after that I had nothing to do with the installation! Phew.
Gary
Gary one last though on expansion,,, I’ve used a detail similar to the sketch attached for ship-lap that is interrupted without a rail to carry the open end.
Paul,
GREAT idea! I might have tried that if I had thought of it, but I didn’t. I put a lot of time into trying to avoid mistakes–the drawings, planning, the glue-up, securing the wood doors to the steel panels, etc., but at a certain point, either my patience reaches a limit or I just give up and have to cut wood. So the idea of some type of hidden/integral connection on those ‘cut panels’ never occurred to me! :)
Gary
That is quite the trick of gluing and cutting the doors. I’m guessing the TS75 had to be dead on so you did not wreck your blade on the steel door.
Gary, why did you use Titebond over a poly glue, the poly glues have nice open time and are completely waterproof, would not solve the splitting issue
David,
I used Titebond for all the wood joinery and PL Premium for adhering the wood to the steel doors because I needed a thicker adhesive that would fill in voids. I don’t assemble doors or any wood joinery with polyurethane glue. Polyurethane glue might be better in some ways but it’s not fun to work with, and fun is important.
Gary
David,
Before I glued the wood doors to the steel roll-up panels, I spaced the panels apart about 1/8″, knowing I’d be removing that much material when I cut through them–because of the thickness of the blade. And I set the TS75 so that it just cut through the wood. In a couple spots I had to go back cut through again, a little deeper. But I never hit the steel doors.
Gary
Gary,
Great looking door!! It is a shame about the expansion/contraction cracks. Every time I attached wood to steel (mostly furniture) in the past I didn’t use adhesive but rather pan head screws (or lags, or timberloks) with a washer into an over sized hole in the steel (or sometimes oval if we knew exactly which way the wood would move). That would of probably jeopardized your R value/air sealing but the wood and steel could move independently.
I wonder if you could of attached a piece of steel strap with keyhole slots in it and your panels simply slid in with gravity. Anyway that PL was your enemy on this one.
Luka,
Good suggestion. PL was definitely the enemy. Well, sort of. The real enemy was impatience, as usual. I was trying to seal up my shop–it was fall and winter was coming fast–at least i thought it was. So instead of thinking more (about expansion/contraction), I thought only about using shorter screws to secure those panels!
Gary
Gary, what “know how” do you feel you may be lacking to build your own roll up doors? Roll ups are less complicated to construct than the appliqué doors you glued to yours. I built two sets of wood doors and they work well; probably would be even better/easier using a domino though. Simple 1″x3″ cedar stiles & rails with polyicenene infill then 1/8″ hardboard attached to inside and 3/8″ fir ply on the outside. I built mine in a hurry with only butt joints at the panel edges. If done again I’ll add a spline/t&g joint between panels. The biggest difficulty for me has been in finding a durable door edge seal. The seals I could find are made for metal doors. But wood doors are rougher and grippier than metal and will eventually grab and tear poly foam and butyl rubber seals. Brush seals are an option but I can’t imagine them being the best. What seals did you use?
Gaberiel,
Even in hindsight I don’t think I would have or should have built the doors myself. I knew nothing about how the hardware worked and didn’t have time to explore the whole subject. All I knew was that I needed an insulated roll up door, in a hurry. And I’m kind of glad I went with that decision. The steel doors are indestructible, they’re very easy to adjust, the seals are superb (between panels and between the jamb and sill), etc. A few minor expansion/contraction cracks–a totally aesthetic issue, doesn’t bother me much. It actually adds some to the rustic look of the building. And if any of adhesive or panels fail completely in the future, the fix will be pretty easy.
Gary
Gary,
Great article. I particularly appreciate the post mortem outcome and analysis after 4 years. Murphy’s law and “the best laid plans” meet the reality of dissimilar materials and differential shrinkage. Well done. Thank you for your great contributions to our craft!
I was lucky enough to learn at least one of those lessons without any harm:
I wanted to get a feel for Azek expansion/contraction, so I took a length of it, and made partial crosscut kerfs 100″ apart – that protected against dinged-up ends messing up my measurements when I schlepped the piece around from place to place, since I was moving from my shop.
On a 10º-15º day, I cranked up the heat in the house to 70º before I made those cuts, attached the Azek to a plank with the recommended fastener schedule, and took it outside.
When I went back later to measure it after it cooled off, I was astonished to see it “grow” before my eyes by about 3/16″… as my steel tape, which I had kept indoors until then, cooled off!
Never had a problem in the field before, at least not one that I didn’t just chalk up to Operator Error. And most of the time, the guy who is cutting has a tape just as hot/cold as the guy calling out the numbers, so it wouldn’t be an issue most of the time
Live and loin, live and loin.
I have built probably 300-400 doors just like this over the past 6 years. The process you took to build the door is almost identical to how we build them.
Things to consider;
1- choose wood materials wisely. Cedar is absolutely the best. Many wood products will expand and contract at greater rates
2- always use quarter sawn/ vertical grain material
3- we use 3M 540 polyurethane adhesive to glue our wood to the steel panels with little to no issues (you might want to consider rolling the adhesive and covering the entirety of the board with the adhesive spread..this will help seal the backside of the wood from moisture and the elements)
4- A GOOD FINISH!! **MOST IMPORTANT*** finish all end grain and exposed wood. Klima makes a excellent product