


I got my start in roof framing because I was personally interested in it, and it seemed that there was a lack of local knowledge on the subject. I live in Norway, and almost everything here is trussed. I tried to find some kind of course to take but, as far as I know, there is no course on the subject in Northern Norway, and there are no Norwegian books or DVDs. I had a little experience from my work in the states—on occasion I have helped a friend with roof framing projects, but I was basically just the cut man and far from an expert.
I turned to the Internet and ordered a vast amount of books and DVDs. In fact, I probably have every book and DVD available on the subject (in English, of course).
I was happy with most of the DVDs and books, but Will Holladay’s DVD program, “Roof Framing for the Professional,” was the best on the subject, and he goes a little more in-depth than the others I purchased.

(Note: Click any image to enlarge)
It seems that most of the others used a rafter length book, or some sort of book reference, to get the length of rafters, jack rafters, etc., instead of taking the time to go into the math involved to determine how to get rafter lengths, presetting your ridge beam, heel stand height, the theory of the hip roof, gang cutting rafters, etc. On the other hand, and in my opinion, Will explains all of these very well. He uses a Construction Master Pro Calculator, and I thought he did a better job of explaining how to use the calculator than any other DVD.
He covers every roof, from a regular gable to bay roofs, dormers, and complicated hip roofs, to conical and octagon towers. I wasn’t able to try all but I managed to try a few.
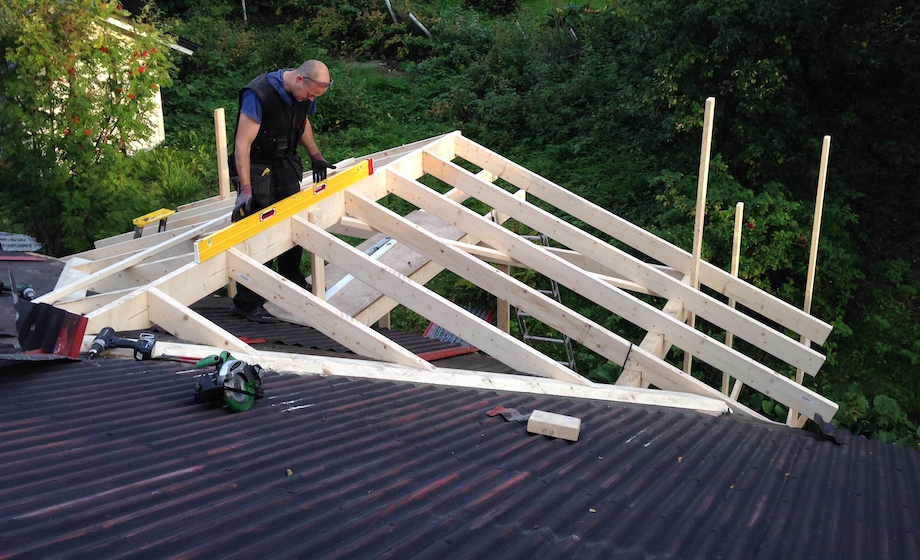
| I had never built a hip roof before, but I was able to after watching Will’s DVDs. | 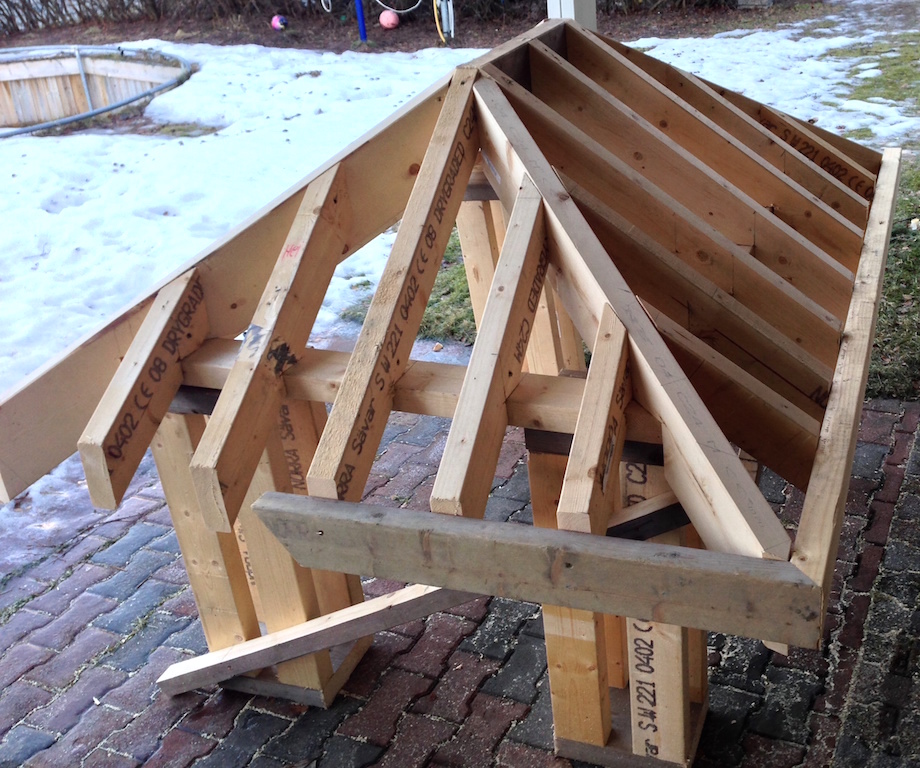 |
Of course, I couldn’t watch it and expect to become an expert. There was still a certain amount of trial and error. But the important thing, to me, was that I was able to learn. I didn’t get the hip rafters correct because of the heel stand, but I went back and watched the DVD again, and I was able to figure out what I had done wrong.
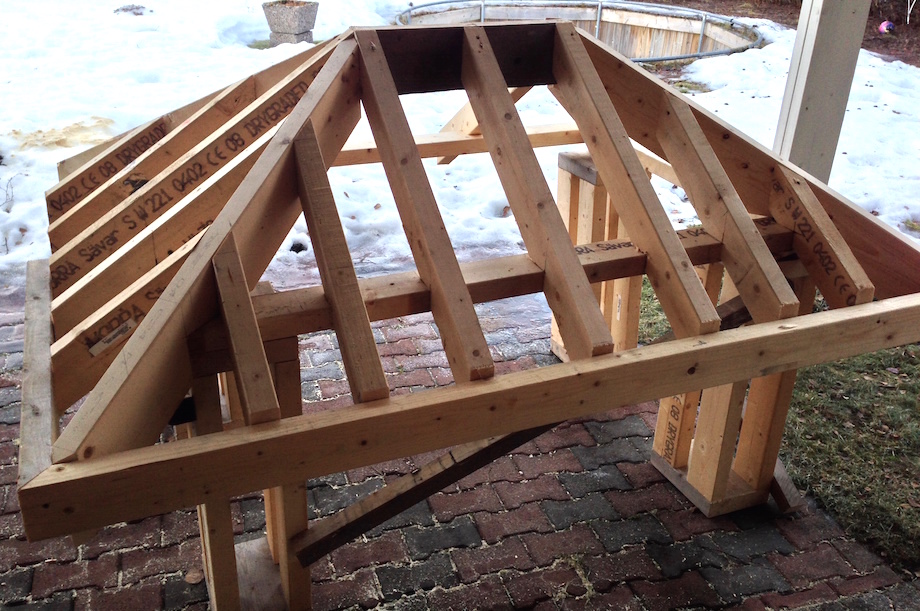 |
I did a few small models of the hip roof, switching the measurements up—going from inches to metric, but the formulas are the same. |
Math is math, whichever way you look at it.
I was also able to build a porch roof tying into a house roof (California Valley).
| I applied Will’s techniques to the project and I was actually able to precut all of the rafters to length on the ground and preset my ridge beam at the height I wanted (I couldn’t find the math for the ridge beam height in any other DVD besides Will’s.). | 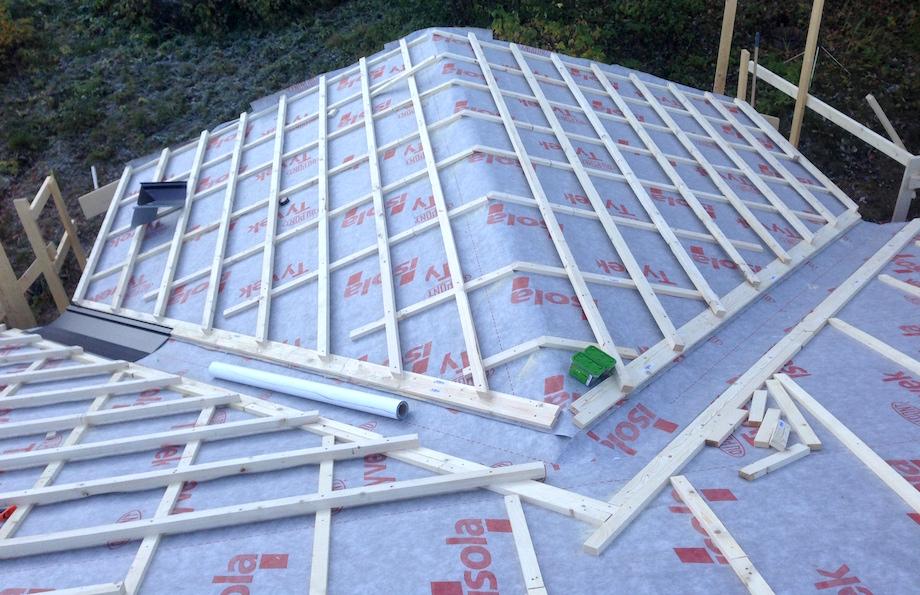 |
The rafters fit perfectly. I didn’t precut the overhangs because the customer wasn’t sure how long he wanted them, but I could’ve actually cut the entire rafter and rafter overhang on the ground (using Will’s techniques) if I had known what he wanted.
| I also tried beveling the sleepers, which was pretty different. | 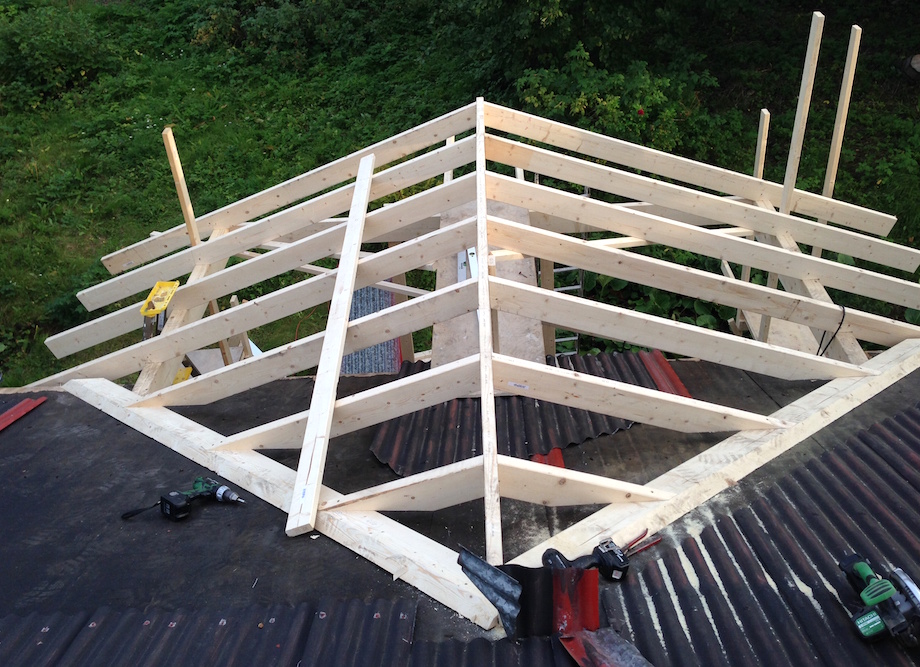 |
I didn’t need to do this—it’s more work, especially if it’s not required, and I wouldn’t recommend it (Sim Ayers’ roofing blog has a great explanation on how to do that.).
 |
I had to cut another sleeper so the rafters had good bearing. I managed to frame this roof in three hours! |
I shocked a few people on how quick it went!
I think Will’s DVDs are great for someone like me who doesn’t have access to a course and can’t find anyone who knows the art of roof-cutting. Most people in Norway who can do it use the caveman method, at least from what I’ve seen.
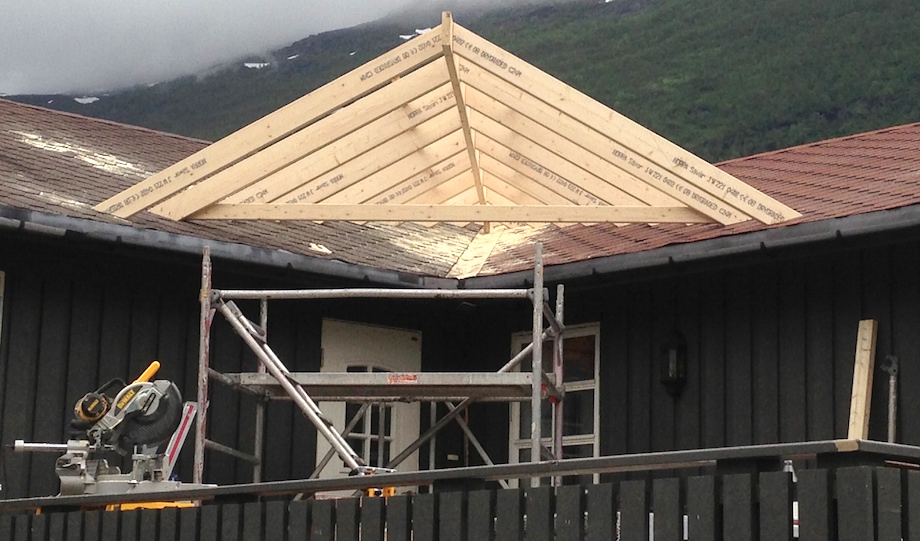
I was also able to use the math shown in Will’s DVD for an off-angle California Valley.
| I had a project where I did a porch roof coming out of a valley and tying into another roof. | 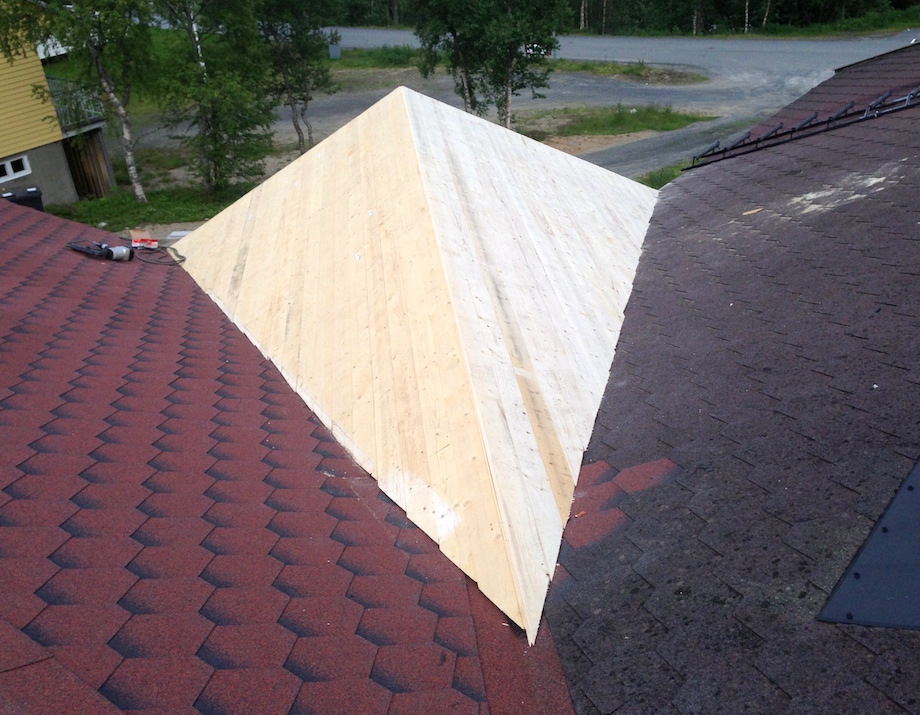 |
It only took one day to do the rough framing. I doubt I would’ve been able to do this without Will’s techniques. I would’ve probably used up all the material at the lumberyard!
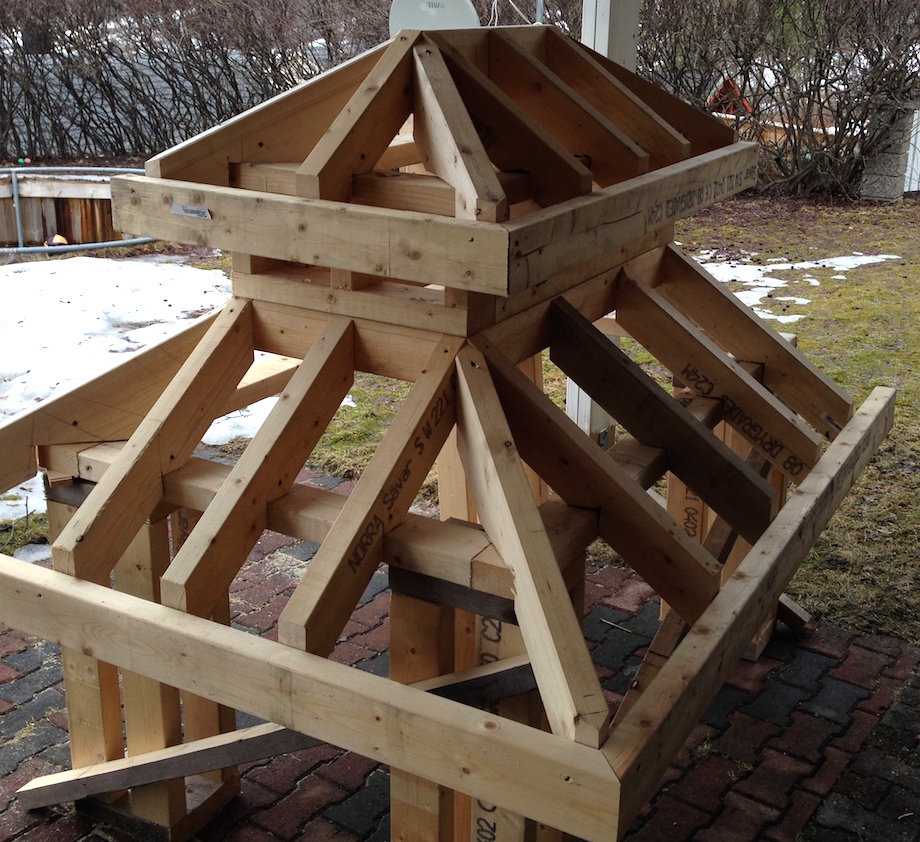
Will also explains how to cut an octagon tower in his DVDs, which was the last thing I jumped into. I was kind of ahead of myself on this one (I had never seen one on a house in Norway before), but I had a lot of fun with the math and I enjoyed precutting everything first. The best thing about Will’s DVDs is his instruction to calculate everything before you start building—you really save a lot of time.
| The octagon turned out pretty well. Again, I had some small trial and error problems, but I rechecked my math and I ended up framing it all except the jack rafters (I ran out of scrap material to use). |  |
Will covers everything in the roof framing DVDs, and he goes in-depth on every subject—he doesn’t just fly through it. Once I manage to try more and more of Will’s techniques, I truly believe I will be able to learn everything about the subject of roof framing and I’ll be comfortable doing any job (again, accepting trial and error). I think roof framing is an addiction (laugh if you want to)—it becomes more and more fun after you build a few roofs (or model roofs). I like to challenge myself and these DVDs definitely do that!
 |
 |
My only “complaint” has nothing to do with the content: I would like to see the DVDs as a digital file that you can view online or on a USB memory stick. DVDs have a tendency to get scratched up and I value these quite a bit!
I would recommend the first DVD in the series, “The Essentials,” for someone starting out in roof framing. I believe this program does an excellent job explaining all the basics, though I could definitely see how an expert could use these as well.
Remember, Will recommends that you have a Construction Master Pro Calculator to help follow along in the DVDs, especially those on the metric system as you can convert to metric on the Construction Master Pro.
| I would also recommend Will’s book, A Roof Cutters’ Secrets, which has a companion DVD—the DVD actually includes the book’s page numbers so you can use the two together as references. A Roof Cutters’ Secrets has got to be the best book written about the subject—it’s worth buying. |  |
On the whole, Will’s DVDs (and the book) are all well worth the money, but beware: they involve a lot of math (which I think is fun, but I know that not everyone does!).
I hope to see more of Will’s DVDs in the future (I’d love to learn about chandelier domes, barrel vaults, or circular stairs, all of which sure look like a lot of fun!), and I hope this review helps those of you who are thinking about purchasing the programs. Lastly, I’d like to thank Will for actually taking the time and energy to share his vast knowledge on the subject.
• • •
Will’s DVDs and books are available for purchase on his website, theroofcutter.com. “Roof Framing for Professionals: The Essentials” is 3-disc set, which Will sells for $50.00 before shipping. A Roof Cutters Secrets has also recently been released in e-book format; it’s available for the Amazon Kindle for $28.00.
• • •
AUTHOR BIO
 Ray Scholz is originally from the town of Elkton, Maryland. He moved to Narvik, Norway after meeting his wife in the summer of 2004. He made the transition from roofer to carpenter in 2005, and after working for six years as a carpenter, he took the Journeyman’s Exam and Practical Test in 2011 to become a Certified Carpenter in Norway. Today, he continues to work as a roofer/carpenter. When he’s not building models of small roofs, he enjoys hiking or hunting in the mountains, and spending time with his kids.
Ray,
Two hammers WAY UP—a bingo!!!
Thanks for a terrific article with link to Will’s book/set.
Ed Latson Brooktondale NY
Ray- What are the nominal and actual dimensions of your framing lumber there in northern Norway? Your framing stock appears somewhat beefier than our North American framing lumber…and is it kiln dried?
Thanks again Ray,
Ed
Ray, a suggestion, the next time that you need to frame a “California Valley”, you may want install a full length ledger to nail the jack’s to. Personally I would consider it Best Practice.
Good Article, thanks for all you efforts
Good point Paul. Beveling that 2x ledger/plate probably ate up at least 3″ of valuable bearing interface. It might seem cool to do, but in reality that bevel isn’t doing much good for roof sheathing nailing. It could have done much better work by being set back and catching more of the rafter heel cuts which transfers the rafter load from securely.
Remember, in most cases, your 2x ledger/plate doesn’t have to be a continuous width piece of lumber for structural purposes. I wouldn’t recommend butting up a bunch of 2″x4″‘s, but larger width combinations ( say a 2″x10″ and a 2×6″ or 8″ to the inside) would have probably sufficed for this situation. If you want to go all out with the beveling and full width members, then you can cover your bases with an LVL ledger/plate.
Sonny, this is what it takes to make the beveled California valley sleeper useful. You’re right, without blocks in the main roof to nail the roof sheathing and sleeper too, it’s just looks cool. However, it’s a pretty common practice to bevel the “Layover Valley” in Europe. It’s kinda like the rites of passage for carpenters in Europe.
Sim
Roy, after reading your article and seeing the off-angle California Valley you built, I realized I have an off-angle California Valley on the house I’m working on. I looked in Will’s book, but he just says to scribe the jack rafter foot cut. Will’s math for the off-angle California Valley must only be on his DVD. Extremely good reason to buy the DVD. Anyway, I went through the geometry and trigonometry for building an off-angle California Valley and I’m impressed with your ability to cut the off-angle California Valley jack rafters on the ground. The trigonometry I came up with is pretty intense.
Also, it’s great that your building the task models.
Hey, thanks for all the comments I appreciate all the input as I am trying to learn and make myself more knowledgeable in the art of roof cutting. Ed,the lumber here is kiln dried I believe, I’ll check on that next week just to make sure. It is beefier than the U.S. as it is an actual 2*4,2*6,or 2*8 or 48mm*98mm,48mm*148,or 48mm*198mm the 2*8 being the biggest you can get without going up to an LVL. Paul and Sonny, you are absolutely right in that comment i will definitely do that in the future as I am trying to teach myself I definitely regret not doing that. Sim, I’m sorry if i misled you on that one but i don’t believe it is in the dvd, I just used Will techniques as you have said about the jack rafter foot cut. I cut 2 rafters and then just found the jack rafter length difference and cut the rest on the ground. I kind of did both calculating and scribing on that roof. I calculated the ridge beam height from a 2*6 i set,I measured out from the valley the length the customer wanted his roof then I calculated the ridge beam from that, set the ridge beam, then setting a rafter on top of the ridge beam I had an angle finder on that so I adjusted the rafter to the pitch of the roof. I also did a 3,4,5 triangle from the ridge beam to get the rafter square with that then I scribed it as Will explains, cut the first one, then I snapped a line from where the ridge beam met down to my first rafter to get a valley line. I didn’t put a sleeper in, I know I should have looking back but I did block it, also the existing roof was tongue and groove as well which definitely helped. When i was done framing I cut a 2*8 with the angle that fit in on the backside of the rafter(kind of like a sleeper if you will)for extra support. I will upload a few pics so you can see what I mean,its definitely strong enough, I built it last summer and with the snow load here it’s definitely fine, I’ve been by and checked and it looks good.
I am suprised that you have such an elementary artical on roof framing. Maybe I’m spoiled old school. But a”framers square” if you look on the sides of the long leg of the square it gives you all the information you need to frame a house. Bevels, length per foot of common, hip, jack rafters etc. It’s one of the oldest carpenter tools out there and out of laziness people use a little pocket speed square. Any carpenter worth thier weight in Salt should have a framers square on the truck at all times. In all honesty when I read an article like this in JLC I question why I even subscribe anymore. It used to be a magazine for professionals. When I worked Framing, we used to say if you can’t stick frame a roof you are not a capenter. You are a helper that needs to work on the job with a man who can teach you. You shouldn’t be writing for JLC if you can’t frame a roof. Go back to farming and stop calling yourself a “Roof Framer” by the way is that now a specialty? Or is it a way to over charge your customer for work tou don’t know how to do. Or if you want call me and I’ll set up an appointment with my secretary and charge you $500.00 for a crash framing course.
Neil,
Wow! What a long rant! First of all, this isn’t JLC, it’s TiC. Maybe you’re starting to forget where you are? Happens to me sometimes, too!! But more important: Do you use a nail gun? I expect you do, because it’s faster. Do you still use a water level? Or are you using a laser these days? Probably a laser, if you’re as sharp as you say you are. Lasers are much more accurate and far faster. Do you still use a hand saw or are you using a circular saw? I could go on and on and on. Construction calculators are faster and far more accurate than framing squares. I’m not saying there’s no place for a framing square on a jobsite–on the contrary, even as a finish carpenter, I use one frequently, but I use a calculator far more frequently. But the real point it, I’d never condemn someone for the techniques they use that work for them. I might try and show someone an alternative, but if I’m truly serious about teaching someone something, if I actually want to help them, the last thing I’d do is put them down.
Gary
Sorry Sim, I tried to upload the pics but I’m having problems, I’ll try again now.I just want everyone to know I have not claimed to be a professional roof framer. That is reserved for guys like Will Holladay and Sim Ayers, Will, who has awesome dvds and books and Sim who shares his knowledge on a roof framing blog. These two in my opinion are the best in their craft. You can go deeper into the trade with the french compagnons and the german carpenters who specialize in the roof framing so it is an art after all maybe you need a little history lesson on that before you come with all the negative comments, all you need to do is google Patrick Moore historical carpentry and there you find other masters in the trade who do not use framing squares or calculators to frame their masterpieces. My review was about how the dvds and books helped me as a carpenter to make myself better. I have no problem with criticism at all as long as it comes from someone with a vast knowledge and experience (will holladay,sim ayers,and others of their caliber). As for Neil, why bother commenting if you have no input value to the article. The others that have commented have made a point about sleepers in the valley and so forth and that is positive in my view,it will help me learn and be better so I appreciate them. Furthermore, in Europe the carpenters don’t even use framing squares or speed squares, (also they are on metric not inches as well) as far as i know so that would be a little difficult to find someone to teach me that wouldn’t it?
More pics of the roof,as you can see the 2*6 going across the 2 roofs I leveled that up and measured to the middle so i could get the ridge beam centered,feel free to comment on what I could do to different next time to get a better result.
Ray, great explanation about the European carpenters building cathedrals with framing squares with no rafter tables. Rafters tables were the downfall of the American carpenters in the early 1800’s. It was faster to use the tables on the carpenter squares, but the roof framing geometry that was passed down through centuries was shrugged aside for speed.
After looking at your recent pictures I’m ready to jump on a plane to Norway to cut a roof with the lumber you used. It’s makes the roof look like a real roof structure that would last for centuries, instead of the gunk we frame with here in the states.
I did buy 2 more of Will’s book yesterday after reading your article. You’re right, roof framing is an addiction. So I drew out an off angle California Valley to see what the geometry and trigonometry would look like. It’s a lot of math just to cut a couple of jack rafters, but it was fun going through the exercise.
What could you have done differently on the off angle California Valley? Add a sleeper, but you already knew that. Otherwise nothing. 99% of all carpenters in the states would have done it exactly like you did. Out of the 1000+ California Valleys I’ve framed I rarely ever do math for the roof. Just cut it in place. If it’s a standard California Valley Framing then cut the jack rafters on the ground like you did.
Thanks for sharing,
Sim
Here is my collection of roof framing books and dvds, again my review is of Will’s dvd and also his book. Out of all of these, I found Will’s books and dvds the easiest for me to follow. I do enjoy all of them of course and they are all well written, I’m just saying as a carpenter trying to learn the art, I found his the best for me.
Ray, I disagree about all of the books being well written. When I helped Bernd Kuppers translate his German book into English, I knew from the from the start it should have been completely re-written.
Self publishing by carpenters is like trying to hit a 16D penny nail into a piece of wood with your forehead. The only way to stop the bleeding is to hire some like Clayton DeKorne, editor of JLC Magazine, or Gary Katz to edit the book.
If you look closely at the pages on my Roof Framing Geometry blog, you’ll see blood spots on all of the pages.
While you’re living in Norway, you should buy Traité théorique et pratique de charpente by Louis Mazerolle published in 1852. It’s basically, the holy grail on French ‘L’Art du Trait’, the art of line. It will probably sit on the shelf for a couple of years, but you’ll need it when you take a class from Patrick Moore.
Sim
Sim,
I’ve done a couple of these add-on roofs coming out of a valley. If my memory serves, for finding the compound miter foot cuts, the face miter angle is the pitch angle of the add-on plus the H/V Pitch angle of the existing, with the backing angle for the hypothetical existing H/V as the bevel. The more Pitches involved, the more fun. I think the two existing should be equal for the best visual appeal, but not always the case.
Ray,
I’ll agree with Sim about “All Books” are not all good. Books are tools. OTJ reference materials are good to have. And like tools, their primary function is to make you buy them. Once that happens, it up to the consumer to get their money’s worth out of them. So buying books and tools from the guys who really invented them and use them is usually a major benefit. Will Holladay’s vast experience is a great resource, as well as Steve Chappell’s Master Framer Square and the user’s manual. I use my own notebook sheets as well.
One of the Best Books you can have in your collection is the “Swanson’s Blue Book of Rafter Lengths”. (I didn’t see it in your books picture.) It often comes with their squares. The method they show for marking and cutting Hip Rafters is by far the best and simplest concept. The explanation is concise, probably not elaborated on enough, and is telling of the early modern time it came from. (It is the only book I have read that does not include “Hip Drop” methodology because their method does not need this additional adjustment step.) Both the book and square were intended as complementary tools to guys that are/were already well versed with their Steel Framing Squares. They improve production greatly since they both fit in a nail bag and won’t obstruct movement. But don’t throw away your or forget your Framing Square, it is still preferred for many marking and layout tasks.
Hey Ray,
Thanks for your review of the DVD series. Glad it has been helpful. You remind me of a younger Nick Ridge. When I first met him sometime around 2000 he had an insatiable appetite for anything to do with roofs. He consumed everything and had quite the collection of books and tapes just like you. This was sure the opposite from when I was younger. It was hard to find much at all on roof framing beyond a few basic sectional views included in various construction textbooks and some ancient Steel square books. No detailed methodology of assembly was covered. In those days, this type of critical knowledge was passed down from an experienced journeyman on the job. Today it is more difficult to find this type of guy but thankfully there are more literary resources available to fill the gaps. Times have changed so much since the old days that I now feel like a stranger in a foreign land. Oh, by the way, Nick went on to become “Mr Roof” of the East Bay Area, so you are following in good footsteps.
A little history on the CA valley (or overlay valley) that many have commented on. They may not realize it but when we first started using this method in the LA tracts the lower end of the jacks were framed straight to the roof sheathing just as you did for one of your projects. Since the roof pitch was low (3.5/12 – 4/12) some part of the jack’s horizontal cut (2×6 material) always sat on one of the over framed 16 OC rafters below – and what little roof load they did carry was transferred directly. Only when 24 OC became the preferred rafter spacing did the sleeper make inroads, since now at times the lower end of a jack could possibly sit on unsupported sheathing. Obviously, the addition of a sleeper to this style of valley framing was an overall improvement since it allowed better nailing along at the valley line. But that being said, I still go “sleeper-less” for some unusual situations as long as the load is transferred solidly.
The earlier comment on the Steel square was interesting. When I taught roof framing seminars for JLC back in the 90s I would invariable get a few similar derogatory comments from folks who believed more in their ideology than in learning production efficiency. While true craftsmen, like roof guru Sim Ayers (math and CAD genius if you have seen his webpage), who strive to carry on the age-old “art” of roof framing, can certainly dazzle us with the Steel square’s use to find/cut fancy roof pieces (many with names I can’t even pronounce), for me, the Steel square’s principal use has been to layout stair stringers or cut fascia. Not only is using the Steel square inefficient to cut regular rafters, it introduces an error factor if you step off. As Gary mentioned, we have come a long way since the Steel square – all those crazy little charts on the side of the Framing square are now fitted in the computer chip driving your calculator. I sure do love my Construction Master Calculator but I know hotshot framers like Shone Freeman and Mark Monosmith who have trick roof programs on their I Pads. I suppose at some point I will have to go that way or be left behind (first, I will have to get an I Pad). My feeling is this: there will always be folks who want to drive a Model T Ford or use the slide rule to make calcs and they are certainly welcome to do so, but most of us have to get to work on time and make some money.
Keep it up my friend. wh
Will,
It is my hope to be as good as you or sim thats for sure, i hope too see more dvds or books from you.(im guessing you saw sims drawing of the off angle valley,that guy is definatly a roof guru,hopefully one day he will come out with a book or dvd too.)I just need to land a job that wants someone to stick frame roofs,I wanna get more practice on big roofs not just small models(hopefully one of these norwegians will read this and call,i am fluent in norwegian too if they are wondering).Sim i do plan on taking an online course from patrick moore in the future,i just need to find the time with 4 small kids they take up a lot of it.Thank you both for the positive comments i really appreciate it.Ed,im still checking on the kiln dried,and sim it is fun framing with the beefy lumber its the same in sweden and finland too,maybe other places in europe but im not sure.(Ill try to swing buy the off angle california valley i did and take another picture , he reroofed it with metal tile it really looks good as a finished product)
Richard Birch checked the drawing I uploaded and pointed out that the saw blade bevel angle was not correct. Here’s the correction for the saw blade bevel angle on the foot of the jack rafter.
Saw blade bevel angle = main roof hip rafter backing angle
Roof Sheathing Angle = arctan(sin(miter angle on the side of the jack rafter foot) ÷ tan(main roof hip rafter backing angle) = 65.15092
Roof Sheathing Angle = arctan(sin(46.03627) ÷ tan(18.43495) = 65.15092
Thanks,
Sim
Sim,
You’re welcome,
The geometry of this roof scenario is really quite simple to visualize. The Jacks will land on the main roof slope at an angle that is the same as a H/V plan-angle, so the same geometry can be applied.
This reveals some very simple formulas for finding face miters and bevel angles at the foot of the Lay-Over Jack rafters.
For In-Side Valley cuts: (as seen in this example, framed over a Regular Valley)
Face Miter angle is the Common Pitch angle of the Lay-Over Roof, plus the H/V pitch angle of the Main, (or Existing Roof).
The Bevel Angle is the Backing Angle of the Main Roof.
*Unverified assumption below, (just a guess =)
I would think the same madness in concept would apply for the Out-Side Valleys. ( Not shown here, a offset addition that meets the original structure at an off angle straight wall and not in line with an existing valley, or inside corner.)
The Face Miter would be Common L-O Roof Pitch Angle, minus the H/V Pitch Angle.
The bevel is the same Backing Bevel as used for the In-Side L-O Jacks.
I look forward to your documenting your upcoming roof with the Off-Angle intersection.
regards,
Richard
Will, is Nick Ridge for hire? We’re maxxed out and could use some help. Way too much work going on here in the SF Bay Area and not enough “real” carpenters to hire.
Sim
Hi Sim,
Here is Nick’s contact info:
http://www.nmridgeframing.com/
Also try Shone Freeman:
http://www.srfreemaninc.com/
wh
Richard and Sim, you’re both right about “well written,” I should have said I enjoy all of them. Some better than others. Richard, I do have The Swanson blue book, also have a Chappell framing square in metric booklet too I should have included. Thanks for the tip about hip rafters, I’ll definitely look into that. Thanks again for sharing.
Ray,
Thanks for the reply. I’m glad something I said peaked your interest.
“If you can determine a Line Length in plan-view, you can calculate a rafter length from it.”
As a follow up to my Tip on H/V Rafter cuts, Read the Blog Page that Sim wrote about how I developed a more complete “One Length Method” for producing these Rafters based on the Swanson’s Blue Book method.
http://sbebuilders.blogspot.com/2013/09/one-length-method-richard-birch.html
Sometimes the simplest methods just “plane” get overlooked and the best kept secret is the one you freely share, but still nobody understands. (Like the Swanson’s Blue Book”, everyone owns it, no one reads it. =)
My contact info is; mrjalapeno@sbcglobal.net
Feel free,
Richard
Hi! I read your article and it really helped me out. I’m trying to add a patio cover onto my house and I have a valley that I’m trying to tie into exactly like the one pictured. I was having a hard time find roof framing instructions/videos that tied into the valley so I didn’t even know if I could do it.
I was planning on going all the way up to the very top of my house where the valley started and start a new gable, but it seems like I could start 6 to 8 feet up if I wanted to.
If anyone has any good books that specifically show how to build in a valley I would greatly appreciate it! Thanks again for the posts, comments ant article!
Ed,
I asked around at the lumberyard here and it seems to me the lumber here is kiln dried.I checked on the net also and found an article about it it says the following,exact stacking of lumber,high tempature 60-80 degrees celcius,a little dry heat 70-98 percent humidity and high air circulation.Drying time is anywhere from 1/2 to 2 weeks.It all depends on the thickness of the lumber and how much moisture content is desired.Hope i anwered your question.Kristin im glad you liked the article and richard i havent had time to try it out but am planning on it soon ill let you know how it goes,now that i have your email i may email you if i have some questions when im done(hope thats ok)
Ray,
OK!
Thanks for the review! I always appreciate someone sharing their knowledge and learning process because we don’t all learn in exactly the same way it really helps to hear/see how everyone does it. Take a little from each and improve and we keep the craft alive in Craftsman.
In my four decades of piecework rafter cutting, I learned to identify those who hadn’t paid attention in school by their attachment to feet and inch calculators. In order to apply the trig you have learned efficiently, you need to be able to quickly convert to decimal form and then back again if needed. Any standard calculator with trig functions will outperform the fancy ones, provided they are in the right hands. I take all dimensions to decimal form and work with numbers that way, and anyone who doesn’t can’t compete with someone like me.
Glenn,
Wrong.
The functions on a Construction Master Pro or Build Calc are invaluable–many of which you CAN NOT replicate on a standard calculator–not at all, period, no way, nor argument, no discussion. :)
Clearly you don’t have much experience with these new types of calculators or you would be as thrilled with them as other carpenters are who use them for stairs, baluster layout, rafters, crown molding angles, etc. etc. etc.
Gary
Ray,
What I admire most about you is your dedication and desire to excel in your work. Whatever you do in life, you are a rare and valuable commodity. I appreciate your article. To those with divergent views, ego is the enemy of education.
Gary
Thanks for the positive comment gary,you made my day.Im glad you liked the article i wrote.Its nice to see that other people enjoy reading it i hope everyone can get something out of it.`”What we learn with pleasure we never forget”.
hi ray! fredrik(freddy) from the mathisen dock and bvs here.
can’t belive i coincidentally found your article?..cool!!
have a nice weekend
freddy
Excellent review and the comments on this feed are priceless . Thanks a million
Just did another one, here are some pics.
More pictures- I’ll upload as I’m working on it, it’s my house so it will take a little while. I’m working on it in my spare time.
Collar ties in place,roof is almost complete
Pictures
Hi Pat Phillips here.
I am training young carpenters for worldskills competitions, a major part of the work is roof framing. Usually quite complicated with rotated hips, lipped jacks / purlins and St Andrews cross.
I have accumulated a lot of drawing dating back from Worldskills in 1995.
I would be delighted to exchange knowledge with you.
patphillips111@gmail.com
Hi, Ray!
Thank you for the article, which I’ll be commenting on a little later. I would like to know your opinion on the other DVD by the carpenter at http://roofframing101.com/
I’m eager to learn, and might as well be buying the here reviewed dvd. But I’d like an article about the other mentioned roof framing training dvd. Do you have an article about it?
I think here in the central forest in Peru, most of the roofs are trussed, too. If that means that the roof structures are made with trusses and not with… frames? Or what?
But I still want to learn this framing system, because it looks to be modular and pre-fabricable… And because I would really like to learn how to frame those very nice roofs. There are many of them.
I, also, have recently purchased the Construction Master Pro calculator app, and want to really use it :)
Thank you a lot for your help.
Cheers from Peru!
– Leonardo Rojas.
Pd: Looks like the comments in this section are very interesting. I’ll have to come back later to read them :)
I have seen this dvd,but for me Wills worked better,the main reason being you can reference the book with the dvd, I would recommend his book a Roof Cutters Secrets,in my opinion the best book ever on roof framing, also the other dvd might work for you–don’t rule out buying it.
Awesome work