


Once I find something that works, I pretty much stay with it. And the system I’ve used for making simple cabinets is still largely the same. I use multiple shaper setups for making cope-and-stick stile-and-rail doors, raising panels, and other high-end cabinetry projects. But in this article I want to focus on basic cabinet construction using a minimal number of tools—tools that most carpenters already own.
(Note: Click any image to enlarge)
Design
Though the design and construction of this cabinet might be simple, the cabinet is still a lot more complicated than a bathroom vanity. In Arkansas, where I live, we call this a ‘step-back cabinet’ because the top steps back from the base and creates a small counter top.
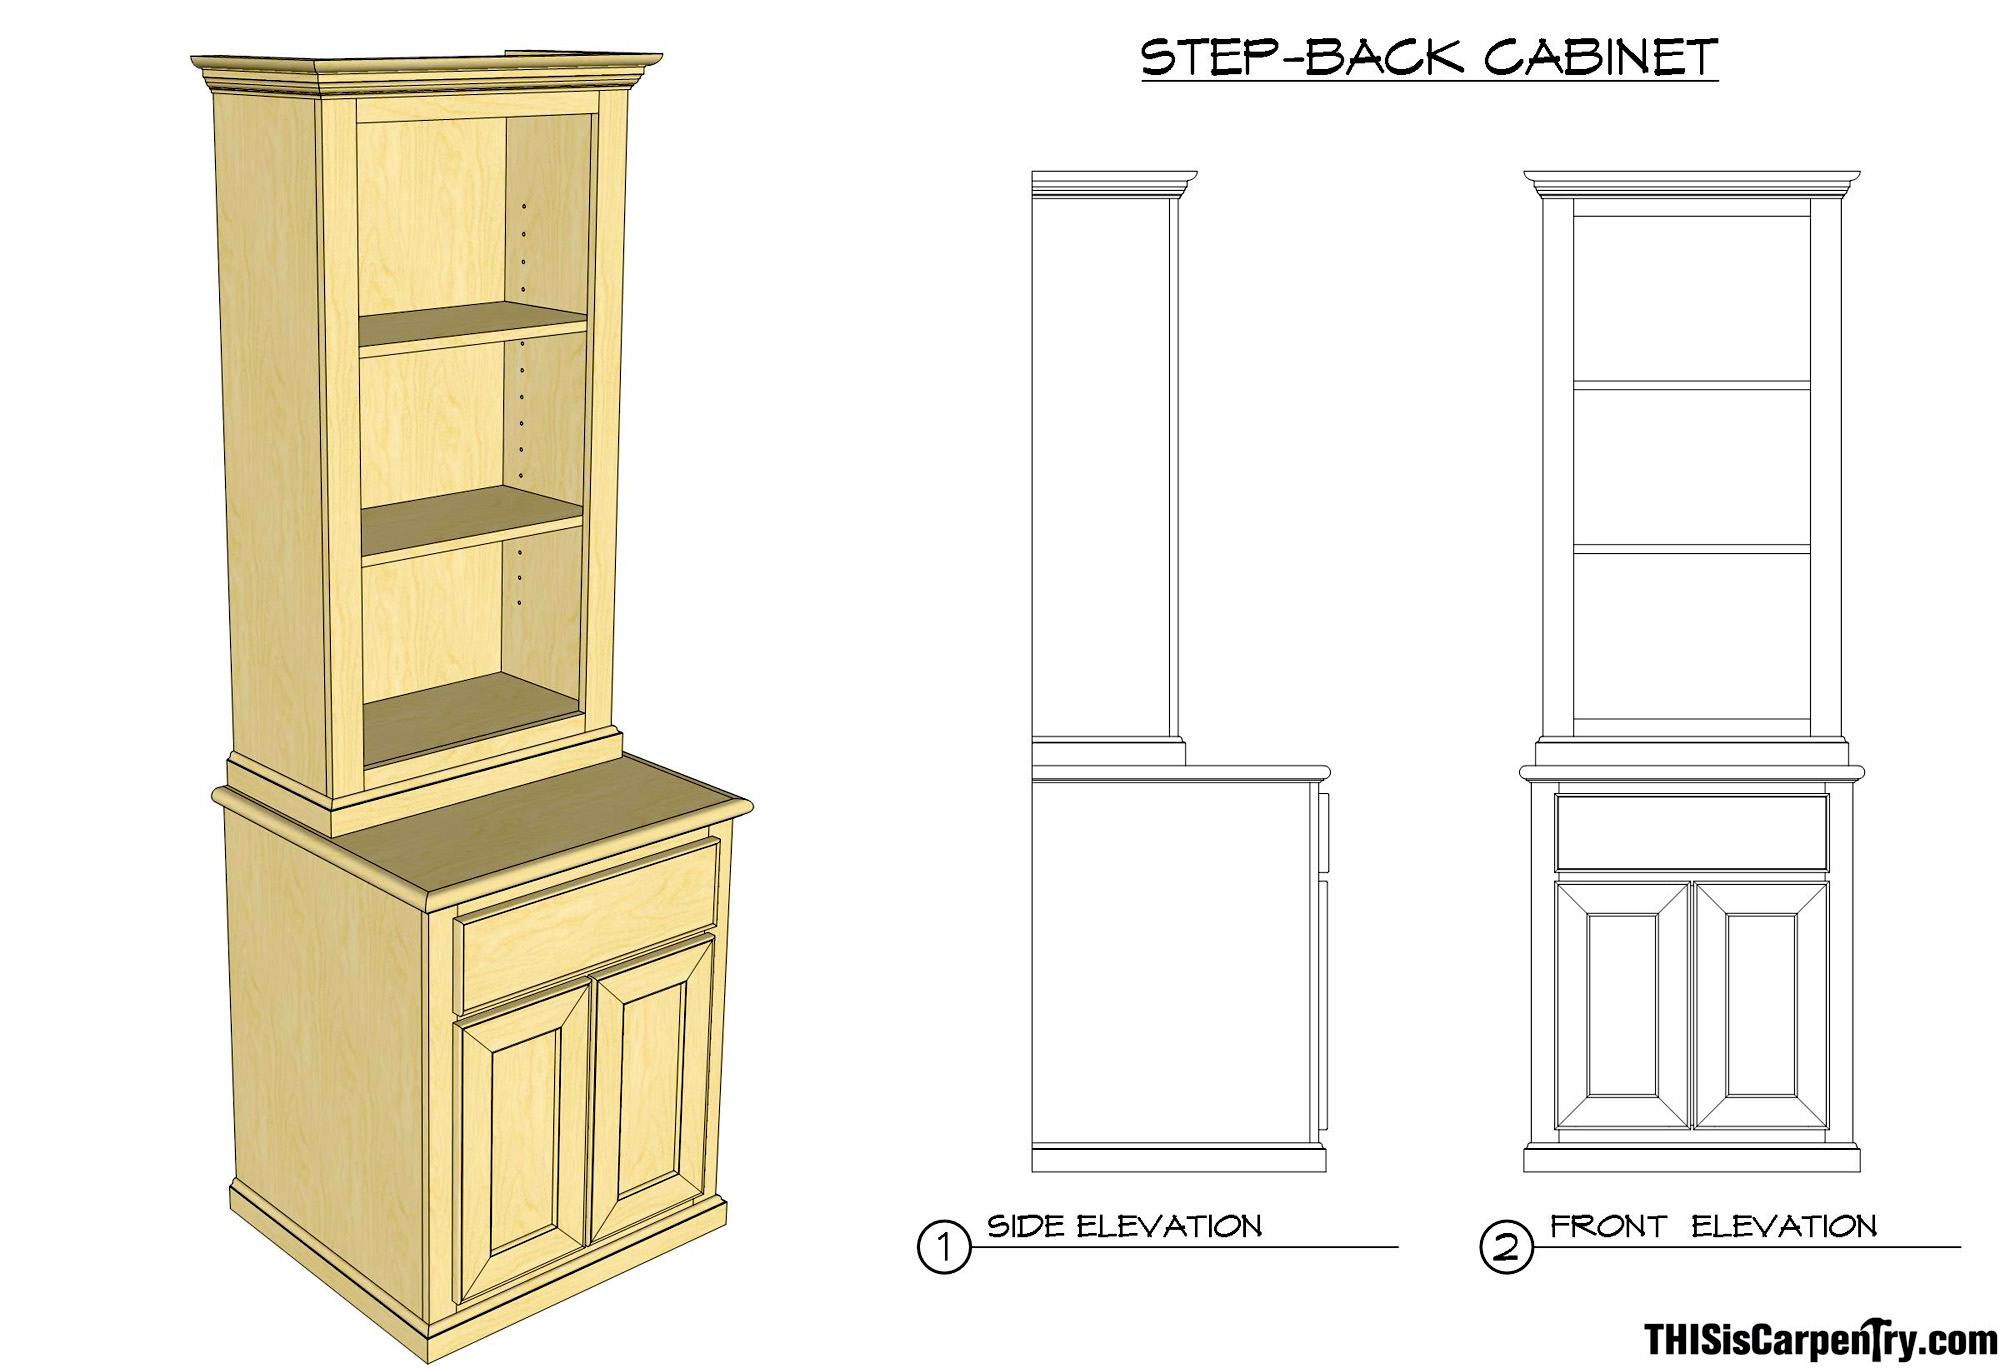
The top section is really a separate bookcase with adjustable shelves. The top is only about 12 in. deep, and it’s 25 1/2 in. wide, about 2 in. narrower than the base unit, which allows plenty of room around the small counter top for trim molding. And I like trim molding.
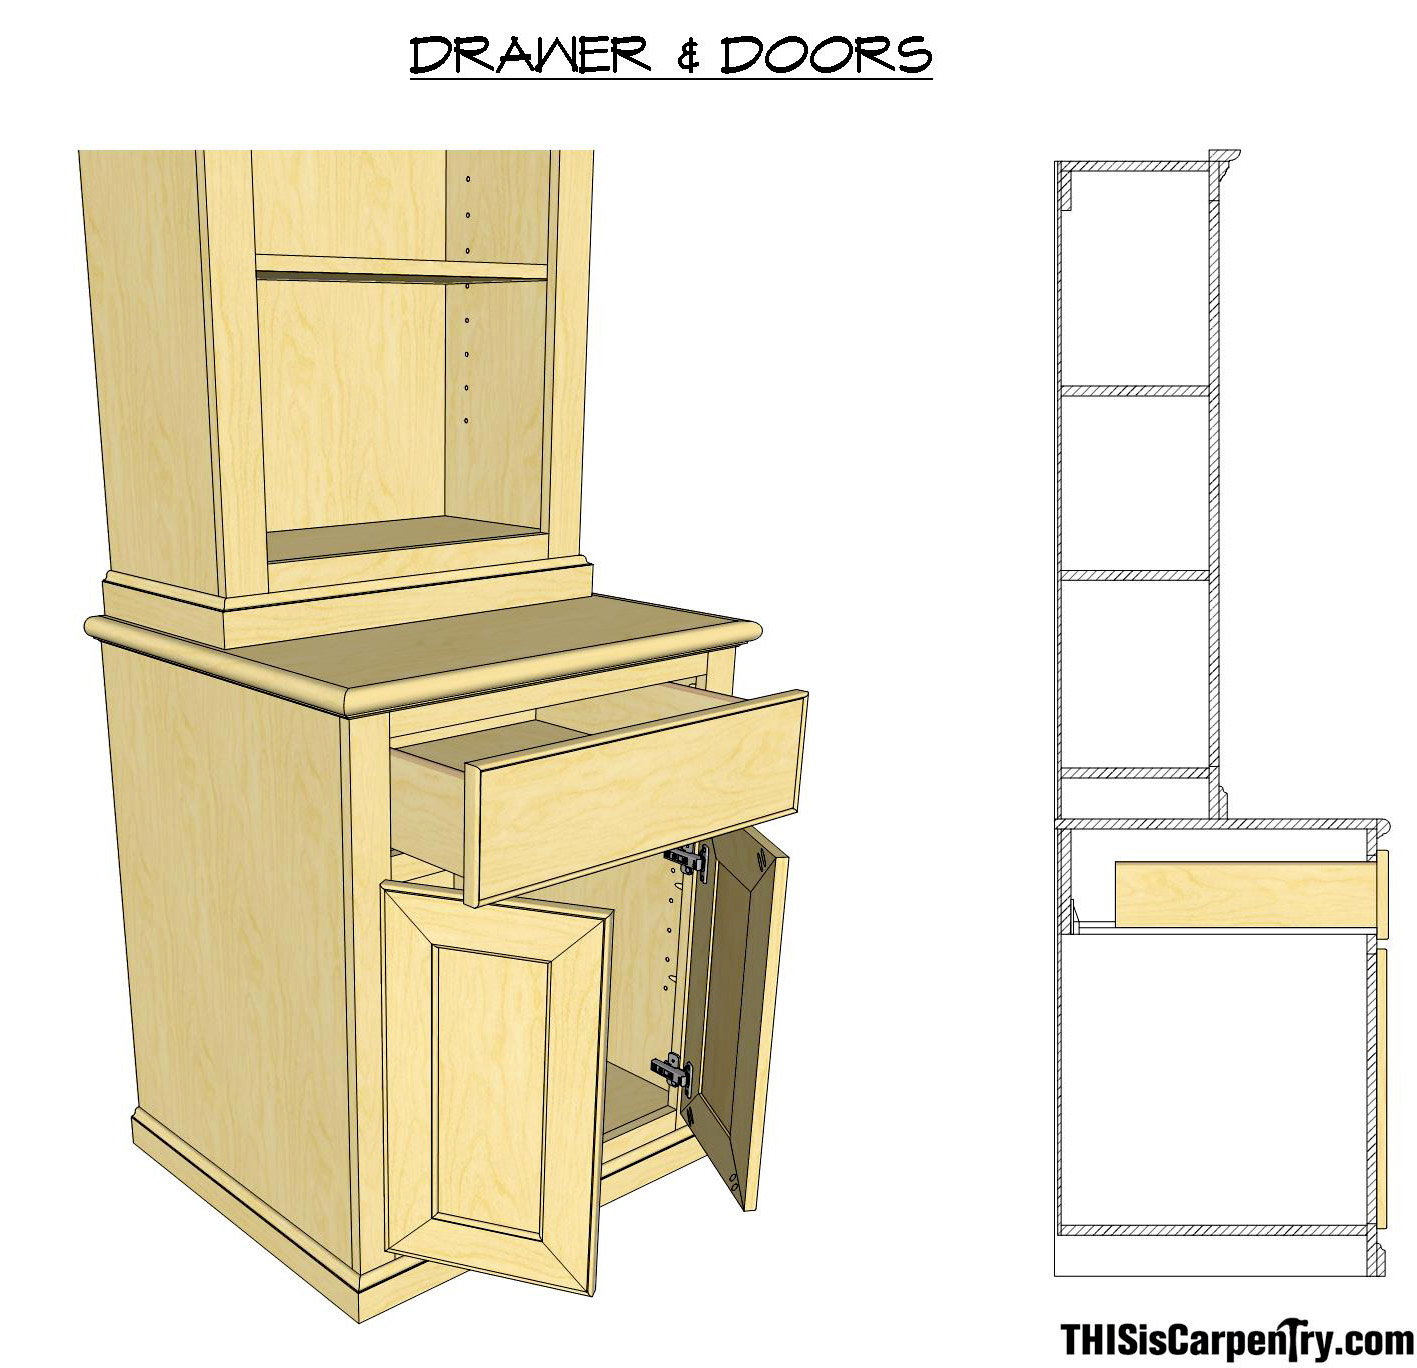
The base cabinet is pretty simple, too—it has only one drawer and two doors. I designed the dimensions of both cabinets so that I could get all the materials from less than two sheets of plywood.
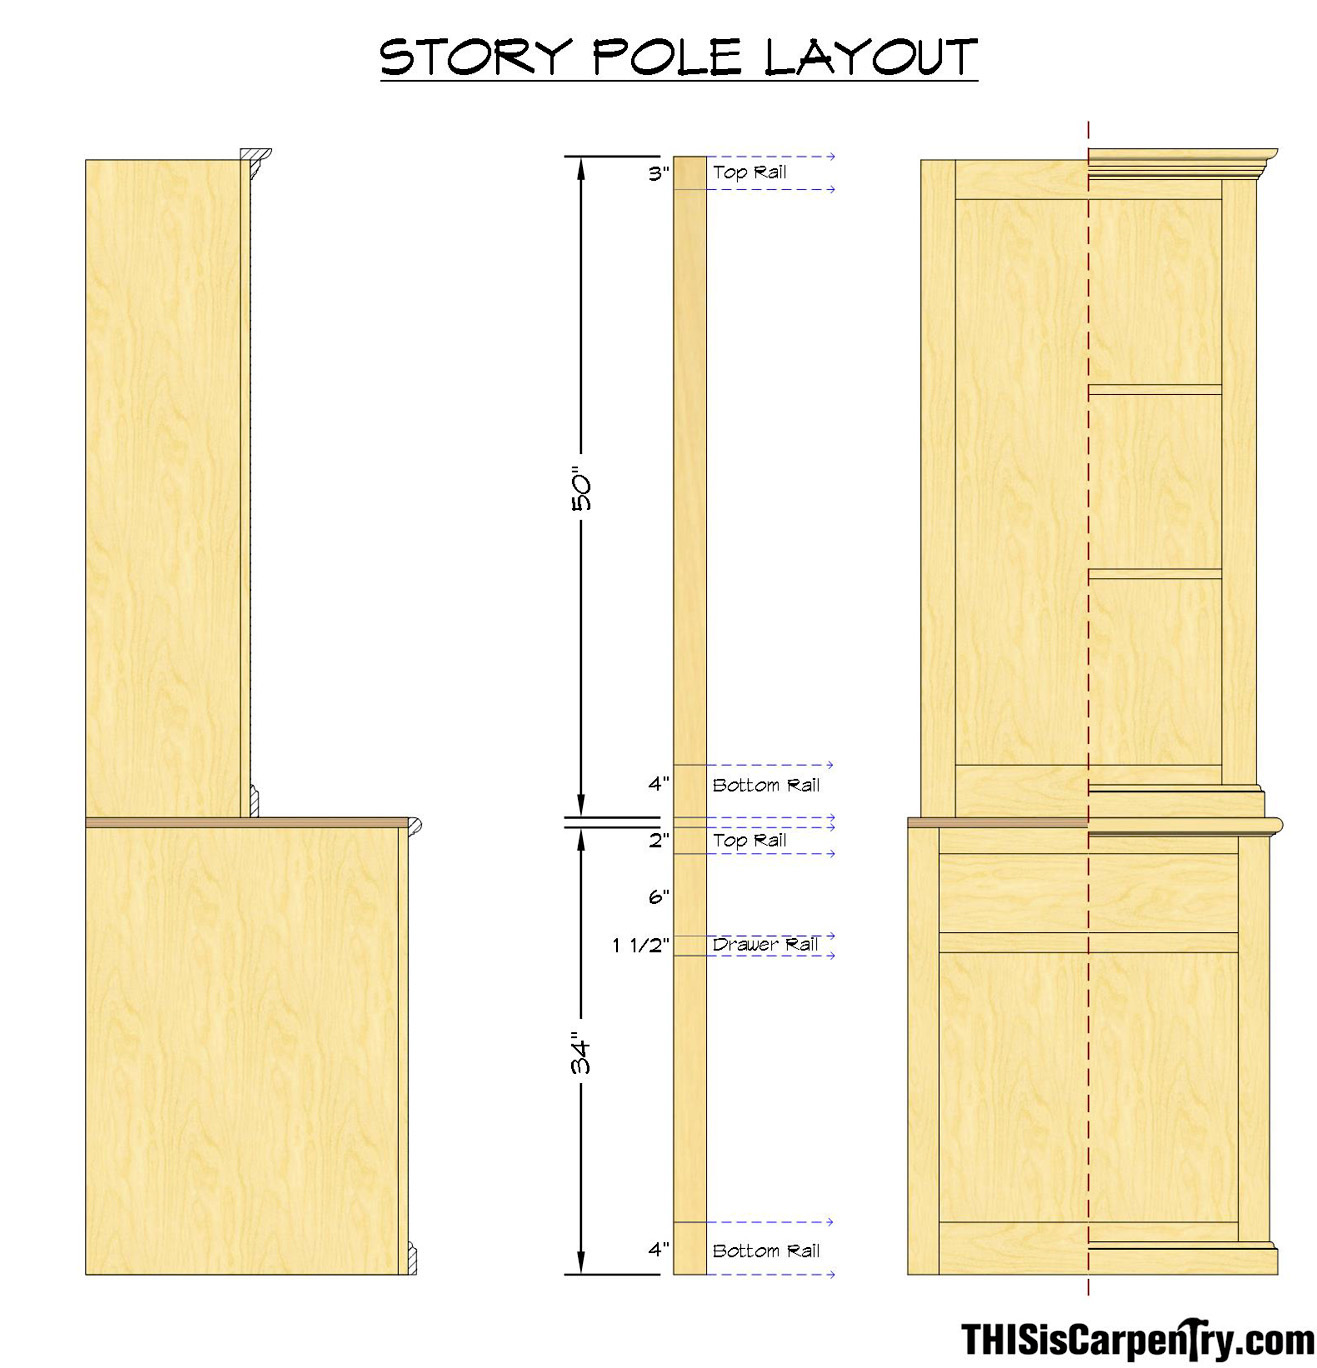
Whenever I build anything, I always start by making story poles—one for the height or elevation, one for the width of the cabinet, and one for the depth. Story poles are like full-scale drawings; every piece of the cabinet can be measured off the story pole, so if you layout your story pole accurately, you’ll save a lot of time and aggravation fixing mistakes.
Construction
The hardest part of being a finish carpenter and cabinetmaker is making mistakes, so I have come up with systems that help prevent mistakes. Watch this video and you’ll see how (before I rip cut the sides of the cabinet) I cut all the dado for the bottom shelf and I cut rebates for the cabinet back. That way, I always end up with one left-hand side and one right-hand side, instead of two left-hand sides.
Like I said, in my shop, I have a lot of cabinetry equipment—shapers and in-line boring machines, along with molding machines and router tables. But you can make a cabinet, including all the moldings, with tools that most carpenters already own! So for this article, I’m using pocket hole joinery for everything—both assembling the cabinet boxes, and making the face frames.
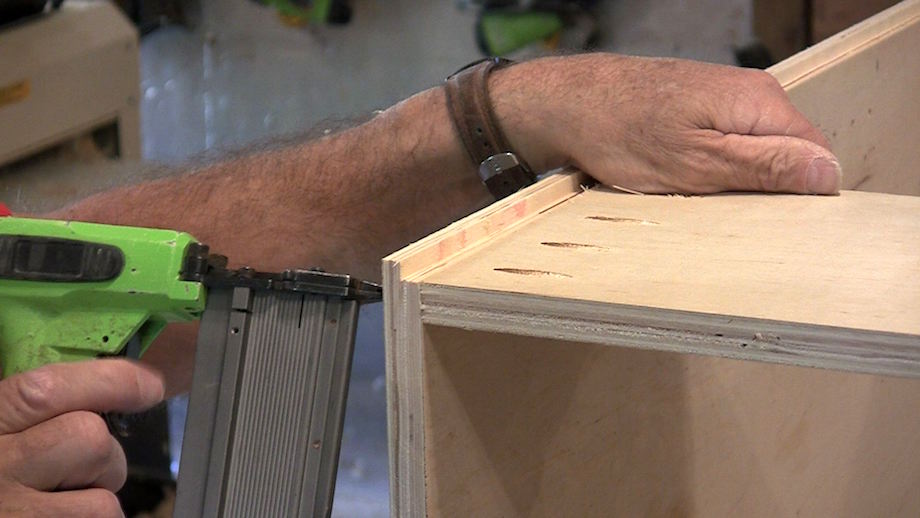
There are a half-dozen different ways to make drawers, from fancy dovetail joints to the Quarter-Quarter-Quarter drawer system. But I want to demonstrate a method I’ve been using for years that’s simple, easy, and affordable—no extra tools required, just a table saw, a brad nailer, and a staple gun.
And the same goes for making the doors. Instead of using my shaper to cut cope-and-stick stile-and-rail doors, I made the doors for this article with just a router and a miter saw.
I made all the molding with hand-held routers in my shop, including the two-piece crown molding at the top of the bookcase. I own several Woodmaster molding machines and a whole collection of knives, but most carpenters don’t have that kind of equipment. You can make attractive moldings with router bits, but be sure to choose the right bits. Common router bits, like small ogee bits and classical ogee patterns, aren’t enough when it comes to making handsome custom moldings. You’ll need to invest in a few large patterns, too.
Story Pole: my kind of layout tool! Precursor to SketchUp. (Which I still don’t get.)
Hello,
Loved the series about making cabinet construction. You explained it so I could understand everything. Thank You
Is it just me or is this article missing some graphics and video?
This post is just a question on the layout and structure of the article not the content.
John
There are three videos that are quite long and excellently produced. And several good Sketchup shots. Maybe your computer has a problem.
Must be me
Where can one get American made plywood? My guy at 84 Lumber said it’s almost impossible.
Columbia Forest Products,,, try Home Depot for starters. Maybe your guy at 84 doesn’t want to send a sale to one of the competitors?
I use Columbia Forest Products gauged or calibrated true .750”
panels. Dead flat, smooth with no dimples.
Home Depot usually sells imported Chowfun brand plywood. That awful multiply junk.
Though I DO try to avoid Home Despot like the plague, many of them are stocking the (domestic and very good) Columbia Purebond panels. Not everyone is lucky enough to be in delivery range of a decent pro lumber/plywood supplier.
Great article. Very clear demonstrations. My only question is you emphasized the importance of the.story pole but I certainly saw a lot of measuring with a tape measure.
Hi Gary,
Great article and videos. I always learn so much from you.
Thanks for taking the time to share with all of us.
Emanuel
Amazing series of videos. Thanks for taking the time to share.
Kind regards,
Dave
What a brilliant series of videos. Gary, they’re a real joy to watch.
Gary, Excellent Article. I like the simple tried and proven methods. I appreciate you taking the time to use and explain the basics. That way someone who is familiar with the basic toolset can feel comfortable with expanding their skill and knowledge set. We need more articles like this to help rebuild our nation of crafts persons. Looking forward to more of your articles! Thank-you
I like the idea of using the upholstery stapler… No matter if I use a narrow crown stapler or try a brad nailer, sooner or later something hits some wild grain and I am fixing that. What size of staple were you using?
Thanks
Just watched the first video on building the box, very similar to the way I have been constructing cabinets for years. I also use the shallow dado with pocket screws ,only difference is I pocket screw 3/4 ” plywood in a shallow dado on the back also.
Just a safety note : cross cutting a piece of plywood that narrow freehand is going to kick back on you someday. I have been pushing my luck for years doing that same procedure and had a piece kick back on me a few months ago, thankfully just took a small amount off my thumb and 3 weeks out of work.
Be safe! Thanks for the video!
Excellent series. I have a family room project coming up and the casework just got a lot easier. – Thanks
Great videos! Nice to see an impressive cabinet built using basic carpentry tools. Very useful for those of us who don’t have access to pro cabinet shop tools.
Can someone send me a link to the videos? For some reason my computer images are blank after the ‘Story Pole’ illustration.
John,
Here’s the video links:
Part 1: https://www.youtube.com/watch?v=XrepSmd8S90
Part 2: https://www.youtube.com/watch?v=F29GqCDFic8
Part 3: https://www.youtube.com/watch?v=Sql2jWoWS4E
Part 4: https://www.youtube.com/watch?v=2vNgjFpaqmk
Hope that helps!!!
Gary
Is the Sketchup file of the project available?
Gary,
Thanks’, the video’s just loaded. I’m on a Virtual Private Network, ‘VPN’ because of security issues and it take’s forever for some content to load.
John
Great videos Gary, and thank you very much for taking the time to make them.
You use the headless pinner a lot to hold pieces together, what length pins are you using?
Thanks,
Bob
I enjoyed the videos and found the article. You’re right, most of us do not have the molders. Can you tell me what router bits you used to make the molding. I like the look and want to make sure I get the right bits to make my cabinets look right.
Tell us which bits you used to make the crown please?
I am going to use this method to make a upper bookcase for my washboard cabinet. With glass doors of course.
Great videos very helpful.
Would like to know exact size and gauge of the upholstery staples you are using, a great way to go for 1/4″ ply.
Thanks
Thanks for the Inspiration; so clear concise and patient. This helped me imagine new ways to work !
Gary, great set of instructional videos. I’ve built cabinets before but I certainly learned a lot and will use most of your techniques. Good job.
Great videos, thank you. This answered some questions I’ve had for a long time about cabinet construction.
I was wondering where you get the infill wood lugs. You fill the pocket hole with them later
Great video and easy to understand, the only question I have is, what is a rebate, or are you referring to a rabbet joint?
Where are you sourcing your drawer slides and Euro hindges?
Hey Tom,
I will apologize for Gary Striegler–he hasn’t answered a single comment or question on his articles, which is disappointing!
And I will answer in his stead! I get my cabinet hardware online–and the location depends on how complicated the order is. Most of the standard self-closing drawer slides are available from Amazon, as well as a variety of professional cabinet hardware suppliers.
Gary Katz