


The last time I built gates, for my old home in L.A., I didn’t spend too much time on the design. My dog was jumping over the top of the old gates and I just wanted to get them built. But this time, with a cattle guard in front of the gate, I didn’t have to worry about the dog, and I wanted the gate to express what I loved about architecture, and I wanted the gate to express the style of architecture I enjoy most. With Todd Murdock’s help, I spent more than a month working on different designs.
Patience is definitely a virtue when it comes to design. If you’re not a talented artist, you have to work harder to achieve something acceptable. I started with a crude idea and passed it around to a few friends. Most said that it looked too southwestern.
(Note: Click any image to enlarge)
Then I remembered the Thorsen House, a Greene and Greene in Berkeley, CA, which has inspired several of the features I had already included in my home, especially the brackets under the eaves, the brackets that support shelving, and even the brackets that support the draperies in the living room.
I’ve learned a lot about architecture from reading books, but I’ve learned just as much from haunting historic homes and reviewing photographs from those homes.
| It wasn’t until I reviewed the photographs I took of the Thorsen House that I remembered the garden gate, which features an unusual combination of horizontal and vertical elements. In fact, before visiting that home with Jesse Wright, I had never seen vertical cloud lift panels before. | 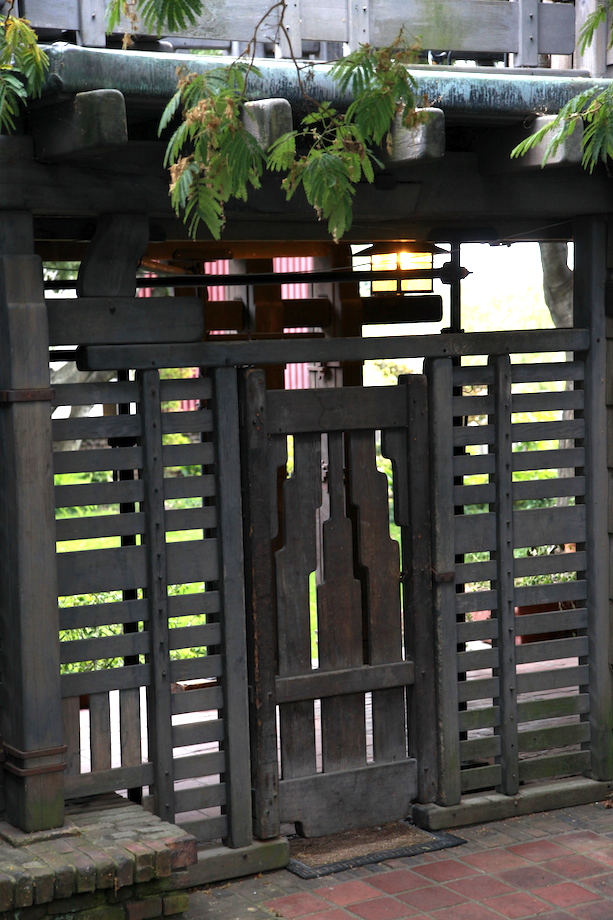 |
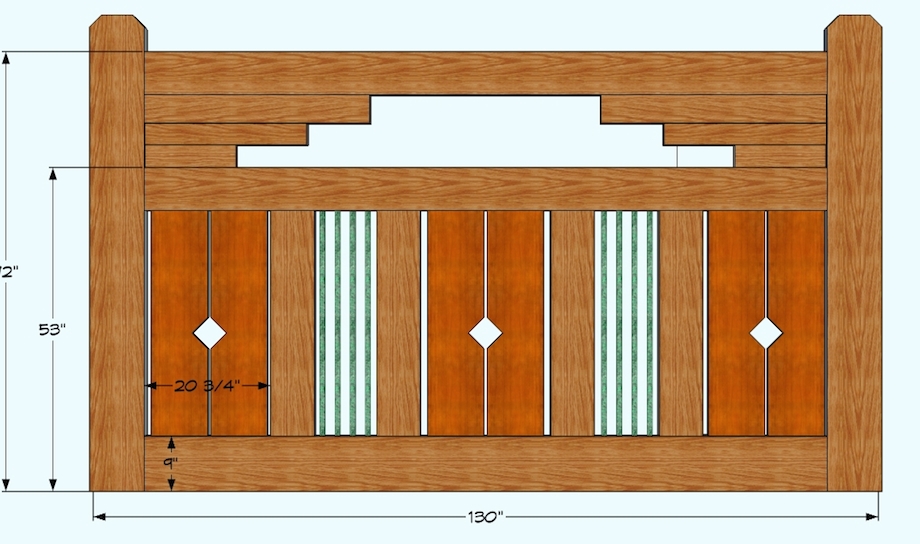
With those vertical panels in mind, the design for my new gate began to take better shape. First, I came up with a tall version, with a straight top rail, with two sets of vertical cloud lift panels.
Then I played with a lower design, eliminating the bottom intermediate rail. But that didn’t seem dramatic enough for an entry gate, and besides, I’d be eliminating the intermediate bottom rail, and I would’ve lost that Thorsen-style impact.
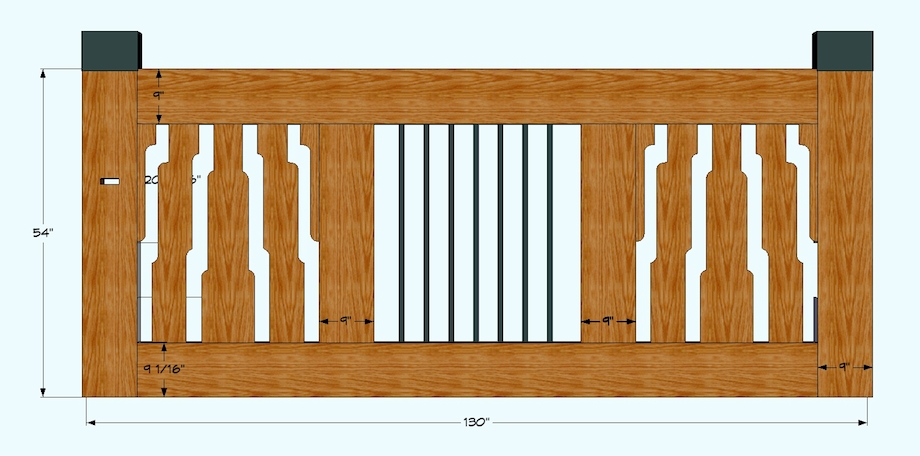
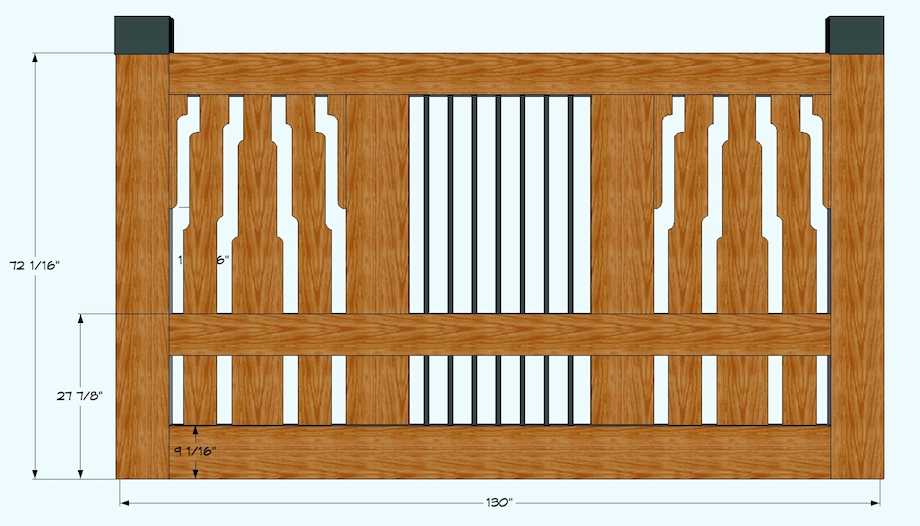
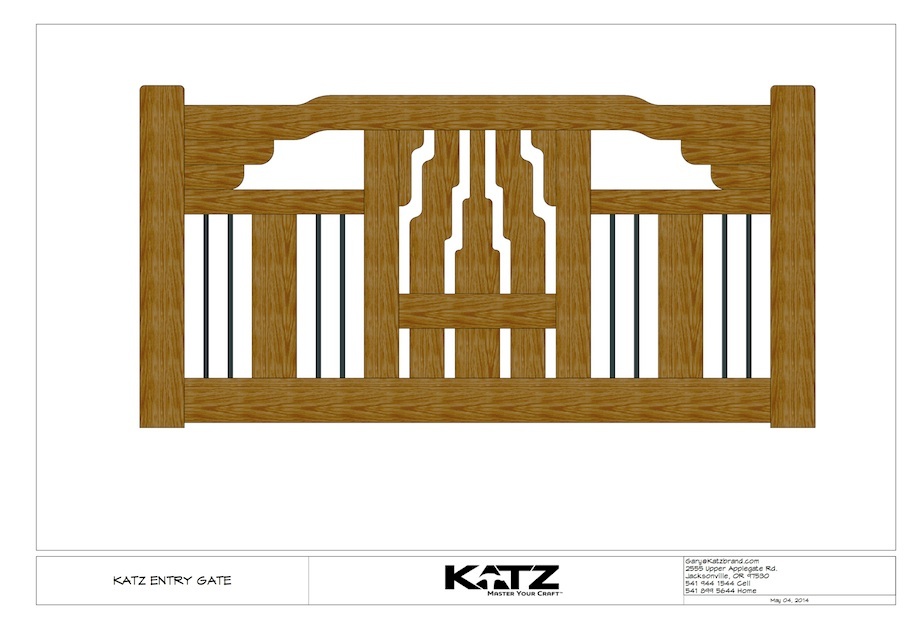
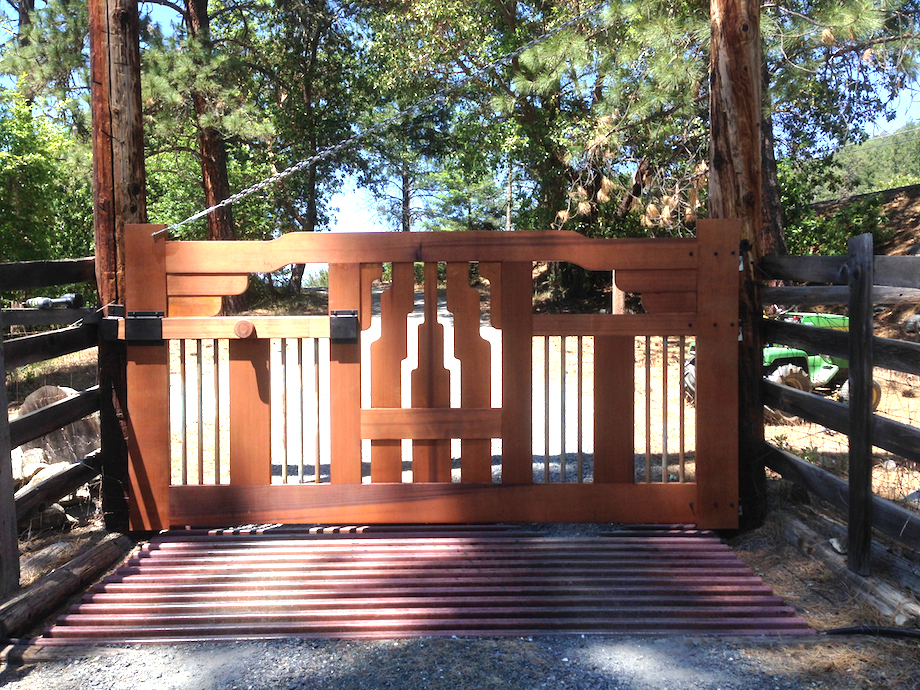
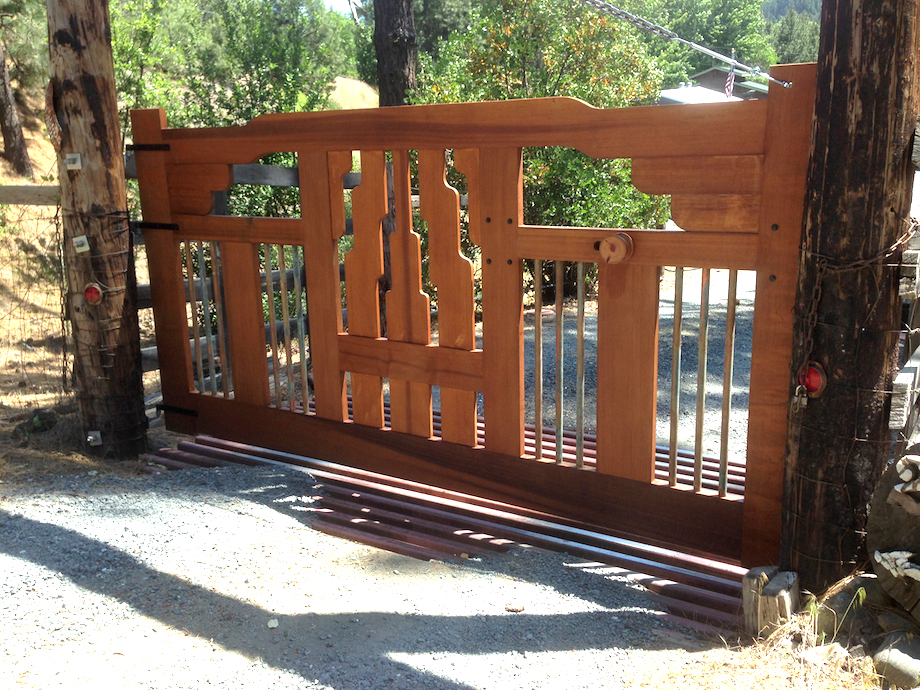
I was getting pretty frustrated when I passed the drawing off to Todd, but I was thrilled when I received his interpretation. He centered the sculpted panels, making them the focal point of the gate, he incorporated the short rails I’d played with in my first design, and he added a cloud lift top rail. The minute I saw the drawing, I knew I had to build it.
 |
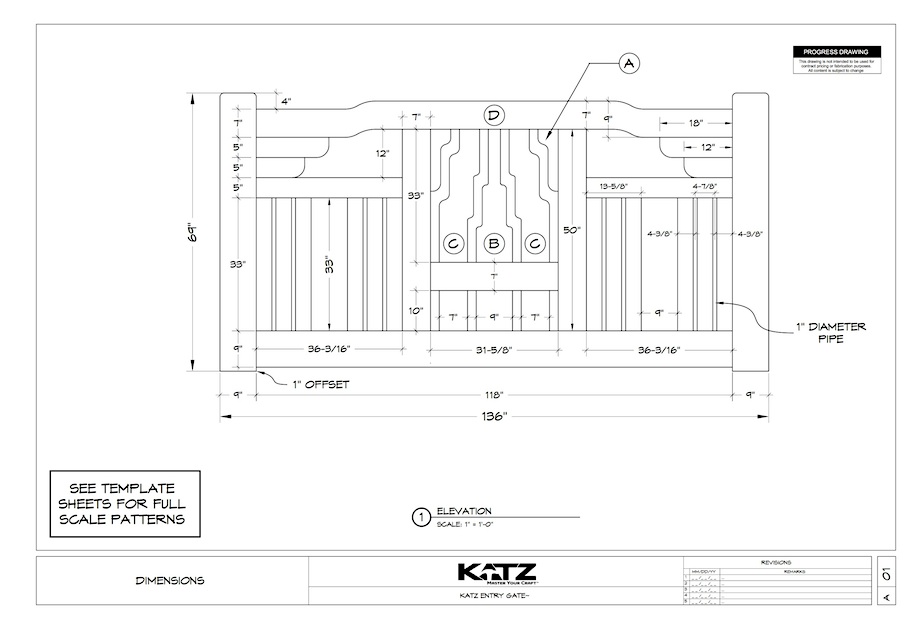 |
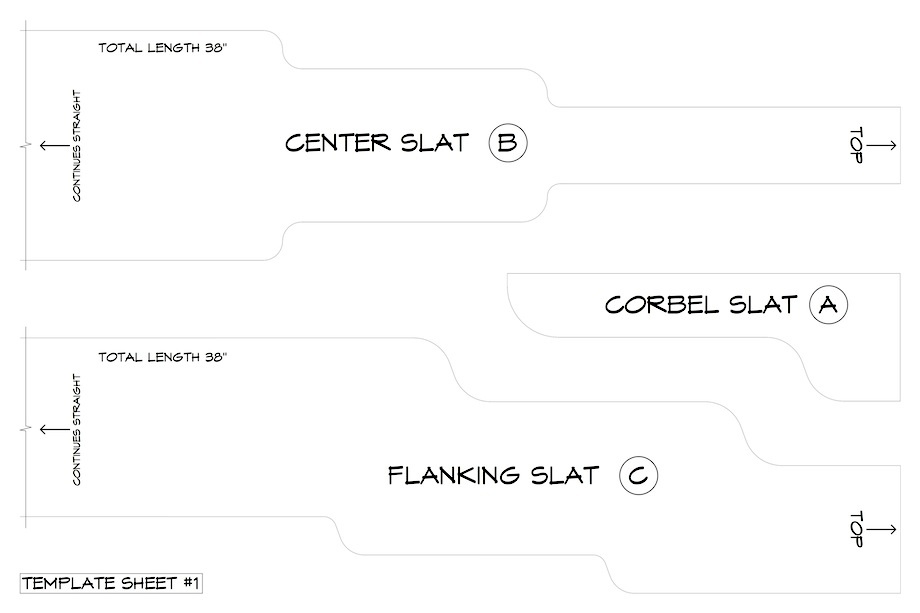
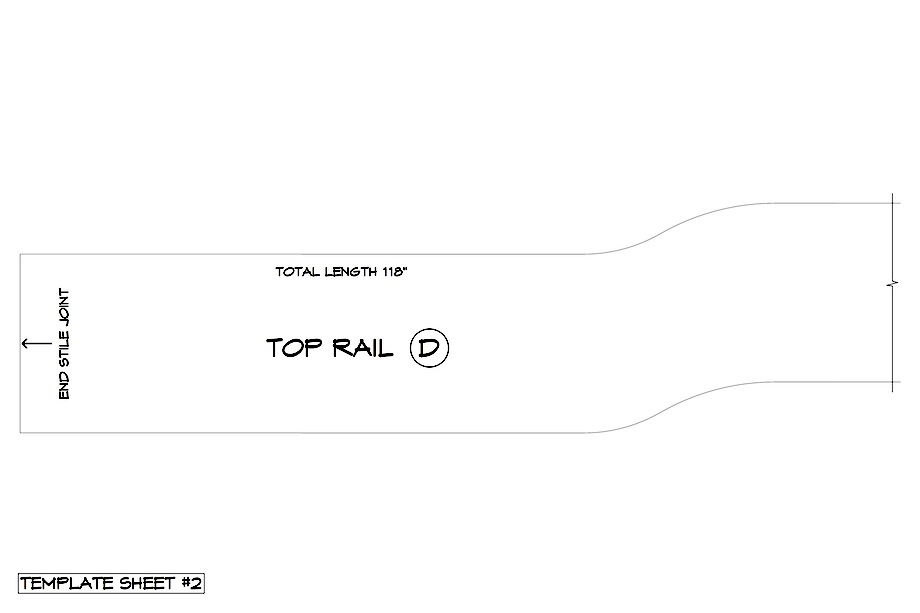
And Todd made that easy, too—he sent me full-scale templates so I could print out patterns for the sculpted panels.
 |
 |
All I had to do was the easy part: build the gate….
Of course, no article would be complete without a picture or two of the finished product:
Gary,
This article couldn’t be more timely!!! I also am building that garden gate for my dog yard! Thank you for sharing all your tips and layout file for your build. That gate has always been in my mind, Its so unique! I LOVED Seeing your design how you incorporated it with the side panels with pipes. Just beautiful! Great pictures, and video! But much better in person!!
Thank you Gary
Gary,
Beautiful gate! Most people don’t appreciate the iterative design process and the amount of effort required before you cut the first board. Nice to know that I am not the only one that spends more time on Sketchup than on the build.
I have a suggestion for your next outdoor gate or outdoor project.
Fill the pipe holes with CPES and use epoxy on the dominoes to extend assembly time. Soaking all of the end grain in CPES will stop water absorption but a film finish like Epifanes would need to be used. A small drain hole in the middle of the pipe hole would let the water drain out. I have examples of cedar and redwood finished this way and the finish is still perfect after 10+ years.
Could you have mounted the hanger bolts on the pole first and then attached the strap hinges to the gate? Just a thought.
Gene
Gene,
THANK you for the great suggestion. One of the coolest things about the internet is how much more quickly we can learn from others if we’re open to constructive criticism. And your suggestion is a great one. I thought of bedding the pipes into epoxy or something and we talked about it before the glue-up. We talked about it for about five full minutes and then I said the magic four-letter-word contraction (just THINK about how long it took to build and finish that gate and how anxious I was to see it hanging! and how badly I wanted to get to the next project…I still had over thirty boxes of books I desperately wanted to unpack but didn’t have any bookshelves YET). SO we started gluing everything up. Yep, I plead guilty to impatience. However…I was curious about water getting inside those pipes, so late last winter, after long and steady rains (we got about 24″ of rain this year), I drilled a small hole up at an angle, through the bottom rail and into the center of a pipe. Nothing came out. While the gates stand in the open air, with no protective cover, water still rarely drains down the sides of the pipes, and the holes are cut pretty tight, so it would be tough for liquid water to get in there. And even if it does, where I live, it rains and then it gets hot and dries everything out. Rot occurs when things get wet and stay wet–over 19% MC. After testing the bottom rail of the gate, I see no signs of high MC.
As for the hinges…I was primarily concerned about getting the hinges in precise locations. I could have mounted the J-bolts first, but then I might have had to make adjustments. But truthfully, I never thought of it. I saw only one path, one solution, and I took it…quickly. :)
Again, thank you very much for your constructive suggestions. Occasionally on this magazine, we see criticism of the other type, aimed at undermining or disrespecting a contributor, and in one particular case–and most of you probably know who I’m talking about–the moment you respond to that comment, the person gets personal and starts calling you names.
When I was younger, I think I had more patience for BS (though maybe I had less?). But I’m over 60 years old and realize how little time we have; definitely we don’t have time to waste on BS. That’s why if the staff at TiC sees any comment that isn’t constructive and isn’t meant to “add to the discussion”, it will be deleted.
Thanks again, Gene,
Gary
Gary,
I am a big fan of the Craftsman style. Wright or Green and Green have always had a huge influence on how I see design.
I generally lean towards a more simple approach and tend to try to make things look more spacious with the use of the “cloud lift” and more linear horizontal lines than vertical ones.
Years ago I was into making lamps that incorporated these designs but as with many of us artsy folk – I have the sight and mind for the artistic but am not adapted to the discipline it takes to market oneself. Because of that even staying employed becomes a task while having an abundance of skill.
Very nice.
Gary Kimes
BEAUTIFUL!
Gary:
Thanks again for the article and video.
I keep using and stealing all the ideas you guys present here.
Maybe someday I can actually contribute something.
Tim
Tim,
THANKS for writing and sticking your head up! Until you contribute an article, I’m canceling your subscription!!!
Just kidding.
Glad you’re enjoying the magazine. I am, too!!!
Gary
Very beautiful. Though it won’t keep the zombies out. ;)
I need to build a new gate think I’ll take some design cues from this.
Regards,
Joe,
No, it won’t keep the zombies out. I have a 9mm for that.
Gary
When I saw the first designs, I was concerned about gate sag.
Then the final design had beefier upper corners and several glue-up connections to add stiffness.
Then in the final gate mount, I noticed you have a guy support which is a good idea for any long gate.
The design and build is superb. I especially like the slide latch
with custom hardware. Bet it makes the neighbors jealous.
Jim Lynde, North Hollywood, CA
Jim,
I was thinking of the sag just the other day. I finally had to take up a little slack on that chain-guy, just a little, the slide bar was starting to rub on the strike. :) The chain is all rusty now and looks wonderful. I figured from the beginning that the chain would remove all worries. It has.
And my neighbors just put up No Trespassing signs on their ‘open-all-the-time’ chain link gate. I’m hoping that might be the next step to setting posts. I’d volunteer to build their gate for free if they pay for the WRC! Two of them side by side would be very cool.
Gary
beautiful gate,love it,you are a true artist and a great craftsman i dont think it could possibly be done better.
Nice job Gary. I’d love to see what you do for bookcases. That’s on my list since we moved and I’ve got more boxes to unpack than I’d care to admit.
This is a beautiful gate which I would love to adapt for a manual wooden vertical pivot gate. When I was 12 I was enchanted by the elegantly engineered ranch gate in the 1948 fillm “Duel in the Sun” ( https://www.youtube.com/watch?v=W4f-IKxRBTE )
You can see this wooden pivot gate in action if you fast forward to 16.30 minutes.
The top of the mechanism much clearer in a simpler but similar gate –that’s the one I would build–if you freeze-frame it at 31:34 minutes into the film .
Has anyone ever seen a gate like this anywhere outside this film? Do you think it was originally colonial Spanish engineering ? Part of this film was shot in California.
Hey R Wenner,
GREAT gate!!! I love borrowing stuff from movies, too! So great to be able to go right to a time line on a film and take a screen shot. But boy, I wouldn’t want to build that one! :) If you do it, take a lot of photos. I’d love to publish the article!!! :)
Gary
Gary,
I love watching you build that gate. The design is wonderful.
One thing I would suggest is on big glue ups like this, use West epoxy to give yourself more working time and take away some of
that panicky feeling.
Martin
(big fan of Greene and Greene)
Thanks Martin,
But I hate working with epoxy. :)
Excellent work! I have a driveway gate coming up and this has been very helpful and inspiring for me. I was wondering if you had an idea of roughly what that gate weighs when it is all assembled? Thanks!
What was the wood that you used and what did you use for a stain and sealant?