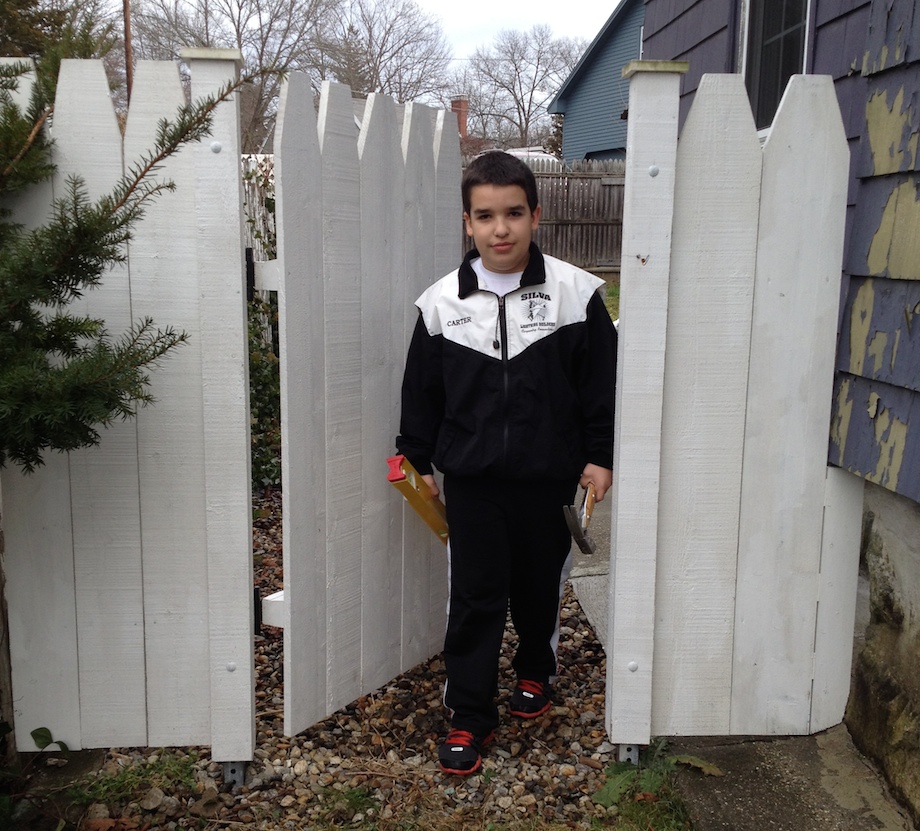
In my last article, I wrote about installing a fence post. Although it was dirty and hard work, I enjoyed every minute of it. Seeing that fence post today, standing plumb and solid, makes me feel glad that all the steps I did were well worth it.
I helped my dad install the other post and build the gate, too.
(Note: Click any image to enlarge)
Today, as I pass through that gate, I appreciate the value of hard work and knowing that this gate will be up for many years.
A Note from the Publisher:
In an effort to keep abreast of the impact that young carpenters are having in the industry, we’re publishing this article by Carter Silva. Manny Silva, Carter’s father, will be moderating all comments and discussion that follow this article.
.
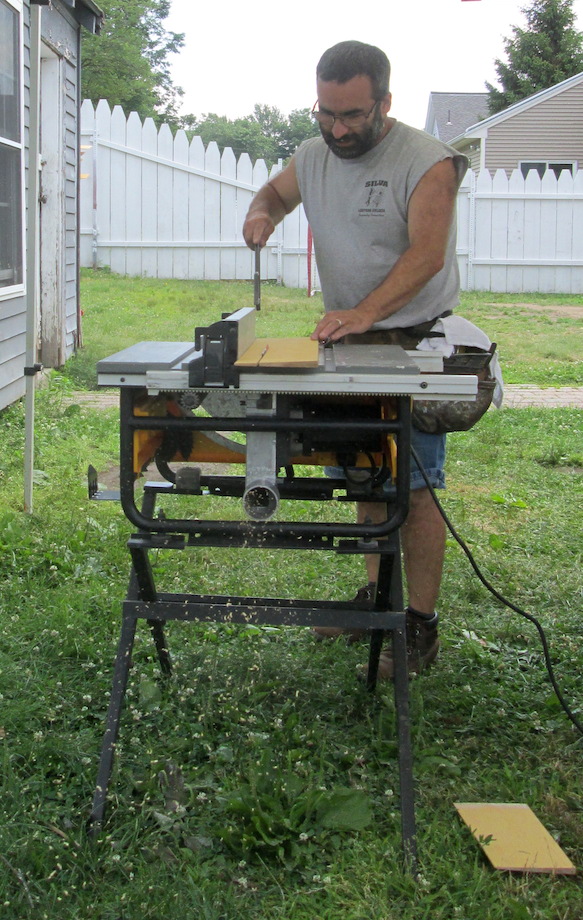
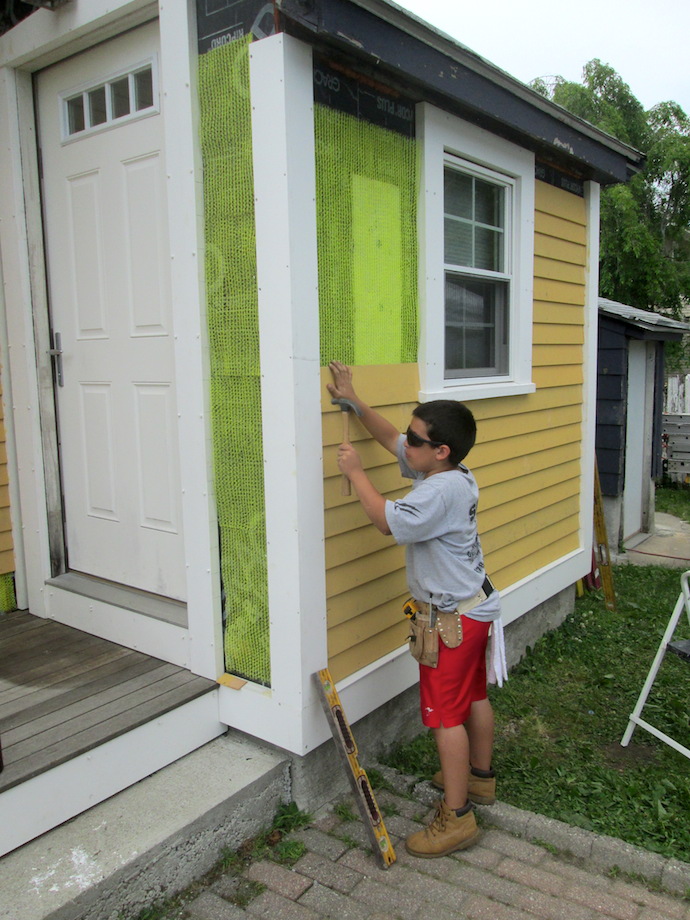
We have many ongoing projects at our house. This past summer, my dad started installing clapboard on the back of the house, which led me to a new project: siding. My dad gave me the opportunity to install one of the sections. Following his steps, and being patient throughout the process, helped me accomplish great results. Here’s how I did it. (Don’t worry! I only used hand tools in this project!)
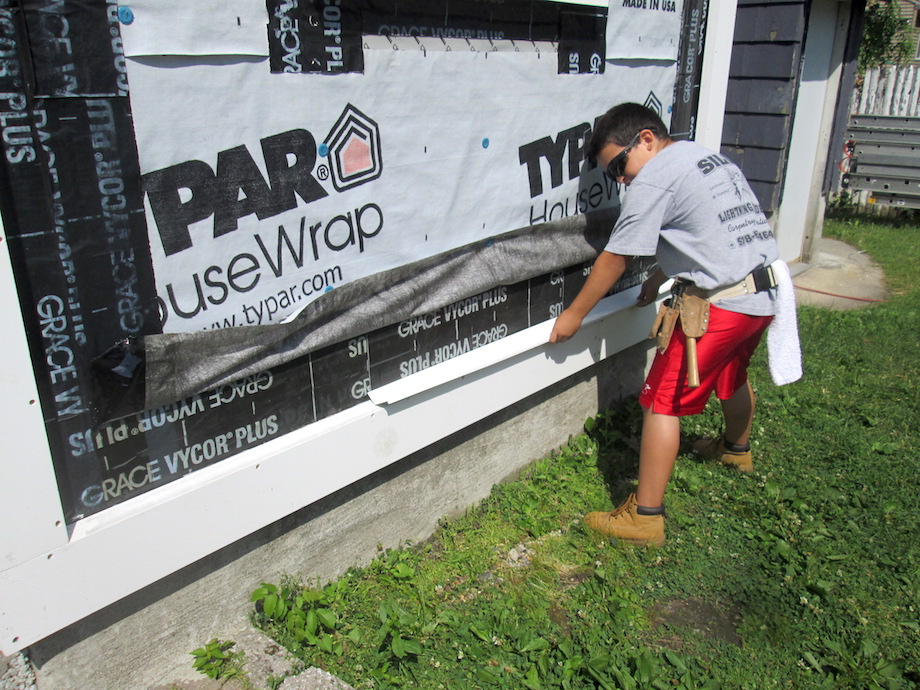
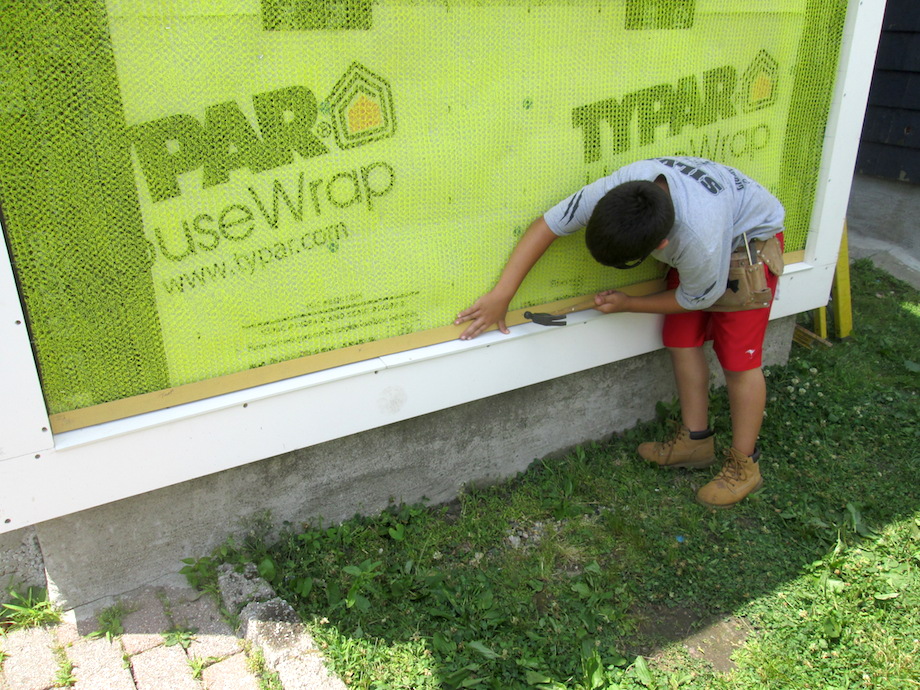
Flashing the skirtboard
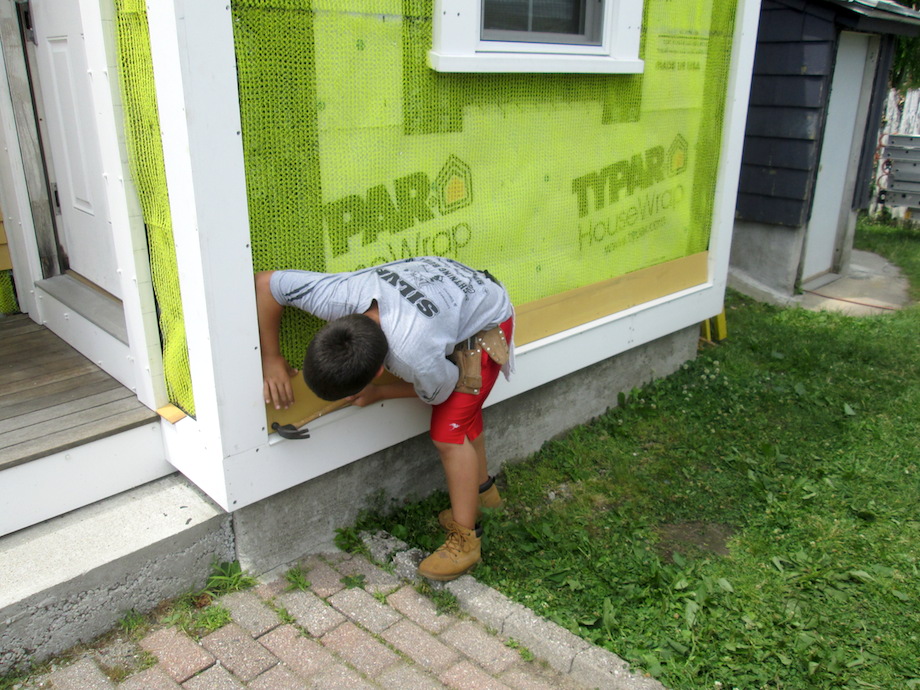
After my dad finished installing the housewrap, flashings and trim work, it was ready for siding. I started by cutting the housewrap along the top edge of the skirtboard, being careful not to cut through the flashing tape behind it. My younger brother, Corey, held up one edge of the housewrap, which made it easier to cut.
Once I completed the cut, I cut along the ends in order to flip up the house wrap. I used my dad’s cap hammer to hold up the housewrap while I installed the drip cap.
My dad pre-formed some aluminum stock to act as a drip cap. One piece would have been ideal and easier to install, but my dad used up remaining stock we had on hand.
I started by installing the first piece, nailing from the end, working my way down the piece while applying minimum pressure in order not to bend the drip cap.
Before nailing the last nail to the end, I installed the next piece overlapping the previous piece by three inches. I then nailed through both pieces and nailed the remaining nails.
I applied housewrap tape to the top edge of the drip cap in order to keep any water or moisture from entering.
Once the drip cap was sealed, I pulled down the housewrap, taped both ends, and skip-taped the middle so that any water that gets behind the housewrap can escape.
Clapboard layout
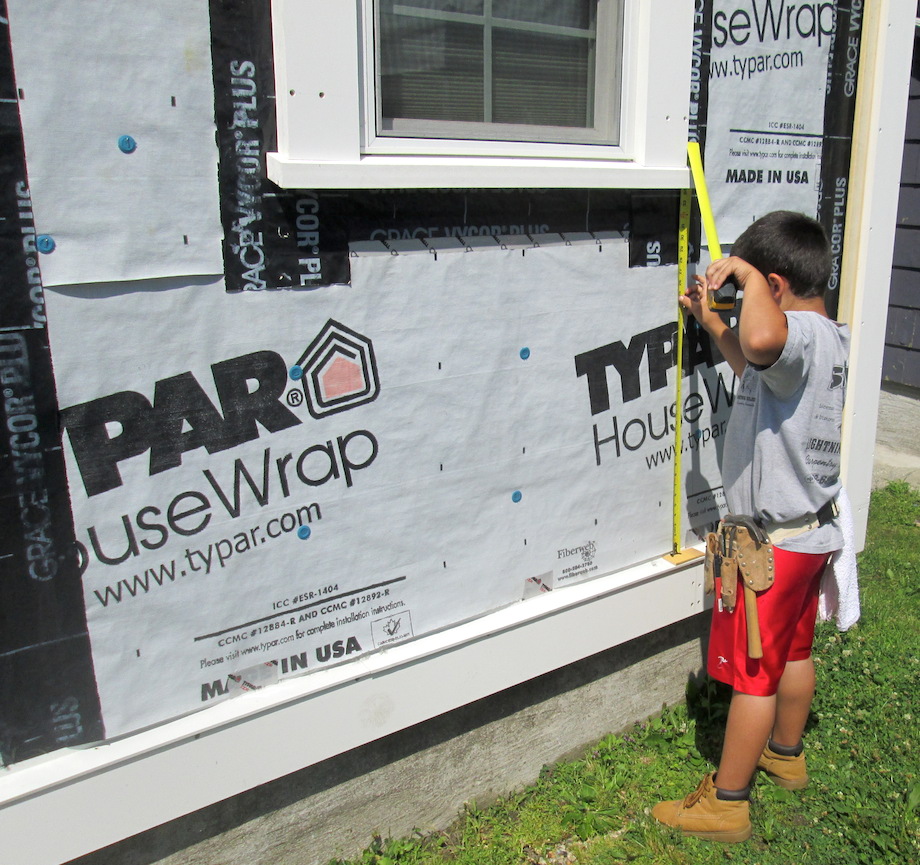
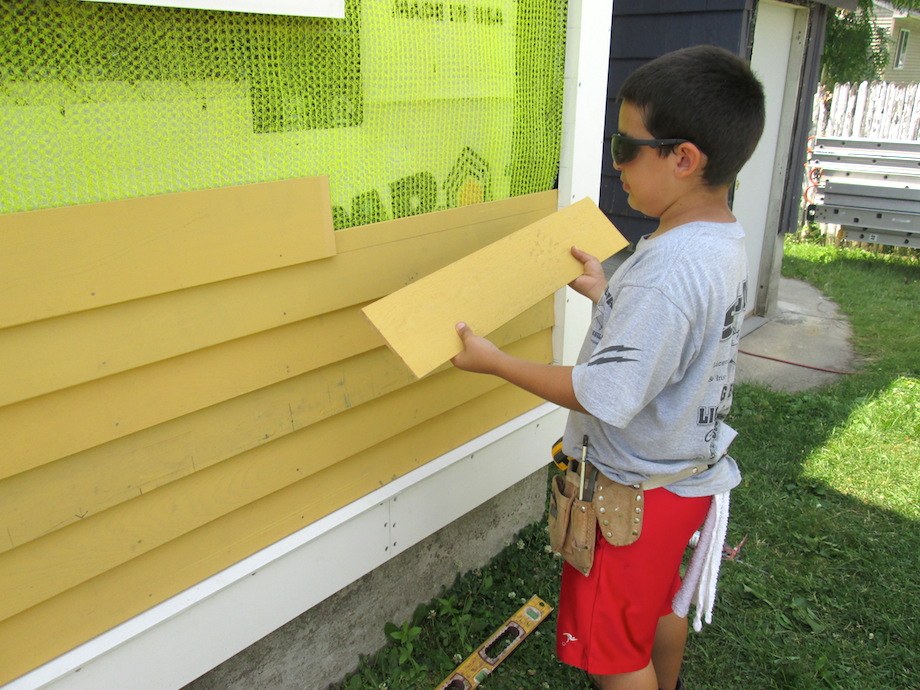
To see if the clapboards would fit without any adjustments to the rows, I measured up from a spacer on the drip cap and found that they would need to be adjusted.
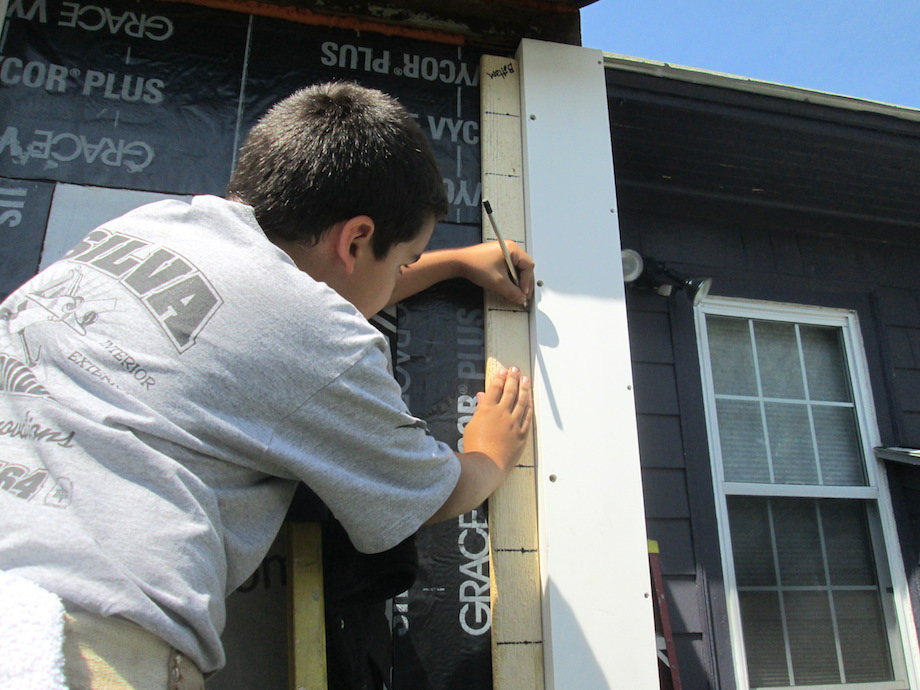
In order to keep all the clapboards at their same exposure and not get into any math work, I used a story pole.
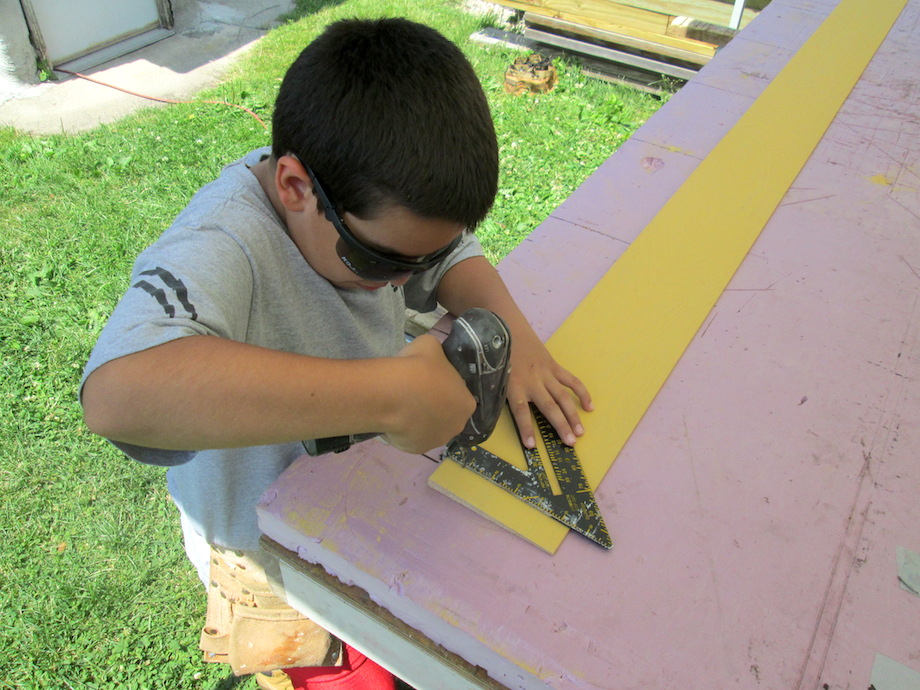
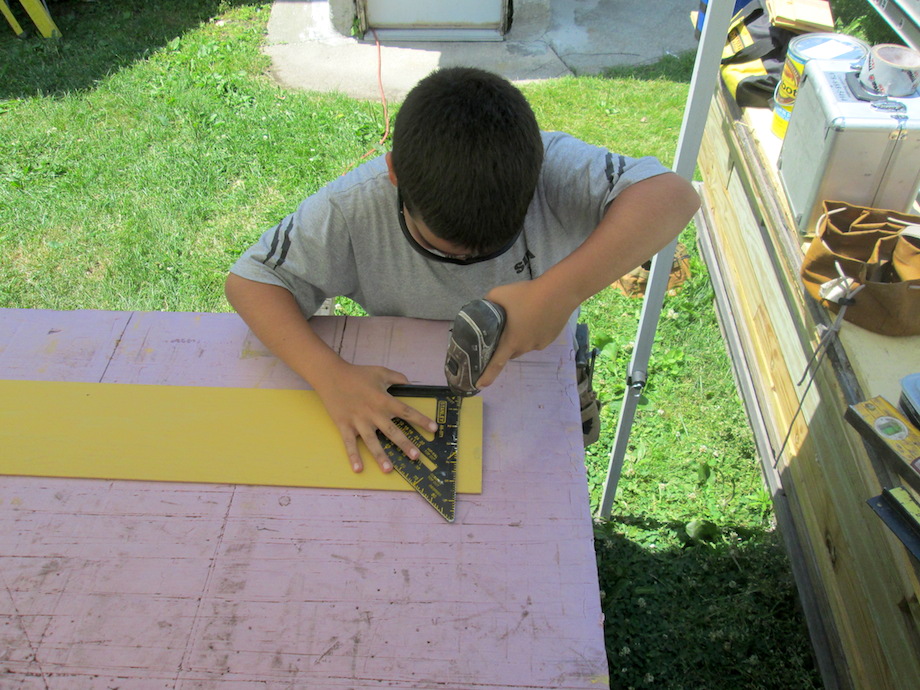
To make my story pole, I grabbed a scrap piece of wood long enough to fit all the measurements needed. I hooked my tape and measured down the board, marking every four inches, and squared them off with my speed square.
Then, I placed the board against the wall on top of my spacer at an angle and slid it until it reached the bottom corner of the sill.
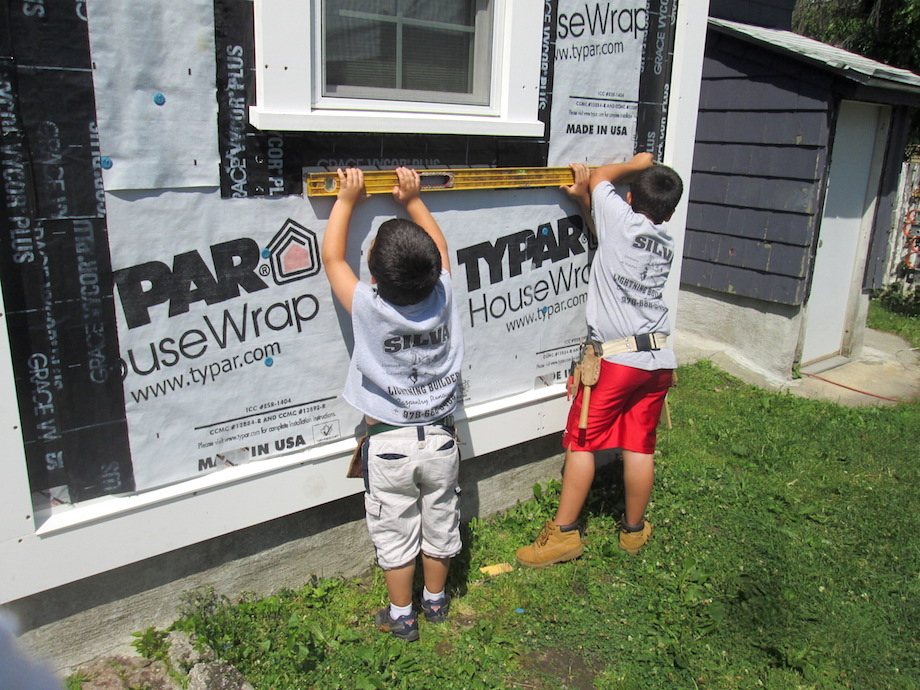
Using my marker, I marked off each exposure on the housewrap and followed up by transferring them with my level to the corner boards.
Each row was less than 4 in., but they were all at the same exposure–about 3 3/4.
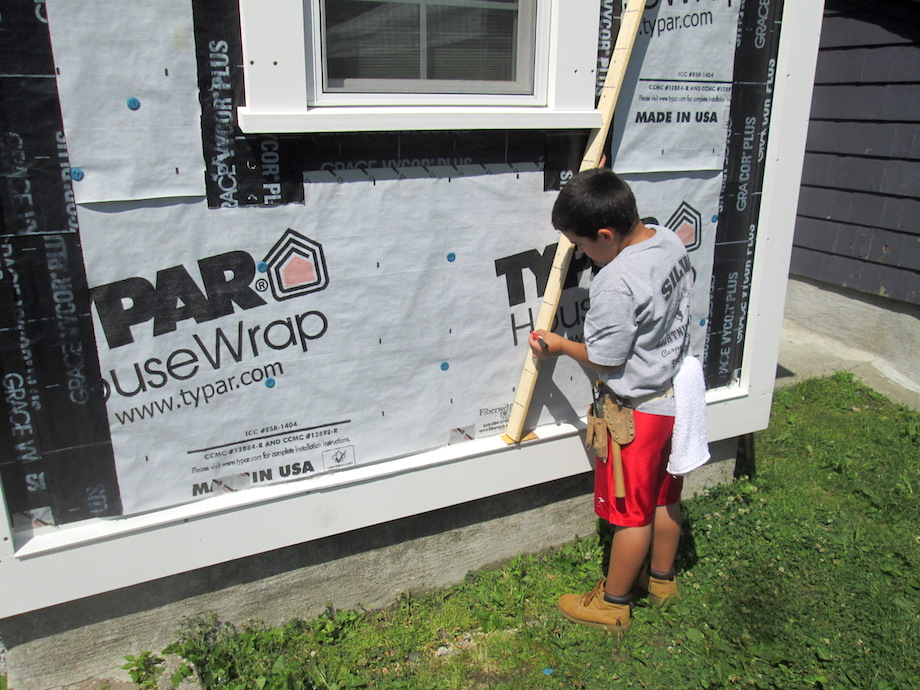
I repeated the same process of measuring along the sides of the window and found that no adjustments were needed, so I used the story pole from the bottom of the sill and marked all the way up the wall.
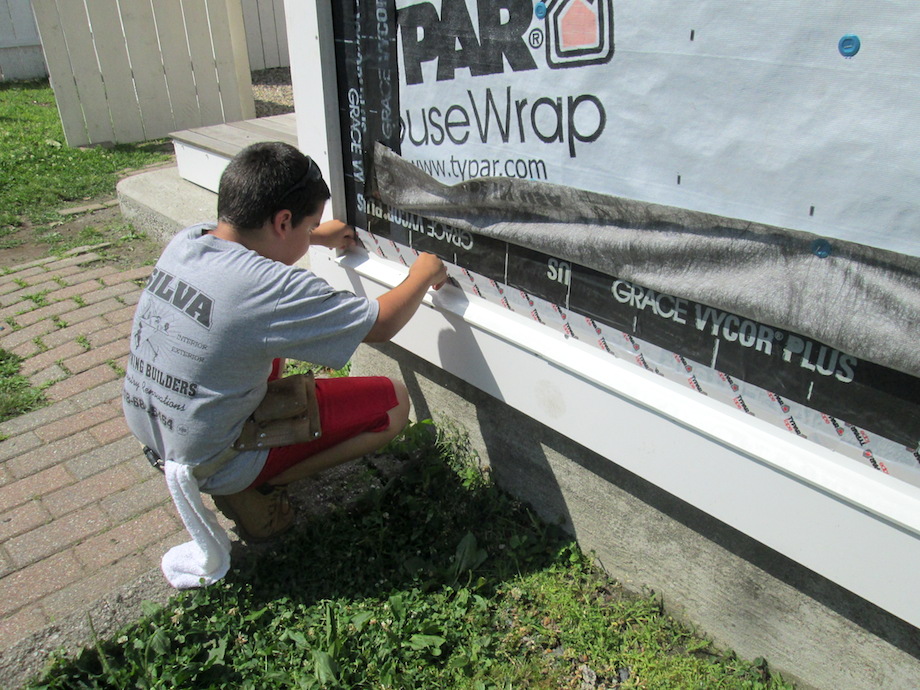
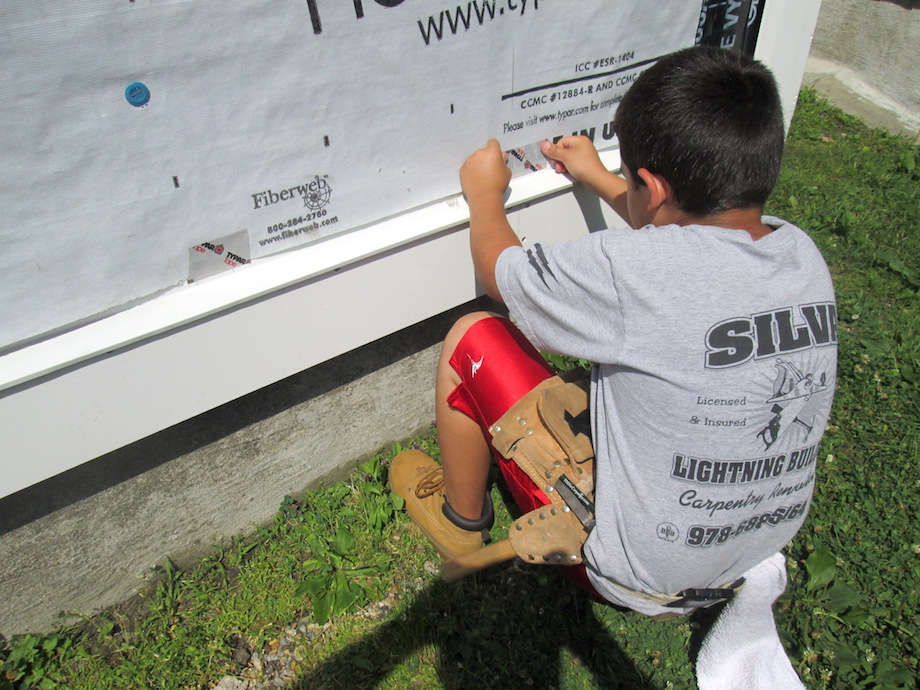
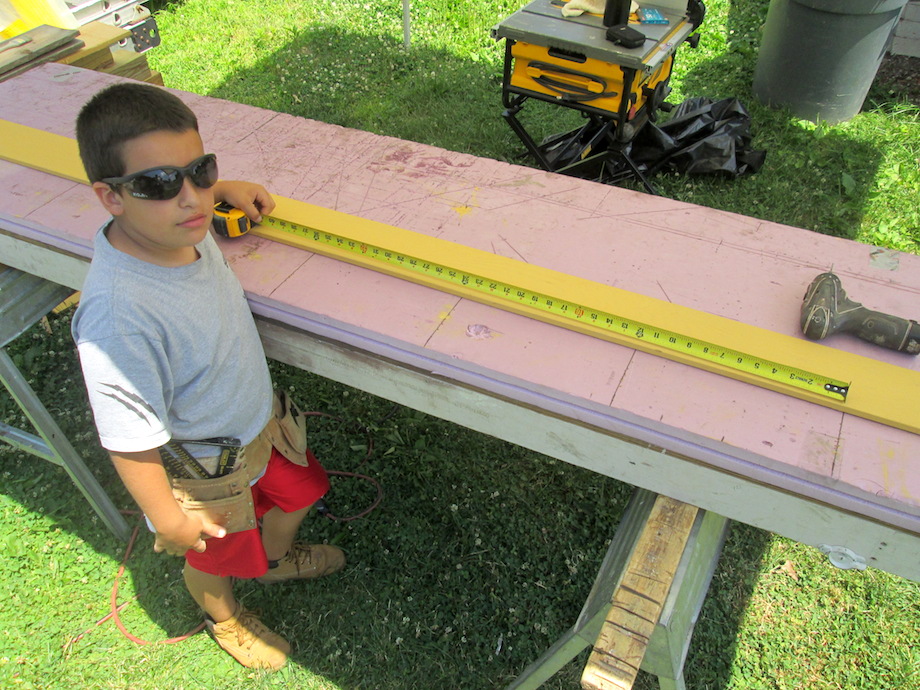
Measuring for rainscreen and clapboards
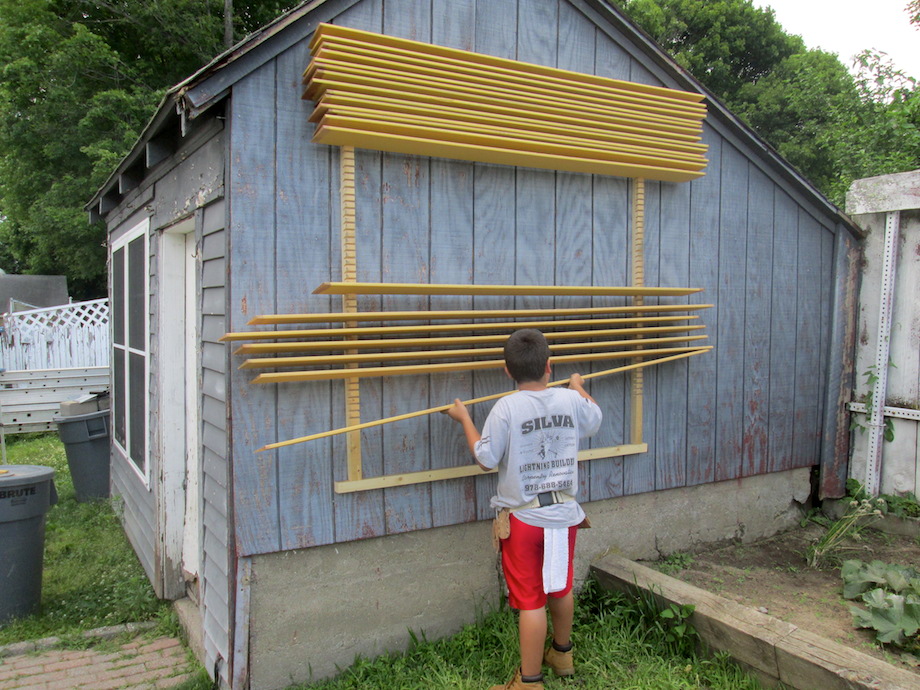
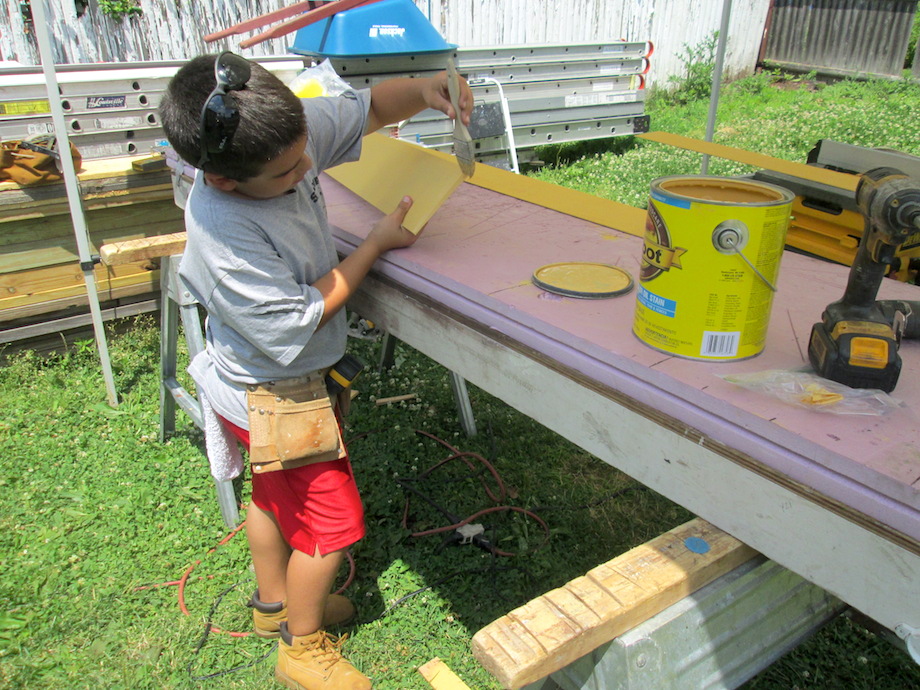
Naturally, I want my siding to last for many years, so I applied one coat of solid stain to all sides of my clapboards a couple days before. In order for my clapboards to dry properly, I installed them on a drying rack my dad built.
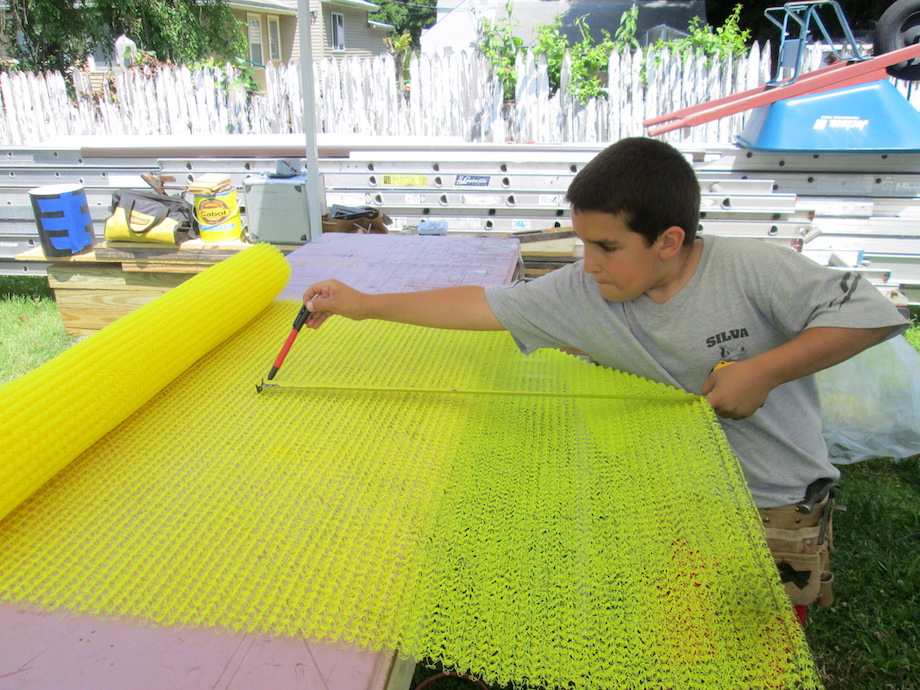
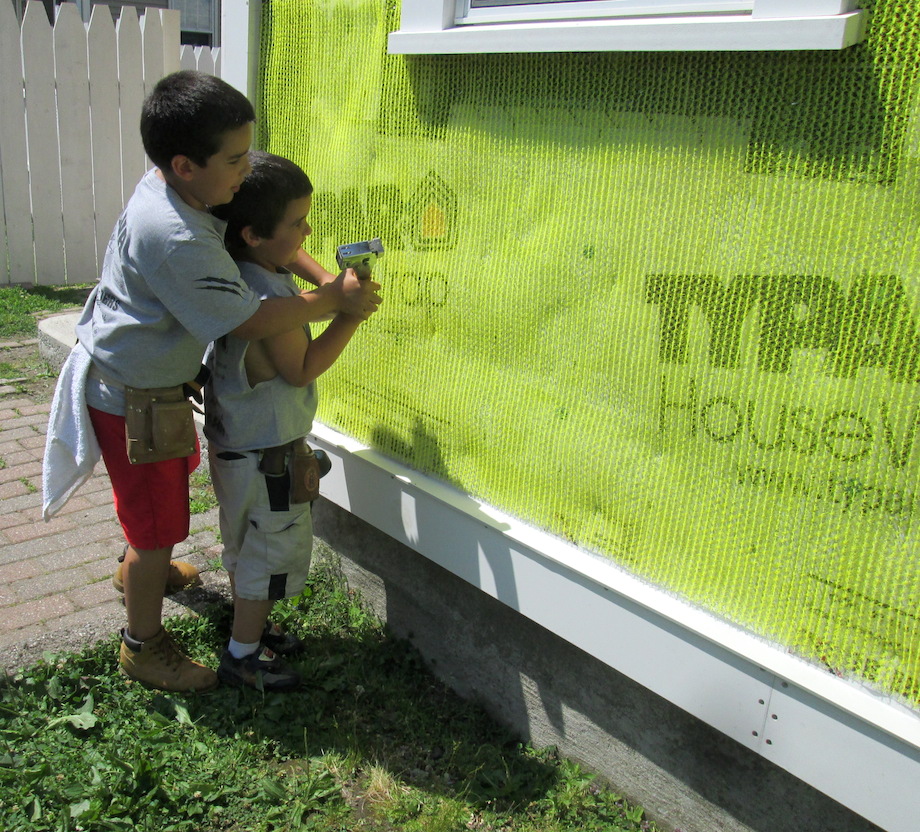
Sealing up all the sides would help prevent the siding from moisture-induced rot. To keep out moisture from behind the siding, I installed a rainscreen on top of the housewrap. This material creates a space behind the siding wide enough to let moisture dry. (For more information on rainscreens, read Gary Katz’s article, “Rainscreen Walls.”)
I measured for the bottom and side sections of the window and transferred them onto the rainscreen.I then used a pair of scissors to cut them to the sizes needed.
Attaching them to the house using a staple gun with 3/8 staples was so easy—I even taught my younger brother how to do it.
This wall was only 8 feet long, so I measured it in three sections, under and along the sides of the window. Knowing that the window trim and corner boards were plumb told me that I would have three accurate measurements.
My dad ripped some pieces of scrap clapboards to act as filler for the first row of clapboard.
Installing this piece is important because it redirects water from the house. It also keeps the second row from tilting in, which would look bad.
After checking my stockpile, I found that some of the clapboard ends had some cracks, so I had to make some joints in some of the rows. This is where most leaks start if not properly flashed and sealed.
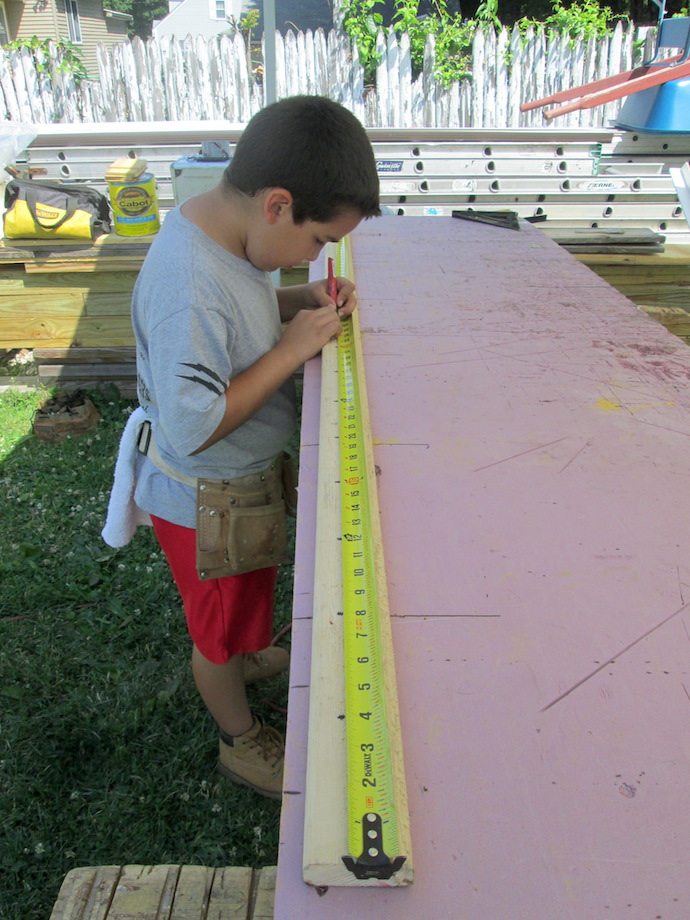
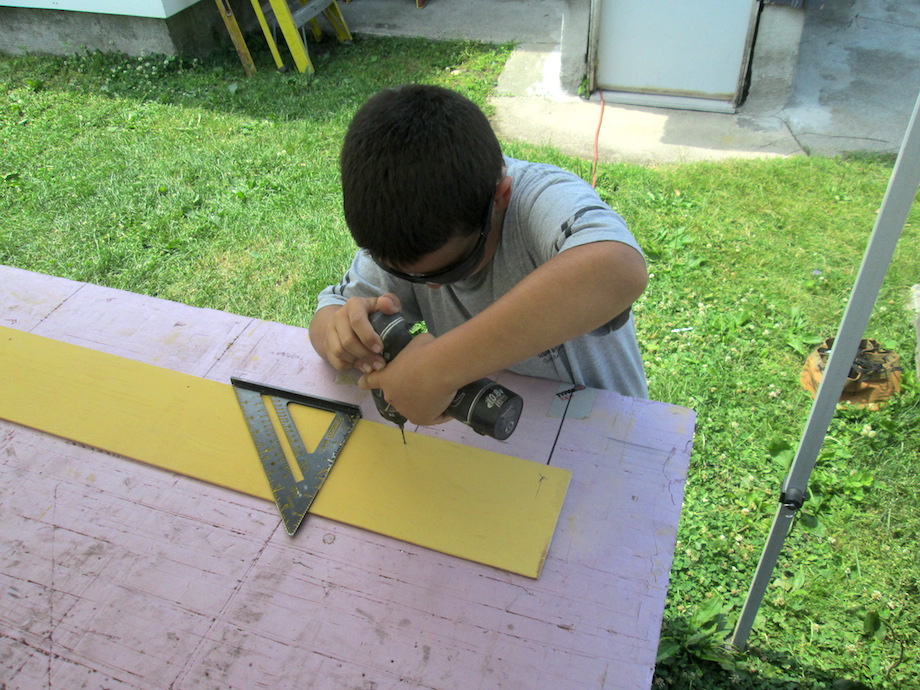
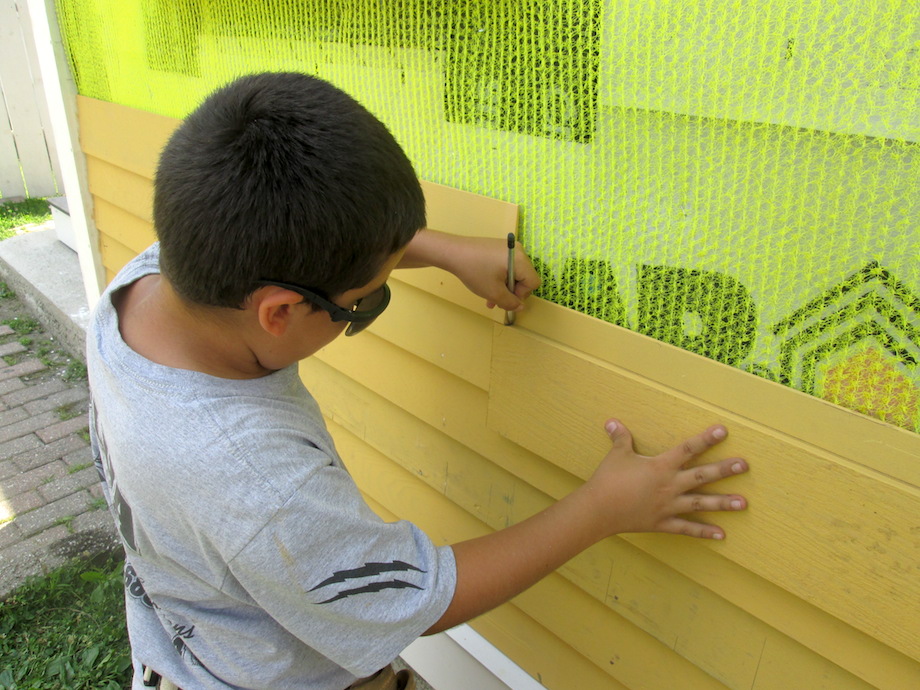
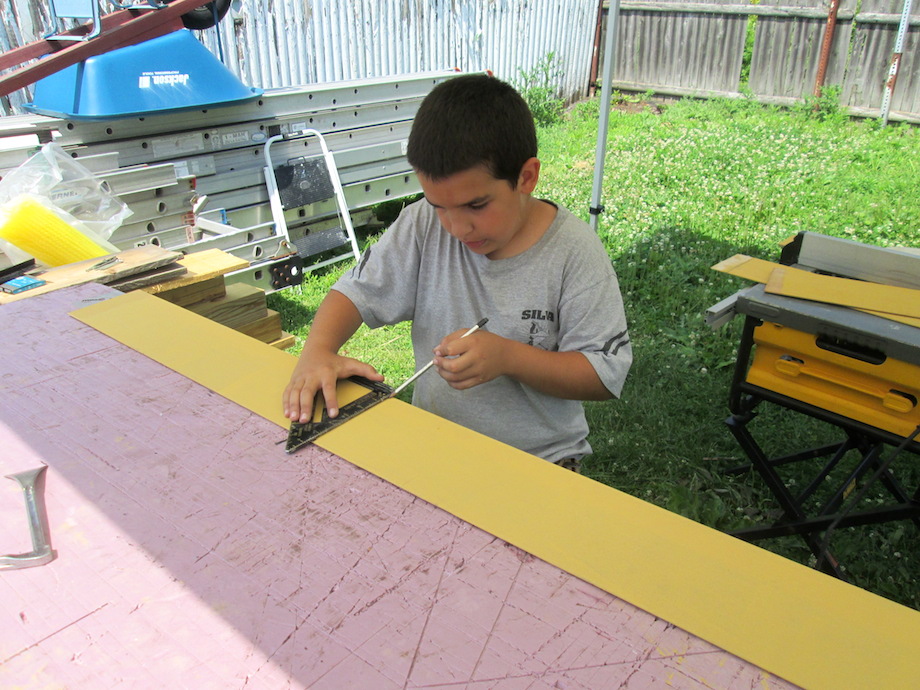
Layout and pre-drill clapboards
I started by giving my dad the measurements needed so he could cut the clapboards to size.Knowing that the sheathing was 7/8 thick, I was able to nail wherever I wanted, so I chose to space my nails 1 ft. apart.
To make fast work of pre-drilling my clapboards, I again made a story pole on my worktable, measuring 1-ft. spaces long enough for my longest piece.
After making my story pole, I placed the clapboards one at a time from one end and transferred the marks to the boards.
Once I finished marking my boards, I placed my speed square along each mark and drilled up from the edge 1 inch. Measuring and pre-drilling my clapboards would help prevent any splitting and also keep all my nailing consistent.
I then sealed all my cut ends with one coat of solid stain to match the finish.
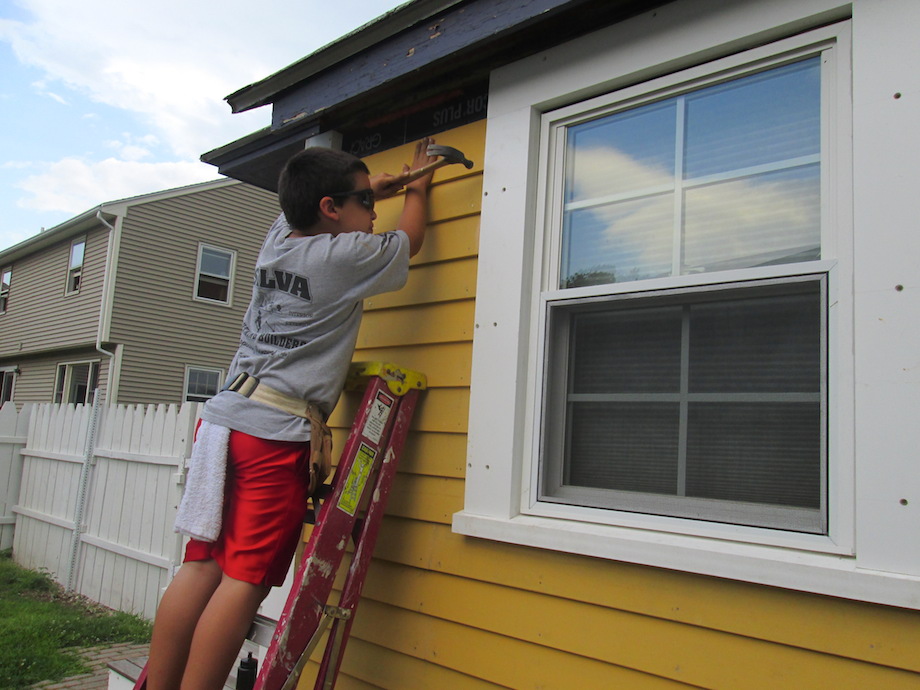
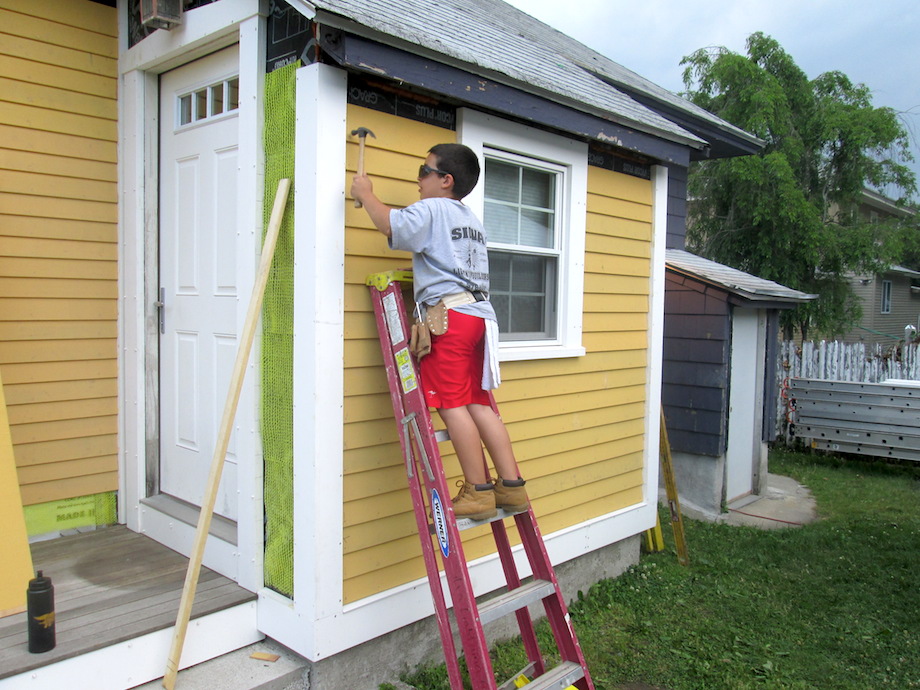
Clapboard installation
Before installing my first full clapboard, I installed the starter strip leaving 1/8 space above the drip cap.This would help prevent water from wicking onto the first row of clapboards and provide a space for moisture to drain from above.
I then installed my first row using the bottom edge of my starter strip as a guide.
The next couple of rows were pretty easy—I used the marks located on the corner post and checked the measurement in the middle as I used stainless steel nails to nail them off.
I made sure to not overdrive each nail as best as I could, and most important not to miss each nail.
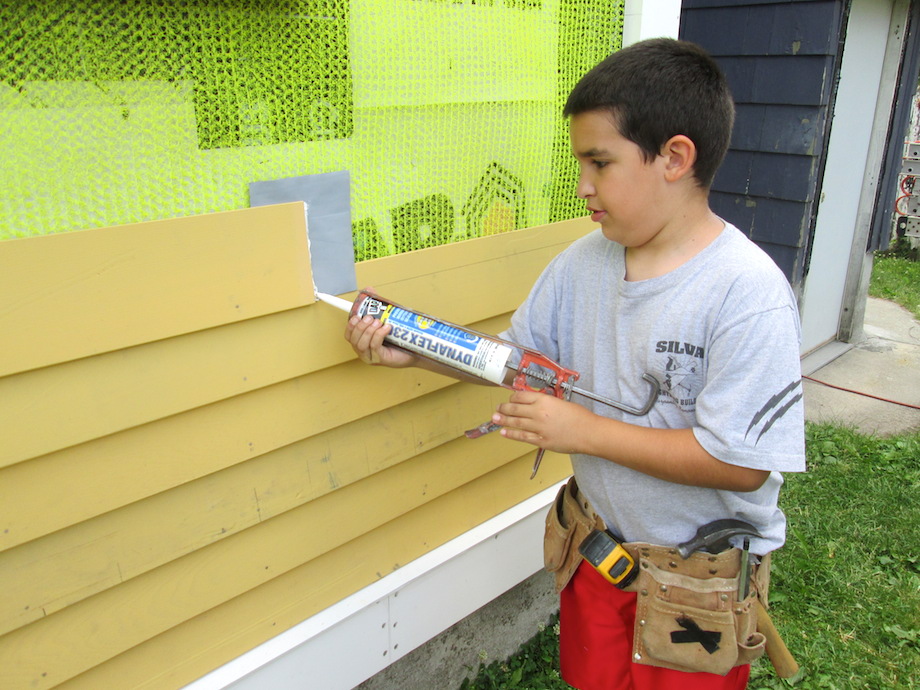
I knew I would have to make a seam between two boards, which would be a challenge. This is where it got tricky, but I worked slowly and with patience, taking it one step at a time, and I was able to make my seam just about seamless.
I started by installing the first piece, making sure not to nail the end where both pieces would meet. This made it easy to adjust and it also helped me slide my flashing behind it.
After having the first piece in place, I then butt the next piece up against the corner board and under the previous piece, and I marked where they both meet.
Having that piece cut about 1/16 in. shorter would allow me to apply caulking to both ends, which would help prevent water from entering.
Before that piece was installed, I sealed the ends. I slipped a piece of flashing behind the first piece, making sure to leave enough for the next piece.
I ran a bead of caulking along the edge, and then I installed the next piece, which would help fill in that joint and make it watertight.
I nailed them off while checking that both pieces were flush. I knew that all boards don’t sometimes meet flush, so I lightly sanded both boards and applied a coat of sealer to make them look perfect.
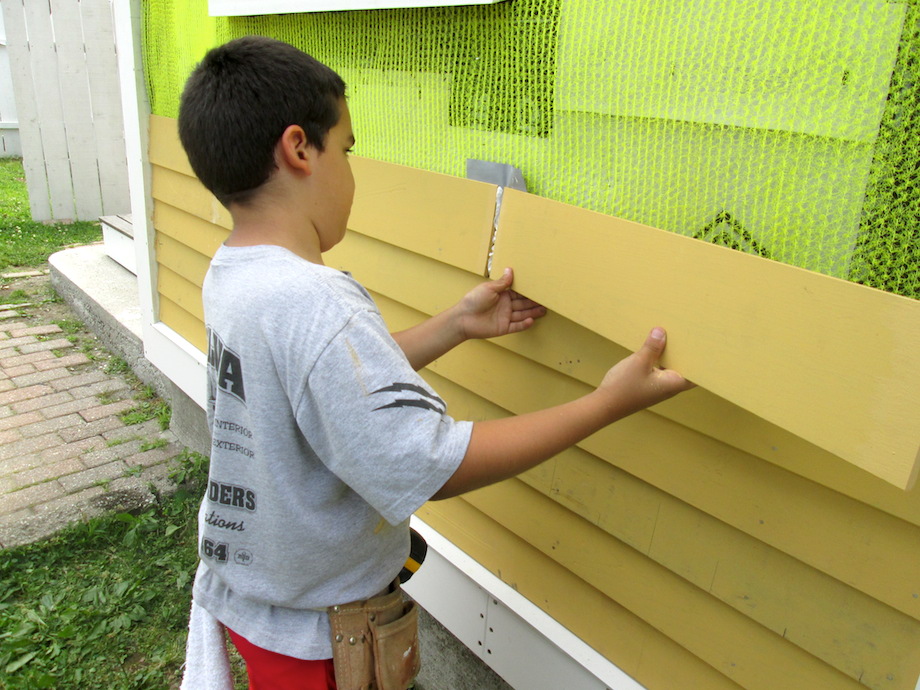
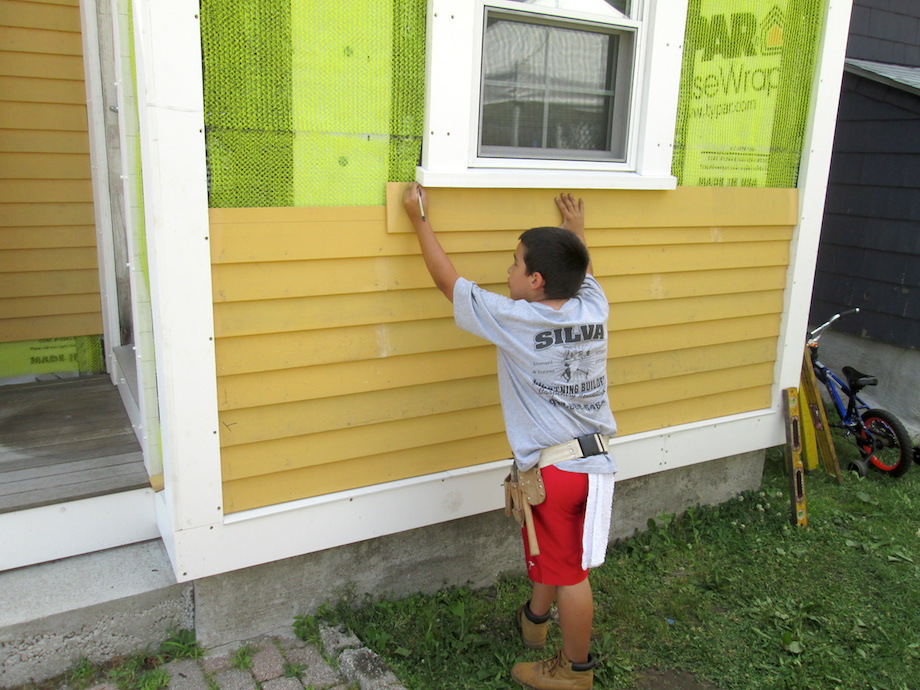
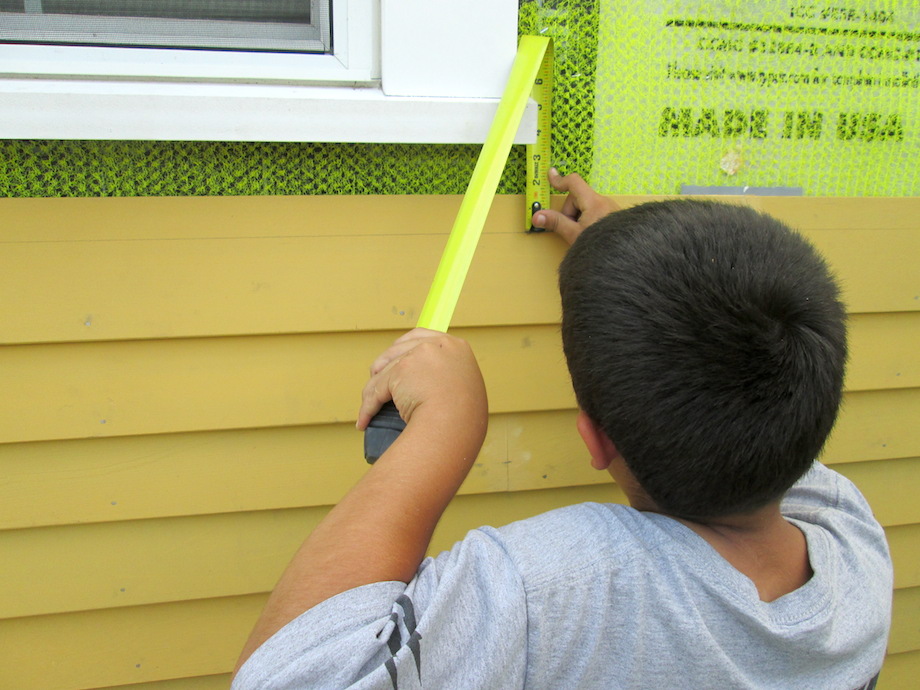
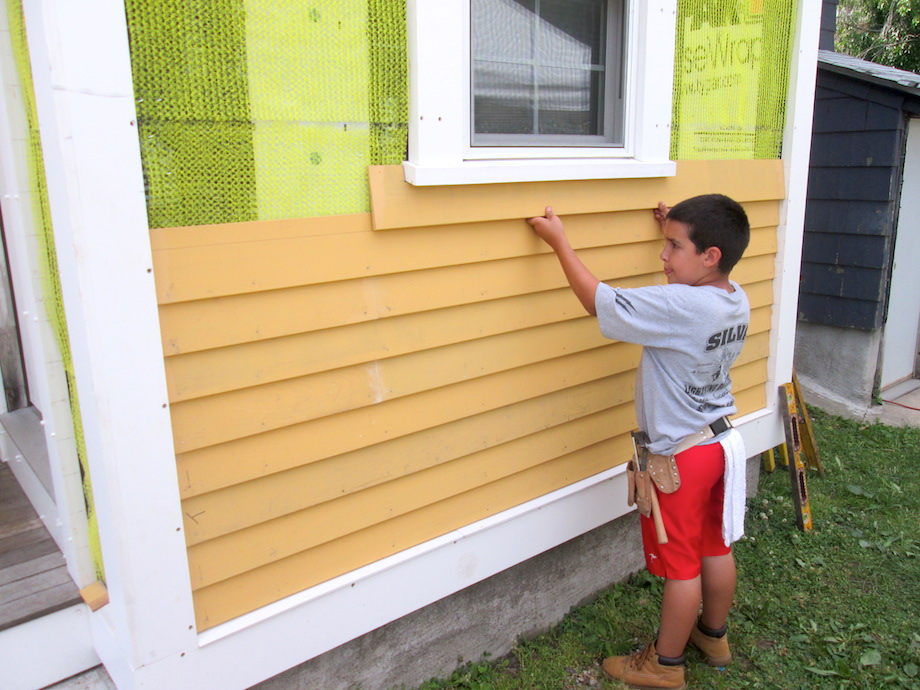
To fit the next row under the window, I placed the clapboard under the window, marked where the windowsill ends met, and transferred the marks to the edge with my speed square.
I connected both marks from the corner posts using my level and measured up the distance for the bottom section of the clapboard, which told me how much to cut out of the section.
After transferring those marks to the clapboard, my dad cut out that section and I sealed the cuts. It was then just a matter of sliding that piece in place and securing it with stainless steel nails.
For the clapboards that met the lower corners of the sill, I repeated the same process, making sure they fell flush with the bottom of the sill.
From there on, I ran the clapboards along the sides of the window high enough to where my dad will eventually rebuild all the overhangs on the house.
I then stood back to look at my work. I was very proud of how it all came together, knowing that those clapboards will be up for many harsh seasons of New England winter.
Comments/Discussion
41 Responses to “Installing Clapboard Siding”
Paul Mobley
Fantastic article, I enjoyed it, learned something, and even felt entertained! Thanks.
Wow! Did this ever remind me of my son working with me in the past. As I read this account of installing siding, I noticed every thing was done patiently, in order, properly. This young man is learning life lessons way bigger than just siding. My son worked with me every summer from age 12 until 18, as a finish carpenter helper. He learned how to get up in the morning, and how to work with his hands, and also some ‘carpenter stuff’. He also learned some of my old sayings…”if you don’t have time to do it right, when do you have time to do it over?” My son, at age 26, has now been an aerospace engineer for 5 years. (Do I sound a little proud?) Way to go Carter! Excellent work! Manny, get ready to be a carpenters helper.
Craig
Thanks Craig.
I really enjoy getting up early and helping my dad on the weekends. My dad sometimes doesn’t, but is looking forward to being my helper sometime soon:)
Making memories that you’ll never forget.
Learning skills that you will always use.
This brings back good memories for me: mixing mortar with a shovel that was twice as long as I was, getting my own hammer, cutting mouldings too short, learning to blunt the nail for thin mouldings, working out compound mitre angles, sharpening chisels and plane irons, fitting hinges and locks. It took a long time before I was useful. I’m okay now, but I’m still too slow.
My 8 year old wants me to assemble the lathe tomorrow, and start turning bowls. The cycle starts again.
My dad is always telling me, that he is so proud of me. Corey has been asking lately, that he wants to help, so now I can give back by teaching him. Corey got really excited to see himself in the article and asked when are we doing the next one.
It is nice to see the little people learning carpentry and to see a father willing to teach them. I couldn’t see all of the pictures but it looks very well done. I remember my grandfather stopping me cold in my tracks when I was young and said “Jason, I’m gonna tell you something” Of course I started to think about what I may have done wrong lately, but he finished with this “There’s one way to things – the right way!!” And then he walked away. So, keep doing things the right way and you will never be sorry, Carter!…….Hey, where did all of that green grass come from? I haven’t seen the ground since late October! :-)
Jason Laws
Plain In Maine
Amity, Maine
Fantastic article.
The love of Craftsmanship begins with Dads & Sons & Daughters spending time together learning these valuable trade skills.
Great job, and thanks for sharing with us.
The future of America will be in good hands with these young men.
Great article. It’s one of the better step-by-step guides to siding I’ve read. I’m planning on re-siding my own home this summer and look forward to getting my daughter involved using this article. Thanks.
Glad you enjoyed the article and found it useful for your home. I’m sure you’ll enjoy working with your daughter. I always like helping my dad work on our house. It’s very rewarding.
Carter, you’re a lefty like me… I can really nail with both if I need to.
I wonder how many times your Dad put the hammer in your right hand and you switched it to your left. That’s how it works with us lefty’s sometimes when we begin ?
I’m glad you enjoyed the article and you’re right, my dad used to put the hammer in my right hand and also the tape measure. We BOTH had to learn how to work with each other and were getting better throughout our projects.
I have been applying wood siding over this rain screen for years and have had great results. The product is very rigid once you apply the siding over it. It leaves an eighth of an inch gap between the sheathing and siding.
Since the nails are exposed at the bottom of each piece (I assume to keep the boards from curling), what keeps water from tracking along the nails and into the structure? Or are there enough layers with the wrap and rain screen to keep this from happening? Thanks. Great article. You helped answer some other questions I had like what to do where boards butt one another.
We use cookies to improve your experience on our site. By using our site, you consent to cookies.
Cookie Preferences
Manage your cookie preferences below:
Essential cookies enable basic functions and are necessary for the proper function of the website.
Name
Description
Duration
Cookie Preferences
This cookie is used to store the user's cookie consent preferences.
30 days
CleanTalk offers effective spam protection and website security solutions to enhance user experience.
Name
Description
Duration
spbc_timer
Dashboard. Time spent on the page.
Session
spbc_log_id
Dashboard. User identification.
Session
spbc_2fa_passed
Dashboard. Flag defines if Two-Factor Authentication was passed.
Session
apbct_antibot
This cookie is used to distinguish between humans and bots. This is beneficial for the website, in order to make valid reports on the use of their website.
session
ct_check_js
Used in order to detect spam and improve the website's security.
session
ct_fkp_timestamp
Used in order to detect spam and improve the website's security. Does not store visitor specific data.
session
ct_has_scrolled
This cookie is used to distinguish between humans and bots.
session
ct_pointer_data
Used in order to detect spam and improve the website's security. Does not store visitor specific data.
session
ct_ps_timestamp
Used in order to detect spam and improve the website's security. Does not store visitor specific data.
session
ct_timezone
Used in order to detect spam and improve the website's security.
Session
apbct_cookies_test
Сookie to validate other cookies, so they can’t be spoofed.
Session
apbct_
Group of cookies which are set from backend and contain information about the current user
Session
ct_
Group of cookies used for storing dynamic variables from browser
Session
ct_sfw_
Group of cookies used for our SpamFireWall technology.
Session
spbc_cookies_test
Cookie to test cookies so we know that everything working properly
Session
spbc_firewall_pass_key
The flag defines if the Security Firewall was passed.
Session
spbc_is_logged_in
Dashboard. Flag defines if a user was logged in.
Session
CloudFlare provides web performance and security solutions, enhancing site speed and protecting against threats.
The cf_use_ob cookie informs Cloudflare to fetch the requested resource from the Always Online cache on the designated port. Applicable values are: 0, 80, and 443. The cf_ob_info and cf_use_ob cookies are persistent cookies that expire after 30 seconds.
session
__cfwaitingroom
The __cfwaitingroom cookie is only used to track visitors that access a waiting room enabled host and path combination for a zone. Visitors using a browser that does not accept cookies cannot visit the host and path combination while the waiting room is active.
session
cf_chl_rc_i
These cookies are for internal use which allows Cloudflare to identify production issues on clients.
session
cf_chl_rc_ni
These cookies are for internal use which allows Cloudflare to identify production issues on clients.
session
cf_chl_rc_m
These cookies are for internal use which allows Cloudflare to identify production issues on clients.
session
__cfruid
Used by the content network, Cloudflare, to identify trusted web traffic.
session
__cf_bm
Cloudflare's bot products identify and mitigate automated traffic to protect your site from bad bots. Cloudflare places the __cf_bm cookie on End User devices that access Customer sites that are protected by Bot Management or Bot Fight Mode. The __cf_bm cookie is necessary for the proper functioning of these bot solutions.
session
__cflb
When enabling session affinity with Cloudflare Load Balancer, Cloudflare sets a __cflb cookie with a unique value on the first response to the requesting client. Cloudflare routes future requests to the same origin, optimizing network resource usage. In the event of a failover, Cloudflare sets a new __cflb cookie to direct future requests to the failover pool.
session
_cfuvid
The _cfuvid cookie is only set when a site uses this option in a Rate Limiting Rule, and is only used to allow the Cloudflare WAF to distinguish individual users who share the same IP address.
session
cf_clearance
Whether a CAPTCHA or Javascript challenge has been solved.
session
__cfseq
Sequence rules uses cookies to track the order of requests a user has made and the time between requests and makes them available via Cloudflare Rules. This allows you to write rules that match valid or invalid sequences. The specific cookies used to validate sequences are called sequence cookies.
session
cf_ob_info
The cf_ob_info cookie provides information on: The HTTP Status Code returned by the origin web server. The Ray ID of the original failed request. The data center serving the traffic
session
Statistics cookies collect information anonymously. This information helps us understand how visitors use our website.
Google Analytics is a powerful tool that tracks and analyzes website traffic for informed marketing decisions.
Contains information related to marketing campaigns of the user. These are shared with Google AdWords / Google Ads when the Google Ads and Google Analytics accounts are linked together.
90 days
__utma
ID used to identify users and sessions
2 years after last activity
__utmt
Used to monitor number of Google Analytics server requests
10 minutes
__utmb
Used to distinguish new sessions and visits. This cookie is set when the GA.js javascript library is loaded and there is no existing __utmb cookie. The cookie is updated every time data is sent to the Google Analytics server.
30 minutes after last activity
__utmc
Used only with old Urchin versions of Google Analytics and not with GA.js. Was used to distinguish between new sessions and visits at the end of a session.
End of session (browser)
__utmz
Contains information about the traffic source or campaign that directed user to the website. The cookie is set when the GA.js javascript is loaded and updated when data is sent to the Google Anaytics server
6 months after last activity
__utmv
Contains custom information set by the web developer via the _setCustomVar method in Google Analytics. This cookie is updated every time new data is sent to the Google Analytics server.
2 years after last activity
__utmx
Used to determine whether a user is included in an A / B or Multivariate test.
18 months
_ga
ID used to identify users
2 years
_gali
Used by Google Analytics to determine which links on a page are being clicked
30 seconds
_ga_
ID used to identify users
2 years
_gid
ID used to identify users for 24 hours after last activity
24 hours
_gat
Used to monitor number of Google Analytics server requests when using Google Tag Manager


Fantastic article, I enjoyed it, learned something, and even felt entertained! Thanks.
Thank you Paul.
I’m glad you enjoyed the article.
Carter
Wow! Did this ever remind me of my son working with me in the past. As I read this account of installing siding, I noticed every thing was done patiently, in order, properly. This young man is learning life lessons way bigger than just siding. My son worked with me every summer from age 12 until 18, as a finish carpenter helper. He learned how to get up in the morning, and how to work with his hands, and also some ‘carpenter stuff’. He also learned some of my old sayings…”if you don’t have time to do it right, when do you have time to do it over?” My son, at age 26, has now been an aerospace engineer for 5 years. (Do I sound a little proud?) Way to go Carter! Excellent work! Manny, get ready to be a carpenters helper.
Craig
Thanks Craig.
I really enjoy getting up early and helping my dad on the weekends. My dad sometimes doesn’t, but is looking forward to being my helper sometime soon:)
Thanks again for reading
Carter
Can I hire your crew?
Hi Derek,
Give us a call in the future. about eight years :)
Thanks
Carter
Wonderful article! And nice work, young man. Thank you, both, for taking the time to make both the siding and the documentation attractive.
Thanks Jeff,
Glad you enjoyed the article.
Thanks
Carter
Use a shim with a slot cut in the end to protect siding while nailing
Hi Kevin,
Thanks for the great tip. I used that tip a couple of years back and now I”m pretty good at not missing, but sometimes I do.
Thanks
Carter
Great job by Carter and Manny.
Making memories that you’ll never forget.
Learning skills that you will always use.
This brings back good memories for me: mixing mortar with a shovel that was twice as long as I was, getting my own hammer, cutting mouldings too short, learning to blunt the nail for thin mouldings, working out compound mitre angles, sharpening chisels and plane irons, fitting hinges and locks. It took a long time before I was useful. I’m okay now, but I’m still too slow.
My 8 year old wants me to assemble the lathe tomorrow, and start turning bowls. The cycle starts again.
Looking forward to the next project report!
Best wishes from Cork, Ireland.
Thanks Dave,
I’m glad that the article brought you back some nice memories.
Thanks for reading
Carter
Nice work, Carter. You should be proud of the fine job you did and your dad should be proud of you. It’s nice that you let your brother help too.
Thanks for the kind words Patrick,
My dad is always telling me, that he is so proud of me. Corey has been asking lately, that he wants to help, so now I can give back by teaching him. Corey got really excited to see himself in the article and asked when are we doing the next one.
Thanks again
Carter
Great Job Carter and crew,
If you ever need a new cut man, don’t hesitate to call.
Thanks Jim,
We’ll keep that in mind.
Carter
It is nice to see the little people learning carpentry and to see a father willing to teach them. I couldn’t see all of the pictures but it looks very well done. I remember my grandfather stopping me cold in my tracks when I was young and said “Jason, I’m gonna tell you something” Of course I started to think about what I may have done wrong lately, but he finished with this “There’s one way to things – the right way!!” And then he walked away. So, keep doing things the right way and you will never be sorry, Carter!…….Hey, where did all of that green grass come from? I haven’t seen the ground since late October! :-)
Jason Laws
Plain In Maine
Amity, Maine
Your right Jason. My dad keeps telling me to do it right the first time. I will never forget those words.
Thanks for reading
Carter
Proud Father / Proud Son – Couldn’t be Better!
Your so right. We are both so proud that we can work together and let others know about it.
Carter
Fantastic article.
The love of Craftsmanship begins with Dads & Sons & Daughters spending time together learning these valuable trade skills.
Great job, and thanks for sharing with us.
The future of America will be in good hands with these young men.
Tim
Thanks Tim,
My dad has some subs that are father and sons companies.
It’s nice to see that through out the trades.
Thanks again for the kind words.
Carter
Great article
Fantastic presentation !
Thanks.
Thanks Allen,
I’m glad you enjoyed it.
Carter
Great article. It’s one of the better step-by-step guides to siding I’ve read. I’m planning on re-siding my own home this summer and look forward to getting my daughter involved using this article. Thanks.
Glad you enjoyed the article and found it useful for your home. I’m sure you’ll enjoy working with your daughter. I always like helping my dad work on our house. It’s very rewarding.
Good Luck
Carter
Carter, you’re a lefty like me… I can really nail with both if I need to.
I wonder how many times your Dad put the hammer in your right hand and you switched it to your left. That’s how it works with us lefty’s sometimes when we begin ?
Great article.
Thanks Steve,
I’m glad you enjoyed the article and you’re right, my dad used to put the hammer in my right hand and also the tape measure. We BOTH had to learn how to work with each other and were getting better throughout our projects.
Thanks again
Carter
I have never used rainscreen. is it rigid or does it get “crushed” under the board? how does it maintain the gap needed?
I have been applying wood siding over this rain screen for years and have had great results. The product is very rigid once you apply the siding over it. It leaves an eighth of an inch gap between the sheathing and siding.
Thanks for reading
ES
Nice work on the siding and very nice work on the instructions. You’re a great carpenter and obviously have a great father.
Thanks SC.
I’m glad you enjoyed it.
Great article….reminds me of when I sided our house with my dad in the early 2000’s (at the time I was just a bit older than your kids).
thanks for reading and enjoying it
Oh the memories when I started! Nice encourager keep up the good work:)
Thanks for the comment Chip
I did clapboard siding several years ago. It does take a lot of skill to do on a house and vynal siding too. Wayne Johnston
I am truly touched by your son’s work and his article!
Thanks. I’m glad you enjoyed it.
Emanuel
Russ,
Me too! I’m really amazed by Manny and Carter, they are both close to my heart.
Gary
Since the nails are exposed at the bottom of each piece (I assume to keep the boards from curling), what keeps water from tracking along the nails and into the structure? Or are there enough layers with the wrap and rain screen to keep this from happening? Thanks. Great article. You helped answer some other questions I had like what to do where boards butt one another.