


This article is reprinted posthumously.
In my shop, I use dado blades a lot. So much so that I keep one table saw as a dedicated unit with dado blades in it all the time. I find that, for one cutter, the number of operations I can complete is worth the money and floor space required.
| I use these blades for milling dados, grooves, rabbets, tenons, tounges and grooves (which are the same as a cope and stick for doors and paneling that are craftsman style), to make dental mold, rough out a cove mold and for many other milling applications. |
 (Note: Click any image to enlarge) |
One of my favorite operations to use dado blades is when I make drawer boxes using what I call the “Quarter-Quarter-Quarter System” (QQQ). This method makes a really nice looking drawer that is very strong and shows lock joint joinery in each corner.
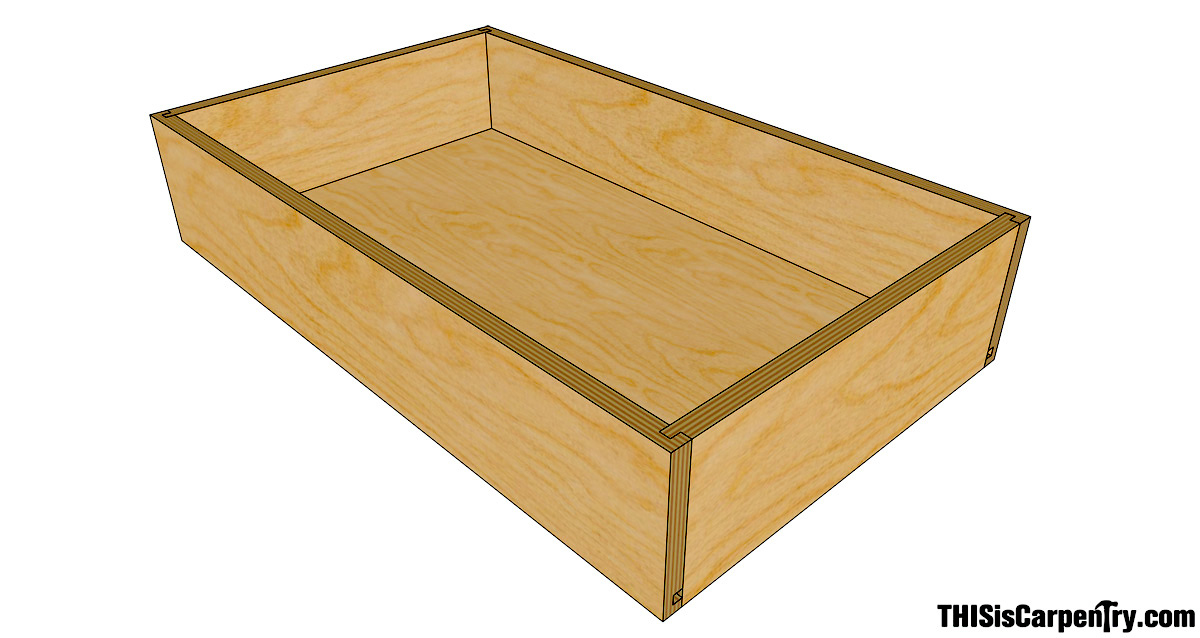
For the system to work, all of the 1/2-in. material must be a true 1/2 in. thick, unlike much of the 1/2-in. plywood on the market today which is as much as 3/32 in. undersize. I like to use 1/2-in. 9-ply pre-finished plywood for the sides, front and back, and 1/4-in. pre-finished plywood or melamine for the drawer bottoms. My customers like the look of the exposed 9-plys and lock joints, and the painters and customers both love the fact that the drawer boxes need no finishing. Also, pre-finished drawer boxes are a must for euro style cabinets, which have both pre-finished drawers and cabinet boxes, leaving only the doors and drawer fronts to finish in the shop or onsite.
I call this system the QQQ system because…
- I use only the outside dado blade plates, which combined are 1/4 in. wide.
- The blades are raised 1/4 in. above the table saw top.
- There is 1/4 in. between the rip fence and the dado blade.
…thus Quarter-Quarter-Quarter.
With this one QQQ set-up, I can make all the cuts I need to build my drawer boxes. The cuts I make with this set-up are the crosscut dado for the box joint, the rabbet for the box joint, and the bottom groove for the drawer bottom.
To get started, you need to create the table saw and dado blade set-up using precise 1/4-in. measurements.
As with many of the set-ups on my machines, I like to set the measurements using dial or digital calipers—once you get used to them, they are easier to read and more accurate than a tape measure. Calipers are read in thousandths of an inch, so instead of thinking in sixteenths, eights, quarters, etc., you need to know the decimal equivalent in thousandths. You can use a construction calculator for these conversions or download a handy conversion chart through this link (or click the image, below).

Prepare the material
To start building the drawers, I first determine how many drawers of different heights I need to build, and then I rip one lengthwise slice off the plywood for each height multiplied by the number of drawers for those heights. If the drawers are an average size, you can usually get one drawer from each ripping with maybe enough left over for a side of another drawer. Next I figure the lengths I need to cut off of the pieces for two sides, which are equal in length, and the front and back, which are equal in length.
I generally make the sides 2 in. less than the overall depth of the cabinet box. For example, a standard kitchen box is 24 in. deep so I cut the sides 22 in. long. If all of your drawers are the same depth, cut two pieces for each drawer of the same height, and you are done with this step.
Figuring the widths for the backs and fronts requires more time, since there will be many different cabinet box widths. To determine the widths of these pieces, you need to measure the widths of each drawer box opening, making a list for these widths multiplied by the number of different drawer heights of the same width. You will cut two pieces for each drawer height of the same width.
When you have a drawer bank with several drawers stacked vertically, their fronts and backs will all be the same width, though you’ll probably have varying heights. For these drawers, you can cut two pieces for each drawer height, since they are all the same width.
Drawer part dimensions
The formula for the width of a drawers’ back and front is as follows:
Drawer box opening width – 1 1/2 in. (1 in. for drawer sides + 1 in. for drawer guides) – 2 x the length of the milled tongues (1/4 in. each)
The instructions for your drawer guides will give you the side space required. All of the side mount guides I have used require 1/2-in. space for each side. When multiplied by two, this equals 1 in. I like to use full extension ball bearing slides by Dynaslide, Knap Voit or Accuride—all have the 1/2-in. space per side, which again equals 1 in.
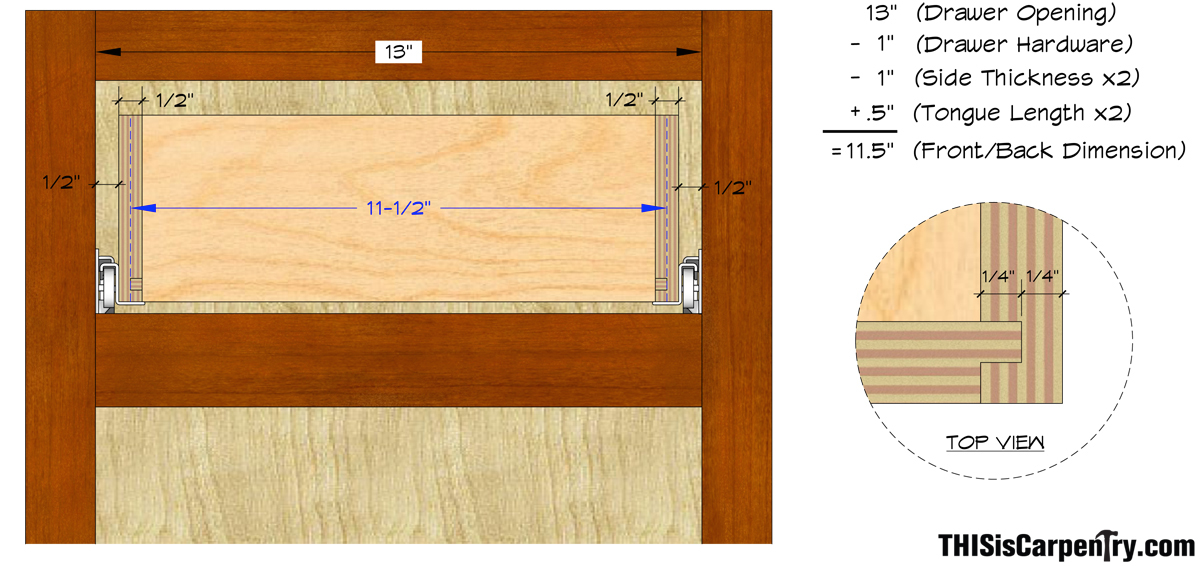
Almost all of the powder-coated euro style slides which I have run across require 1/2 in. per side, too. So I’ve made 1 1/2 in. the default amount to subtract from the drawer box widths to determine the width to cut the fronts and backs. Just check the amount of space the manufacturer requires for the guides you use to affirm this 1 1/2 in. factor.
These days we’re also seeing more concealed drawer guides on the market, such as Blum’s tandem guides. These guides require a different amount of space from the bottom of the drawer to the drawer-bottom groove than the 1/4 in. allowed by the QQQ system.
Understand the lock joint
With your list complete, cut all of the fronts and backs from the pieces left over from cutting the sidepieces. Make sure you keep the stack of sides separate from the stack of fronts and backs since these have totally different milling operations.
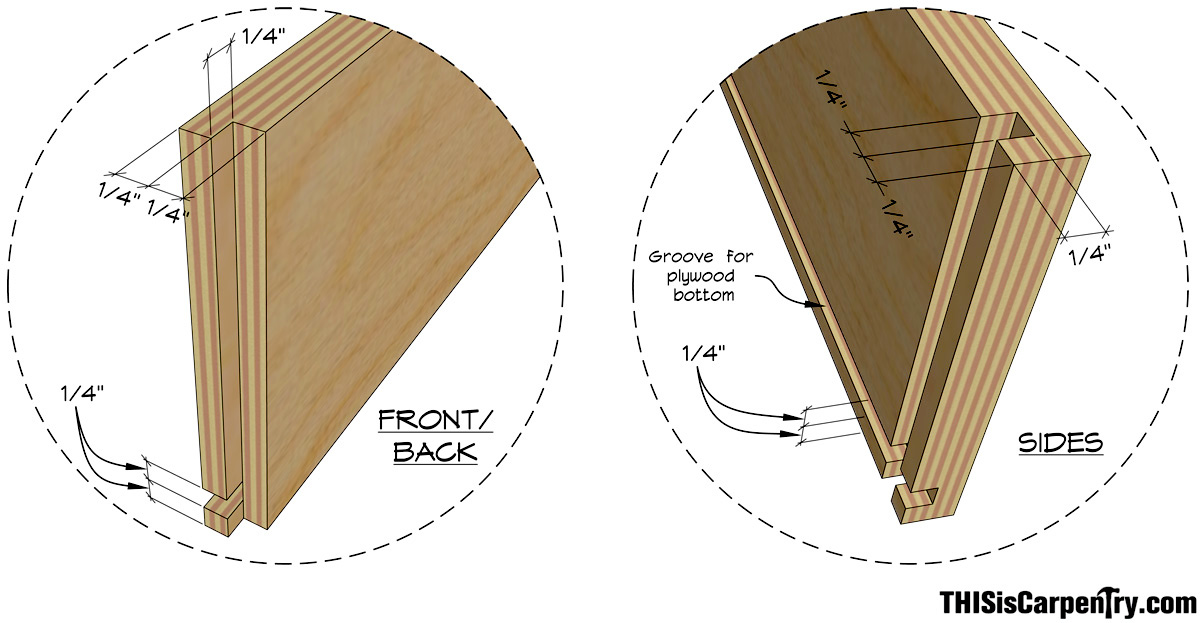
With all of these parts cut, you are now ready to mill the box joint corners and the grooves for the drawer bottoms. The sides are easy. They just have a crosscut dado at each end, cut into the inside face of each side.
But the backs and fronts require a rabbet cut, and that cut must be made into the outside face of the front and back.
All of the parts must be cut with a groove for the drawer bottoms.
Follow the milling sequence carefully. Remember, when you’re cutting the front and back, the groove for the drawer bottom must be on the inside face, which is the opposite side of the rabbet!
Saw setup
Start by setting up the dado blades.
| They must be set to cut an exact 1/4-in. wide groove. Use a caliper to check the setup. If necessary, place paper shims between the blades. | 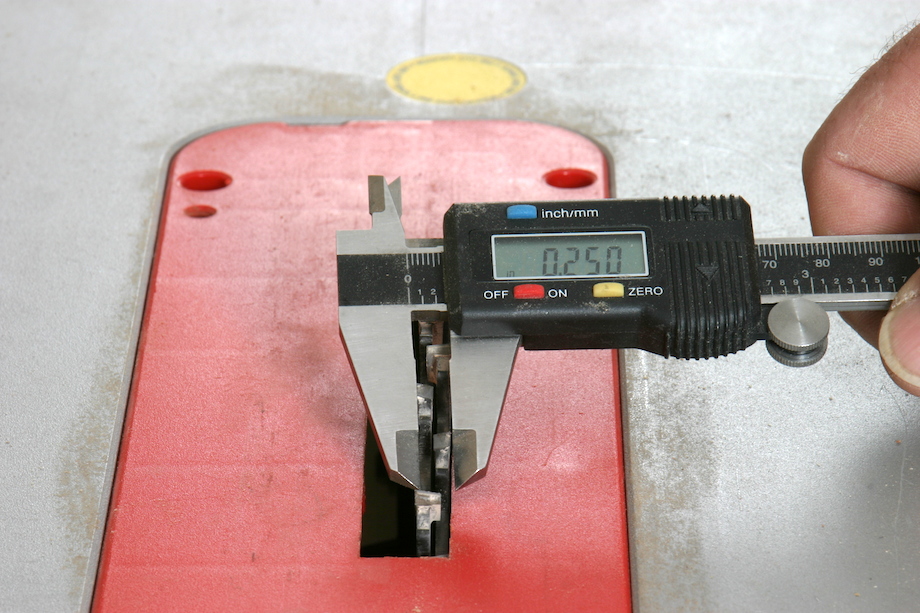 |
Next, raise the dado set so that it’s exactly 1/4 in. above the table.
 |
I use a piece of 1/4-in. mdf and a straightedge, then I rotate the blade so that the teeth are just barely touching the straightedge. |
Finally, adjust the rip fence so that it’s precisely 1/4 in. away from the dado blade.
| A dial caliper works really well for this adjustment, but you can also use a piece of 1/4-in. mdf—if it measures exactly 1/4 in. You can check that with your calipers. | 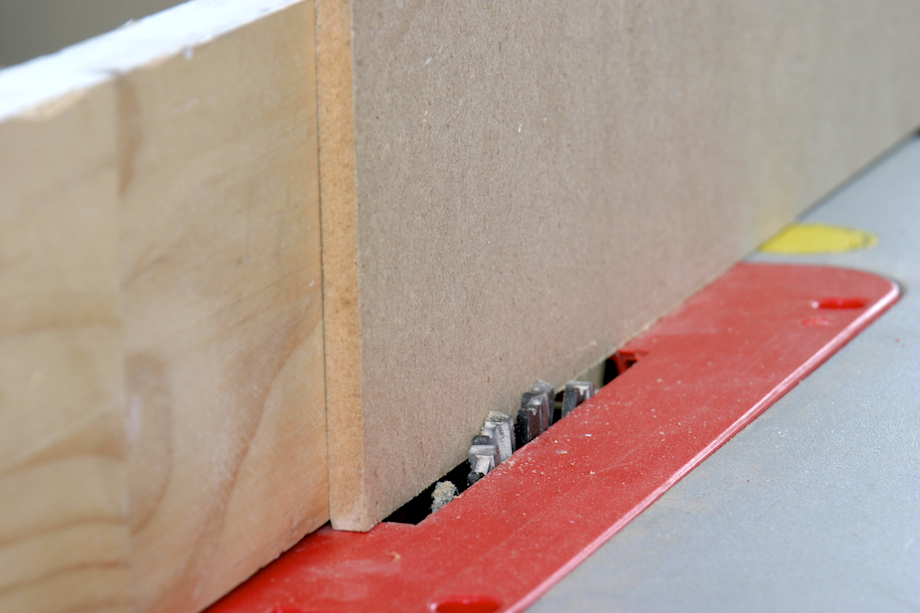 |
Mill the lock joint
Now you’re ready to cut the joinery. I always start with the sides—they’re easy and I get them out of the way.
| Simply cross-cut a dado into each end. Be sure the inside face of the material is down against the table. | 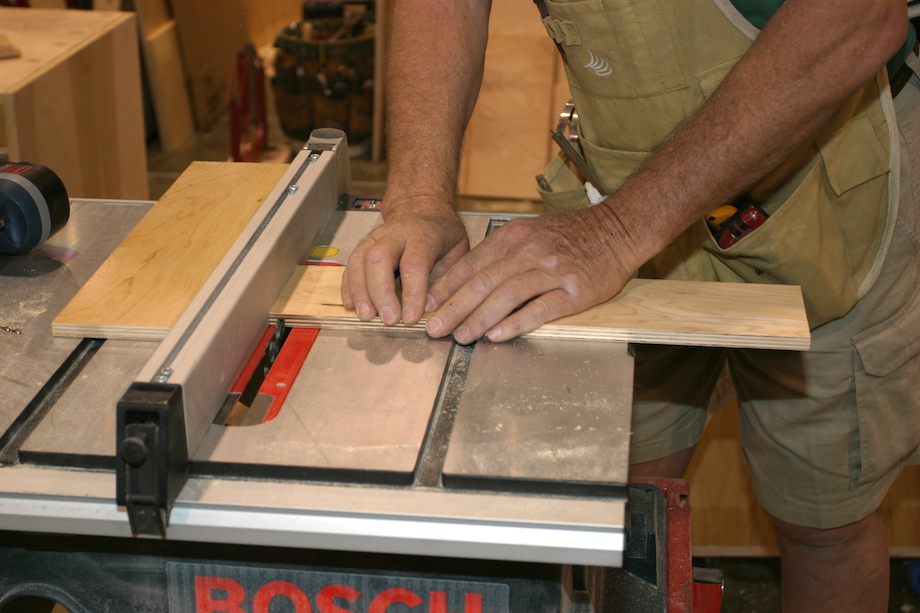 |
 |
Then, also keeping the piece with the dado grooves facing down to the table saw top, cut the length-wise grooves for the drawer bottom. |
Once all the cuts are complete on the sides, set them aside, and bring over the stack of fronts and backs.
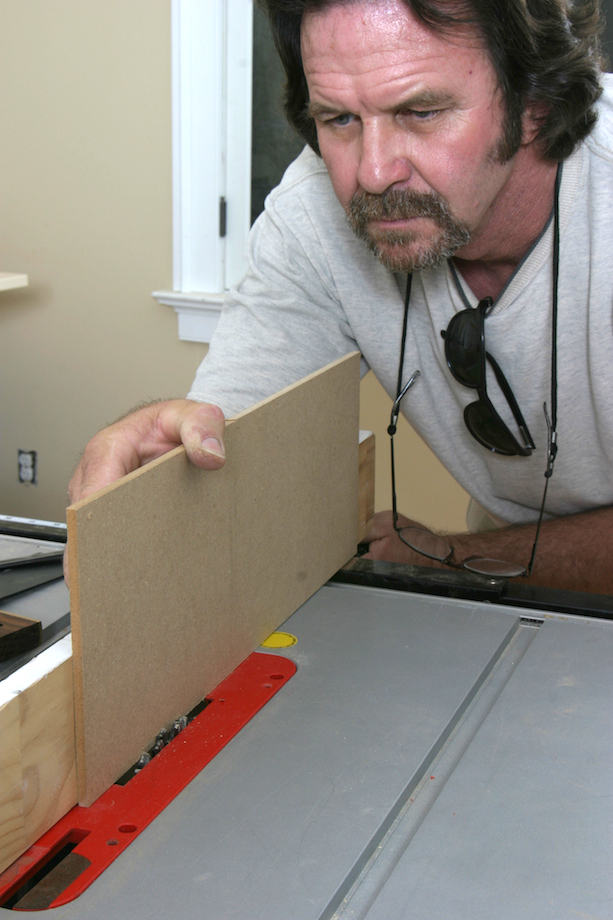
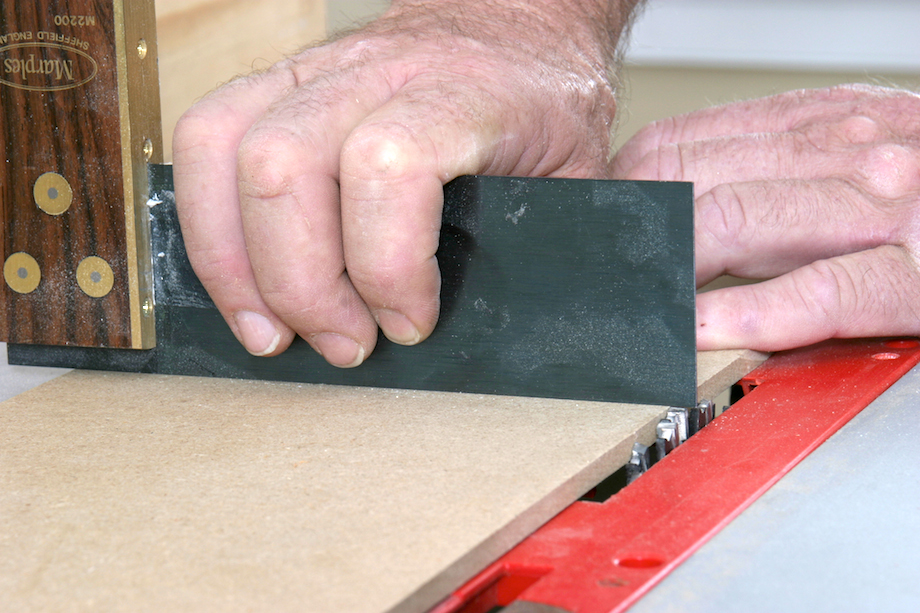
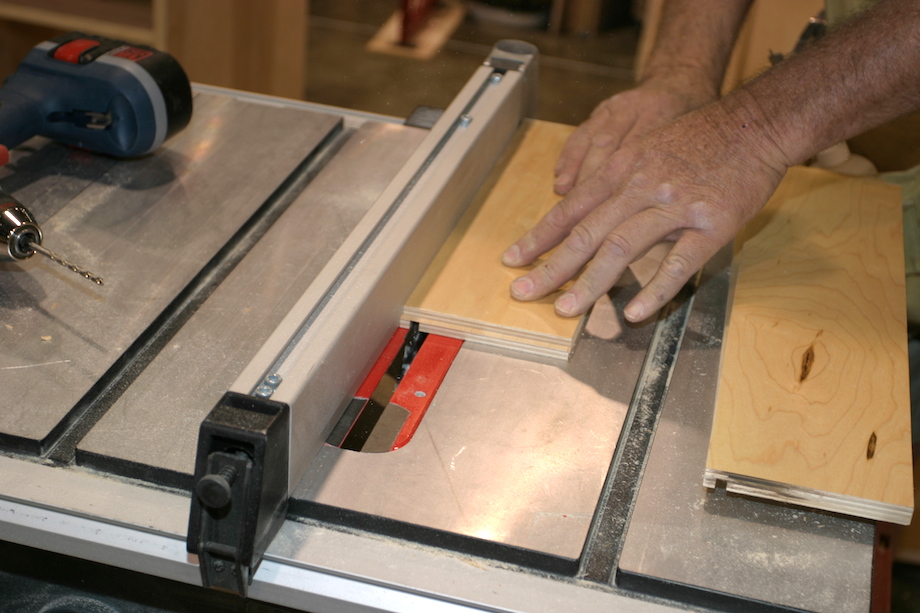
| Like I said before, the fronts and back can be a little confusing. The rabbets are cut into the outside edge and the pieces must be held perpendicular to the table saw face. | 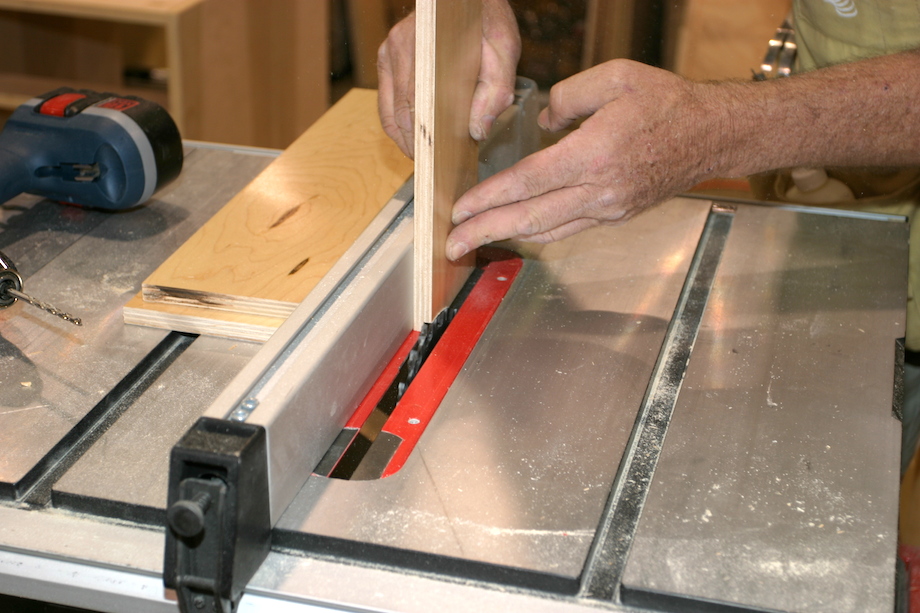 |
It may seem a bit awkward if you have never cut in this position before. But these cuts remove only a small amount of material and you’ll feel little resistance from the machine.
As shown in the photo, apply light pressure to the piece against the table saw fence with one hand, and push the piece through the cut with the other hand. You could also use feather boards to apply the pressure to the fence, which would be safe, as the boards would cover the dado blades.
| Once you’ve rabbeted the sides, lay them down with the rabbets UP, then cut the groove for the drawer bottom. | 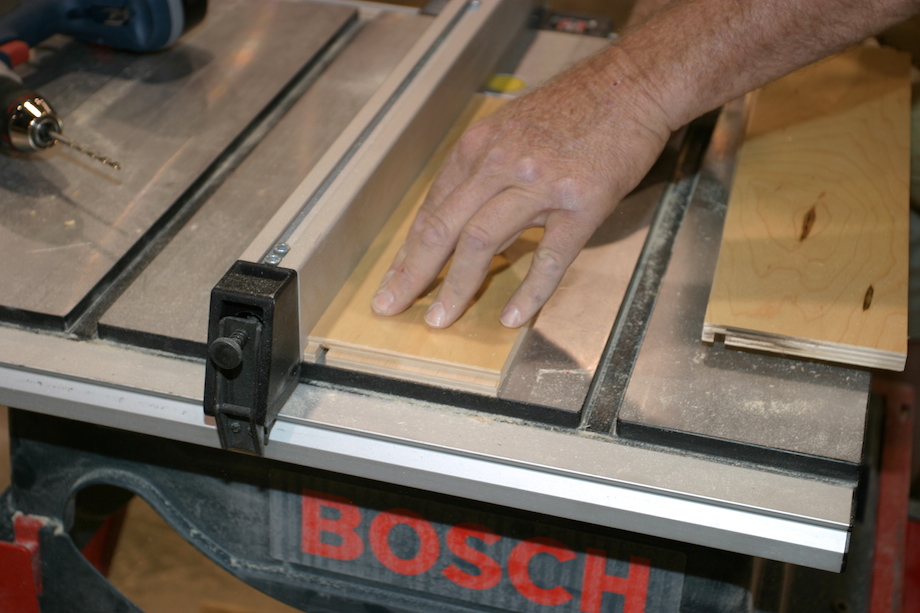 |
| Assembly is really a snap. I apply a light coating of glue to the rabbets and inside the drawer-bottom grooves, then I pin two sides to one back, slide in the drawer bottom, and press the drawer front into place, securing it with a couple pins, too. |  |
Some folks think that the only way to make a drawer is with dovetail joints, but I’ve never had a QQQ drawer joint fail, and they are a LOT faster to cut, a lot easier to cut, and require far fewer tools!
•••
AUTHOR BIO, written by Gary Katz
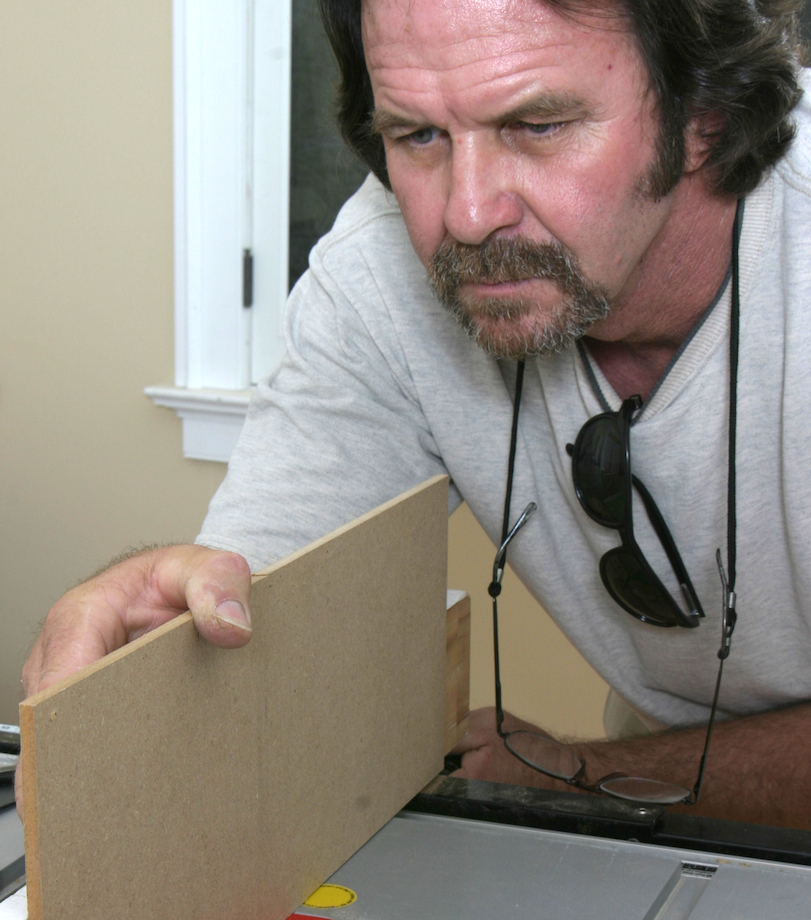 For those of you who never met Steve, he was a beloved cabinetmaker and millworker who lived in Southern California. He contributed to some of the top trade magazines, and presented at JLC LIVE. If Steve couldn’t find a tool from his collection to use in building custom cabinets, doors, and windows, he made one. When I looked for a special radius jamb and entry door or a houseful of bifold windows and doors, or the sweetest hardwood kitchen, Phipps was the guy I turned to first. He made some of the finest circle-top sash available, even those fancy radius muntins for Gothic tracery.
But Phipps also invented tools and hardware, and made them right in his own woodworking and metalworking shop. One visit and I could walk away thinking, “This is one scatterbrained genius!” Good luck trying to keep him on a single subject; Phipps’ mind worked on multiple issues simultaneously. He’d be untying the knots on his latest update to the Rok Buk (a door and plywood dolly that became a carpentry cult icon, mostly because it was in such short supply!), but his mind was analyzing the traffic and shop flow at one of his latest creations, like the small manufacturing plant where he planned to turn out Rok Buks, custom miter saw stands (that double as router tables), Simple T-Astragals (with integral extension flush bolts), and who knows what else.
There was no such thing as a quickie when you visited with Steve Phipps. In his Cabinetry Workshop at JLC LIVE, Phipps’ demonstrated his slick setup for milling cope-and-stick joints in cabinet doors—all right on his miter saw stand. He taught cabinetry and tool design, but he also spoke a lot about gardening, classic guitars, deep-sea diving, and Texas, too.
Sadly, Phipps died of cancer a few years ago. His funeral was attended by nearly 1,000 people, many of whom knew Steve through AA—Steve personally assisted dozens of people in the AA program with their recovery.
Every time I build a drawer box using this technique that Steve taught me—and I use it frequently—I can’t help but stop and think about the guy. He was one of the most memorable carpenters I’ve ever met. He had more ingenious and creative ideas than any person I’ve known. His energy was limitless, especially the energy he devoted to his friends and the carpenters who were lucky enough to have met him and learned from him at JLC Live!
most excellent, most simple, most must try on my list. Thank You
Thanks for re-posting this. Clear, common sense advice is hard to get these days without a website like this one. I’m just beginning a smaller kitchen and this was perfectly timed. Steve sounds like he was a real renaissance man.
This is a great method for drawers. I use it sometimes for the simpler jobs that we do.
What is this rok buk? I always am looking for better dollies and miter saw stands.
Steve sounds like a brilliant man.
Jarin
What a nice surprise to see an article from Steve Phipps. I had the pleasure of attending several of his clinics at JLC Live way back when & always came away with some helpful information.
He’s missed.
An example of “good enough” cabinet making. I often see people way over doing the construction because they consider it the “best.” Use what ever method you feel confident in and have the tools to easily accomplish. In my shop doweled 3/4″ melamine drawers are the standard, because we have the equipment to easily make them. Are they the best? Nope, but plenty good enough.
I was shown this, well similar for 3/4″ ply boxes. We used the 1/4″ blade set then moves the height and the fence to match the thickness of the ply and the side of the joint we are doing. just have a couple scrap set up block handy at the saw. The blade was either flush with the fences and 1/2″ high, or 1/4″ high and the material thickness from the fence to the far side of the blade. Once you do it a few times you get a feel for the number of cranks on changing the height and it goes quickly.
This is a great system which I’m now using. Tried Doweled, dovetail, Pocket screws, and staples. This makes the most sense since theres no clamps and you get a dado bottom. Larry’s right some times its “good enough.” I have seen many kitchens with Melamine stapled drawers and bottoms that are 25 years old and still going.
I like this drawer joint system and have used it many times for my own shop purposes. That said, I would be hesitant to use it on a client’s project.
While we here seem to acknowledge that it is a “good enough” joint that will certainly take normal residential kitchen and bath abuse, I believe the general public in the market for custom built cabinetry has been ingrained with the limited notion that the dovetail joint alone is a mark of quality craftsmanship to look for when considering cabinetry, thereby relegating every other drawer joint as a mark of junk quality.
I would really be curious to know if Gary or others here have used this joinery method on client projects, if/how you ‘break it’ to the client (tell them during design consult, offer as a discount option, or just do it without the client’s connect), and what the client’s reaction was afterwards?
DreamcatcherDB,
For years, custom cabinet shops in S. CA. didn’t use dovetail joints.
Steve supplied us with built-ins on several jobs with the same drawer joint–overlay doors and recess. No one ever commented on the joinery. His workmanship was excellent. The drawers functioned beautifully.
I’ve used the same drawer joint in my home and shop–some of the drawers I built for my shop are fifteen years old and loaded with nails, screws, hardware, etc. and have no drawer slides. They’re just as strong as a dovetail joint–you can’t pull the face off the sides, and that’s all that matters.
Lately I’ve seen a lot of drawers made with butt joints and dominos. That seems to be catching on with cabinet makers, too. I really don’t believe that many customers aren’t going to buy cabinets if the drawers aren’t made with dovetail joints.
Gary
Steve Phipps was The Man! Someone you took a liking to right away. Thanks for this one Gary!
Wood magazine did a joinery “torture test” and found that the locking-rabbet joint (constructed in a manner analogous to the QQQ system) is STRONGER than a dovetail joint…see link below. Considering this and the speed and tooling requirements of the QQQ system, it is well suited for production work and strikes a balance b/w strength and aesthetics. The dovetail joint seems to be best suited to fine furniture constructed using traditional methods (i.e., dust frames w/ no drawer slides) where the drawer front is an integral part of the drawer box and subjected to much of the stress. It seems foolish to take the time to construct a dovetailed drawer, affix a false front, and mount the whole unit on engineered drawer slides (as is typically the case with modern kitchen cabinetry). To me this is not craftsmanship, but rather an illusion of craftsmanship.
http://www.woodmagazine.com/videos/v/70929150/build-super-simple-drawers.htm
Josh,
Good points!
The link above no longer works. I believe that this is the video referenced:
https://www.woodmagazine.com/video/making-super-simple-drawers
This is the same joint I was taught in my first cabinetry class at Portland Community College’s construction tech program. The tool used was a little different though, a dedicated table top router jig permanently held a dedicated router with 1/4″ slot cutter. The jig had a small (about 3″ deep by 20″ wide) “table” with a larger (20 x 20?) “fence” set at 90 degrees to that. The whole assembly angles back off the vertical to allow gravity to assist in keeping the pieces registered into the jig. (Not sure if I’m giving the a good description but in the pics above imagine the table saw sitting at an angle so that the table is at about 10-15 degrees off vertical and the dado blade being replaced by a slot cutter). The slot cutter was set 1/4″ up off the table and to cut 1/4″ deep so that by just orienting the pieces differently it would cut the appropriate rabbit or dado. The beauty of this jig was that once built you never had to reset fences or depths, just fire it up and slide the pieces through. Because it was relatively compact the whole thing could be put up on a shelf or under a table out of the way when not in use.
Credit for this goes to Spence Hinkle, my instructor at the time, and who it appears still works at PCC part time (I’m embarrassed to admit I had to go looking on the school’s website to find and remember his name). If I remember correctly he said he had seen the jig somewhere else and just fabbed one himself. I think his was made from 1/2″ melamine scraps screwed together with black drywall screws and had an old craftsman 1.5 horse bolted in. I’ve never had a need for one myself but for 20+ years have kept it in the back of my mind in case I ever needed it.
Roger,
I don’t know…1/4″ router bits are always so slow and don’t ‘want’ to cut, plus they scream so loud! Maybe I’ve been using them wrong, but dado blades cut rabbets and grooves much more smoothly, a lot faster, and pretty quietly, especially if you’re using a Bosch table saw–they almost hum. BUT…that’s a pretty expensive dedicated tool to have setup in a shop! And the footprint is huge, too.
Gary
Wow
Thank you for the help. Really found your pics and description a big help.
I’ve used this method for a few years and it is my go to when I need some reliable and quick drawer building. Dovetails are nice but this joinery is probably just as strong and still looks neat.
I can’t take credit for this. The idea came to me from several sites and I combined them together.
You named it beautifully.
Great work!
I realize this is an old post, and that I’ve commented on this before, but I just reread this really GREAT article as I’m getting ready to build some drawer boxes using this method for a bathroom vanity. My primary reason for the reread is that I’ll be using prefinished plywood for the drawer sides, and I was concerned about the reduced raw-wood glue surface due to the factory-applied finish. It appears that Mr. Phipps was not concerned with this, so neither am I. I have two additional comments:
(1) This article addresses the grooves for the 1/4″ thick plywood drawer bottoms, but it doesn’t mention how to size the bottom. This is somewhat unfortunate because this is another huge benefit to using this method. All of the information for sizing the drawer bottom can be taken directly from the milled sides — i.e., the bottom width is the tongue-to-tongue distance on the front and back (less maybe ~1/16″) and the bottom depth is the distance between the leading and trailing edges of the grooves in the sides (again, less maybe ~1/16″). No need for a tape measurer, just mark the drawer bottom in place…another benefit!!!
(2) For those that may not want to cut the tongues with the workpiece held vertically as illustrated by Mr. Phipps, there’s an alternative method. That 1/4″ MDF spacer that was used for the initial setup can be clamped to the table saw fence as an auxiliary fence. This allows the tongues for drawer fronts/backs to be milled on the flat. You can use a miter gauge or simply back up the cut with a scrap of wood that has a square edge. Make a test cut of the tongue first using a scrap of the drawer plywood and fine tune the blade height as needed based on test fits of the joint. Once everything is dialed in you can machine away.
Again, a great article to come back to over 1 yr later…
Josh
Son of a gun – I’m contemplating building my own drawer boxes and just came across this article. As I read it, I wanted to shoot Steve a quick THANK YOU for taking the time to share his technique w/others. That is, until I reached Gary’s message. I hope Steve’s family and friends occasionally peek at this thread to see his advice living on. Oh WTH – THANKS STEVE!
I’ve seen a lot of drawers with dado or rabbet joinery come apart under normal usage. This seems like a very strong method, and I found it just in time to start building drawers for our kitchen & bath.
Thanks.
I’m attempting my first drawer box build for a home kitchen remodel, and Google led me here…and I’m glad it did! This is a fabulous method that has already settled the question for me even after just playing around with some scraps.
Quick thoughts regarding tweaks:
The essential of this method is that the dado/rabbet is precisely HALF the thickness of your material, whatever that thickness is. Scale the “quarter” up or down as necessary for the thickness of your drawer backs and sides. (You’re still probably stuck with a 1/4″ slot for the bottom because that’s the most available thickness, though.)
If you want to stick with a quarter-inch dado but your material is not a half-inch thick, the key change is the amount of material you remove from the front and back rabbets so as to leave a quarter-inch tongue: You’ll remove more for thicker material, and less for thinner. Mill the piece flat, and raise/lower your blade as necessary. (A previous poster described this same process in a different way, hopefully between the two of us the idea is made clear.)
The above adjustments will affect how the corner of the end and side outer faces meet. If this is a problem for you, then adjust the location of the dado on the sides (hint: increase your fence setting by the amount your stock thickness exceeds 1/4″.)
Since the dado depth and tongue dimensions are always the same with this method, the front and back rabbets will always just barely blow through to the slot for the drawer bottom. That’s when you know the rabbet is right.
Finally, dovetails were The Thing before power tools simply because they could be constructed by hand and were fairly resistant to those kinds of tolerances.
Now that we can machine wood, rather than just carve it, we end up with wood-wood contact that’s much more uniform with a dado than a dovetail, and we do less damage to surrounding wood fibers. That’s why locking rabbets are stronger than dovetails.
Question: why does he mill the bottom slot AFTER cutting the rabbets?
To me, it seems easier to mill the slot for the drawer bottom while the wood is still in one, long strip rather than four shorter ones. It also helps me keep track of which face is inside and outside…
As a beginner I might be misunderstanding how this works. In the assembly notes the author states:
“then I pin two sides to one back, slide in the drawer bottom, and press the drawer front into place, securing it with a couple pins, too”
Is this a typo? Wouldn’t the procedure be to pin the front and back to one side? Then you would slide in the bottom and pin the second side into place.
David,
Slide the bottom in from whatever direction you wish. Some fellows rip the back of the draw short, so that the bottom can slide in after all four sides are pinned together, and then you can fasten into the bottom of the back.
Gary
I think you are right David, once the sides are totally in place, the front would not go on because of the lock tongue. A side however, will slide over the front and back. Well spotted. It’s a strong and simple way of making drawers, if you can keep track of everything. Jim
What a treat to see Phipps’ picture and to read his article!
His set was next to mine at his last JLCLive show and I got to see a lot of his entertaining and informative presentation. He was on crutches and in real agony from surgery- it wasn’t long before his death- but no one in his big audience seemed to notice. I’ve never seen such courage.
Like any carpenter or woodworker I could talk shop with Steve for hours- it was hard not to. I always learned something, and I hope he did too. I think of him often.
Thanks Gary, for reprinting the article.
Jed Dixon
By the way, I make cabinet drawers the same way. I think I learned all the little tricks from Steve Phipps.
I love the Q Q Q system and typically use hard maple for drawer boxes. Using technique described, I add at least two walnut 1/4” Miller Dowels to the four corner joints. Sanded and clear coated, i’ve Never had a customer suggest they were short changed on quality construction.
I am not a big fan of holding the stock perpendicular to the blade (since I have an over the table guard) and there are safer options in this case. An option would be to clamp the 1/4 spacer to the fence and then cut the rabbets with the flat side down on the table. See the 3rd picture above where a 1/4 piece is used as a gauge. Just clamp that to fence.
This is a great, straightforward approach for guys like me. Would it also work for 3/4 inch drawer sides and ends if I used 3/8 – 3/8 – 3/8 set up instead of a quarter-quarter-quarter setup? Seems like it would. Has anyone tried to do this on 3/4 inch material?
How do you size and account for the front / back to allow for hinges and the slight overlap in cabinet doors of euro style cabinets?
Example:
Total width is 22.5
Slider requires 1/2 inch per side = 1 inch
Hinge obstructs .75 inch per side = 1.5 inches
So: I need to build a brace for the sliders of .75 for each side, then allow the customary .5 inch for the slider. So in total cabinet width less 2.5 inches.
Am I overthinking this?
I have a questions about the quarter, quarter, quarter drawer system. Wondering if the drawer groove (for the bottom) shows up on the external edges after the drawer is complete….or is it hidden.?
It shows up at the front and back of the drawer, but since you always install a false drawer face/front, that hides the drawer bottom from the front, and the back doesn’t matter.
Can the QQQ System be done with a 1/2” thick bottom
In other words 1/2 1/2 1/2 system or 3/4 system
Yes you can i have tried for bigger cabinets that need the drawer to be a bit more stronger for putting heavy stuff in it and it never let me down yet, works absolutely fine my friend go for it!
Wonderful article. Sadly, I never see true dimensional plywood to make this system’s calculation simple.
Anyway, for clarity sake and to help with web search, the other names for this type of joinery are:
Barefaced housing joint
Tongue housing joint
Lock rabbet joint
Barry,
You need to buy your plywood from a hardwood plywood supplier. Baltic Birch plywood is available all over the country in exact 1/2″ thickness. Using anything else is just too dang difficult.
Gary
Thanks for this article. I’m certain it’s old but always helpful as a review. Nice to know that this is a (small) part of Steve’s legacy of ingenuity and creativity. I’ve used this method for awhile in the shop cabinets I’ve made but adapted it to included a flush fit full face front cabinet. So the front overlays “X” inches to appear as an inset front. The measurements are tricky for me between how much overlay vs reveal but rewarding. Just built a solid maple outfeed table for my new saw (overkill I know) but I’m going to use his QQQ technique and some maple drawer fronts. Thanks again for sharing
JDN
I’ve seen these joints on my 100 year old watchmakers desk and they are still strong. I’m thinking about using 1/4″ dado planes to make a small drafting desk with flat file drawers using this method.. Thanks for the info. RIP Steve, any friend of Bill is a friend of mine.