Most finish work is a matter of repetition. And if you don’t come up with a good system for all that repetition, you’ll never make any real money. I had one job where we had to glue up almost 100 panels made from a mixture of recycled beech and maple. We wanted to biscuit all those glue joints, but the last thing anyone on my crew wanted to do was plunge a hand-held biscuit joiner a few thousand times. And the last thing I wanted to do was invest in a big-dollar tool that I might not have a real need for again.
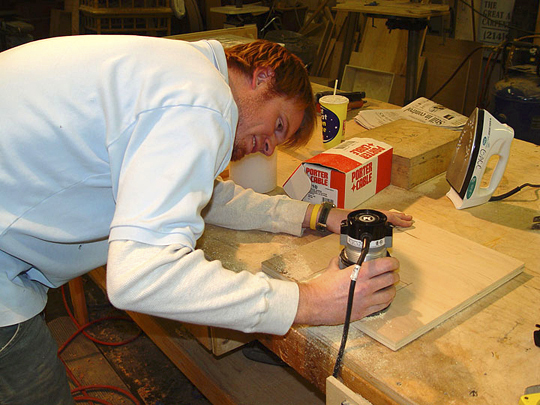
So Adam Myers took charge of making a good idea work in 3D.
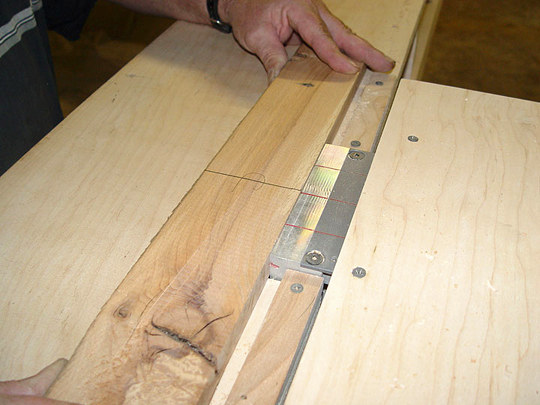
Here he is routing out the top cover to help hold the biscuit joiner in place.
(Note: Click any image to enlarge)
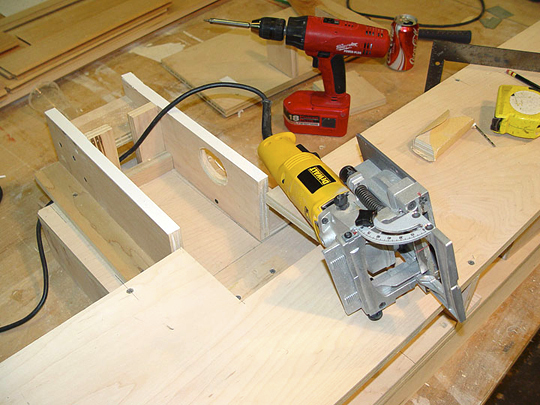
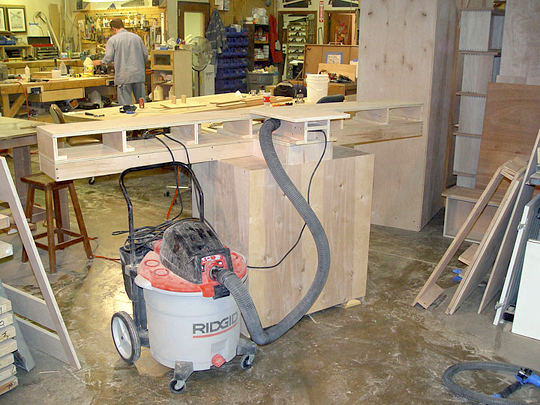
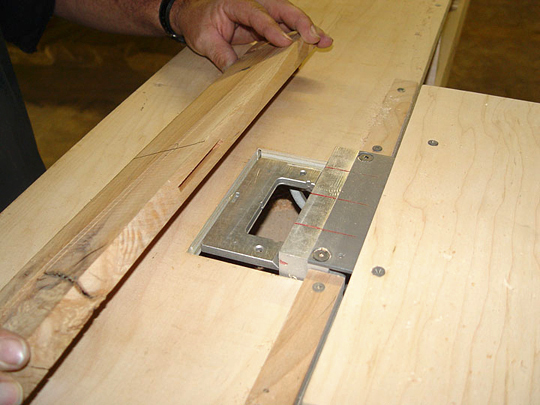
The biscuit joiner had to fit just right in the cradle. That hole in the side is for a vacuum. You can imagine the mess you’d make otherwise.
Inverted in the table, the top was perfectly flush, and the housing was held back far enough so that it wouldn’t interfere with the plunge action of the joiner.
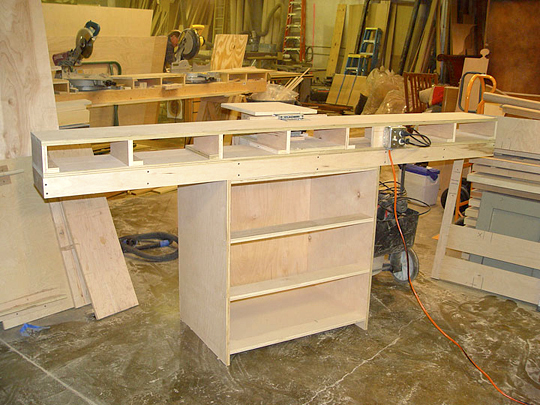
We designed the top as a torsion box, rigid and perfectly flat.
And we finally got some use out of a mis-cut cabinet from a previous job. That switched outlet was a piece of ingenuity, too. Always remember to think about power when you build any workstation.
One outlet powered the joiner, and the other powered a shop vac. We could turn both on or off simultaneously.
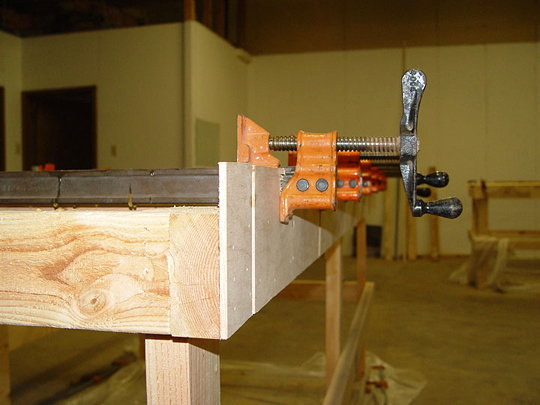
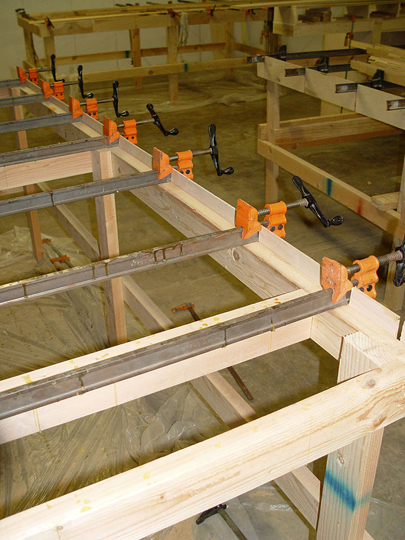
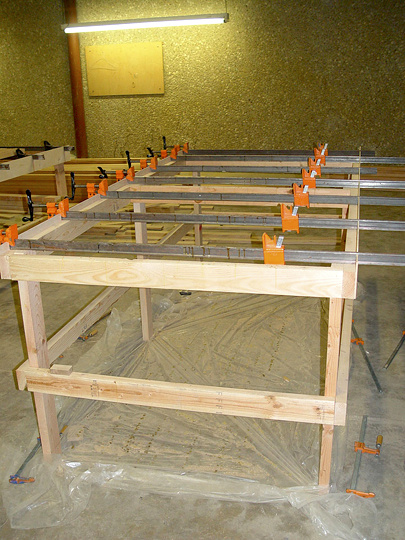
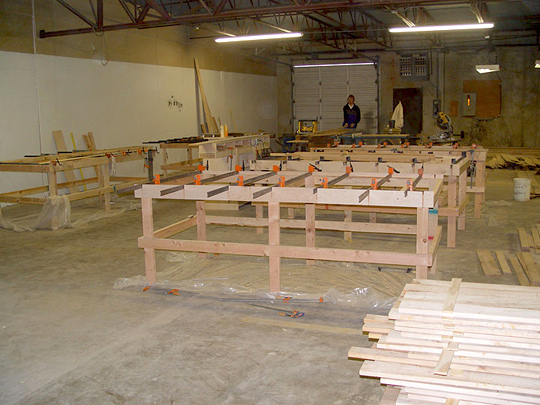
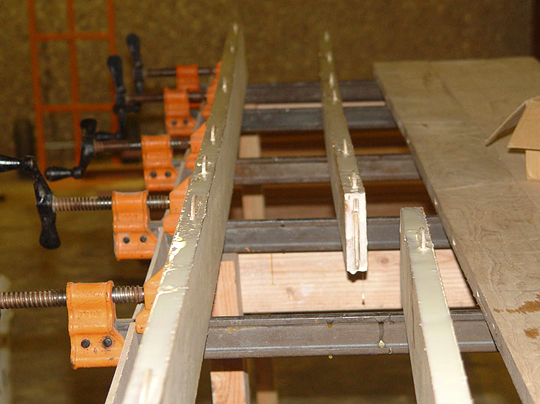
Next, we set up a few easy-to-use clamping stations.
We built a 1/4-in. plywood rim around the tables so the barclamps would stand up.
The tables were wide enough for the widest panels we had to glue up. In case you haven’t figured it out, we had a lot of panels to assemble. With this many tables, we were ready to work.
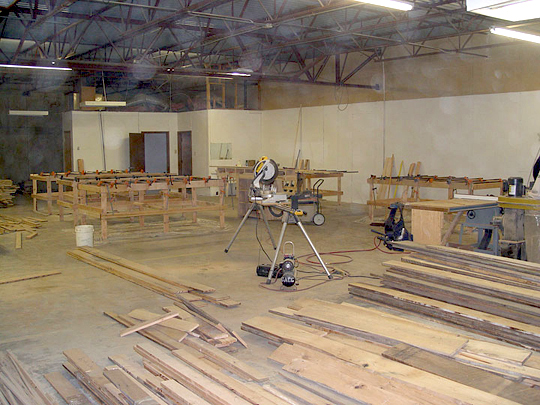
Set-up for the operation was simple. Once we had the biscuit joiner mechanized, and the lay-up tables ready, we only needed a table saw, a joiner, a chop saw, and a LOT of space.
We set the shop up to move the lumber from the tooling area (saw, planer) to the table joiner, to the clamp tables, to the stacking area.
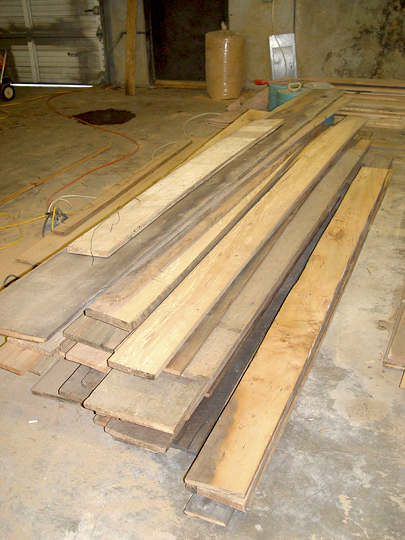
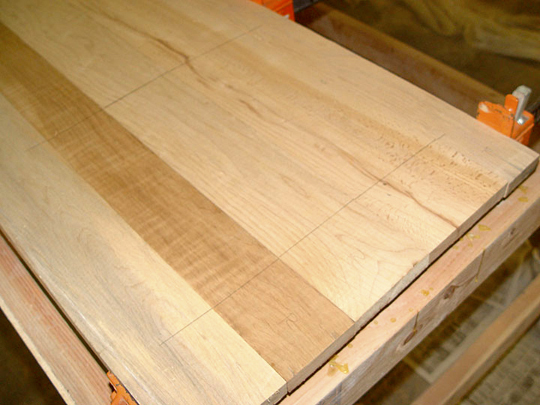
We had to S4S all the material to uniform widths and thickness. We also had to fumigate and de-nail the entire 3,000 bdft. The lumber was shipped to us from Ohio—it was reportedly over 100 year-old reclaimed beech and maple. Once it was planed, we found a few pieces of poplar mixed in.
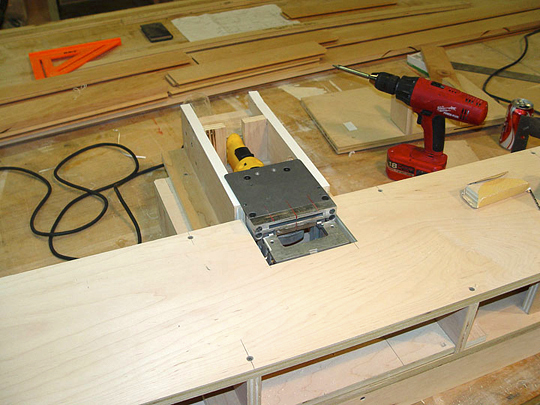
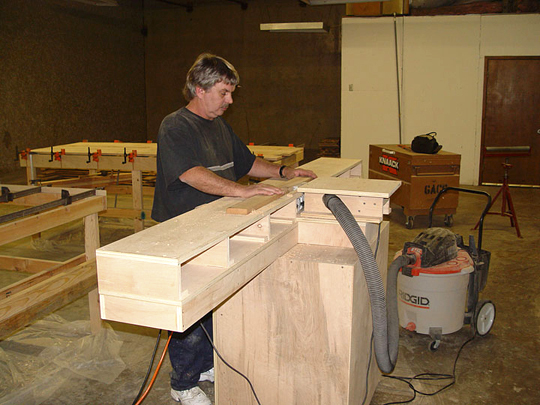
Here’s Mike Bell at the table joiner.
Each panel was dry fit and laid out with pencil lines for biscuits.
Then each piece was pushed against the table joiner at the pencil lines.
By holding the boards down tight and flat against the table, each pocket was perfectly aligned. After all the pockets were cut, the boards were returned to the clamp table.
We weren’t quite done with the job when I wrote this article, but we had already gone through 25 gallons of white glue. We like to use white glue for this kind of set-up because it dries slower than yellow glue, which allows for more work time.
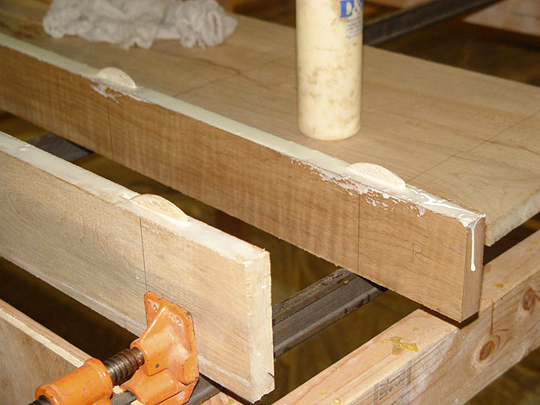
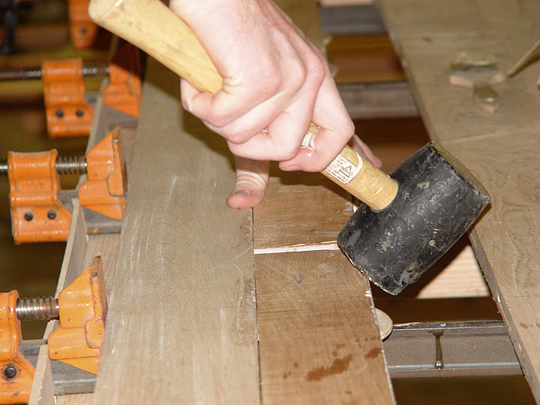
All end joints received biscuits, too, and a little persuasion was necessary on occasion.
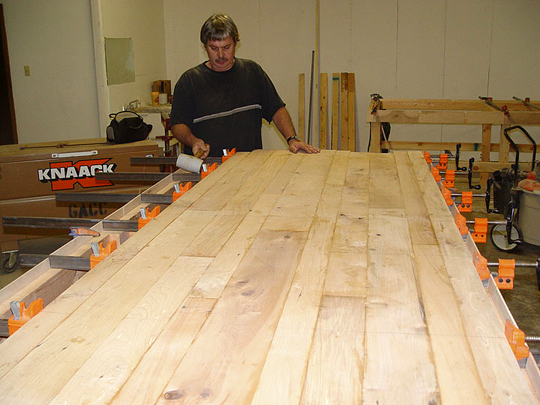
As you can see, some of the panels were pretty wide.
We kept them flat with additional clamps and bracing, but first we wiped off all the excess glue with wet rags.
Most of the wider panels (some over 60 in. finished) were laid up to 40 in. wide, then sized and assembled in the field. You guessed it: we had a serious restriction on the width and length of our panels—the size of the elevator; the residence was on the 18th floor!
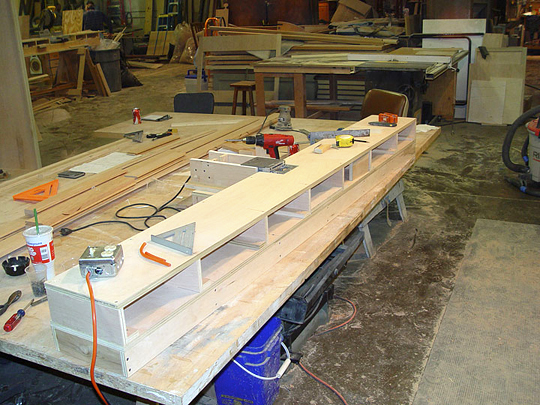
Here’s a pile of panels ready for the drum sander.
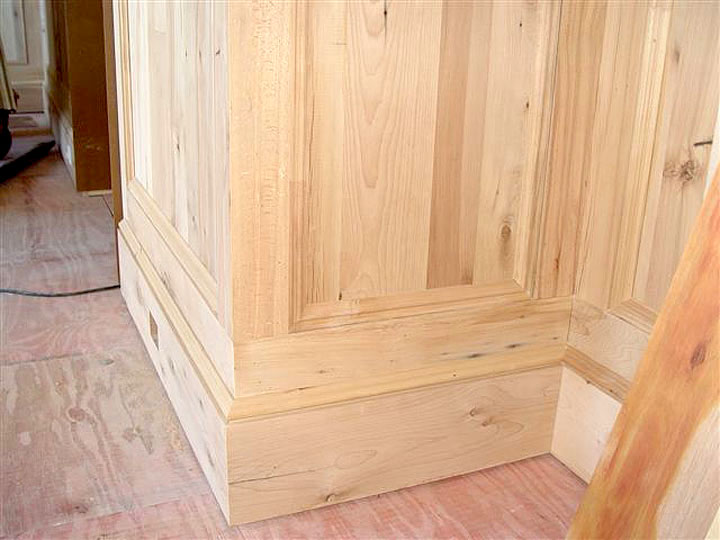
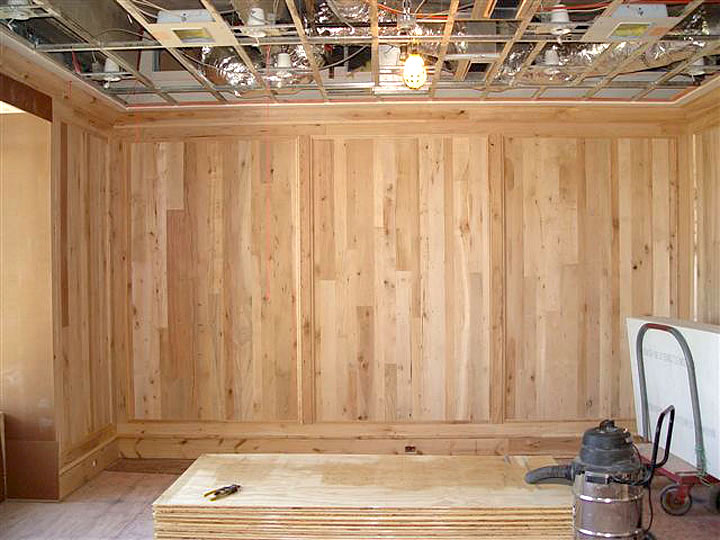
As you can see, there are a lot of panels, and they’re wide. But it’s the frames and the trim that really make the room.
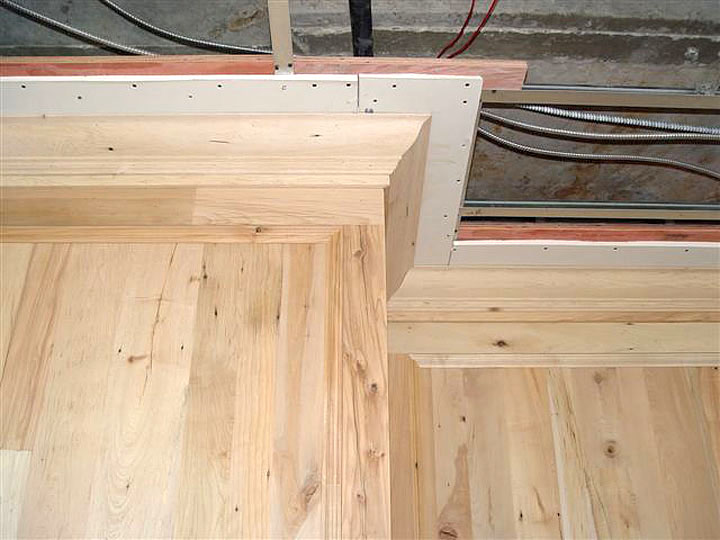
We milled the face frames, the panel molding, and the baseboard cap.
We shopped out the crown molding to a local millwork company, but supplied them with our material. And if you’re wondering what that drywall is doing up there, in the way of the suspended ceiling…haven’t you ever worked on a commercial job where they want you working, but they’re not ready for you?
Gary Katz says that this is one of the best times to be a finish carpenter, because of all the new tools, technology, adhesives, and materials we’re able to use. At the time I wrote this article, it was also one of the best times because the economy had fueled jobs of this quality. Still, it’s a lucky thing to be a finish carpenter today.
21 Responses to “Low-Budget Mechanized Biscuit Joinery”
Ed Latson
Very cool! I’ve been practicing in this profession for 41+ years and, ‘Wow!’, you’ve taught me several really great ideas for large format glue-ups. And that trick with the biscuit joiner table is priceless, too—–excellent!
Any chance of seeing the finished work in place????
Thank you for some cool ideas.
Best regards and continued goo luck,
Ed Latson Danby VT
Unfortunately, the finished product is located in a penthouse apartment here in Dallas, and the original owner has since sold the place. There’s no telling if the new owners kept that billiard room intact or if they gutted it which is often the case in high-end residences around here.
I’m glad to hear you found the tricks useful. It was a real time saver for us.
Very Nice! Glad you mentioned that it was a billiard room, I thought it might have been for a public bar or restaurant. I hope if someone did revise it later, they had the foresight to disassemble and save all the workmanship for re-use. My question is on pricing – did you quote this project or were you fortunate enough to run it T&M
Thanks
Art Wehnert
Yorkville, Illinois
T&M. It’s the only way I would agree to the project. There were too many unknowns to try to give what would be considered a reasonable price. I would have had to put in so many contingency dollars that the project wouldn’t have happened. There were issues with an unknown amount of waste with this material, the extra costs to rent the empty warehouse next door to my shop for assembly, plus being in a penthouse, I would have to try to factor in downtown traffic, and waiting on a very busy freight elevator to get the material up there.
As it turned out, the material was infested with powder post beetles and we had to have the entire shipment fumigated before we could bring it into our shop environment. That was a cost I didn’t anticipate.
But it was one of those lucky projects. I knew the GC very well, and the clients were people of means. We did a budget for all the costs we could foresee, and we kept everybody abreast of where we were with the budget as things progressed. As we were doing all the woodwork for that project, I don’t remember the exact final cost for that room, but I do know that we hit pretty close to our cost projections.
Very cool, A friend mounted a Virutex Biscuit joiner in a similar set up to make drawer sides. He attached a little air piston and foot peddle together to automate the process. The downside was the blade slammed into the material sometimes causing tear out.
Your way gives greater control on the plunge.
Yes, the glue was the binding agent that held it all together; the biscuits added nothing to that aspect. But they were indispensable with regard to keeping the faces of the boards all in the same plane. The wood was re-claimed English Elm and although it had been surface planed to the same thickness, there were still boards that were not perfectly flat from end to end.
Trying to keep those long wide panels as flat as possible during the glue-up process was the reason we used biscuits. We still had to do a lot of dead-blow hammering to keep the edges of the boards in line between the biscuit points. We were trying to keep the finish sanding to a minimum because every panel had to be a uniform thickness for the installation to go smoothly.
I began reading this article and pictured a biscuit joiner being held. I mean what other way could you possible use one right. This just goes to show that finish carpenters are engineers at heart. Excellent thinking out of the box.
Great write up and an excellent finished product. Any chance we can get a diagram with measurements of all the pieces you used to make the box the biscuit jointer is held in. Thanks
A set-up like this would have to be individualized to work with whatever brand of biscuit jointer you happen to have available. The tool we used at the time was a DeWalt. Today we use the Festool Domino system (GREAT tool) for applications where this kind of joinery is required. All you have to do is build a cradle to hold your machine upside-down and then start building a table around it. It’s more of a fill-in-the-blanks kind of process. But then, that’s the fun part!
We thought about T&G. All the boards came in random widths and the client wanted them laid in random widths. Plus, it was reclaimed lumber and wasn’t the flattest of lumber to work with. The first strike against the T&G idea was we would have had to equalize all the widths in order to run them through a two head moulder, and we didn’t have a 2 head moulder anyway. We also considered setting up on two shapers – one with a tongue and one with a groove. But by the time we got both shapers set up, dialed in and tuned up, and all the stock feeders feeding just right, we could have had eight panels already in the clamps. There was also the issue of tear-out as the lumber, which was very old, dry, and brittle, ran through the knives. Even a little tear-out or blow-out would have turned a usable board into cull. Also, trying to clamp up T&G boards that long can be a real fight. With the biscuits spaced out like we had them, it wasn’t much of a battle to get tight glue joints. It’s not that we didn’t consider T&G, but when we really considered the pros and cons, the biscuits won hands down.
Was any thought given to simply routing a biscuit-sized groove the full lenth of all boards, on both edges? (…referencing off the finished side to keep that face in the same plane.) Then, you can put your biscuits any where, or even spline to reclaim the lost glue surface entirely.
Thanks. Your idea would work. My only concern would be the same one you addressed which would be reducing the glue surface area and weakening the joint between the biscuits by taking out that much more stock. Trying to fill up the voids with splines sounds like it might be a pain trying to get biscuits and the splines to all line up with each other to then slide into the groove of the adjoining board. It was enough of a pain with just the biscuits! But it’s always good to consider all the options.
Got me thinking. Your pushing the material into the joiner instead of plunging the tool . Could it be done with a slot cutter in a router table or putting the plate joiner cutter on the spindle to have the proper radius and not have to slide the board. But just not to make the cradle . I love the idea.
Ah! I wasn’t sure what you were talking about by “dual miter boxes” until I revisited the photos. That set-up was not just for this particular paneling project, but used only as a space saver. We wanted to have at least one compound box and a slider set up at all times, and putting them in line seemed the most efficient use of space at the time.
We have since expanded our shop and have several kinds of miter boxes in various locations around the shop so we broke down the “dual” set-up. But it was real handy at the time.
We use cookies to improve your experience on our site. By using our site, you consent to cookies.
Cookie Preferences
Manage your cookie preferences below:
Essential cookies enable basic functions and are necessary for the proper function of the website.
Name
Description
Duration
Cookie Preferences
This cookie is used to store the user's cookie consent preferences.
30 days
CleanTalk offers effective spam protection and website security solutions to enhance user experience.
Name
Description
Duration
spbc_timer
Dashboard. Time spent on the page.
Session
spbc_log_id
Dashboard. User identification.
Session
spbc_2fa_passed
Dashboard. Flag defines if Two-Factor Authentication was passed.
Session
apbct_antibot
This cookie is used to distinguish between humans and bots. This is beneficial for the website, in order to make valid reports on the use of their website.
session
ct_check_js
Used in order to detect spam and improve the website's security.
session
ct_fkp_timestamp
Used in order to detect spam and improve the website's security. Does not store visitor specific data.
session
ct_has_scrolled
This cookie is used to distinguish between humans and bots.
session
ct_pointer_data
Used in order to detect spam and improve the website's security. Does not store visitor specific data.
session
ct_ps_timestamp
Used in order to detect spam and improve the website's security. Does not store visitor specific data.
session
ct_timezone
Used in order to detect spam and improve the website's security.
Session
apbct_cookies_test
Сookie to validate other cookies, so they can’t be spoofed.
Session
apbct_
Group of cookies which are set from backend and contain information about the current user
Session
ct_
Group of cookies used for storing dynamic variables from browser
Session
ct_sfw_
Group of cookies used for our SpamFireWall technology.
Session
spbc_cookies_test
Cookie to test cookies so we know that everything working properly
Session
spbc_firewall_pass_key
The flag defines if the Security Firewall was passed.
Session
spbc_is_logged_in
Dashboard. Flag defines if a user was logged in.
Session
CloudFlare provides web performance and security solutions, enhancing site speed and protecting against threats.
The cf_use_ob cookie informs Cloudflare to fetch the requested resource from the Always Online cache on the designated port. Applicable values are: 0, 80, and 443. The cf_ob_info and cf_use_ob cookies are persistent cookies that expire after 30 seconds.
session
__cfwaitingroom
The __cfwaitingroom cookie is only used to track visitors that access a waiting room enabled host and path combination for a zone. Visitors using a browser that does not accept cookies cannot visit the host and path combination while the waiting room is active.
session
cf_chl_rc_i
These cookies are for internal use which allows Cloudflare to identify production issues on clients.
session
cf_chl_rc_ni
These cookies are for internal use which allows Cloudflare to identify production issues on clients.
session
cf_chl_rc_m
These cookies are for internal use which allows Cloudflare to identify production issues on clients.
session
__cfruid
Used by the content network, Cloudflare, to identify trusted web traffic.
session
__cf_bm
Cloudflare's bot products identify and mitigate automated traffic to protect your site from bad bots. Cloudflare places the __cf_bm cookie on End User devices that access Customer sites that are protected by Bot Management or Bot Fight Mode. The __cf_bm cookie is necessary for the proper functioning of these bot solutions.
session
__cflb
When enabling session affinity with Cloudflare Load Balancer, Cloudflare sets a __cflb cookie with a unique value on the first response to the requesting client. Cloudflare routes future requests to the same origin, optimizing network resource usage. In the event of a failover, Cloudflare sets a new __cflb cookie to direct future requests to the failover pool.
session
_cfuvid
The _cfuvid cookie is only set when a site uses this option in a Rate Limiting Rule, and is only used to allow the Cloudflare WAF to distinguish individual users who share the same IP address.
session
cf_clearance
Whether a CAPTCHA or Javascript challenge has been solved.
session
__cfseq
Sequence rules uses cookies to track the order of requests a user has made and the time between requests and makes them available via Cloudflare Rules. This allows you to write rules that match valid or invalid sequences. The specific cookies used to validate sequences are called sequence cookies.
session
cf_ob_info
The cf_ob_info cookie provides information on: The HTTP Status Code returned by the origin web server. The Ray ID of the original failed request. The data center serving the traffic
session
Statistics cookies collect information anonymously. This information helps us understand how visitors use our website.
Google Analytics is a powerful tool that tracks and analyzes website traffic for informed marketing decisions.
Contains information related to marketing campaigns of the user. These are shared with Google AdWords / Google Ads when the Google Ads and Google Analytics accounts are linked together.
90 days
__utma
ID used to identify users and sessions
2 years after last activity
__utmt
Used to monitor number of Google Analytics server requests
10 minutes
__utmb
Used to distinguish new sessions and visits. This cookie is set when the GA.js javascript library is loaded and there is no existing __utmb cookie. The cookie is updated every time data is sent to the Google Analytics server.
30 minutes after last activity
__utmc
Used only with old Urchin versions of Google Analytics and not with GA.js. Was used to distinguish between new sessions and visits at the end of a session.
End of session (browser)
__utmz
Contains information about the traffic source or campaign that directed user to the website. The cookie is set when the GA.js javascript is loaded and updated when data is sent to the Google Anaytics server
6 months after last activity
__utmv
Contains custom information set by the web developer via the _setCustomVar method in Google Analytics. This cookie is updated every time new data is sent to the Google Analytics server.
2 years after last activity
__utmx
Used to determine whether a user is included in an A / B or Multivariate test.
18 months
_ga
ID used to identify users
2 years
_gali
Used by Google Analytics to determine which links on a page are being clicked
30 seconds
_ga_
ID used to identify users
2 years
_gid
ID used to identify users for 24 hours after last activity
24 hours
_gat
Used to monitor number of Google Analytics server requests when using Google Tag Manager


Very cool! I’ve been practicing in this profession for 41+ years and, ‘Wow!’, you’ve taught me several really great ideas for large format glue-ups. And that trick with the biscuit joiner table is priceless, too—–excellent!
Any chance of seeing the finished work in place????
Thank you for some cool ideas.
Best regards and continued goo luck,
Ed Latson Danby VT
Hey Ed,
Unfortunately, the finished product is located in a penthouse apartment here in Dallas, and the original owner has since sold the place. There’s no telling if the new owners kept that billiard room intact or if they gutted it which is often the case in high-end residences around here.
I’m glad to hear you found the tricks useful. It was a real time saver for us.
Regards,
Ed. Williams
Very Nice! Glad you mentioned that it was a billiard room, I thought it might have been for a public bar or restaurant. I hope if someone did revise it later, they had the foresight to disassemble and save all the workmanship for re-use. My question is on pricing – did you quote this project or were you fortunate enough to run it T&M
Thanks
Art Wehnert
Yorkville, Illinois
Hey Art,
T&M. It’s the only way I would agree to the project. There were too many unknowns to try to give what would be considered a reasonable price. I would have had to put in so many contingency dollars that the project wouldn’t have happened. There were issues with an unknown amount of waste with this material, the extra costs to rent the empty warehouse next door to my shop for assembly, plus being in a penthouse, I would have to try to factor in downtown traffic, and waiting on a very busy freight elevator to get the material up there.
As it turned out, the material was infested with powder post beetles and we had to have the entire shipment fumigated before we could bring it into our shop environment. That was a cost I didn’t anticipate.
But it was one of those lucky projects. I knew the GC very well, and the clients were people of means. We did a budget for all the costs we could foresee, and we kept everybody abreast of where we were with the budget as things progressed. As we were doing all the woodwork for that project, I don’t remember the exact final cost for that room, but I do know that we hit pretty close to our cost projections.
Ed.
Very cool, A friend mounted a Virutex Biscuit joiner in a similar set up to make drawer sides. He attached a little air piston and foot peddle together to automate the process. The downside was the blade slammed into the material sometimes causing tear out.
Your way gives greater control on the plunge.
A great project but I did not see how you operated the plunge of the biscuit joiner.
Lee
Hey Lee,
You just push the wood into it. Instead of pushing the joiner into the wood like usual, you push the wood into the joiner.
Ed.
Why are the biscuits used? I would think that the glue would do its job just as well.
Hey Alex,
Yes, the glue was the binding agent that held it all together; the biscuits added nothing to that aspect. But they were indispensable with regard to keeping the faces of the boards all in the same plane. The wood was re-claimed English Elm and although it had been surface planed to the same thickness, there were still boards that were not perfectly flat from end to end.
Trying to keep those long wide panels as flat as possible during the glue-up process was the reason we used biscuits. We still had to do a lot of dead-blow hammering to keep the edges of the boards in line between the biscuit points. We were trying to keep the finish sanding to a minimum because every panel had to be a uniform thickness for the installation to go smoothly.
Ed.
When you say white glue. I am not familiar with that. What brand is that? Thanks, amazing post!!!
Elmer’s. Just regular old Elmer’s glue.
I began reading this article and pictured a biscuit joiner being held. I mean what other way could you possible use one right. This just goes to show that finish carpenters are engineers at heart. Excellent thinking out of the box.
Great write up and an excellent finished product. Any chance we can get a diagram with measurements of all the pieces you used to make the box the biscuit jointer is held in. Thanks
Hi Steve,
A set-up like this would have to be individualized to work with whatever brand of biscuit jointer you happen to have available. The tool we used at the time was a DeWalt. Today we use the Festool Domino system (GREAT tool) for applications where this kind of joinery is required. All you have to do is build a cradle to hold your machine upside-down and then start building a table around it. It’s more of a fill-in-the-blanks kind of process. But then, that’s the fun part!
Ed.
Lots of expended labor– a simple tongue and groove would have saved tons of time and labor
We thought about T&G. All the boards came in random widths and the client wanted them laid in random widths. Plus, it was reclaimed lumber and wasn’t the flattest of lumber to work with. The first strike against the T&G idea was we would have had to equalize all the widths in order to run them through a two head moulder, and we didn’t have a 2 head moulder anyway. We also considered setting up on two shapers – one with a tongue and one with a groove. But by the time we got both shapers set up, dialed in and tuned up, and all the stock feeders feeding just right, we could have had eight panels already in the clamps. There was also the issue of tear-out as the lumber, which was very old, dry, and brittle, ran through the knives. Even a little tear-out or blow-out would have turned a usable board into cull. Also, trying to clamp up T&G boards that long can be a real fight. With the biscuits spaced out like we had them, it wasn’t much of a battle to get tight glue joints. It’s not that we didn’t consider T&G, but when we really considered the pros and cons, the biscuits won hands down.
Very impressive!!
Was any thought given to simply routing a biscuit-sized groove the full lenth of all boards, on both edges? (…referencing off the finished side to keep that face in the same plane.) Then, you can put your biscuits any where, or even spline to reclaim the lost glue surface entirely.
Hi Drew,
Thanks. Your idea would work. My only concern would be the same one you addressed which would be reducing the glue surface area and weakening the joint between the biscuits by taking out that much more stock. Trying to fill up the voids with splines sounds like it might be a pain trying to get biscuits and the splines to all line up with each other to then slide into the groove of the adjoining board. It was enough of a pain with just the biscuits! But it’s always good to consider all the options.
Ed. Williams
Got me thinking. Your pushing the material into the joiner instead of plunging the tool . Could it be done with a slot cutter in a router table or putting the plate joiner cutter on the spindle to have the proper radius and not have to slide the board. But just not to make the cradle . I love the idea.
Ed, what’s the story on the dual-mounted miter saws in sequence?
Ah! I wasn’t sure what you were talking about by “dual miter boxes” until I revisited the photos. That set-up was not just for this particular paneling project, but used only as a space saver. We wanted to have at least one compound box and a slider set up at all times, and putting them in line seemed the most efficient use of space at the time.
We have since expanded our shop and have several kinds of miter boxes in various locations around the shop so we broke down the “dual” set-up. But it was real handy at the time.
Ed.