


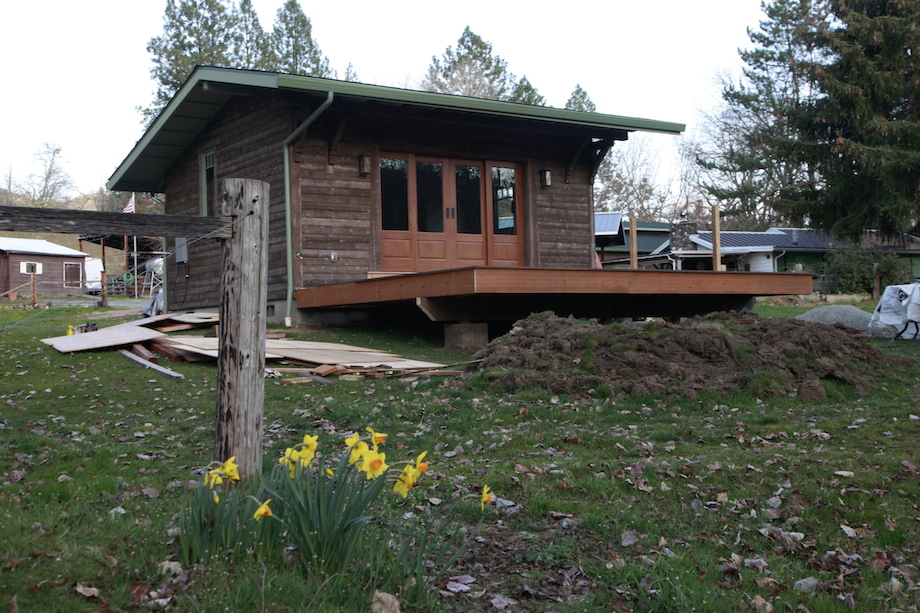
At my new home, I built a small guest cabin down by the river (reservations are booked years in advance, so good luck with that!). I wanted to open up the west wall of the cabin, along the river, to both the sight and the sound of the water. But I couldn’t afford a 12-ft. wide commercially manufactured sliding door unit. And besides, I wanted it to look cool. So I made the unit myself.
|
A Note from the Publisher: WARNING: POTENTIAL CONFLICT OF INTEREST! Many people have asked about my new home and shop, so we’re publishing a new series of articles. You’ll notice I’m using a lot of Katz Roadshow-sponsored materials in these articles—for example, the doors in this article are manufactured and provided by Plastpro. We choose our sponsors carefully, from among the best manufacturers in the industry, and that’s why I chose to use their products on my own home, too. |
.
A Careful Drawing
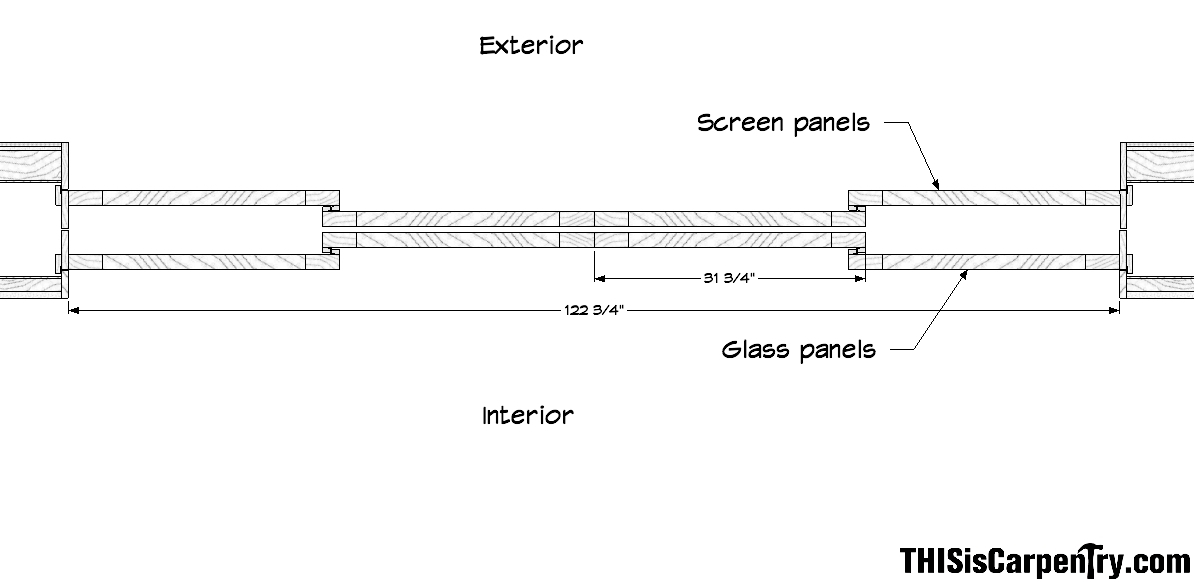
I started with a very carefully drawn plan in SketchUp, with no idea what the rough opening would be until I finished the drawing. The only thing I knew for sure was that I had to use 2/8 doors. I could have made the opening wider by using 3/0 doors—I had the wall space, but I wanted to save wall space inside the cabin for the wood stove and some furniture.
First I drew the four 1 3/4 x 2/8 x 6/8 doors with glass panels for the interior of the wall; then I drew in four 1 3/4 x 2/8 x 6/8 doors with empty panels for screens on the exterior of the wall.
(Click any image to enlarge)
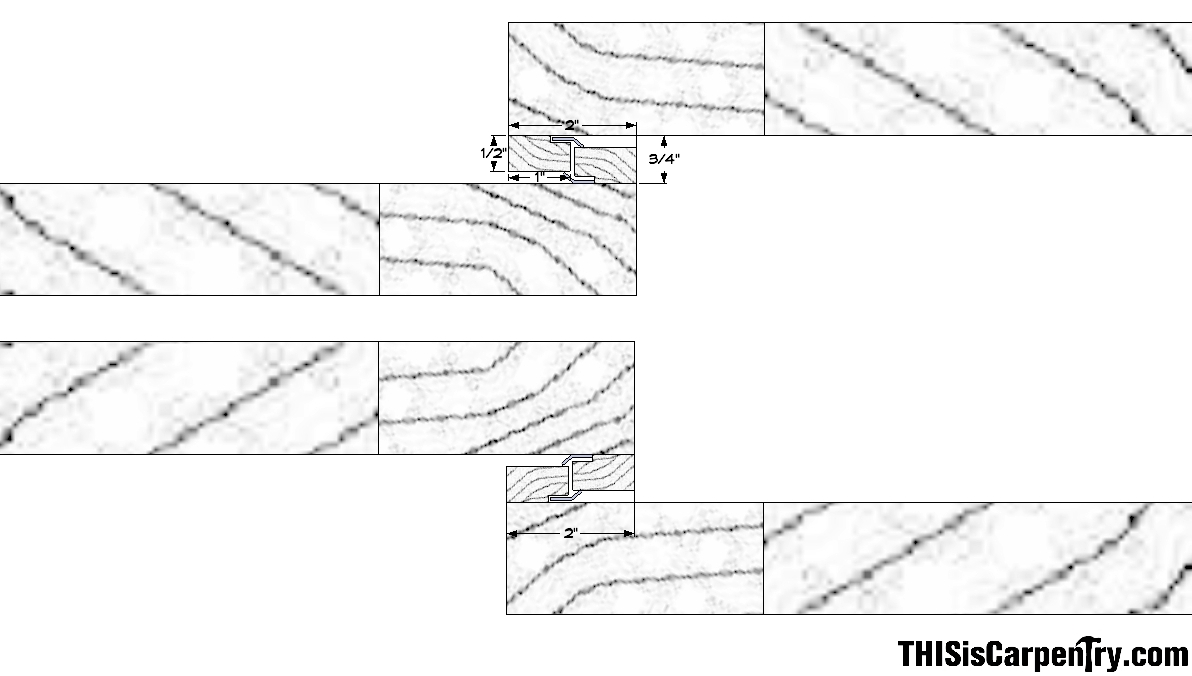
I knew I had to attach check rails—really check stiles—to the overlapping stiles so that I could properly weatherstrip the opening. I didn’t worry a lot about how much the doors overlapped, I just wanted them to seal. I added ½-in. x 1-in. strips to the back of the lead doors and also to the front of the rear doors. Before I fastened the strips, I rabbeted them so I’d be able to slip in Q-Lon weatherstripping.
With the check stiles defined, along with the spacing between the doors, I was able to draw the head jamb. I planned to kerf the tops of all the doors, on both sides, so the weatherstripping would seal the doors to the head jamb, and also provide a smooth surface for the doors to glide on.
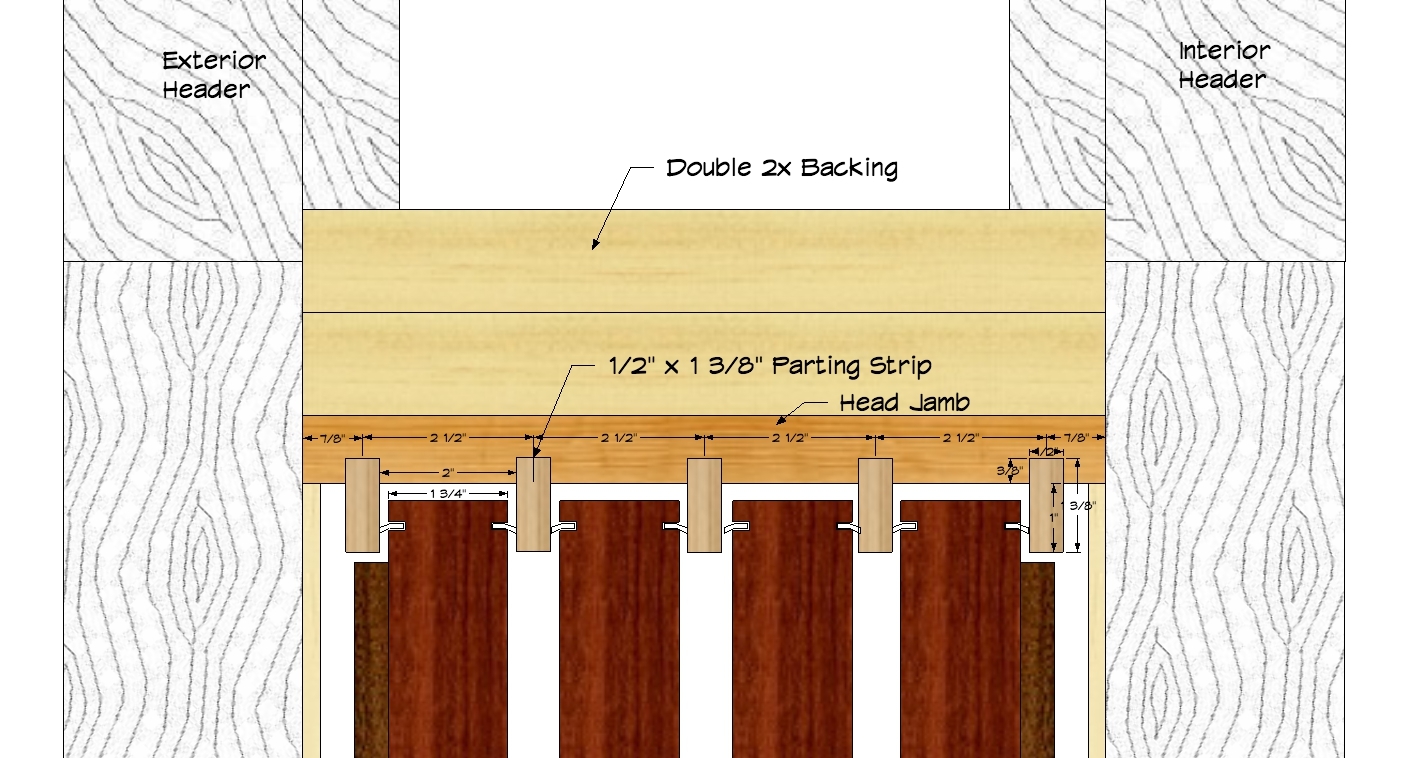
The darker wood strips on the outer doors are stops—see the jamb block photo, below.
Rather than trying to attach the parting strips with just screws, I wanted to groove the head jamb so the parting strips would be perfectly straight and all the spacing for each door would be perfect—otherwise, I knew I’d end up with one door that had too much wiggle room and another door that didn’t have enough!
Like the doors—which are fiberglass and made by Plastpro—I wanted the sill to be impervious to the sun and weather, especially near the river! So I planned to use Plastpro’s Polyfiber Jamb material and I knew I’d have to rip it and laminate the sill from several pieces.
The Polyfiber jamb stock has an oak grain, which takes stain nicely, so instead of beveling the top of the outside exterior nosing—and losing the grain texture—I decided to rotate that piece and bevel the back edge before gluing up the sill.
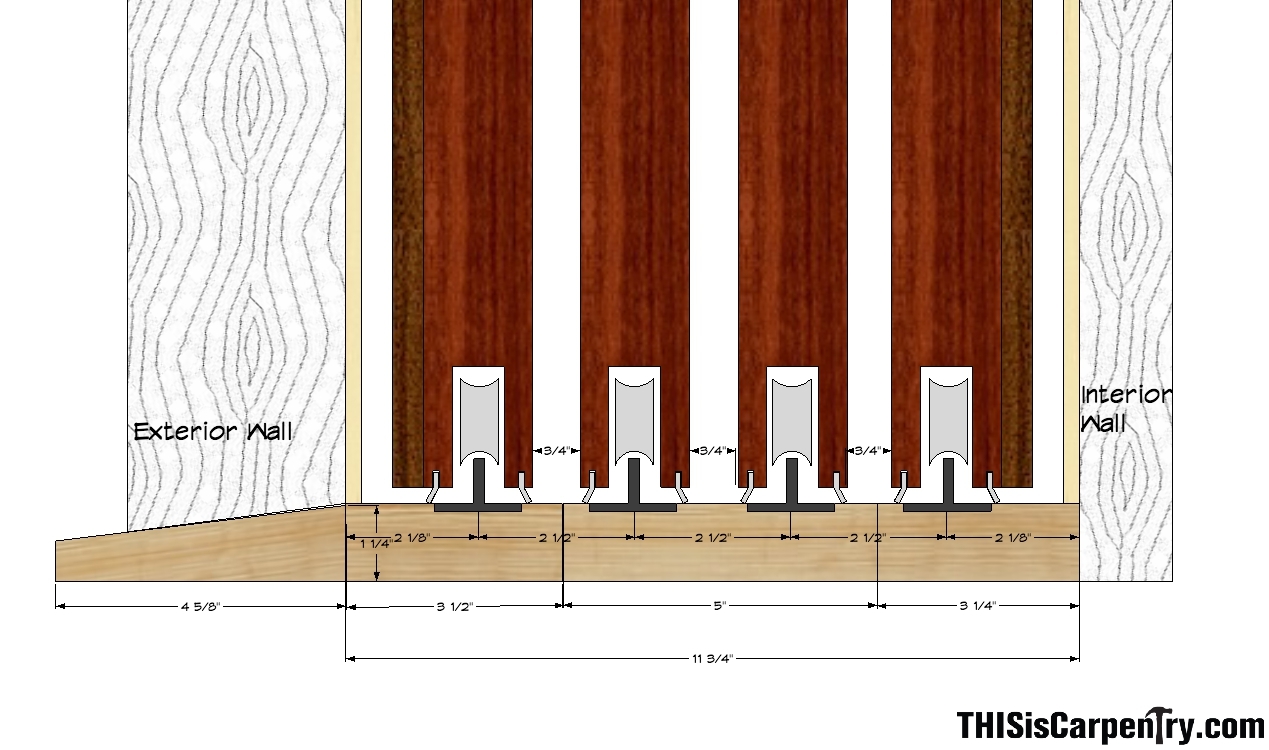
The overhang on that side of the cabin is 5 ft. deep—plenty of protection from rain and snow. The landing outside the pocket doors is 4 in. beneath the sill, which also provides protection from rain and snow. But I still planned to kerf the bottoms of all the doors, on both sides, to weatherstrip and seal the opening from air leaks and wind-blown weather.
The last critical detail was designing weatherstripping for the backs of the doors, which was pretty simple—I added a piece of 1x to the back of the rear doors and made it wide enough to strike the removable jambs, but not so wide that it would rub on the interior wall of the pocket. I planned to weatherstrip that stop, too.
I wasn’t the only one that worked on designing these doors. I had a lot of help from my brother Larry and from Todd Murdock, too. Larry—through his store in Southern California—helped me collect all the hardware. He suggested adding jamb blocking to the rear doors, too, so that in the winter, when the screen doors were retracted and in their pockets, and the primary doors were closed, you wouldn’t see inside the pockets.
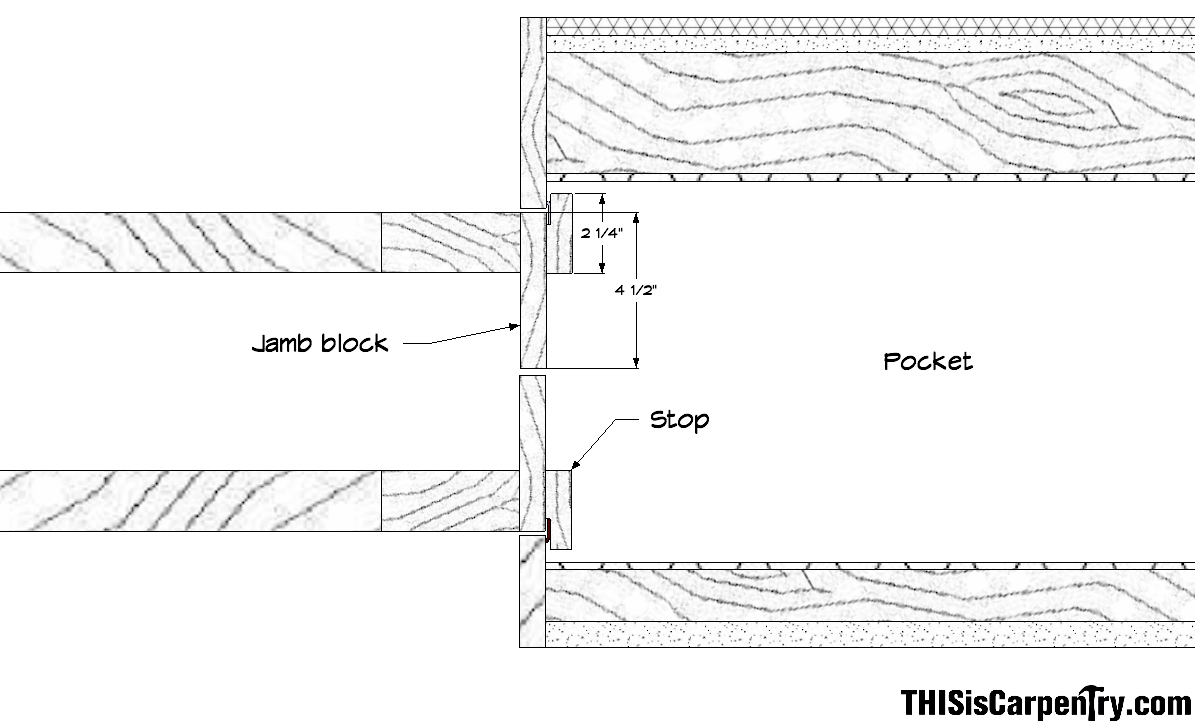
Those jamb blocks are also handy because the lead doors can push the trailing doors back into the pockets.
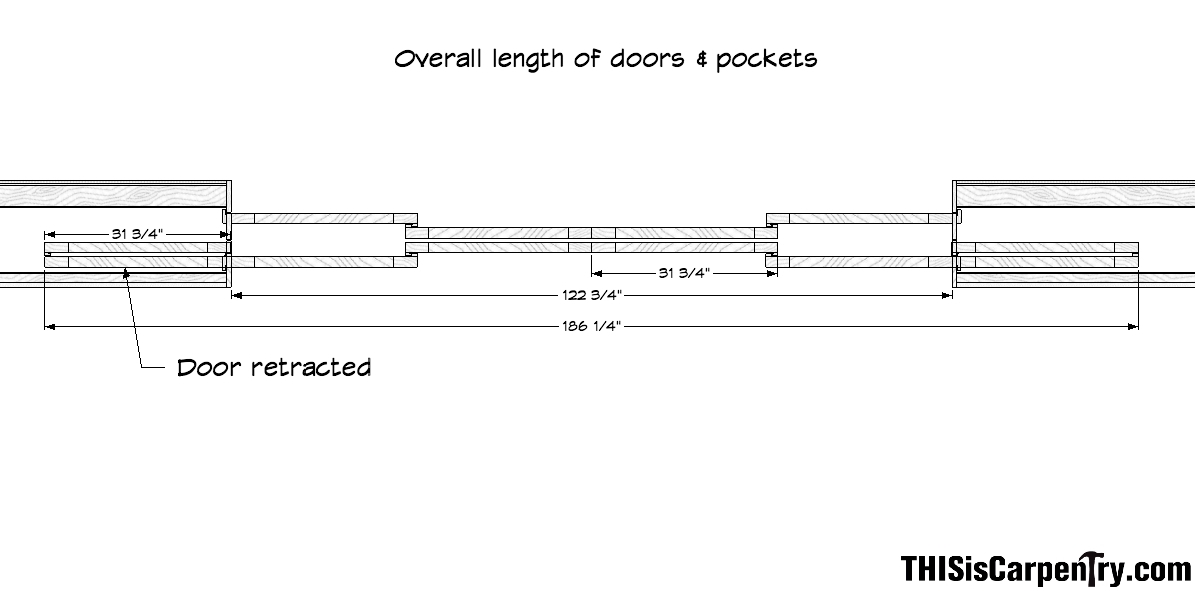
Once I had the details for the check stiles, the sill, and the head jamb worked out, it was easy to determine the O.D. of the doors and the I.D. of the jamb.
Likewise, once I had the O.D. of the doors and the I.D. of the jamb, it was easy to determine the depth and the O.D. of the pockets.
I didn’t want to worry about the exact header height, so we set the rough header much higher than necessary. I also didn’t want to cut the doors down, not even a little, because I knew the pocket mortises for the wheels would cut deep into the bottom rails.
And with the rough header set high, I figured we’d start by setting the sill, then use the full-height doors, riding on the track, to determine the precise height of the head jamb. Once the doors were all on the track and engaged in the head jamb, I figured we’d set the jamb legs and adjust the I.D. of the opening so that the stops on the backs of the doors kissed the backs of the jamb legs just as the lead doors touched. I know, that’s a lot of figuring…
But I honestly think I never would have tackled this project if it weren’t for SketchUp. There were too many details that I might miss—too much to try and keep in my head. Even one mistake could prove fatal to the function of the doors. I not only used SketchUp to test and prove that the design would work, but I also used it to develop a step-by-step schedule for the installation.
A Mockup
I used the same wheels that are found on many custom wood sliding doors and purchased them through Functional Fenestration, a company that specializes in sliding door hardware. The tandem wheels come in three types: stainless steel, which can carry up to 500 lbs. and is a necessity for coastal homes; steel, which can carry up to 400 lbs.; and nylon, which is rated up to 250 lbs. I used the nylon wheels because fiberglass doors are light, even with glass, and the nylon wheels roll very smoothly. Once I had the wheels in my hand, I made a mockup.
| Yeah, I relied a lot on the SketchUp drawing, but I still needed to reassure myself of other critical details, especially one thing that SketchUp couldn’t help me with: How far above the sill did the doors need to ride so that the weatherstripping wouldn’t drag too much and still seal the door? That determined the depth of the pockets for the wheels, though the wheels had some adjustment, too. | 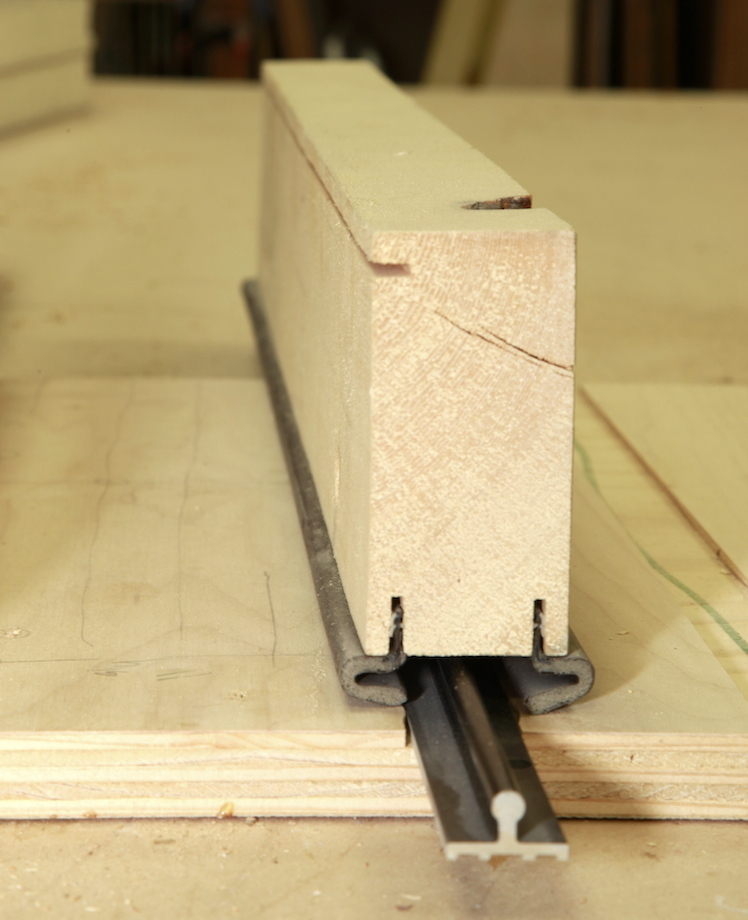 |
I also wanted to test the space at the head jamb I planned to allow for each door, along with weatherstripping on both sides.
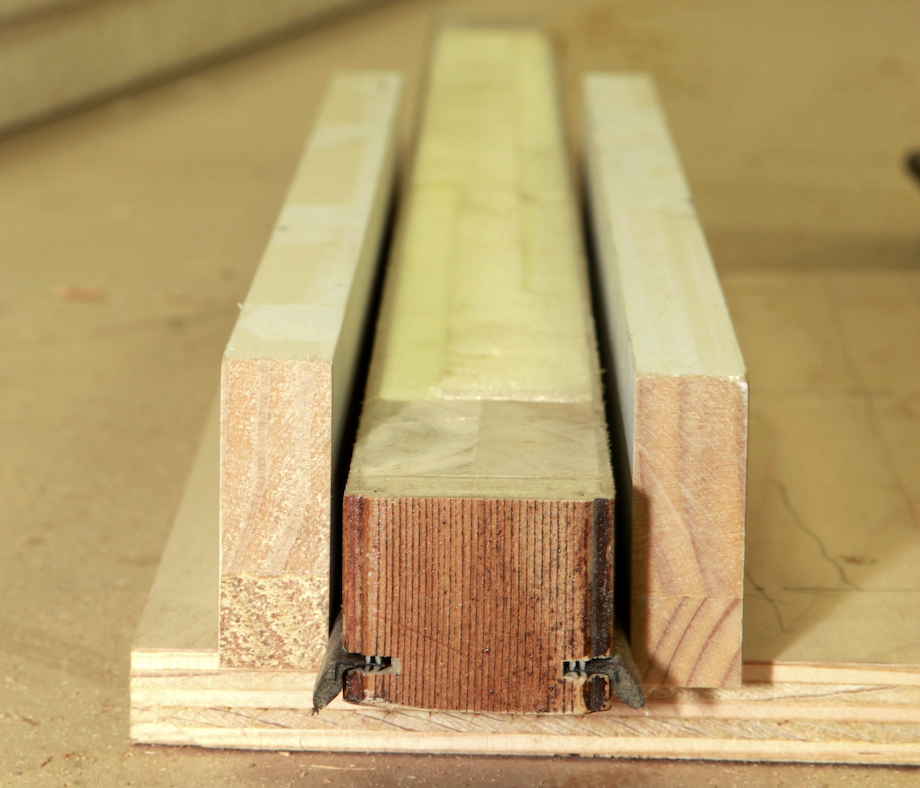 |
In the drawing, I allowed 2 in: 1 3/4 in. for the door and 1/8 in. on either side for weatherstripping. If the space was too tight, the doors wouldn’t slide easily; if the space was too wide, the doors might rattle. A functional mockup was the only way to know for sure. |
The Wheels
Building the mockups also provided the opportunity to dial in each dedicated router. The kerf-in weatherstripping for the head of the doors was smaller and required a narrower kerf than the weatherstripping at the bottom of the doors. The mockups also allowed me to test my router template and set router depth stops for the two-step mortises each wheel required. With four glass doors and four screen doors, I had to cut pocket mortises for 16 wheels. Definitely a production job.
I made a two-step template for those mortises. Router templates are so easy to make. Once you know the O.D. dimension of your template guide, just subtract the size of your cutter and you’ll know exactly how much larger to make the template for your hardware. In this case, the template guide was 1/8 in. larger than the router bit we cut with, so I added 1/4 in. to the I.D. of the template guide.
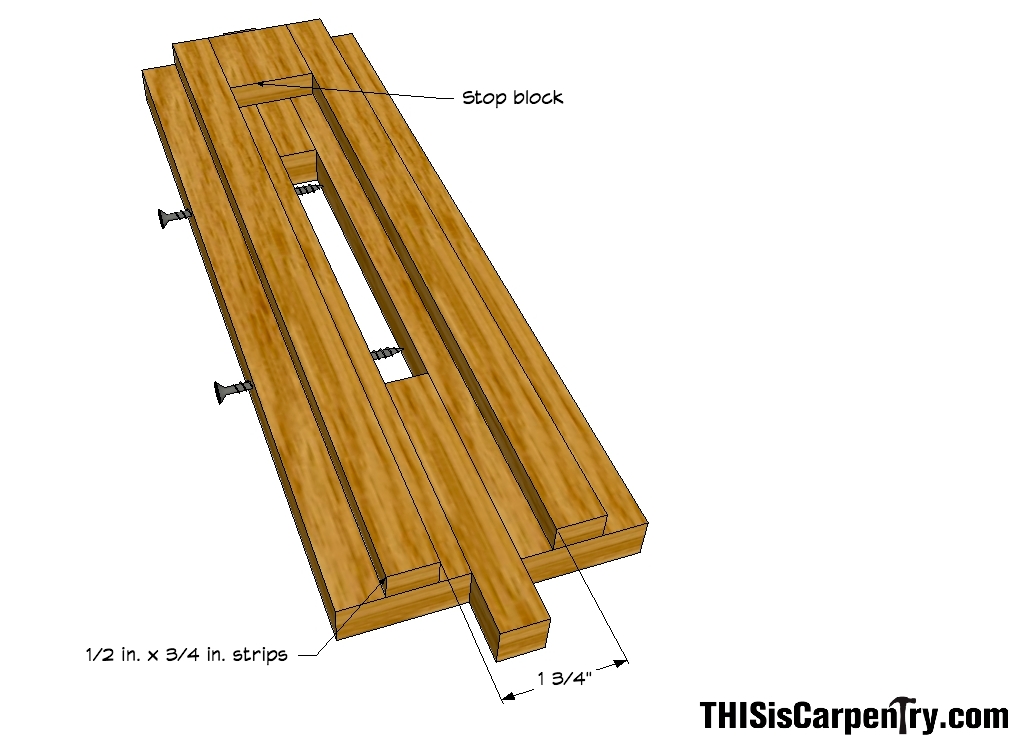
The wheels measure 6 1/4 in. long x 3/4 in. wide. So I made the I.D. of the template 6 1/2 in. long by 1 in. wide. First I ripped a 1-in. wide strip off a 16-in. 1×4. I cut that piece in half and glued it between two 8-in. pieces of 1×2, spacing those pieces 6 1/2 in. apart.
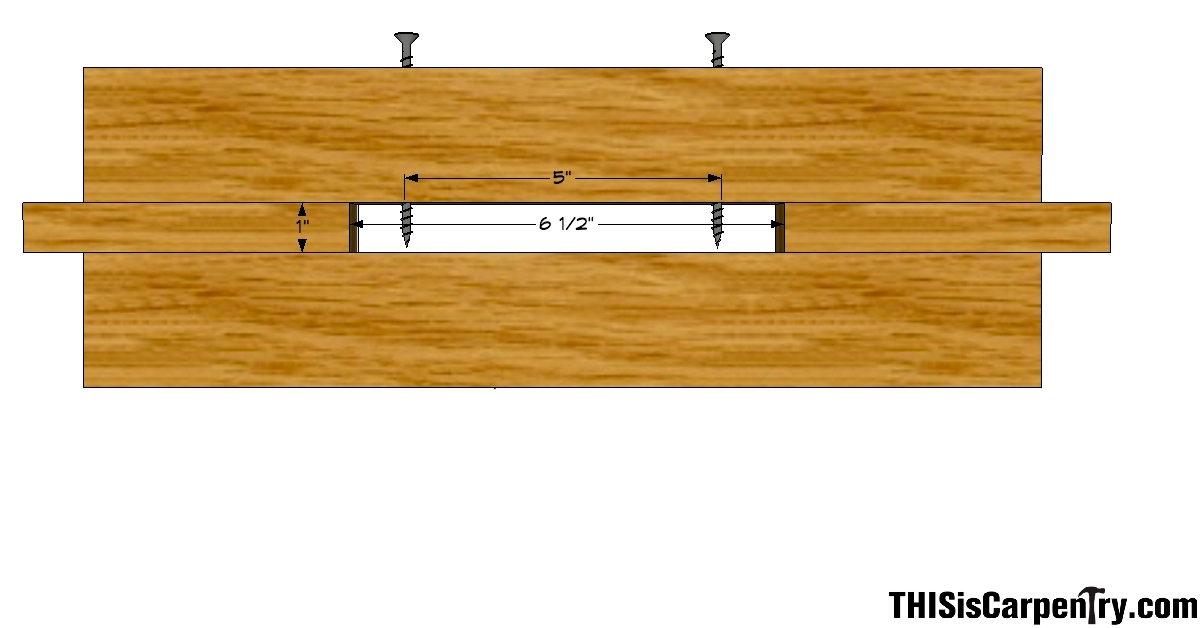
To be sure the mortises were cut right in the center of the doors, I attached 1/2-in. x 3/4-in. guide strips to the back of the template. And to position the mortises exactly the same distance from each edge of the door, I fastened a stop block between the guide strips.
The mortise for the wheels had to be cut with two steps: one shallow step for the shoulder of the hardware where the screw mounts, and a much deeper pocket for the wheels. The pocket had to measure 4 3/4 in. wide, so I pre-drilled for a pair of long steel screws, centering the screws and spacing them 5 in. apart. Using screws for two-step templates is a handy technique. I’ve used them for lock strikes that require large dust buckets, for Soss hinges, for flush bolts, etc.
Processing the doors
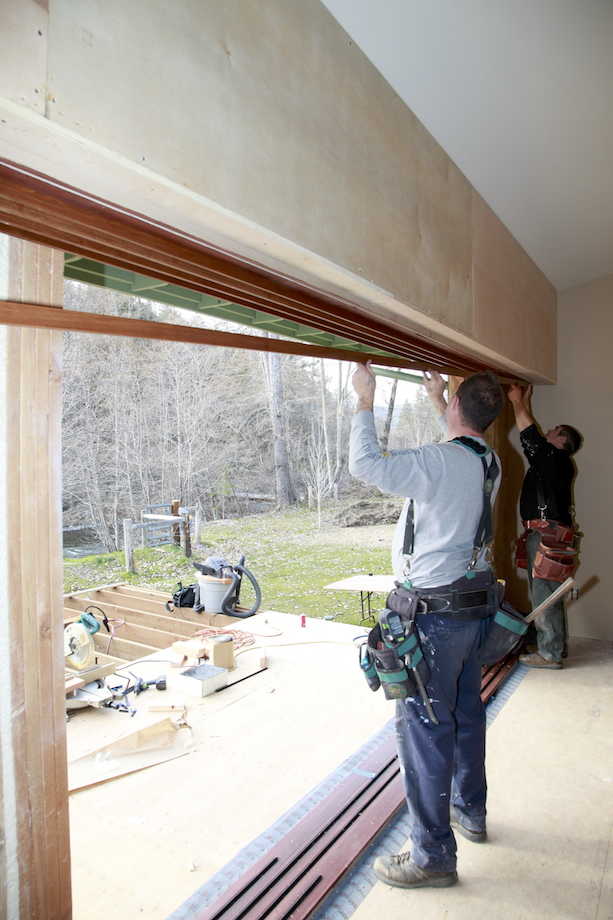
Once the mockups were completed, the hard work, at least the thinking part, was over. Fortunately, there were two of us doing all that thinking. Scott Wells was with me every step of the way, and there wasn’t a chance that he was going to let me do any of the actual processing. I was allowed to stand around and watch…and take pictures, and even a little video.
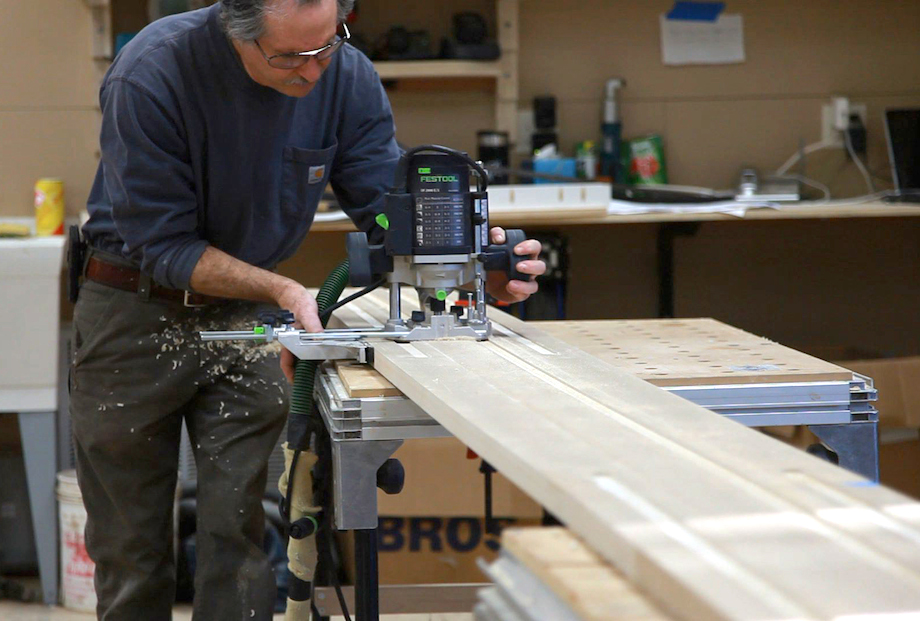
We started on the tops of each door and ran a slot cutter to kerf for the weatherstripping. Then we switched to the bottom of the doors where most of the work took place.
| We attached the two-step router template with a temporary screw. | 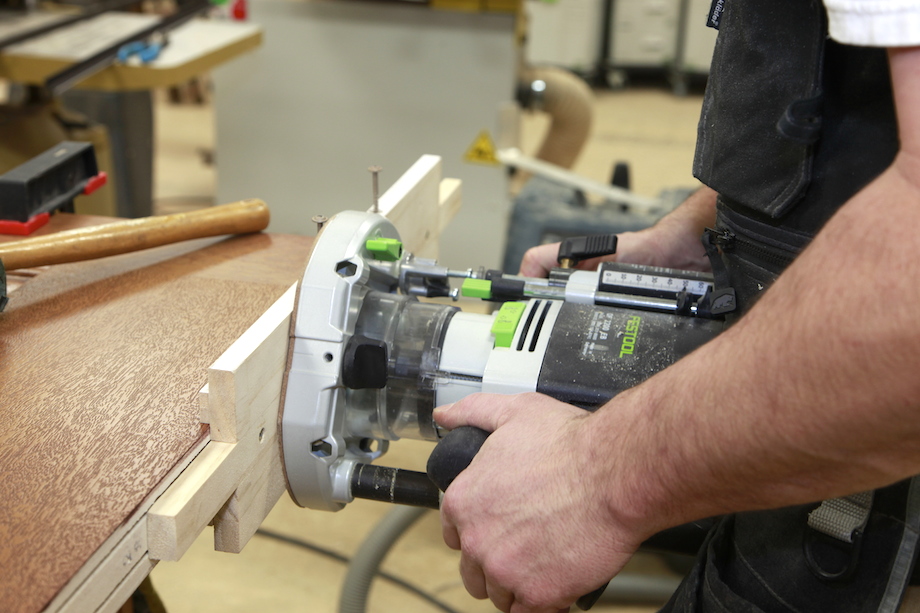 |
 |
Pre-set turret stops made it easy to adjust the router for each step. |
| We marked the template just to make it clear that the center section was cut deep. The pilot holes for the screws run through the top of the template and down into the bottom, too, so the template won’t split. | 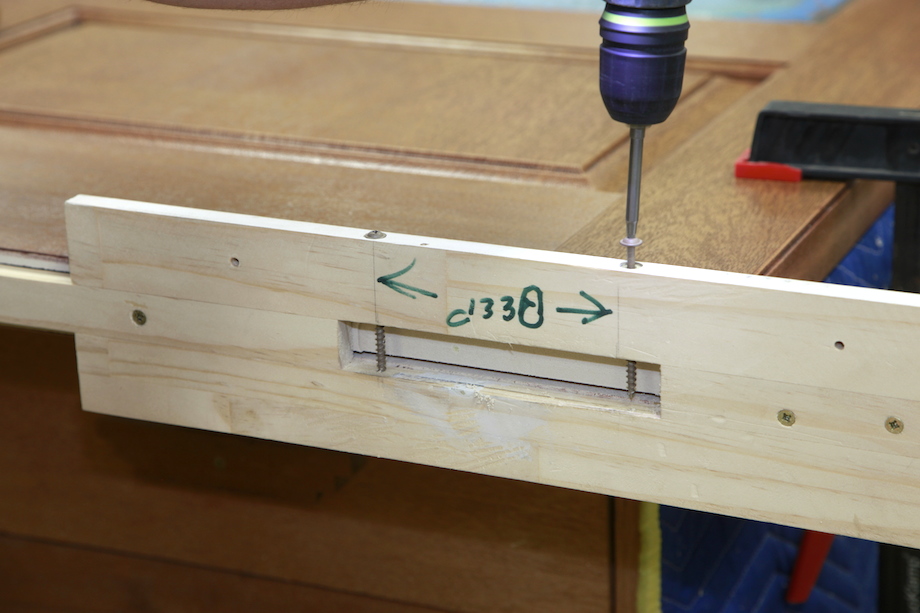 |
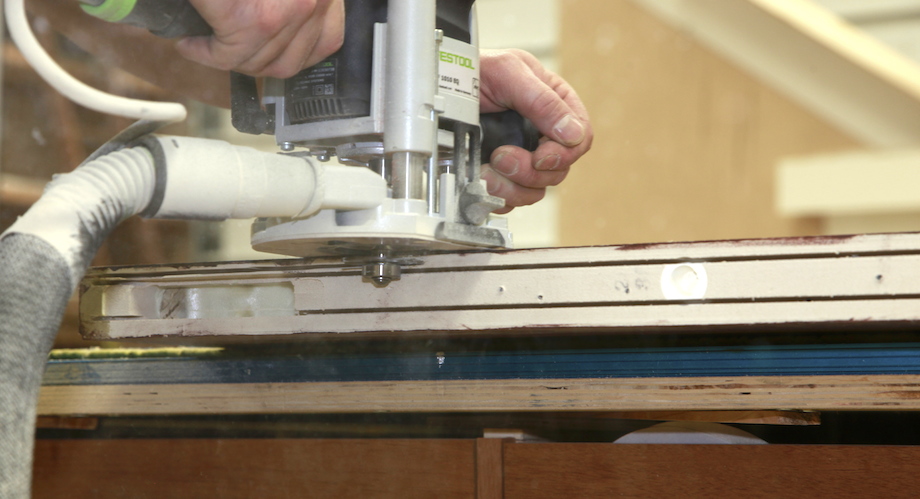 |
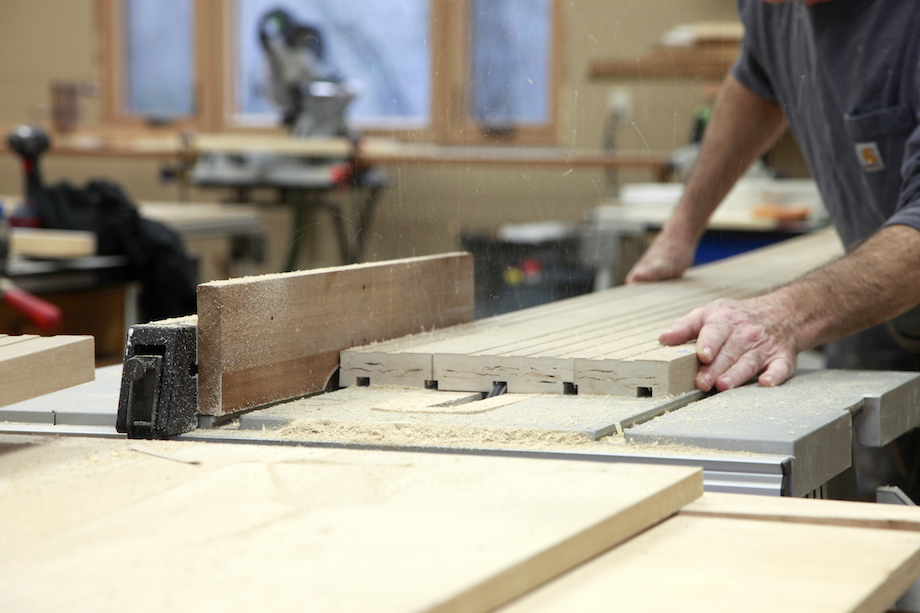
After we cut the pockets, we routed a kerf in the bottom of the door for weatherstripping. The two interior kerfs were machined by the manufacturer. I’m not certain why! |
| We even made a template to position the exact location of the access hole for the wheel height adjustment. | 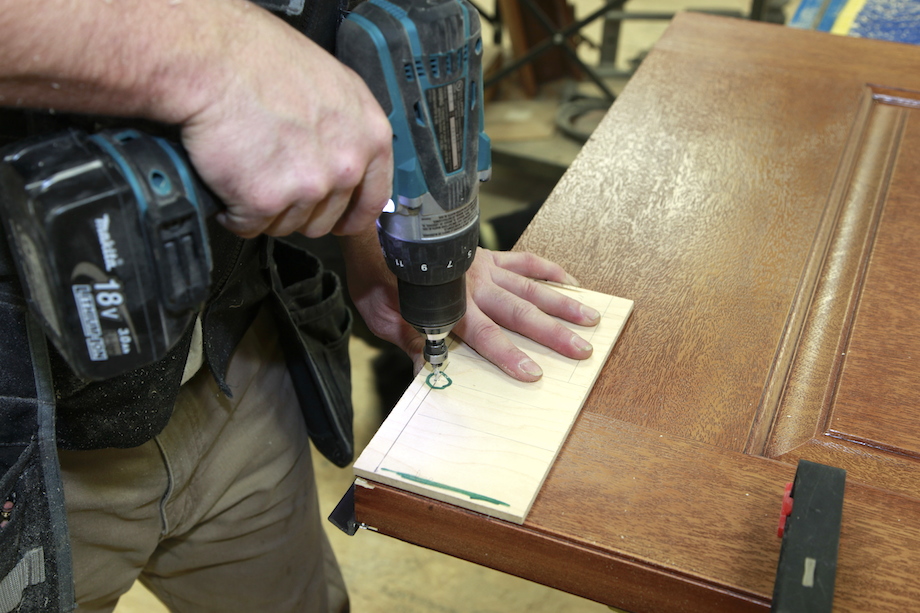 |
| And drilled the pre-finished doors with a forstner bit. | 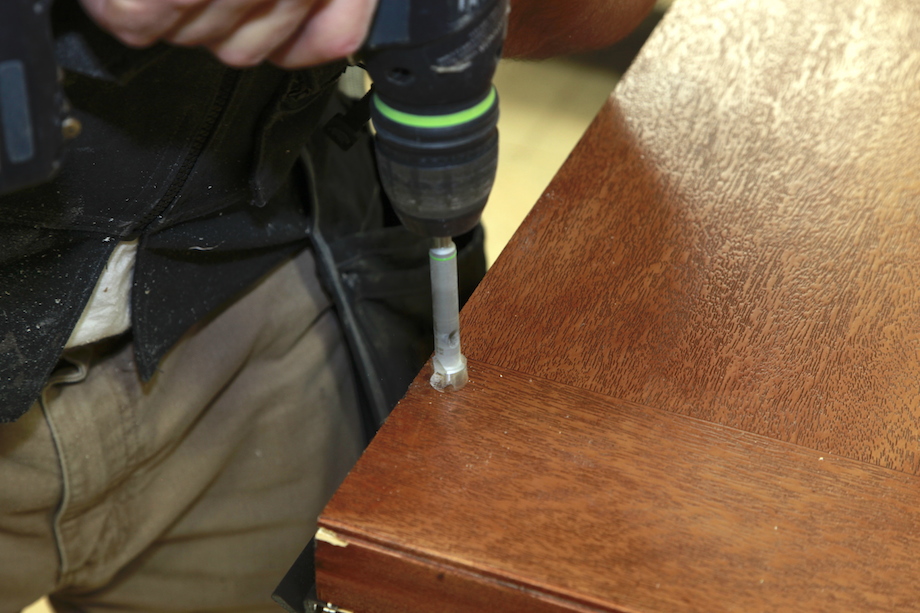 |
| Once all the sawdust was cleaned out of the mortises, we installed each pair of wheels. |  |
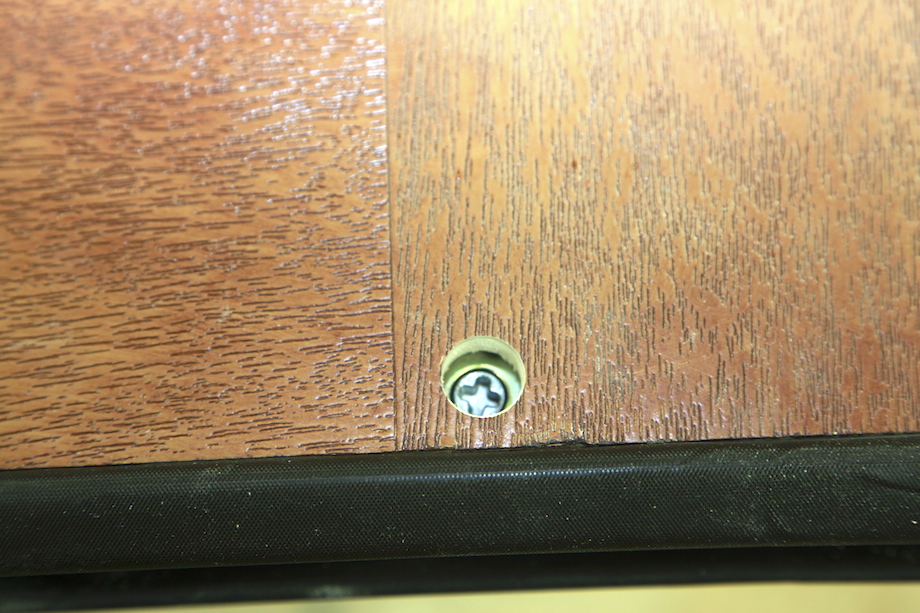 |
Yes, the adjustment screw was centered in the hole we drilled! |
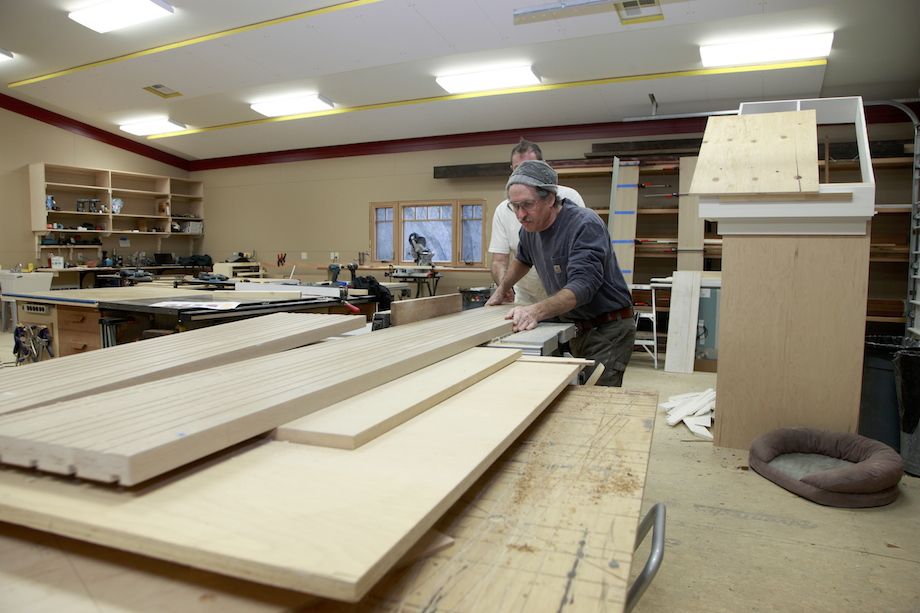
| Finally, we installed the weatherstripping in the bottom of each door, and then we carried the doors down to the cabin. | 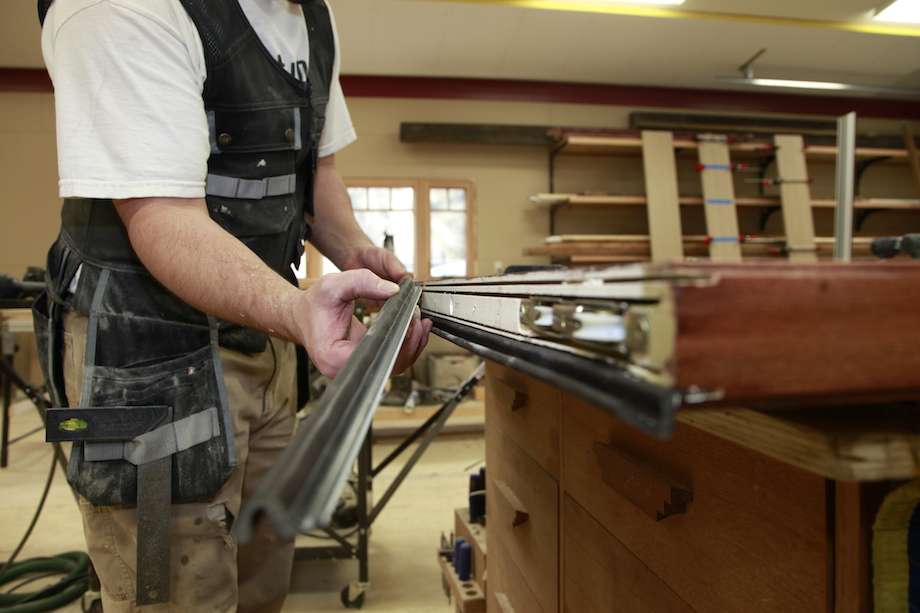 |
The Sill and Head Jamb
Unfortunately, Plastpro doesn’t sell 5/4 flat stock, so for the sill and the head jamb we ripped down the widest rabbeted polyfiber jamb stock we could get, and discarded the 3/4 x 1 7/8 rabbet—we wanted only the 1-in. un-rabbeted section of each piece. Then we joined all those rips to make the sill and head jamb, reinforcing the laminations with PL Premium and Dominos.
| Then we joined all those rips to make the sill and head jamb, reinforcing the laminations with PL Premium and Dominos. | 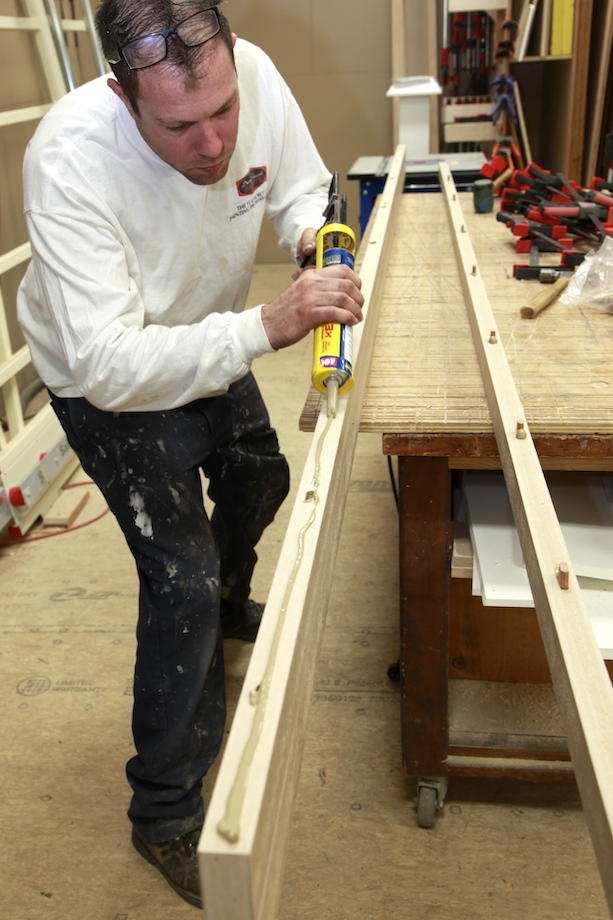 |
| For the beveled section of the sill, on the exterior of the cabin, I attached a piece of 3/4 x 3/4-in. scrap to the face of the laminated sill using a few small spots of 2P10 glue, which is easy to split off later. | 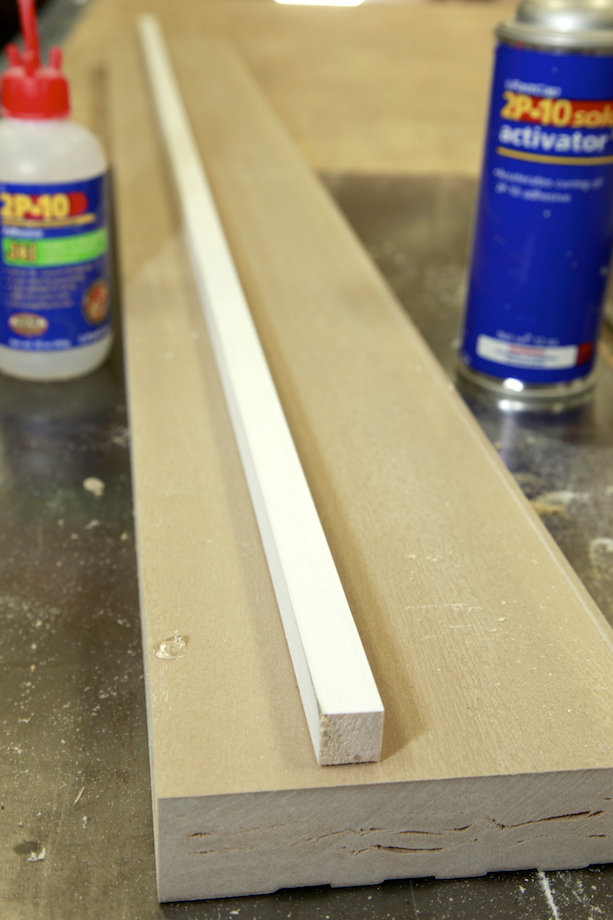 |
| I ran the sill through my surface planer on its face, which cut a nice clean bevel in the bottom of the sill. I use the same technique for making wood sills, but in this case, I had to bevel the bottom rather than the top so that I wouldn’t remove the grain texture. | 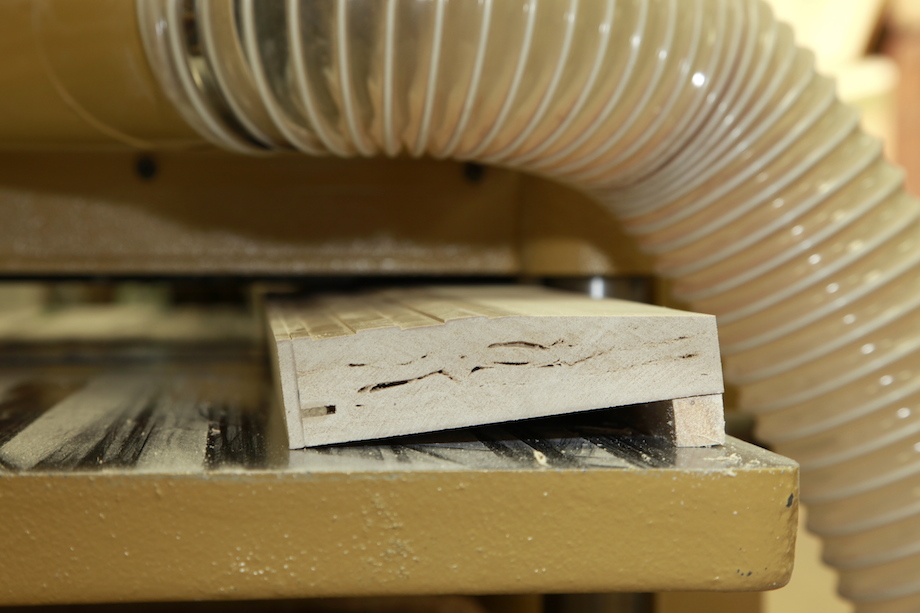 |
Before pre-finishing the main sill, we plowed grooves for the track using a router and guide fence. The tracks for the lead doors—both screen doors and glass doors—were continuous, but the track for the trailing door stopped midway across the opening.
We ground the ends of those tracks round to fit tight in the radius left by the router bit, and we also ground the top of the track at a soft angle, so stepping on the track wouldn’t be a problem.
To cut the continuous grooves in the head jamb, we ran the glue-up through a dado blade.
 |
 |
Poly fiber is very flexible. Even though the head was 1 1/4 in. thick, it still sagged and needed good support going into and through the saw—two sets of hands and continuous out feed.
Installation
We started by weatherproofing the rough opening.
| Since the landing was four inches below the sill, we had to install the small ledger and Everflashing first, then work our way up and across the sill. | 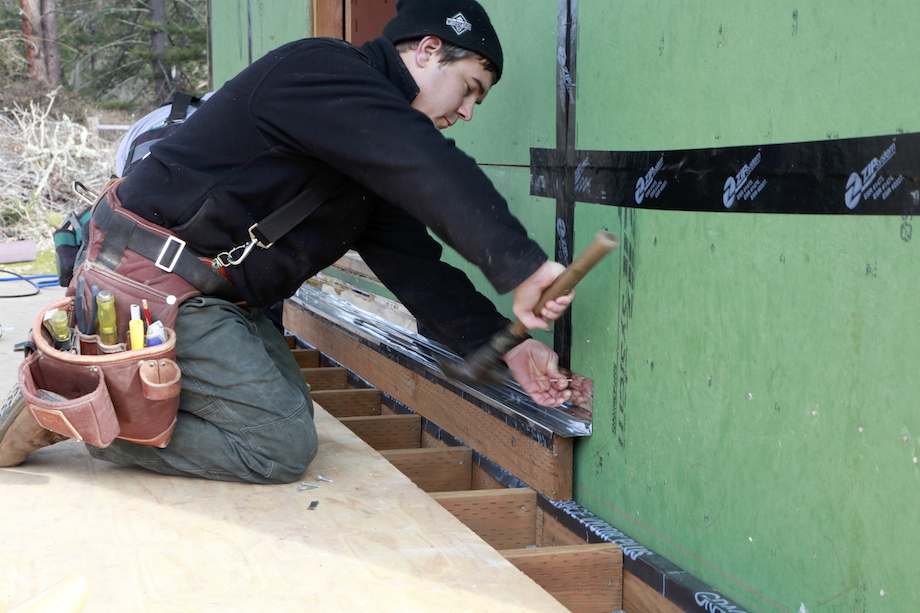 |
| We used a peel-and-stick membrane to seal the entire rough opening, including the full depth of the pockets. | 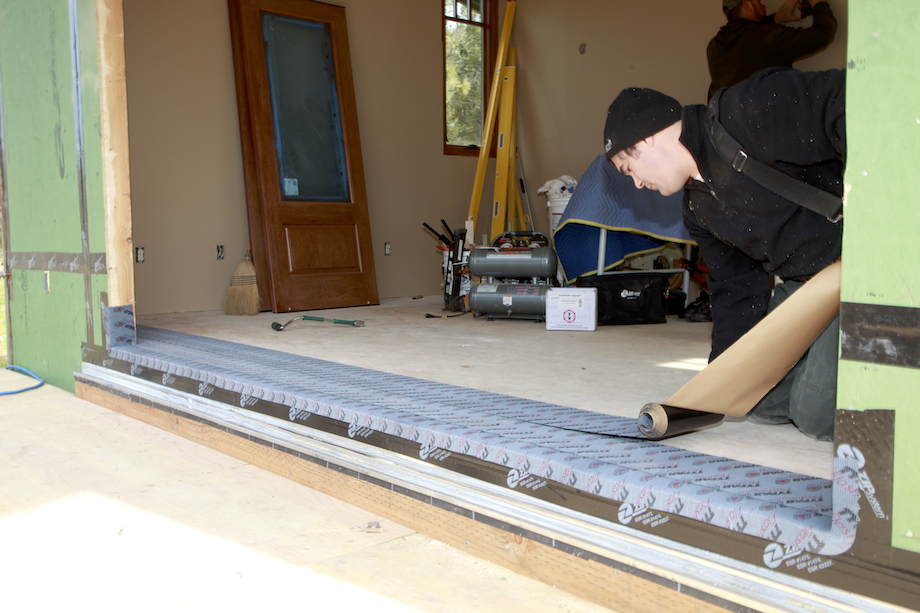 |
| Next we set the sill sections in place, reinforcing the splices with dominos and polyurethane adhesive. | 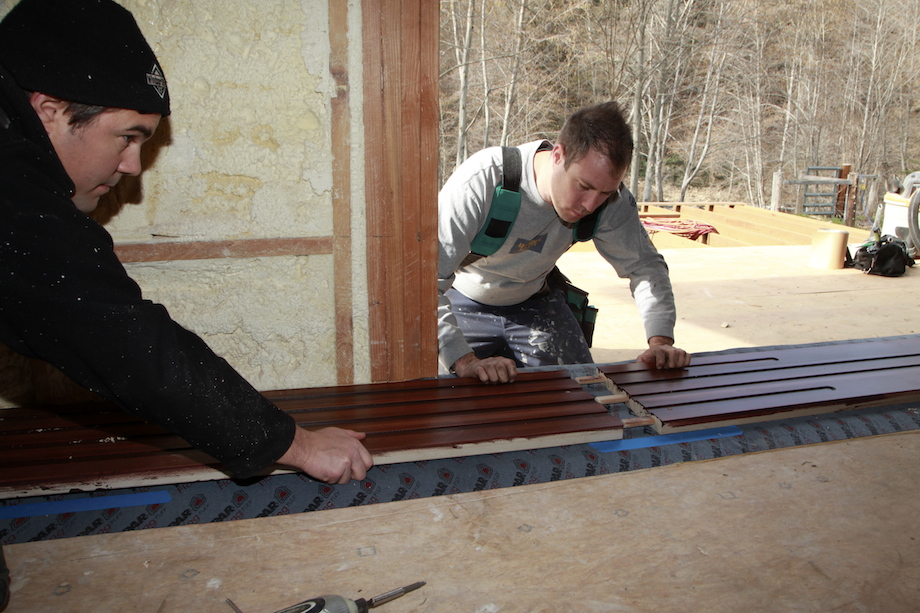 |
| We pressure fit the splices with blocks and shims at the back of each pocket. | 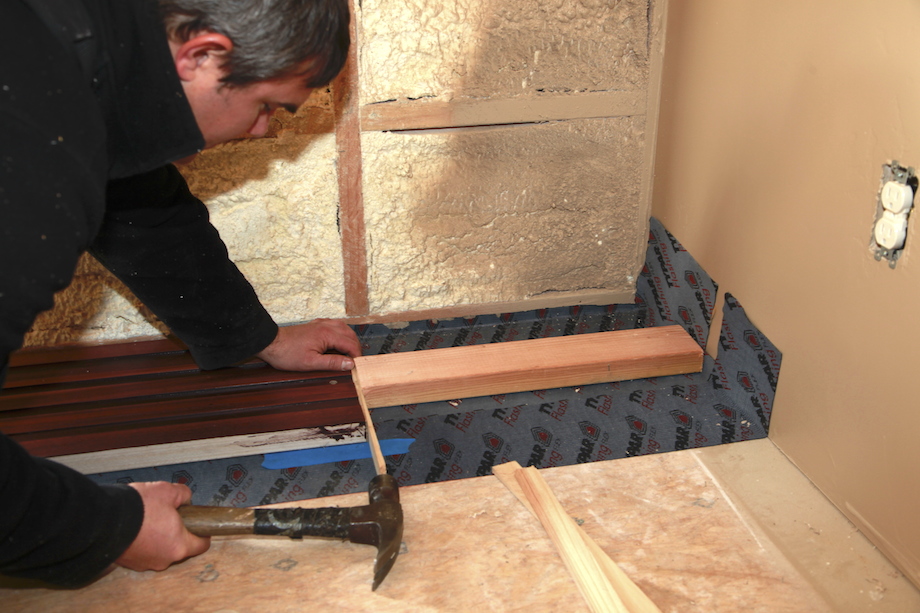 |
Most sliding doors don’t have to have perfectly straight or perfectly level sills—getting them pretty close is usually good enough, and adjusting the wheels is always an option. But for pocket sliders with multiple doors, adjusting the height of the wheels to accommodate a sill that isn’t straight is not an option—an adjustment with the doors in an extended and closed position could easily cause one door to be proud of the other when the doors are retracted and nested in the pockets.
| We used an 8-ft. level and a laser to check that the sill was perfectly level, all the way back into the pockets. And we checked the sill with a fishing line to be sure it was absolutely straight. | 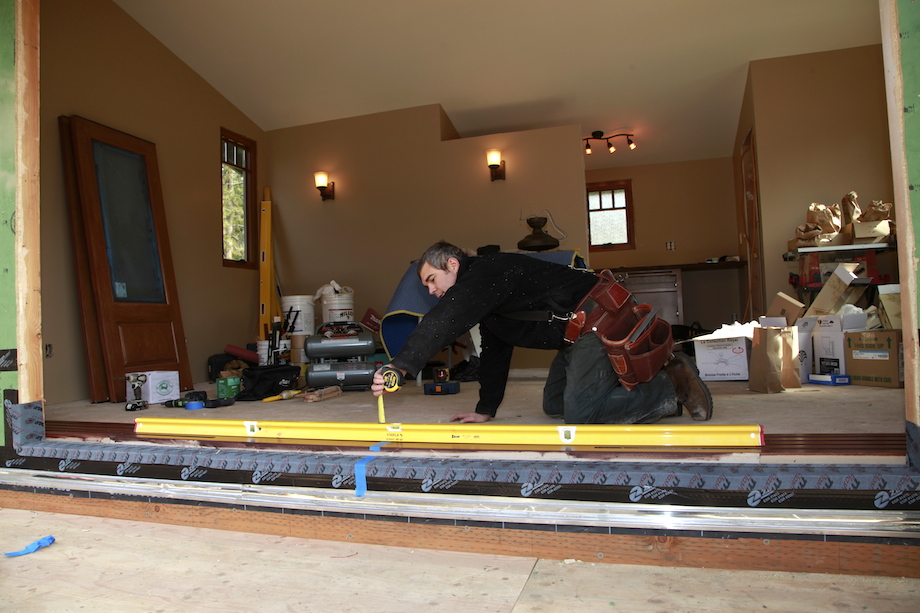 |
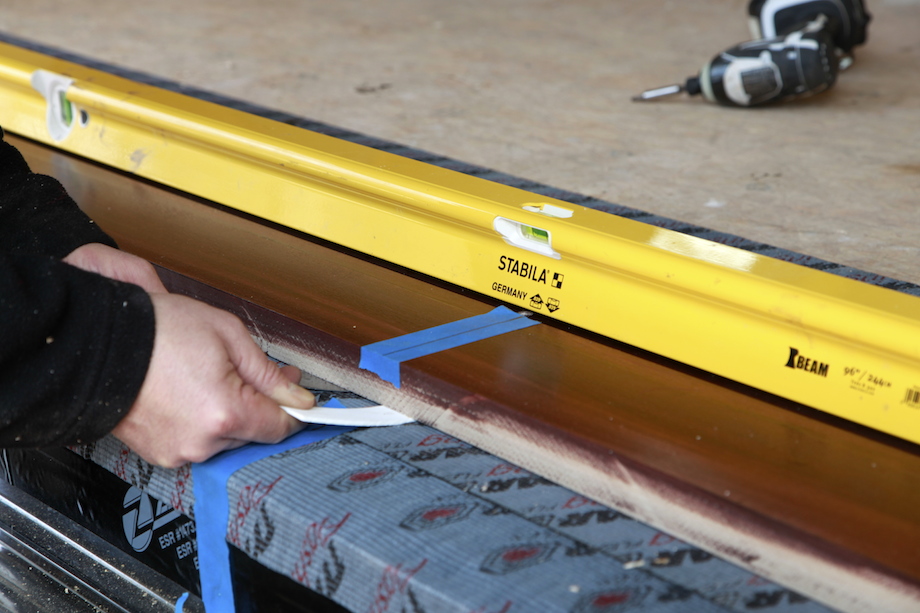 |
Instead of long tapered shims, we used flat strips of PVC to shim the sill and provide backing for the fasteners. |
| We fastened the sill down with washer-head corrosion-resistant screws, all countersunk beneath the tracks. | 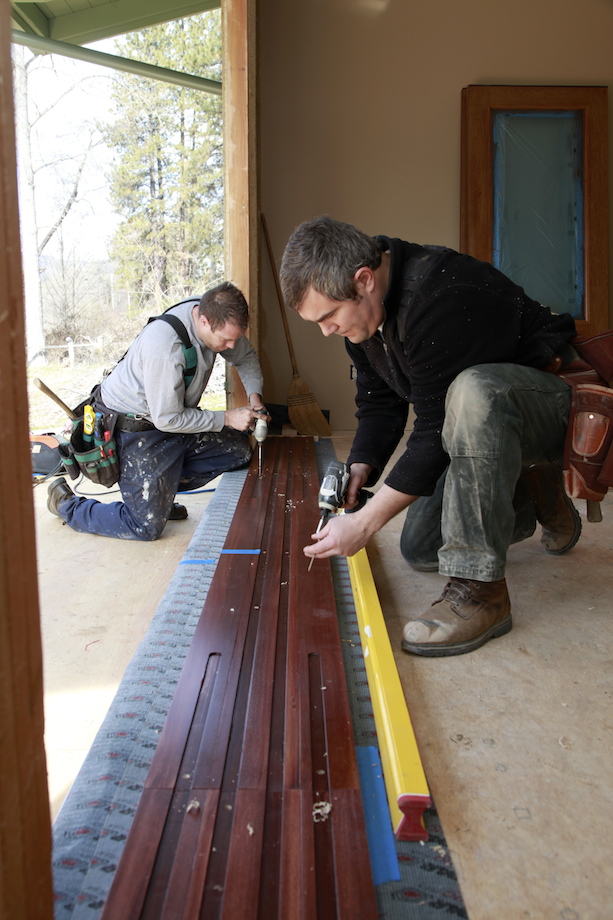 |
 |
The head was built in the same manner, with splices along its length. |
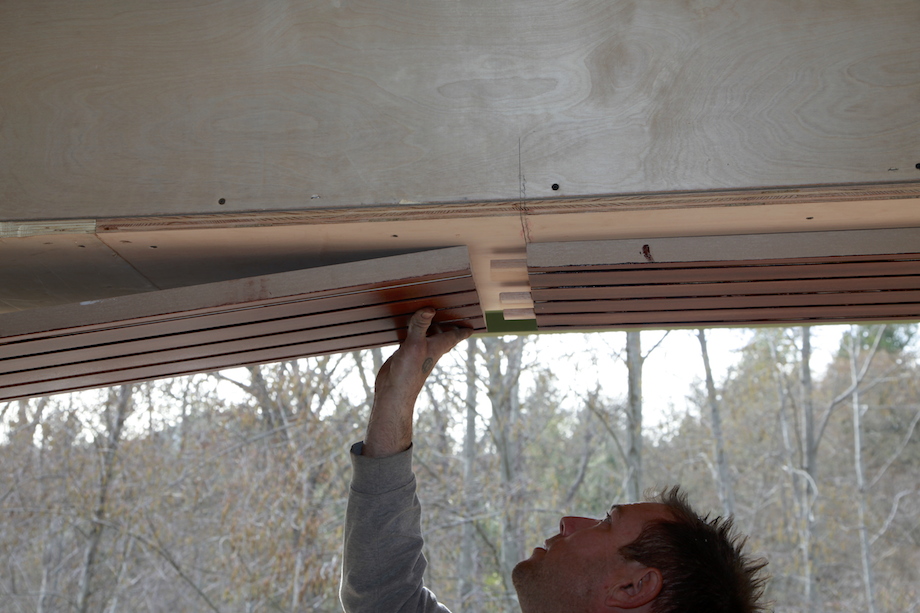 |
To be sure the surfaces would mate perfectly flush, every splice was reinforced with dominos. Fasteners were hidden into the parting strip grooves. |
The pre-finished parting strips were tapped into the grooves, and then secured with trimhead screws.
 |
 |
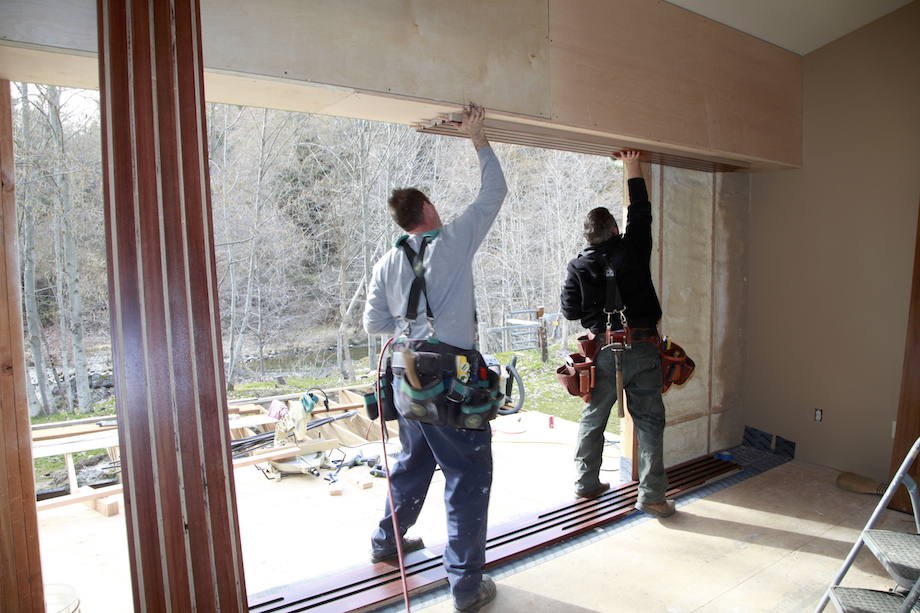
The doors were lifted up into the head jamb, and then the wheels set down on to the track.
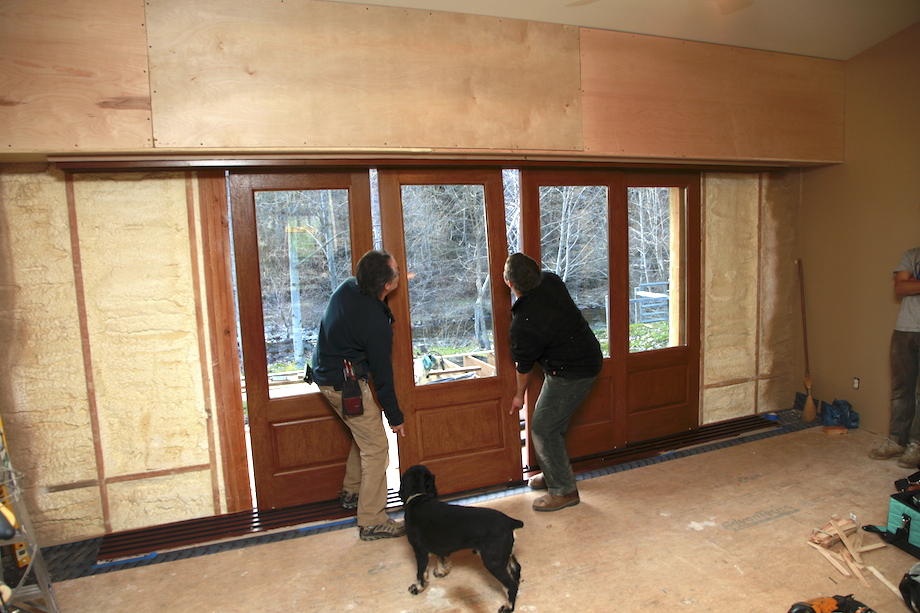
| With all the doors in place, it was easy to slide them back and forth to attach the check stiles and weatherstripping. |  |
| Once we were confident that the doors operated smoothly, we attached the interior and exterior sill extensions using the same techniques: dominoes and PL Premium. | 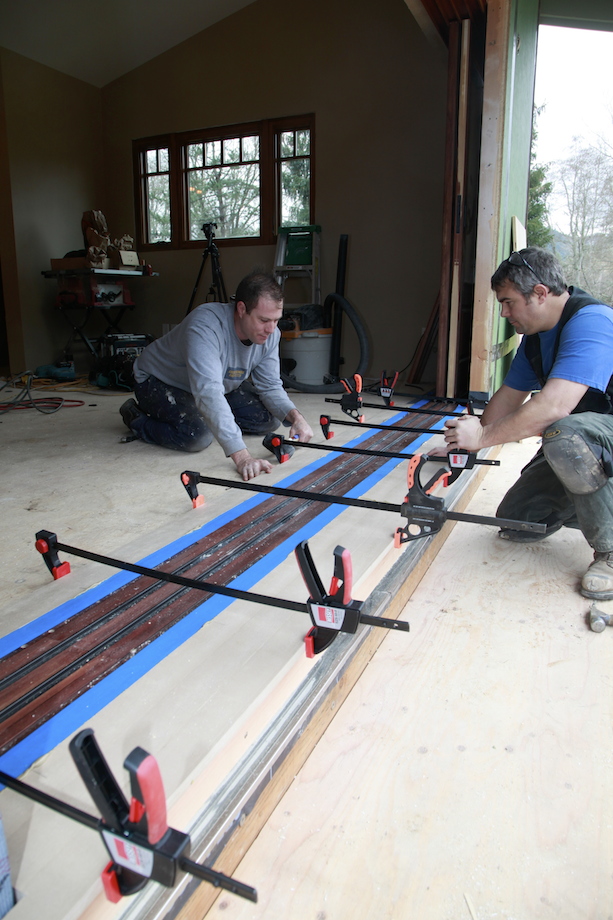 |
After the sills were complete, and the stops and jamb blocks installed on the rear doors, we shimmed the trimmers so that the finished jambs could be installed—positioned to stop the doors the moment they touched at the center of the opening.
Incredible build! Incredible place. Where do I sign up???!!!
Gary,
“OUT OF SIGHT” project!!! Wow! One question before I make my reservation: The cabin is out in the middle of beautiful nowhere, why do you need to lock it up so tight? Do the bears have skeleton keys? Thanks–this project is amazing!
Roe
Great Project! My question how much time do you have into it because all my customer always want a price
Mark
Once I made the template, it took a day for one guy to prep all the doors and install the wheels and weatherstripping. I spent a day making all the screen frames and installing the screens in the screen doors.
One day to make the bottom and top sills–not a lot of work really, just a lot of material. Two guys were on that all day.
Pre-finishing tool the longest–there were eight doors and a lot of components–probably three days. After staining everything, we sprayed a lot of top coats–maybe five coats, on everything.
One day to install the doors. And a half-day to trim the exterior–jambs and stops. Of course, the interior finish isn’t complete, so I figure another four hours to mill and install the interior jambs, stops, and casing?
Great door set up. I had some doors built that resemble this set up but we had a problem with the sill cupping really bad due to exposure. We ended up replacing it with a stone sill. We tried several sills before finally going with stone. Lesson learned.
Stephen,
Yes, wood sills are notorious for cupping, especially especially especially wide sides. That’s why I made it out of polyfiber, not wood. It swells and contracts a little, like PVC would, but it won’t every warp, check, crack, etc.
Gary
I tried to look up “polyfiber” and can’t find a solid material description. What is this product that you made the sill from? Is it like Trex?
Polyfiber is a combination of wood fibers and pvc. Decking material has been made from it, but the material I used is made by Plastpro for their door jambs, embossed with wood grain.
Gary
Amazing work, Gary! Very impressive.
I’ve never seen that jamb stock before. How does it differ from other synthetics? And good thinking re beveling the back — not the normal way to go, but, hey, you were laminating it up anyway.
I also like the two-stage template system that simply uses screws, instead of little blocks that can split and get lost. Sure, it’s a bit harder to size the inner rout exactly that way, but I can’t think of a two-stage situation where you don’t want to build in a bit of wiggle room anyway.
I’ll be interested to hear reports on how the Q-lon holds up in a sliding application… and on that note, who made the other weatherstripping profiles? I always start flipping through my RCT book when weirdo apps come up — can’t beat their silicone, and they sure have a lot of different profiles for different apps.
Harlan,
The jamb stock and the doors are made by Plastpro. The doors are fiberglass, but the jambs are polyfiber: wood fiber and PVC, pressed with a wood grain and stainable. Like most PVC products, the material swells in the heat and shrinks in the cold–considerably. I’ve noticed that 17″ sill swells almost 1/2″ between 10 degree and 100 degree weather.
I’m totally confident in the Q-lon skirting. Several companies in S. CA use that material for sealing the bottoms of sliding doors (and the tops, too, don’t forget–there’s little difference). I’ve installed hundreds of sliders with that component and it lasts a long long time. You can’t lower the doors too far or the weatherstripping will stick, and then it will wear out, but that’s why the wheels are adjustable.
Gary
More accurately PVC “expands” rather than “swells” with the introduction of heat– and “contracts” rather than “shrinks” in the cold . Review John Pace’s article published on this forum under the title: Everything Moves. Not once does John use the word “swell” in conjunction with PVC movement; only when referring to wood. To do so would have (IMO) only served to confuse the issues of working with these very different materials.
Wood swells because it actually gains mass by taking on water weight due to its hygroscopic nature. For all intents and purposes PVC stock will weigh the same whether it’s measured at 10 degrees…or 110 degrees.
That’s why we carpenters use a moisture meter when working with wood (which can shrink & swell under different moisture conditions) and only use a thermometer when working with PVC (which can expand and contract under different temperature conditions).
Sonny,
You’re always the perfect pedagogue, so normally I wouldn’t comment on your comment but in this case, I think “swells” is much more descriptive. And I also think it’s an appropriate word given the context: wooden and even PVC sills can swell. I think the alliteration helps get the point across. Yes, John Pace is one reliable resource on the subject of PVC, but so are a lot of other PHD chemists and construction industry specialists. Do a Google search on PVC “swelling” and you’ll find plenty of reputable examples.
Gary
Nice,since live Eagle Point Oregon, I won’t need to stay there, but I would love to stop by an do a little fishing….
Good luck with that!:)
Gary
Seems like brush weatherstripping inserts would have been a good detail to consider for the bottom of doors*. After all, that’s what the door bottom seals are doing as they open and close; they are “brushing” the threshold. Q-lon is designed primarily for a compressive condition. I share Harlan’s concern regarding abrasive wear with the use of Q-lon here. Pemko makes some nice brush weatherstripping (like the the 5025 shown here on some sliding shop doors) that’s solid and easy to install with its aluminum barbed fitting. The use of Q-lon also has me wondering if a vinyl jacket was the culprit of that strange “zip” sound during door operation.
*assuming 1/4″ wide kerfs could have been accommodated along side the roller mortise pockets.
Door manufacturers have been using Q-lon for bottom (skirt) weatherstripping for years. I’ve installed more than a hundred sliding doors manufactured by custom door companies in S. CA. that have Q-lon skirting. It works MUCH better than brush weatherstripping. Wind-blown air or rain will not penetrate a Q-lon seal the way it will brush weatherstripping–this I know from years of experience. Q-lon’s nylon surface is extremely slippery and durable. It lasts a LONG time, as long as the doors are pressing down tight against the weatherseal. On my doors the Q-lon just kisses the sill, on both sides of the door, providing a clean solid barrier that is almost friction-free. Personally, I love the gliding swoosh sound the doors make–and the feel of being able to push them effortless with one hand, knowing there’s still a dependable seal on the BOTH edges of the bottom. If and when it wears out–maybe in ten years, it’s extremely easy to replace. But that’s typical maintenance on a sliding door. Something else I know from years of experience.
Q-lon’s surface jacket is made from polyethylene rather than nylon.
While not as durable, my guess is that polyethylene was chosen, in part, because of its tendency to resist paint film adhesion. Since door panels are many times painted in place and closed ( compression) before full cure is achieved, this is a wise choice of materials. Polyethylene thwarting abrasion and/or puncture ??; not so much.
Wow! I’m at awe of this build. Love the custom work. I didn’t see those specific rails in the link you posted. Or the or the upper guides. I’m looking in to doing something similar..
Joe,
I don’t know what you mean by “specific rails” or “upper guides.”
Gary
Hi Gary
I mean the specific tracks the rollers sit on an the what looks like a metal tab in which holds the upper half of the door in place. I looked on the link and they did not have them as options.
Thanks
Joe,
I guess that link was shortened a little. You have to scroll down to the bottom of the page to find the Sliding Door Hardware link, but here it is:
http://www.fenestration.net/pdf_documents/Catalog_D_sliding.pdf#page=25
You’ll find all the wheels and the bottom track down there, too. The track is available in different materials, too. I used the standard bronze colored aluminum.
But I’m still not sure what you mean about the tops of the doors. They ride inside wooden stops that are secured in grooves I cut with a dado blade into the head jamb, and I kerfed both sides of each door at the top for a smaller Q-lon weatherstripping, so the doors stay centered but not friction-stuck. And they’re air sealed very well.
I hope that helps!
Gary
Ok great thanks so much. Gary
I’m having property envy… and door envy. Wow! the systems nice too, but the place looks fantastic.
That’s an awesome idea! I wonder if I could modify this for larger, doors for my garage. Never thought of a door system like this thanks for the ideas Gary!
I had an early reservation at this place. I stayed there last week, just for a night. Having the ability to open the doors to the river , than keeping the screens closed was really neat. Especially when the local skunk wandered by the deck at 2am.. I was pretty glad the screens were closed. I spent a half hour trying to figure this whole thing out. What I noticed is how Dead level that threshold has to be.. nice job Gary & crew!
Mike
Amazing job on the doors. For the screen doors, does PlastPro make these, or did you build them? If so, what material did you use to match the look of the doors?
Gene,
The screen doors are exactly the same as the glass doors, I just ordered them ’empty’, without the glass, then I made wooden screen frames that fit inside the empty doors. My brother’s idea. Worked perfectly.
Gary
Nice job! I have client who is looking to replace an old set of aluminum exterior pocket doors that open in to a sun room and modifying what you have done here will fit the bill for me. I have a few questions though:
– Didn’t see a source for the planking on the Plastpro site. Where is it?
– How did you mount the T-Track in the polyfiber?
– What part number for the Q-Lon weatherstrip did you use to seal the ‘jam stiles’?
– Did you use any weatherstrip where the exterior doors butt together in the middle? If so again what part number?
– What about the locking hardware, what did you use there?
Thanks!
Mike
Mike,
I used Plastpro’s jamb stock, not planking. And I ripped the jamb material, removing the rabbit and just using the 1 1/4-in. thick stock that remained.
The T-track is mounted into a groove that I cut with a router and fence, and then I screwed the track down to the sill. The grooves were really important. I knew I’d never keep the track straight and perfectly aligned without the grooves. The grooves made the job fool proof, and I need a lot of that kind of protection.
I believe that’s the #250 Q-lon, the smaller size.
I haven’t run any weatherstripping at the meeting stiles in the center of the opening. I planed the two doors just a little, so that they kiss up flat and pretty tight, but I wanted to avoid weatherstripping there so that it wouldn’t interfere with the lockset. Plus I would have had to run it down the middle of stile edge, and it wouldn’t have sealed around the lockset. I did run a piece of silibead (silicone bead from Resource Conservation) down the meeting stiles of the screen doors! Didn’t want bugs getting in there!!! :)
I used an Emtek Pocket Door mortise lock, of course!
Gary
Great job, I have a similar project and wonder why you did not do a top hang vs the bottom hang. My single door is between the laundry room and the garage. thanks
Joe,
You could do it either way, but I think it’s easier to weather seal the doors, and easier to make adjustments, if they ride on a bottom track, and it’s easier to install the bottom track/sill perfectly level and straight…no ladders to work off.
Gary
Gary,
I just wanted to say thank-you for your excellent instructions. I have a 150-200 yr old house and some of the work done by “carpenters” was shoddy(so it needs to be redone). In addition, the remaining work has to be custom as nothing is “normal” in this house.
You are inspiring and take my fear of not being capable to do woodworking away. I love to design things that are “unique”. Your site is the beginning of my woodworking journey. I’m designing a linen closet in a bathroom and then have to do the molding in this room.
Thanks again!
Sandy Cook
Nice project. Now that it has been in for a little while has there been any issue with moisture in the wall? Water will accumulate on the door even if it is just morning dew. Curious as to how you evacuated it from the wall?
I never have a problem with water in the wall. The overhang is 5 feet, so rain never gets close. When it’s cold or really wet outside, only the center doors are opened, so none of the doors are slid back into the pockets. Any moisture that does get inside the pockets dries out from diffusion–the pockets are 17″ wide.
Gary
I am looking to replace a double glass sliding door with a single pocket exterior door. Could you please let me know if this is something that can be done? Been looking and researching for companies that can create a single exterior pocket door that will tuck away into a wall that leads to my outside.
My brother once told me that you can get anything you want, it’s just a matter of money and how much you’re willing to pay. I’d imagine that a single door like that would cost you about $5,000.00. The wall would have to be opened, a new header installed (dry wall repair, exterior siding repair), probably some electrical stuff moved, etc. etc. And then there’s the cost of the door unit and installation. $5,000.00 is probably on the low side. :)
Gary
’m looking to add a 36″ wide exterior door to a small kitchen wall. Is there any way to make or buy an exterior pocket door for a single panel? There is no space for typical double door set-up. Obviously needs to be weather proof and have normal exterior door R value.
Does such a thing exist? I’m trying to avoid the typical swing-in door for space and aesthetic reasons. My carpenter can retrofit most anything (he likes a challenge) but I don’t want to spend crazy $$$ and hours if possible.
No, there is no such thing as a manufactured single exterior pocket door. And if there were, it would cost about 5 times more than a regular hinged door. Why don’t you install a swing-out door? MUCH cheaper and easier. They are very common, and a code requirement in HVHZ zones.
Gary
Gary,
I’m sure you covered this in your design, but I gotta ask…..as far as security, can the doors be pushed through? Like forced up off the bottom rail and entry gained?
I love this design/idea. I have been thinking about Entry way pocket doors for some time. I plan to implement an install soon probably on my own place, but already have a customer interested.
Thanks in advance…..and thank you so much for sharing this project.
Gary, Why did you install the lock upside down?
Great Job!
Gary,
I live in Massachusetts. Where can I go to see the exterior pocket doors and screen doors finished in order to purchase them?
Thank you, Gene
Gary,
Can one set of doors be fitted for screens to keep out the mosquitos and insects?
In Christ’s Love,
Gene