


When it comes to decks and especially exterior stairs, there are several critical areas that can spell the difference between safe and dangerous construction techniques. For that reason, current code requirements focus on some of those areas. In this article, we’ll look at just one detail: the prescribed method for securing the bottom newel post at the base of a stair.
.
|
A Note from the Publisher: WARNING: POTENTIAL CONFLICT OF INTEREST!! If you are sensitive about articles that seem to favor a particular manufacturer, then DON’T read this one!! It’s written by an employee of Simpson Strong-Tie! But after years of experience, I’ve found that some manufacturers know more about their products than anyone else; if a carpenter wants to learn the best way to install a product, sometimes the best source of information is the manufacturer. In the future, look for more carefully-screened articles from manufacturers. |
.
I’ve seen just about everything when it comes to setting bottom newel posts.
| Depending on soil conditions, climate, wood treatment or the type of steel, wood or steel posts buried a foot or more into the ground may rot or corrode. The 4×4 post can be embedded in the ground or concrete, but frequently the post may still rot at the surface-to-ground interface. |
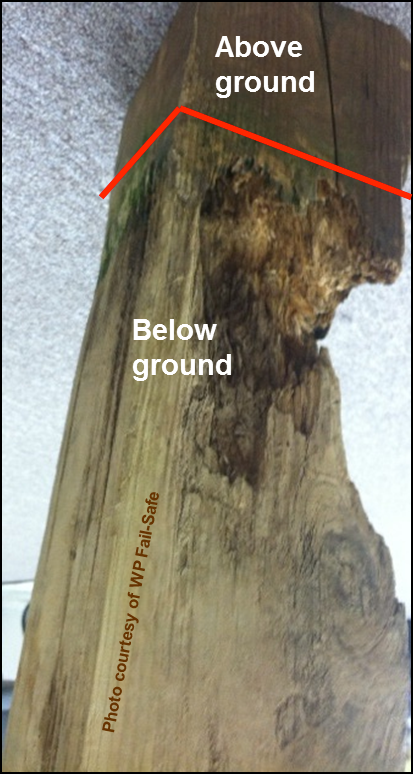 (Note: Click any image to enlarge; photo credit: David Paul-WP Fail-Safe Form Footer™) |
Another common method is setting the post on a concrete slab—with no footing or structural hardware at all. Neither method ensures a safe installation.
Newel posts are dynamically linked to stair systems, both aesthetically and structurally, which is why stringer and post installation must be planned carefully and concurrently. There are several code requirements to consider for posts and stringers.
The stringer must support a design live load of 40 psf for residential decks. Therefore, the top of the stringer must be anchored with a proper connector (keep an eye out for future TiC articles on stringer-to-deck attachment); the bottom of the stringer should rest on an appropriate footing or be anchored to the post, which itself should rest on an appropriate footing. One approach to this detail can be found in figure 34 of the American Wood Council’s (AWC) 2009 Design For Code Acceptance 6 (DCA 6-09).
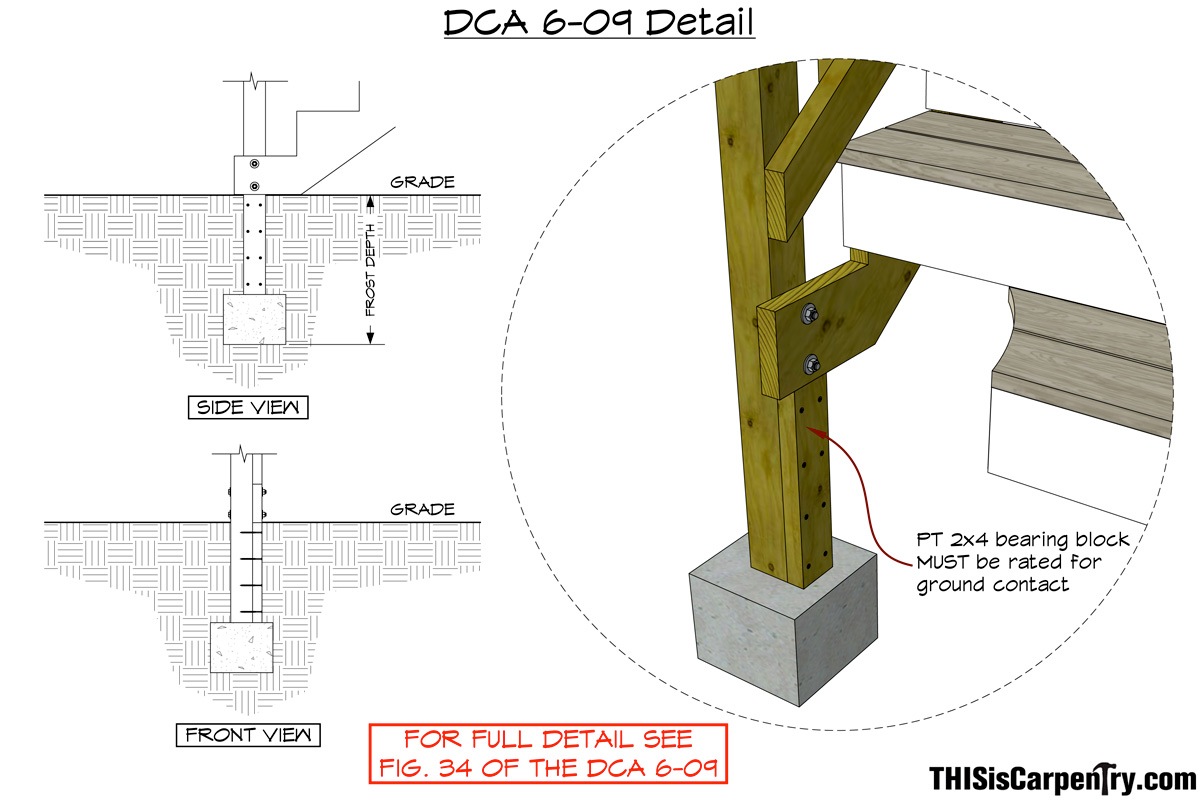
One problem with the detail in Fig. 34 is the 2×4 bearing block embedded into the ground. Most 2x material is not rated for ground contact and may rot fairly quickly.
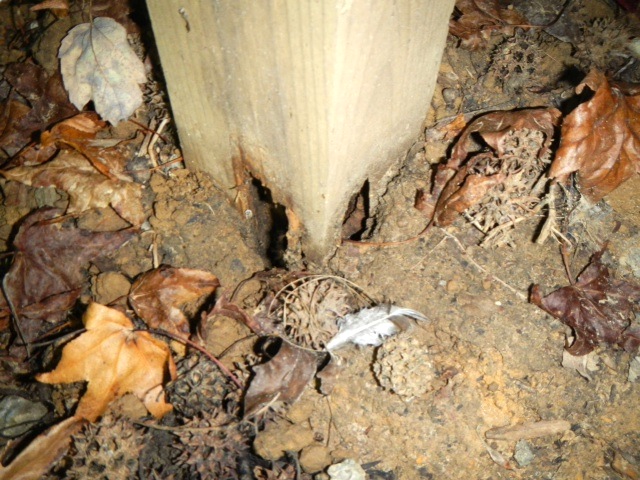 Photo credit: Brian Vane, Vane Property Inspectors |
The post could be embedded in the concrete, but once again, when the wood dries out, it shrinks and rainwater or landscaping water drains into the gap, rotting out the post. |
Of course, it may take years to rot out a buried or embedded post, and some people believe that the homeowner will replace the stairs and posts when that happens, and perhaps the entire deck. But building something and knowing it will have to be replaced, or knowing it will fail, is generally not a good practice. Furthermore, homeowners naturally assume that structures will last for years. Unless a contractor informs a homeowner that their deck has a limited lifespan, that the posts may rot and should be maintained, a homeowner will never attend to that maintenance.
| The best solution is to follow good building practices and install a proper footing, without an embedded or buried post. Instead, use a post base that has a 1-in. standoff and a moisture barrier to protect any wooden surface that will come in contact with the concrete. | 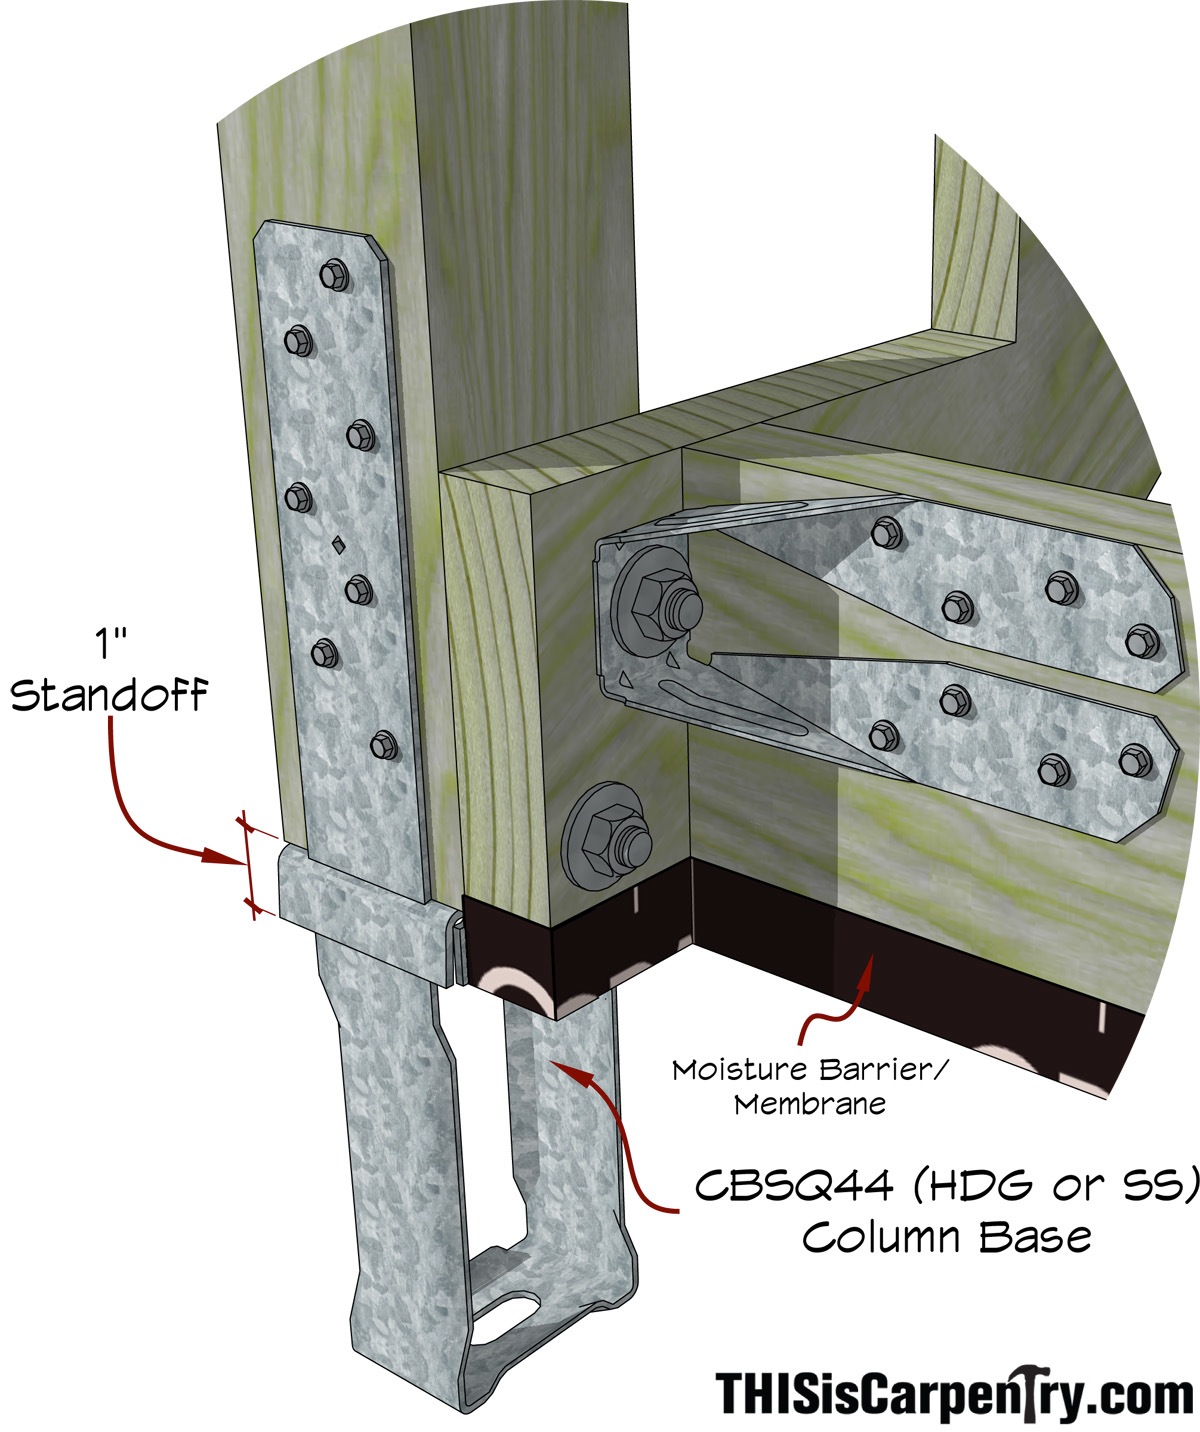 |
Though it isn’t pictured in the Prescriptive Residential Wood Deck Construction Guide (DCA 6-09), properly secured post bases are also the best method for meeting another critical code requirement: if the post is part of a guardrail system, it must resist a lateral design load of 200 pounds.
To meet the 200-pound lateral load requirement, Simpson Strong-Tie recommends using a hold down or “Deck Tension Tie” (DTT2Z). The Deck Tension Tie must be installed to a minimum 2x riser or blocking, and it must be attached using 1/2-in. machine bolts.
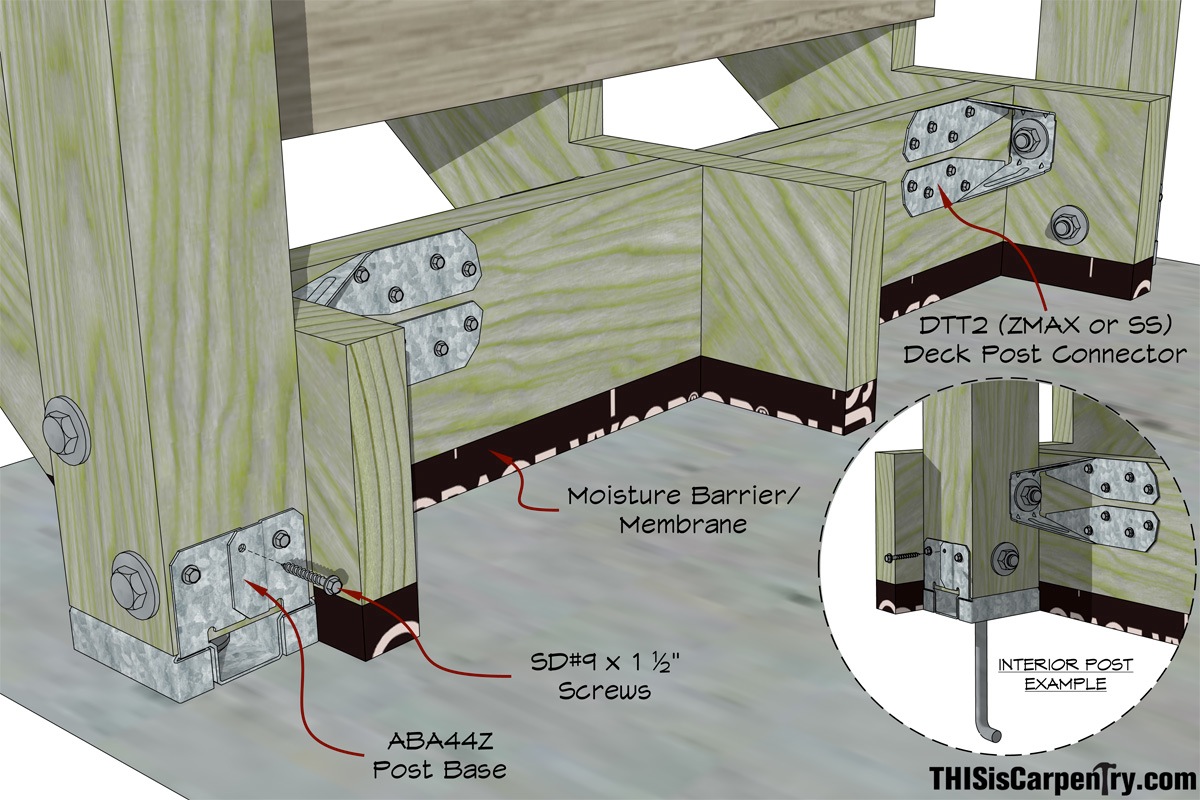
If you use a post base connector with fasteners (bolts or nails) that drive through the post, these fasteners may interfere with the DTT2Z bolts. However, fastener interference can be avoided if you use a Simpson Strong-Tie ABA44Z with SD#9 x 1½ in. screws.
In either case, the Deck Tension Tie can then be attached to the riser or blocking under the steps to resist lateral or outward force. (See the DTT technical bulletin for more information.)
Keep in mind all assemblies should be approved by the authority having jurisdiction.
• • •
AUTHOR BIO
 Jim Mailey is the Midwest, Northeast and Mid-Atlantic market-training manager for Simpson Strong-Tie–a company that, for more than 56 years, has developed structural products to help people build safer and stronger homes, buildings, and decks. Jim joined Simpson Strong-Tie in 1992 and he has given hundreds of presentations to more than 25,000 design professionals, building officials, builders, contractors and dealers. He has developed numerous programs designed to educate industry professionals about how to install Simpson Strong-Tie products, as well as how these products meet various building code requirements. Jim is considered an expert in safe, outdoor wood deck construction and he provides economical product solutions to satisfy structural code requirements. He has written articles about deck safety and has been quoted in deck contractor and home inspector publications. His programs, entitled “Deck and Porch Framing Connections” and “Continuous Load Path-Wood Framed Structures,” review the correct and incorrect structural methods for building a deck or home, show why commonly accepted practices should not be used, and provide informative tips that anyone (from the novice to the most experienced student) will find useful. Jim earned a B.A. from Bloomsburg University in Bloomsburg, Pennsylvania, in 1980.
Simpson Strong-Tie is committed to helping customers succeed by providing exceptional products, full-service engineering and field support, product testing and training. For more information, visit the company’s website at www.strongtie.com.
Thanks, Jim, for clarifying an important detail.
Now, can you detail a guard rail post placed mid-stringer?
Great detail. I really like the addition of the Simpson hardware. I have been doing something similar to this for years. I use a double 2x header in back of the second riser and hang my intermediate stringers with joist hangers. I frame the first riser as a box. This way I only use footings at the side stringers.
I highly recommend Jim Mailey’s “Deck and Porch Framing Connections” presentation. I’ve attended it three times over the past 6 years and each time Jim adds more useful content. He covers the deck code requirements and feasible solutions. The program is about 6 hours long and very thorough. Check out the Strongtie training page for info: http://www.strongtie.com/workshops/workshops.asp?source=topnav
Jim mainly covers the Northeast region (Dakotas to New England).
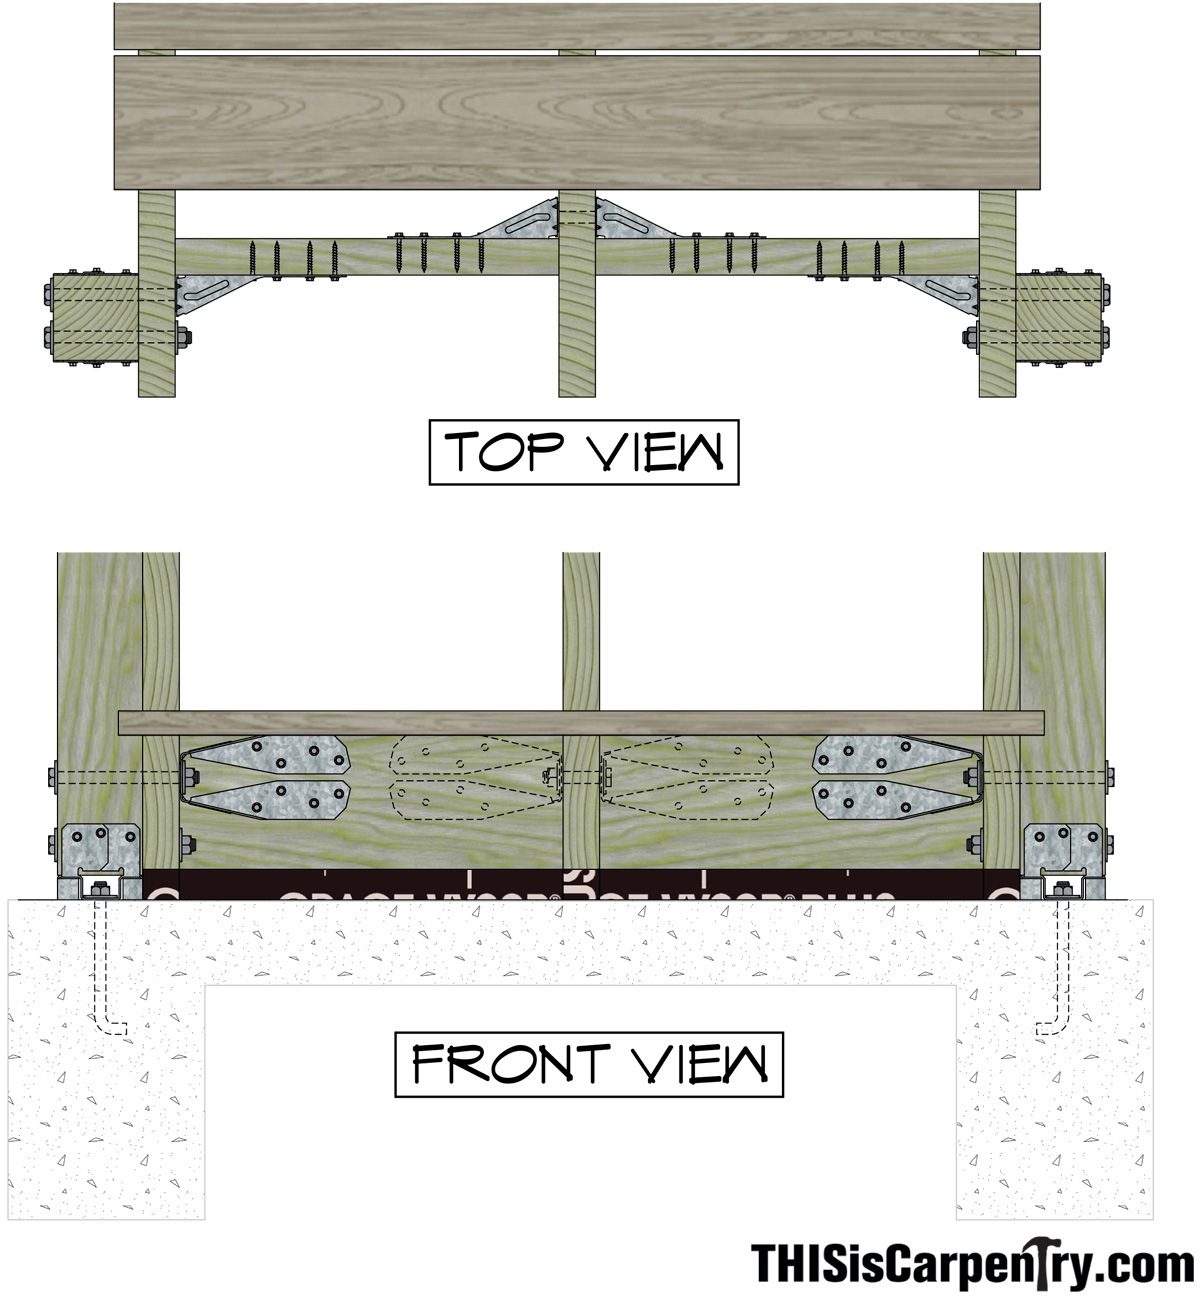
I use details similar to the one shown in the drawings.
One uses a threaded rod that reaches from one post to the other. It takes the place of the 4 DTT connectors and like them, is located at the upper fastener position. It works up to stairs about 4 ft wide.
On stairs wider than 4 ft where the post is mounted outside the stringers, I use DTTs the same way shown on the drawing (post, stringer, block with DTTs, stringer) . But since there are multiple stringers between inside stringers that the DTTs are bolted to, I just install solid blocking between the intermediate stringers with structural screws. This is a take-off on the standard detail shown in ‘Guardrail Post Outside the Rim – Detail B’ http://www.strongtie.com/FTP/bulletins/T-GRDRLPST10.pdf
When the posts are mounted inside the stringers (as is the case when using composite railing systems), I follow ‘Guardrail Post Inside the Rim – Detail B’ in the same tech bulletin. Basically you install double blocking between the outside stringer and first inboard stringer AND double blocking between the first and second inboard stringers. A single DTT is mounted to the second set of blocking with the bolt extending all the way through the first inboard stringer, the post, and the outside stringer.
Response to Scott’s question about mid-span posts.
Mid-span posts can be secured using the same method shown in the drawing or the alternatives I described in the posting above. The mid-span posts end up being stiffer than the bottom post because the distance between the upper and lower bolts is wider and the blocking can be taller.
I cut the intermediate posts with a bottom angle that matches the angle of the stringer slope and position the bottom bolt 2 in. up from the middle point of the post. I install stacked blocks – say a 2×12 and a 2×6 or a 2×10 and a 2×8. The blocks can be installed between all of the stringers for the greatest stiffness.
Here are some shots of the threaded rod detail described above.
Note the rod coupler – it connects a bolt to the treaded rod. The alternative is to drive a threaded rod all the way through the assembly.
After the outer set of blocks are installed between the stringers, the nut is tightened.
Great info. About the “Deck Tension Tie” (DTT2Z) to help lateral load. I have putting a simple 5-step stringer stair from my driveway down to the side of of my house. Your article clearly shows 4 Ties being used at the bottom of some stairs; however, the article does not state if they are needed at every step level. If I were to do this, it would be a total of 20 which seems to me a tad overkill. One thing that confuses me is that on the Simpson Website about these ties it states “The DTT2 can be used to satisfy the IRC provision for a 1,500 lb. lateral load connection at two locations per deck.”
Two per deck as opposed to anywhere from four to Twenty for a simple 5-stringer stair is quite a difference? Would appreciate a clarification.
Thanks
The photo above shows the next to last step – this one shows the threaded rod.
Can anyone tell me what is being used as the moisture barrier between the stinger bottoms and the concrete pad ? Who make it and where can you buy it?
Thanks
A popular moisture barrier is Grace Vycor Deck Protector.
Thanks for the informative write up on Stair posts. I always incorporate Strong Ties in all parts of the decks I build. Now I know a new way to tie in the stair posts.
Great, useful article. Love to see more of these, covering common issues with specificity.
On that front, it would be nice to have had a paragraph on using threaded rod and epoxy after the fact, rather than j bolts.
And if mike guertin ever reads this, first, I always enjoy your stuff, wherever published, (though I dropped my fine homebuilding subscription a while back for the obvious reasons), and would love to see some more pictures of the threaded rod detail, especially in the middle and at top of stairs. Do you put intermediate bolts at the interior connections?
Really appreciate the information and images as it’s been helpful in addressing some of my own challenges. In order for me to align my bottom stair rail posts with the top (deck/guardrail posts), I’ll need to install the lower posts outside of the stringers. Since my stringers are spaced at 12″ rather than 16″, I see that I cannot use the DTT method that Mike Guertin describes (upon reviewing the details of ‘Guardrail Post Outside the Rim – Detail B’ . Rather, am considering the use of continuous threaded rod with blocking. My new deck has two sets of stairs; one is 5-ft wide and the other 6ft. Any advice or thoughts would be appreciated. Thanks
Great article. I had a question about deck posts that i could not find anywhere. At present, my decks outer joists (frame) is made up of 4×12 (or 4×16 i havent measured it yet though Im sure theres a standard for this)
The deck posts are mounted on the outside of the joists and while replacing deck boards, I would like to replace the deck posts and put them inside of the frame. One technic is by cutting a two inch slab at the bottom so half rests on the frame while the bottom bolts into the frame. If this is safe to do for a tall deck, how would the posts line up at the corner positions? If I cannot do the cutting method, I plan to simply bolt them inside the frame and add securing joists around them (Sorrry for not knowing the lingo)
John,
I think you’d better send a photo and sketch, so we know exactly what you’re talking about before we provide ANY advice.
Gary
What is the moisture barrier material? Where do I get it?
John,
Most folks use Grace Ice & Water or Grace Deck Protector which can be purchased in 4″ and 9″ rolls.
Gary
Hey Jim, we are using Simpson strong tie to brace everything on
my deck. I have a different question: do you think it is problematic to have a bottom step at ground level flush with a walkway?
Hey Jim, we are using Simpson strong tie to brace everything on
my deck. I have a different question: do you think it is problematic to have a bottom step at ground level flush with a walkway? Can this lead to water/ground deterioration issues and difficulty going up and down steps?
I’m building per IRC in NJ.
Each stringer needs a footing.
Don’t see that in the photo.
Need suggestions on some type of support for the mid stringers that will be code compliant, other than footings on each one..
8 foot wide steps, 33″ rise total.