


The joinery in baseboard forms the foundation for nearly all the joinery in finish carpentry, which makes perfect sense because baseboard is meant to replicate the foundation—the plinth—of a classical column. Though casing is the first molding profile noticed in a home, and often the first molding installed in a home, baseboard is usually the first molding that an apprentice carpenter learns to cut, and for good reason. The first big challenge in finish carpentry is learning how to identify and cut inside and outside corners—both miters and copes.
·
|
Please don’t try anything you see in THISisCarpentry, or anywhere else for that matter, unless you’re completely certain that you can do it safely. |
·
Understand Baseboard Joinery
Most carpenters are never taught how to recognize inside and outside corner miters. Instead, they’re assigned a closet in the back of a home and told to figure it out on their own. That’s a tough way to learn, and it explains why many carpenters never learn the simple basics of miter joints. Watch most carpenters at work, and sooner or later you’ll see them close their eyes and try to visualize the direction they need to miter a piece of molding. Learn these basic rules—the Short-point-Long-point Method—and you’ll never wonder which way to miter your moldings, even when you’re cutting them upside down and backwards (yes, crown molding is next!).
| 1. For outside corners, the short point of the miter is always at the back of the molding, against the wall, and against the miter saw fence—for outside corners, you measure to the short point of the miter and you cut to the short point of the miter. |
 (Note: Click any image to enlarge) |
 |
2. For inside corners, the long point of the miter is always at the back of the molding, against the wall, and against the miter saw fence. For inside corners, you measure to the long point of the miter and you cut to the long point of the miter. |
Cope Inside Corners
There are a few reasons why carpenters should always cope inside corners. Wood swells and shrinks throughout the year, depending upon seasonal humidity. Coped joints don’t open nearly as much as miters. Cope joints are also faster to install than miters—the pieces of molding don’t have to be cut exactly the right length; in fact, coped material can be cut a little bit long. You never have to caulk a coped joint, not like you do a poor-fitting miter, so your hands will stay cleaner. And coping inside corners is a sign of craftsmanship. Learn how to cope molding, and you’ll be a craftsman.
| 1. Miter joints aren’t forgiving. If a wall is bowed, or a corner out of square, a miter won’t close tightly. Miters require extra fiddling time. And they have to be cut exactly the right length. | 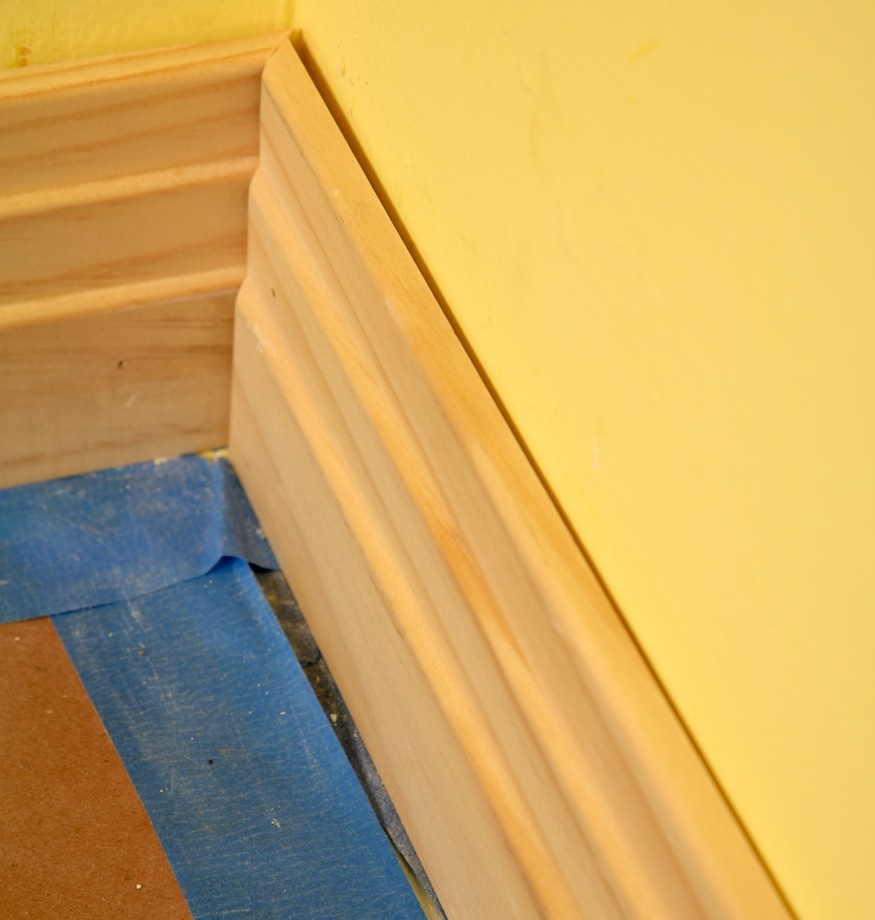 |
 |
2. Bumps ruin miters. A common bump of drywall mud at the bottom of a wall will ruin a miter, making it tough to close the top of the joint, requiring shims, messy drywall cutting, and more fiddling time. |
| 3. First and second pieces are cut differently. For coped inside corners, the first piece is always cut with a butt or square cut. The second piece is always cut first with an inside corner miter, then that miter is coped to fit tightly against the first piece. | 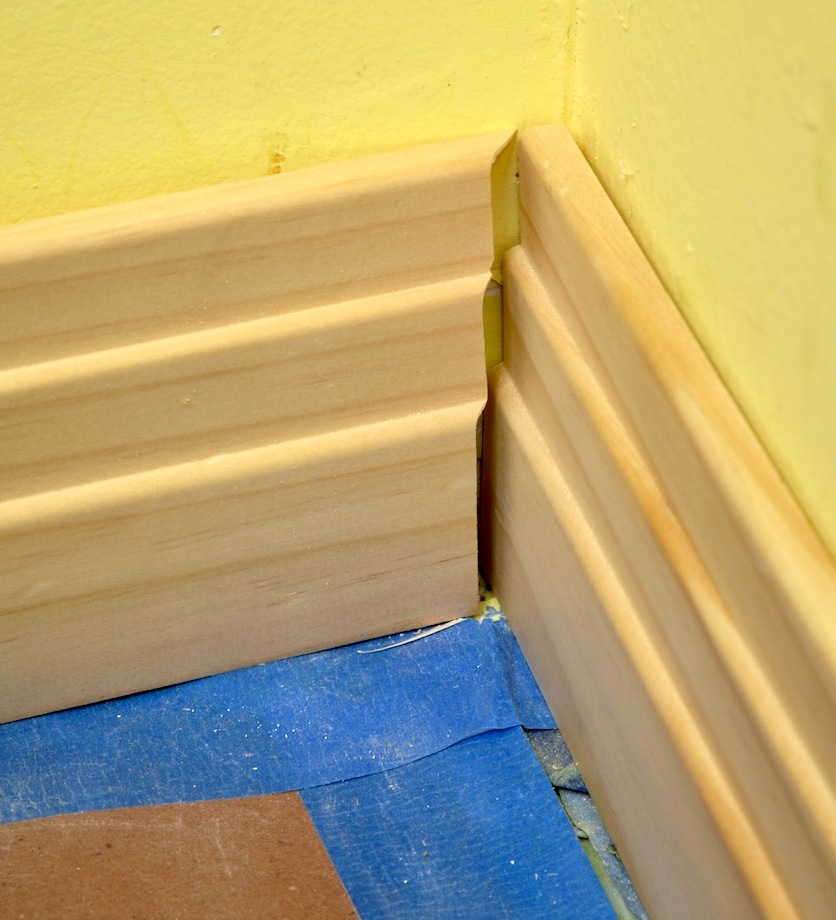 |
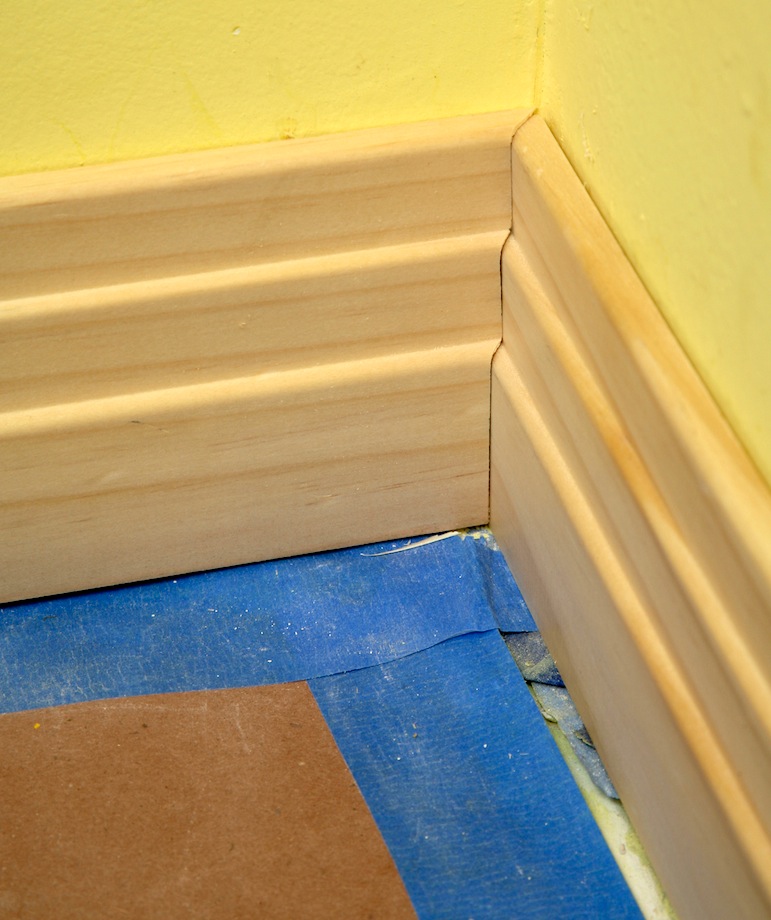 |
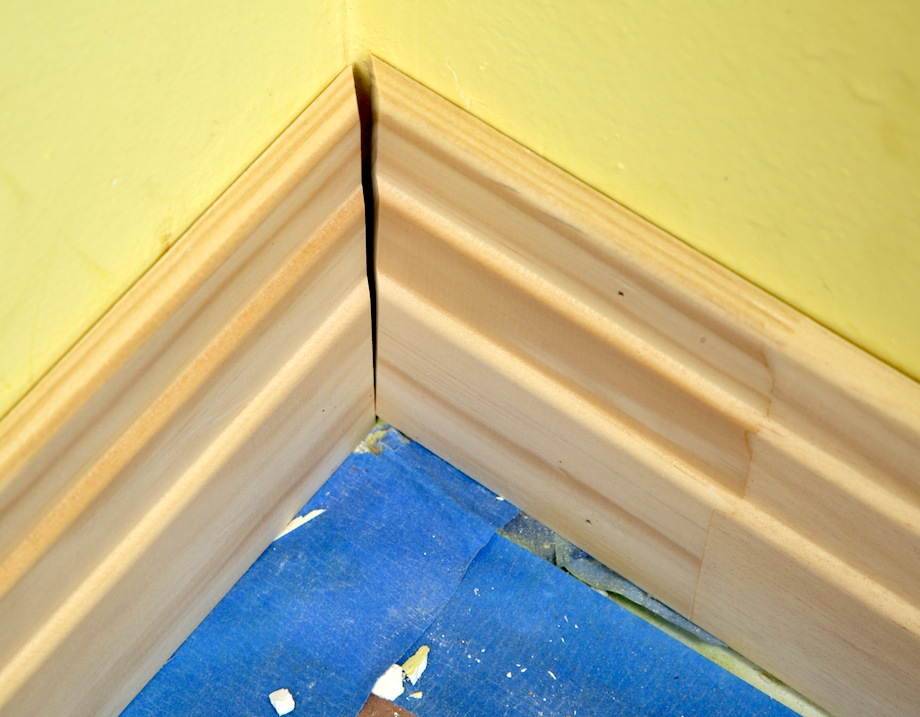
4. Coped corners fit tight. Even if an inside corner is out of square by three degrees, a cope joint will fit tightly without any wasted fiddling time. |
Make a Cutlist
For right-handed carpenters, walk into a room, pick a wall and move to your left. Carpenters who use a coping saw in their left hand might find it easier to move toward their right. You’ll see why when we get to coping.
| 1. Measure pieces precisely under six feet. This piece measures 45 1/8 in. and has an inside corner on the left and a butt cut on the right. | 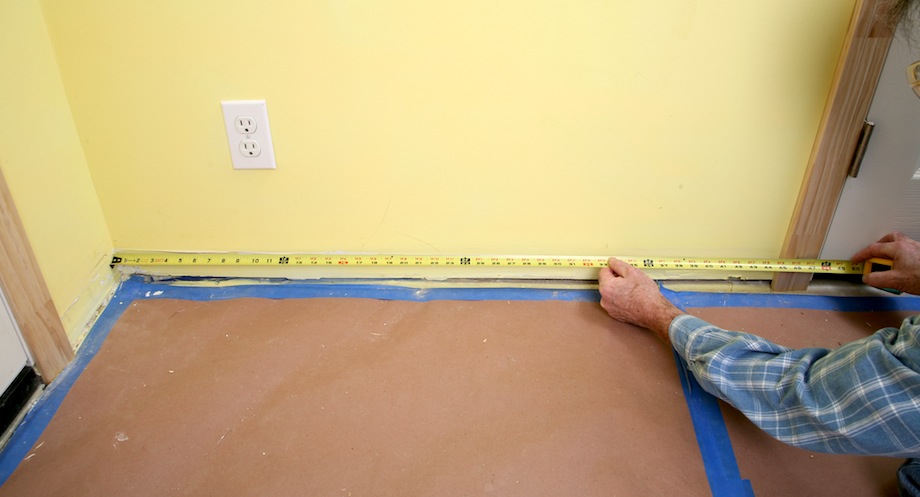 |
| 2. Mark the cutlist. Write the measurement in the center of the cutlist and write a “B” on both sides. We’re coping all inside corners, so both ends are butt cuts. | 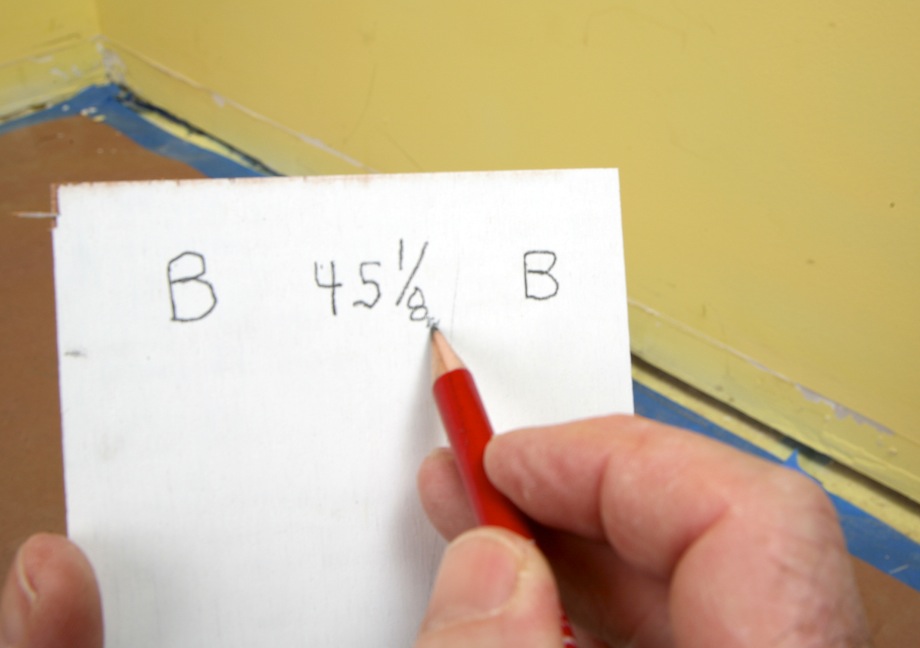 |
| 3. Measure short pieces a hair short. Sometimes short pieces are hard to install. I measure them a little short, especially when they butt against casing. If you measure them too long, you might move the casing. | 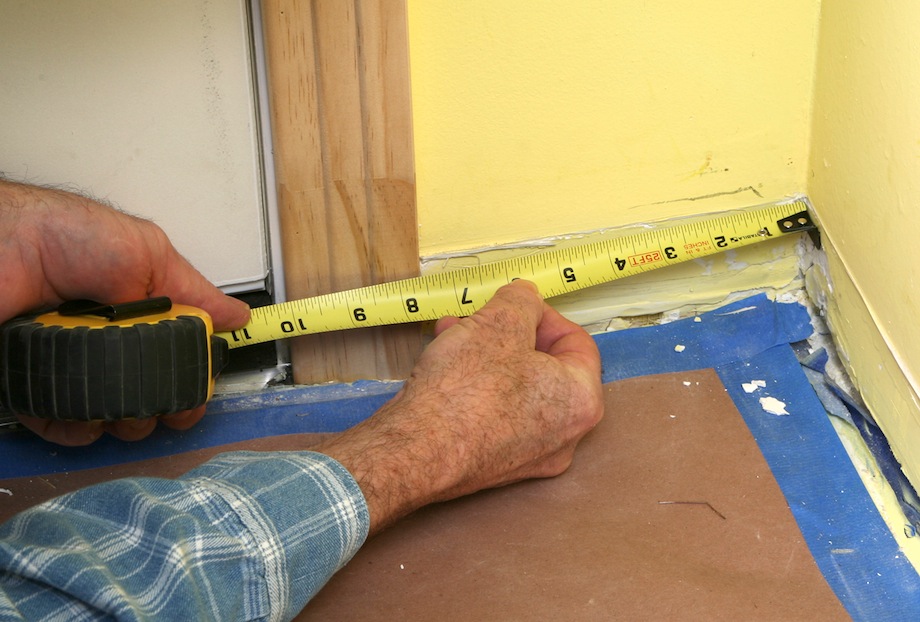 |
| 4. Mark the cutlist. This piece measures 7 9/16+. The + sign really means an extra 1/32 in. The left end is a butt cut; the right end is a Cope (C), which means it must be mitered first. | 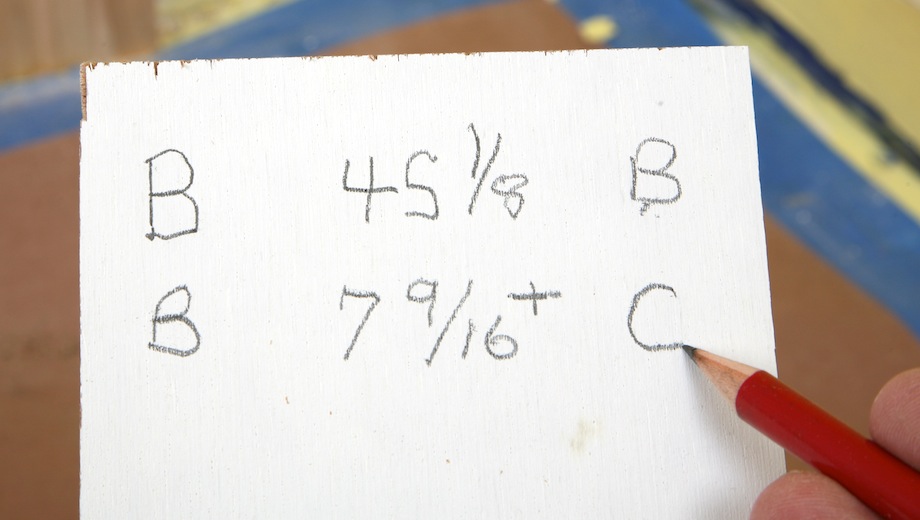 |
| 5. Measure long pieces a little long. Add 1/16 in. for walls over 8 ft., and add an 1/8 in. for walls over 12 ft., then bow and snap the pieces in for a tight fit. | 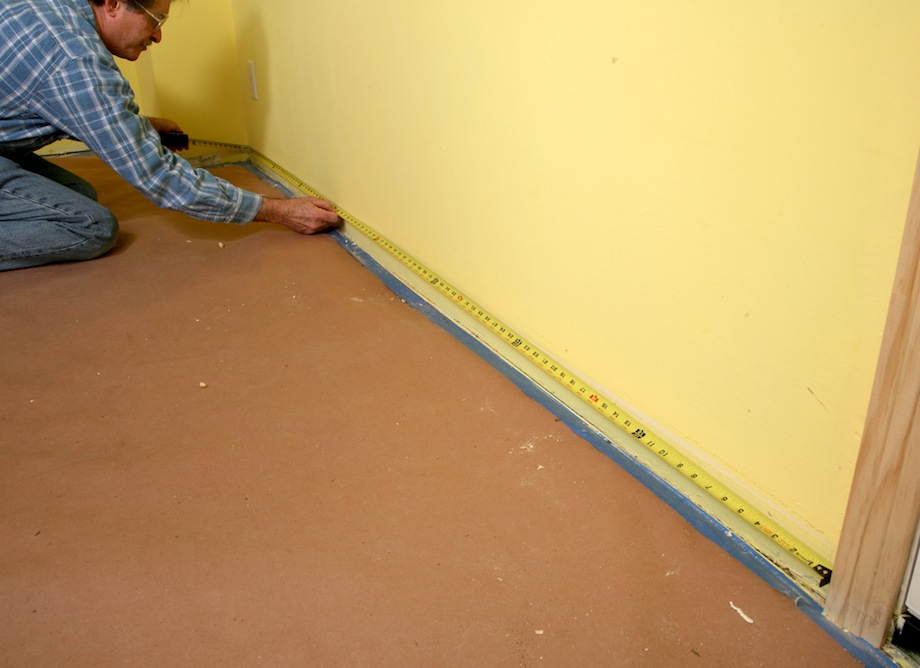 |
| 6. Mark the cutlist. This piece is butt cut on both ends because the inside corner on the left will be covered by a cope cut on the next piece. | 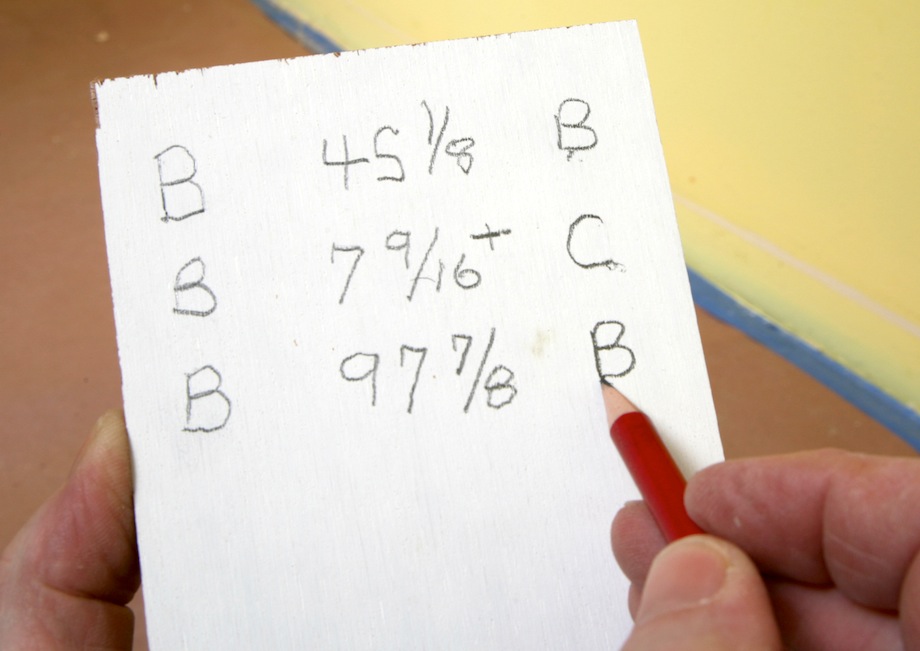 |
Measure Long Runs Carefully
Measuring long runs is difficult and the learning curve is steeper, or at least it used to be. Here are a few techniques that make the job easier:
| 1. Read a bent tape measure. Most carpenters learn the hard way how to read a bent tape measure—by trial and error. But it’s never exact and always requires a little guess work. | 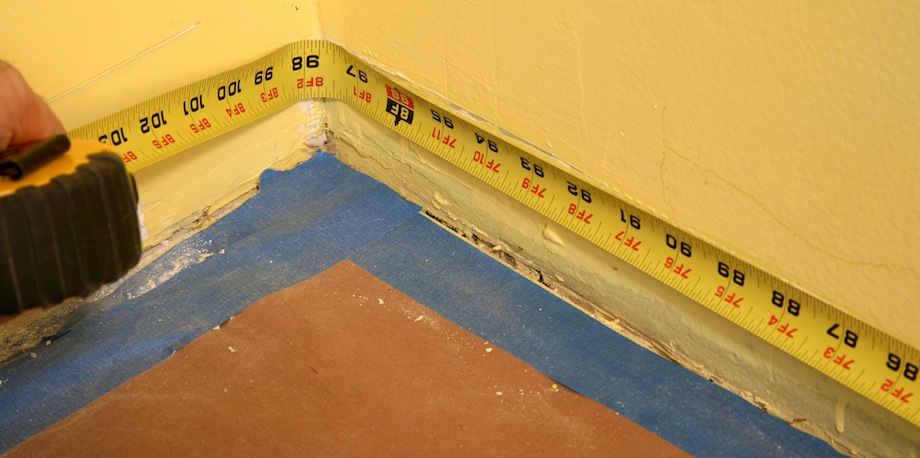 |
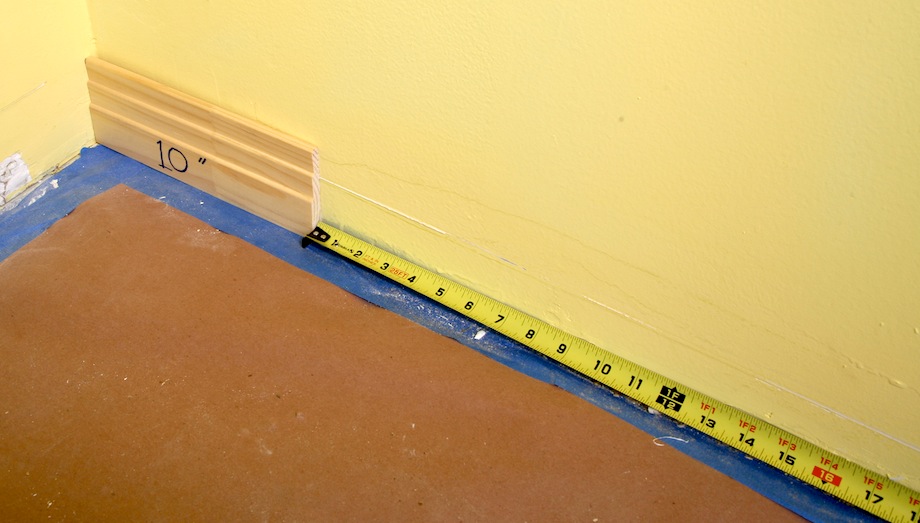 |
2. Use a block. Avoid bending a tape measure by cutting a block of baseboard exactly 10 in. long. Measure to that block and then add 10 in. (WHOOPS! That tape measure should be reversed!!) |
| 3. Use a Laser Measure. Laser distance measuring tools are becoming more and more popular. The price of these tools is dropping steadily, and they’re now extremely accurate, which makes them ideal for measuring inside corner pieces, especially on long walls. | 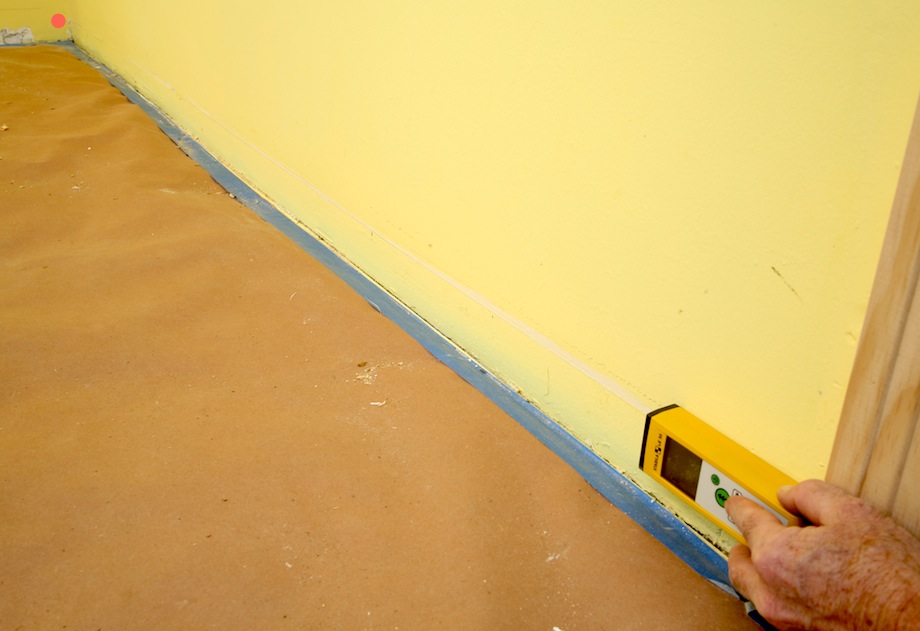 |
Miter Outside Corners
Outside corners must be mitered. Because of that, the joints must be cut precisely to fit the wall. Measure these pieces carefully and expect to spend some extra fiddling time at each corner.
1. Measure precisely. To avoid drywall mud build-up near the floor, always measure near the top of the molding—if necessary, trace a faint line across the top of the molding.
| For pieces up to 8 ft., measure outside corners precisely; for pieces longer than 12 ft., you can add a little if the molding is thin and flexible. | 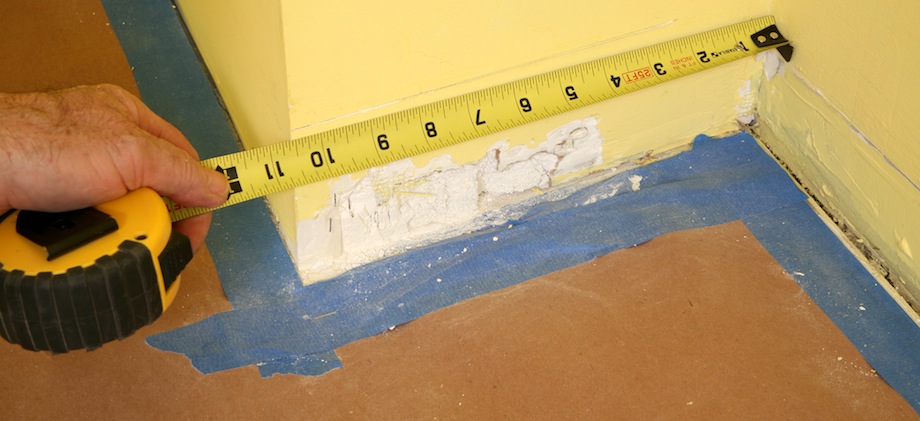 |
2. Use a protractor. Outside corner miters must be cut at precisely the correct angle. Use a protractor to read the corner angle. Divide the corner angle in half to get the miter angle.
| This corner measures 86 degrees—it’s really out of square, which isn’t unusual at all. | 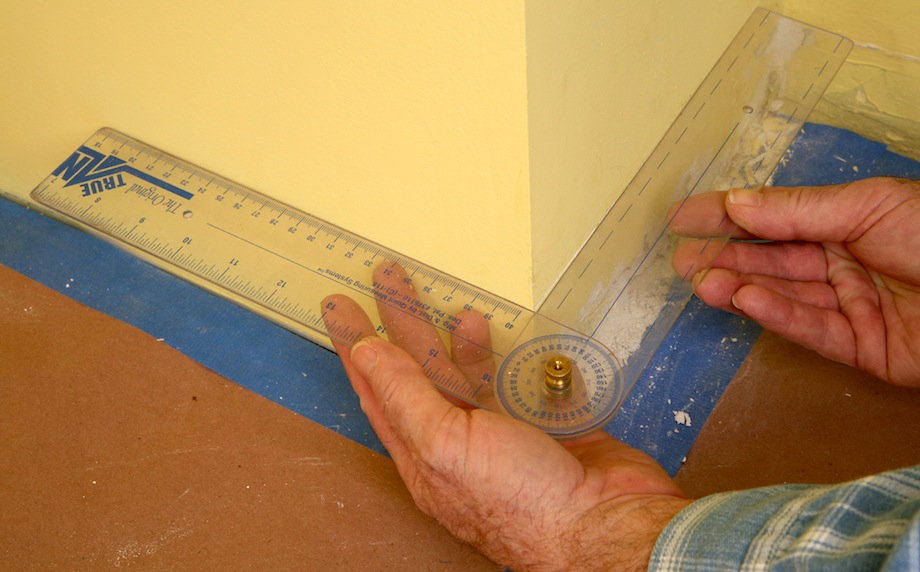 |
3. Mark the cutlist. This piece has an inside corner on the right, which gets coped, and an outside corner on the left (OC).
| The outside corner needs a 43 degree miter (2 x 43 = 86 degrees). In order to cut that angle, the saw will need to be set at 47 degrees. (For more information, see Jesper Cook’s article, “Miter Angles and Miter Saws.”) | 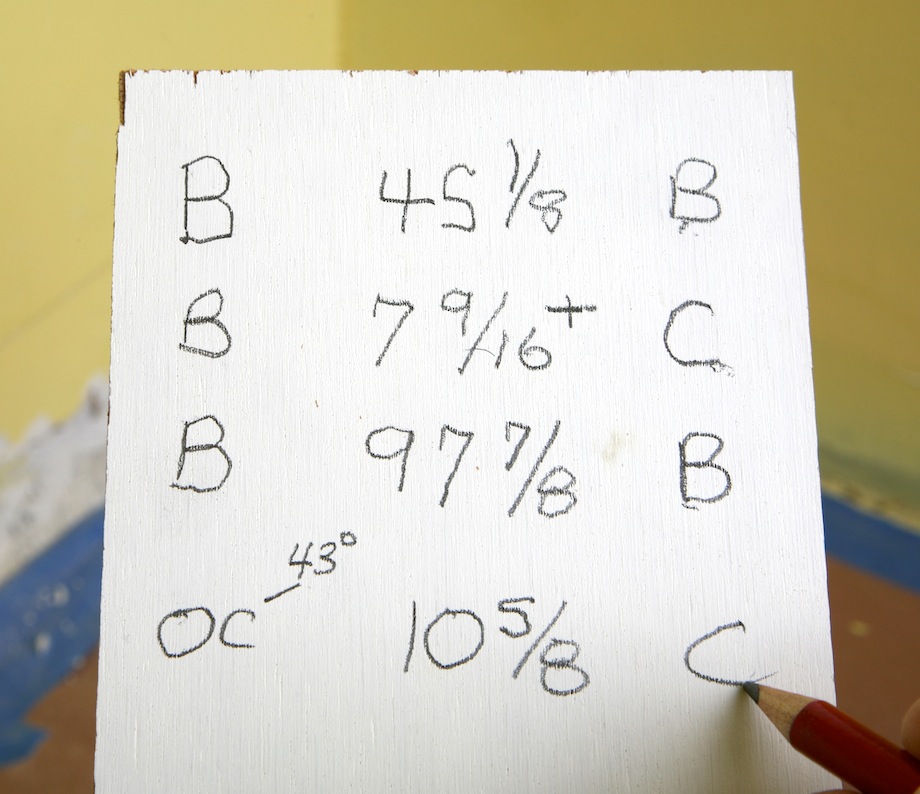 |
4. Measure the next wall. Be sure to hold your tape measure near the top of the molding and measure to approximately the same height on the outside corner.
| Avoid having to bend your tape by placing the butt end on the inside corner. | 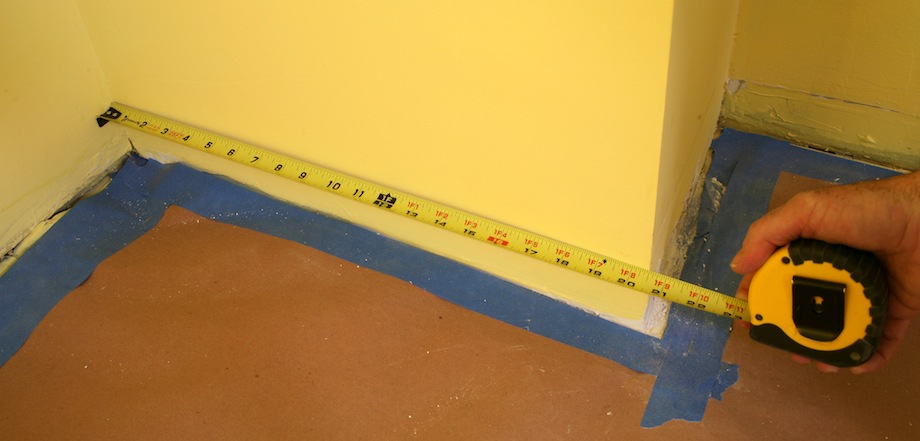 |
5. Mark the cutlist. This piece has a butt cut on the left, since it’s the first piece into the inside corner, and an outside corner (OC) on the right.
| Always write the measurement in the center of the cutlist. | 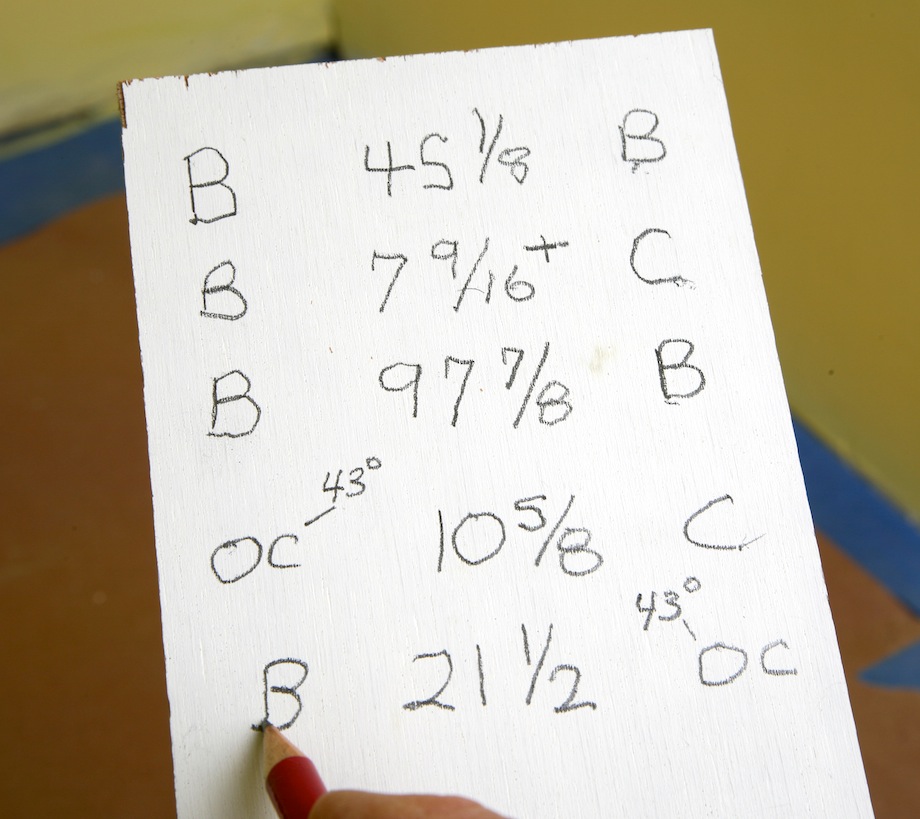 |
6. Measure one room at a time. Too many pieces on a cutlist will make the measurements and corner notes too small and difficult to read. You’ll confuse one piece with the next.
| This wall is the most common one found in homes. It has two inside corners. The right corner will be coped and the left corner must be butt cut. | 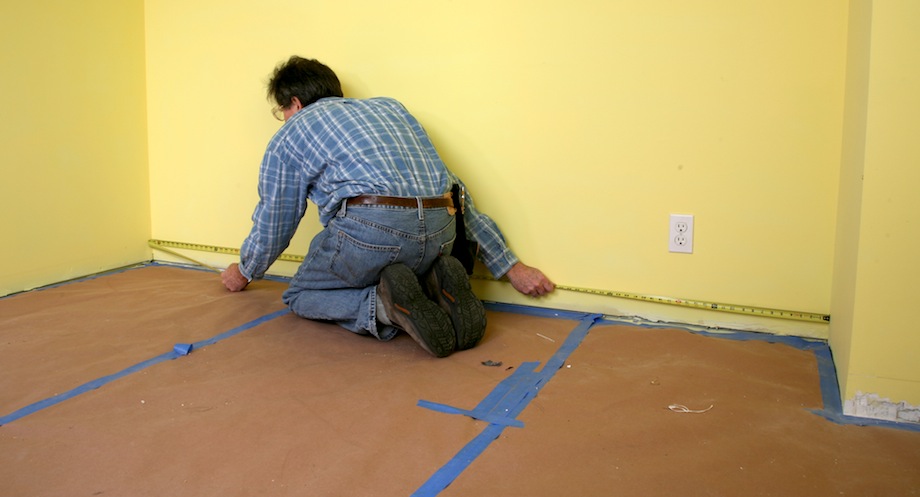 |
Cutting Baseboard
I have a lot of fun cutting molding at my miter saw. You should, too. In fact, if you’re not having fun, something is probably wrong. Having a cutlist makes the job much easier. It’s also much easier if the baseboard you’re using is short enough to cut in-position at your saw. With the molding standing up against the saw fence, the right end of the molding is the right-hand corner, and the left end of the molding is the left-hand corner.
Cope Inside Corners
Coping inside corners isn’t nearly as difficult as people think. In fact, once the miter is cut, whether you use a coping saw or a jig saw, the cut can be made effortlessly—if you use the tools properly. Follow these directions and you’ll soon be coping molding perfectly. Make several practice cuts before attempting to cope a measured piece of molding. Remember, craftsmanship and safety go hand-in-hand: you can’t do fine work, and you can’t work safely, unless you clamp your work to a work bench, table, or work station.
Installing Baseboard
Like every part of trim carpentry, there’s a few techniques that make installing baseboard a lot easier. But before you start kneeling on the floor, buy a good pair of knee pads or place a piece of carpet or foam beneath your knees.
Short Walls
Installing baseboard also forms a critical part of trim carpentry. The techniques used vary from wall to wall.
1. Fit the pieces tight but not too tight.
| Installing each piece will require a slightly different approach. For short lengths that butt against the casing, don’t force them in if they’re cut too long. Take the piece back to the saw and trim it if it’s more than 1/32 in. too long, otherwise you might crack the casing or even move the door jamb. | 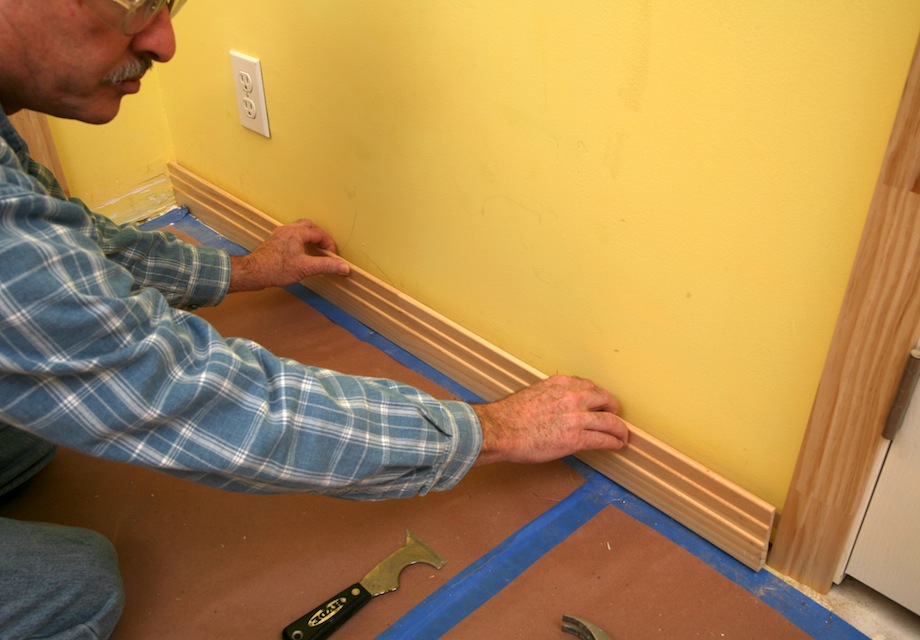 |
2. Use a block of wood.
 |
A snug fit is best. Don’t hit the molding with a hammer. Instead, use a short block of wood to nudge the molding into position. Often a little drywall mud built up in the corners is all that prevents a well-measured piece from fitting on the wall. |
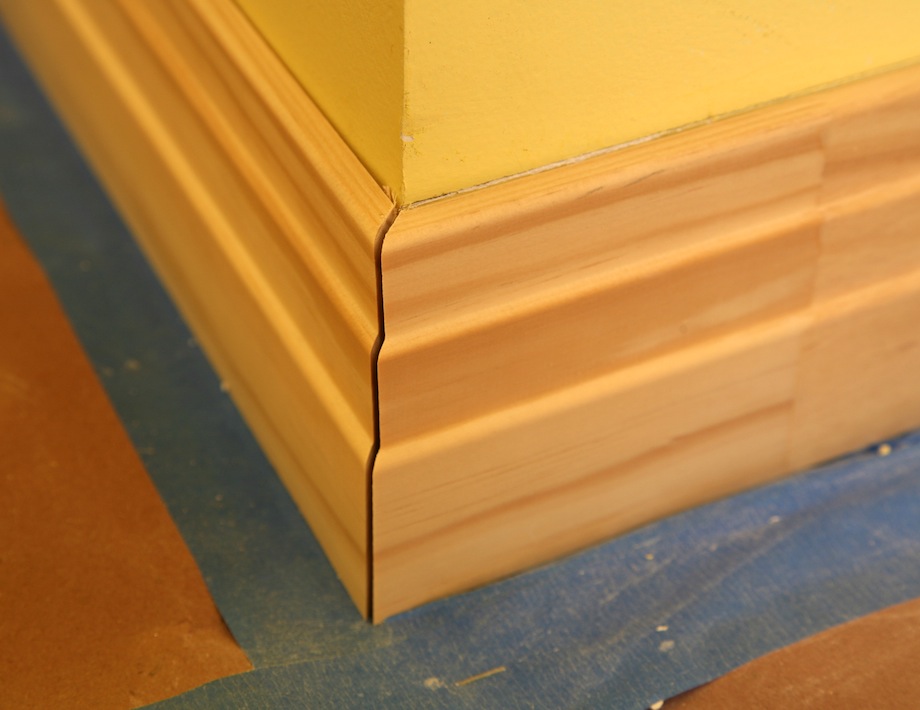
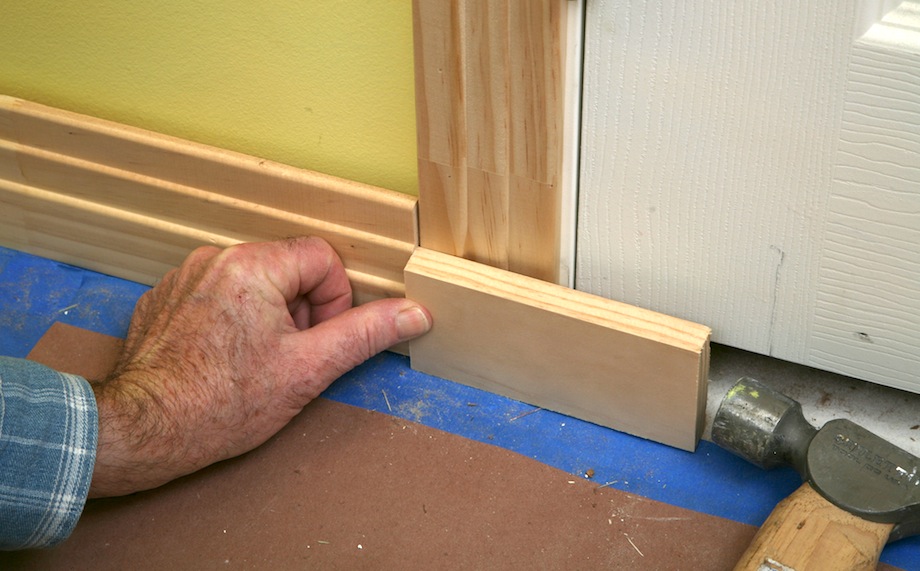
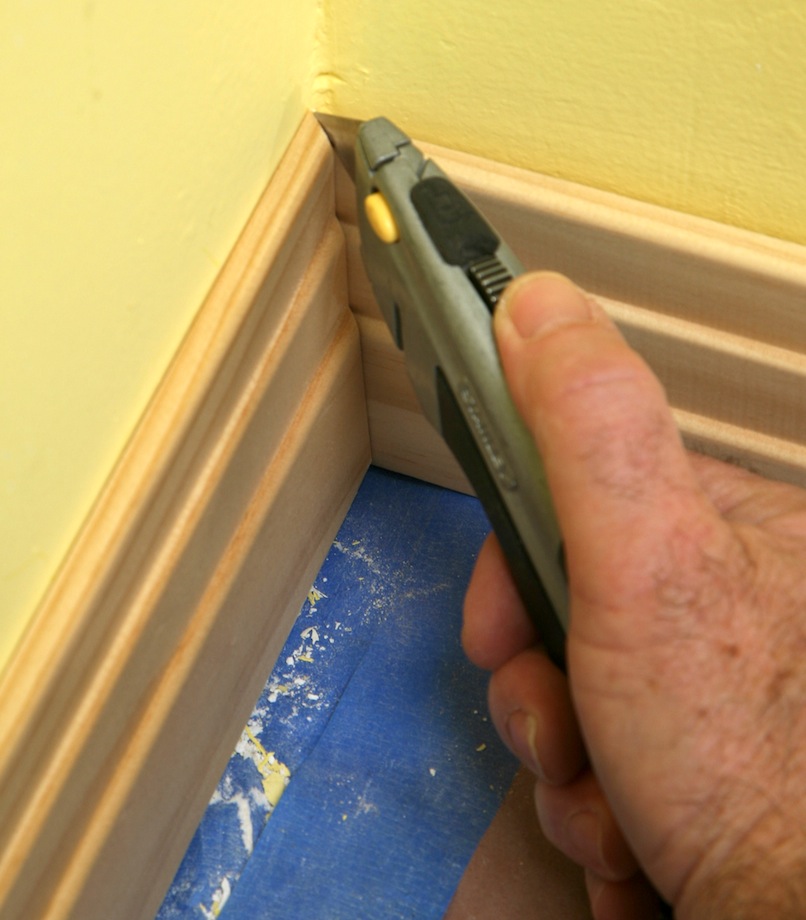
3. Trace overlapping copes.
| I cut my copes with an overlapping miter. Rather than make that overlap paper thin—in which case they often break off—I prefer to cut them 1/8-in. thick. With the piece in position, I follow the angle of the miter with my utility knife, and score a line in the previous piece of baseboard. | 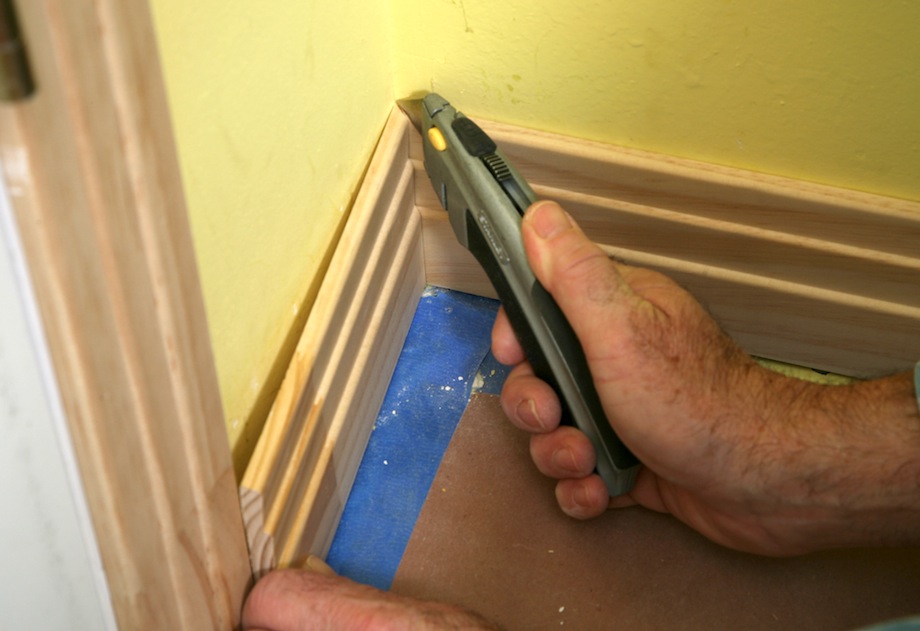 |
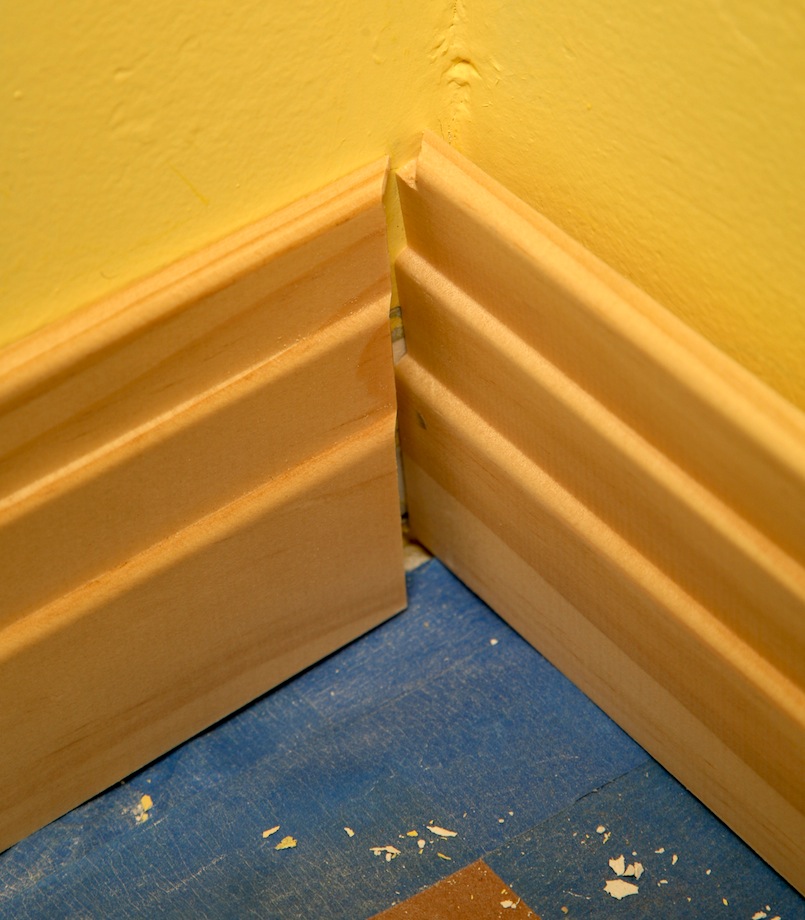
4. Notch overlapping copes.
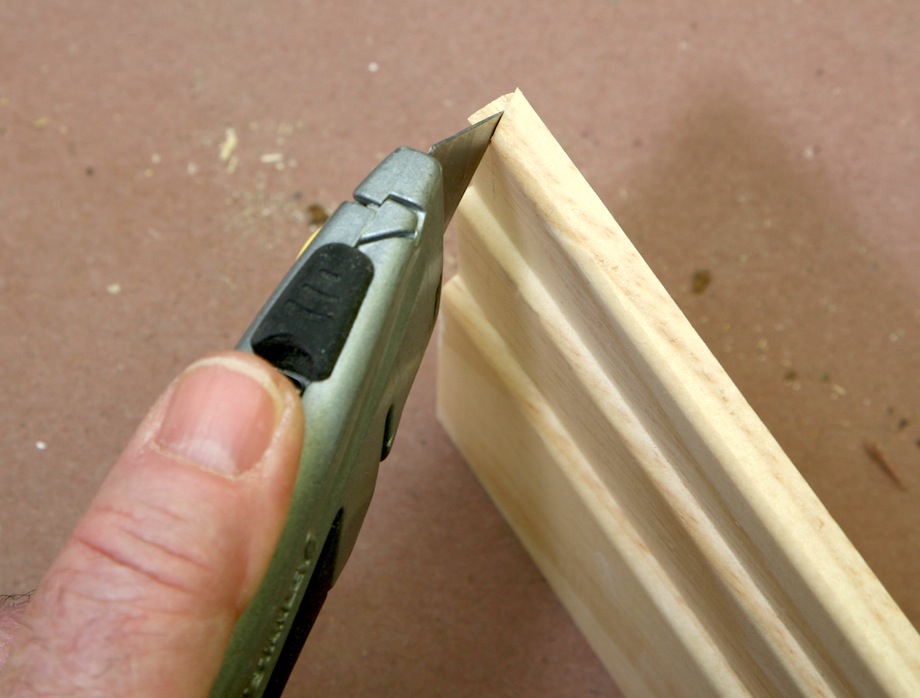 |
Once the angle of the miter is traced, set the utility blade on the line and wiggle it up and down, cutting the angle a little deeper. When the blade is about 1/8-in. deep, twist it sideways and the waste will snap out of the way. |
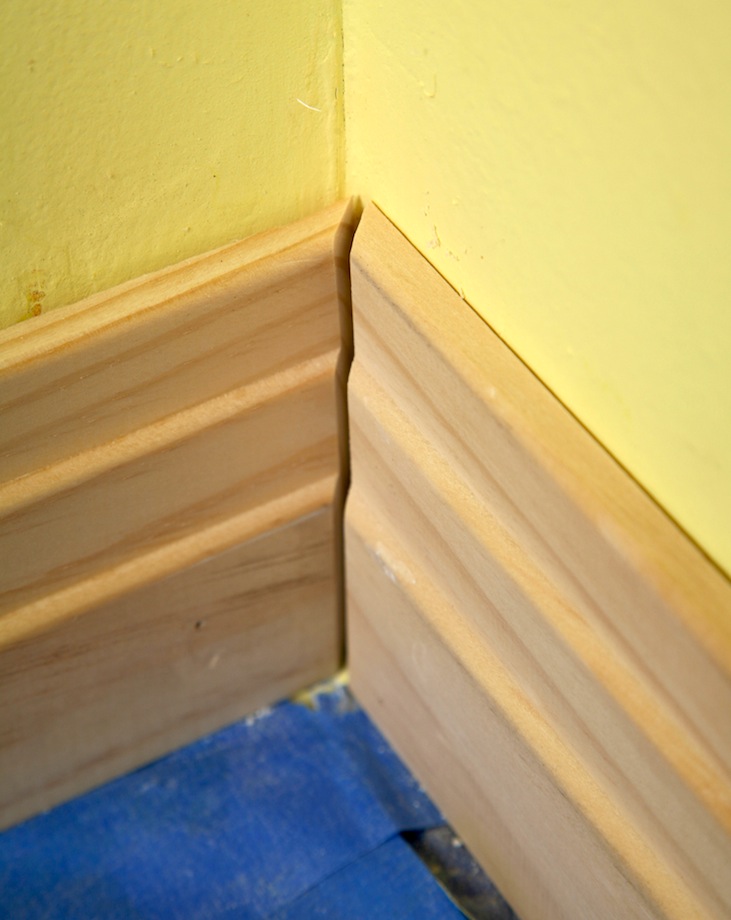
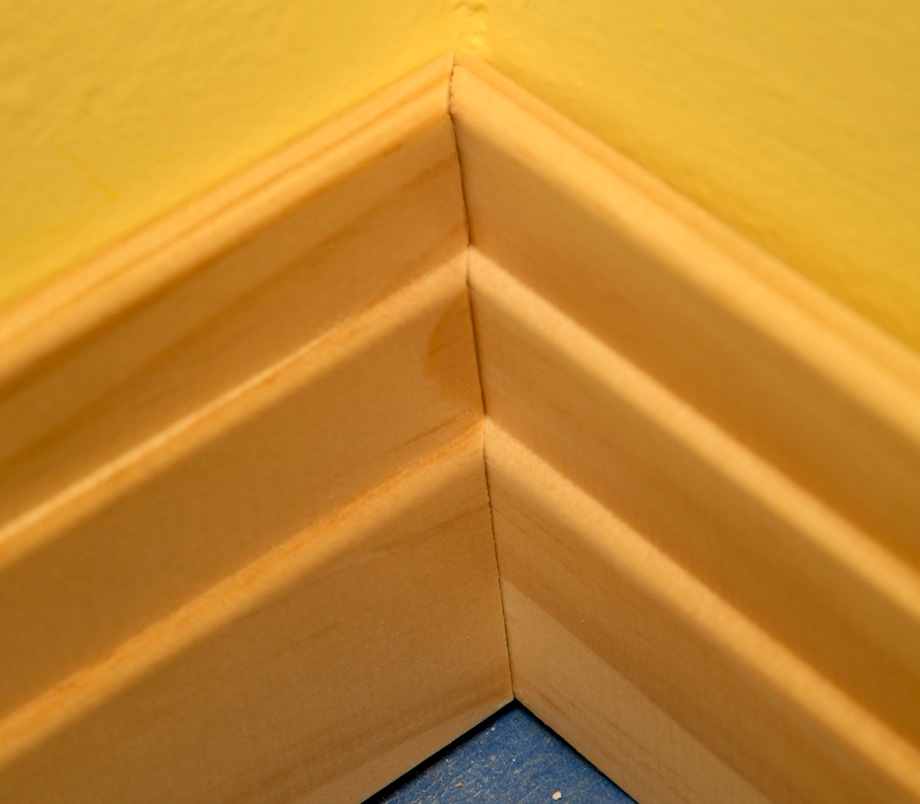
5. Position the cope.
| Now isn’t the time to lose patience. Don’t force the cope together, otherwise the overlapping miter might snap off! Use a 5-in-1 tool to lift the molding and align the cope joint before pushing the piece against the wall. | 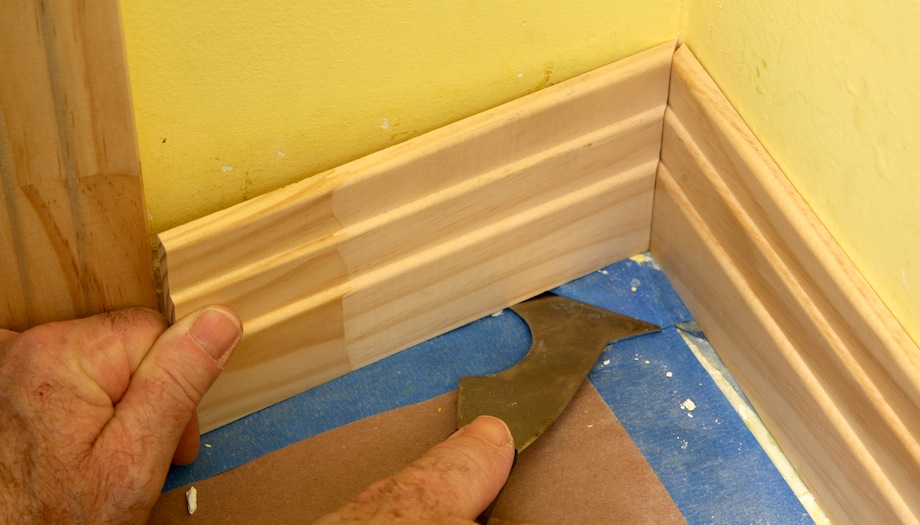 |
6. Use a block.
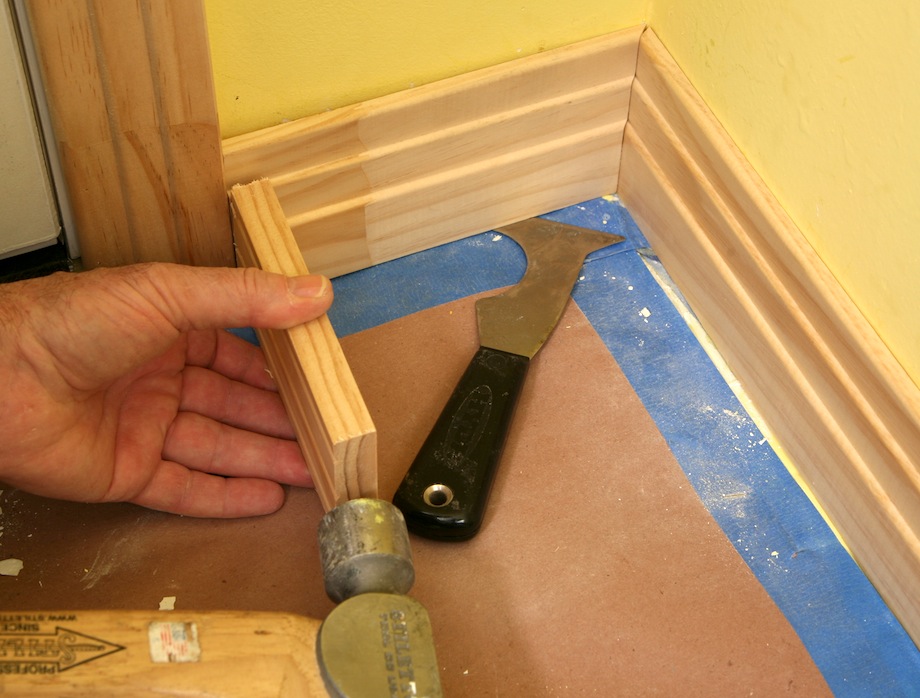 |
With the cope aligned, tap the back of the baseboard into position against the wall. A well-measured piece should be snug but not move the casing. The cope joint should close up almost water tight. |
Long Walls
Not all of finish carpentry can be taught through simple rules. Some of it must be learned through experience. Installing molding on long walls is one example. To get tight-fitting joints on long walls, carpenters frequently “pressure-fit” the pieces—they cut them a little long so the molding snaps into place and the joints “sound” perfectly tight. But learning just how much pressure to apply takes experience. Don’t be nervous. Experiment and you’ll learn, too.
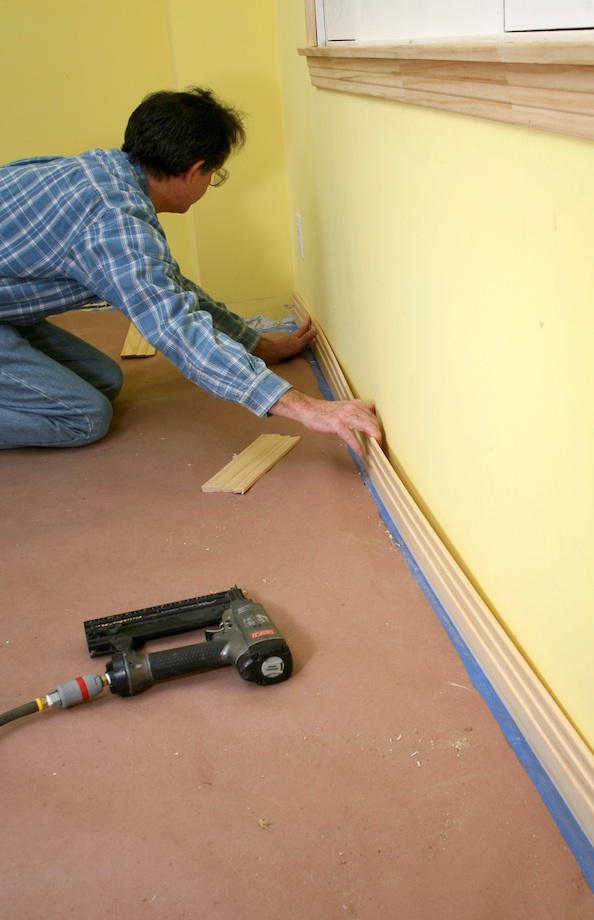
1. Nail off baseboard at casing. Before pressure-fitting a long piece into position, securely fasten butt ends against casing. That’s the best way to prevent moving the casing. (See left photo, below.)
2. Snap in long pieces. Hold the center of long lengths away from the wall. Push the corner in, then remove your hand and let the molding snap to the wall. (See right photo, below.)
 |
 |
3. Mark for overlaps. Butt-cut ends do not have to be removed for notching. Just follow the miter with your utility knife and wiggle the blade in about 1/8 in. deep. (See left photo, below.)
4. Make notches deep. Don’t worry about cutting a notch too deep. (See right photo, below.)
 |
 |
5. Copes cover notches. A tight-fitting cope joint will always cover the notch.
Outside Corners
Making tight-fitting miters on outside corners is critical. These joints are the first thing people see in baseboard, chair rail, or crown. Fitting outside corners requires a different set of techniques, and an “eye” for solving problems. Whenever you reach an outside corner, downshift into slow mode and start looking for anything that interferes with a tight-fitting joint.
1. Test fit every piece. Always test fit outside corners.
| Check that the cope fits perfectly, then make sure that the short point aligns exactly with the turn in the corner. Be prepared to trim a hair off the miter if necessary. | 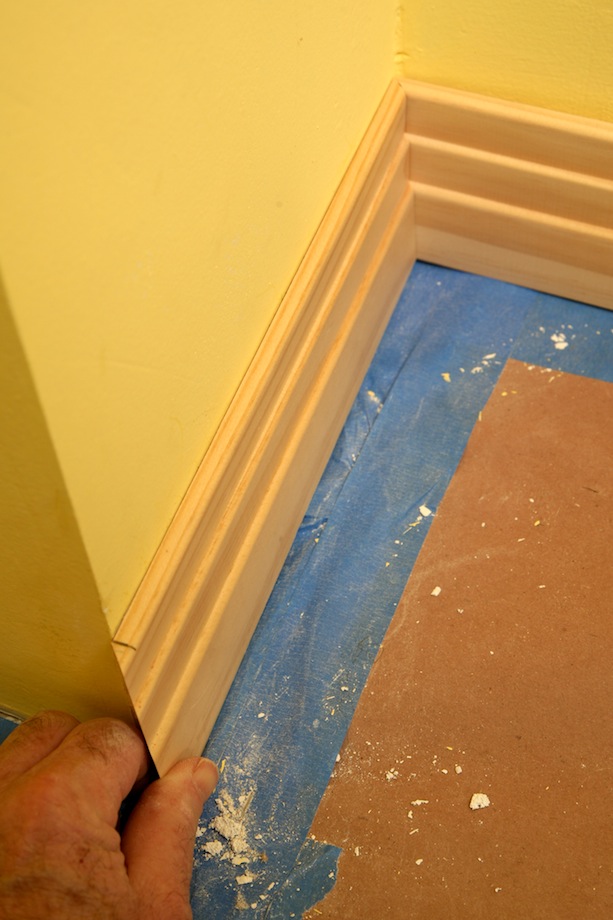 |
2. Don’t waste mistakes. Mistakes happen! Rather than get angry with yourself and lose your patience (and then make more mistakes), say these magic words: “How’d I do that?” If you can understand why you made the mistake then you won’t make it again.
| Look back at my cutlist (See Miter Outside Corners, Step 4 and Step 5, above.) and you’ll see I wrote down the wrong measurement mark! | 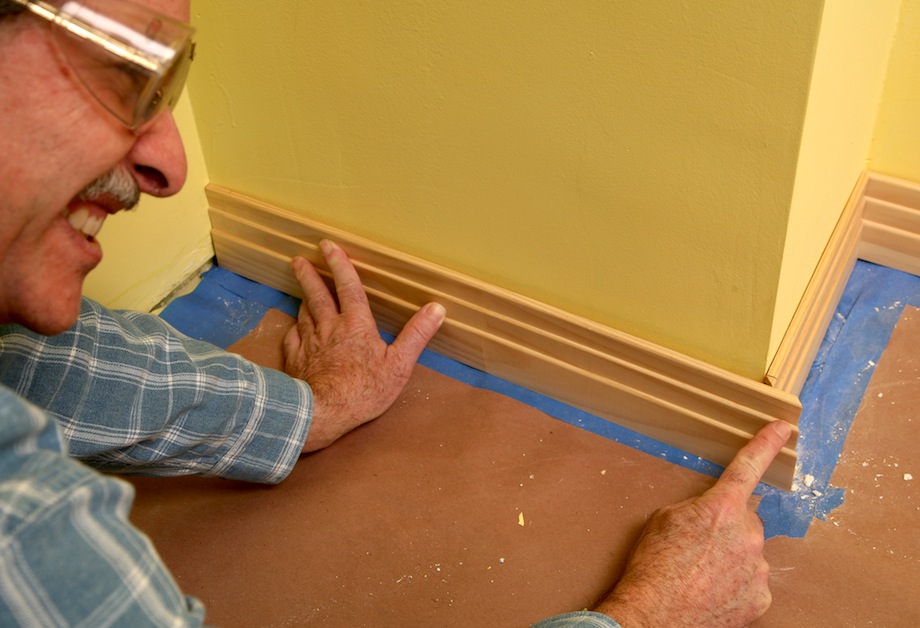 |
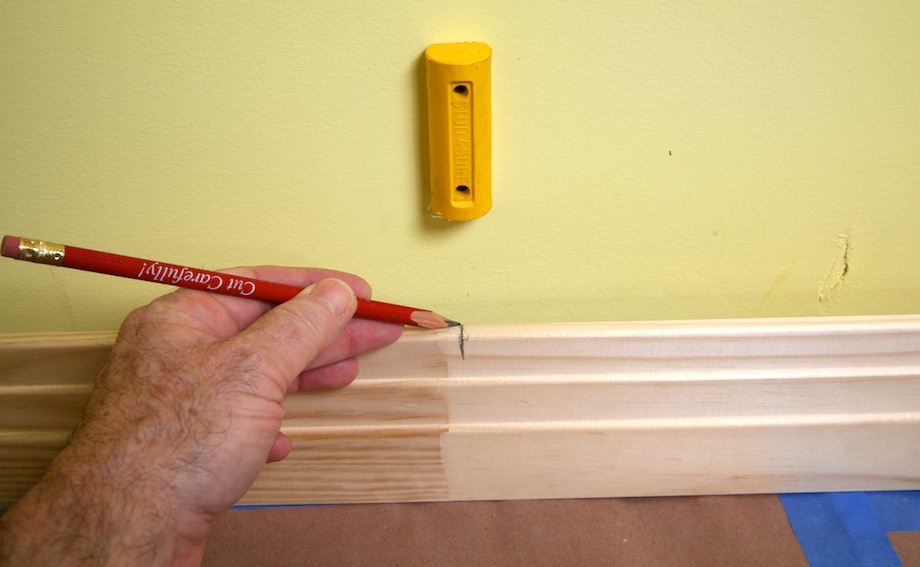
3. Mark pieces in place. Some carpenters intentionally cut outside corners long so that they can mark them in place, without having to use a tape measure.
| Reverse the molding so the long point of the miter is touching the inside corner, and then track a line along the outside of the previous piece of baseboard. | 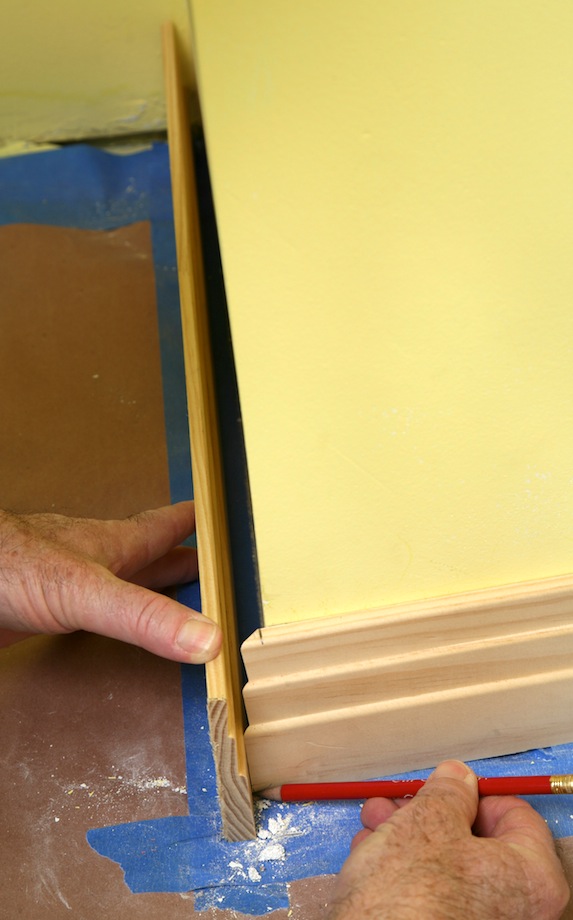 |
4. Solve problems. I’ve heard carpenters say that 90% of finish work is solving problems.
| If the miter won’t close, then find the problem. In this case, I can’t press the molding tight enough to the wall because of the drywall mud build-up near the floor. | 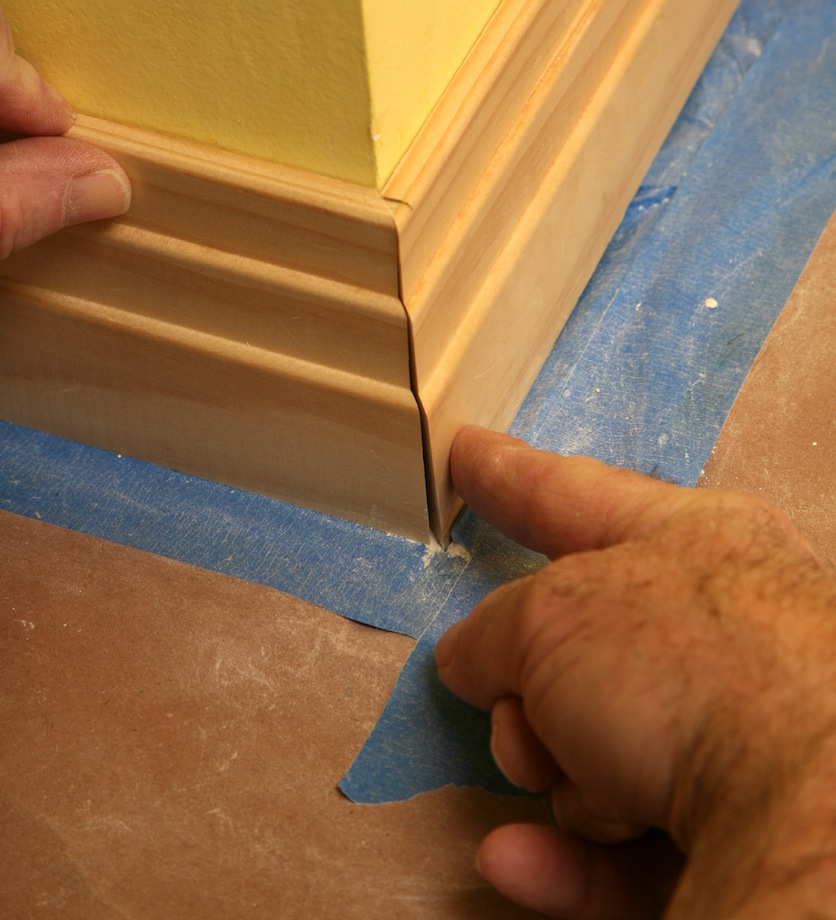 |
5. Scrape problems away. Use a 5-and-1 tool to scrape away drywall mud…
| …especially from inside corners that might interfere with fitting a nearby outside corner. | 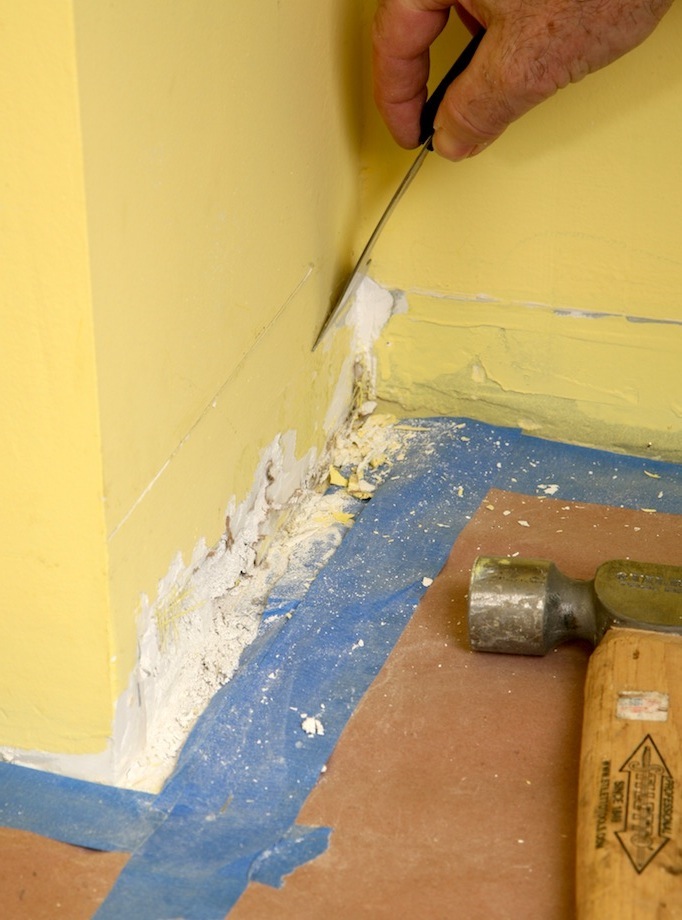 |
6. Carve problems away. Don’t be shy! If corners have too much build-up, mark the top of the molding, then drive a 5-and-1 tool into the wall about 1 1/2–2 in. lower than the baseboard.
| Carve out the whole corner if that’s what it takes to make a tight miter. | 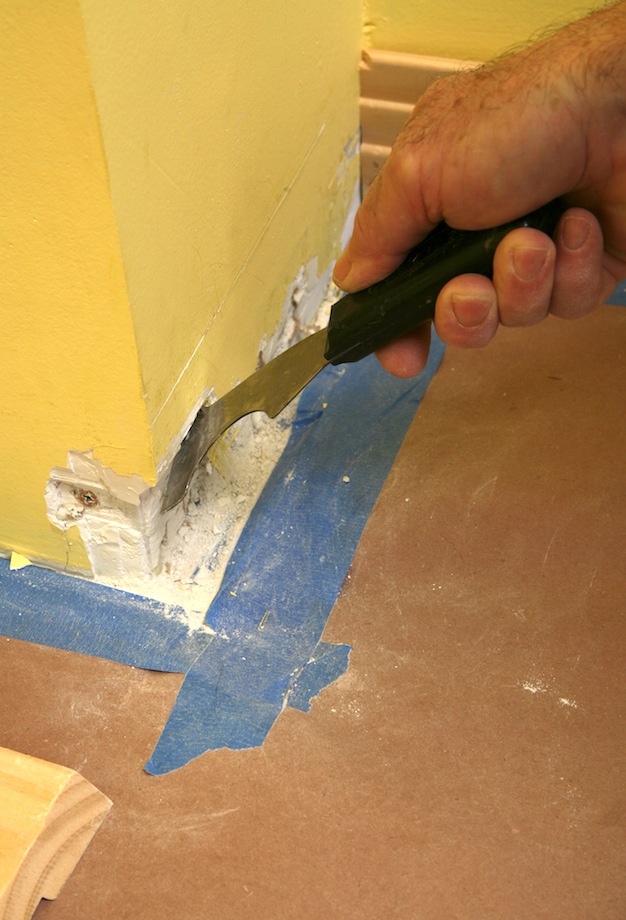 |
Fastening Baseboard
I like to fit baseboard before I begin fastening it. That way I’m not carrying a nail gun and hose with me while I’m fiddling with the drywall, notching inside corners, and generally preparing the molding.
| 1. Fasten outside corners first. Some corners must be fastened as you fit the pieces. Long pieces that butt in to casing are one example; outside corners are another example. I use glue and 23ga pins to secure outside corners. |  |
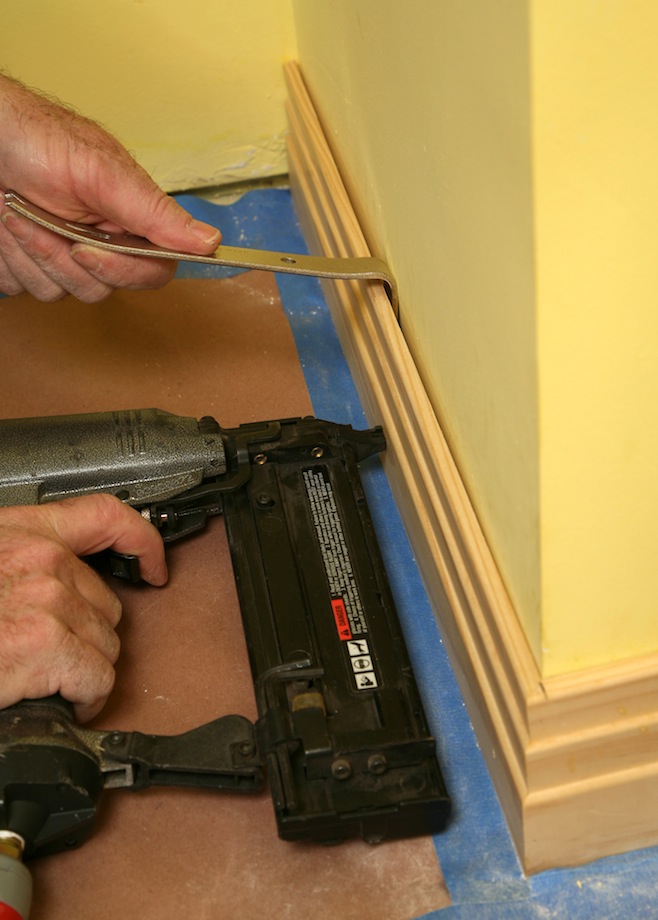 |
2. Fix bowed walls. Don’t always nail baseboard off tight to the drywall. If the wall is bowed, hold the molding out with a small prybar, and create a straighter line. Don’t attempt to make the line perfectly straight. Instead, if the bow is bad, split the difference. Fasten the baseboard securely, use shims behind the bow if necessary, and caulk the top at the wall. Most bowed walls will look fine using this method. For stain-grade molding, the wall must be floated. |
| 3. Fit all joints first. Never nail off any piece permanently until the joint is made with the next piece. You never know when you might have to lift a piece of baseboard just a little in order to get a perfect fit. | 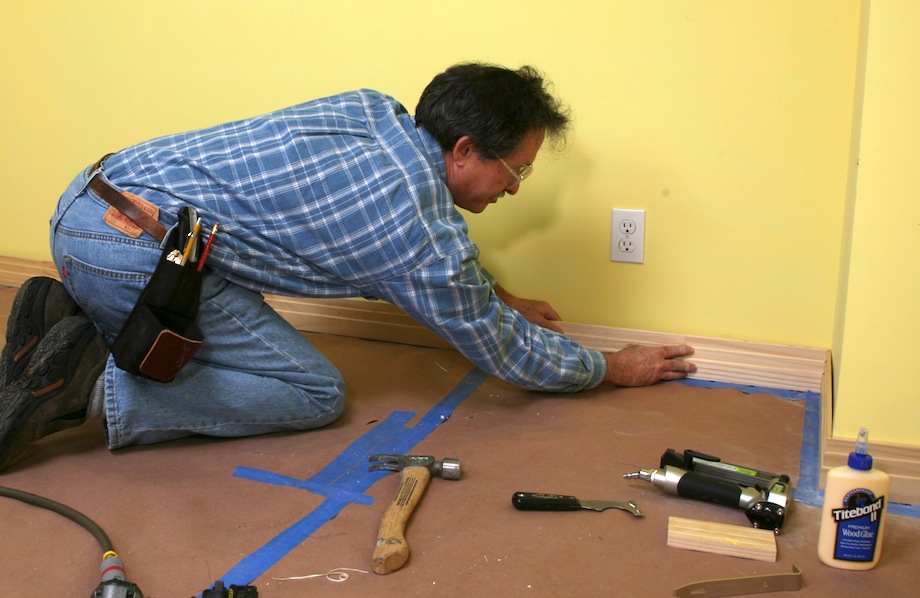 |
 |
4. Nail into the studs. Often times you can nail baseboard in to the bottom plate by angle-driving nails near the floor. But the molding must be secured near the top, too. Use a stud finder to find solid backing in the wall, and drive a nail at least every 32 in. on center. |
Thx, I’ll be doing baseboards next week.
I do have one question, I am using MDF for every thing but stain grade, and I can’t get a good cope with it. Any suggestions?
Again thx for a great article.
Billy,
Nope, coping MDF molding isn’t something that’s always possible. It crumbles on the point of the cope cut if you pressure fit it, and sometimes it crumbles while you’re coping it. Miters and double glue.
Gary
Will,
For MDF inside corners, I prefer to miter then final fit the miter using caulk. MDF is always painted so it’s gonna get caulked there anyway.
Also remember that MDF shows nail hole puckers really bad so be careful where you place your nail in the profile as you will most likely need to come back with a chisel to slice off the pucker prior to hole filling.
DC
thanks for the great videos. can you tell me the manufacturer of the inside/outside angle finder you used in the video. That tool looks like a major time saver,
happy new year
Eric
That’s a Festool angle finder. It comes ‘free’ with a Kapex. So you can get one for about $1400.00. I think they probably sell that separately, too. It’s a VERY nice accessory!
Gary
I have been a student of Gary for many years and spread his gospel, as it were. Question: No construction adhesive? We mostly install tall, stained base and it cuts – we hope – way down on nail or pin holes. Thanks Gary.
I’ve been a student for a few years, too–about 40. I use adhesive but only when it’s necessary–when there’s little or no backing, on e steel-stud walls, etc. But you’re right, a combination of smaller nailers and adhesive would be a good method for stain-grade material.
Gary
Great article and a refresher course thanks for publishing Gary !!!
Nice article ! I was taught how you look into a room will establish copes. In a square room, the back wall base would be square cut on both ends. Both sidewalls would be coped into it with the opposite ends square cut. The door walls would be coped into the sidewalls. This is done so you are not “looking into ” the joints. Yes you are coping ambidextrously but it’d be another skill set you could claim !
Steve,
Yeah…I’ve heard that one before, too. But I’ve also seen an awful lot of baseboard crews and visited historic homes, where I’ve never found any evidence of this “looking in the room” approach. If a cope is cut tight, it’s tight and stays that way, no matter what direction you’re looking at it from.
Gary
Steve,
I was taught that way too and used that method for a long time until I realized that it often leads to problems. For starters, you will move much faster if you base a room in one direction; moving rotationally from the door around and back to the door. This will be reflected in your cut list too and your work pieces will effectively be A-B, B-C, C-D, D-E, etc. with no confusion or forgotten pieces.
More importantly, your cuts will almost all be the same. Not having to question the angle of the cut on each end of each piece saves time and reduces errors. Then (as Gary points out) performing the cope is the same every time. The cope is the most complex operation involved; why complicate it further by changing the end or your stance or any other variable. Just get good and fast at the one cope and make it your only cope for the job.
Nice article, Gary.
If you’ve been doing this stuff for a long time, it’s easy to find yourself skipping some basics when you teach. So it is good that you included a “Miters 101” section.
My cut list is similar, but I draw a piece of shoe to represent whatever molding I’m cutting, even crown. Each end will have one of four profiles: square, pointy (miter), curve (cope) or jagged (cut long, scribe in place). Don’t know if it’s faster or not, it might be, but I like the visual. You might think that there could be confusion between a hastily-sketched outside miter and a hastily-sketched cope, but my miter is slightly blunt, and my cope is exaggerated, so I’ve never mixed them up.
I probably take the old adage, “Never measure when you can scribe,” to the extreme, so my cut list has a lot of jagged ends on it. Not as efficient as trusting your tape, but it gets you there.
BTW, you might want to re-shoot that pic of the 10″ block with the tape flipped end-for-end! You’re going to confuse some poor newbie! Some guys use a 1′ block, but that is asking for trouble. 10″ it is.
harlan
Harlan,
Good catch! I made a note for that photograph. It’s so funny that I never caught that before and funnier when you think about the stuff you don’t think about when you’re shooting photographs. The one before is just right–with the tape measure butted against the casing. Who knows WHAT I was thinking when I shot that one! :)
Gary
Awesome article with critical details for the avid finisher!
Great work!
Will, you could use a sanding disk on the grinder to cope.
(always with a respirator)
Pete
Great job on the video and excellent scenarios of how to fix the issue when running into these problems.
I have ran allot of trim especially base boards if I can suggest a video on doing inside 22.5 degree corners, we all know what the tapers do they use a curved flexible inside corner tool and it is one tuff job to make the base fit properly, I usually scribe the height of the base on the wallboard with my utility knife and then cut a short left and a right inside cut on pieces then fit them together once finding the perfect intersection of the pieces laying as flat as possible on the wall I then remove one piece and make a vertical cut along one edge of the remaining piece on the wall board, then I proceed to dig out the built up sheetrock mud on both sides until the base board lays flat against the wall and the angle meet up perfectly though leaving the top of the inside corner hanging over the top of the base board, personally I hate the look but it is acceptable. The other method I use for painted millwork on higher end applications is that I divide the inside wall angle into equal sections then cut small angled pieces of base around the inside of the wall angle, glue them with SP210 then sand the inside profile to make a smooth transition around the inside corners this eliminates digging into the wall, allot of work I know but looks very clean!
Hey, Gary,
I remember a product review you did some years back, an adjustor screw for those oh-so-frequent situations where the butt piece of baseboard sits too far back at the bottom, often because of tapered-edge drywall, messing up the fit of the coped piece.
You mentioned that a lot of us use drywall screws to shim the base back out, but that this new gizmo allowed adjustment with the base in place. Don’t know if you actually use that gizmo or not, but I have an improved version of the drywall screw trick for those who don’t want to buy one more dedicated product:
Drill a 1/8” hole through the baseboard and into framing, right where you want to shim, pull the base away, and buzz a T-15-drive flathead into that 1/8” hole. Enlarge the hole in the base to 5/32”, and a 2”, ball-detent T-15 driver will slip in to adjust the shim screw in or out. I spin the 5/32” bit backwards to avoid tearout.
The adjustment hole is smaller than that left by a trimhead screw, but if you want, you can skinny that T-15 driver down even more, to 9/16” or so, by spinning it against your belt sander — it doesn’t have to be very strong, since the screw is in a pre-drilled hole.
harlan
Harlan,
I missed that ‘home-made adjustor screw’ suggestion! It’s a good one! The Trim Adjustor screws I use and reviewed several years ago, are made by the same fellow who makes the Copemaster, Bill Shaw, but I don’t know if he’s still in business. So your suggestion is doubly good!
Gary
I felt the building trade 20 years ago in New Orleans. At that time, the step down moulding was getting hard to find. I still saw it in some existing houses and could ‘mill’ small pieces. It’s good to see it’s still viable. thanks for the article.
Thanks Gary…
The older I get, the more I forget, and the more it helps to review everything from the beginning. Maybe a touch of brain damage too.
The new construction jobs I’ve been on in Brentwood, BelAir, BeverlyHills, call for the wall trim (base, crown, panel) to be cut at the angle called for by the plans. We put our trim on right and rock guys come back an float/cut to us.
Causes a lot of excitement for the GC sometimes.
steve
Steve – does this mean that you are affixing your trim directly to the wall framing? Not sure I understand.
Gary – thank you so much for your work!
Rob
Great series. I look forward to seeing one on crown moulding!
Brian,
Coming very soon….
I am always amazed at how Gary presents things- simple tools that make the jobs fast, precise and practical. I got into the carpentry field a little late in life and have focused on interior trim. I purchased all of his DVD’s and books. Gary, I consider you my mentor although, we have never physically worked side by side. Keep up the great web site and informative articles- they never get old.
bernie
Great article. What blade for the power jig saw works best?
Joe
Joe, for my Festool Trion jigsaw, I use an S75/4 FSG. For a Bosch jigsaw, use the 244D.
Gary
Gary,
Good article. Even something that seems basic on the surface, goes much smoother with a plan! One thing I often do on outside corners, especially on old house, where the walls might be really boogered, is put a small piece of blue tape on the floor at the outside corners. When I’m working my way around the room measuring, I have a scrap of base that I can lay up on either side of the corner, and scribe the outside of the miter joint intersection on the tape. I find this gives me a more accurate take on how the baseboard will actually lay, and, so long as there isn’t a ton of crud on the bottom of the walls, saves me the hassle of having to scrape it away. It also allows me to get a long point/long point measurement, which I prefer.
Mike
Mike,
Nice approach! There are so many little tricks and techniques and different approaches to running baseboard, and many of them are worth knowing.
Michael,
Ask five carpenters how they scribe baseboard and you’ll get five different answer. I know some people who shoot a laser line–which works if the floor is level, but often it’s not. I know others who find the highpoint and the lowpoint of the floor with a laser, figure the difference, and starting at the highpoint, the scribe off that amount, holding each piece level as they scribe it. Personally, I don’t enjoy scribing baseboard that much, so I try to keep it to a minimum. Unless the differences between high and low points are really dramatic, then I cheat. There are always doorways into rooms, so I do one room at a time–each room is a separate entity. And even within a single room, I don’t try to match every wall. If there are two doorways, or some cabinets or something that breaks the baseboard, then I scribe JUST those pieces, by themselves, without any consideration for the other pieces in the room. That way, the amount of scribing in minimal, the amount I take off any one piece is minimal, and you can’t tell the difference between one wall and another because doorways/cabinets separate the pieces. I hope that makes sense!
Gary
For long wall measurements, cut a piece of base board exactly 100″. Butt it tight into the corner, measure from the other corner to the end of your 100″ stick. Take that measurement and guess what? Add the 100″ to it and there you go. No more hassles with your not staying up.
Tom
Michael,
In my experience the base is most often accompanied by shoe to cover small gaps at the floor. However, especially in very old homes the floor is too far out for even shoe to cover. At that point I just do what is necessary to make it look “level” and with the rest of the base. This may mean scribing just one wall, ripping down base to differing heights, or even chiseling out a channel in the flooring (only in extreme cases).
When trimming, it is best to remember that the point of trim is only to “Look”. That is, it doesn’t need to be level but you must make it look level. Corners don’t need to be tight but they must look tight; Case in point, a cope only appears to be a tight inside miter. Similarly, you can carve out the back of an outside corner if it’s giving you issues.
Good trim carpentry almost seems ‘shady’ at times because it is all about deception…. and one reason why trimming in front of a homeowner is a bad idea. Did you notice the pic where Gary chiseled out the drywall using a 5-in-1? Try that in front of a homeowner hovering over your shoulder.
DC
Gary, I learned how to cope from you. I own a festool trion and a Collins coping foot. I just learned from this thread what blade to use. You mentioned the correct blade at one of your shows, however I could never find where I wrote that down. But I have one more question….what speed should I use on my jigsaw for coping? and would I use different speeds for different molding or material composition?
Steve,
I run my jig saw at the highest speed. Personally, I like using the mid-oribt setting, though I think David Collins prefers not to use the orbit feature at all. One thing I will say–MDF is different, and very small moldings. You might want to run at a slower speed if you’re worried about the saw cutting too aggressively.
Gary
Gary, I am just a regular guy who likes to work with wood but I always stayed away from the coping technique. I never tried it that much but when I did I made a mess of it. I read your article and watched your video and decided to give it a try. It worked out great, I have the water tight joints you talked about. The way you said to measure the walls with the length in the center of the page and then on either side of the measurement to mark “butt, cope, outside or inside mitre and the angle” was great advice. It worked for me and made the job so easy by making all my cuts from the same side. I can’t believe how just this one article has changed my thinking about something I thought was too hard for me to master. Coping joints won’t ever bother me again. Thank you for your column and this advice.
Tom,
I know the feeling and thanks for your note!
Gary
Hi, Gary!
I really enjoyed the article, especially since I have always shied away from coping, thinking my miters have been very good to start off with. But there’s always that expansion/contraction thing. I will have to get that coping foot and give it a try.
On a related note, do you have a set of tools that a trim carpenter should always use. For example, I notice the five-in-one tool is part of the arsenal.
Great article. Thanks!
Jack
Jack,
Good question but the answer would require a long article!
Gary
I am in need of someone who can make rounded corners for my baseboard molding., I can find the pattern of the baseboard from a local supplier but he was not helpful when it came to the rounded corners. I had a handyman remove one of the rounded corners and can send a picture and probably measurements of what I need. I need to replace 9 of them. Can you refer me. I see a picture of my my molding in your section of installing molding. Thank you. barb
Barbara,
There are many millwork shops online, and probably a few in your area, too, that do that type of work. Try a google search in your area or ask a few lumberyards for recommendations.
Gary
For someone who holds a coping saw in the left hand, would you need to cut the miter in the opposite direction so that the butts are on the right and the miters on the left? Would this lead you to feed from the other side of your saw for any reason?
If you need to do a wall longer than your stock, do you scarf the pieces together? How do you mark this on your cut list since now you have two different angles for the scarf and neither is a cope?
Thanks for the great article and videos.
Ed,
Yes, I’d suspect you’d be more comfortable moving material from your right to the left. And installing baseboard in the opposite direction, but I’m just guessing about that because honestly, I can’t imagine the scenario…I can’t get my head around it. I usually tell left-handed people that they’re fired. That’s the easiest way for me to deal with the conundrum (just kidding!!!!). You’ll have to experiment and figure out what works best for you. Definitely, if you’re using a coping saw in your left hand, you’ll want to hold the material with your right hand, which will mean you’ll want to cope the ‘wrong’ end!
And for splices/scarf joints, I describe them as inside corners and outside corners, too. The first piece on the wall gets an inside corner cut (long point), and the second piece, that overlaps the first miter, gets an outside corner cut (short point measurement).
Gary
Thanks, Gary. Here’s the irony- You use your left hand to do your microadjusting on the saw. It’s the one doing the fine work. You may have to fire yourself! Many electric tools are intrinsically right handed and I just use them that way.
Gary- Any suggestions/tips for installing when there is already carpet in the room, but also no prior base moulding? So the carpet and tack strip are run right up to the wall. How much gap do you leave between the carpet and bottom of the baseboard and what tricks are there for figuring out “level” so that things come together when you have such a soft wavy reference?
Ed,
I’ve never been lucky with tack strip. It’s always too close to the wall. Whenever I try to push the base down into the carpet, I end up with spots where it isn’t tight enough to the carpet and you see small gaps. And I also end up with bloody fingers. If there’s room for the base between the tack strip and the wall, it’s much easier, otherwise, I’ve had to pull the tack strip out and tell the clients they have to call a carpet installer and re-stretch the carpet. As for getting the corners aligned and the the pieces level–don’t nail anything off in a remodel until you know what’s happening at the next corner. Tack pieces to the wall with just a few nails, fit everything, then nail it off.
Gary
Very nice tutorial. For the most part, it’s just reinforced what I seem to be learning about baseboards: there is no magic way to get them perfect without test-cuts and shaving down oversized pieces to get an exact fit. I don’t think I would hack off of much of that corner as you did because I’m afraid of interfering with the cornerbead but whatever. One tool you might want to check out for coping MDF is a jig called “The Coper’. With it, you create a template of the base you are installing and then use a router to cut the profile into your piece. It works awesome. I spend way more time on outside corners now. I’m thinking of getting a laser tool for measuring, what do you think of those? And btw, if you do check out ‘The Coper’ the secret is to cut a template out of plexiglass after you pour your mold. The epoxy ones their system creates don’t stand up to a day in the real world.
Bryan,
Yes, it seems we all ‘seem’ to learn the same stuff.
I actually used The Coper for a short time–while writing a review on the tool, and found it unnecessary. I can cope much faster with a Collins Coping foot–much much faster than using a router bit; I can get into tight quirks and beads that a router bit can’t reach into; I can also use the same tool to cope crown and chair rail; and I don’t have to make a mold or listen to a router wide up or have another work table dedicated to routing the ends of 16′ long trim. But I do use epoxy a lot! Mostly on bowls that have knots and stuff. :)
Gary
Gary,
I’ve read the article, watched the videos and yet it still escapes me why you’re cutting the OC 43 degree at 47 degrees.
I normally use my Starritt gauge so it tells me what the miter setting is supposed to be. I’m I missing something?
Michael,
If you’re using your Starrit guage and “it tells” you things that you don’t really understand, then I think you are missing something. :)
That’s one of the problems I encounter frequently with carpenters who rely on a ‘workaraound’ to understand angles. The Starrit protractor is a great tool, but if you lean on it too much, you’ll never understand what’s happening. I’m really really adament about this because I know from personal experience that until I forced myself to recognize what an acute angle looked like, I wasn’t able to visualize angles and miter saw settings at all–and when I say visualize, I mean: guess what the angle is and be within a few degrees; know in my gut which way to swing the saw.
It’s the gauge on your miter saw that’s messing with your mind. Don’t let it do that! Write the proper angles on the miter-saw gauge, directly above the existing angle numbers: Your miter saw says “0” degress when you know you’re cutting a 90 degree butt cut. Think about that! If you write 90 degrees at zero, 80 degrees at 10, 70 degrees at 20, etc., you’ll figure out the problem with 44 and 46 degrees all by yourself. And this is one thing you need to figure out by yourself!! :)
Gary
Gary,
Thanks for the response. I “get it” in relation to my miter saw gauge. I also understand that if I want a 90 degree miter, I cut two 45’s. If I want a 45 degree miter, I cut two 22.5’s. So why, if I need a 86 degree miter would I cut two 47’s?
Honestly, I’m not trying to be obtuse here. I just need to understand if you made a mistake in the video, or I don’t know something I should.
Thanks so much.
Michael,
You’re math works, but you’re measuring from the 90* angle (labeled as 0*) on your saw instead of measuring from the fence. Remember that a straight line is 180* and 90* is a right angle (butt cut). For example, a 45* cut is 45* from the fence and another 45* from 90* (marked as 0* on your saw). The 43* measurement in your example is 43* from the fence and 47* from the 90* angle which is labeled 0* on your saw. Does this make sense? You need to subtract the angle you’re looking for from 90* to find the correct angle of your cut.
Mike/Michael:
That’s the long way around the barn. All that mental figuring isn’t necessary.
The miter saw gauge reads O when the saw is cutting a 90 degree angle (butt cut), that’s because the gauge is setup more for cutting roof angles than miters for finish work.
Do yourself a big favor and write 90 at the 0 mark, then 80 at the 10 degree mark, 70 at the 20 degree mark, etc. 45 will be correct on both sides of the saw, but 46 degrees is actually 44 degrees, etc. You’ll see that right away.
Read this article and you’ll understand much better:
http://www.thisiscarpentry.com/2011/07/29/miter-angles-miter-saws/
Gary
Hi Gary —
Thanks for the article and video. It’s great overview as I’m about to install baseboard for the first time. Here’s the question I have: my baseboard (at 7 1/4 inches tall) is too high to position on my mitre saw fence. In your first video to this article (at around 2:30-:40), you mentioned cutting baseboard on the flat of the mitre saw, but didn’t explain any more. Do you have rules of thumb or tips or any other resources you could point me to? Thanks.
Mastering The Mitersaw DVD.
Gary
Great video. Thanks so much for publishing. What brand of chop saw do you recommend and what features do you feel are most needed?
I use a Festool Kapex miter saw because it’s extremely precise, has wonderful adjustable and reliable lasers, weighs only 42lbs, has a superior and precise bevel gauge, is easy to adjust, etc. But it costs $1200.00. You can get nearly equal results with any good miter saw–DeWalt, Makita, etc. Features are not that important–as long as the saw cuts smoothly and accurately. Using a miter saw is really more about the technique than the tool. But having a nice saw is something of a blessing. Especially if you use it frequently. The same is true of all tools. Superior tools are usually more durable, they help cut the learning curve considerably; a professional quality, highly precise saw provides a deeper sense of satisfaction and joy. At least that’s been my experience.
Gary
I am replacing the “colonial style” baseboard in an upstairs hallway that has a 152 degree jog in the hall. The original finish carpenter (35 years ago) mitered the inside and outside corners. I was never pleased with the quality of the joinery. All of his other work was excellent and lasted the test of time.
I plan on mitering the baseboard on the wall with the outside corner. Any suggestions on how to keep this joint tight? Just glue it and pin it? Try a biscuit? What about a spline?
What to do with the baseboard on the wall with the inside 152 degree corner? I am sure I could just miter the joint, but I have been wondering if it is practical to cope it? If so, what angle do I cut the the piece to be coped?
Gary,
I’m fairly decent woodworker, but mostly in the realm of furniture and the like. Thus, getting base trim to look straight over the course of a 40-50′ run is a new endeavor for me. My plan is to finish, install and then touch-up. I have an big, expensive pile of semi-custom milled trim laying in my shop, all sanded out and ready for finish, but I’ve come to realize the stock isn’t as straight (vertically) as I’d like. Not bad, but not consistently flush with my nice new flat floors.
I’d prefer not to put shoe molding over it, so I’m thinking the only option for my long runs to scribe each piece and throw it under the track saw.
Do you have any other tips or suggestions that might help?
Thanks!
You’re right. There’s no other option. And I agree with you about base shoe. In modern-style homes, or homes that emphasize straight clean lines, base shoe is a burden on the eye. You’ll have to straighten the bottom of the stock. Personally, I wouldn’t use a track saw. Instead I’d use a long sled made from a straight piece of 1×12, then clamp each piece to the sled and run the sled through a table saw. The same setup you’d use for tapered columns, except you’re just making a straight cut. You can cut pretty long pieces that way. Fast. But I bet you still have to scribe the material. I’d pick each run–each section of base that runs from a butt joint to a butt joint (between door casings), cut those pieces to length, fit them all in place, then scribe and cut a minimal amount off all the pieces so they sit flat on the floor.
Gary
Good suggestions. Thank you so much for your time and thoughts.
Hello Gary.
I enjoy your videos, and find them easy to understand.
While watching your installing baseboard/fixing bowed walls you mention putting caulk in the gap for paintable baseboard, but say for stain grade baseboard that the wall must be “floated”. What does that mean, the wall must be floated?
Thanks
Jim
Floated out with drywall mud, and painted. (mask off the trim first)
Or mask off the trim, caulk, paint the caulking the wall color, pull the masking.
Hi Gary,
Great tutorial! I am about to begin a project of redoing the baseboard trim in my house, but I’ll admit I’m newbie when it comes to this kind of thing. We want to go with a more contemporary look, so we’re using 1×6 boards without any shoe or anything else on top and we’ll be painting them white. The outside corners, I am planning on mitering, but as for the inside ones, how would you join those pieces? Since they’re just square edges, coping wouldn’t work, right? Would you miter and caulk the insides or just butt them all together?
Thanks!
Jim
Butt joints
That’s what I hoped you would say. Thanks Gary!
Hi
We are replacing the 3″ baseboards with 4″ in our 27 year old house. We have 8 foot ceilings so the Sheetrock taper is at the floor ( I mention this because I wonder if it is the problem). The upper edges of the inside corners meet but then there is a gap at the bottom where they should meet. How do you deal with this problem? Would appreciate any help or advice!
Thanks,
Debbie
Hey Gary,
Any tricks on coping 5-6 inch Colonial baseboard? Stuff with a lot of detail?
I always enjoy watching you work.
Thanks!
Ed
Gary – I’m not sure I followed your cutting in a corner using a utility knife. Can you please elaborate?
Many thanks
Tom
I agree. Step 3 in the installation section didn’t quite make sense to me (“Trace overlapping copes. …I cut my copes with an overlapping miter. “) I think this is a case where I have to practice some coped joints on sacrificial baseboard to understand what’s going on there. A video tidbit with closeup might help clarify it.
Novice here. If there is no casing around a doorway (closet) how do you include that in your cut list? I mean, how do you end it with a return from the right and left? Hope that makes sense.
Thanks,
Anthony
Hi guys can you please tell me whats the name of the baseboard you guys were showing on the demonstration? My client is looking for that specific baseboard. Thx u very much
Gary,
It’s a standard three-step baseboard…that’s what I call it. I used a profile from WindsorONE (that’s the painted material I was cutting and coping), which they call a Colonial Revival Apron (WOCS006). http://www.windsorone.com
When you have baseboards installed would you expect the installer to set the nails and fill the holes and caulk where necessary.
I had flooring installed and new baseboards installed and that is what I expected them to do but, they insist that its not something that the installers should know how to do.
They said it is something you hire separately that its not expected for a trim installer to do this type work. Even though the installer used caulk to fill everything but did a very subpar job.
Here is another example of the craftsmanship.
Jeff,
Most finish carpenters will fill/caulk large imperfections. Some will only apply enough filler to make a ‘first coat’, leaving the remainder for the painters. Often the painters use their own brand of filler and get upset if they have to sand or work with other brands. But usually it’s the job of the painter to detail moldings before final coat. In fact, most painters spend far more time filling and caulking and masking than they do painting! For that reason, I know a lot of finish guys–professionals– who actually spell out precisely how much filling/caulking they include in their estimate/scope of work.
Gary
Love your stuff Mr. Katz! Thank you for this tutorial. I’m about to start some finish carpentry and as a beginner I’ve gained a lot of confidence by learning from you. Somewhat off topic question…what would be the concern with installing case, base, and crown molding after the finish coat of painting has been applied to the ceilings and walls? Thanks again!
I’ve done that myself in my own home. I never regretted doing it, but keep in mind, you will eventually have to go back and caulk everything in, which means re-painting! But I wanted to wait until I had nearly all the trim installed before bringing in a painter, so I pre-finished everything which made the place look a lot nicer for the five years I waiting to bring in a painter! :)
Gary
Is coping an inside miter for an obtuse or acute angle the same as a 90*? I’m not having the same results when trying this on a 22.5* inside corner.
N0! It’s not the same. At all. I had the pleasure and honor of shooting video of David Collins doing just that for the Baseboard and CAsing DVD.
Gary
Gary, great video, love he level of detail.
Getting ready to start a project where the base is 1×6 (3/4 x 5 1/2) . Currently the top edge is square corner. Does the inside corner “Overlapping Copes” still make sense? The overlapping knife cut on 3/4″ wide could be a tough detail. I am going to make some mock-ups first but will also consider simple 90 deg cuts at inside corners. What you think?
Dave
No, you do NOT have to cope that. :) A cope joint is really a butt joint cut to the shape of the preceding piece of trim, so if you cut butt joints on that 1×6, it would be the same thing. However, I kinda think a miter on the top would look better than a butt joint on 1×6…IF it’s stain grade. It it’s paintgrade trim, just butt joint it and paint it. :)
Gary
I have learned a ton reading articles on your website and watching your videos. I’ve enjoyed doing my own home because of them. I ran into a problem on my last piece of baseboard 5 1/2 x 9/16ths. The wall has a bow in it and when I nailed it it made my outside corner mitered to 45 degrees pop. Not sure what the solution is. Could you tell me what floating the wall is please? I think it’s adding drywall mud behind the molding but I’m not sure.
PS. Your videos have given me confidence to try chair rails and crown molding too! Thank you, Mr. Katz.
Thomas,
Yes, floating the wall is adding drywall mud to straighten out a bow or belly in a wall. It’s a simple matter if the bow is concave–just insert a shim behind the baseboard to maintain a somewhat straight line, then float the wall near that shim (or if the bow isn’t too bad, just caulk the top of the baseboard at the shim). But if the wall has a convex bow in the center, then you sometimes have to add a little extra length to the piece of baseboard on the abutting wall that forms the outside corner. Yes, that means the piece of baseboard you’re installing, may not be tight against the wall at the outside corner, but the outside corner miter will be tight and clean. Then you have to float the wall at the outside corner, or caulk the top of the baseboard, to hide the convex bow in the wall.
Hi, I know this is a really old post, but I’m hoping you can help me. I’m remodeling a 1950s home and all the trim is exactly the three step trim you have pictured here. May I ask where you got it? I’ve been looking everywhere. I’d like to use the same trim to keep the house looking authentic.
Thanks!
This is gold