


Have you ever worked on an older remodel and needed a couple of sticks of trim to match but couldn’t find anyone who still stocked that profile? How about a piece to mate to a change in pitch on a rake run? Or have you ever had a designer draw something and then ask for a mock-up? There isn’t enough lineal footage (LF) to warrant having a knife made, much less the setup cost to run it. But there is an alternative—a good one. Make the moulding yourself. With a few moulding planes and some guidance, custom pieces can be made in the time it takes to find a millshop, explain what you need, and provide them with a scaled drawing!
Some Background
Moulding profiles haven’t changed much over the years…or have they? Look at Thomas Sheraton’s or Asher Benjamin’s books on moulding and you’ll notice that moulding sizes are described in ratios—2 to 3, 3 to 4, etc.—but if you look at any router catalog, you’ll notice that nearly all are based on a 45-degree slope. A well-designed moulding is intended to reflect light and have shadow lines; the angle of the slope is influenced by its height relative to the human eye.
(Note: Click any image to enlarge)
Asher Benjamin, in particular, was a proponent of the Grecian form of mouldings, which are based not on a single point radius but on an elliptical form. Elliptical forms are seldom seen in router bit catalogs. But moulding planes aren’t limited to cutting radius profiles. Moulding planes don’t have fences, bearings, or depth stops. A larger and smaller radius plane used on the same curve will produce an elliptical shape. They can be guided to produce any moulding desired—after all, these are the same tools with which mouldings were originally made.
Technique
Up until a couple of years ago, to cut a custom profile, I would trace a drawing on both ends of a board and then “work” my way towards the final result. It wasn’t particularly fast, but it was reasonably accurate, and I was able to produce what was needed. Awhile back, Larry Williams and Don McConnell came out with some DVDs. These programs were more for furniture-makers who wanted to do everything with hand planes. Still, it was from these DVDs that I learned some techniques which allowed me to increase my accuracy. But my speed didn’t change much.
| Then came Matt Bickford and his book, Mouldings in Practice. | 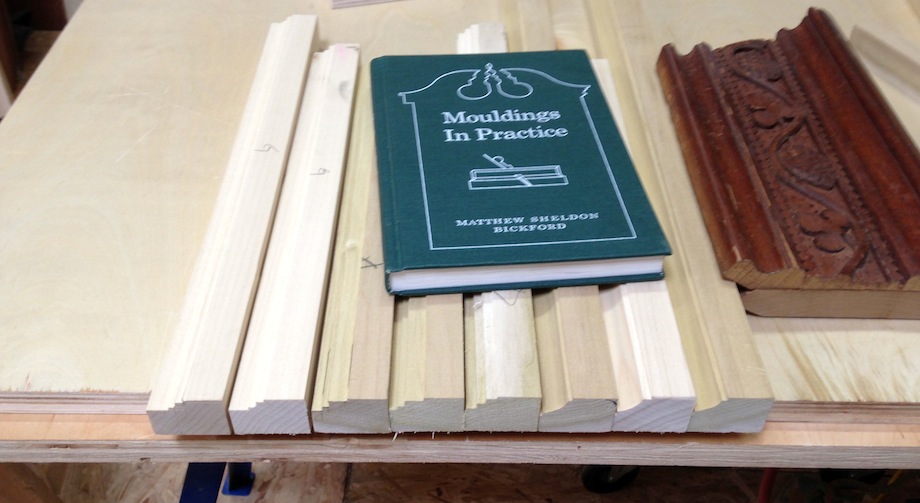 |
Although Matt Bickford makes wood-bodied hand planes, his approach is to use as many power tools as practical; then use hand tools only for things power tools can’t do. For me, the biggest change while learning Matt’s technique was to work off of rabbets made with a table saw instead of matching curves drawn on the ends of the boards. These two fundamental changes made creating moulding significantly faster and much easier to achieve.
 |
 |
| Matt recently spent the day at my shop to teach a few local contractors the use of wooden moulding planes to create moulding. | 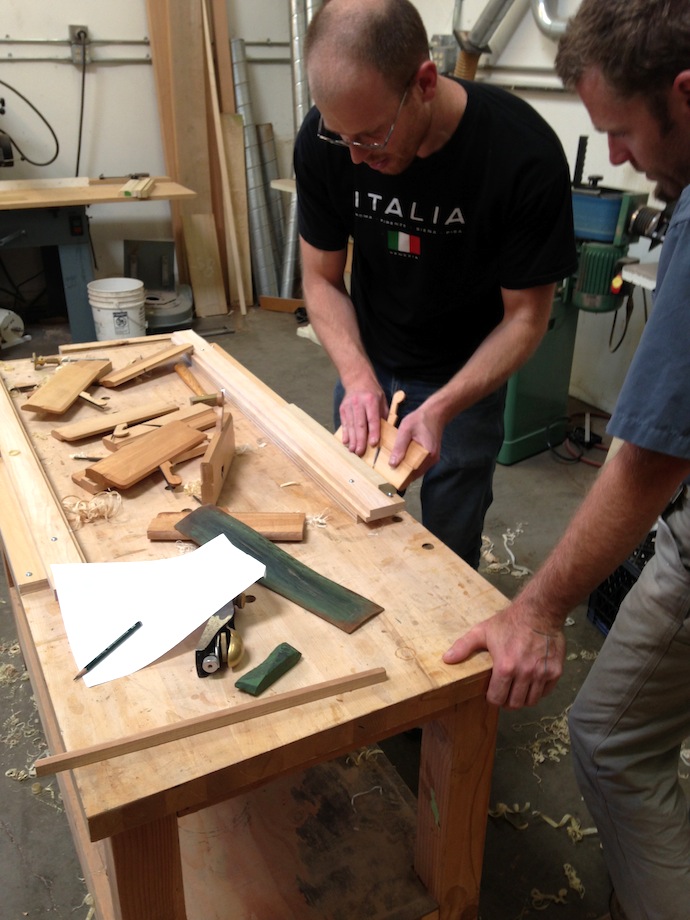 |
 |
Once you understand how to layout the rabbets to create the shape you want, it’s just a matter of a few passes on the tablesaw to prep the piece, and then literally minutes—not hours—to achieve a finished piece of moulding. |
This article is not intended to be a substitute for Matt’s book, which is a well-written, useful full-length book. Consider this article a short primer.
How to Get Started
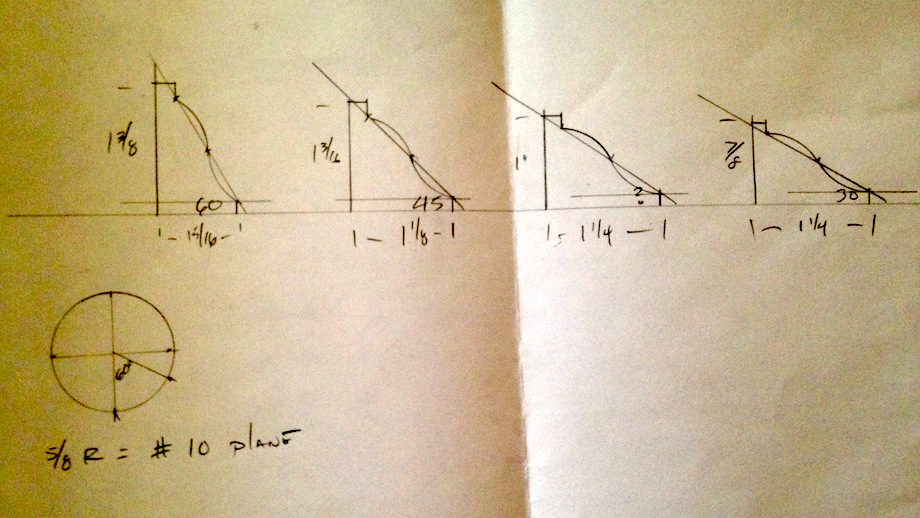
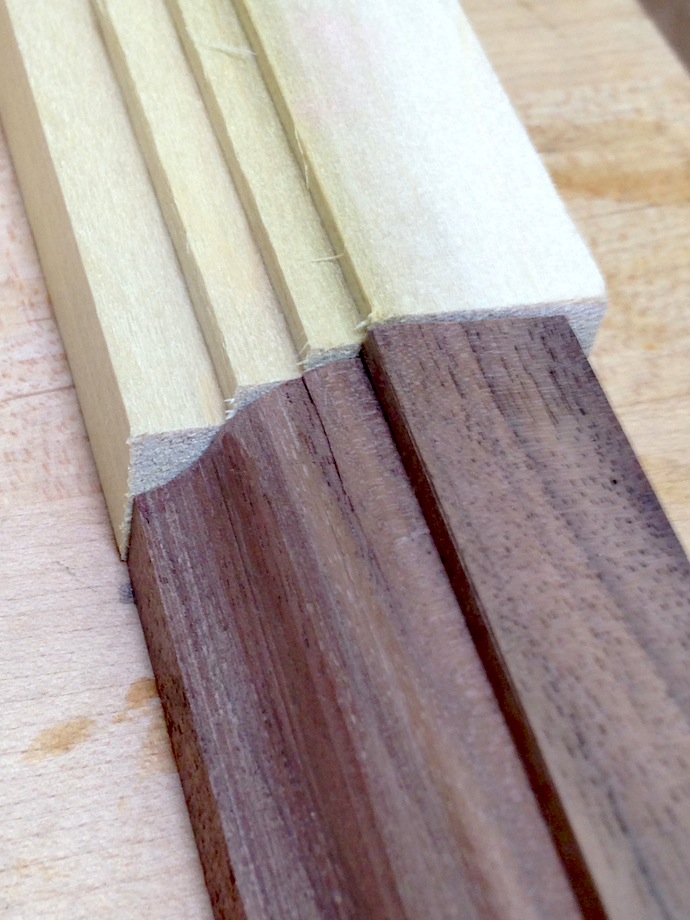
The rabbets are the critical first step. They act as an angle guide and a depth-gauge when making passes with the plane–almost like rails for the planes to ride on. The slope of the moulding is determined by the placement of the rabbets, which is why laying out the rabbets and cutting them correctly is critical. With the molding plane held against both rabbets, it’s easy to hold the plane at a consistent angle while making each cutting pass.
| You can predetermine the angle of the moulding by holding the rabbet plane so that it rests on the two edges of the rabbets to be worked. | 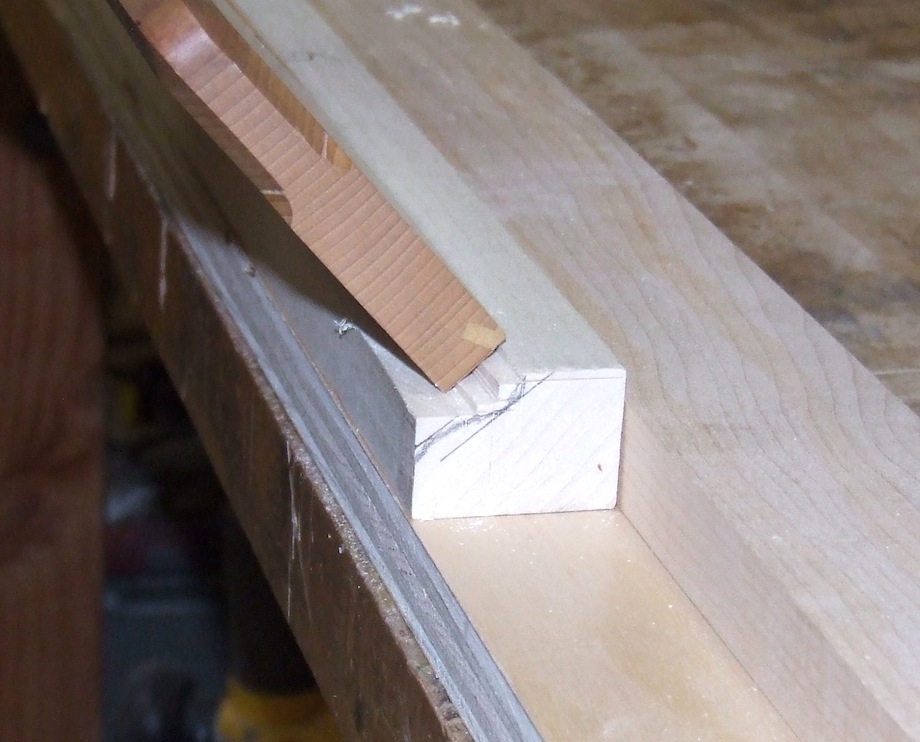 |
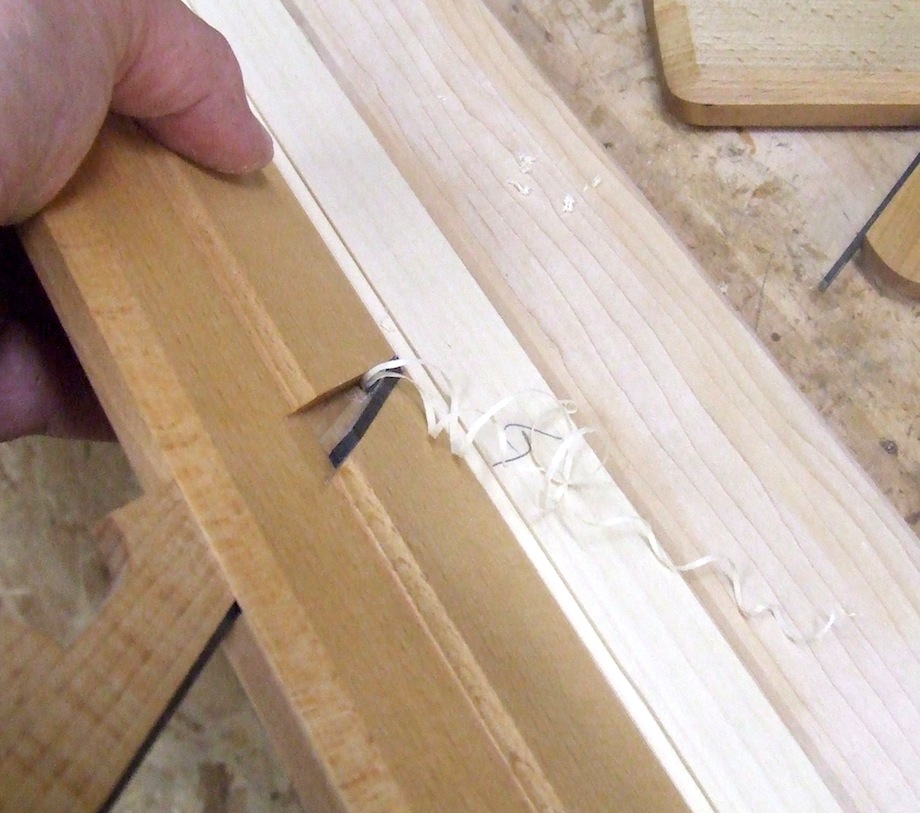 |
When you begin making passes, two shavings are ejected from the plane and you can look to make sure that both shavings are coming out the same size. Also be sure to examine the rabbets so that both flat parts of the rabbet are the same size. If they’re not equal in size, then now is the time to correct that. |
| By following these “rails” and observing the bottom of the rabbets, or the depth-gauge, you’ll develop a guide to check your progress from beginning to end. | 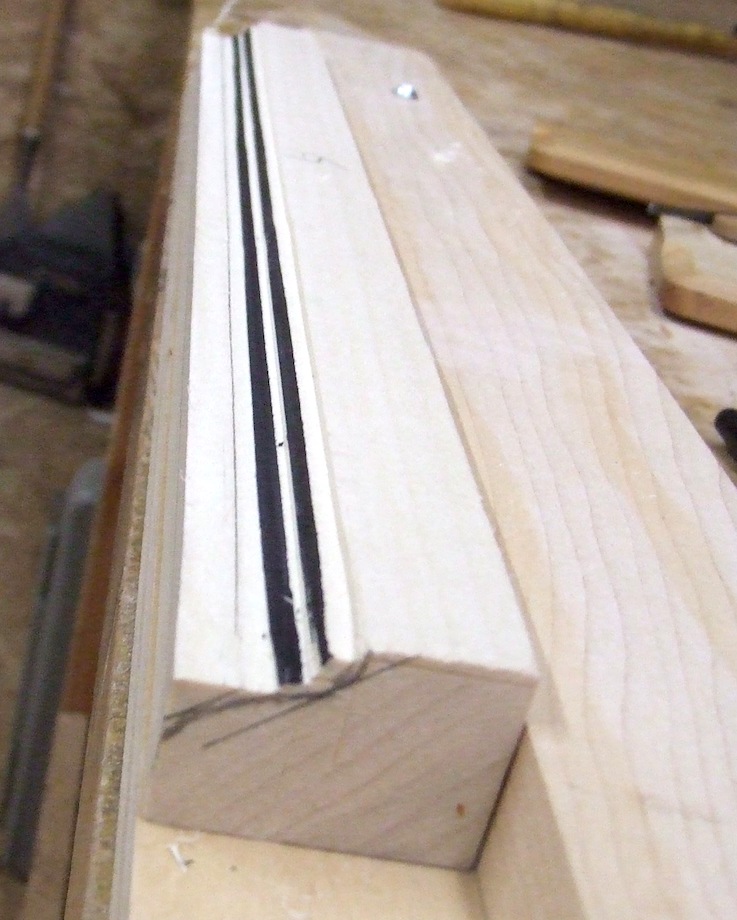 |
| You’ll notice there is still a portion of the rabbet remaining in this image. | 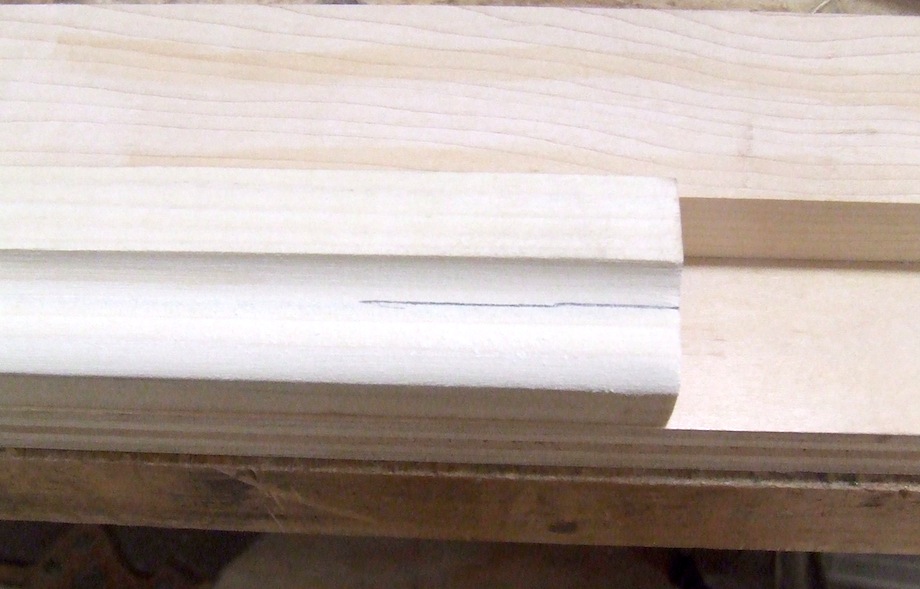 |
If you pass over just the portion, you can achieve the full depth without over-cutting the rest of the moulding.
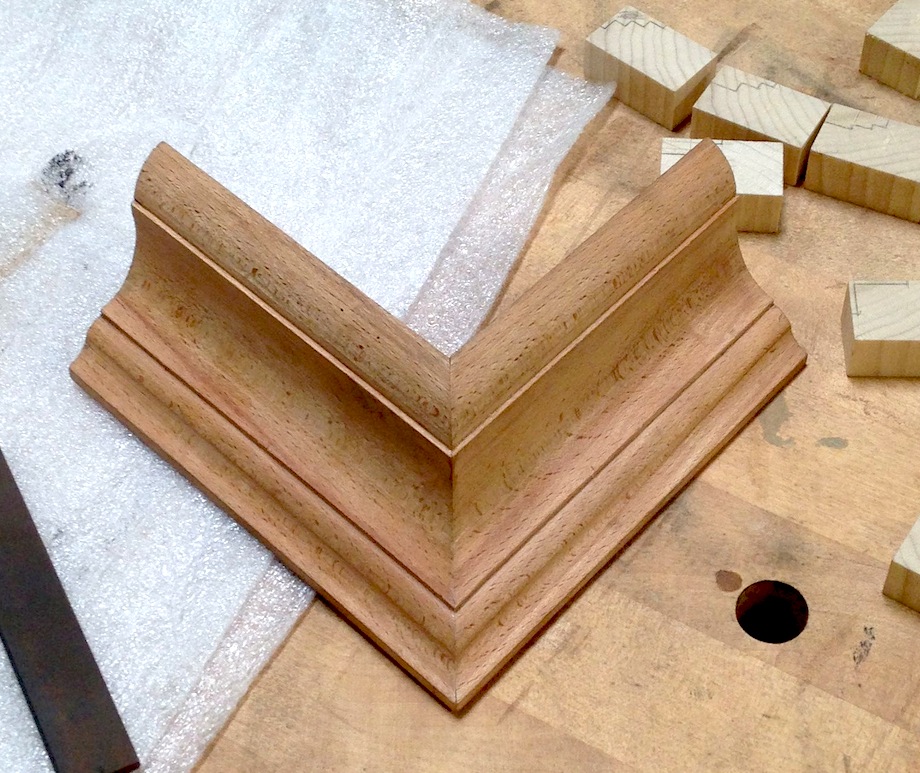
All the mouldings in these pictures were made with three planes (after most of the material was removed with a tablesaw, of course): a rabbet plane, a #6 hollow, and a #6 round. You do not necessarily need a full set, but they can be obtained over time, much like the way we might develop a collection of router bits. Matt sells his planes a pair at a time.
Many people might be inclined to think that making mouldings is beyond their capabilities, so what’s the point in trying? Truthfully, the biggest hurdle is to take the initial step and attempt to make that first piece. It’s a lot easier than you’d think!
| After you have made a few simple profiles, it’ll be much easier to produce just about any moulding you encounter. |  |
One of the students at Matt’s workshop had never used a moulding plane before. He said, with a tone of disbelief, “I can’t believe this is so easy!” For the most part, it is!
 |
While making mouldings by hand is not without mishaps and mistakes, it’s not nearly as imposing as it might first appear. |
Lest I be accused of taking a romantic stroll down the golden lane of a yesteryear that never existed, time is money, and budgets need to be adhered to. If the moulding can be produced with one or more router bits, or if there is an off-the-shelf shaper cutter that will produce it, that would be my first choice. If not, then this approach can be a cost effective and time sensitive answer to obtaining or creating a particular moulding. One of the biggest benefits might be that you won’t be the one to tell a customer that “it can’t be done,” and hoping they never see a picture where it has been done!
I hope that this will encourage carpenters and woodworkers to try and make a piece of moulding. Being able to make a custom molding is distinctly gratifying—when the job calls for it. But keep in mind that this process is best suited for making feet and not yards of material!
Thank you, Keith, for this Article.
I can’t tell you how much your willingness to teach others in this trade has helped me.
Thanks, I’m glad you found it useful.
Thanks, I’m glad you liked it.
Thanks for the article. Mouldings are what make a project “pop”.
I made some pieces of replacement baseboard over the years with moulding planes when router and shaper bits just won’t do the job.
I have a full set of planes that I inherited. Many of them need to be sharpened. I have held back from doing too much sharpening until I know what I am doing.
So some day when I have more time and I am not in a hurry I will did them out and research proper sharpening.
Rich
I think this article was great and I don’t say that lightly…
Whenever I had a molding setup to produce I would go about it somewhat the same way but albeit a bit more cumbersome. I still achieved what was needed for a mock up profile but it did take a bit of thought and time to produce. After reading this article I will be buying the book and some starter planes to see just what I can do with them. I generally didn’t do the whole process because it took so long. I always tried to draw the profile and go about trying to convey the concept of the way the molding would look through a drawn picture. It would work well if the customer has what I would call the ability to visualize. But unfortunately there are an awful lot of people that just can’t do that. So doing a mock up becomes really important whenever that type of customer is asking you for help with their project.
Great article ! I have to reproduce mouldings on a regular basis and for short runs, this is, many times, the most effective way to do it quickly. I usually use a combination of-Table Saw, Table saw with Moulding cutters, Shaper, Router Tables both horizontal and verticle, and a Stanley #55 Combination Moulding Plane (an interesting challenge of a tool to use). A nice set of wooden hollows and rounds like you have would be a great addition.
PS- for larger runs I use a Williams and Hussey Moulding machine with custom knives.
This is a great article and I am so happy that Matt’s planes and book gets such a nice exposure on here. I had a chance to visit his shop and interview him for an article published in American Woodworker magazine. I also made a short video showing Matt at work, plowing away a reverse ogee within an ovolo profile . Check out this video at Youtube, I hope you will enjoy it.
http://youtu.be/3LTSnu7_nz8
Keith
Nice article. Even if a custom knife might eventually be made for larger runs I can definitely see the need for this for mock ups and small pieces like you say.
I also enjoyed the video of Matt the previous commenter posted. Especially the part where he shows how the two shavings become one once he’s reached the right point. And I love the sound of the molding planes. I’ve had the pleasure of using some older wooden planes and a Stanley 55 to make and augment some pieces over the years and I have to say that there is something so pleasant about that sound and feel. Quite different than a router or shaper!
I don’t know much about the sizes and terminology of hollows and rounds. I’ll have to look into it more. Do you think there are particularly good types to start with? Also, what are your thoughts on buying antique planes? I know all the old time carpenter tools that made so much are still out there to be found.
Thanks again
Rob
I have quite a few old moulding planes and have found it is really blind luck buying them online. Sometimes they work fine with little attention but mostly it takes a fair amount of work to get them serviceable and some are just too far gone.
Good article. I have long been a fan of making these short runs myself, with various planes, or one of hundreds of old “squint and spark” 3 wing cutters on an ancient Rockwell shaper. Often, I can be making shavings long before a proper cutter can be located in this catalog or that website. The job is complete, with far less cost than buying and waiting, with an added bit of smug self-satisfaction.
I learned this self sufficient attitude from working for an antique dealer where I often had to replicate missing parts, with spare tools. While the result was certainly hand-made – and looked it, so was the original. His view was that the original maker made do with what was at hand, and I should do the same. I thought him cheap – perhaps he was – but I gained from the activity.
As a sidebar, I have been known to have a sharp plane and a nice piece of Pine on the bench when a prospective client comes by. I’ll find an excuse to make a pass or two, and let them hear that marvelous sound, see the shaving, and tease them with it. In no time, they are making shavings, happily doing what they never thought they could do.
I recently had to make some covers for casement window operators. Started w/ an old growth DF 2×6 salvaged from something I demoed, ripped it in half, then started rabbeting w/ a table saw & router table. Simple cuts in a complex sequence, to maintain the various indexing surfaces, then a bit of sanding, stain and varnish. Installation called for coping the ends to the jamb molding, then cutting the recess for the operator. The operator profile was parallel to the sill at the ends, but humped up in the center, so had to be scribed.
Hey Keith, this is a fantastic article, thank you so much for all you have done to help me and so many others. Your depth of ability is amazing.
Jim Marshall
How could you mill a hawk’s-beak?
Hi!
I was wondering if it was possible to make crown molding using this method. If your profile is large, you would begin needing 6/4 or even 8/4 stock. Conversely, only 4/4 stock would be needed, even for a large profile.
Thanks in advance,
Eyale
How often do you guys come across the need to match mouldings? Just curious if anyone is using these planes on a regualr basis?
Thanks
Henry
I must have come in late. Where exactly do you get a set of moulding planes as pictured here?