


I first heard of the Tectus line of hinges when bidding a project a year ago. I didn’t get the job, but I learned about a new-to-me hinge that is an ideal replacement for the Soss hinges I occasionally had to deal with. I never liked the Soss hinge—there was no forgiveness and no adjustment; you routed while you kept your fingers crossed. Plus, the setback dimensions on a Soss hinge make them difficult to use in many situations.

(Note: Click any image to enlarge)
The Tectus hinges are German-made and sold in the United States by Index-D. What sets these hinges apart from the others, besides the beautiful functional engineering, is the fact they are adjustable in three dimensions. Like most high-end hinges, the cover plates conceal and clean up the final appearance, but adjustments are easily made even after the doors are installed. Try that with a Soss hinge.
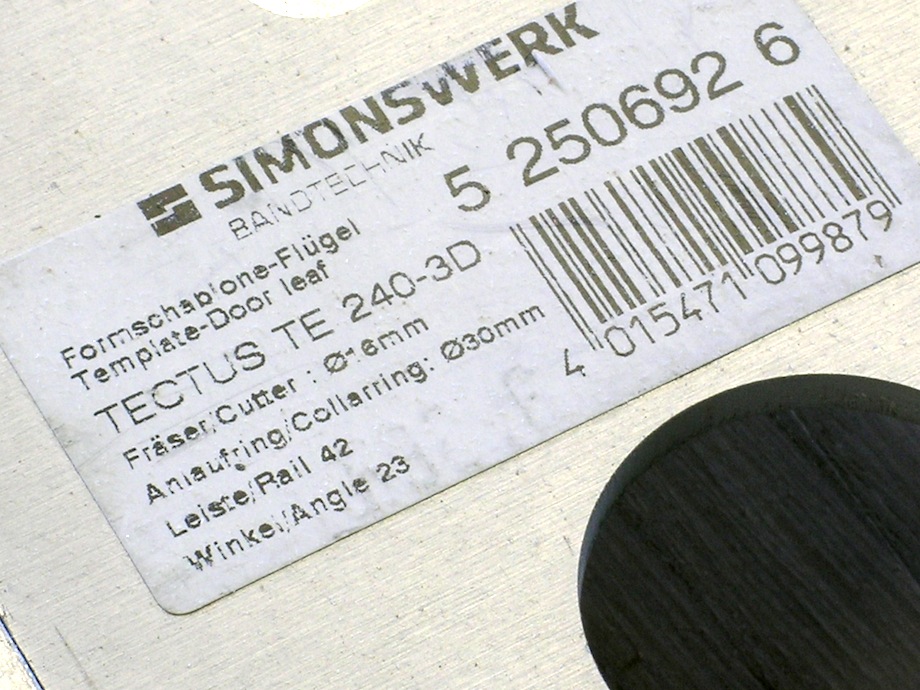
The Index-D website has some good information on the line-up: sizes, finishes, and all the technical information you could need. The technical information can be overwhelming…drawings and more drawings, as well as installation videos. Being German, everything is well thought out and methodical. But one call to Index-D will straighten out any questions you might have. They’ll provide all the technical help you need for sizing and placement for the hinges, as well as pricing. These are definitely not one-size-fits-all hinges, and they’re pricey—around $100 per piece at the low end, depending on the finish, and up to $600 per piece at the high end. The cost is significantly more than a Soss hinge, which you can find for around $10-20 on Amazon. But the Tectus hinge is well worth it for both the installer and the end user.
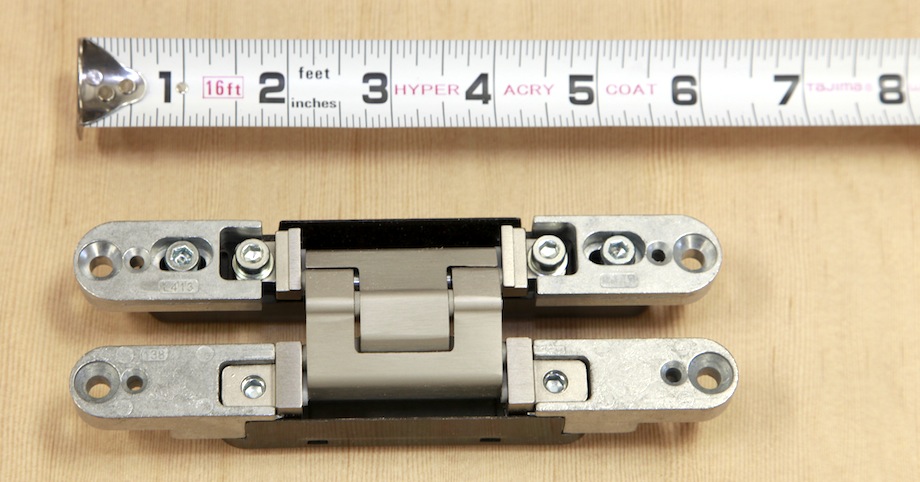 |
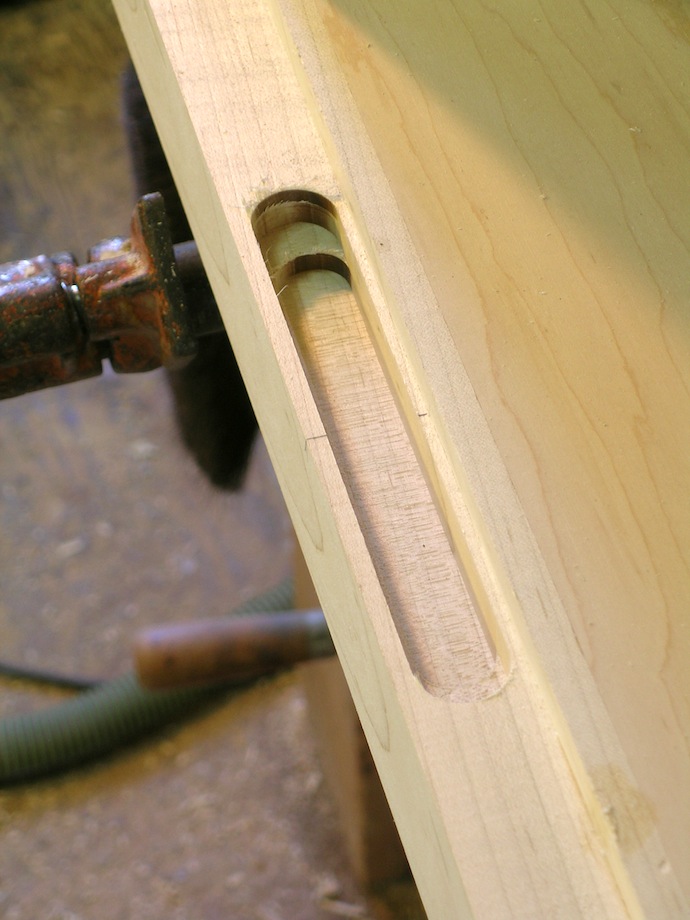
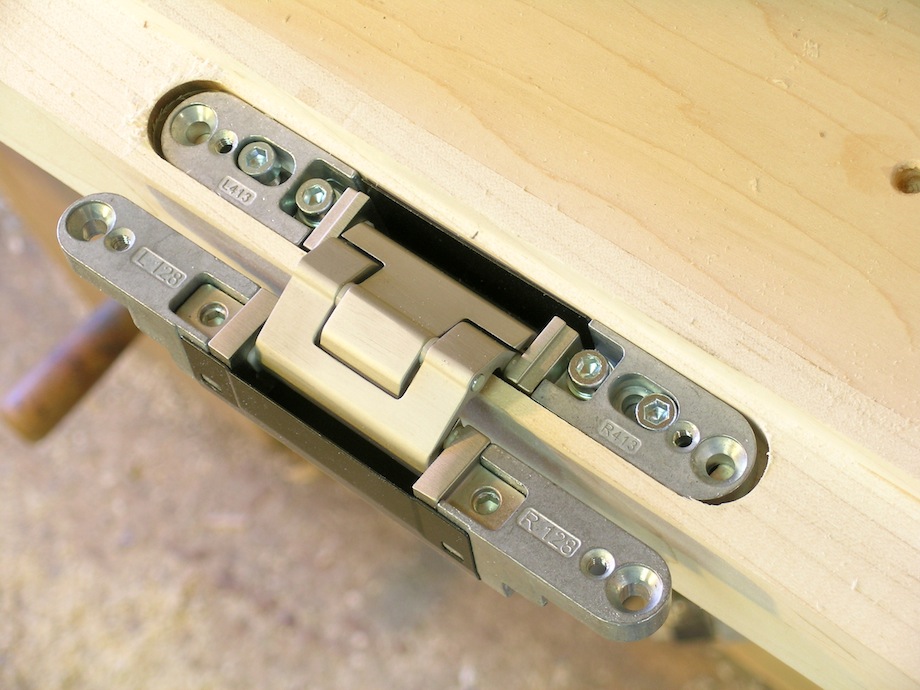
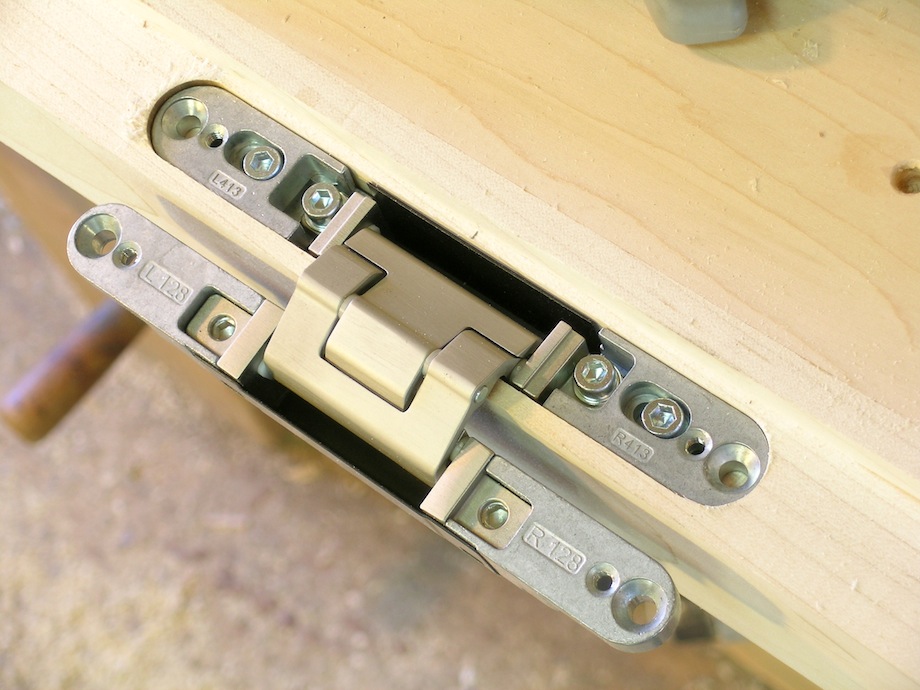
The hinges are different than anything I’ve worked with before. Look closely and you’ll notice the leaf that attaches to the door is narrower than the leaf that attaches to the jamb. …More on that in a moment. |
Index-D recommends using their installation kit, and I agree—their kit is the way to go. I am a shop guy and I always make my own jigs, develop my own methods, etc. But I opted for their installation kit on our first job with Tectus, and it really made the fitting of the hinges easy. The job was a pair of 220-lb. Walnut solid-core doors, and hinge prep was about the easiest part of the job.
| The installation kit comes in a nice Pelican shipping container, and all the templates, router bits, tools, and instructions you need are in the box. The return shipping label is even included for UPS return. | 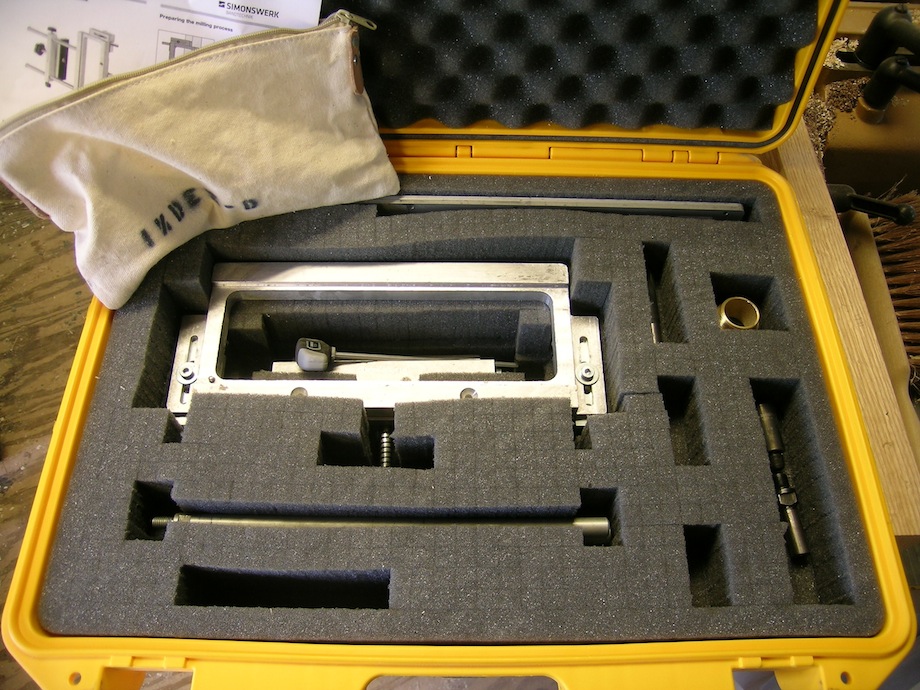 |
My always-able assistant, Justin, and I had a nice, four-door, minimalist cabinet coming up that needed something other than standard adjustable cabinet door hinges, so I opted for Tectus. The 240D was the smaller size, and would fit into our 1-in. thick doors and the rabbetted frame. We used the satin nickel finish.
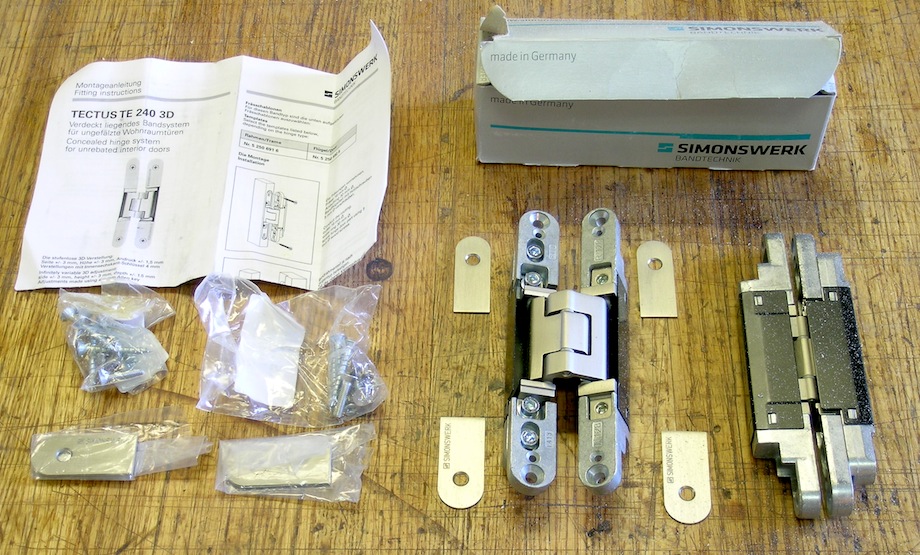 |
The hinge also comes with an Allen wrench for making adjustments, all the trim parts, and good instructions. |
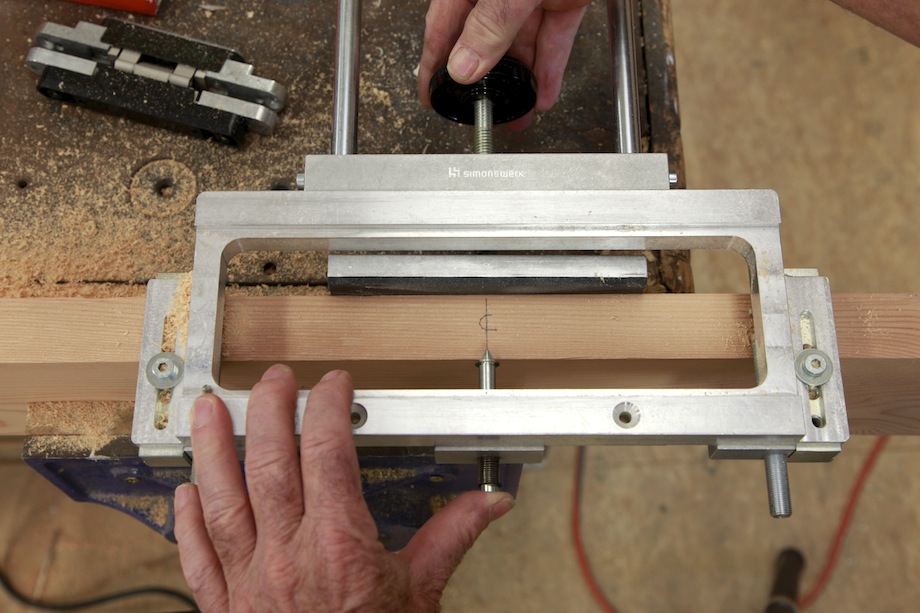
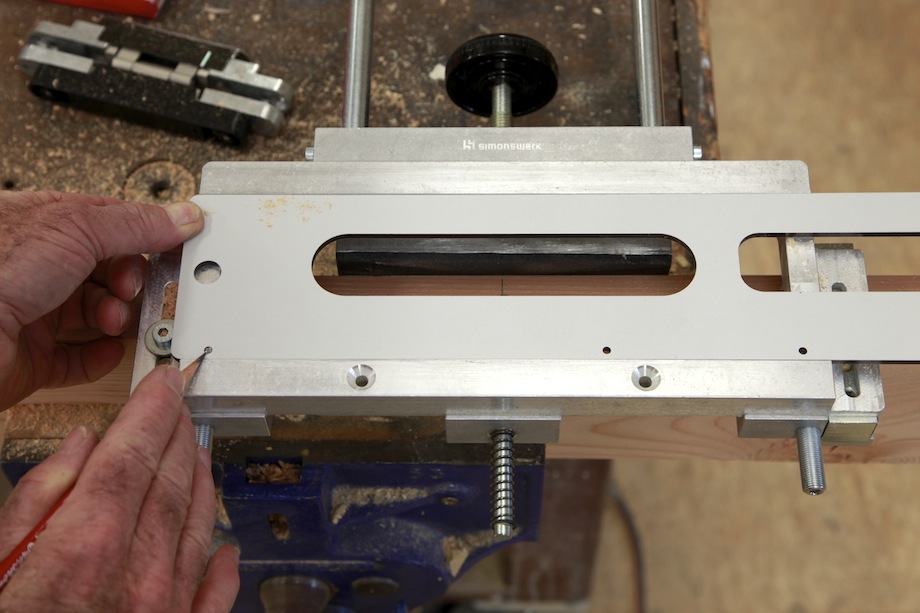
| As usual, we used a mock-up and did a trial run to insure all was well before we cut into the cabinet or doors. Everything is metric, but not difficult. Layout is easy to make—always off the center of the hinge, height-wise, on both the cabinet or jamb and the doors. The jig registers off the face of the door and jamb. | 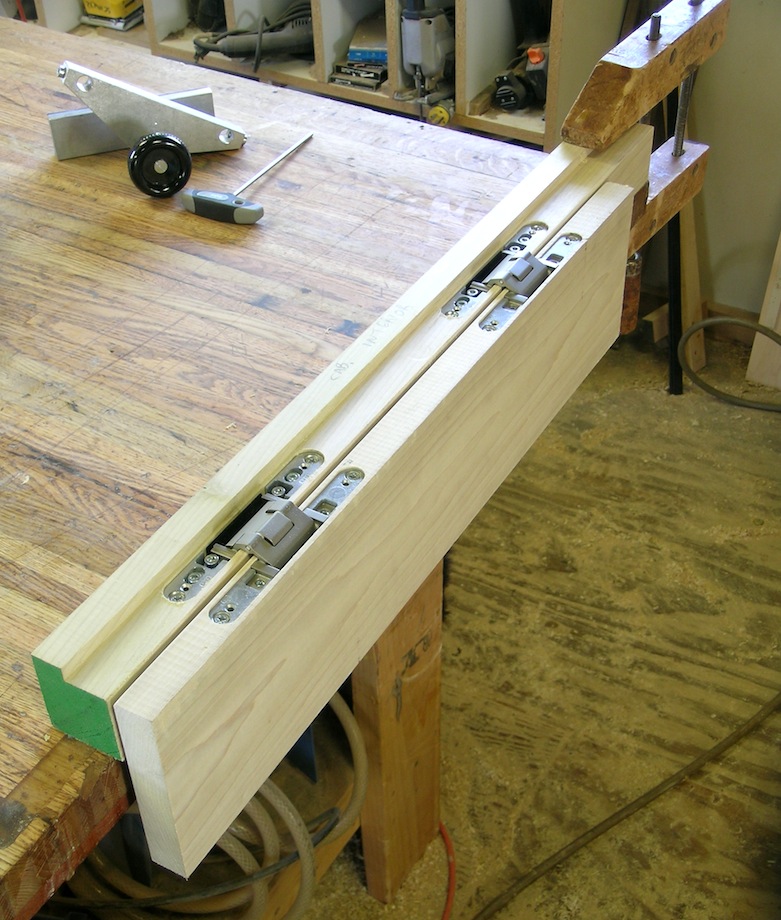 |
The industrial-duty aluminum jig has a built-in clamp, fences, or stops that can be adjusted to any hinge type, and a very handy spring-loaded center plunger that centers the jig according to your layout marks—at the exact center of the hinge on both doors and jambs.
 |
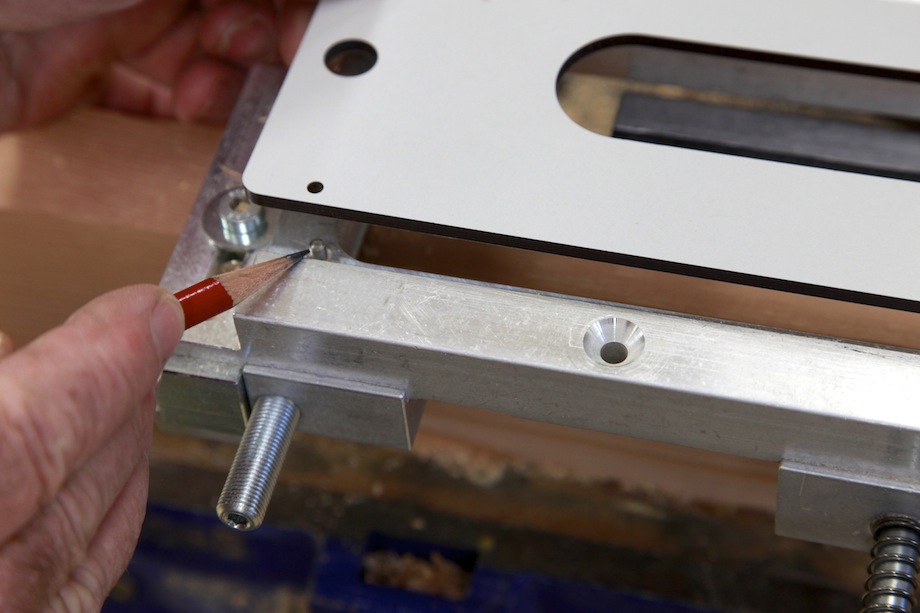 |
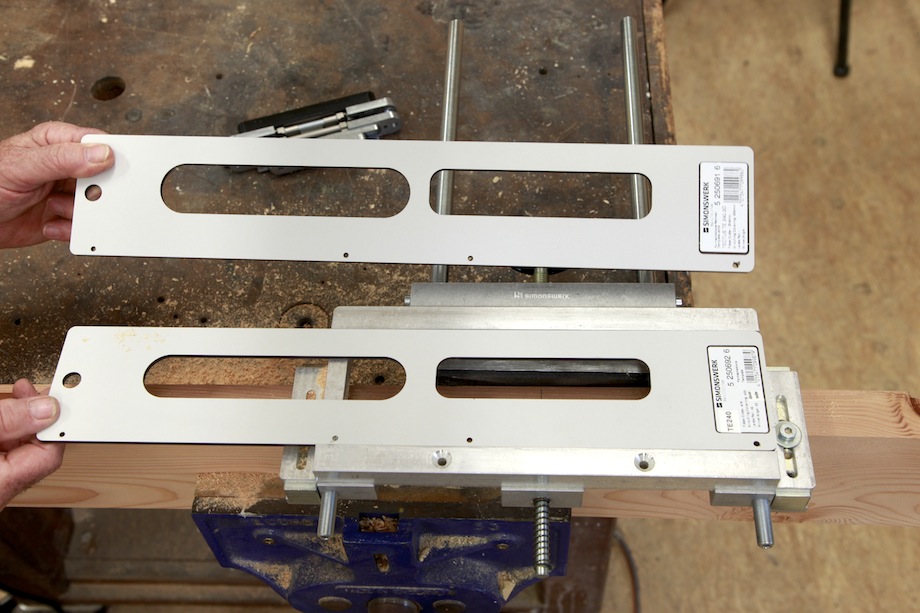
Laminate templates insert snugly into the aluminum jig frame and register off an index pin. The templates can be inserted in only one direction, making them idiot-proof—you cannot mess this up.
| There are two templates: one for the door leaf and one for the hinge leaf. |
 |
 |
And there are two openings in each template: one for the shallow mortise and one for the deep mortise. Insert the template and center the longer opening to cut the mortise for the face dimension of the hinge—about 3/8 in. deep. |
| Then move the template to the second position to cut the mortise for the body of the hinge, about 1 in. deep. Yes, this is a four-step process, two steps for each hinge, but it’s foolproof. In fact, the template for the leaf attached to the door is even marked “Door.” | 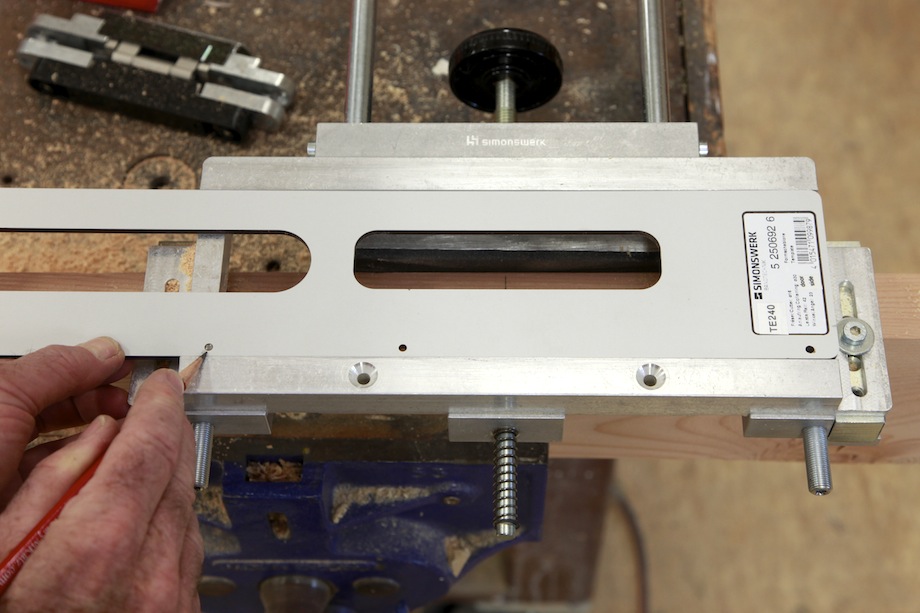 |
And don’t worry about which router you’re using. Index-D provides a router base bushing—or template guide—for either Porter-Cable or Bosch type bases, as well as the bits needed, sharp and ready to go.
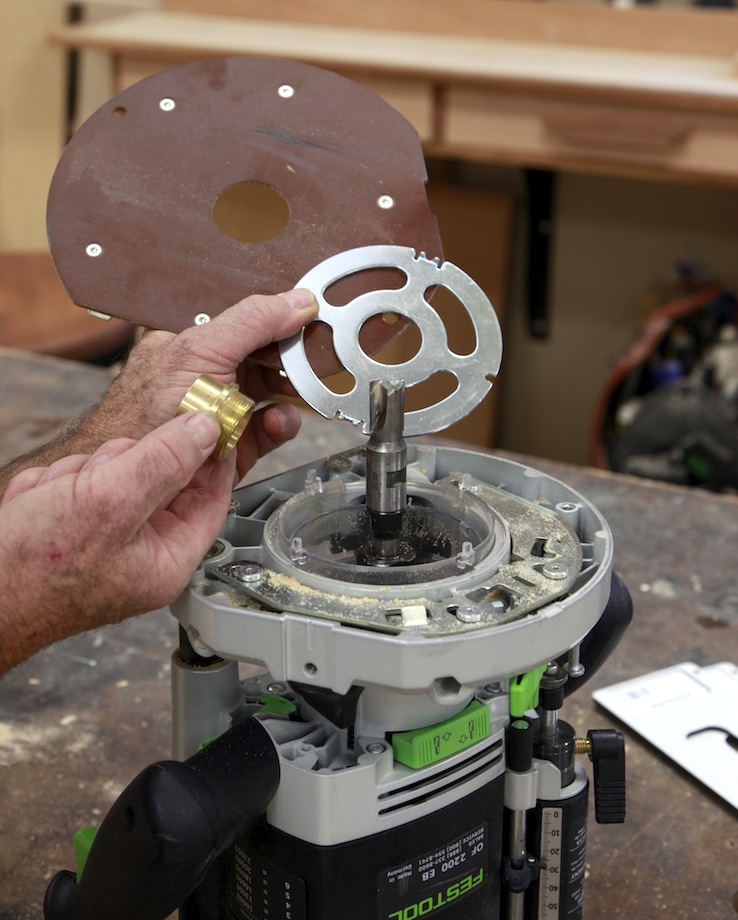 |
Most router bases will accept these template guides. For Festool routers, use the appropriate base plate. |
| And they supply two types of bits, along with extensions, so if you need an extra-long bit for your router, it’s right in the kit. |  |
The routing jig plates are labeled and matched to the type of hinge used and have the two user settings marked “Rail ” and “Angle” on the labels. Odd words to me, but the instructions help make sense of it all.
| The first step is to adjust the back-set of the hinge. The metric scale on the front of the template is extremely easy to use. | 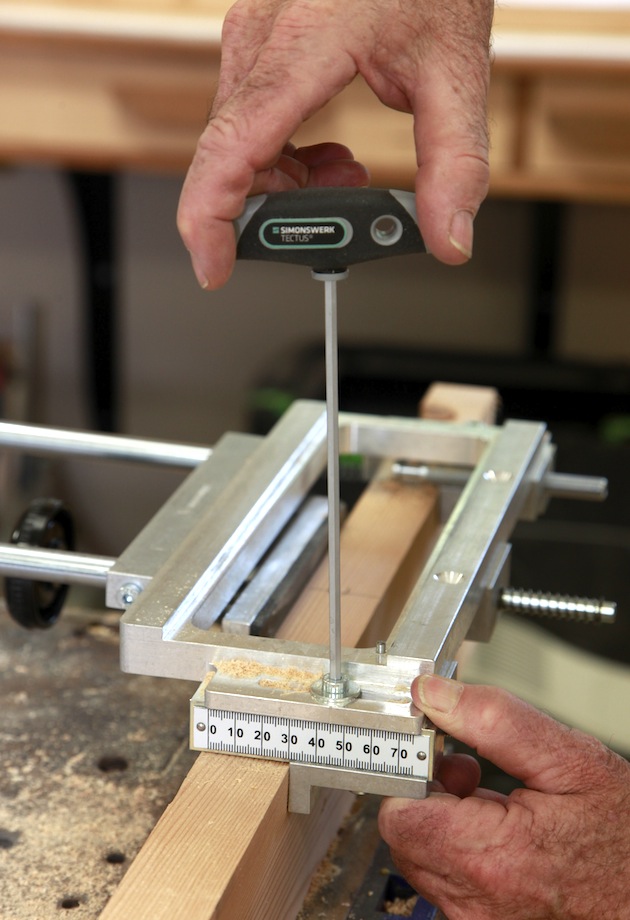 |
Once set, everything falls into place and extremely clean, two-step mortises are located correctly in both dimensions.
 |
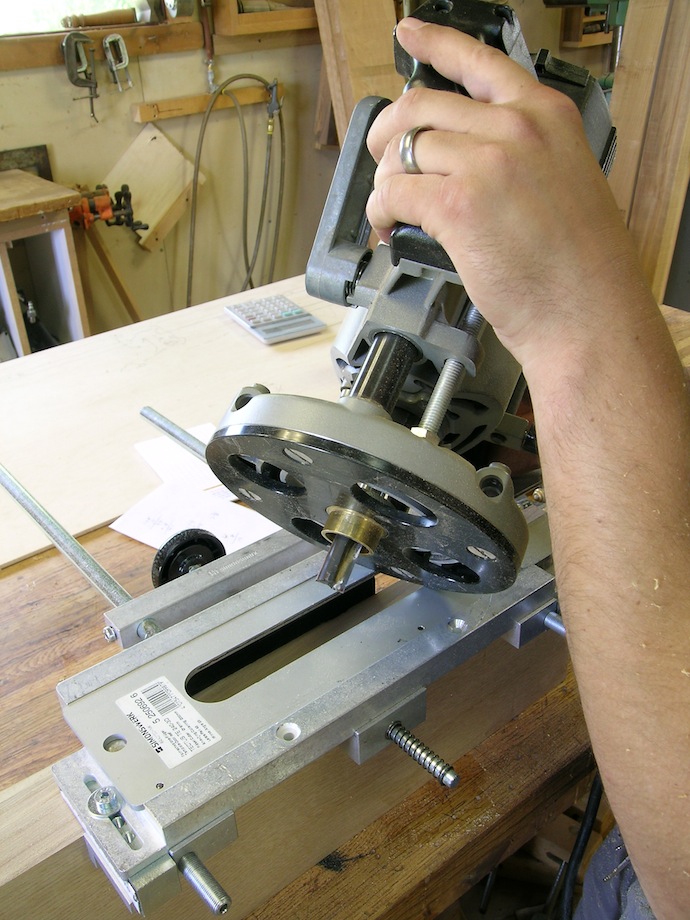 |
We used a plunge router and quickly cut each step—switching templates is literally a snap. The bits do extend a bit more than you may be accustomed to, because the aluminum jig sits high on the work. However, we were very pleased with the results.
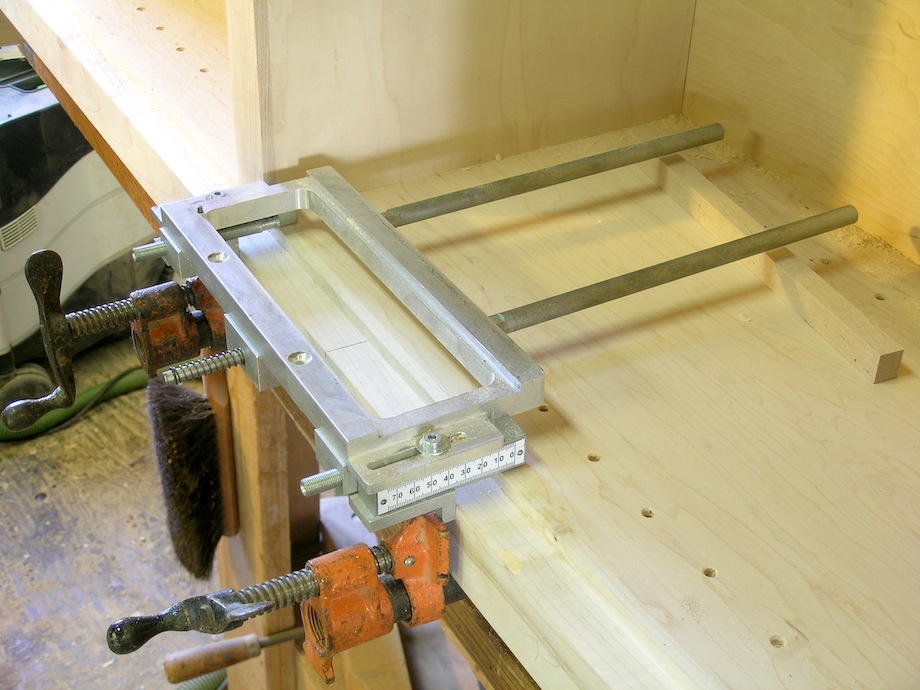 The Tectus 240D hinge we used had to be recessed 1/8 in., so we adjusted the jig for our cabinet—you can see from the photos that the “jamb” was not a conventional design. Making that custom adjustment was easy, too, and we were still able to use the center plunger to align the templates with the center marks of our hinges. I like versatility, and the jig allowed for our free-range attitude without barriers.
| The Tectus hinges use cover plates for the different finishes and they conceal all the adjustments. The cover plates go on last, after all the adjustments are made, cleaning everything up nicely. | 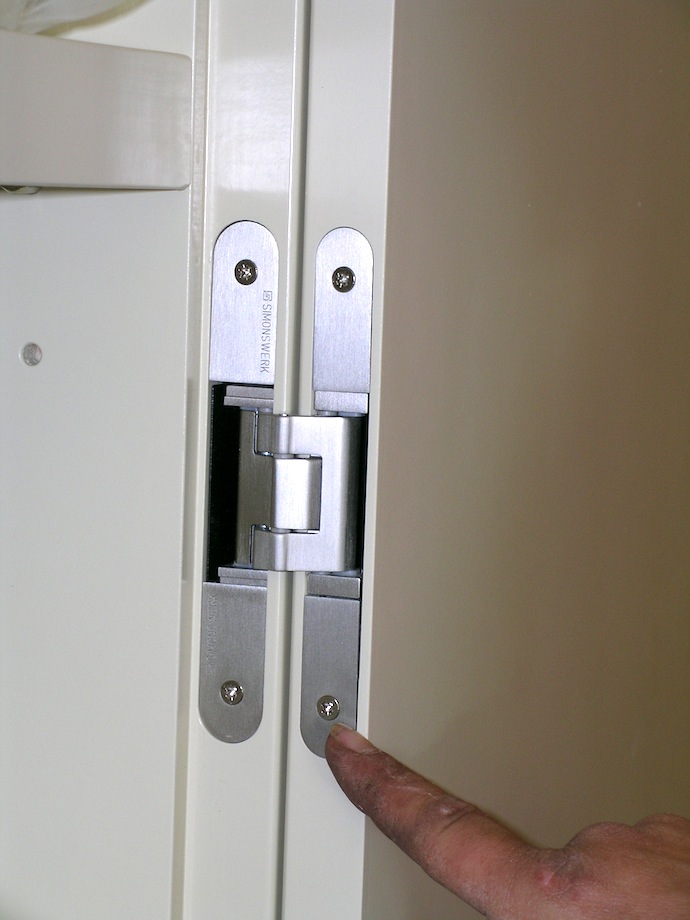 |
After the first route in the actual cabinet, Justin had one of those heart-stopping moments when a hinge was removed from the packaging and placed into the mortise to check the fit. The mortise was about 3/8 in. longer than the hinge! Once he calmed down, he realized the hinge could also be adjusted in height—good luck finding that feature on any other hinges.
 |
 |
The fits are snug, but do not require any handwork other than a little sanding to remove router fuzz.
| The routing for the doors had no surprises and proceeded quickly and cleanly. | 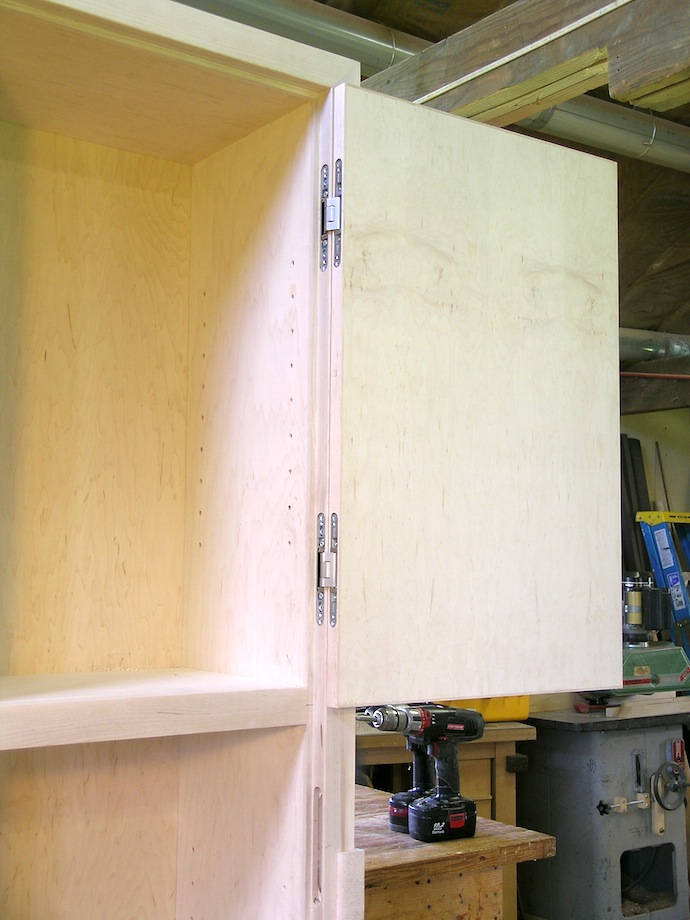 |
The hinges were installed first into the doors, then into the cabinet, and adjusted one by one.
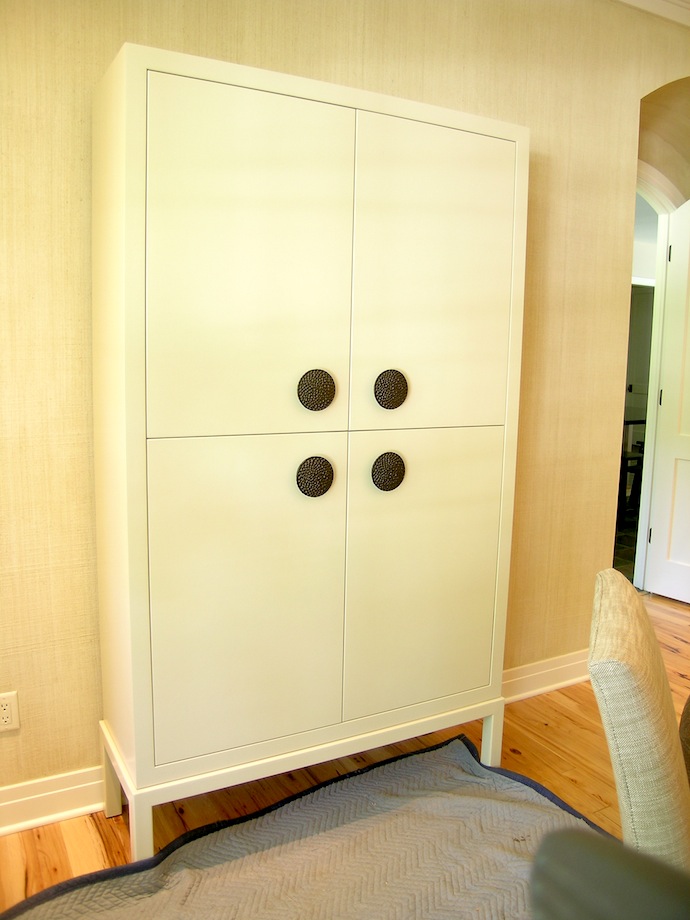 |
This job had all four doors coming together in the center and had no room for error. Of course passage doors would be a lot easier. But the adjustability made it easy for us to achieve close tolerances. The hinges are free swinging, so we later set some rare earth magnets to retain the doors, and installed pulls. |
| We delivered and set the cabinet, and installing the hinges was easy. We had marked each hinge when we removed it for transportation, and they all went back in with mostly the original adjustments—a little fine-tuning with the Allen wrench took only minutes. | 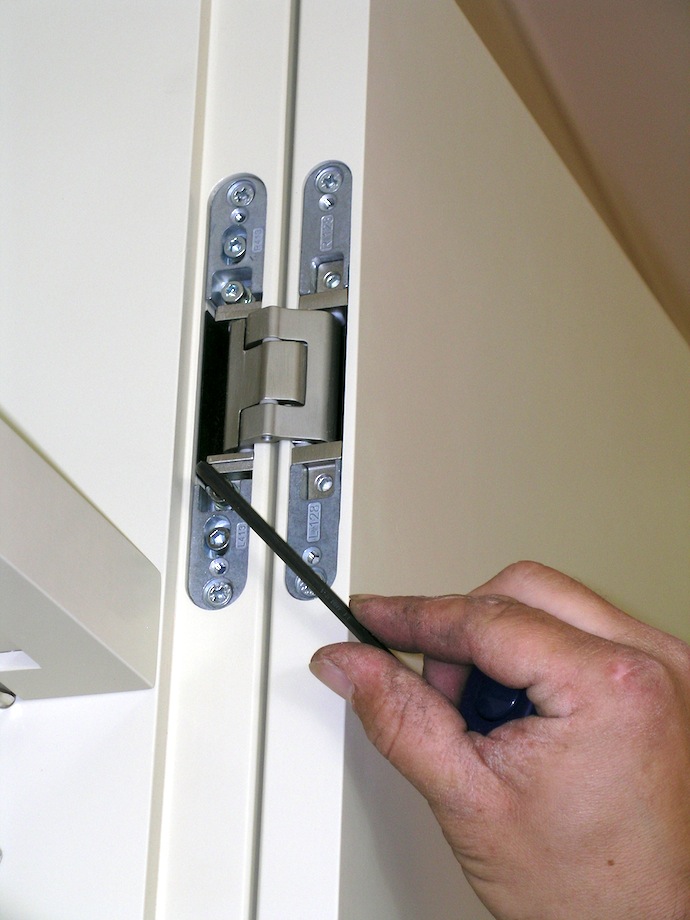 |
There’s no sign of any jamb or leaf binding with these hinges; the magnets hold them nicely, and the hinge action has a firmness or solidity that speaks of engineering and quality—minor things to some people, but impressive to me.
Drawbacks? Nothing serious. The price may cause some hesitation, but once you work with them, and then see them in action, you’ll feel the same way I do: on high-end demanding jambs, Tectus hinges are worth it. Prices are comparable to finer, knuckle-type, ball-bearing hinges with concealed bearings, finials, etc. This is called high-performance hardware, and just handling it tells you that it is worth the cost. The finishes are not the usual US types offered by mainline hardware people, but if a design professional is specifying the hardware, that is not your job. The fact that these are not exactly on the shelf at your local hardware distributor makes access a bit cumbersome, as well as jig rental, so plan ahead!
Our first project—the Walnut doors—has had no callback for adjustment after a year. And we didn’t even install those doors! We shipped the door and jamb to the job and their carpenter handled the install and the hinge adjustments. We provided the instructions and once he figured it out, he had nothing but praise, too.
• • •
AUTHOR BIO
 I wanted to learn furniture making—fabrication and design—in college, but nothing was offered, and serious wood programs were hard to find. That being the 60s, I set off to find myself and had the good fortune of finding my own way to woodworking.
I was lucky to get hired at an aging stair shop in 1972 that made curved stairs, doors, louvers, mantles and such—all out of solid wood—mostly residential, in Indianapolis, Indiana. I spent a year or two in awe of the curved stairs. Calculus? Algebra? What did you need to know to build those things? As time passed, I got more exposure, and pretty soon I was the crew’s second hand on stairs. Being one of only two guys under 60, I quickly ended up doing the stairs and other complex work.
When the stair shop failed to survive a transfer from one generation to the next, I moved on to several other shops, but I was always trying to concentrate on solid wood fabrication. Eventually I was hired to start a shop for someone else. I helped the staff grow to 12 hands, and I had the fun of buying all the equipment and tooling for a profitable run of five years. Over time, the owners decided to get into panelized wall systems, and shrink down the mill. They wanted me to join them.
And that is when I started Acorn Woodworks, with a penchant for better design and solid wood. Doors—exterior and interior—became about half of the work, and we spent a lot of time and energy developing both the practical and aesthetic offerings in custom door fabrication. The shop grew and moved several times, peaking with the economy in 2007 with ten employees. Acorn always did nice work: curved stairs, large doors, round wine cellars, and lots of other interesting things.
But, with the recession, the shop reversed those many years of growth, and I am now back in my original small shop with one employee, sawdust in my pockets, and even a few splinters every now and then.
Use these a lot here in Northern Ireland along with a lot of products which are similar from the Blum range. Only difference we are not supplied with jigs and make my own from MDF
Dave-
Nice, well written article! I wish I had a job where I could use those hinges…pricey but nice!
Chris
Nice job!
I have been using the Sugatsune versions of these for big interior doors, but will check out the tectos next time!
Everything I have ever used from Germany has been top notch. Festool, Blum hardware and Martin machinery, while expensive (sometimes shockingly so) are top of the line and worth the huge price tag over the long term.
I’ve used Soss hinges. Next time I have a need for a concealed hinges, these will be used, guaranteed.
Now, if we could just get the US to adopt the metric system. It will eventually happen. Probably sooner than expected after Congress forces the US to default on its debt and China forecloses. ;-)
Dave, you are a hell of an interesting writer.
I’m assuming that you strive for perfection
in everything you do.
Enjoyed it much.
Dr. Jim Lynde, Retired Gen. & Specialty Contractor
North Hollywood, CA
These look like a German improvement of the SOSS hinges, Even more expensive. I have used soss when ever I did not want a hinge to mar the look.
Great article Dave! I am just about to begin a project that includes a pair of “invisible” doors that are to blend into a paneled wall. There will be no door handles, and the client wants to use magnetic touch latches. I was planning on using the Sugatsune hinges, but these Tectus hinges are significantly cheaper, and have a more streamlined look. Have you used the Sugatsune hinges? How do they compare? Also, how much did it cost to rent the router jig?
Thanks,
Zak Morrison
The Good Life Fine Carpentry
Santa Cruz, Ca.
I hope I get to try those hinges someday. Great job on your article.
Thanks for all the nice responses.
As for the Sugatsune hinges, I have seen them, but not used them. It would be interesting to do a side by side just to see.
The router jig from Index-D was about $100.00, with the shipping all pre-paid, for 2 weeks rental. you can hold on to it longer if needed, for additional charges. Very reasonable considering the learning curve length if one were to make their own jigs.
Index-D has a sister site: http://www.betterbuildinghardware.com/
that has a lot of nice hardware, and features a touch latch that they say is better than any others. I love the principle of a touch latch, but have seen very few last at all, much less for a ‘lifetime’.
Dave S
Dave:
Great article and I am glad it was my cabinet design where you could incorporate these new hinges. The hinges work beautifully and allowed us to keep the cabinet’s overall lines clean and simple. I could not be happier with the end result. Congratulations on a fine article and I plan on providing more opportunities for you to showcase your fabrication talents. Hope you continue to get good feedback from the article. Chip Kalleen, ASID
I used these for the first time in January in Dublin on some 44mm doors in tri fold arragement where architect didn’t want to see hinges on different sides. Cool hinges but bit strong on the money and I didn’t see any jig!!
Timely (for me) article in that some of these were recently delivered for a job I am doing. Jig looks interesting but at $475 I will think about if for a day or two. My feel, though, is that these are going to become more popular in my end of the market. Soss issues are abundant. Thanks for the article.
I just completed a set of concealed doors using using Tectus TE 340 3D hinges. The customer wanted the doors to blend in with the wall paneling. The contractor supplied me with the hinges and the templates, but not the fancy jig to use them, or the router bits/bushings. I quickly discovered that the manufacturer specs a 24mm bit and 30mm bushing, which weren’t in my collection. I didn’t want to spent the $500+ to tool up for a job of this size, so I did some experiments. Used the supplied templates and a pattern cutting bit to make my own templates out of 1/2″ ply, to allow clearance for the router bushing. Then I did some math and discovered that a 1/2″ bit with a 3/4 OD bushing is very, very close to 6mm (the difference of the spec’d bushing and bit) Tested my idea, and the hinges fit perfectly.
The hinges are awesome. The ease and degree of adjustment is amazing. I will definitely use them again. If i got a big enough order, I would bid to account for their install kit, as it looks very nice. I just wanted to share my install solution for those out there who need a cheap solution to get the job done!
3/4″ – 1/2″ is 1/4″ which is 6.35mm. Close enough to 6mm :)
Reminds me of the Satellite launch that failed because one vendor used metric and the other imperial. Your results on the other hand are extraordinary.
paddy – If you made your own jigs, you probably found they were not too difficult, similar to the Soss routings. Just label them well so you know what hinge the jig preps for. Perhaps the jig rental is just a US thing.
NYC – Look up Index-D at:
http://www.index-d.com/pc.php?cat=21&mt=v&v=SMSWK
and call or write to inquire about the jig rentals. They are also able/wiling to help you spec the best hinge type and even placement.
Another option, Templaco made my last set for the 240 Tectus. Cheaper than the rental. Fit was right on with standard 5/8 bushing and 1/2″ mort bit. If you ship out without hinges or pull for painters be sure and slip in sacrificial mortise in-fill blocks, with the 4-5 mm tab set back it doesn’t take much to break.
Whole house of doors coming up and will probably splurge for the Tectus setup. FYI if you buy from Hafele they too have the hinges and templates in stock just not the main frame, special order.
Thank you Dave for a well written article along with excellent photos that give a visual to the written word. Enjoyed your bio as well, thanks for sharing!
Thanks for sharing. I really like this type of hinge.
Is this the same hinge that Lamp Sugatsune sells? Price and spec’s are about the same.
Similar in form but not in technology or appearance.
The difference is that the Tectus system includes hinges for capacities from 88 lbs. to 660 lbs with just two installed plus hinges for special situations like mirror-clad doors, frameless doors, and a hinge with hidden permanent power/data transfer. Tectus also offers a much wider range of finishes. It’s really comprehensive.
I’ve got a job coming up here in April and May 2015. 48 hinges I have to machine and hang the 8′ tall doors (4 hinge per door) so looking forward to using this hardware. Tectus is the only concealed hinge that I found that will work with a revealed jamb too (check out model Number TE 541 )
How’d that install go, Ryan? any good photos?
The TE 541 3D FVZ hinges that you mentioned are a great way to get that frameless door detail. The hinge can be installed in set back .55″ from the face of the door. They hold up to a 220lbs. door with 2 hinges installed. And having them 3D adjustable let’s you keep the gaps between your wall board and the door nice and neat.
Mr. Sochar –
I have read with appreciable interest your comments posted in this venue for several years and wondered who this young fellow was that gave so freely of his expertise & time in such a well written manner.
As a 33 year fugative from the corporate world (aka retired), I was a long time indentured servant to the publish or perish culture of substantial publications, and with discovering this article and your personal history was swept off my feet with your exceptional composition and journalism skills added to the underlying woodworking expertise. It filled in any missing curiosity and is indeed a pleasure to read. Given the wild banter of numerous forums it is an inspiration to read your articles; thank you for taking your time to contribute them.
Steve Slavin
Concord, California
As a woodworker starting on the exterior door quest, appreciate your tip and insight from your journey. Hope to hear more tips on techniques and business from you.