


…with One Router Sled
I live in an old stone barn that was converted to a house in the 1950s. The master bathroom needed a makeover, so I gutted it in preparation for a complete overhaul. I wanted to build a new closet and separated toilet area, both of which needed doors. I decided to build louvered doors out of Mahogany, which would normally cost approximately $600 from an online supplier. My total cost for materials was less than $200 for all three doors.
I found several jigs and videos on the web and in woodworking magazines that could have helped me make the slots. The one thing they all had in common was that you needed two jigs, one for each side of the door. Some of the jigs cost hundreds of dollars, or required extensive fiddling to get good results. There had to be a better way that didn’t include a $40,000 CNC machine! The following is a description of the jig I came up with; it took longer to write about it than it did to build!
• • •
|
For an alternative method of making louvered doors, |
• • •
This jig will cut slots in both stiles, costs about $13 to make, and takes only a few hours to construct. It worked so well that I decided to send my SketchUp drawing to Gary to see if he was interested in publishing it in TiC. He replied that I should document building the doors with the jig (maybe he didn’t believe it would work!), which was more than I bargained for, but I agreed to give it a try. I’m going to include lots of tips and details in case you want to try this in your own shop.
Key features of the jig include:
- One jig cuts slots in both stiles
- Jig self-centers on the stile
- Slot width can be adjusted easily
- Offset slots can be created by off-centering the stops
- Consistent slot spacing, length, and angles on both stiles
- Any angle slot can be made by changing the distance between the pivot points
- Accurate and consistent results
- Contains most of the dust during cutting
- Easy and fast to use with a plunge router (about 10 seconds/slot)
(Note: Click any image to enlarge)
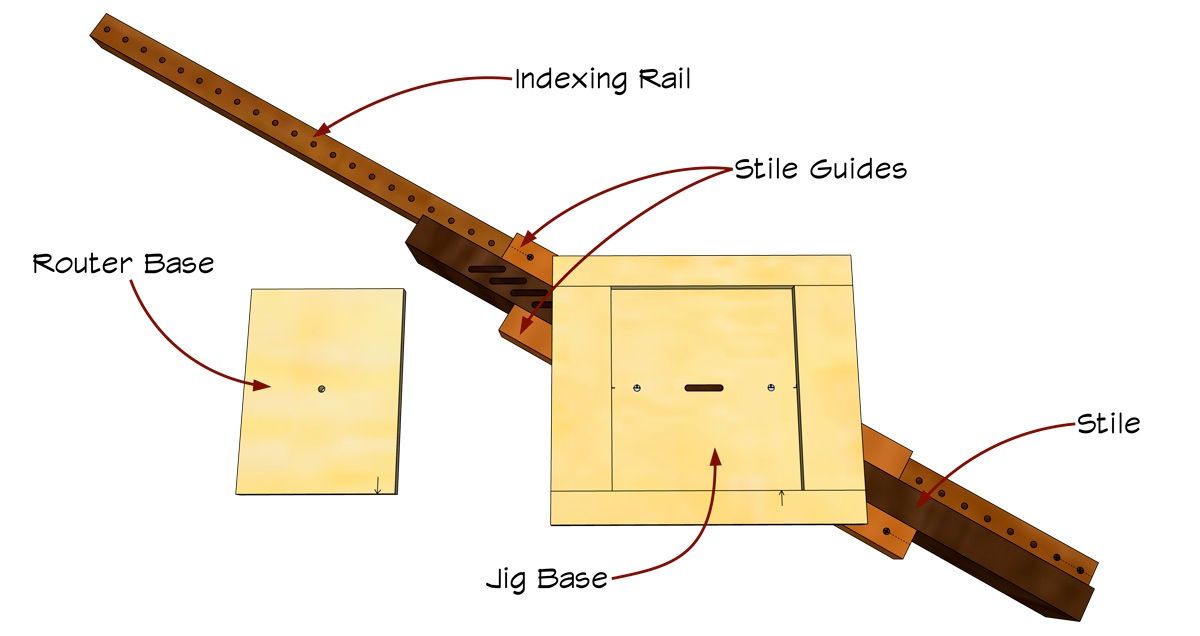
The jig has four basic parts, which I will describe in detail along with some construction tips. Accuracy and the dimension of each component are both important. If you download SketchUp 8 (the free version), you can view my model in 3-D and orbit around it so that you can see it from any angle. I’ve also included comments on the drawing, which you can turn on or off by clicking on the scene tabs at the top of the drawing window.
Click here to download the SketchUp drawing to your computer!
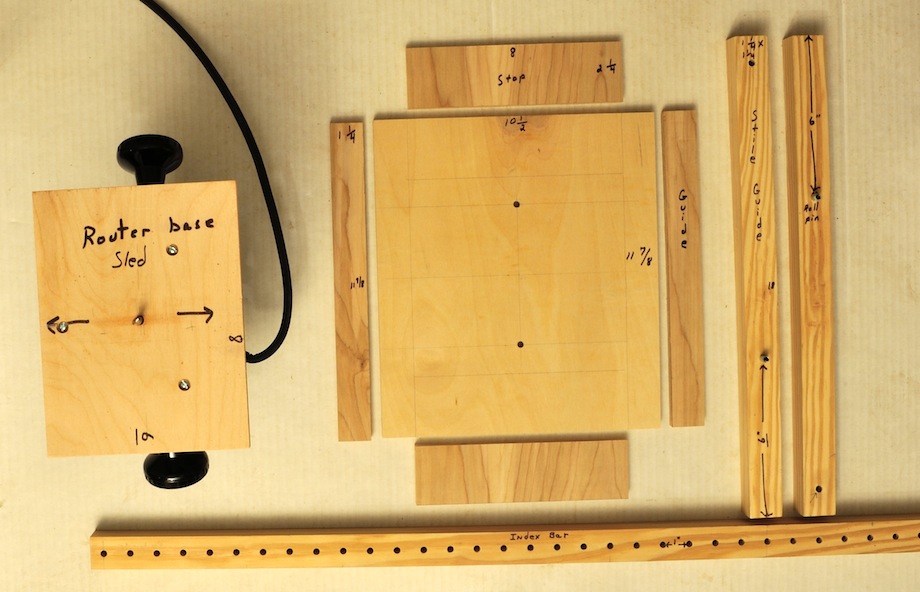
Materials you will need to build the jig:
- 1 – 1/2″ x 2′ x 2′ Baltic Birch plywood or something smooth, – $8 (enough material for two jigs)
- 1 – 8′ 2 x 4 that is straight – $3
- 2 – 1/4 x 1 1/2 roll pins – $2
- 1 – 1/4 x 2″ clevis pin or any 1/4″ straight rod
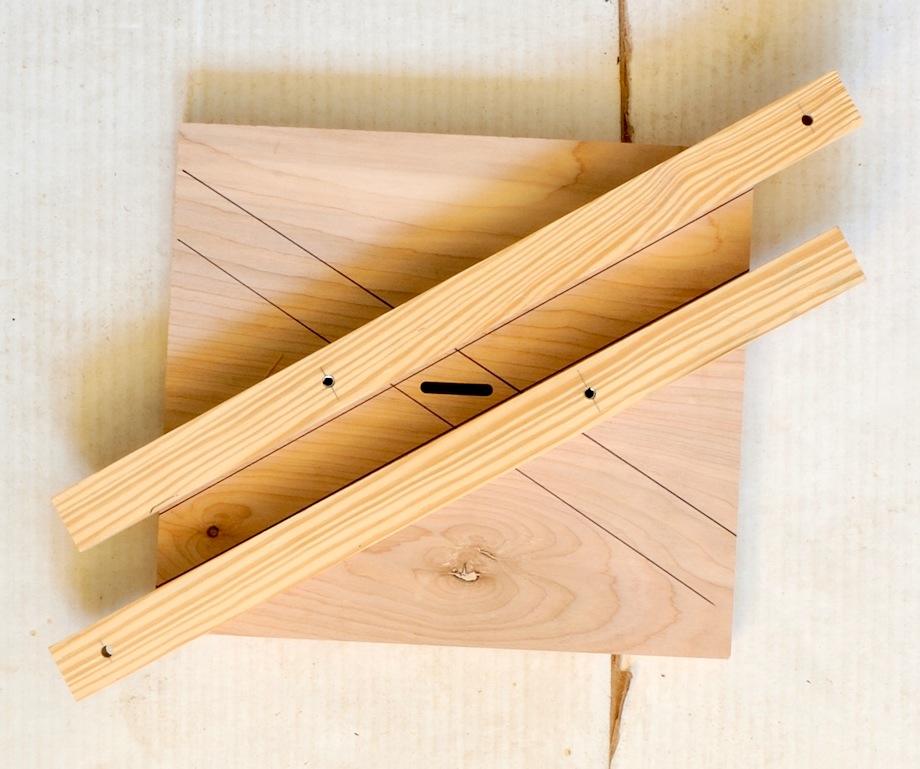
The Jig Base
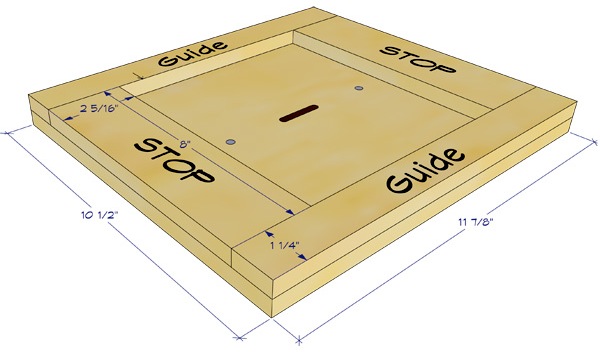
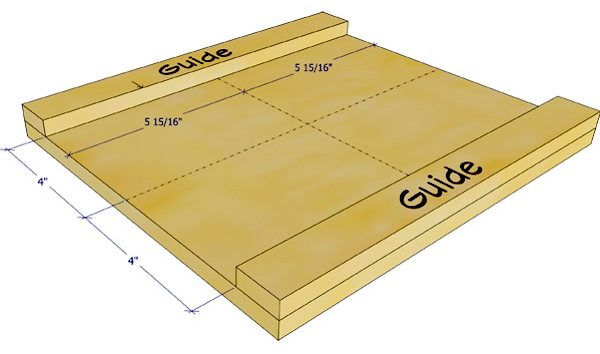
I started by cutting the bottom of the jig base from the 1/2-in. plywood. I made mine 10 1/2 in. x 11 7/8 in. so that I could make two jigs from the 2 x 2 sheet of plywood. The size is not critical as long as you are close and the corners are square. Next, I cut the router guide rails and stops. These pieces orient the router in the jig and limit its travel during cutting. For my router set up, I cut the router guides 1 1/4 in. x 11 7/8 in., and the router stops 2 5/16 in. x 8 in. I would glue these to the base, but not yet.
Tip: Cut the stops and the router base at the same time on the table saw so that they are the exact same size in the 8 in. dimension.
Tip: If you use stock that is more than 1/2 in. thick to build the jig, your router bit may not be long enough.
The Router Base
You may not need to make a base for your router if it has a square base, or if the round base is perfectly centered. My router is an old Porter Cable 690 plunge router, so I needed to make a base. I cut my router base from the 1/2-in. plywood and made it 6 in. x 8 in. so it would slide between the guides of my jig base. If you choose not to make a base for your router, you will have to adjust the sizes of the router guides and stops on your jig base.
Next, I drilled a 1/4-in. hole in the center of the router base. I put a long 1/4-in. drill bit in my router and then slipped the bit through the hole I just cut. The drill bit kept the base centered while I marked for the mounting screws and attached the base. I counter sunk the screws that mount the base to my router so that the bottom was flush and the router bit was centered. Centering the bit is important! After the base was mounted, I removed the drill bit and inserted a 1/4-in. spiral up-cut bit.
Tip: Make the screw holes oversized so that you have some play when you secure the router base. Check the distance from the bit to each side and remount if necessary.
Tip: Lightly sand the inside edge of both router guides and the 6-in. sides of the router base before assembly so that they slide more easily when you are using the jig.
Assembling the Jig
I clamped the router stops to the jig base after centering them on the base. They would help me position the router guides for gluing.
| I glued the router guides to the base, making sure that they were tight against the ends of the router stops. I always go easy on the glue! | 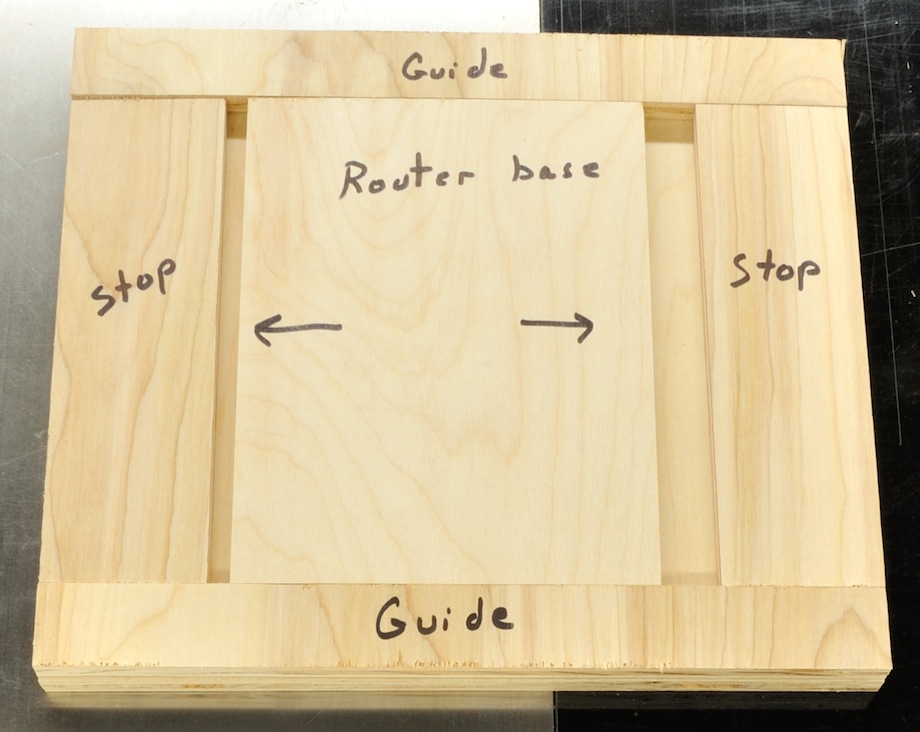 |
 |
I clamped the router guides and removed the router stops and the router base so that they wouldn’t get stuck from the glue squeeze-out. I then cleaned up any glue that wasn’t between the two pieces of wood. |
The Stile Guides
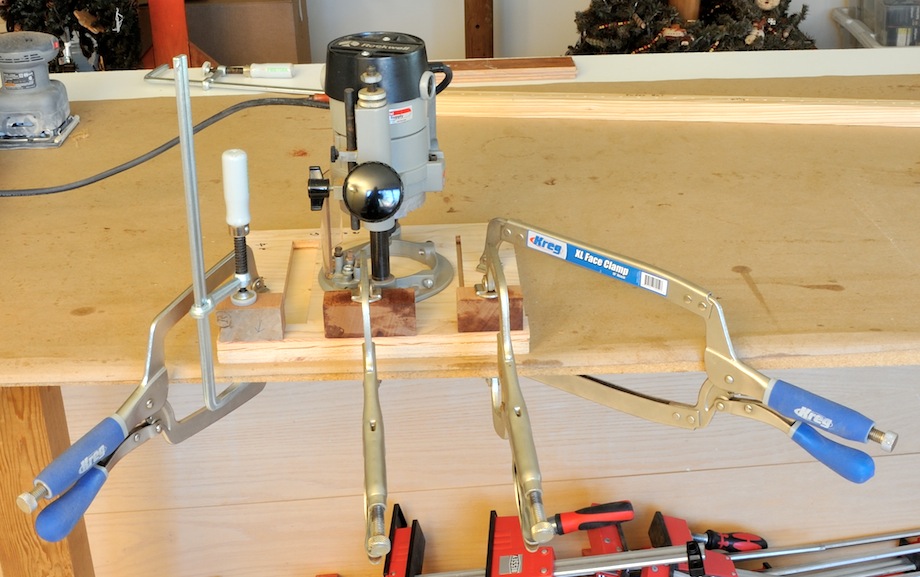
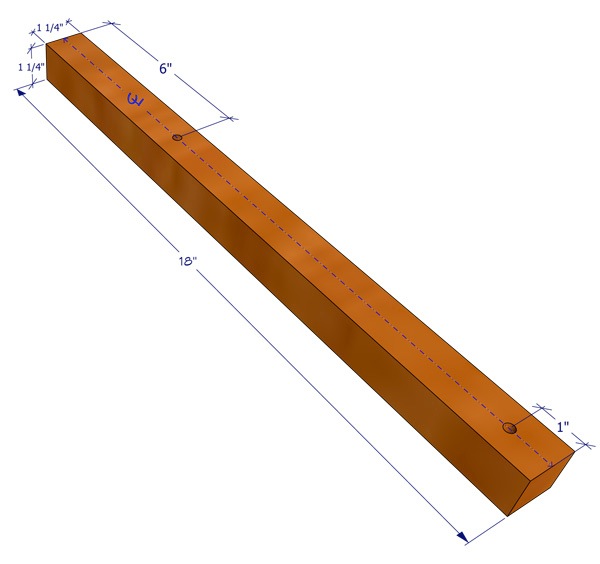
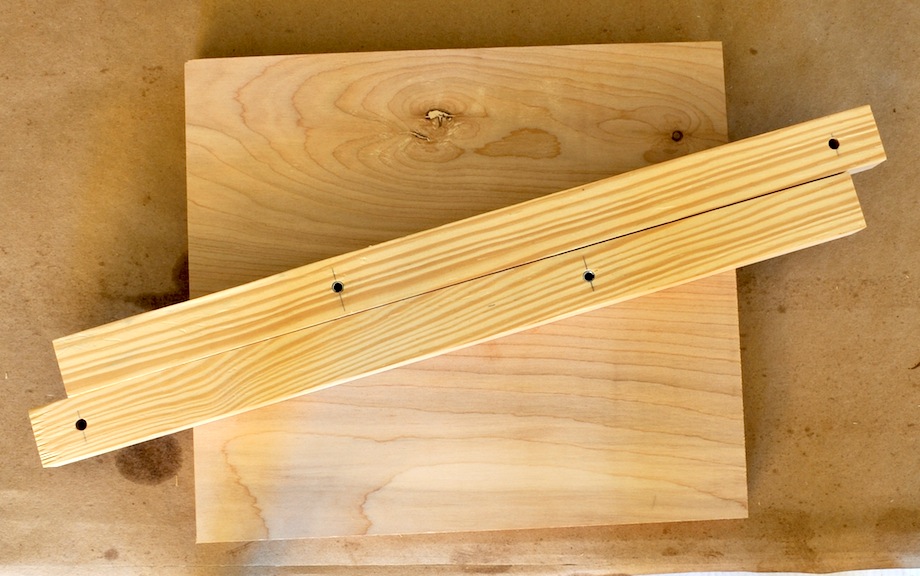
While the glue was drying, I cut the stile guides that attach to the bottom of the jig. I cut 18 1/2 in. off of the straight 2 x 4 stock, and I milled two 1 1/4 in. x 1 1/4 in. x 18 in. pieces out of it (the length is not a critical dimension). Next, I drilled two 1/4-in. diameter holes along the center line of each stile guide—one hole needed to be located 6 in. in from an end, and the other 1 in. in from the opposite end. I did this on both pieces. I used a drill press (but you could use some other gadget) to ensure that the holes were perpendicular to the surface. It was critical that the holes were centered, but the distance from the ends was not critical. After drilling the holes, I pressed a 1/4-in. x 1 1/2-in. roll pin into the hole that was 6 in. from the end on both pieces until it was protruding a little less than 1/2 in.
Indexing Rail
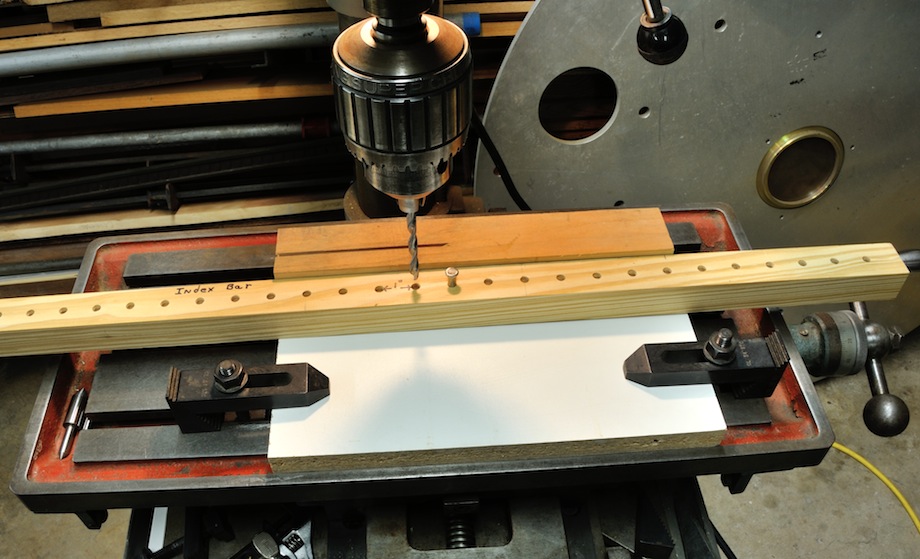
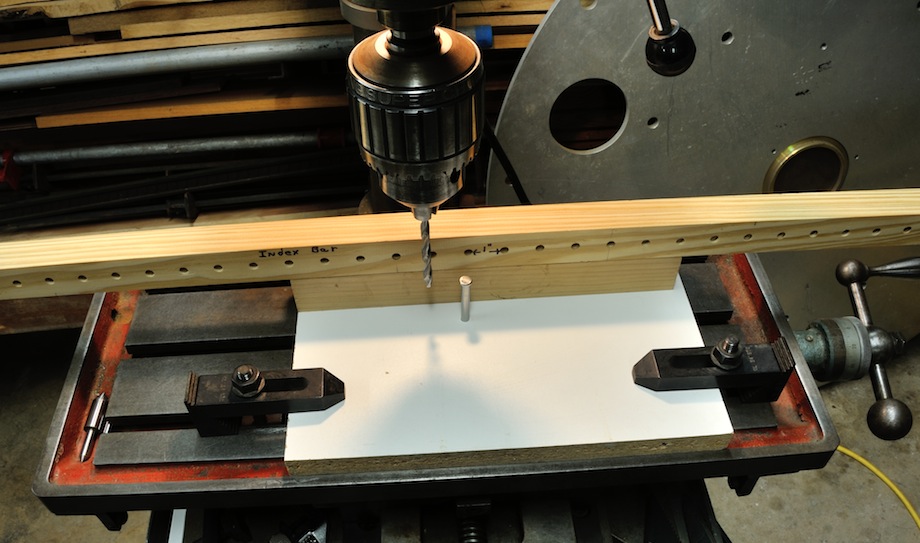
The indexing rail should be long enough to cut all of the slats on one stile without moving the rail. My slats were 1 in. apart, but you can choose different spacing. I milled the leftover 2 x 4 stock so it was 1 1/4 in. thick and 1 1/4 in. wide. On the drill press, I clamped a scrap piece of 3/4-in. plywood to the table (to act as a backer), with a straight piece of wood attached on top of it to act as a fence when drilling the holes in the indexing rail. I adjusted this fixture on the drill press so the bit would be centered on the 1 1/4-in. rail width (5/8 in. in from the fence). I drilled a 1/4-in. hole in the plywood backer. It’s important that the holes in the rail are centered, so be sure you test your set-up on some scrap. Then I slid the plywood fixture exactly 1 in. to the right and re-clamped (the bit should still be centered 5/8 in. from the fence). I could now drill all of my holes exactly the same distance apart, without having to measure by indexing each hole from the previous one that I drilled. I stuck the chuck-end of a 1/4-in. drill bit through the previously drilled hole in the rail and inserted it into the plywood hole. I drilled holes from one end to the other. The number of holes should be greater than or equal to the number of slats in the stiles.
 |
 |
Back to the Jig Base
Now that the glue had set, I could attach the stops and drill holes for the pivot pins. I started by drawing a fine line across the base, parallel to the guide strips and perfectly centered between them. Then, I located the exact center of the base by drawing a perpendicular line centered on the 11 7/8-in. dimension of the base.
 I now had a cross on the base that I could use to reference the pivot holes and the router stops. The stops determine the length of the slot which should equal the slat width. I recommend not gluing the stops. I just put a screw in each stop so that I could adjust them if necessary. I located both of my stops 3 5/8 in. away from the center line (for a 1 1/2 in. slat width). You’d move them closer together for a narrower slot and further apart for a wider slot. They should always be placed the same distance from the center line unless you wanted the slots to be off-center in the stiles.
Tip: Position the router stops 1/32 in. closer to the center line and make a test slot. Test fit a finished slat in the slot and either adjust the slat width or the slot length for a loose fit.
Locating the holes for the pivot pins was the next step, and it can be the most challenging part of building this jig! The location of these holes sets the angle of the slat mortises. While the angle of the louvered slats is not critical, a little trigonometry (or a full-scale drawing) will allow you to set them at any predetermined angle you’d like.
This jig is based on a simple right triangle. I knew the desired angle and the length of the opposite leg (the thickness of the stile and one stile guide). I just needed to find the triangle’s hypotenuse.
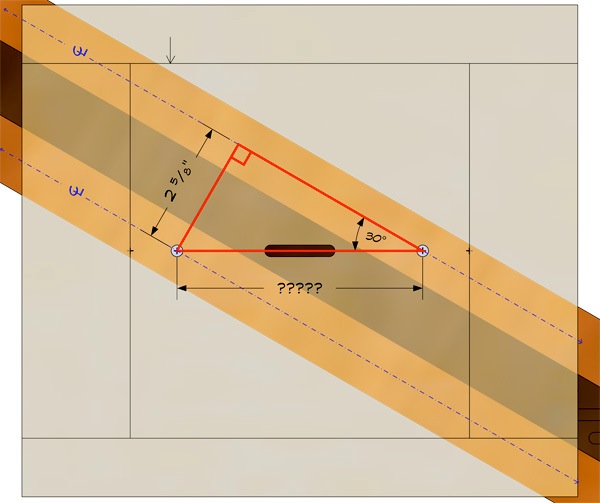
The formula for determining the spacing between the pivot points is: Stile Thickness (ST) + Thickness of one Stile Guide (SG), divided by the sin of the Slot Angle (SA). (ST+SG) ÷ sin SA = pivot point spacing. (Don’t let this formula scare you!) I would use half of this length to determine the pivot hole spacing from the center line between the sled stops.
Example 1:
Stile Thickness = 1.375 in.
Stile Guide Thickness = 1.25 in.
Slot Angle = 30°
(1.375 in. + 1.25 in.) ÷ sin 30° = 5.25 in.
Example 2:
Stile Thickness = 1.5 in.
Stile Guide Thickness = 1.25 in.
Slot Angle = 25°
(1.5 in. + 1.25 in.) ÷ sin 25° = 6.507 in.
Another approach would be to use a construction calculator’s “roof” function—there would be a few less keystrokes, and you could keep all your measurements as fractions. In which case, your math would be as follows:
Stile Thickness = 1 3/8 in.
Stile Guide Thickness = 1 1/4 in.
Slot Angle = 30°
1 3/8 in. + 1 1/4 in. = [RISE]
30 [PITCH]
[DIAG] … 5 1/4 in.
Note: Keep in mind that changing the thickness of the material used for the stiles or the stile guides will change the slot angle.
| Now that I had determined the spacing, I drilled two 1/4-in. holes on the line that was parallel to the stile guides. I spaced mine 5 1/4 in. apart, placing them 2 5/8 in. from each side of the center line intersection. | 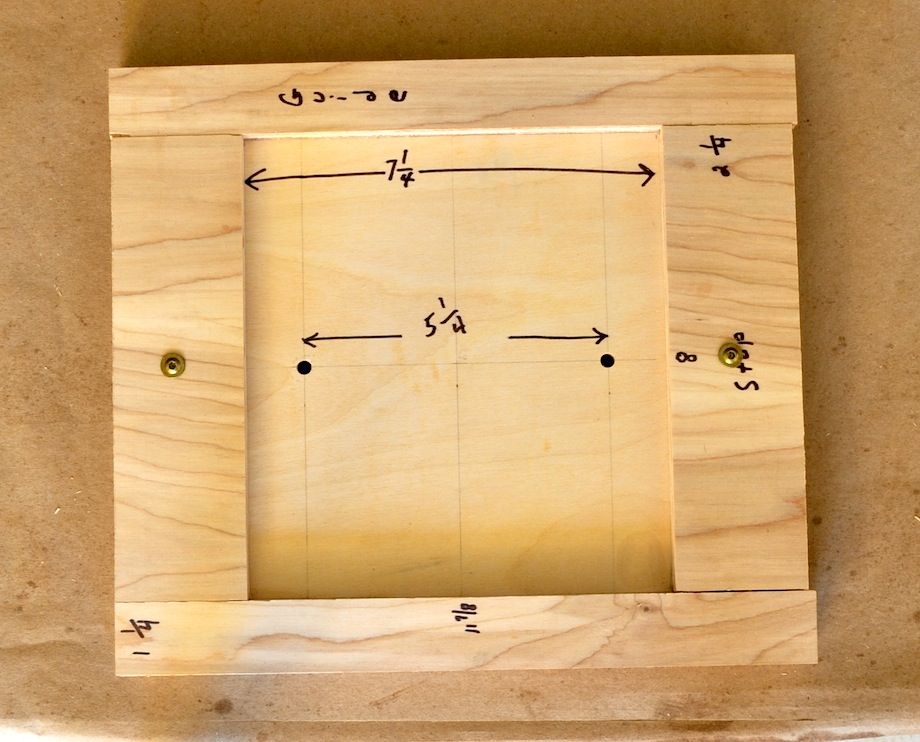 |
 |
It is important that these holes be positioned correctly to achieve the desired slot angle. If I moved the holes closer to the center mark, the angle of the slots would be reduced, and moving them further away would increase the slot angle. |
| Now that I had my pivot holes drilled, I attached the stile guides to the bottom of the jig base by inserting the roll pins that were sticking out of the stile guides into the pivot holes. The stile guides should attach securely and still be able to pivot. | 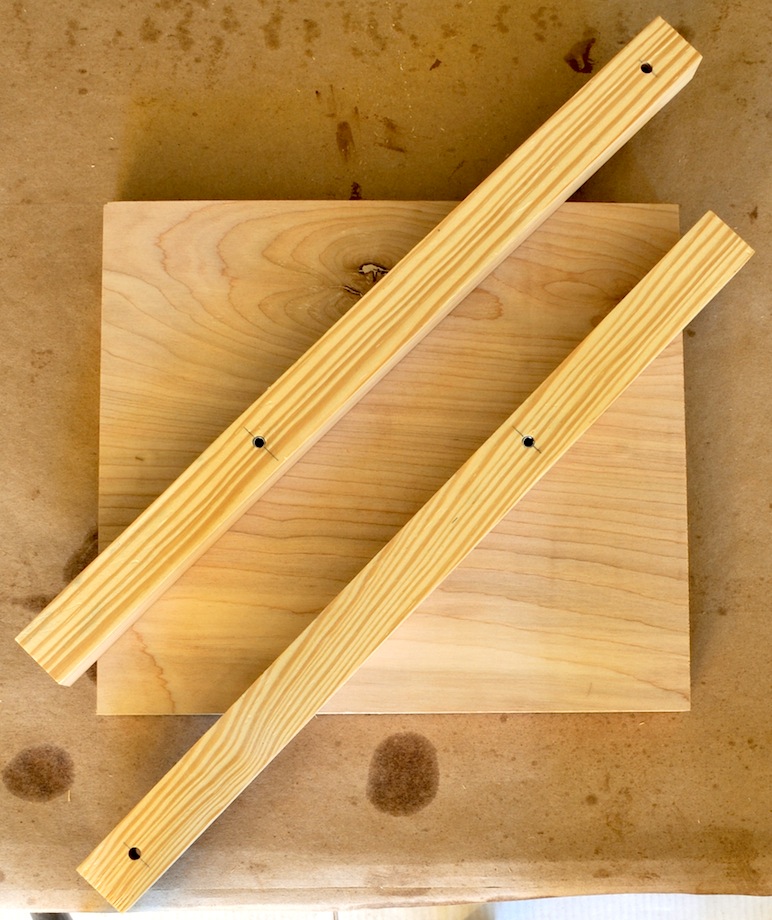 |
I gave the jig a try on a piece of scrap that was the same thickness as my stiles—1 3/8 in.—and I adjusted the router so that my slots would cut 1/4-in. deep into the stiles. This test cut the slot in the base and test scrap.
Tip: Mark one side of the router base and one side of the router jig so that you always position the router the same way in the jig. Any error in mounting the router to the base will be doubled, and the slot will be enlarged and/or lengthened, making it difficult to align the jig for the first slot.
 Here’s the really cool part about the jig: The stile guides pivot in parallel and get closer together or further apart while keeping the stile centered. This allows you to clamp them tight to the stile when routing. When you finish routing all of the slots on one stile, pull one of the stile guides off of the jig, rotate the other guide 60 degrees, and reattach the guide that you just removed. You are now ready to cut the other stile!

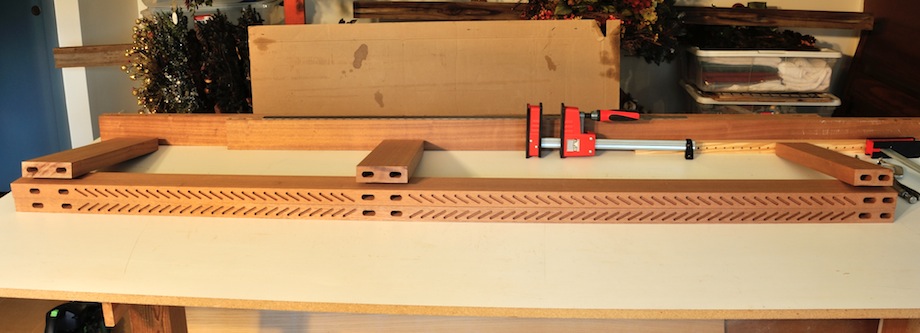
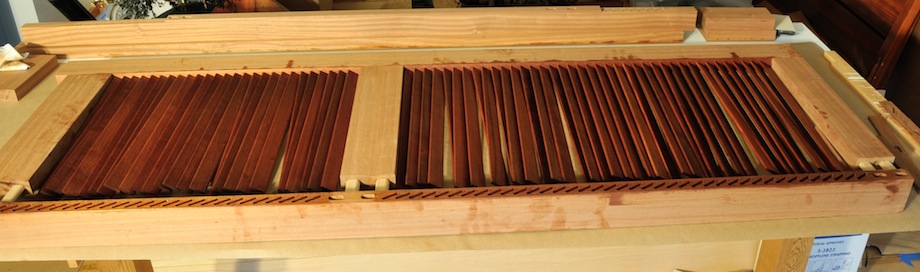
Building the Louvered Door
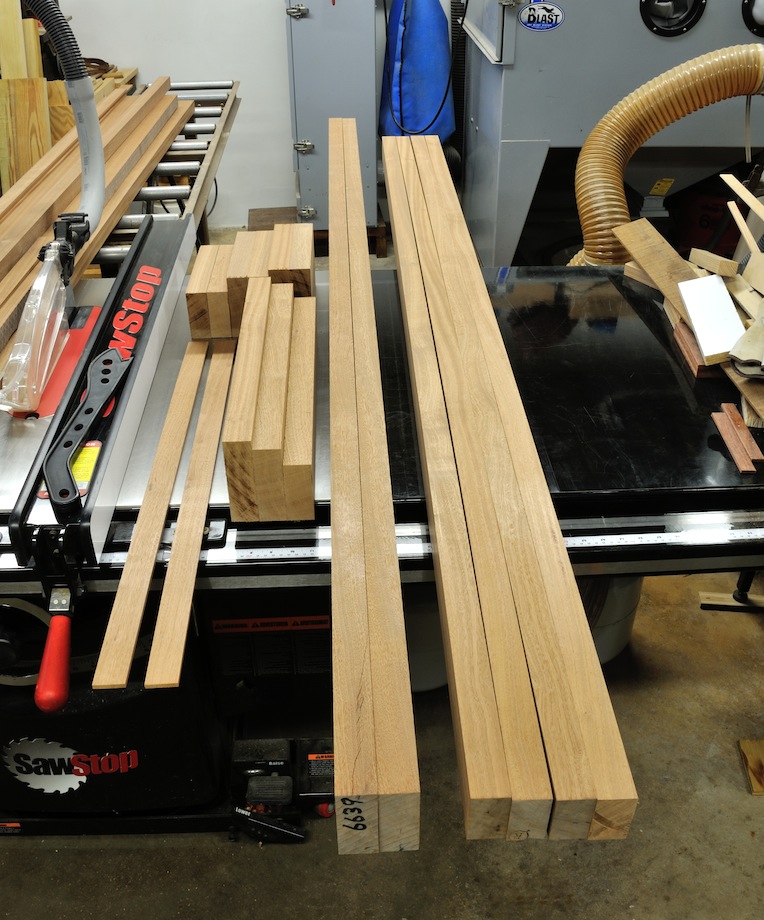
I started by preparing all of my stock (joint, plane) for the rails and stiles.
| If you are making multiple doors or shutters and they are different sizes, make the larger ones first so that you can use any mistakes to make the smaller ones! You don’t need to rip the stiles to width or cut them to length at this time; this way, you haven’t ruined as much wood if you make a mistake. Of course, you can always use your mistakes to make the necessary 60-plus slats for each door. | 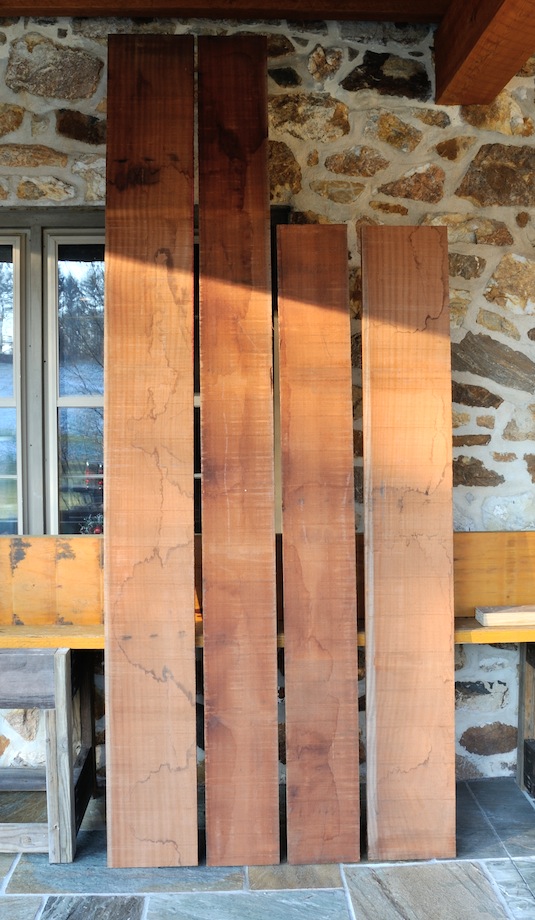 |
 |
I suggest leaving the stiles a couple of inches long and the top and bottom rails 1/4 in. too wide. The door will be trimmed to final size after final assembly. I drew lines on the stiles to mark the approximate locations of the rails, and then adjusted their positions so the slats would fall evenly between them. I used blue tape to mark the rail positions along both stiles. It would be very difficult to patch a misplaced slot! |
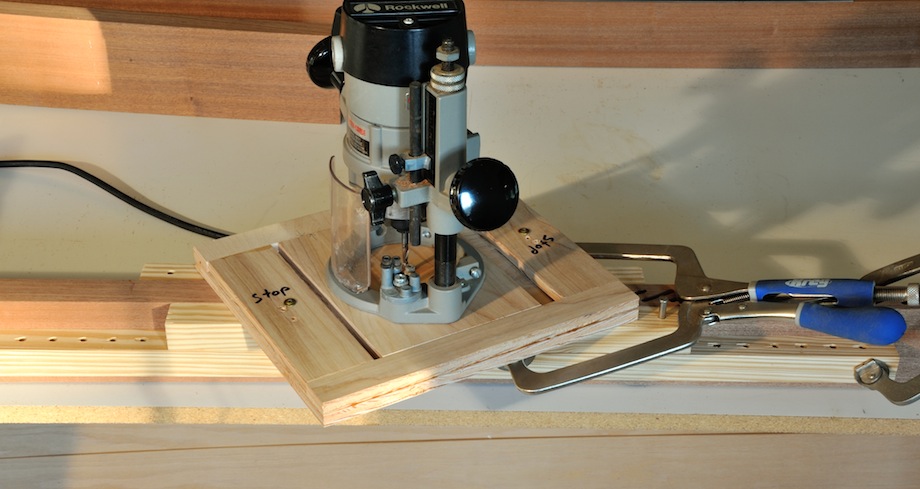
Next, I made a mark across the stile to indicate where my first slat would begin. After attaching the jig to the stile, I looked through the slot hole in the bottom of the jig for the mark that I made across the edge of the stile. I aligned the end of the slot with that mark, and clamped the stile guides to the stile. At this point, I still had to clamp the indexing rail to the stile, so I waited to turn on the router. I used a 1/4-in. clevis pin to index the jig to the rail, but anything that is 1/4 in. x 2 in. or more will work. With the jig firmly clamped in the correct position for the first slot, I placed the pin through the end hole in the stile guide and into the end hole in the indexing rail. I then firmly clamped the indexing rail to the stile with two clamps. Do not move the indexing rail until all the slots have been routed. If you need to move the clamps, move one at a time.
Tip: If you make the rail width in 1/2-in. increments, they will fall between the slots!
Tip: If you leave the stiles at least 5/16 too wide, you can cut off the edge with the miss-cut slots and start over. I wish that I had thought of this before I cut my first stile!
 Tip: Do not cut the mortises or rails to width until all of the slots are cut, just in case…!
After I cut all of the slots in the first stile, I removed the jig and set it up to cut the opposite stile. I turned the jig over and pulled off one of the stile guides and then rotated the other stile guide so that it would be on the other side of the slot in the jig base. After I re-attached the stile guide that I had just removed, I was ready to cut the slots in the opposing stile. I double-checked my angle on the stile that I had just routed—the slot in the jig base should be 60 degrees to the slots I just cut.
Once all of the slots were cut, I positioned the rails and marked them for the mortises.
| A TiC article wouldn’t be complete without mentioning that I used a Domino XL700 to cut the mortises. | 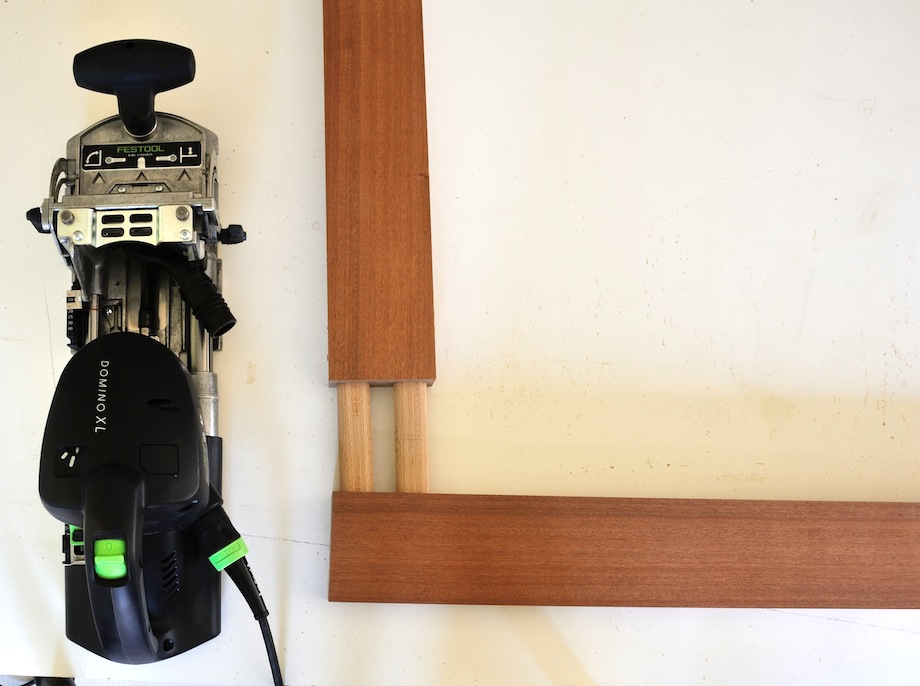 |
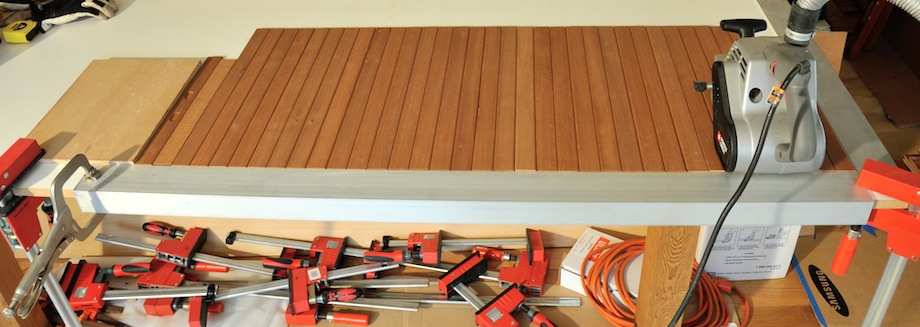
Milling the Slats
The slats were ripped to 5/16 in. thick on the bandsaw from my “mistakes.” I ran my stock across the jointer before ripping so that I could have a smooth surface on one side. If I had tried to plane both sides with the planer, I wouldn’t have had a good surface—the saw marks would telegraph through thin stock. I used a 1/8-in. radius, half-round cutter on the shaper to round over the edges of the slats before cutting them to length.
Tip: Run the slats through the planer with their ends butted so that you have one continuous stream of wood going through the planer. This will reduce snipe on the ends. The slats should be about 1/32 in. less in length than the distance between the bottoms of the slots in the stiles.
I wasn’t looking forward to sanding more than 60 slats on both sides—I made three doors; that’s 195 slats! I clamped some long scrap, which was less than the thickness of the slats, to a table in a square U-shape to hold the slats while I sanded them with a belt sander. 220-grit gave me a nice finish on the mahogany. I was able to sand 195 slats in an hour!
I sanded the louver slots by hand, with a block, and the edges of the rails that faced the slats as well (the top of the bottom rail, both edges of the middle rail, and the bottom of the top rail). I made sure not to round over the edges of the stiles until the rails were attached.
Tip: Dry fit the door frame with a few slats inserted. You don’t want to find out that your slats or tenons are a hair too long when you are gluing the frame together.
I rounded all four long edges on the rails with a Radi-Plane. I made sure not to get carried away with rounding over the edges on the stiles before assembling the frame, so that I wouldn’t end up with an unsightly groove where the rails and stiles met. I created two mortises on the ends of each rail, and in the corresponding locations on the stiles.
Tip: If you make your own dominos, or buy the long ones that you have to cut to length, don’t forget to chamfer the ends so that they are easier to insert.
After dry fitting the frame together, I had to take it apart so that I could glue the tenons and insert the slats. During the dry fit I kept asking myself this question: “How am I going to glue up the frame and insert all of those slats before the glue grabs?” The answer: Don’t use water-based wood glue! I used epoxy because it gave me the most working time.
Tip: Reverse your clamps (if they have this feature) to spread the stiles apart, or use a block of wood, so that you can make sure that the slots you cut are protected when you begin to coax it apart with a hammer.
I knew to finish the slats and slots before I inserted the slats into the frame. I put them in a 5-gallon drum of Penofin Marine Oil Finish to soak, and then I wiped them dry after 30 minutes of soaking. A film finish would have been difficult to repair when the time comes to freshen up the finish, but oil is very easy to apply and wipe off. If you do decide to use a film forming finish, apply the primer to the slats and slots before you assemble the door. If you are using polyurethane, apply a coat to the slots and slats before assembly. You may also want to undersize the slats a little to make room for the paint. When I paint louvered doors, I spray them with Alkyd paint, which leaves a perfect finish.
Assembly
It was then time to assemble the door. I applied epoxy, sparingly, into the mortises on the stiles and slid the door together until the stile just touched the slats that I had already inserted into the opposing stile. Since the slots were 1/4-in. deep, I was able to pull them out of the slot enough to get them started in the other stile before they fell out. You will not be able to angle the stile unless you cut all of your mortises oversize, which I didn’t.
I learned to just take my time, and I made sure that I positioned each slat so that it was in both slots before I closed that last 1/4-in. gap between the rail and stile.
Tip: Get a helper or two to help with slat insertion.
| I gave my door a light sanding and applied the finish. Then I stood back, and admired the work. | 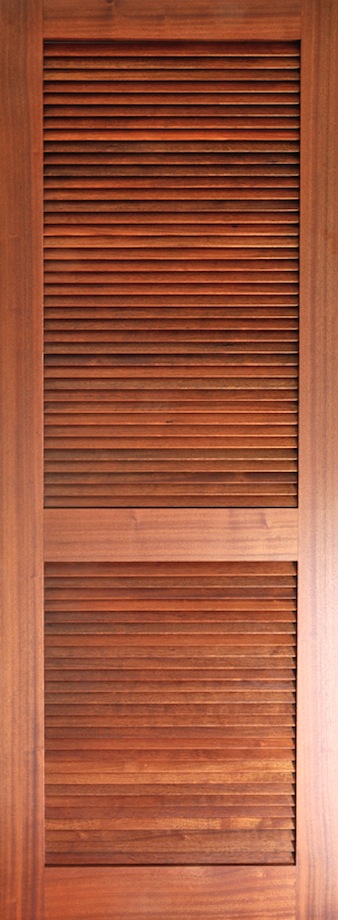 |
Tip: Always be sure to remember that last step!
• • •
AUTHOR BIO
 Gene acquired his passion for construction out of necessity after buying a house that needed a lot of work. His interest in construction and woodworking continued to grow as he rebuilt his “fixer upper.” Eight years later, when the house remodel was completed, lightning struck the house and caused severe fire damage. The second remodel only took two years!
His day job in Information Systems didn’t leave a lot of time for home repair projects. Each new project created a need for more tools and more “how to” books—Gene has read his stacks of Fine WoodWorking, Fine HomeBuilding and JLC magazines all cover-to-cover; he somehow even found the time to read Gary Katz’s book on trim carpentry.
Gene retired in 2011 and now works full-time on a converted stone bank barn that was built in the 1800s. He loves to innovate and find new ways to solve problems that combine knowledge from multiple disciplines.
On the rare occasions when he takes a break, he also enjoys skiing and photography.
Great article! Very precise and organized work, door looks great. Never thought of making louvered doors, giving me good ideas!
Courageous!
I concur !
Great job Gene! Thanks for all the details. I’m looking forward to downloading your Sketchup drawing. Congratulations on your retirement! It looks like your spending your time well.
Great article.
Thanks for posting the links to like articles such as the Domino louvered door method.
Nice article, looking forward to making my own jig. I’ve tried the domino method before and wasn’t that satisfied. Perhaps there needs to be an adjustable domino jig. Cheers
Mike,
My original plan was the use the Festool Domino but it became clear very quickly that it was not the best tool for the job. Length and angle of the mortise are not flexible and you need an accurate way to index the mortises. My first jig indexed each mortise off of the previous mortise. By the time I got to the end of the stile (63 mortises later), I was off by 3/8″. Not cool! That is why I built the indexing rail. Even if the rail isn’t perfect, mortise spacing and the location of the last mortise will be consistent which is important if you want your slats to line up correctly and be the same distance from the rails. Consistency from stile to stile is your most important objective. Thank you for taking time to read my article. Gene
Gene,
Thanks for taking the time to put together such a detailed article. The doors look great. Building louvered doors hasn’t come up for me yet, but I’ll definitely refer back to this article when it does.
Rob
just the kind of article I was looking for. DO you have any related books or videos on door making to learn more from?
Cole,
I have not written any other articles on door making. Do a search on “how to make doors” on youtube. There are lots of videos on the subject. Gene
gene, it’s good that you give a very nice and detailed jig. I’m a novice and it surely help me a lot. thank you and more power!
nido
Nido, You are welcome. I tried to provide tips that I had to learn from my mistakes.
Gene:
What a great article; your writing is clear, uncluttered, and easy to follow. Well done. I had just completed some louvered HVAC covers for a client (36″ wide x 25″ high) in natural cherry, and now he’d like three louvered doors to match. Doors? Thank goodness for your detailed article! I have one question for you: did you find it necessary to sand the routed edges of your slats? If so, how did you approach this labor-intensive chore?
I would note, as you may know, that Rockler sells a jig that’s quite similar to yours. If you haven’t seen it you might want to take a look. Thank you again, Sir!
Ron
Ron,
I looked at the Rockler jig before I built the one in the article. It wasn’t as versatile and it cost a lot more but it would be a good choice for certain designs, like ones that require movable louvers.
I did not sand the edges of the slats. There were over 380 edges in the three doors that I built! I would have sanded them if it would have made a difference but it wasn’t necessary because I used a new Freeborn shaper cutter on the shaper that was equipped with a stock feeder set to slow. I did sand each side with a belt sander but that didn’t take very long when I sanded a bunch of them at the same time.
Try to do a high quality job on the slat edge profile and sanding won’t be necessary. Also, I shaped long slats and then cut them to length. If you use a shaper, make sure that the height of the cutter is centered and that the thickness of the slats is a little less (a few thousands) than the cutter profile.
Gene
Ron,
Another thought… If you have to use a router, use a router table and a bullnose bit instead of a round over bit, It will save half of the time and it will do a better job. Use feather boards or the hold downs of your choice to keep the wood flat and a split fence.
Something like this —> http://www.woodpeck.com/whitesidebullnosebits.html
Thanks Gene;
In fact I did end up using a 1/4″ bullnose bit, and it worked perfectly. No sanding for the edges. I assembled all three doors yesterday, with help, and I am headed to the shop to apply the poly now.
Thanks again,
Ron
Gene,
Great job on both the doors & the article!
I’m part way into a remodel that I plan to make both interior plantation shutters & exterior window shutters and about 12 interior closet louvered shutter doors. I’ve been searching for information on both tools and procedure.
I did find a router jig called a Router Boss that is claimed to be versatile for many different joints including angled mortises, but it’s in the $800 range roughly the same as the Leigh jig. The Domino is interesting but definitely has its drawbacks as you mentioned. I too, would like to find a way to wrestle the alligator and win at the lowest cost for a decent production rate.
If you had to do over again would you spend more up front on tooling or keep the everything the same? I have the time since I’m retired, but there other things in life too.
Ken
Ken,
I would spend the money on wood and use the $12 jig. If I were making a lot of doors and I wanted to vary any of the specs, I would spend a little more time on the jig and make it adjustable.
Gene
Gene,
Really appreciate the work you put in the article,
“Making Louvered Doors”.
How can I get the sketchup file referenced in
the article, Louvered-Jig-Published-2a.skp?
Clicking the article link results in
File Not Found.
Keep up the good work!
Bob
I had the same issue. Try right-clicking and selecting ‘save link as’ or some such (at least in Windows). That worked for me.
Sorry. Right-clicking only saves the html from the link (but it does save it as an .skp file). Maybe they can fix this?
Bob, Joe,
Thank you for bringing this to our attention and I apologize for the inconvenience. The link has been updated and the SKP file is now available for download.
Please let us know if you have any questions!
Thanks,
Tristan
—
Tristan M. Katz
Managing Editor, THISisCarpentry.com
Very nice color on finished product. I will try my hand at this. Thanks for the help.
Hi Gene ,
Thanks for the great tutorial. Just one question. You show when routering the louvers in the stile that you clamp the stile guides to the stile. Would that necessitate clamping it for each one that is routered? I would have thought that after it was clamped it would be locked in place with a screw through the base of the jig, making for a faster operation ?
regards,
Michael .
Michael,
Sorry, I am just now seeing your question.
The answer is yes. The indexing rail is clamped to the stile and the jig is also clamped to the stile after it is indexed with a pin. The stile guides need to be clamped so that the jig does not move during the routing operation. A spring clamp makes this a very quick process.
Gene
Will be using it to re do my hatch door on my sail boat
Very well presented Gene
thks
Thanks Gene. I also have done on my boat. The two sides angled slats is difficult. Before and after:
After
Jordi,
Nice job! Did you modify the jig or come up with another way to cut the slots? I would have never imagined a louvered trapezoidal door.
Gene
Gene:
I built your fixture precisely to your plan. Very accurate used digital calipers. precision table saw,and drill press, etc.
however it took eight tries to center the slot on the width of the stile and moving the stops to fiinally get slot centered.
when I reversed the rails 60 degrees as per your design, I have the same problem. Looks like the mirror mirror image will not work.
I will need to cut one stile and go through the long process to make the other. The holes in the rails are accurate. Don’t understand why it does not work. Can you tell me how ti fix this or should I make another fixture for the mirror side????
Thank You: Joe V
A trick I used to make assembly easier, not to mention repair if ever needed, was to route one style side’s slots to depth sufficient to allow the shutters to be installed after the frame is completely glued up. You just slip the shutter the deep slot, line it up to the mating slot, then shift its position to the shallow slot that has a few drops of glue. The dried glue in the shallow slot will keep the shutter in place after assembly but will allow removal of a broken shutter if needed.
Tom,
Planning for replacing a slat is a good idea, especially if the door is located in an area that gets a lot of use. Another approach would be to use 1/4″ weather stripping in each slot or maybe some of those space balls that you put around raised panels.
Thanks for the suggestion.
Gene
Broken link: Gary Nichols’ PDF on Making Fixed Louvers with the Festool Domino.
Please provide.
Thanks,
Mo
Mo, Here’s a link to that PDF: https://www.dropbox.com/s/2f7rb57jskuwu2b/domino_making_fixed_louvers.pdf?dl=0
Maurice,
I looked around on the site and could not find the article. Hopefully, Tristan will see your reply and send you a link. If she doesn’t, try contacting her directly via the “Contact Us” button.
Check out this link:
https://www.youtube.com/watch?v=1FivEuxItPw
Gene
Looking forward to making this jig and cranking out a few shutters. The SKP / Sketchup file link does not work. Possible to repost link? Thanks!
hi, great job!!
can you please upload the sketch file or mail it to me?
thanks!!
Hi Gene.
Great article!
After getting a $7000 (CAD) quote for 4 sets of bedroom louvered closet doors I have decided to build my own. Your jig, and the instructions for it, are the best I have seen. Like some others here, I am wondering if I might get my hands on your sketch-up file as the link is no longer working.
Please… making the indexing rail, what is the error in spacing over a 48″ distance? after drilling all holes using the pin index method, what is the center distance of the first and 48th hole? Is is 47″?
Hello. I built the jig. Very ingenious. Thanks for posting it. One improvement I might suggest is in making the indexing rail. Making the rail by referencing the previous hole compounds the error in the spacing of the first two holes. This error might be very small but after many holes can be significant. What I’ve done is still used the fence on the drill press, to keep the holes centered, but lay the holes out with a tape so even after drilling 60 or 80 holes you are still within a 1/16. The jig works great. I didn’t have a spiral router bit so I made the slot in the jig base bigger to let the chips out.