


I was fortunate that the first great carpenter I worked for was a master stair builder. He didn’t build stairs all the time, but when he did, he built them the old fashioned way with a lot of the old details.
We would rout the housed skirtboards, make all the wedges, tongue and groove the treads to the risers, install mitered returns for the stair tread nosings (mitered both ends, no CNC curved profiles or sanded ends), and even install little cove return pieces under each tread where the cove molding returns into the stringer on the open skirtboard.
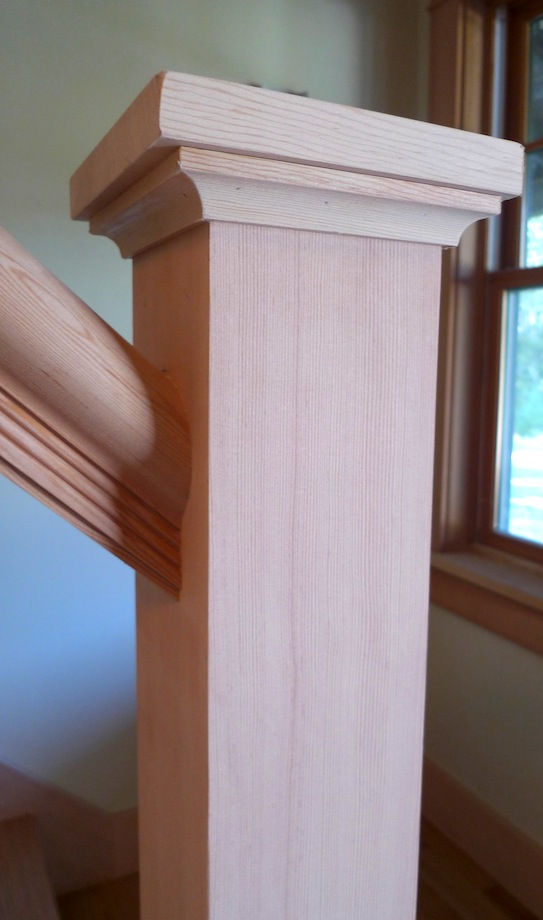
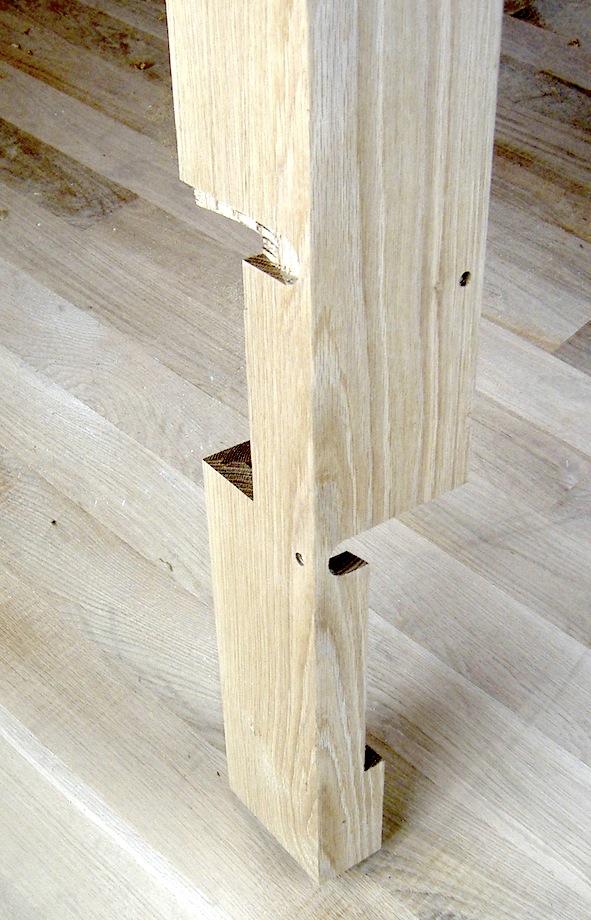 I learned a lot from working with him. One specific detail I learned was how to fit and install a housed newel post. Just like a housed skirtboard is routed to accept the treads and risers, the housed newel is cut to fit around the treads and risers—you cut the profile of the tread nosings, risers, and skirts into the side of the newel post. The end result, when properly fit, is a post that is truly locked into the staircase. A few fasteners are still required, but not as many or as large as what you would otherwise need.
There are a couple things to note about this installation: First, it does work best with larger newels. The one in this stair measures 4″ square. It also works best with solid wood: I don’t think I would attempt it with any composite or MDF newel. But I make my own box newels, and they are always lock mitered out of solid 5/4 stock.
Layout the balusters
Let me say a few words about layout. Most carpentry projects, if not all carpentry projects, come down to good planning, good layout, and patience. It’s not always easy to do, and sometimes you don’t feel like you have the time to take an additional step—you just want to “get something done.” Sometimes you don’t have enough information from the architect or homeowner either. But when you’re building stairs, you cannot skip steps, especially this one. Let me say that again: you cannot skip this step. The patience and focus I’ve learned from disciplining myself to take the time to lay everything out carefully, especially when building stairs, has been invaluable in all the other work I do.
Careful layout always begins with the balusters. Once that’s established, and you have determined the spacing between balusters, you can layout the newel so that the distance between the newel and first baluster is equal to the baluster spacing—or as close as possible.
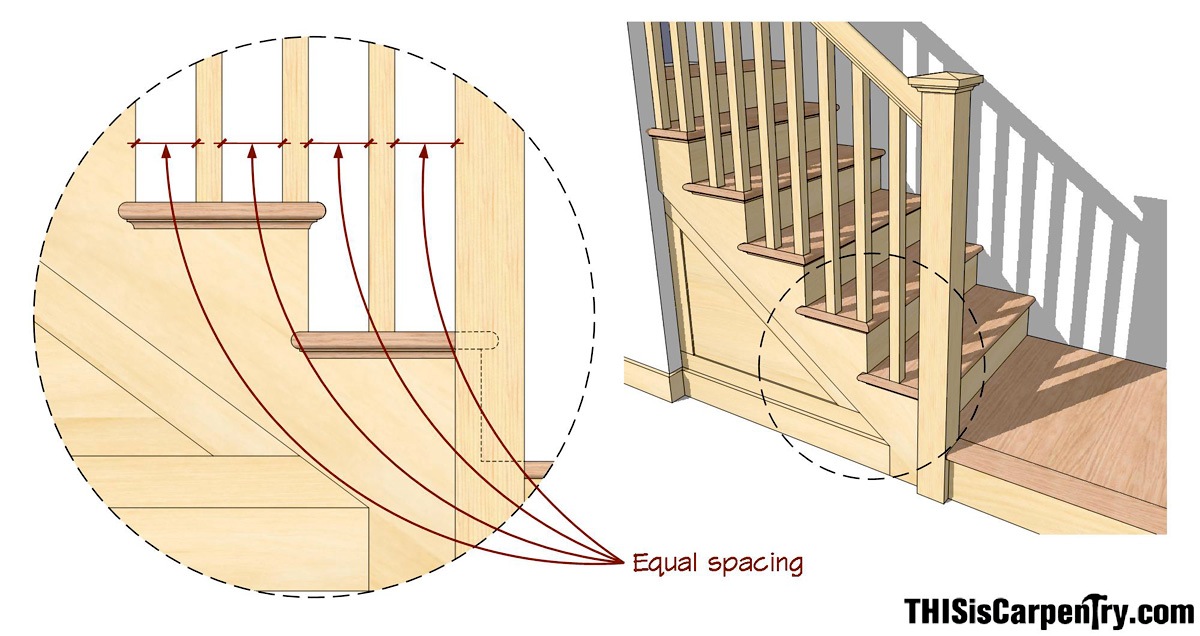
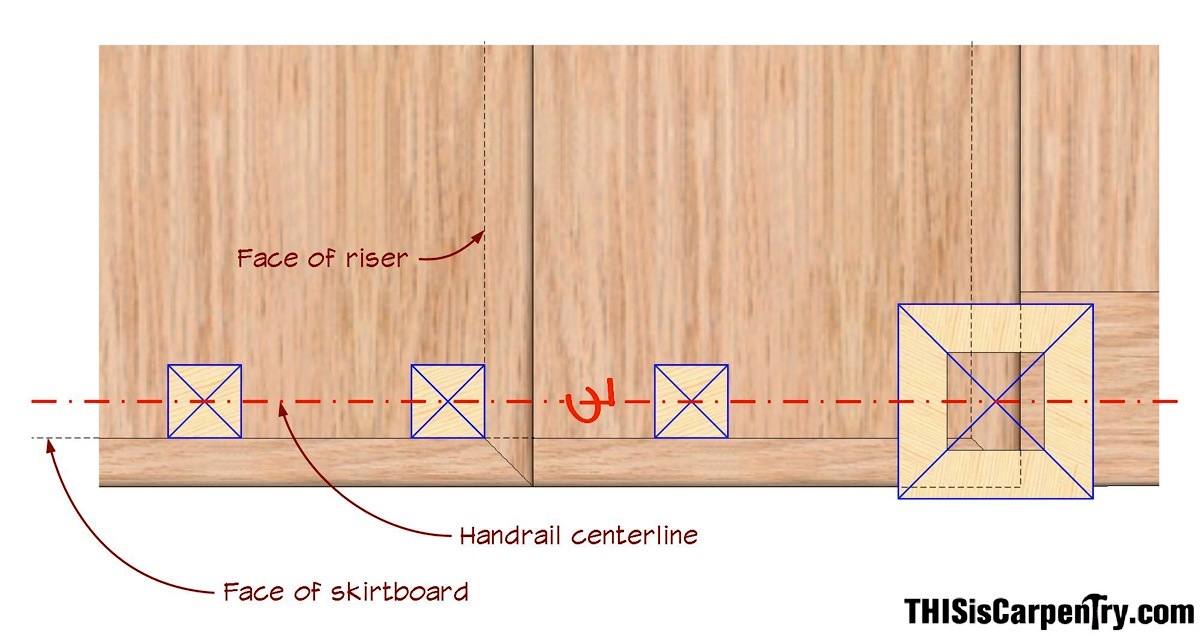
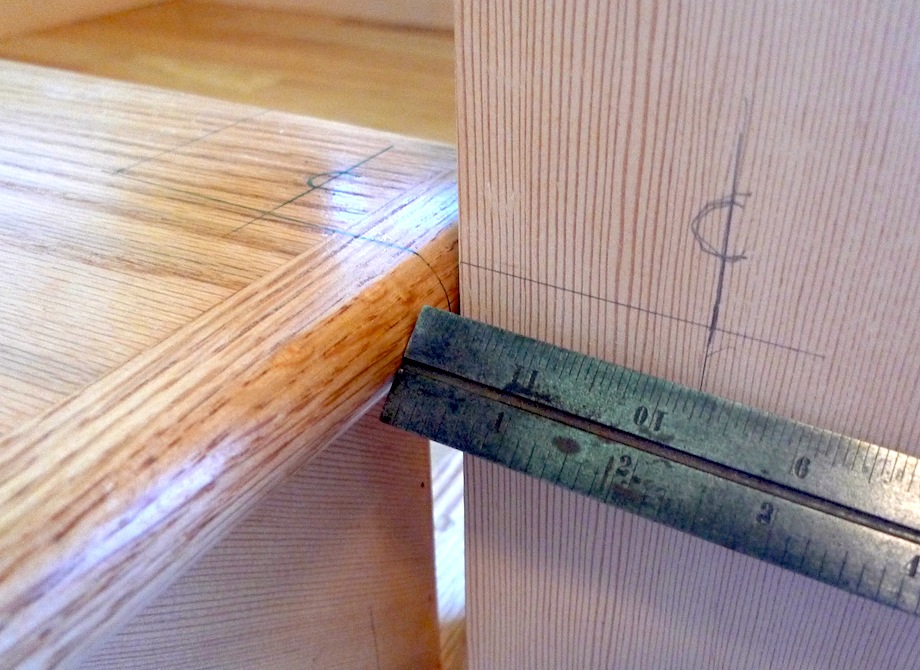
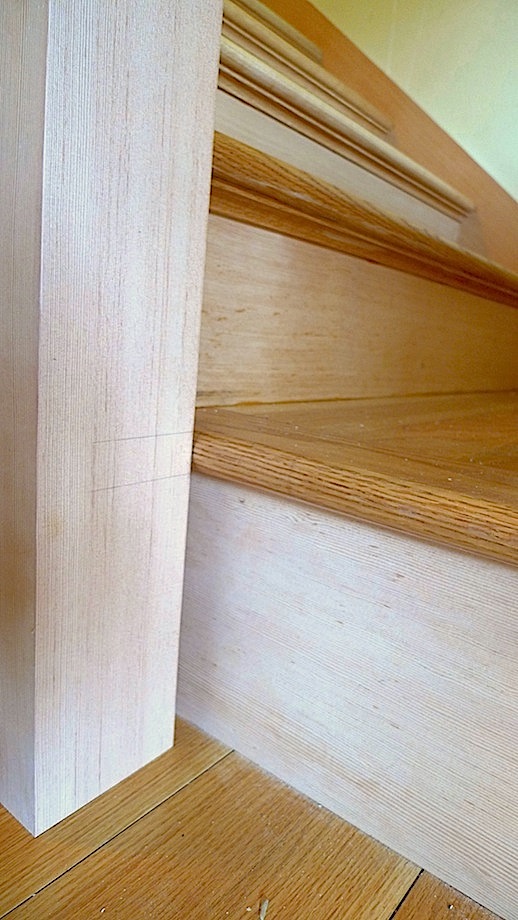
The next step is to find the centerline of the balusters. I usually line up the edge of the baluster with the glue line between the tread and the nosing return.

This will also line up the edge of the balusters with the outside edge of the skirtboard. This centerline will also be the centerline of the handrail and newel post.
A tight fit to the floor
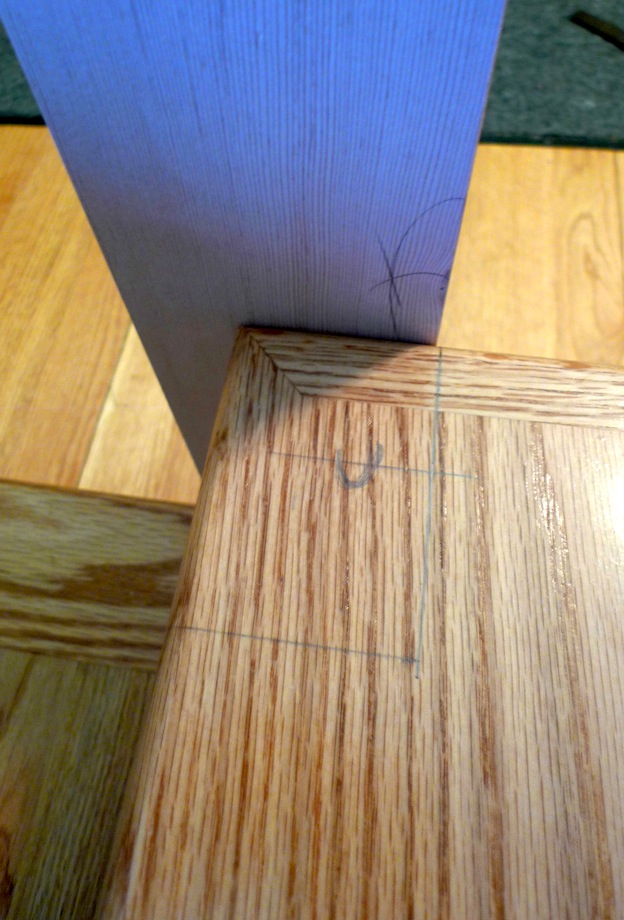
With that information penciled on the treads, I draw the footprint of the newel post directly onto the main starting tread. Next, I align the newel post with that layout.
 |
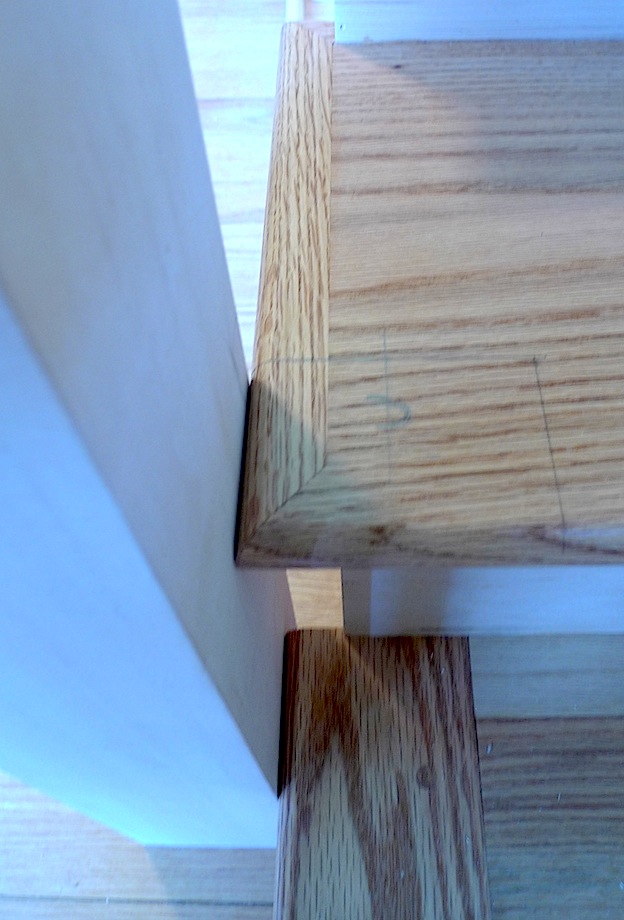 |
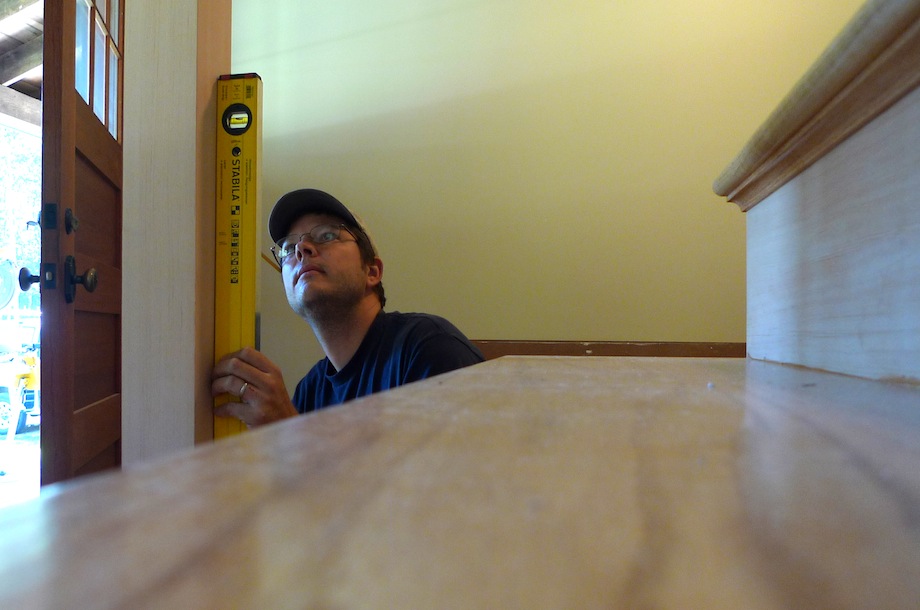
Then I plumb the post.
Once plumb, I mark where the newel intersects any other treads or nosings.
 |
I use a combination square or straightedge to transfer and mark those lines. |
At this point, there are two critical parts: One is that the post must be square to the line of the skirtboard/handrail; two is that the bottom of the newel must be fit tightly to the floor—any slope to the floor directly under the newel must be accounted for. For example, if the newel is sitting on a crooked floorboard, and you scribe the newel and then slide it into its final position, you might end up with a gap between your newel and flooring.
| Once everything is laid out and marked on the stairs, and any issues with the fit to the floor are figured out… | 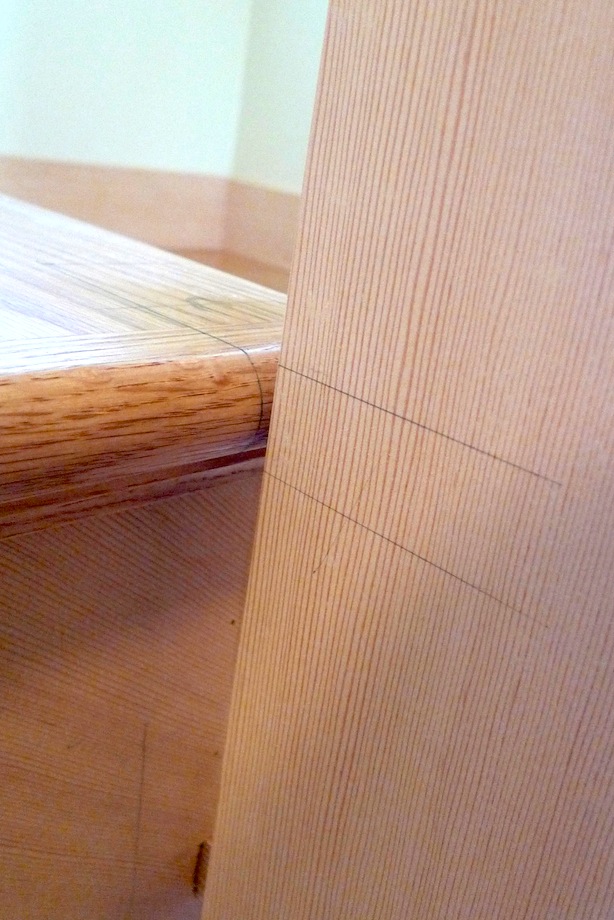 |
 |
…I transfer the top and bottom lines of all of the nosings to the newel. |
This is the time to adjust for the floor. If the floor rises as the newel slides into position, adjust these lines down; if the floor falls, adjust the lines up. Always double check that the post is still plumb and square.
Cutting the newel
With the centerline marked on the newel…
| …I measure and locate the outer edge of each nosing. | 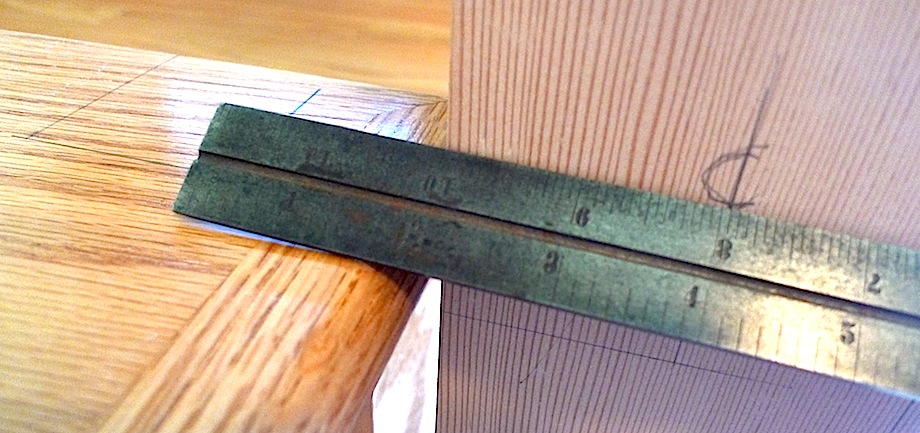 |
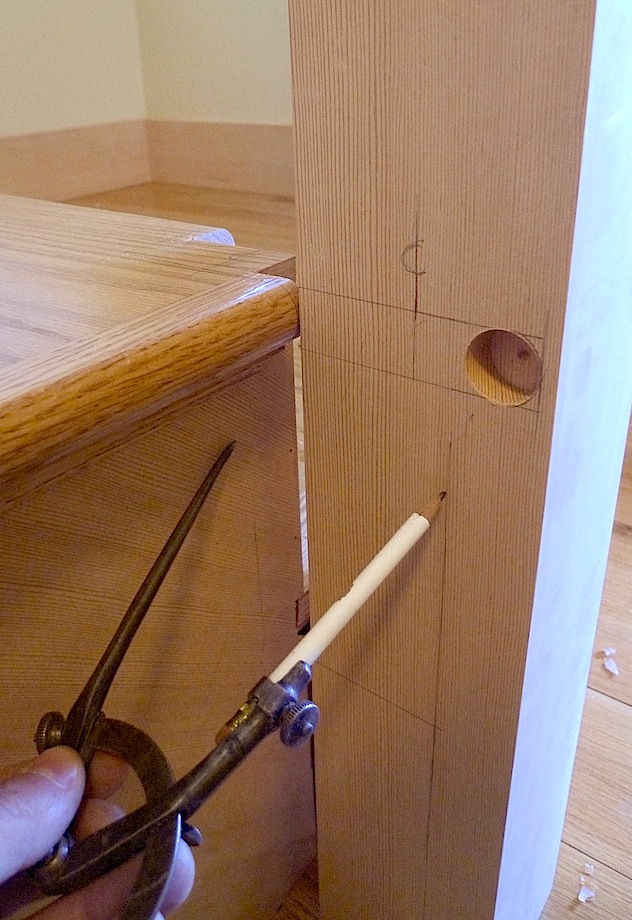 |
Then I measure and mark the skirtboards using my scribes. |
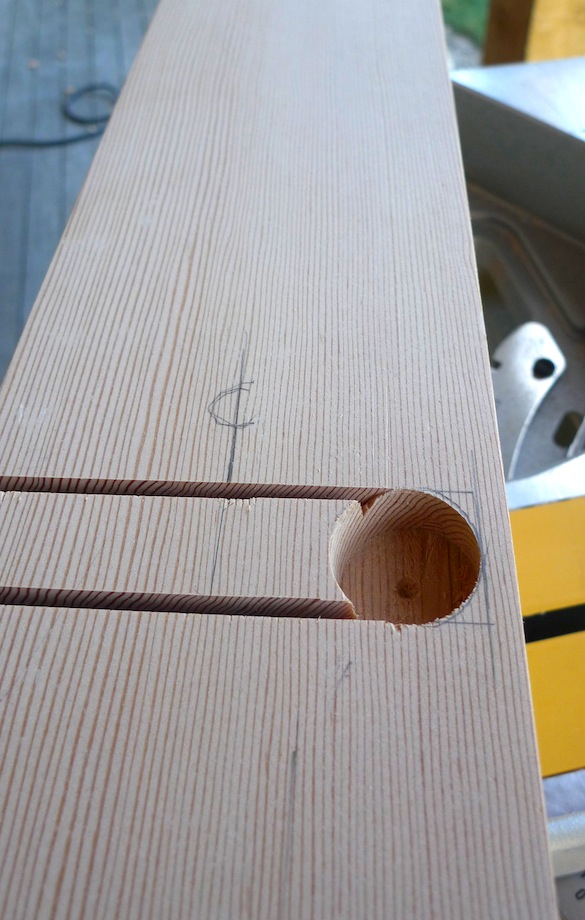
| Using a piece of the nosing, I trace the full profile on the newel to be sure that the Forstner bit is accurate, and to position the drill bit precisely. Some treads are milled with a slight thumbnail profile, which isn’t a problem, but I would rather fine-tune the cut on the bench at this time by following the exact pattern I traced with the piece of nosing. | 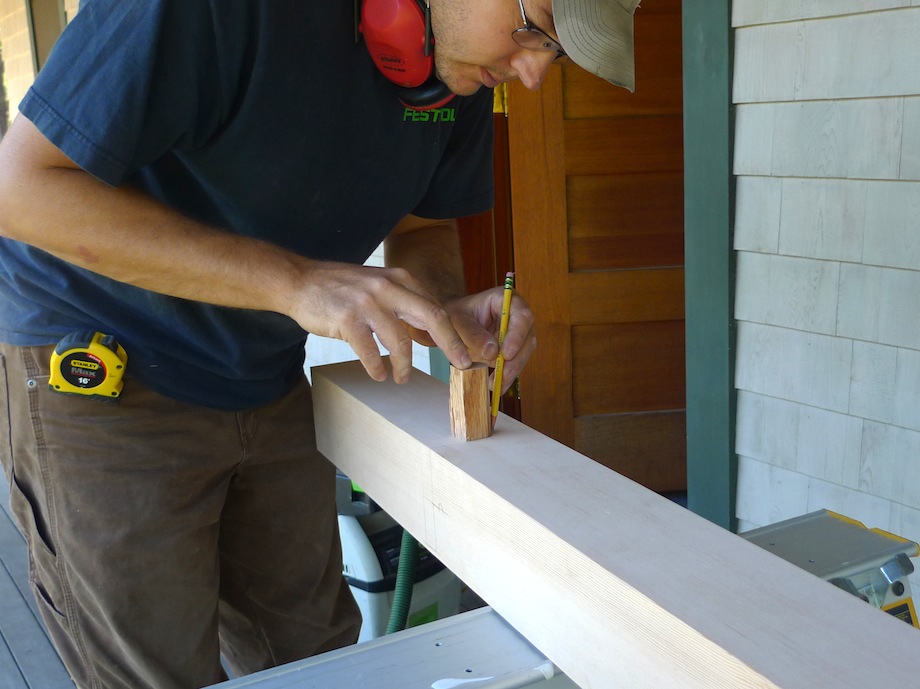 |
I drill a 1/2″-deep hole where the nosing will eventually sit, using a 1 1/16″-diameter Forstner bit that matches the nosing profile and tread thickness. I never drill all the way through—depending on the location, a through-hole could weaken the newel post unnecessarily.
With the nosing profiles drilled out and everything marked, I start slicing and dicing.
| I make the cuts for the tread quickly with a miter saw… | 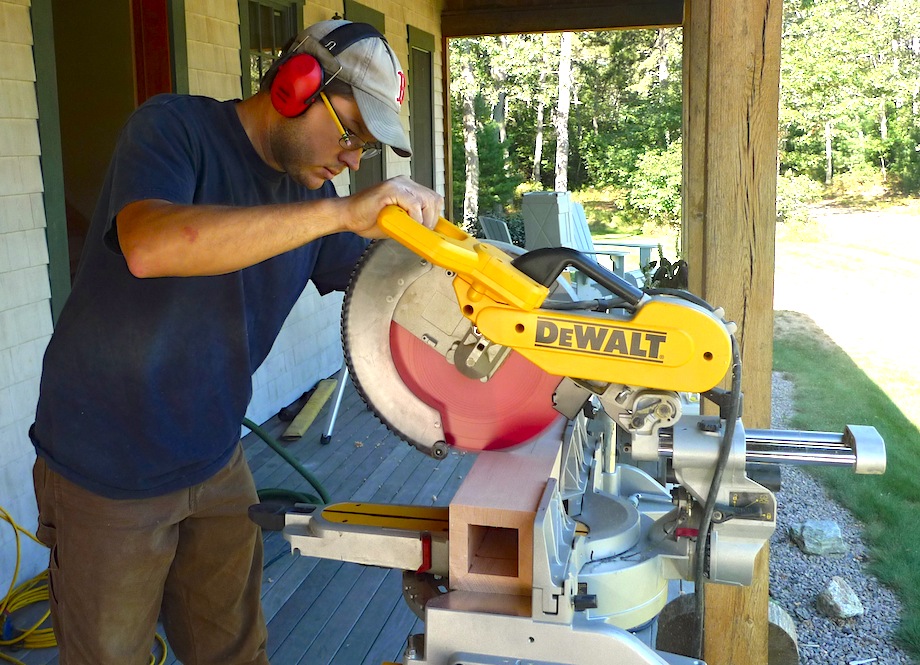 |
 |
…and I finish with a jigsaw or handsaw. |
I use a circular saw, tracksaw, or jigsaw to cut the skirtboard lines. I like to bevel the cuts a couple of degrees so that the leading edge hits. If I need to take a little more off, I can use a block plane to fine tune the fit instead of going back outside to the saw.
| In this photograph, I’m using a jigsaw because the circular saw seemed a bit precarious and there was no place to lay the track for the tracksaw. | 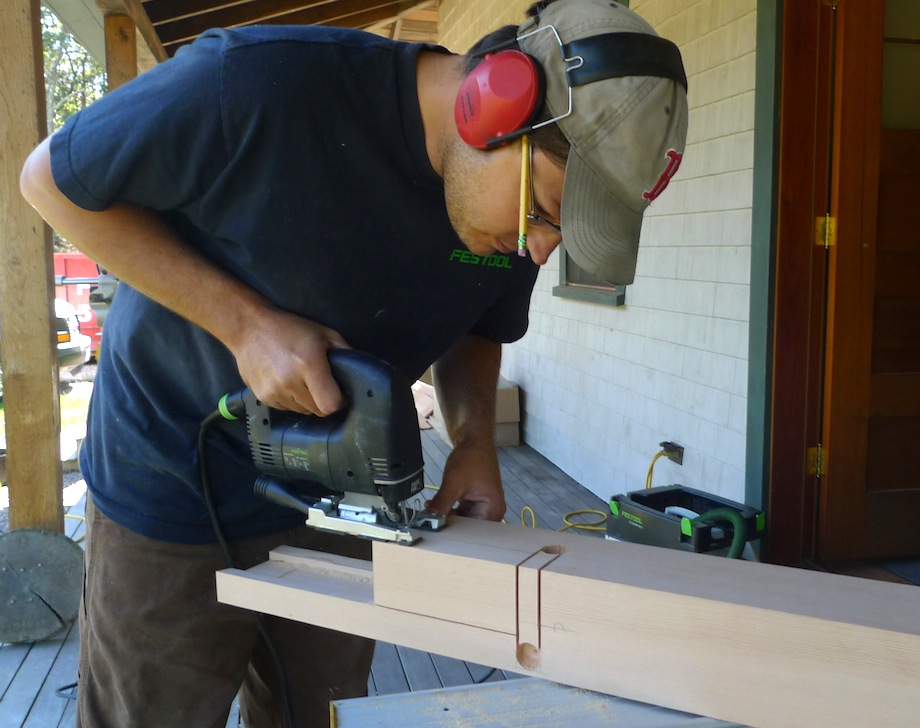 |
Before sliding the post into position, I trim off the stair nosings that will be hidden under the newel post.
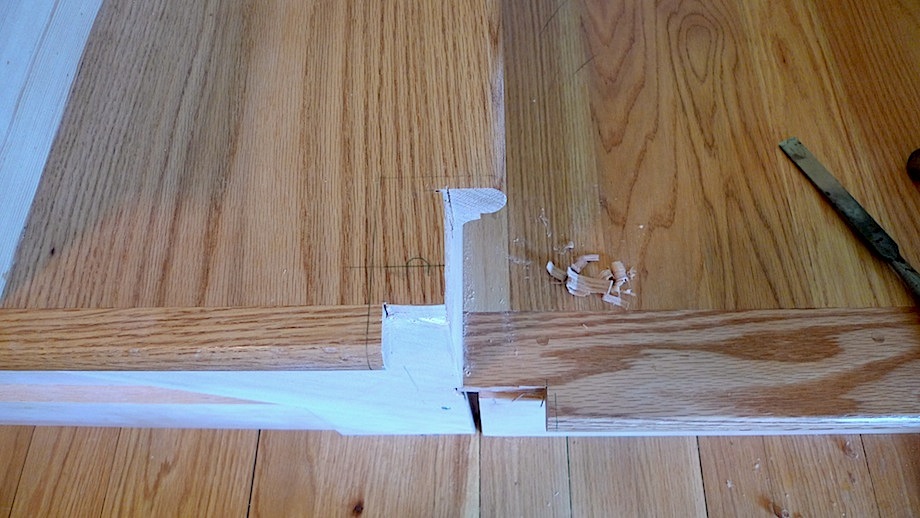
Don’t cut to the original newel post lines or there won’t be any tread nosing left to catch the post. I make a second mark 3/8″ over, and cut that line. Remember: the hole I drilled into the post is only 1/2″ deep. The 1/8″ difference between what I left on the tread and the depth of the hole will allow enough room for error without sacrificing the strength of the attachment.
The stair nosings
One other thing to consider is the cove moldings under the tread. I usually leave them off and install them after the newel post is installed, because it’s easier and faster. Who knows why, but I forgot to do that this time! With the post in position, I can mark the coves and chop them out with a sharp chisel.
| Sliding the post into position is the moment of truth! I know it’s a good fit when a couple whacks with a rubber mallet are all that’s needed to help the newel find its home sitting plumb and solid. | 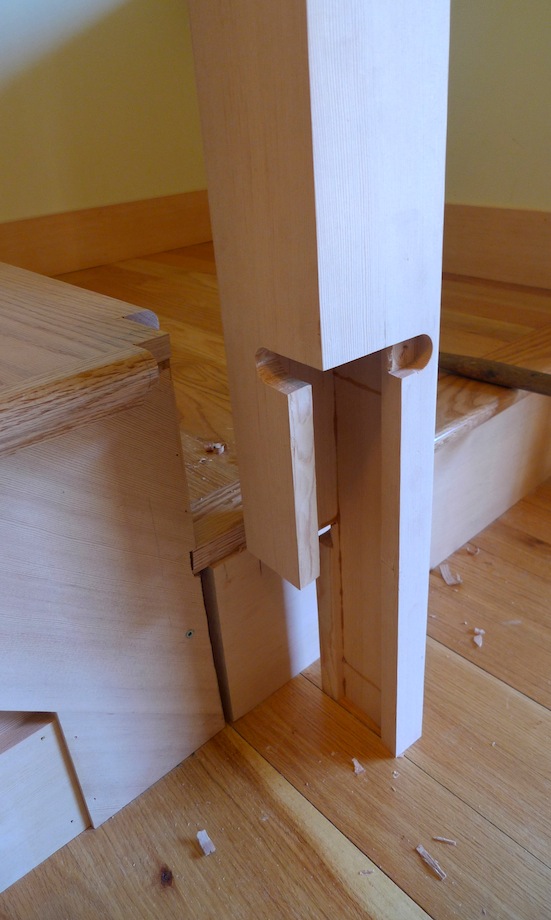 |
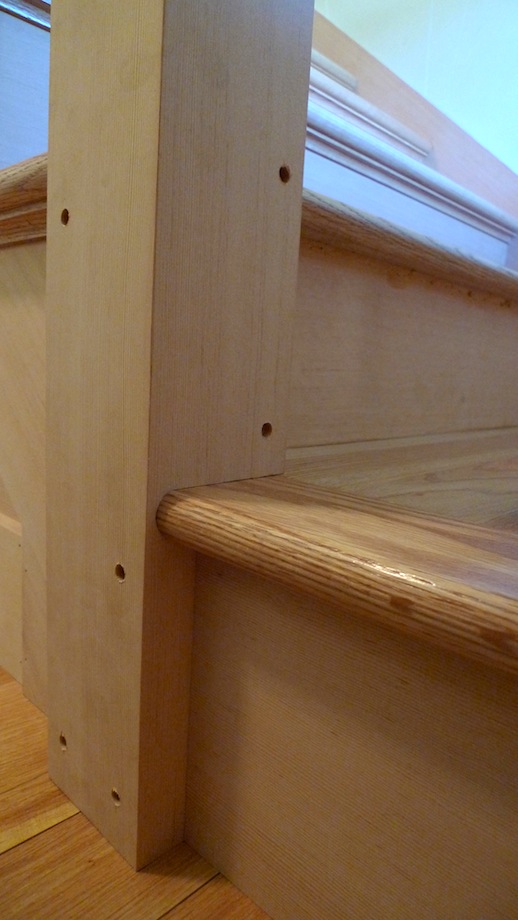 |
A few strategically placed screws are usually enough to pull everything together solidly. Be sure to continuously check the post with the level as the screws are driven so it doesn’t get pulled out of plumb. |
Finishing up
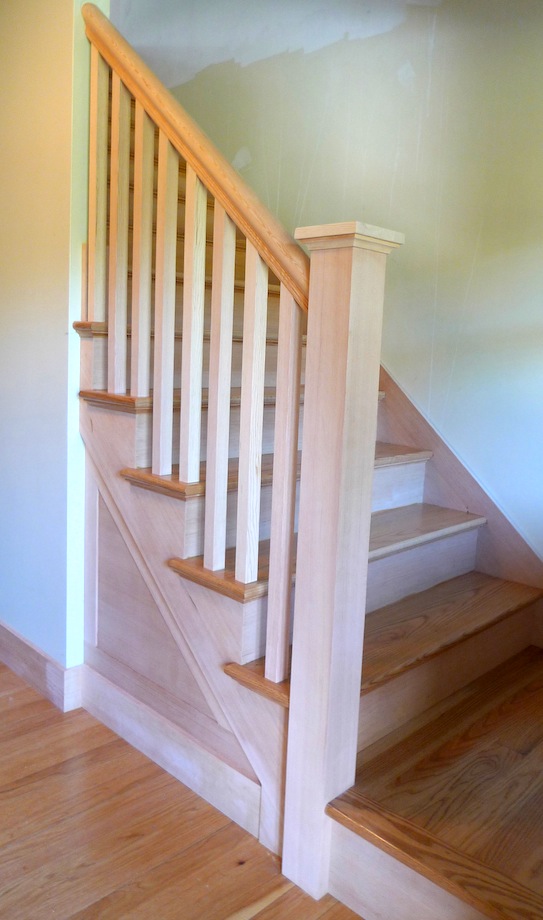
The final step is installing the balusters, handrail, and newel cap. There are three parts to this step: the handrail, the subrail (or fillet), which fits into a shallow dado milled into the bottom of the handrail, and the balusters. First I attach the subrail to the handrail with a few small brads. This way I can cut them at the same time, to ensure an exact fit. Then, using a digital level placed along the plane of the stair nosings, I get an exact reading on the pitch of the stairs. This number is also the angle of the cut at the newel post, because the newel is always installed plumb and square. This number is close to, but not necessarily the exact angle of, the cut at the plaster, which is most likely lumpy, out of square, and out of plumb. Now it is just a matter of a few trips back and forth between the stair and miter saw to adjust the cut at the plaster until everything fits nicely.
With the rail fit to the wall and supported at the finished elevation, it is easy to mark and cut all of the balusters to length. Remember the angle from the digital level that provided the angle to cut the handrail? Well that’s the same cut for the tops of the balusters.
After all of the balusters are cut to length, I place them in position one at a time and mark their locations on the subrail.

| Next, I remove the rail and install the balusters using dowel screws. If this were a paint-grade stair, I would just brad nail the balusters into the handrail and putty the holes. In this stain-grade stair, I want to hide as many fasteners as possible, which is why I made a separate subrail under the handrail. | 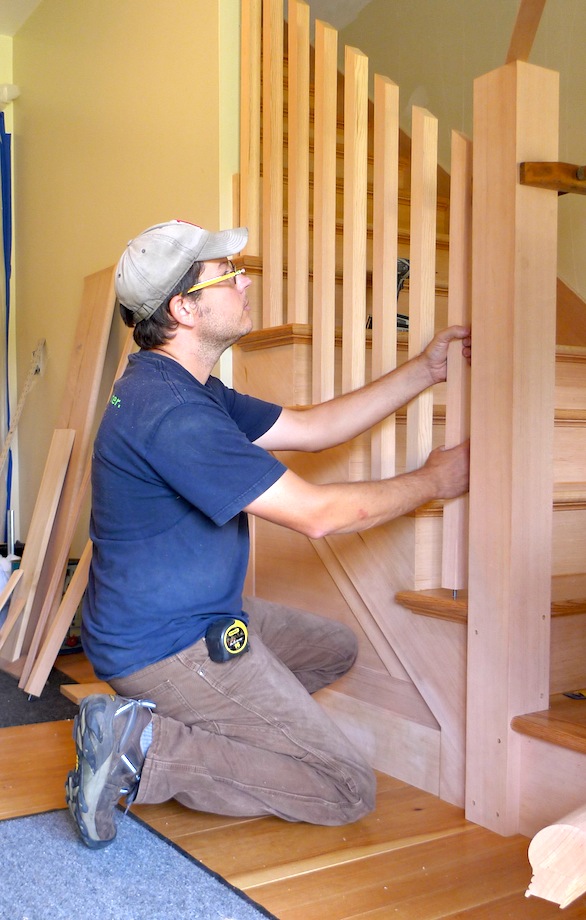 |
The subrail, removed from the handrail, is fastened through the top into the balusters with 1 1/4″-screws.
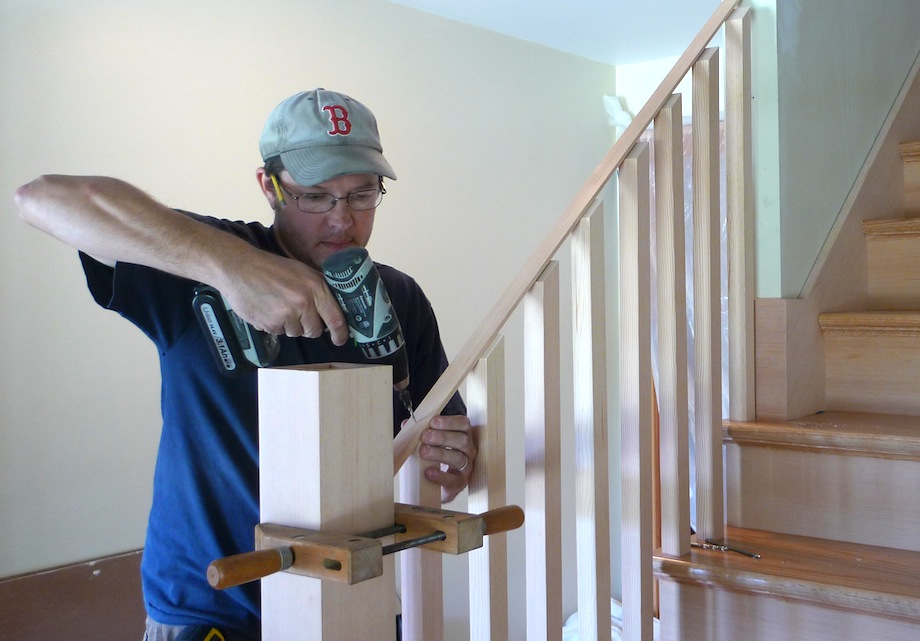 |
I then install the handrail over the subrail and fasten it to the newel and wall with screws, and I bung the holes with grain-matched plugs taken from the handrail cutoffs. The subrail is now locked into the dado cut in the bottom of the handrail, and it only needs a few brad nails to hold it securely in place. |
I then install the new cap and clean up. Done!
 |
 |
Not counting set up and breakdown of tools, this post installation took about two hours, including the time I spent photographing (I wish I had a helper that day!). Of course, the balusters, rail, cap, and clean up were an additional five hours of installation work. Although more challenging, in my experience it takes about the same amount of time for me to fit a post this way as it does to chop the nosings off completely. And like coping base and crown, this scribed joint provides a little more forgiveness. I also like this method because it gives me an opportunity to really practice the craft.
Really clean! nice work
Very nice workmanship. From an engineering standpoint, isn’t a chain as strong as its weakest link? I would have thought fitting the tread and riser to the newel would optimize the structure. Shouldn’t the newel be able to withstand a load much as a deck post must withstand someone crashing into it? I use steel connectors attached to the joist to meet the load requirements for a deck. The newel post shown is cut in a number of places and wouldn’t withstand much of a side load from what I see.How does this satisfy those loading requirements? Again…excellent workmanship.
Gary,
I build my stair carriages as their own solid structure and install the balustrade as a separate part. The carriage, when properly constructed, doesn’t need any additional strength that the newel posts might provide. One big reason is that the carriage is usually installed during the rough construction stages (usually after framing is completed, ideally after board and before plaster). I can easily protect the treads and risers until the final finishing, but not the balustrade which is then installed at the finish stage.
This newel is extremely strong as installed.
-The newel has no cuts on two sides where it meets the upper tread, an L-shape that is very rigid, especially given that the newel is real wood, 1″ thick.
-The holes I drilled to accept the nosings don’t go all the way through, and this tight connection point also captures the tread from below, giving it more strength
-The handrail connection also adds a lot of strength to the balustrade by capturing it at the top. I always connect rails to newels with rail bolts which offer a much longer lasting positive connection versus nails or regular screws. The newel shown at the beginning of the article was installed at the top of a staircase and was completely locked in by the handrails attached from two directions.
Basically, this is a very solid construction. The amount of load you would need to damage this assembly is highly unlikely inside a house. It doesn’t need to be built as strong as a deck because it is all kiln dried lumber installed in the controlled environment of the house. Exterior construction is usually wet PT lumber that is constantly moving due to exposure to the weather.
-Steve
I am not sure how strong the newel is without installing it myself. Since it is not a solid post, for a safe play, i would put a support block which is attached to riser so the newel can be fastened onto it.
Anyway, it is a very good job by Steve!
Concerning the strength of the newel post;
looks like any time one creates an angle, in this case there are 45 degree angles working with the precisely cut newel post, this would increase the strength of the post along with the strategically placed screws to withstand any side load that one would possibly encounter.
I agree with Gary’s comment, detailed craftsmanship but the structural (lateral) integrity is a concern.
Nice tidy work however it’s little different than the way I was tutored to do them 30-years ago in London (mostly restoration joinery). Newel posts were always solid, went below to finished floor, were connected to the joists and the treads/risers connected to the post, nothing like the material removal you show – mainly for the reason of strength… I’d be concerned about the posts integrity.
Just an observation, that’s all..
Steve
Gentlemen,
With all the due respect to those of you who have been in the stairs business for a long time , that post is locked in place in all 4 directions and in my opinion, after observing the construction details, it can go nowhere.
Here’s a statement from the author describing one picture where the post is shown with all the cuts:
“Don’t cut to the original newel post lines or there won’t be any tread nosing left to catch the post”.
The balustrade prevents the post from moving north and south, the post rests on the landing and can not go east then the post is locked on the first tread nosing preventing it from moving west and east.
On top of that there are 6 screws reinforcing the assembly.
Just my 2 cents.
Al
Al,
Thanks for helping to explain the strength of the assembly. The “weakest” direction is perpendicular to the handrail away from the stair treads. Even from that side, the 4″x4″, 1″ thick sides of the newel would have to break and the way the nosing is captured by the newel, the tread would be ripped off of the riser if the post didn’t break.
-Steve
My concerns is the structural integrity of the post. The quality of the work is good and it is obvious that a lot of time was put in this project.
Sounds like a bunch of old guys throwing their hands up saying,( thats not how I do it, my way must be better). That newel is more than strong enough for the abuse it will take. You have to remember people are grabbing/falling into it not cars. The key to this install is that everything is working together. Try breaking a 5/4 4″wide board pretty tough ha.
Beautiful work and a terrific article. Gave me a few new ideas for a current project. Thanks!
Steven,
Thank you.
It is obvious the skill and patience demonstrated on your project.
Thank you for sharing.
If I may ask some questions.
What area of the country do you work in?
How long did it take to do this project? (hours/workers)
What dollar value does this project cost not including materials?
Thanks again,
GWK
GWK,
I work in southern RI. Here are the approximate times for the different parts of the stair:
1. Mill all parts in shop -1.5 days, 2 men – s4s skirts and risers (solid 4/4 fir); s4s tread stock (milled from 5/4×12 red oak), mill bullnose profile, cut and glue up returns, route stringers, make all wedges and glue blocks
2. Install carriage on site – 2.5 days, 2 men – remove existing staircase, install new finished stair carriage – fit skirt boards, install treads and risers with glue and wedges from below, frame below stair to accept sheetrock, install cove moldings and tie in skirtboard to existing baseboard, fabricate and install panel under skirt
3. Shop – 2 day 1 man – fabricate newel post, balusters and handrail
4. Install balustrade – 1 day one man – all the work in the above article
I don’t recall the exact cost for the project but I think it was about $6500 – $7000 for labor and materials.
Steve,
Awesome job! This works for me, I don’t think any carpenter that I know could break this newel, at it’s weakest point without a three pound hammer, and placed horizontally across two saw horses.
You achieved an A+ grade, for the project!
Thanks for taking the time to report the work.
Pittsburgh, Fritz
Thanks Fritz! -Steve
Thanks for all of the replies. A bit more about the strength of the newel post in this type of installation. First off, I over build and over engineer everything I build and would never leave a project knowing or thinking that it might not survive for the long haul. I know this newel installation works because I return to projects to check on how well they are holding up (thank you to Paul Eldrenkamp for that). Believe me, this newel is rock solid. I would think that the stair carriage would be destroyed before the newel broke at the cuts I made. The only way to prevent that would be to install the newel post solid all the way down into the floor framing which I think is overkill in this case. Also keep in mind that this is a residential installation in a confined space, there is only about 38″ from the post to a wall in every direction.
There is never a one size fits all approach to any carpentry installation and the way I attached this newel might not work in every situation. Depending on the location, size, material, etc. I might change my methods. My intent for this article is to share a different approach to installing a newel post. These concepts and methods could also be used in whole or in part in other areas of our work.
-Steve
The workmanship is impeccable, but I question why you notch out for the nosing instead of just making a straight cut and sliding in the newel post. It just seems to me that with all that notching you are weakening the post. Just an observation form an old handrail installer. Why do you use screws instead of lags to hold the post?
I always feel more comfortable with lags holding the newel especially with kids grabbing the post and swinging around. We always use trim screws to hold the balusters in a notched (plowed) rail knowing the fillet will hide the head of the screw. Great article!
Vance,
I don’t use lag screws because I don’t like the giant bungs necessary to cover the screws, especially in this case with a clear tight grain douglas fir newel post. I use #12 hardened wood screws. I always make the hole in the post slightly larger than the threading to avoid bridging. Because I built the stair carriage, I was able to add additional framing behind the riser and skirt so that the screws holding the newel are going through those into something more solid.
-Steve
Vance,
Forgot to mention the fillet. I screw through the top of fillet into the balusters. I prefer that method to avoid visible fasteners. Also, I really don’t like cutting and fitting all of those individual fillet pieces. It wouldn’t be that big of a deal in this case, just a habit from when I’ve done larger installs where I would end up with a ton of small fillet pieces to cut, fit and install. More pieces is always more labor/time.
-Steve
Because this newel installation is executed here obviously fits like a glove on sound stair carriage construction and is well braced in both axis with extensive mating wood surfaces (w/ the addition of well placed screws (mini helical wedges), I believe it allows for an efficient transfer of lateral loading conditions (and resolution) to the substructure. I see this installation as “rock solid” and very efficient construction. The housed nosing profile, in particular, is also a very clever way to assure a visually tight fit—while maintaining maximum structure. In my opinion, that detail alone was well worth the read.
I know “fit like a glove” and “rock solid” are layman terms and not very scientific– not easily verifiable. With that room for discrepancy in mind, it’s no wonder it’s come up for debate. It would be interesting to test this installation in a laboratory condition much like Frank Woeste, one of my mentors at Virginia Tech, tested the Simpson StrongTie™ HD2A connector (http://www.structuremag.org/article.aspx?articleid=303) in the lab. I believe the results would be eye opening– and put to rest some of the earlier stated concerns.
Also, as we conjecture to quantify the structural capacity of this project, it may be important to keep in mind the code requirements for an exterior deck railing (200 Lb. load at any point and in any direction). Does this apply to interior rail systems as well? I believe this minimum threshold does apply. While this may generate thousands of foot pounds of torque at the base of a post (like when children grab and swing themselves from the top of a newel post when chasing sibling down stairs) I don’t believe it is particularly hard to surpass in the field with box newels; particularly when installed by qualified carpenters like Stephen Demetrick.
It’s also interesting that we don’t develop more rigorous standards for a variety of interior rail and post anchoring systems much like is written into codes for deck construction. Maybe because the construction and aesthetics of interior stair rail systems vary so much??? Who knows. Anyhow, some of the “pre-fab” interior rail assemblies on production homes that I have seen (and get inspected) are wobbly as hell…and I should think never meet the current deck rail code requirement for lateral bracing. It’s not the pre-fab part that is the problem…it is integrating (professionally fitting) it into the separate stair structure where it usually falls short. Unfortunately most get approved every day.
As for this job–nice work Stephen!
Cheers!
Sonny
Well put!
Well put Bob!
Steve, very nice work as always.
My take on the post Is that it’s plenty strong enough for it’s intended purpose.
I’ll add some food for thought on the notching here. I’m assuming you glued the post to the skirt, riser and treads. Probably a quality construction adhesive? If so, The stair replaces
Continued from above:
The stair material replaces the material removed from the newel and the post gets more than it’s original strength back.
Sorry for two posts but my iPhone only allows so many characters. Probaly user error.
Bob
Bob,
There is no glue in any of the balustrade. Never used it there and never saw a reason to do so. Don’t know why, have always just done it that way. When I screw the parts together I always predrill for the screws with a hole slightly larger than the threading on the screws (#12’s in this case) so there is no bridging and the parts go together very solidly. There is also additional framing I installed behind the risers and treads when I assembled the carriage. The screws in this newel go through the risers and skirts into the framing. Don’t know where this thing could go under normal wear and tear!
-Steve
Great job Steve!! Amazing planning, craftsmanship and report!
Credit is due here! Positive replies only!!
ps- I think Steve and this website are both creditable to ensure his work is sound….isn’t that why we are here?
-Mike
Steve,
Thank you for taking the time to photograph and document your exceptional work.
As for the strength: I see a great deal of leverage created by the opposing and interlocking surfaces. Nobody believed Royce Gracie would have won the first UFC. At just 180lbs he defeated veteran martial artists twice his size using a mastery of physics and leverage. Your carpentry reminds me of Brazilian Jiu Jitsu!
Great article and excellent work as always Steve !
It’s good to see classic stair details on the open portion. Too many stairs are built with the skirt board on the face of the closed wall and the treads projecting past the balusters by 3″-4″. Just does not look right !
Bruce
Thanks Bruce. My eyes are always drawn to poorly executed stair details that just don’t look right. For the opposite reason, I also notice the ones that are done properly. When all the details are nicely done they work together to make the entire piece look that much better.
I thought you would have commented on the panel detail under the stairs as well! It was faster for me to whip that up (out of scraps from the same stair) and install it than to sheetrock and tape the corner, and it looks so much better!
-Steve
Nice job! never seen a hollow post like this, here in scandinavia, food for thought…
go metric (DeMetrick…..) how cool is that?!
martin
Martin,
I like to make box newels (like the one here) when they are 4″ square or larger. It’s difficult to get solid wood in that size that is stable and I don’t like the finished look of the glue lines when they are made of smaller pieces. Does my name really mean “go metric” in your language?
-Steve
more or less, yes. I am actually about to make a newel post, I think i am going to try this out, i have a 5×5″ piece of Douglas fir and it takes forever to dry without cracking
martin
Thanks for a great article Steve. A couple of points. First, that newel is built from 5/4 stock not 4/4. That in itself makes a big difference. Second, the one side of that newel, that covers the last riser and landing, is not mortised or notched in any manner. That is a distance that’s most likely 14 1/2″ to 15″ giving the newel a large area to fasten to the steps. Third, the newel is mortised to the tread in two locations that are perpendicular. Again mortised is what I said. Mortise and tenon joinery is superior to all other types in carpentry. You add all of these factors together and you have a bullet proof connection. One that could easily withstand some one “crashing into it”.
I’ve done many box Newels over the years using a similar method. The one difference is I did not mortise the treads. I notched the nosing flush to the face of the tread and skirt and then attached blocking to the tread and skirt. I’d consider my method to be inferior to Steve’s. My Newels where very strong and could with stand exceptional lateral forces.
Thanks Kent. I’m almost exclusively installing newels on stair carriages at the time of the finish work or even at punch list time so have always notched my newel posts over the treads and risers. Before learning this technique I installed many 3 1/2″ turned oak newels by notching them around the tread/riser and notching the stair nosing to fit tight to the side of the newel. The only difference in material removal between the method described here and your way is the mortising of the nosing into the newel. When fit tightly, the mortise adds quite a bit of strength the assembly. The one in this article took a few whacks with a rubber mallet to seat itself tightly and once in place, before adding any screws, was difficult to move laterally because of the locking fit of the mortises around the nosings.
-Steve
Hi Steve,
Yes, I did notice the raised panel (nice touch btw !) and was going to mention it but was on my out and missed it in my post.
It must be nice to work on stairs built with housed stringers where the treads and risers are plumb/level and 90deg to each other. All of my stair work has been on stairs with stringers cut from wet framing lumber by the framers. We all know what those look like when they dry out ! A royal PITA to work on.
Again, a well written article with great illustrations and photos.
Bruce
Beautiful work, thanks for sharing.
Bruce B, don’t build on bad stringers cut by framers- remove them and cut your own stingers from engineered wood and/or build like a stair shop with a mortised 5/4 stringer on the wall side, no center stringer, and a notched finish stringer on the open end (supported by a wall you build).
It is more efficient to start over than dealing with every riser and tread cut being out of plumb/level on “wet cut” stringers.
Mark is absolutely right about that. Housed stringers are one of the few tasks that combine three very difficult to assemble variables – faster, cheaper, better. I built the stair carriage in this article and removed the existing rough framed carriage before doing so. It only took an hour or so for two of us to remove. It did help that it wasn’t trimmed out yet and wasn’t plastered below.
Nice article and fine craftsmanship. I build and install site and shop built stairs in southern coastal Maine and have never thought of housing a tread nosing in a newel post.
I dread cutting tread nosing & scotia to fit newels, especially when the rail system in installed after the stairs, nosing, and floors are sanded in finished. It seems like I spend way too much time fussing those cuts up with sharp chisels, files & sanding blocks.
I am going back to a site to install a rail system in a couple weeks where the stairs & floors have been finished. I am definitely going to try Steve’s method. The post are custom turned with a 5 1/2″ x 5 1/2″ square solid base made from Tigerwood, I will be creeping up on the cuts for sure!
Sometimes when I build a site built stair I will spend a half day or so laying out the baluster line & spacing as well as the newel placement & heights. If I have the newels when I start the job I will:
1) install the newels to the framing
2) butt my skirts & risers to the newels
3) tightly notch my tread around the newel and cut the edge flush with the skirt.
4) apply my tread returns & scotia
If anyone has any input on this I’d like to hear it, it is great that there are so many people out there who enjoy sharing ideas on stair construction. Most finish carpenters who I work along side with think I am nuts because I am into stairs.
-Tom Ventura
Ventura Staircase & Woodturning
Hey Stephen!
I just started doing handrails on our jobs, and had to do a similar type of post on 3 sets of stairs. Having read this article really helped with my approach, and they turned out great.
Thanks! Awesome article and great photos!
Hello Stephen,
Thank you for the insightful article–beautifully done.
Question: I have the same task to perform; however, my 6.5″ square newel is SOLID wood throughout (i.e. it’s not boxed). Do you have any suggestions for how to cut and remove the “squared cornered waste” required from a solid member? Thanks so much in advance.
John,
Sorry for the late reply, I just came across your question. I’ve housed solid newels as well without issues and the techniques are all the same. I find it easiest to make my first cuts right to the lines with a skill saw/miter saw. Next I’ll remove the majority of the waste by making another cut with the skill saw. The next tool out of the box is my fein multimaster with a wood blade. Using the multimaster I can plunge cut through all of the areas that the circular saw couldn’t finish cutting through.
-Steve
It’s been a couple of years since the last comments but I’m leaving one to thank the author for his work and nice presentation with explanation. What led me to this post was the simple contemporary square newels, which is where I am leaning on my current stair project. I’m building my own as you did, either 5/4 or 6/4 red oak. I may not use this exact method of fitting the newels but seeing this and reading the comments helps me get more clear so thanks!
Can you tell me the best way to install the newell posts on the 2ndfloor balcony/catwalk? The guard rail needs to be strong to hold heavy wrought iron panels. The posts are solid turned oak. The sub-floor is made by engineered I-beam joist (wood and OSB)
Surface mount will not work.
Can you tell me the best way to install the newell posts on the 2ndfloor balcony/catwalk? The guard rail needs to be strong to hold heavy wrought iron panels. The posts are solid turned oak. The sub-floor is made by engineered I-beam joist (wood and OSB)
Surface mount will not work