


One of the most important aspects of window installation is weatherproofing. I’ve seen too many jobs with window flashing installed improperly, allowing moisture to penetrate the jamb, leading to air and water leaks, rot, mold—the whole mess.
From the critical components of housewrap integration, to flashing, sealants, and flanges, this detailed video will help you perfect your window installation process.
•••
AUTHOR BIO
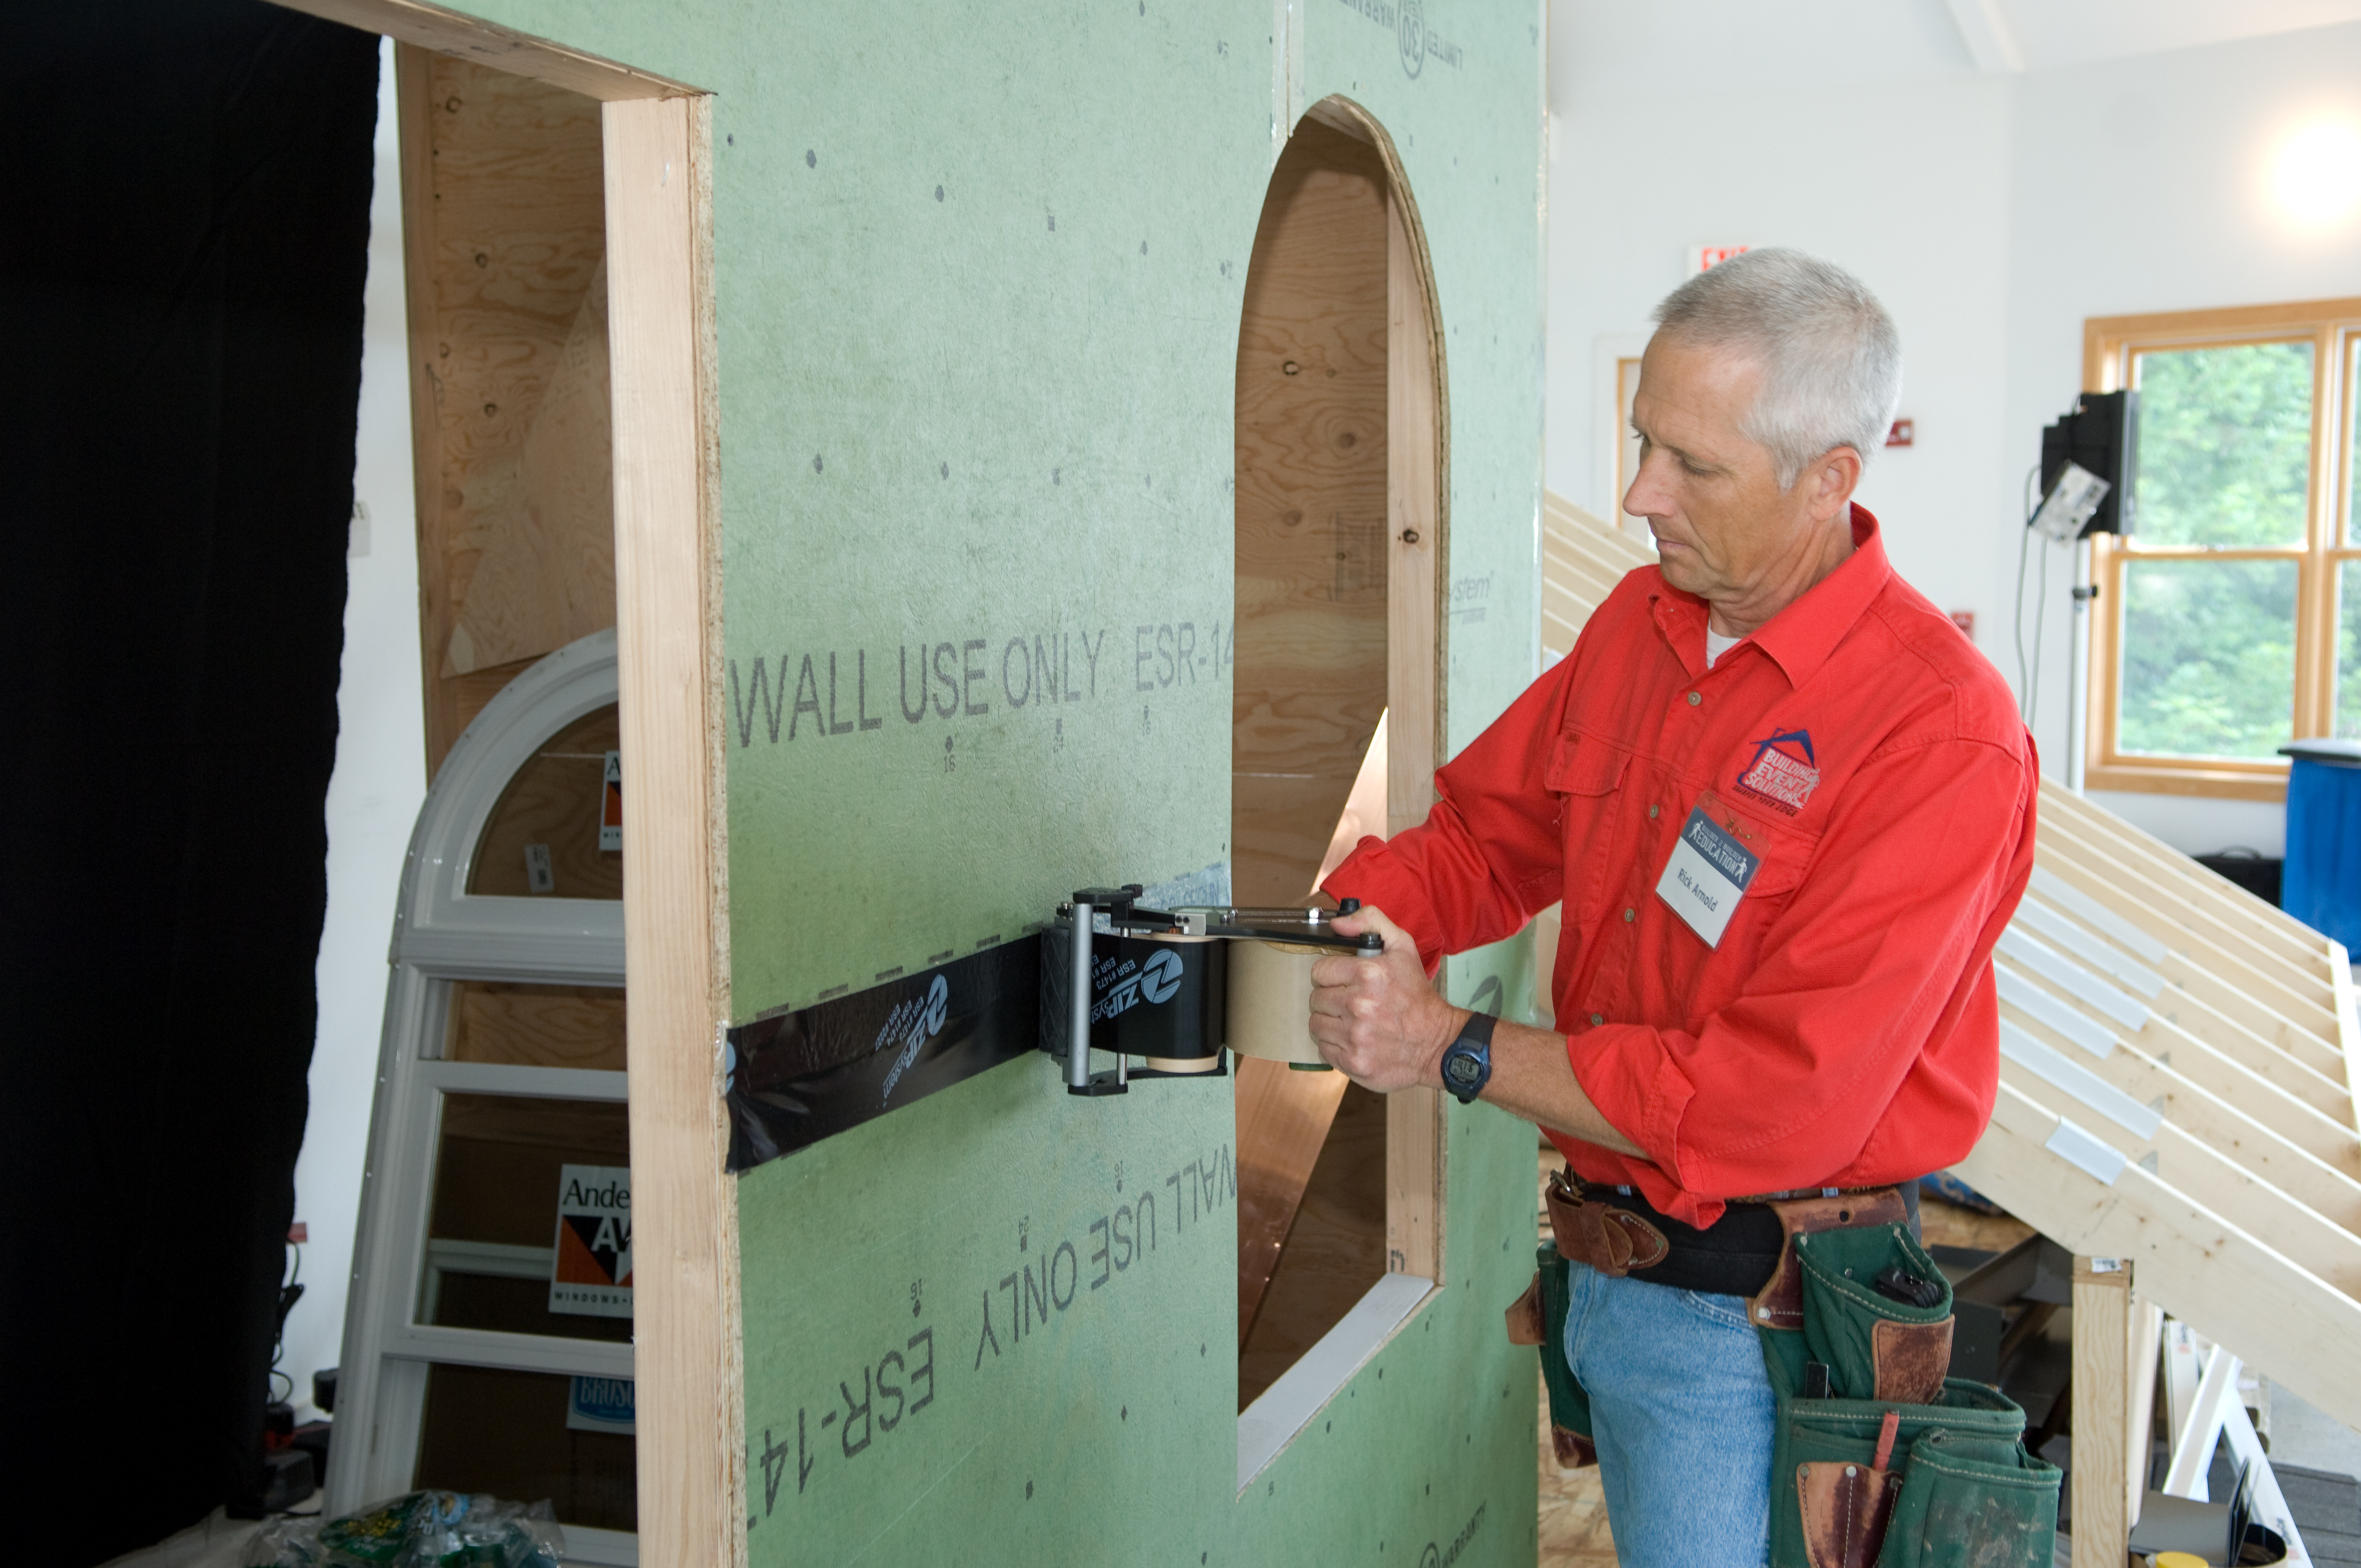 Rick Arnold has over thirty years of experience in hands-on, residential and light commercial contracting in New England. His experience includes remodeling, framing, Energy Star construction, and concrete work. Rick is a contributing editor for Fine Homebuilding. He has also authored numerous articles and books on home construction and remodeling.
Rick travels around the country, presenting seminars and workshops at trade shows and events such as JLC Live, the International Builders Show, Affordable Comfort, The Remodeler’s Show, and the Katz Roadshow.
Rick mentions putting a piece of clapboard on the sill to create a sloped drainage plane. My habit is to just slope the rough sill, with an angle on the top of the cripple. One degree will give you ~~1/4″/ft. Tipping the rough sill does cause it to stick out a bit, less than a 32nd overall w/ a 1 degree tilt. My preference is to put that on the outside- drywallers are pickier than siders.
Sloping the rough sill is a good way to achieve the same results, in fact many of the older houses I’ve remodeled did just that, except the angle is usually closer to 5 degrees.
My son worked his way thru college installing doors and windows and is now an engineer with a fire department and has a building-handyman business on the side. Clap board is not popular where he lives, he runs the bottom sticky membrane 3/4 long to the inside of doors and windows, folds a 3/4 inch edge under creating a dam so water won’t run inside.
I appreciate how concise and informative this video was, and I hope someday someone like Rick Arnold will address how to properly flash a new window into an old house. On my own house, built in 1961, they just stapled courses of tar paper over the sheathing. Perhaps the logic and sequence of the flashing is no different…
You’re absolutely correct Tim, the logic and sequence are the same. Start at the bottom with the sill pan and finish at the top, avoid any reverse lapping and always allow for intercepted water to be directed to the outside in as short a run as possible.
To me the same installation principles apply whether I’m installing a window or a skylight.
RA
Thank you….great video.
Whats the reason for not using flashing tape on the bottom window flange?
I should have specifically addressed this, I usually do.
I don’t put flashing over the bottom flange for the same reason that I don’t use sealant along the inside of the bottom flange, I want to provide a path to the outside for any water that finds it’s way into the rough opening.
If I tape or seal the bottom flange any intrusive water has only one way to go, and that’s to the inside.
Thanks,
RA
Thanks for your explanation. My main concern was an air barrier and the fact that I have never seen a window in my area without tape flashing on the bottom. Makes more sense to leave the bottom open.
Rick,
Excellent video and explanation. I would say in most areas it is a correct installation, but in extreme weather situations in homes facing the ocean or large bodies of water I would recommend adding a few more steps. On the bottom flange rip a piece of house wrap 6-8 inches in width by the length of the window plus a few inches. Install this piece partly over the bottom window flange. Now starting with the bottom install the self adhering membrane around the entire window as you show in your video. An easy way to get the lap correct on the window flange is to stick the edge of the membrane right on the edge of the window then stick the opposite side first. As you stick the membrane onto the house it will create the perfect amount of flashing on the window. This method creates a drainage plane, but helps stop wind driven rain coming in through the bottom of the window. Even with the sloped sill, if there is any small gaps under the window a sustained wind can create a negative pressure difference and siphon water into the house.
Next, on the interior, install a layer of low expanding foam around the window. Some Manufacturers recommend pushing foam backer rod against the inside of the window nailing flange before adding the expanding foam. It is also recommended to install the foam in two layers. One close to the outside and one on the inside. If the bottom of the window cannot be foamed carefully seal the interior side with sealant to stop any possible air leak trying to avoid pressure differences from occurring around the windows.
Although some Manufacturers recommend installing the house wrap part way onto the inside of the framing as you showed on the left side. I feel that the method you used on the right side is much more sound in protecting the framing. It will not allow water to creep around the house wrap. We have replaced many windows where the builders installed the self adhering membrane to the house wrap instead of the framing and water still managed to get behind it. As homes are getting tighter and tighter, a small air leak or flashing mistake can cause big problems quickly.
@ BobboMax:
I think that the best argument for doing it Rick’s way is to let the framers fly, and do what they do best, fast. Even when I’m framing it myself, I try to wear a framer’s hat, and think and act like a framer.
I’ve also got overlay extensions on the chopsaw table with zero clearance at the saw kerf, so that I can mark it for cripples.blocks, etc. I screw down a 1×6 with about 1/2″ overlapping the blade, chop it off, butt a 2nd one to it, and chop that one off.
A 1º blade adjustment would wipe out that zero clearance, besides slowing me down, and possibly allowing me to cut a whole wall’s-worth of studs 1º out-of-square, because I forgot to adjust the saw back to zero.
@ J.Alvis:
Watch the video again closely, (make sure the sound is on!) and you will hear Rick explaining that you want any water that DOES find its way in to have a way out.
Rick’s last step, the “skip-taping” of the top housewrap down over the drip edge, is one example of this principle. And the word “weephole” is possibly the oldest example of this principle.
Many installers overlook a step Rick pointed out – Some window manufacturers’ instructions require the flashing tape be lapped about 1/4 in. onto the jamb projection to protect the joint between the jambs and applied flanges or fold-out style flanges.
It can be hard to bond a narrow 1/4 in. strip without the rest of the flashing tape sticking to the wall. For more control I cut the release sheet 1/2 in. in from one edge and peel it off. This leaves most of the adhesive covered and offers lots of control to get an even 1/4 in. bond to the jamb projection.
I couldn’t tell from the video whether Rick was using the Typar BA or Typar RA flashing tape for the side and head flashing. Several window manufacturers prohibit the use of RA (rubberized asphalt) flashing tapes on their window flanges. As I understand it, plasticizers used in the gaskets of applied flanges and hinges of folding flanges can react with RA tapes. The reaction results in a gooey mess that can leak.
And don’t forget to run a bead of sealant on the back of the flange corners on those Andersen windows – right where the corner gasket meets the jamb.
The video clearly shows Typar BA
Rick,
Two thumbs up for the Window flashing video showing method A & B.
Sim
Now if Rick would just cover those cases when the window is not square. If the window was plumb and level, but not square (is that possible), how do you correct it with a vinyl window.
Rick’s trick of opening the window a crack (top sash, too!) and checking for parallel is the best thing to do –– who knows, the sash itself might be out of square. And the most important thing here is that the sash fit well in its frame.
Right off the bat…a good method is to cut the house wrap and have it come over the flange, but if, as mentioned, for some reason water gets behind the house wrap above the window you have problems anyway, and the likelihood is that that water will get behind the window in any event. Also, I used windows that come from the manufacturer with casings installed, so the method mentioned won’t work.
Excellent tutorial. It’s not TOO hard to be smarter than a drop of water ! [But I’ve seen folks that don’t seem to be able to…]
Great tips Rick! I really like and agree with having the flashing tape stick to all three surfaces.
I’d like to share a tip for applying the flashing tape (sides and top).
Say you are using 6″ flashing, make a few guide marks 5 1/2″ off the window. Then starting from those marks, stick the tape from the outside and work it in towards the window. The flashing tape will cover by a 1/2″ perfectly up the sides of the window to cover that joint where the flange connects to the frame.
Bingo!
That’s what my Swanson speed square is for :) well, that and about a million other things.
Hi Rick, Great video and well done. It’s nice to see a window installation done properly with all the necesary steps. Everything you mentioned will make that window live up to its name. Most people don’t follow the instructions and blame the window itself for its failure.
well done
Emanuel
If I had a penny for each time I’ve seen a window installed improperly…
This is a very good video, and I hope some people view it before they install windows or as they are watching the windows installed on their new houses. It will save a lot of time and frustration in the long run.
Nice job, very well explained. One thing i noticed. Even if your sill is level, wouldn’t you want to shim it up to have room for spray foam along the bottom as well?
It’s a good idea to shim it up, some manufacturers require it. And when I seal it with canned foam I run a bead only along the inside edge (inside of the house), leaving a void beneath most of the sill open to the outside to prevent water from getting trapped.
Hi Rick,
I’m working on an old house that has new stucco (with foam insulation behind it), a second layer of stucco (original stucco) over 1×8 sheathing, there might be some builder’s felt in there, but nothing I can rely on. I am planning on replacing an old window with a new vinyl window with a factory installed brick mould, but I wonder if this is a bad idea as I can only get self-adhesive flashing on the the rough opening framing not the window, so I would really only be depending on the sealant around the brick moulding to keep the water out. I could go with a flanged window as you demonstrate, but it is a very small opening (19 1/2″ wide) so I would lose a lot of light. Just wondering what you would recommend.
I really enjoy all of your articles and videos.
Thanks,
Brendan
I too am in the process of installing a new Vinyl window similar to Brendan’s scenario. I have an old stucco home built in the 60s.
I had all my windows replaced a few years back with vinyl windows. The guy that did it basically ripped all the old aluminum windows out, frame and all, leaving just the rough opening. I don’t think he used any flashing at all. I believe he just used sealant around the outside trim. I had one aluminum window remaining and that is the one I am working on now. I took a grinder with a masonry wheel and cut all around the window. I used my sawzall to cut the rest out. Now I am left with a rough opening. The opening is a bit too large so I plan to add to the opening about 1/4 inch on all sides. I am thinking the only option I have is to use your flashing tape, seal the bottom first overlapping about 6 inches, then overlap and run up the sides overlapping about 6 inches on top, then finish by adding a piece on the top overlapping 6 inches on the sides. Is there anything else you would recommend? I will also apply the sealant around the top and sides as you demonstrated in your video and stick it up against my stucco wall.
Brendan, Randy,
Flashing replacement windows is always a little tricky and I can honestly say that I have no experience with stucco siding but I know that Gary has so let’s see if we can get him to weigh in here.
Regardless of the siding, the strategy remains the same;
Intercept water at the top, prevent water from entering along the sides, and provide a path out at the bottom for any water that finds it’s way in.
Here are some pointers:
1. Install some sort of drip cap over the top of the window even if you have to fabricate something by using aluminum coil stock, galvanized metal, flashing tape, or a combination of material. It should be worked all the way beneath all layers of siding and build paper, and up as high as possible, and terminate to daylight on top of the window.
2. Install a sill pan like the one in the video and make sure it’s either pitched toward the outside or create a dam along the inside edge of the sill with sealant, foam or backer rod to prevent water from traveling to the inside. Ideally you want the outside section of the flashing tape to go on top of the siding (maybe hide it with a piece of trim). Don’t slip it down behind the siding without addressing a way to prevent the water from following it.
3. Since you will be relying a lot more on the sealant make sure that you get a good quality exterior window and door sealant. Don’t just grab any off-the-shelf caulking or generic type silicone that says windows and doors (I like OSI’s TeQ::SEAL sealant). And use plenty of it during the install.
4. If you’re removing the interior trim then also seal the window from the inside after it has been installed by spraying foam sealant deep into the gap between the framing and the unit so that the foam is in contact with the back side of the flange or brickmold. You must used a closed cell foam because it’s waterproof and it must also be low expanding and low pressure. I don’t bother filling the entire cavity with foam, OSI has a very long and narrow extension for their foam gun that gets the foam to the right area. Seal the side and top in this manner but not along the sill of the window, you must leave a path for the water to exit.
I hope this helps, if anyone out there has more to add please jump in.
Thanks,
Rick A.
Hello Rick,
I saw you demonstrate this last year at a local lumber yard during a Katz Road Show. Good stuff that many may think is overkill but it’s worth the time when you think about what is at stake!
Up at the beginning of the comments a poster suggested, or wished, that such a video could be done to show what might happen with an older home where you are installing a new window through a new rough opening. Makes sense that most of this applies as shown. What about a situation where you have two layers of siding on the house? Would the best practice be to take off both layers of siding to get at the sheathing layer of the house or is just getting behind that first layer of siding effective enough?
My situation is aluminum siding over the original clapboard siding. My plan is to pull off the aluminum above and down to just below the new rough opening. Then cutting through the clapboard a 3-1/2″ boarder than I will apply strips of plywood to so there is a flat surface to apply flashing to and some trim boards after. Don’t know what I will find for house wrap under that clapboard but the house was built in the late 40’s and is located in NY. From inside the gutted upstairs we have what looks like fiberboard as the house sheathing so I would assume I’ll probably find tar paper as the wrap
Any tips or hints on this type of situation and adapting the flashing methods shown?
Rick,
Great video! But what would be the proper install to replace new construction windows on a 15 year old vinyl sided house? Cut the flange and insert and caulk, cut back the siding and put another new construction window in with proper flashing and trim around, or tear the siding back and do it like it is a new construction project again? When the house was built, I know the windows were not flashed but there is house wrap on. Most window companies just want to cut the flange off, put a replacement window in and caulk. When I tell them I want a proper install with tape most don’t even know what I’m talking about. Any advice would be greatly appreciated.
Hi Rick,
The best video by far.
I want to install a wall louver (for range hood) which has a rectangle size of 8″ x 8.5″. Does it need any flashing at all?
I couldn’t find any video on it. I thought it would be roughly the same idea.
Appreciate your advice.
Rick,
Excellent detail.
I have been trying to find the proper flashing for use as the sill pan. You demonstrated in the video working the corners of the flashing on the sill w/o cuts. What flashing are you using?
Also, your other flashing tape – would you identify?
Rick,
Thanks for this great video.
When installing doors, would you use the exact same principles?
Thank you Mr. Arnold, I just finished watching your weather proofing installation of a new construction window (superb, thanks for a great video!). I am in a situation where vinyl windows replaced original aluminum windows on a house that has aluminum siding. All windows seem to have the same/similar leaking issues with water/moisture coming in around the perimeter of the window creating rot on the sill or surrounding jam. I’m pretty sure there is not house wrap on house and I have no idea how the installation was done from the aluminum to vinyl window. How do I correct this issue? I can’t find a contractor that will remove the aluminum siding (so that I can see what’s going on behind it up to the window) and put it back up. And just putting new replacement windows in doesn’t seem like that will correct the issue either. What are your suggestions? I need serious help, please. Thanks in advance.
Go to a PROFESSIONAL lumber yard and ask them to refer a PROFESSIONAL contractor.
Gary
I have been having problems lately too. Our house is only 4 years old but more than a year later they had to replace 2 sets of windows because of major water getting in (especially during heavy rain storm on that side). Now we have a new problem on the North side (and again only during heavy rain storm). We have to now pay for ‘labor’ etc and I am not happy. My mom brought up that she has pictures of our house with the black tape only on the sides and bottom and NOT on the top!! I am starting to wonder IF we had a bad install or if it still is bad windows :-( Any thoughts on this would be great!
Probably the installation but we can’t comment or judge without photos and etc.
Good luck!
Gary
Rick,
I saw the video too late. We sealed the flanges over the tyvek at the top instead of cutting the flap and then pulling it over. Is there any fix without pulling the windows out? Cut out the existing Tyvek and redo so it folds over the flange while leaving whatever is under the flange in place? Also, I sealed the bottoms as well so I don’t have the escape route you discuss in the video. Pretty upset, but I’d rather fix the problem early on before I begin siding.
thanks,
Dave
Dave,
YES. If you can still get to the housewrap, fix the problem now. Cut right through the housewrap above the top nailing fin/flange. Make angled cuts in the two corners. Lift the housewrap up and out of the way. Use peel-and-stick flashing and adhere it under the housewrap to the sheathing and to the nailing fin/flange. You might even leg it creep up onto the window jamb a little, just to help divert the water. And if you want to do a really nice job, first use a piece of rigid flashing (metal) on top of the window, then put your peel and stick on top of THAT and be sure to use the J-roller when you adhere the adhesive flashing to the sheathing! Then pull the housewrap back down over the adhesive flashing and tape the corner cuts and skip tape across the top of the window.
As for the bottom, I don’t know if it’s worth the effort to open that up. In order to fix that, you’d have to pull the windows and install a proper sill pan. Yuck. Hope it isn’t your house.
JUST KIDDING!!!
Gary
Gary,
Thank you very much. I can still get to all the Tyvek so I will do this as soon as it warms up a little. Yeah, it is my house so I’m pretty obsessed with it at the moment….I think I even started having bad dreams about water coming into windows. Do I just bend the rigid flashing at 90 degrees, put sealant behind it and shingle nail it to the sheeting and then put window tape over it if I go that route?
thanks,
Dave
hi everyone i just had a window installer install windows and the old windows were aluminium but new are vinyl and outside of home is stucco , he took aluminum windows out and just put vinyl in and just screwed the windows in place didnt put nothing around
to seal them in although stucco guy will be putting stucco with bands around outside of window but we were told not to cover windows or framing etc.. until after inspection so what does the window installer need to do cause i can see sunlight thru the areas around the windows please advise
I have a 1920s balloon framed house where the clapboards are nailed directly to the studs. There is no sheathing. A previous owner replaced the windows with vinyl ones and used heavy caulking in an attempt to seal them. Most of them are leaking.
Is there a way to remove and reinstall them with flashing? One thought was to add 2x4s next to the window framing flush to the exterior side of the studs (the originals are true 2x4s) to provide additional surface. Would it do any good to add tyvek to this new framing if it is only around the windows. I really don’t want to take down all of the clapboards, but may be able to remove enough nails to work some tyvek under the existing clapboards surrounding the windows.
Then to flash the windows as shown in the video.
Thoughts and suggestions would be appreciated.
thanks
Alex
Alex,
Given the circumstances on your home, I don’t think there’s any method you can use that would prevent leaking. The only defense you have against water intrusion is the clapboard siding. You have no housewrap, therefore no drain plane behind your siding so there’s nothing to flash to. Adding any type of housewrap to just a couple studs won’t have any impact at all. The best you can do–short of removing the clapboards and installing a proper WRB, is remove the windows, install drain pans so any moisture getting inside the wall is directed outside, tuck some type of flashing membrane behind the clapboards as far as you can, and flash the tops of the windows so that the flashing is behind the siding and directs water away from the tops of the windows.
Gary
Hi Rick,
I’ve watched a couple of your very detailed presentations on various topics of home construction. After building homes in New England over the last forty years, I was always available to review how the builder flashed windows, doors and other areas of the home in order to prevent water leakage. About fourteen years ago, my wife and I built our retirement home here in North Myrtle Beach SC. while still living in southern NH, so I wasn’t available to observe the builder or his subs perform the work. Several years after completion and during driving rains we noticed water leaking from above and inside our kitchen windows (Photos attached). We had assumed that the brick shelf below the Palladium window was not properly sealed and hired a “so called” window expert to correct the problem, well he didn’t. After going through this exercise a number of times with additional caulk and brick/mortar sealants, I gave up. The home is all brick and depending on wind direction and the intensity of rainfall, we have continued to get leaks on various windows throughout the home. The home is a beautiful single level structure with these window leaks being the only shortfall. Could you offer a solution to our issue, it would be much appreciated.
Installing Andersen 100 Casement windows on my Northern Michigan cottage. Unlike the video, my cottage is originally wood sided with 1/4″ Amoco accordion folded styrofoam underneath the vinyl siding the former owners had installed. No Tyvek (house wrap). Will install Axel composite trim around windows.
Question: Should I “cut back” the styrofoam around the window to allow fastening and taping to the wood siding? How about at the head? All for corners would need to be in the same plane for the trim to be installed. Trim over styrofoam, or should it be cut back to exterior trim edge? Integrated siding channel in Axek trim. Just find the styrofoam layer a bit complicated as to how to handle proper installation and water channeling. Thanks!
Hi Gary,
Any thoughts on my question? Thanks!
I’m in the process of removing my old cedar shakes but leaving the existing vinyl replacement windows in place, do I follow the same guide lines when I install the new house wrap and flashing tape around the existing window as was used when installing new windows? Also, the window trim around the windows shows signs of rot. I will be replacing the wood trim with probably white Azek boards–any recommendations?
The YouTube video Waterproof Window Installation with Rick Arnold is excellent and helps with new construction using house wrap.
I’m planning a new construction project, and considering exterior insulated sheathing for thermal bridging. Many of the these products have the water barrier impregnated into the sheathing, and claim that wrap is not necessary.
Is there an article or video like this for construction which does not utilize a wrap?
Mark S.
What sealant did you use to seal the metal flashing?
What TYPE of sealant should be used for this application?
Also, I’ve heard really good things about Lexel and Through the Roof… wondering if those are good for that application/ OR scan you just use whatever sealant you used for your window flanges, for example I use quad max.
I had 3 double hung windows removed and 3 full size glass installed. 4 years later the paint was peeling and wood was rotting. In the attached photo is where the rot started. You can see to the left and right there is a plastic channel but none in the middle. Should i install a “membrane” to keep out the water?
Thanks in advance.
Rich
I’m glad you talked about the importance of a good quality sealant because I feel like oftentimes, this is overlooked. The last thing anybody wants is a leak coming in from their windows or doors so the right sealant for your window/door is very crucial. Very insightful and detailed video. I personally learned a lot from it, thanks!
Great tip about checking for mold. My windows needs to be overhauled. I’ll have to hire someone to put in an installation.
Thanks Rick/Gary for such a detailed video about waterproof window installation.
Would you do anything different if you’d install this window in a shower?
Best instructional video on how to water proof window installation.
One thing that is missing from this is about using exterior trims. Where does the drip cap placed in a scenario exterior trims are used? I am assuming instead of window top surface is now goes on top of trim. Love to get guidance on that!
Highly appreciate it!!